Wooassist

Assistance for Your Woocommerce Store

  • How it Works
  • Pricing
  • Services
    • Site Maintenance
    • AI SEO and Content Marketing
  • Blog
    • How-To Articles
    • Code Snippets
    • SEO For E-Commerce
    • Theme and Plugin Reviews
    • Wooassist News
    • WordPress/WooCommerce News
    • Interviews
  • About Us
  • Contact
You are here: Home / Archives for John

Disabling Shipping Methods Based on Order Subtotal: A Step-by-Step Guide for WooCommerce

May 17, 2023 By John Leave a Comment

There are many scenarios where a store owner might want to disable certain shipping methods based on the order subtotal. For instance, they may have a minimum order amount required for certain shipping methods, such as free shipping or expedited shipping. Alternatively, they may want to restrict certain shipping methods for orders that don’t meet a certain threshold, such as only offering express shipping for orders over a certain amount.

By implementing the code outlined in this article, store owners can easily disable or hide certain shipping methods based on the order subtotal, ensuring that their customers are only offered shipping options that are appropriate for their order. This can help improve the overall customer experience and streamline the checkout process.

We will show you how to achieve this using some simple code snippets in WooCommerce.

Important Note: Paste the Code Snippets on Your Child Theme

If you’re making changes to the code of your WooCommerce store, it’s always a good idea to use a child theme. By adding the code to your child theme’s functions.php file, you can rest assured that your changes will be preserved even if you update your theme in the future. Plus, using a child theme can help prevent any conflicts that may arise from making changes directly to your site’s core files.

Step 1: Find the ID of the Shipping Method You Want to Disable

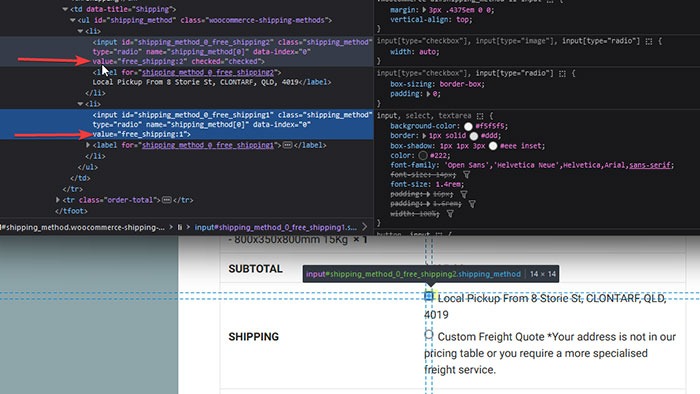
To get the ID of the shipping method, you can inspect the radio button using your browser’s dev tools. The value of the input element is your shipping method ID.
Step 2: Unset the Shipping Method

We will now need to create a function that will unset the target shipping method if the order total is less than the minimum amount. In this example, we will be disabling the Cash on Delivery shipping method if the order subtotal is less than $50.

In this case, the ID of the shipping method is ‘cod’. You will need to replace this value with the value of the shipping method you would like to hide.

You will also need to change the value after subtotal <. In This case, COD will be hidden if the total is below $50. Change this value to your desired amount.

Add the following code to your theme’s functions.php file:

function change_payment_gateway( $gateways ){
// Compare cart subtotal (without shipment fees)
if( WC()->cart->subtotal < 50 ){
// Then unset the 'cod' key (cod is the unique id of COD Gateway)
unset( $gateways['cod'] );
}
return $gateways;
}

Step 3: Display a Notice

The next step is to display a notice to the customer if the subtotal is below $50 and COD is selected as the payment method. We will create a function that will check the order subtotal and payment method, and display a message if necessary.

You will need to change the value after $minimum to your desired minimum amount.

You can also change the value “Minimum order for COD is %s please use another payment option.” ig you want to change the notice.

Add the following code to your theme’s functions.php file:

if ( ! function_exists( 'woa_cod_min_amt' ) ) :
function woa_cod_min_amt( $posted_data) {

global $woocommerce;
$minimum = 50; // set minimum order amount
$stotal = WC()->cart->subtotal;

// Parsing posted data on checkout
$post = array();
$vars = explode('&', $posted_data);
foreach ($vars as $k => $value){
$v = explode('=', urldecode($value));
$post[$v[0]] = $v[1];
}

$payment_method = $post['payment_method'];

// display message
if ($payment_method == "cod" && $stotal < $minimum) {
wc_add_notice(
sprintf( 'Minimum order for COD is %s please use another payment option.' , wc_price( $minimum ) ), 'error' );
add_filter( 'woocommerce_available_payment_gateways' , 'change_payment_gateway', 20, 1);
}
}

endif;

add_action('woocommerce_checkout_update_order_review', 'woa_cod_min_amt');

Step 4: Trigger the Function

The last step is to trigger the function every time the radio button of the shipping method is clicked. We will create a jQuery script that will track the event and trigger the function.

Add the following code to your theme’s functions.php file:

add_action( 'wp_footer', 'woa_custom_checkout_jqscript' );
function woa_custom_checkout_jqscript() {
if ( is_checkout()) :
?>
<script type="text/javascript">
jQuery( function($){
$('form.checkout').on('change', 'input[name="payment_method"]', function(){
$(document.body).trigger('update_checkout');
});
});
</script>
<?php
endif;
}

And that’s it! With these three code snippets, you can now disable a shipping method if the order total does not meet a certain amount.

Disabling shipping methods based on order subtotal is a powerful tool for any WooCommerce store owner who wants to streamline the checkout process and improve the customer experience. By implementing the code outlined in this article, store owners can ensure that their customers are only offered shipping options that are appropriate for their orders. Whether you need to set a minimum order amount for certain shipping methods or restrict certain methods for orders that don’t meet a certain threshold, this guide provides a clear and easy-to-follow solution.
Filed Under: Code Snippets

The Ultimate Guide on How to Set Up Shipping on Your WooCommerce Store

February 14, 2023 By John 1 Comment

Shipping is one of the most important aspects of running an e-commerce store, and it can be a bit overwhelming to set up, especially for new store owners. 

WooCommerce is one of the most popular e-commerce platforms available, and it offers a variety of shipping options to suit the needs of different businesses. In this guide, we will walk you through the process of setting up shipping on your WooCommerce store, so you can get your products to your customers as quickly and efficiently as possible.

This guide assumes you already have WooCommerce installed and you already have your products set up. So let’s get started.

Quick Navigation
  • Configure Your Shipping Zones
  • Integrate Shipping Carriers
    • Setting Product Weight and Dimensions
    • Shipping Method Plugins
    • How to Set Up USPS Shipping Method on WooCommerce
    • How to Set Up UPS Shipping Method on WooCommerce
    • How to Set Up FedEx Shipping Method on WooCommerce
    • How to Set Up Royal Mail Shipping Method on WooCommerce
    • How to Set Up Australia Post Shipping Method on WooCommerce
    • How to Set Up Canada Post Shipping Method on WooCommerce
  • Consider Using Table Rate Shipping
    • Flexibility
    • Accurate Rates
    • Competitive Rates
    • Better Profit Margins
    • Automation
    • How to Set Up Table Rate Shipping
  • Printing Shipping Labels
    • Use a Shipping Label Plugin
    • Automate Printing of Your Shipping Labels
  • Customize Your Checkout Form Fields
  • Ecommerce Shipping Best Practices
    • Offer Free Shipping
    • Provide Accurate Shipping Rates
    • Use Tracking Information
    • Offer Multiple Shipping Options
    • Provide Excellent Customer Service
  • Customizing WooCommerce Transaction Emails
  • Add Shipping Tracking Code to Your WooCommerce Transaction Emails
  • What to Do When Products Arrive Broken?
  • Final Words

Configure Your Shipping Zones

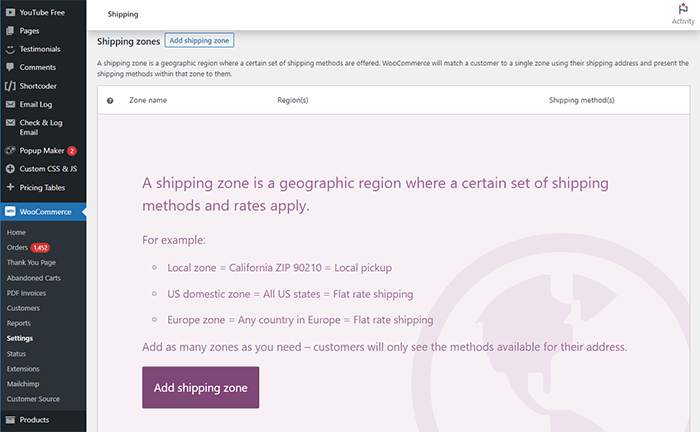
To configure your shipping settings, go to WooCommerce > Settings > Shipping. Here, you will see a list of shipping zones, which are regions where you ship your products. By default, WooCommerce will set up a default zone for the entire world, but you can also set up additional zones for specific countries or regions.

woocommerce configure shipping zones

Next, you will need to set up your shipping methods. WooCommerce offers several built-in shipping methods, including flat rate, free shipping, and local pickup. If this is all you need, then you can set it up and be done.

However, some stores are a bit more complicated and require a more robust shipping system. That’s not a problem. You can also install additional shipping methods using plugins.

Integrate Shipping Carriers

One of the most important things you need to do when setting up shipping on your WooCommerce store is to integrate shipping carriers. This will allow you to calculate real-time shipping rates and print shipping labels for your orders directly from your dashboard.

There are several popular shipping carriers that you can integrate with WooCommerce, including USPS, UPS, FedEx, Canada Post, Royal Mail and Australia Post. To integrate these carriers, you will need to sign up for an account with each carrier and obtain an API key. Once you have your API key, you can install the appropriate plugin or extension for each carrier.

Setting Product Weight and Dimensions

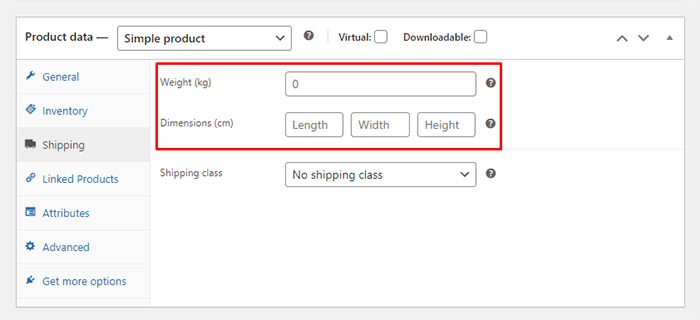
Do note that integrating these shipping carriers usually requires you to set up weight and dimensions for all products that qualify for shipping. To add these dimensions to a WooCommerce product, edit the product you want to add dimensions to. Under Product Data, click on the Shipping tab and then fill in the Weight and Dimensions fields. Save when you are done. 

woocommerce add product weight and dimensions

Shipping Method Plugins

You can find the plugin for each shipping company using the links below:

  • USPS Shipping Method
  • UPS Shipping Method
  • FedEx Shipping Method
  • Royal Mail
  • Australia Post Shipping Method
  • Canada Post Shipping Method

If you are looking for a specific shipping method plugin not listed above, you can head over to the extension store to find more shipping plugins.

How to Set Up USPS Shipping Method on WooCommerce

how to set up usps shipping method

USPS Shipping Method is an add-on that enables you to connect the United States Postal Service (USPS) to your WooCommerce store. This integration allows you to compute real-time shipping rates and print shipping labels directly from your store’s dashboard. 

The extension is suitable for stores that use the US Dollar as their currency and have the United States, US Virgin Islands, or Puerto Rico as their base country. It is compatible with inches and pounds, but other measurements can be converted automatically. USPS offers worldwide quotes for both domestic and international shipping options, including options such as First Class, Flat Rate, Priority Mail, Priority Mail Express, Standard Post, Media Mail, Library Mail, First Class Mail International, Global Express Guaranteed, Priority Mail International, Priority Mail International Flat Rate and International Postcards. 

It is recommended to use this extension in combination with the free service WooCommerce Shipping, which allows you to create discounted shipping labels directly from your WooCommerce store’s dashboard.

To set up USPS Shipping Method, you must first install and activate the plugin after purchasing a license. After plugin activation, you will need to set up a USPS account and enable integration through the USPS API.

To get your USPS API credentials, you will need to create a USPS account here.

After that, you can follow the setup and configuration guide here.

How to Set Up UPS Shipping Method on WooCommerce

how to set up ups shipping method

UPS Shipping Method makes it possible for you to obtain shipping rates from UPS through its API. It’s important to note that your server must have SimpleXML capabilities to use the plugin. This shipping option uses inches for measurements and pounds for weight, though other units can be converted automatically. The currency for the returned shipping rates is determined by the origin country specified in your shipping settings.

It is also important to note that products that qualify for shipping must have weight and dimensions set so that shipping rates can be computed correctly. UPS provides quotes for both domestic and international shipments but it has a weight limit of 150 pounds per package.

To get started, install and activate the plugin then get your API credentials using the UPS Developer Kit. For a detailed guide on getting your API key and setting up shipping, you can check the plugin documentation.

How to Set Up FedEx Shipping Method on WooCommerce

how to set up fedex shipping method

The FedEx Shipping Method provides your customers with shipping options and costs at checkout, calculated through the FedEx API. This extension mandates that your store utilizes US or Canadian Dollars as its currency, has either the US or Canada set as the base country, and that your server has SOAP client installed. The shipping method primarily uses inches and pounds for measurements, though other units can be automatically converted.

With FedEx, you can get shipping quotes for both domestic and international parcels, as it offers worldwide coverage.

For setting up the plugin, you can refer to the plugin documentation found here. 

How to Set Up Royal Mail Shipping Method on WooCommerce

how to set up royal mail shipping method

For WooCommerce store owners in the UK, the Royal Mail Shipping Plugin for WooCommerce makes it simple to offer Royal Mail shipping rates to your customers. Unlike other shipping methods, this plugin does not require an API as Royal Mail does not provide a public one. Instead, it follows the price guide available on the Royal Mail website.

To use this plugin, your store must have GBP as its currency and have the United Kingdom set as the base country. Additionally, weights and shipping dimensions must be set up for all products. The plugin primarily uses mm and g for measurements, but other units can be automatically converted.

For setting up Royal Mail, you can consult the plugin documentation here.

How to Set Up Australia Post Shipping Method on WooCommerce

how to set up australia post shipping method

For WooCommerce store owners in Australia, the Australia Post for WooCommerce plugin lets you access shipping rates from Australia Post’s Shipping API, which offers coverage for both domestic and international parcels. To use this plugin, your store must have Australian Dollars as its currency and use cm and kg for product dimensions and weight, though other units can be automatically converted.

To set up Austrlia Post Shipping, check the plugin documentation here.

How to Set Up Canada Post Shipping Method on WooCommerce

how to set up canada post shipping method

Canada Post Shipping Method is a premium shipping option that enables you to access shipping rates through Canada Post’s API. For the method to work, your store must use Canadian Dollars as its currency and your server must have SimpleXML installed. The extension primarily uses cm for measurements and kg for weight, though other units can be automatically converted.

Canada Post provides shipping services for both domestic and international shipments. Just like for UPS, the API and the built-in box-packer require weights and dimensions to be set for all products that qualify for shipping. You can consult the plugin documentation for detailed setup and configuration.

Consider Using Table Rate Shipping

Table rate shipping is a shipping method that allows store owners to set up custom shipping rates based on a combination of factors such as weight, destination, and price. This method gives store owners more flexibility and control over their shipping rates, allowing them to offer more accurate and competitive rates to their customers. Here are some reasons why using table rate shipping can be beneficial for a store:

Flexibility

Table rate shipping allows store owners to set up custom shipping rates based on a variety of factors, such as destination, product weight, and price. This gives store owners more flexibility in setting shipping rates, which can be beneficial for businesses that sell products of varying sizes, weights, and prices.

Accurate Rates

Table rate shipping allows store owners to set up shipping rates that are more accurate and reflective of the actual cost of shipping. This can help store owners avoid overcharging or undercharging customers for shipping.

Competitive Rates

By using table rate shipping, store owners can offer competitive shipping rates. This can help to attract and retain customers who are looking for the best deals on shipping.

Better Profit Margins

Table rate shipping can help store owners improve their profit margins by allowing them to set shipping rates that accurately reflect the costs of shipping. This also helps store owners avoid losing money on shipping to increase their overall profits.

Automation

Table Rate shipping can be automated using plugins such as “WooCommerce Table Rate Shipping” this plugin allows store owners to easily set up shipping rates based on weight, destination, and price, without having to manually calculate rates for each order.

How to Set Up Table Rate Shipping

how to set up table rate shipping woocommerce

We recommend using the Table Rate Shipping plugin by WooCommerce. Install and activate the plugin. After that, you can follow the instructions in this documentation to set up your table rates.

It’s important to test your table rate shipping settings before making them live on your store. This will help you to ensure that the rates you have set up are accurate and reflect the actual cost of shipping.

Printing Shipping Labels

Printing shipping labels is an essential part of fulfilling orders for an e-commerce business. In WooCommerce, there are several options for printing shipping labels.

Use a Shipping Label Plugin

There are many shipping label plugins available for WooCommerce that make the process of printing shipping labels simple and straightforward. Printing shipping labels is already integrated into WooCommerce. Also, most popular carriers will have printing shipping labels integrated into the plugin or you might need to log in to their websites to print your labels.

Automate Printing of Your Shipping Labels

If you ship a large volume of orders, it may be more efficient to use shipping software that will help automate part of your shipping process and this includes printing shipping labels. Shipping software such as ShipStation Shippo and Stamps.com allows you to automate your shipping process You can connect your WooCommerce store to the shipping software and manage all of your shipping needs in one place.

Regardless of which method you choose, it is important to ensure that you have accurate information for the shipping address, weight, and size of the package before printing a shipping label. This will help to prevent any shipping delays or errors.

Customize Your Checkout Form Fields

Sometimes shipping out your products require additional information from your customers that you don’t find implemented in the default WooCommerce checkout fields. In this case, you will want to add some fields to your checkout form.

However, note that adding too many fields in checkout leads to a bad user experience. It can cause users to abandon checkout and just flat-out leave your site. You don’t want this so make sure you only ask for the necessary information.

To edit the WooCommerce Checkout Fields, you can use the Checkout Field Editor plugin.

Or you can use the code snippet below which makes use of the  woocommerce_checkout_fields filter. This code adds a new text field called “Phone Number” to the checkout page but you can easily tweak it based on your needs.

Open your child theme’s functions.php file. 

Add the following code:

add_filter( 'woocommerce_checkout_fields' , 'custom_override_checkout_fields' );

function custom_override_checkout_fields( $fields ) {

    $fields['billing']['billing_phone'] = array(

        'label'     => __('Phone Number', 'woocommerce'),

        'placeholder'   => _x('Phone Number', 'placeholder', 'woocommerce'),

        'required'  => true,

        'class'     => array('form-row-wide'),

        'clear'     => true

    );

    return $fields;

}

add_action('woocommerce_checkout_process', 'custom_validate_checkout_fields');

function custom_validate_checkout_fields() {

    if ( ! $_POST['billing_phone'] )

        wc_add_notice( __( 'Please enter your phone number.' ), 'error' );

}

In this code, billing_phone is the field name that you want to add, you can change it as you wish. The ‘label’ value is the field’s label that will be shown on the checkout page and the ‘placeholder’ value is the placeholder text that will be displayed in the field before a customer inputs their information.

The ‘required’ value is set to true, meaning that the field is required to be filled out by the customer before they can complete the checkout. Set this to false if you do not want it to be a required field.

Save the changes and refresh the checkout page to see the new Phone Number field. 

This also includes validation on the field by using the woocommerce_checkout_process action hook and the add_action function. This checks if the Phone Number field is filled in. If it’s not, the function will add an error notice to the checkout page.

Ecommerce Shipping Best Practices

woocommerce shipping best practices

Shipping is an essential aspect of running an e-commerce store, and it can greatly impact the customer experience. To ensure that your customers receive their orders quickly and efficiently, it’s important to implement best practices for ecommerce shipping.

Offer Free Shipping

One of the most effective ways to increase sales and improve customer satisfaction is to offer free shipping. Customers love free shipping, and it can be a great incentive to make a purchase. Consider offering free shipping on orders above a certain amount or using a free shipping coupon code.

Provide Accurate Shipping Rates

Customers want to know the exact cost of shipping before they make a purchase. Make sure to provide accurate shipping rates based on the weight and dimensions of your products, as well as the shipping destination. Also, be sure to include any additional fees such as handling or packaging costs.

Use Tracking Information

Providing tracking information is a must for e-commerce shipping. Customers want to know when their orders will arrive and where their packages are at all times. Be sure to include tracking information in the shipping confirmation email and make it easy for customers to track their orders on your website.

Offer Multiple Shipping Options

Customers have different needs and preferences when it comes to shipping. Some may want their orders delivered as soon as possible, while others may prefer a more economical option. To meet the needs of all of your customers, consider offering multiple shipping options, such as standard, express, and overnight delivery.

Provide Excellent Customer Service

In the event of a shipping issue, such as a delay or lost package, it’s important to provide excellent customer service. Be sure to respond promptly to customer inquiries and work to resolve any issues as quickly as possible.

By implementing these best practices for ecommerce shipping, you can improve the customer experience, increase sales, and ensure that your customers receive their orders on time and in good condition.

Customizing WooCommerce Transaction Emails

customizing woocommerce transaction emails

WooCommerce transaction emails are automated emails sent to customers and store administrators when certain events occur, such as when an order is placed, when an order is completed, or when a customer’s account is created. These emails are important for communicating important information to customers and keeping them informed about the status of their orders. Using the default email templates is fine for most use cases. However, it is best if you customize these emails for your specific needs.

Here’s how you can edit the WooCommerce transaction emails:

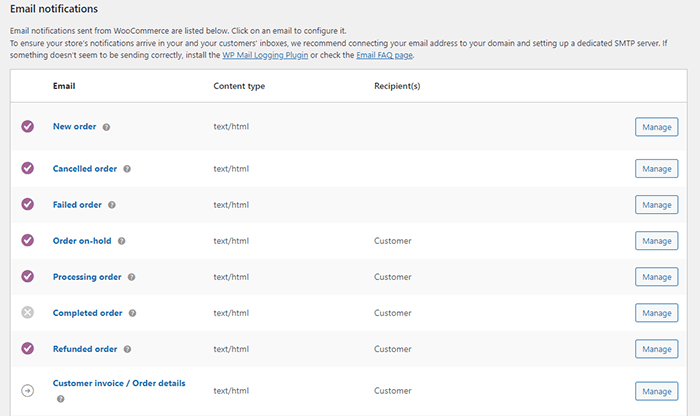
  1. From your WordPress dashboard, go to WooCommerce > Settings > Emails. This will bring up a list of all the different email templates.
  2. From the list of email templates, select the one you want to edit. 
  3. After selecting the email template, you will be able to edit the email’s subject, heading, and body content. You can also use the “Preview Email” button to see how the email will look when it’s sent.
  4. Customize the email design: You can also customize the design of the emails by editing the HTML and CSS code.

Add Shipping Tracking Code to Your WooCommerce Transaction Emails

You can even add shipping tracking codes to your transaction emails. This is a great way to keep customers informed about the status of their orders as well as provide them with a means to track their package. 

We recommend using the WooCommerce Shipment Tracking plugin. Just follow the steps below to set up the plugin.

  1. Install and activate the plugin.
  2. To add tracking information to orders, go to WooCommerce > Orders and click on the specific order you want to edit. Note: This should be done before an order is marked as completed. 
  3. On the order page, you can find the Shipment Tracking fields in the upper-right-hand section. Just fill in all the required fields and the shipment information should now be added automatically to all emails pertaining to that order.

You can view the detailed documentation for the plugin here.

What to Do When Products Arrive Broken?

You’ve done all you can on your end and delivered your products to your customer but sometimes, parcels can be mishandled and products sometimes arrive broken. When products arrive broken, it can be a frustrating and disappointing experience for both the customer and the seller. However, it’s important to handle these situations in a professional and timely manner to mitigate any negative impact on the customer experience. Here are some steps to take when products arrive broken:

what to do when products arrive broken
  1. Investigate the Damage: As soon as you are notified of a broken product, investigate the damage and ask the customer to take pictures of the broken item. This will help you determine if the damage occurred during shipping or if it was a manufacturing defect.
  2. Contact the Customer: Reach out to the customer as soon as possible and apologize for the inconvenience. Let them know that you will take steps to resolve it.
  3. Refund or Replace: Depending on the cause of the damage, you may need to either refund or replace the broken product. If the damage occurred during shipping, contact the shipping carrier to file a claim. If the product is defective, offer a replacement at no extra cost to the customer. If necessary, you may ask the customer to return the defective product and tell them you will shoulder the cost of returning the item. 
  4. Provide Compensation: In addition to refunding or replacing the broken product, consider offering additional compensation, such as a discount on their next purchase or a gift card. This can help to mitigate any negative impact on the customer experience and show them that you value their business. You not only mitigate bad customer experience; you also create a possible repeat customer.
  5. Improve Your Process: Once the situation is resolved, take the time to review your process and see if there are any ways to improve it. This could include changes to packaging, shipping methods, or product quality control.

By following these steps, you can handle broken products in a professional and timely manner, mitigate any negative impact on the customer experience, and improve your process to prevent similar issues in the future.

Final Words

To sum it all up, configuring shipping options on your WooCommerce store can be a bit daunting. With the right tools, however, it can be a breeze. By following these steps, you can configure your shipping settings and integrate shipping carriers. You can also learn how to set up shipping rates, track and manage your shipments, offer shipping promotions, customize the checkout process, and set up email notifications. 

Remember to test your settings before taking your site live. Don’t hesitate to reach out to us for help if you need it. Happy shipping!

Filed Under: How-To Articles

WordPress Site Gets Infected

January 22, 2023 By John Leave a Comment

Hundreds of WordPress websites have been compromised by a recently discovered backdoor. Whether installed intentionally or not, backdoors represent a serious security risk and should be removed as soon as they are discovered. This could redirect the users to malicious sites if the site owner is still using the outdated versions.


This recent WordPress backdoor attack is a stark reminder that site owners should always keep WordPress installation up to date.


For complete information please read this article.


If you have questions, don’t hesitate to contact our support team.

Filed Under: WordPress/WooCommerce News

Where to Hire a WooCommerce Developer?

January 19, 2023 By John Leave a Comment

Where to Hire a WooCommerce Developer?

If you own a brick-and-mortar store in this day and age and you don’t have an ecommerce presence, you’re lagging behind. You can easily move your offline business online with WooCommerce. There’s no reason you shouldn’t. If you’re not a technical user, you need to know where to hire a WooCommerce developer.

Creating a simple ecommerce store with WooCommerce is easy and you can do it with very little technical know-how. However, if you want customizations done in your WooCommerce store, you’re going to have to hire a WooCommerce developer to do the customizations for you. 

And if you already have a WooCommerce store, you might sometimes need the help of a WooCommerce developer to fix any problems you might be having on your site. Having a WooCommerce developer at your beck and call can be a lifesaver. In this blog post, we will discuss where you can hire a WooCommerce developer who can help you build the ecommerce store of your dreams.

How to Find a WooCommerce Developer?

Before you hire a WooCommerce developer, there are a few things you should keep in mind. First, you’ll want to make sure that the developer has experience with both WordPress and WooCommerce. You can ask for referrals from other businesses who have used WooCommerce, or check out online portfolios and reviews.

Contact the developer to get a consultation. This will allow you to learn more about their experience and skills, as well as get a sense of their communication style.

It is important to agree on a price and the scope of the job before starting anything. Once you’ve found the right fit, you can rest assured that your WooCommerce project is in good hands.

What to Look for in a WooCommerce Developer?

When looking for a WooCommerce developer, it is important to consider their experience with the platform. A developer should have a good understanding of how WooCommerce works and be able to customize it to meet your specific needs. Notably, since WooCommerce is built on WordPress, they should also be familiar with WordPress.

Another thing to consider when hiring a WooCommerce developer is whether they are able to provide support after the project is completed. Many developers will only provide support for a limited period of time, so it is important to ensure that you are aware of this before hiring someone. It is ideal to find a developer that provides ongoing support for a fee to help maintain your site.

Finally, it is also worth considering the cost of hiring a WooCommerce developer. While there are many cheaper options available, ultimately, you get what you pay for. A cheap developer may not have the same level of experience or expertise as a more expensive one. You should weigh all of these factors before making a decision.

How Much Does it Cost to Hire a WooCommerce Developer?

The cost of hiring a WooCommerce developer can vary depending on the size and scope of your project. If you are looking for a simple website with a few products, you can expect to pay around $500-$1,000. If you need a more complex website with many products and custom features, the cost can range from $2,000-$5,000 or more. Ultimately, the cost of hiring a WooCommerce developer will depend on your specific needs and requirements.

Things to Know Before You Hire a WooCommerce Developer

A WooCommerce developer can help get the job done, but you as a store owner should also do your own research. Get to know the platform. WooCommerce is great out of the box. It has most of the features you’ll need for standard ecommerce store operations. However, if you want customizations like memberships, subscriptions, affiliate programs, booking, dropshipping, product add-ons, and other integrations, this may entail additional costs in the form of plugins or custom development work.

It’s not uncommon for some store owners to make demands of their developers for things that cannot be accomplished from a technical standpoint. Sometimes store owners may request to add what they think are simple features but are actually quite troublesome to implement for even the most experienced WooCommerce developers.

Be sure to discuss your project in detail with the developer so that they can give you an accurate quote. Any new features that are requested on top of the original quotation can be declined so it is important to get this out of the way. Should you want to add anything, that would entail a new quotation as a separate project.

Questions to Ask a Potential WooCommerce Developer

When looking for a WooCommerce developer, here are some important questions you might want to ask.

  1. What experience do you have with WooCommerce?
  2. What themes are you familiar with? Note: We recommend a WooCommerce developer familiar with the Storefront theme which is easily the best theme to use for WooCommerce. 
  3. What WooCommerce plugins are you familiar with? Are you comfortable using WooCommerce Hooks? Note: Knowledge of WooCommerce Hooks is essential for making customizations to WooCommerce.
  4. Have you developed any custom WooCommerce solutions before? If so, can you tell me about them?
  5. How comfortable are you working with code that needs to be compatible with multiple browsers and devices?
  6. Are you familiar with SEO best practices? Note: You may not want to pay for SEO services at this point but it is important to build a site with a good SEO foundation.

Hiring a WooCommerce Developer

Hire Wooassist for Experienced WooCommerce Developers

There are plenty of places where you can hire a WooCommerce developer and you’re already on one. We at Wooassist have been working with WooCommerce store owners for many years. We’ve helped hundreds of WooCommerce store owners get their stores up and running and even helped with many customizations to WooCommerce (including creating custom plugins).

Our WooCommerce developers have extensive experience with WooCommerce. Our developers live and breathe WooCommerce and we do this all at affordable rates on a pay-as-you-go basis. We do not charge any expensive retainer fees. We only bill you for the time spent working on your site.

If you have any questions, feel free to shoot us an email.

Hire from a Jobs Agency

Another option is to use a job agency. This can be a great way to find qualified candidates, as the agency will have a pool of pre-screened workers to choose from. When using a jobs agency, be sure to specify that you’re looking for someone with experience in WooCommerce development. This will help the agency match you with the right candidates. Be prepared to pay a bit more for this service, as the agency will charge a fee for finding and placement.

You can either hire a project-based developer or get a regular in-house developer.

Hire a Freelancer Through Upwork or Similar Gig Sites

For businesses that are seeking to hire a WooCommerce developer on a budget, one option is to post a job on Upwork, Fiverr, or similar gig sites. These sites can put you in touch with thousands of freelancers that can help you get your WooCommerce store set up or fix any problems you are having on your WooCommerce store.

When posting a job on these gig sites, include as much details as possible about the project. The more information you provide, the more likely you are to find a qualified freelancer.

One problem with working with freelancers though is that it can be very difficult to sort through the sea of freelancers bidding on your listing. Even when you’ve found a freelancer that is a fit for you, there is no guarantee for how long they will be available. Sometimes freelancers disappear on a whim and leave your business hanging.

Alternatives to Hiring a WooCommerce Developer

Buy Premium Plugins for the Functionality You Want

If you need a custom solution for WooCommerce and if the feature you want is popular enough, you can usually find plugins that can do it for you. You can look into the wide range of WooCommerce plugins available in the plugins marketplace. Still, it is important to note that despite being a user-friendly solution for ecommerce, there is still a learning curve to WooCommerce and you might sometimes find yourself unsure how to proceed when trying to do stuff on your own. These are times when you’ll need a WooCommerce developer to help you out.

If the feature you want to implement is too specialized, there might not be a plugin for it. In this case, there is not much else you can do apart from hiring a developer or…

Study Up on Programming Languages 

If you want to cut costs, studying up on programming languages used in WordPress and WooCommerce is an option. This is however not a quick solution. It can take years to learn, and even more, to master various programming languages involved in WordPress, namely, PHP, Javascript, HTML and CSS.

Developer Forums

Heading over to developer forums and message boards is also a good option if you want to get some help with customizing WooCommerce. If the feature you want is simple enough, you can probably find some kind soul who might be willing to help free of charge.

Apart from learning how to code on your own, there is really no replacement for a WooCommerce developer.

Different Businesses Have Different Needs

As we come to the end of this article, you should remember that when it comes to finding a WooCommerce developer, there is no one-size-fits-all solution. While some businesses might benefit from hiring an in-house developer, others may find that working with a freelance or agency developer is a better fit for their needs. Ultimately, the best decision for your business will come down to factors like your budget, project scope, and preferences.

Filed Under: How-To Articles

Recent Spike in Attacks Targeting Outdated WordPress Plugins

January 16, 2023 By John Leave a Comment

In recent weeks, there has been a spike in plugin attacks that take advantage of vulnerabilities in plugins to inject malicious code into your website.

According to the Wordfence team, they noticed a spike in plugin attacks especially during the Thanksgiving holidays and start of December for two plugins in particular: Kaswara Modern VC Addons and Adning Advertising.

This serves as a reminder of the importance of keeping your plugins up-to-date lest you experience a malware attack during some of the most important days for ecommerce sites.


If you have questions, don’t hesitate to contact our support team.

Filed Under: WordPress/WooCommerce News

  • « Previous Page
  • 1
  • …
  • 5
  • 6
  • 7
  • 8
  • 9
  • …
  • 41
  • Next Page »
Let us support your online store so you can manage your business

Get started today

Get 2 Hours of FREE SUPPORT

We are so confident that you will love our services that we will give you your first 4 hours at a 50% discount

That’s 4 hours for only $75

BUY NOW

Free eBook

5 Things Every Online Store Can Fix On Their Website In The Next Week To Increase Sales

Quick Links

  • How it Works
  • Pricing
  • Blog
  • Contact
  • About Wooassist
  • My Account
  • Checkout
  • Privacy Policy
  • Cookie Policy
  • Terms and Conditions

Wooassist

Australia:
59 Luke St.
Hemmant QLD 4174

Philippines:
San Miguel St.
Poblacion, Iligan City 9200

Connect


Copyright © 2026 · Wooassist

Yours FREE!

5 Things Every Online Store Can Fix On Their Website In The Next Week To Increase Sales