Wooassist

Assistance for Your Woocommerce Store

  • How it Works
  • Pricing
  • Services
    • Site Maintenance
    • AI SEO and Content Marketing
  • Blog
    • How-To Articles
    • Code Snippets
    • SEO For E-Commerce
    • Theme and Plugin Reviews
    • Wooassist News
    • WordPress/WooCommerce News
    • Interviews
  • About Us
  • Contact
You are here: Home / Archives for Code Snippets

How to Use WooCommerce Coupons to Drive Sales; Includes Advanced Custom Enhancements

December 9, 2024 By John Leave a Comment

WooCommerce is a powerful e-commerce platform that empowers businesses to create customizable online stores with ease. One of its most effective features for boosting sales and enhancing customer loyalty is the coupon system. Learning how to use WooCommerce coupons to drive sales can be advantageous to your business. It can also help increase traffic and build a loyal customer base.

What are the Benefits of Using WooCommerce Coupons?

WooCommerce coupons are promotional codes that customers can apply at checkout to receive discounts on their purchases. These discounts can take various forms, including percentage discounts, fixed-amount reductions, free shipping, and more. By strategically creating and using these coupons, you can achieve several key goals:

  • Drive Traffic: Attract new customers and encourage repeat visits.
  • Increase Sales: Motivate customers to make purchases or spend more.
  • Enhance Customer Loyalty: Reward loyal customers and increase their lifetime value.

Creating WooCommerce Coupons

How to Use WooCommerce Coupons to Drive Sales

To create coupons for your WooCommerce store, you can follow the steps below:

  1. Log in to Your WordPress Admin Area.
  2. Go to Marketing > Coupons.
  3. Click on Add Coupon to start creating your new coupon. You will be directed to a page where you can configure various settings for your coupon.
  4. Provide a name and an optional brief description of the coupon’s purpose. This is for your reference and will not be visible to customers.
  5. Enter a unique code that customers will use to redeem the coupon. This code should be easy to remember and relevant to the promotion.
  6. In the Coupon Data section, you’ll find several tabs where you can set detailed rules and restrictions, Once you’ve set these up, click on Publish and your coupon will be ready for use on your store.
  7. Important: Make sure you test your coupons so you know you’ve set them up correctly and do exactly what you want them to do.

Using WooCommerce Coupons Effectively

Promote Your Coupons

To maximize the impact of your coupons, you should promote them. Here are a few ways on how you can promote your coupons.

  • Email Marketing: Send personalized emails to your subscriber list with coupon codes and details.
  • Social Media: Share coupon codes on your social media platforms to reach a broader audience.
  • Website Banners: Display banners or pop-ups on your website to inform visitors about current promotions.
  • Partnerships: Collaborate with influencers or other businesses to distribute your coupon codes.

Monitor Coupon Performance

Track the performance of your coupons to understand their impact and make data-driven decisions:

  • Use WooCommerce Reports: Access built-in reports to analyze coupon usage, sales, and customer behavior.
  • Google Analytics Integration: Integrate with Google Analytics to gain deeper insights into coupon performance and customer interactions.

Adjust Your Strategies

Based on performance data, you can adjust your coupon strategies to optimize results:

  • A/B Testing: Experiment with different coupon types, discount amounts, and promotional strategies to see what works best.
  • Seasonal Campaigns: Create seasonal or holiday-specific coupons to take advantage of peak shopping periods.
  • Loyalty Programs: Implement loyalty programs where customers earn points or rewards that can be redeemed for coupons.

Enhancing Customer Loyalty with Coupons

Enhancing Custom Loyalty

Coupons can be a powerful tool for fostering customer loyalty:

  • Welcome Offers: Give new customers a welcome coupon to encourage their first purchase. Even if you take a net loss on a customer’s first purchase, you can make up for it if they become a customer for life.
  • Birthday Discounts: Send personalized birthday coupons to make customers feel valued.
  • Referral Bonuses: Offer coupons to customers who refer friends or family to your store.

Enhancing WooCommerce Coupons

While WooCommerce offers a robust coupon system out of the box, there are times when you might need more advanced functionalities to meet specific business goals. By adding custom code snippets to your WooCommerce store, you can expand the capabilities of coupons to offer unique promotions, automate discounts, and better target your customer segments.

Below are several ways to enhance WooCommerce coupons with custom code, along with practical use cases for each enhancement.

Important: Before implementing any custom code, always back up your site and test changes in a staging environment. Use a child theme or a custom plugin to add code snippets to prevent them from being overwritten during theme updates.

Restrict Coupons to First-Time Customers

Objective: Encourage new customer acquisition by offering exclusive discounts to first-time buyers.

Use-Case: Offer a “10% off” coupon to customers making their first purchase to incentivize them to complete their initial order.

Implementation

Add the following code snippet to your theme’s functions.php file or a custom plugin:

add_action('woocommerce_coupon_is_valid', 'restrict_coupon_to_first_time_customers', 10, 2);
function restrict_coupon_to_first_time_customers($valid, $coupon) {
    if ($coupon->get_code() === 'NEWCUSTOMER') {
        $user_orders = wc_get_orders(array(
            'customer_id' => get_current_user_id(),
            'limit'       => 1,
        ));

        if (!empty($user_orders)) {
            throw new Exception(__('This coupon is only valid for first-time customers.', 'woocommerce'));
        }
    }
    return $valid;
}

Explanation

  • Coupon Code Check: The code checks if the applied coupon code is NEWCUSTOMER.
  • Order History Verification: It retrieves any existing orders associated with the current user.
  • Validation: If the user has previous orders, an error message is displayed, and the coupon becomes invalid for them.

Automatically Apply a Coupon Based on Cart Value

Objective: Increase the average order value by automatically applying a discount when the cart total exceeds a certain amount.

Use-Case: Offer free shipping or a discount when customers spend over $100 without requiring them to enter a coupon code.

Implementation

Add the following code snippet to your theme’s functions.php file or a custom plugin:

add_action('woocommerce_before_calculate_totals', 'apply_coupon_based_on_cart_total');
function apply_coupon_based_on_cart_total($cart) {
    if (is_admin() || !did_action('wp_loaded') || !is_checkout()) {
        return;
    }

    $coupon_code = 'FREESHIP100'; // Your coupon code
    $threshold = 100; // Threshold amount for applying the coupon

    if ($cart->subtotal >= $threshold && !WC()->cart->has_discount($coupon_code)) {
        WC()->cart->apply_coupon($coupon_code);
    } elseif ($cart->subtotal < $threshold && WC()->cart->has_discount($coupon_code)) {
        WC()->cart->remove_coupon($coupon_code);
    }
}

In addition, the code below will add an alert so you can urge customers to add more products to their cart so they can get the discount.

add_action('woocommerce_before_cart', 'notify_customer_of_threshold');
add_action('woocommerce_before_checkout_form', 'notify_customer_of_threshold');

function notify_customer_of_threshold() {
    $coupon_code = 'FREESHIP100'; // Your coupon code
    $threshold = 100; // Threshold amount for the coupon to apply
    $current_total = WC()->cart->subtotal;

    if ($current_total > 0 && $current_total < $threshold) {
        $amount_needed = $threshold - $current_total;
        wc_print_notice(
            sprintf(
                __('Add %s more to your cart to qualify for free shipping!', 'woocommerce'),
                wc_price($amount_needed)
            ),
            'notice'
        );
    }
}

Restrict Coupon Usage to Specific User Roles

Objective: Offer exclusive promotions to certain customer groups, such as wholesale buyers or VIP members.

Use-Case: Provide a special discount to users with the wholesale_customer role.

Implementation

Add the following code snippet to your theme’s functions.php file or a custom plugin:

add_action('woocommerce_coupon_is_valid', 'restrict_coupon_to_user_roles', 10, 2);
function restrict_coupon_to_user_roles($valid, $coupon) {
    if ($coupon->get_code() === 'WHOLESALE10') {
        $allowed_roles = array('wholesale_customer');
        $current_user  = wp_get_current_user();

        if (!array_intersect($allowed_roles, $current_user->roles)) {
            throw new Exception(__('This coupon is not valid for your account type.', 'woocommerce'));
        }
    }
    return $valid;
}

Explanation

  • Role Verification: Checks if the current user has one of the allowed roles.
  • Error Handling: If not, it throws an exception and invalidates the coupon.

Add a Minimum Product Quantity Requirement

Objective: Encourage bulk purchases by requiring a minimum quantity of items in the cart to use a coupon.

Use-Case: Offer a discount when customers buy 10 or more items.

Implementation:

Restrict Coupon Usage Based on Minimum Product Quantity

Add the following code snippet to your theme’s functions.php file or a custom plugin:

add_action('woocommerce_coupon_is_valid', 'restrict_coupon_to_minimum_quantity', 10, 2);
function restrict_coupon_to_minimum_quantity($valid, $coupon) {
    if ($coupon->get_code() === 'BULKBUY') {
        $required_quantity = 10;
        $cart_quantity     = WC()->cart->get_cart_contents_count();

        if ($cart_quantity < $required_quantity) {
            throw new Exception(sprintf(__('You need to purchase at least %d items to use this coupon.', 'woocommerce'), $required_quantity));
        }
    }
    return $valid;
}


Explanation
  • Function: The restrict_coupon_to_minimum_quantity function validates the coupon by checking if the cart quantity meets the minimum required.
  • Exception Handling: If the cart quantity is less than the required amount, an exception is thrown with a helpful message, preventing the coupon from being applied.
Display an Alert to Customers to Add More Products

Add the following code snippet to your theme’s functions.php file or a custom plugin:

add_action('woocommerce_before_cart', 'notify_customer_of_quantity_threshold');
add_action('woocommerce_before_checkout_form', 'notify_customer_of_quantity_threshold');

function notify_customer_of_quantity_threshold() {
    $coupon_code       = 'BULKBUY';     // Your coupon code
    $required_quantity = 10;            // Minimum quantity required
    $cart_quantity     = WC()->cart->get_cart_contents_count();

    // Check if the coupon is not applied and cart quantity is less than required
    if ($cart_quantity > 0 && $cart_quantity < $required_quantity && !WC()->cart->has_discount($coupon_code)) {
        $quantity_needed = $required_quantity - $cart_quantity;
        wc_print_notice(
            sprintf(
                __('Add %d more item(s) to your cart to qualify for the BULKBUY discount!', 'woocommerce'),
                $quantity_needed
            ),
            'notice'
        );
    }
}

Explanation

  • Function: The notify_customer_of_quantity_threshold function displays a notice on the cart and checkout pages when the cart quantity is below the required minimum.
  • Conditions:
    • Checks if the cart is not empty.
    • Verifies that the cart quantity is less than the required quantity.
    • Ensures the coupon isn’t already applied.
  • Message: Displays how many more items the customer needs to add to qualify for the discount.
Optional: Automatically Apply the Coupon When Quantity Requirement Is Met

Add the following code snippet to your theme’s functions.php file or a custom plugin:

add_action('woocommerce_before_calculate_totals', 'apply_coupon_based_on_quantity');
function apply_coupon_based_on_quantity($cart) {
    if (is_admin() || !did_action('wp_loaded')) {
        return;
    }

    $coupon_code       = 'BULKBUY';     // Your coupon code
    $required_quantity = 10;            // Minimum quantity required
    $cart_quantity     = $cart->get_cart_contents_count();

    if ($cart_quantity >= $required_quantity && !WC()->cart->has_discount($coupon_code)) {
        WC()->cart->apply_coupon($coupon_code);
    } elseif ($cart_quantity < $required_quantity && WC()->cart->has_discount($coupon_code)) {
        WC()->cart->remove_coupon($coupon_code);
    }
}

Explanation

  • Function: The apply_coupon_based_on_quantity function automatically applies or removes the coupon based on the cart quantity.
  • Conditions:
    • Applies the coupon when the cart quantity meets or exceeds the required amount.
    • Removes the coupon if the cart quantity falls below the required amount.

Automatically Apply a Coupon When Specific Products Are in the Cart

Objective: Simplify the user experience by auto-applying coupons when certain products or categories are added to the cart.

Use-Case: During a promotion, automatically apply a discount when customers add products from the “Summer Sale” category to their cart.

Implementation

Add the following code snippet to your theme’s functions.php file or a custom plugin:

add_action('woocommerce_before_calculate_totals', 'apply_coupon_for_specific_categories');
function apply_coupon_for_specific_categories($cart) {
    if (is_admin() || !did_action('wp_loaded')) {
        return;
    }

    $coupon_code       = 'SUMMER20';       // Your coupon code
    $target_categories = array('summer-sale'); // Category slugs
    $apply_coupon      = false;

    foreach ($cart->get_cart() as $cart_item) {
        $product_id = $cart_item['product_id'];
        $terms      = get_the_terms($product_id, 'product_cat');

        if ($terms && !is_wp_error($terms)) {
            foreach ($terms as $term) {
                if (in_array($term->slug, $target_categories)) {
                    $apply_coupon = true;
                    break 2;
                }
            }
        }
    }

    if ($apply_coupon && !WC()->cart->has_discount($coupon_code)) {
        WC()->cart->apply_coupon($coupon_code);
    } elseif (!$apply_coupon && WC()->cart->has_discount($coupon_code)) {
        WC()->cart->remove_coupon($coupon_code);
    }
}

Explanation

  • Category Check: Iterates through cart items to check if any belong to the specified categories.
  • Automatic Application/Removal: Applies or removes the coupon based on whether the condition is met.

Set Coupons to Expire Automatically After Use

Objective: Limit a coupon to a single use per customer and ensure it expires immediately after being used.

Use-Case: Send personalized one-time-use coupons to customers as part of a special promotion.

Implementation:

Add the following code snippet to your theme’s functions.php file or a custom plugin:

add_action('woocommerce_applied_coupon', 'expire_coupon_after_single_use');
function expire_coupon_after_single_use($coupon_code) {
    $coupon = new WC_Coupon($coupon_code);

    if ($coupon->get_usage_limit_per_user() == 1) {
        $coupon->set_date_expires(current_time('mysql'));
        $coupon->save();
    }
}

Explanation:

  • Usage Limit Check: Verifies if the coupon is limited to one use per user.
  • Expiration Setting: Sets the coupon’s expiration date to the current time after it’s applied.

Unlocking the Full Potential of WooCommerce Coupons

By integrating these advanced coupon strategies into your WooCommerce store, you’re not just offering discounts—you’re creating personalized shopping experiences that can significantly boost sales and foster long-term customer loyalty. All these customizations transform your promotional efforts into powerful marketing tools. Remember to back up your site before making any changes and thoroughly test each new feature in a staging environment. As you continue to monitor performance and adapt your strategies, you’ll unlock the full potential of WooCommerce coupons to drive growth and success for your online business.


Filed Under: Code Snippets, How-To Articles

How to Set a Minimum Order Amount for Specific Categories on WooCommerce

August 25, 2023 By John 3 Comments

If you’re running an online store using WooCommerce, you may have specific requirements for minimum order amounts. For instance, you might want to set a minimum order value for a particular category of products. This ensures that customers must meet a certain threshold before they can proceed to checkout. In this blog post, we’ll walk you through a custom code snippet that will guide you on how to set a minimum order amount for specific categories in WooCommerce.

Set a Minimum Order Amount for Specific Categories on WooCommerce

To get started, you’ll need to access your WordPress theme files or use a child theme to add the following code. Open your theme’s functions.php file and paste the code snippet at the end:

/**
 * Set a minimum order amount for checkout (Specific Category)
 */
add_action( 'woocommerce_checkout_process', 'woa_cat_minimum_order_amount' );
add_action( 'woocommerce_before_cart' , 'woa_cat_minimum_order_amount' );
add_action( 'woocommerce_before_checkout_form' , 'woa_cat_minimum_order_amount' );

function woa_cat_minimum_order_amount() {
    $minimum = 200;      // Set this variable to specify a minimum order value for the target category
    $term = 'target_category';  // Set this variable to specify the target category

    // Utility function that counts the specific product category of cart items
    $ctotal = 0; // Initialize cart total
    $count = 0;  // Counter variable

    // Loop through cart items to check each category
    foreach( WC()->cart->get_cart() as $cart_item ) {
        if( has_term( $term, 'product_cat', $cart_item['product_id'] ) ) {
            $count += $cart_item['quantity'];
            $ctotal += $cart_item['line_subtotal'];
        }
    }

    // Function that checks if the total order amount is less than the required order amount for the target category
    if ( ($ctotal < $minimum) && ($count > 0) ) {

        if( is_cart() ) { // If the user is viewing the cart page, display a warning and disable checkout

            wc_print_notice( 
                sprintf( 'Your current order total for the Target Category is %s — you must have an order with a minimum of %s <span class="woocommerce-Price-amount amount">+ freight</span> to place your order.', 
                    wc_price( $ctotal ), 
                    wc_price( $minimum )
                ), 'error' 
            );
            remove_action( 'woocommerce_proceed_to_checkout', 'woocommerce_button_proceed_to_checkout', 20 ); // Blocks the user from checking out

        } else { // Display warning on all other pages

            wc_add_notice( 
                sprintf( 'Your current order total for the Target Category is %s — you must have an order with a minimum of %s <span class="woocommerce-Price-amount amount">+ freight</span> to place your order.', 
                    wc_price( $ctotal ), 
                    wc_price( $minimum )
                ), 'error' 
            );

        }
    }
}

Breaking Down the Code

Let’s break down the code and how you can tweak it to work for your WooCommerce store.
The woa_cat_minimum_order_amount() function is hooked to three WooCommerce actions: woocommerce_checkout_process, woocommerce_before_cart, and woocommerce_before_checkout_form. These actions ensure that the minimum order amount check is performed during the checkout process.


Inside the function, you’ll find two variables that you need to customize:

$minimum: This variable represents the minimum order value you want to set for the target category. You can change the value according to your requirements.

$term: This variable holds the slug of the target category. Replace ‘target_category’ with the actual slug of the category you want to apply the minimum order amount to.

The code then initializes two variables, $ctotal and $count, to keep track of the total order amount and the number of products in the target category, respectively.

The code uses a loop to iterate through each item in the cart and checks if it belongs to the target category using the has_term() function. If it does, the product quantity and line subtotal are added to the respective variables.

After calculating the total order amount and the number of products in the target category, the code checks if the current order amount is less than the specified minimum and if there is at least one product from the target category in the cart.

If the conditions are met, the code displays a warning message to the user. If the user is on the cart page, the warning is shown, and the checkout button is disabled using remove_action(). If the user is on any other page, the warning is displayed without disabling the checkout button.

That’s it! By adding this custom code to your theme’s functions.php file, you can set a minimum order amount for a specific category in WooCommerce. Customers are notified about the minimum order requirement, ensuring that they meet the specified threshold before proceeding to checkout.

Remember to customize the $minimum and $term variables according to your needs. Additionally, if you want to restrict the minimum order requirement to specific user roles, you can uncomment the code block provided and modify it to suit your requirements.

Set a Minimum Order Amount Sitewide for WooCommerce

If you’re looking for a simpler implementation and just want a sitewide minimum order amount for your WooCommerce checkout, you can use the code below which is provided in the WooCommerce documentation.

/**
 * Set a minimum order amount for checkout
 */
add_action( 'woocommerce_checkout_process', 'wc_minimum_order_amount' );
add_action( 'woocommerce_before_cart' , 'wc_minimum_order_amount' );
 
function wc_minimum_order_amount() {
    // Set this variable to specify a minimum order value
    $minimum = 50;

    if ( WC()->cart->total < $minimum ) {

        if( is_cart() ) {

            wc_print_notice( 
                sprintf( 'Your current order total is %s — you must have an order with a minimum of %s to place your order ' , 
                    wc_price( WC()->cart->total ), 
                    wc_price( $minimum )
                ), 'error' 
            );

        } else {

            wc_add_notice( 
                sprintf( 'Your current order total is %s — you must have an order with a minimum of %s to place your order' , 
                    wc_price( WC()->cart->total ), 
                    wc_price( $minimum )
                ), 'error' 
            );

        }
    }
}

In the code snippet, you will notice a line that says $minimum = 50;. Here, you can set the desired minimum order value by replacing 50 with your preferred amount. For example, if you want to set the minimum order value to $100, change the line to $minimum = 100;.

Note: We recommend testing the code on a staging or development site before implementing it on a live site. This allows you to ensure that everything works as expected and doesn’t conflict with any other plugins or customizations you may have on your WooCommerce store.

If you need help implementing this functionality on your WooCommerce store, you can contact us. Our team can help.

Filed Under: Code Snippets, How-To Articles

Disabling Shipping Methods Based on Order Subtotal: A Step-by-Step Guide for WooCommerce

May 17, 2023 By John Leave a Comment

There are many scenarios where a store owner might want to disable certain shipping methods based on the order subtotal. For instance, they may have a minimum order amount required for certain shipping methods, such as free shipping or expedited shipping. Alternatively, they may want to restrict certain shipping methods for orders that don’t meet a certain threshold, such as only offering express shipping for orders over a certain amount.

By implementing the code outlined in this article, store owners can easily disable or hide certain shipping methods based on the order subtotal, ensuring that their customers are only offered shipping options that are appropriate for their order. This can help improve the overall customer experience and streamline the checkout process.

We will show you how to achieve this using some simple code snippets in WooCommerce.

Important Note: Paste the Code Snippets on Your Child Theme

If you’re making changes to the code of your WooCommerce store, it’s always a good idea to use a child theme. By adding the code to your child theme’s functions.php file, you can rest assured that your changes will be preserved even if you update your theme in the future. Plus, using a child theme can help prevent any conflicts that may arise from making changes directly to your site’s core files.

Step 1: Find the ID of the Shipping Method You Want to Disable

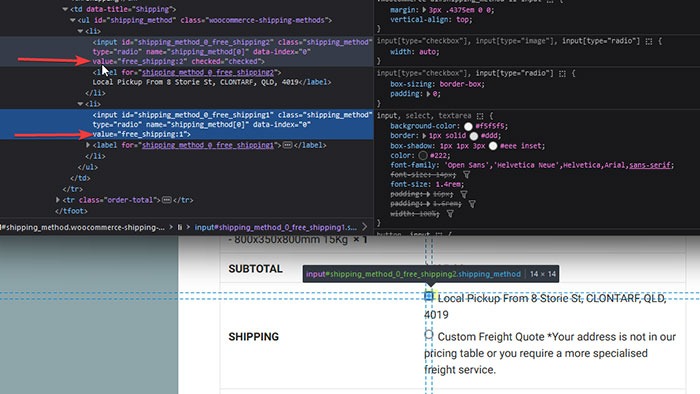
To get the ID of the shipping method, you can inspect the radio button using your browser’s dev tools. The value of the input element is your shipping method ID.

Step 2: Unset the Shipping Method

We will now need to create a function that will unset the target shipping method if the order total is less than the minimum amount. In this example, we will be disabling the Cash on Delivery shipping method if the order subtotal is less than $50.

In this case, the ID of the shipping method is ‘cod’. You will need to replace this value with the value of the shipping method you would like to hide.

You will also need to change the value after subtotal <. In This case, COD will be hidden if the total is below $50. Change this value to your desired amount.

Add the following code to your theme’s functions.php file:

function change_payment_gateway( $gateways ){
// Compare cart subtotal (without shipment fees)
if( WC()->cart->subtotal < 50 ){
// Then unset the 'cod' key (cod is the unique id of COD Gateway)
unset( $gateways['cod'] );
}
return $gateways;
}

Step 3: Display a Notice

The next step is to display a notice to the customer if the subtotal is below $50 and COD is selected as the payment method. We will create a function that will check the order subtotal and payment method, and display a message if necessary.

You will need to change the value after $minimum to your desired minimum amount.

You can also change the value “Minimum order for COD is %s please use another payment option.” ig you want to change the notice.

Add the following code to your theme’s functions.php file:

if ( ! function_exists( 'woa_cod_min_amt' ) ) :
function woa_cod_min_amt( $posted_data) {

global $woocommerce;
$minimum = 50; // set minimum order amount
$stotal = WC()->cart->subtotal;

// Parsing posted data on checkout
$post = array();
$vars = explode('&', $posted_data);
foreach ($vars as $k => $value){
$v = explode('=', urldecode($value));
$post[$v[0]] = $v[1];
}

$payment_method = $post['payment_method'];

// display message
if ($payment_method == "cod" && $stotal < $minimum) {
wc_add_notice(
sprintf( 'Minimum order for COD is %s please use another payment option.' , wc_price( $minimum ) ), 'error' );
add_filter( 'woocommerce_available_payment_gateways' , 'change_payment_gateway', 20, 1);
}
}

endif;

add_action('woocommerce_checkout_update_order_review', 'woa_cod_min_amt');

Step 4: Trigger the Function

The last step is to trigger the function every time the radio button of the shipping method is clicked. We will create a jQuery script that will track the event and trigger the function.

Add the following code to your theme’s functions.php file:

add_action( 'wp_footer', 'woa_custom_checkout_jqscript' );
function woa_custom_checkout_jqscript() {
if ( is_checkout()) :
?>
<script type="text/javascript">
jQuery( function($){
$('form.checkout').on('change', 'input[name="payment_method"]', function(){
$(document.body).trigger('update_checkout');
});
});
</script>
<?php
endif;
}

And that’s it! With these three code snippets, you can now disable a shipping method if the order total does not meet a certain amount.

Disabling shipping methods based on order subtotal is a powerful tool for any WooCommerce store owner who wants to streamline the checkout process and improve the customer experience. By implementing the code outlined in this article, store owners can ensure that their customers are only offered shipping options that are appropriate for their orders. Whether you need to set a minimum order amount for certain shipping methods or restrict certain methods for orders that don’t meet a certain threshold, this guide provides a clear and easy-to-follow solution.

Filed Under: Code Snippets

How to Create a Custom 404 Error Page for Your WooCommerce Store

February 25, 2016 By John Leave a Comment

What is a 404 Error

A 404 Error is an error message displayed when an accessed page is not found in the server that you want to access. It is a standard response when an entered address does not match a data from a server.

This happens when you rename, move, or delete a page. This message also appears when the URL is incomplete, mistyped or misspelled. You can change the way your WooCommerce store responds to this error by redirecting or just letting your visitors arrive at a custom 404 Error page.

Creating a Custom 404 Error Page

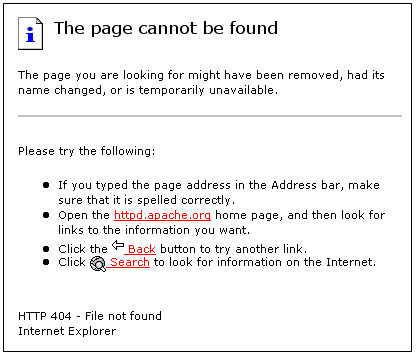
default-404-error-page_screenshot-pngYou can actually just leave it and most websites would just send out a typical text response. So why create a custom 404 error page for your Woocommerce store? A lot of people are highly visual.
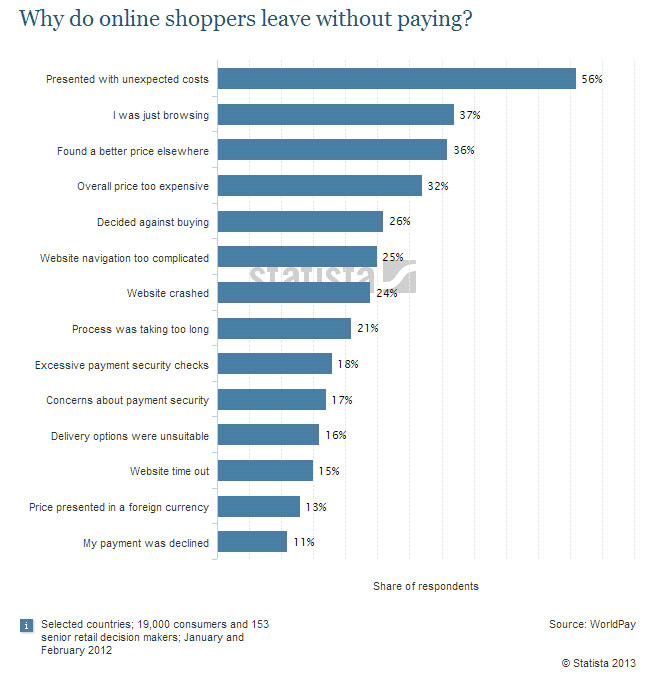


Web design is a huge factor in discerning a company’s credibility. Zabisco found out that 40% will respond to visual information better than plain text. This alludes to the importance of creating a visually-appealing custom 404 error page.

Custom content will not only boost your branding but will make customers have a more positive view of your company. Custom content is one of the many reasons that make a customer feel positive about your website.

Statistics/Case Studies on 404 Error Pages

From a search engine ranking standpoint, 404 error pages will not hurt your ranking per se. It only matters when an important link in your site returns a 404 error. This important link could be your “about” page or “contact” page. Your rankings could suffer since these important pages are actually ranking factors.

Any other 404 error could also frustrate your visitors and just leave your website. Shopify surveyed why online retailers are losing 67.45% of their sales. They discovered that some of the most common mentioned issues are website problems.

Shopify-survey-why-online-shoppers-leave_screenshot-png

A 404 error also affects a website’s bounce rate. A bounce happens when a visitor comes to your website, does not click on any other page and leaves. Search engines like Google use bounce rate as ranking factor.

A high bounce rate raises several red flags for your WooCommerce store. It may imply poor user experience and your website may be deemed irrelevant to your market.

Elements of a Custom 404 Error Pagelabyrinth

Now before you go and make any changes, keep in mind that each theme is different. There are different ways on how you can create a custom 404 Error page. Here are some important things that you need to consider.

Use Simple Language

A regular site visitor will not understand a typical technical 404 message. Use simple human language to inform your site visitor of what went wrong. You can even use language translations or location specific pages. The goal is to deliver a clear message.

How You Can Help

Apologizing and offering a helpful suggestion should be the main theme. The aim is to change the negative experience from 404 pages into a positive one. You can do this by:

touch-screen_touchscreen

  • Adding a search box
  • Showing your menu navigation
  • Adding a contact, subscription or ticket submission form
  • Adding a sitemap, category lists or key links
  • Linking popular posts or social media accounts
  • Giving out coupons, discounts, or other offers

Time spent in your site should not end in your 404 page. These elements are also engagement and conversion boosters. Your customers stay happy and you get a positive rep.

Examples of Good 404 Error Pages

A lot of huge brands out there appeal to human emotions in their marketing strategy. This is because customers are not buying products, they buy the experience. 404 Error pages in the past are just simple text warnings. Websites now use humor or a bit of personality to communicate their brand to the customers. You can use graphics, animations, or even videos. Here’s some inspiration to get you started.

Popscreen

Popscreen showcases a clean and bright but simple and straightforward 404. You can see a link to the home page and popular videos as well as search bar.

404-error-page_Popscreen_screenshot

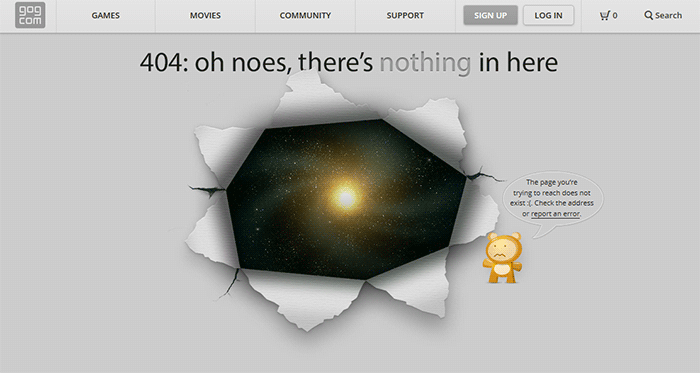
GOG

GOG displays a unique design to say that you lost your way. The 404 error page retains the navigation and footer menu so it is easy for users to navigate. Users can also report the error.

404-error-page_GOG_screenshot

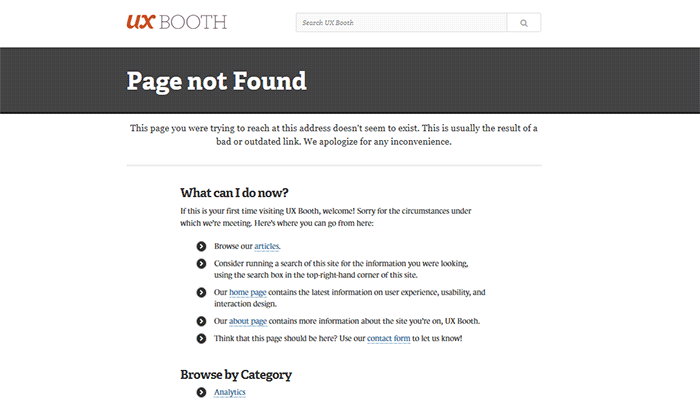
UX Booth

The UX Booth 404 error page uses simple, concise and direct language and an immediate apology. The page suggests popular links on the website as well as the list of categories. It also retains the footer links and the search bar.

404-error-page_UX-Booth_screenshot

Average Joes Blog

Average Joes Blog is a good example of category-rich 404 error page. In fact, the 404 error page is a replica of the home page.

404-error-page_Average-Joes-Blog_screenshot

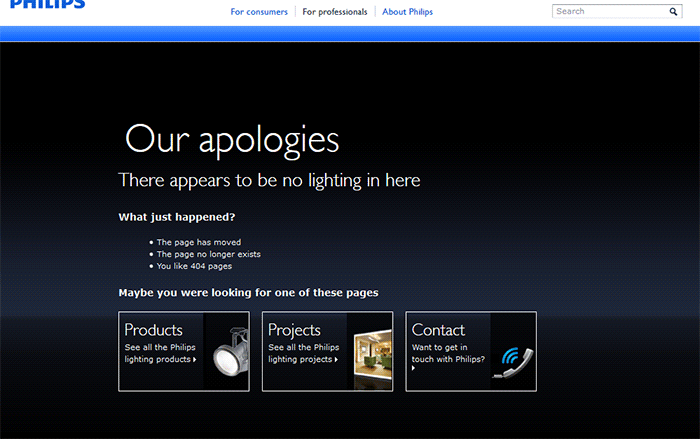
Philips

Philips goes creative and witty with its 404 error page. It mentions the absence of lighting then explains what happened and suggests popular links.

404-error-page_Philips_screenshot

Email Center UK

The Email Center UK website uses humor. Since you are at an error page, it means someone messed up and you get to choose who to fire for the fiasco. Below all that is a simple link to the home page.

404-error-page_Email-Center-UK_screenshot

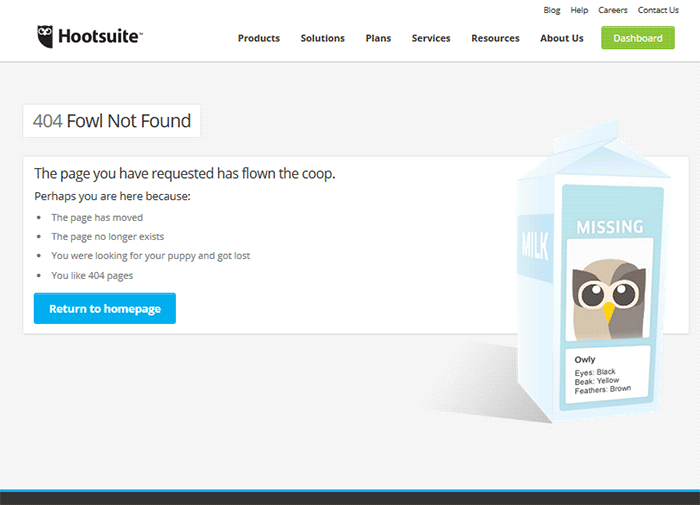
Hootsuite

The Hootsuite 404 error page lists down possible reasons for the error. They used ‘fowl” language to keep the identity of the brand/mascot.

404-error-page_Hootsuite_screenshot

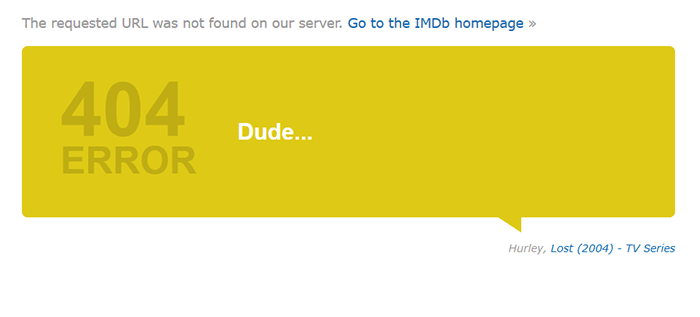
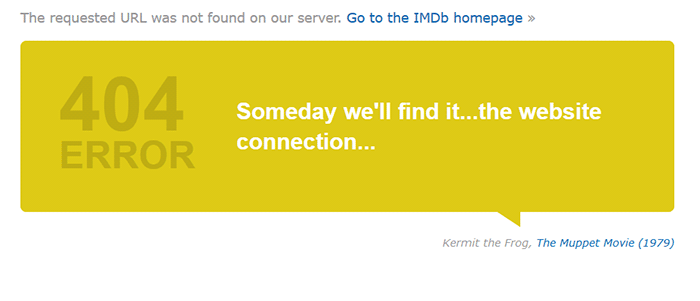
IMDB

The IMDB 404 error page uses a simple layout with a clever idea. Every visit to a 404 error displays a random movie quote. Movie buffs will definitely find this entertaining. A convenient link to the home page is also positioned at the top.

404-error-page_IMDB_screenshot

404-error-page_IMDB2_screenshot

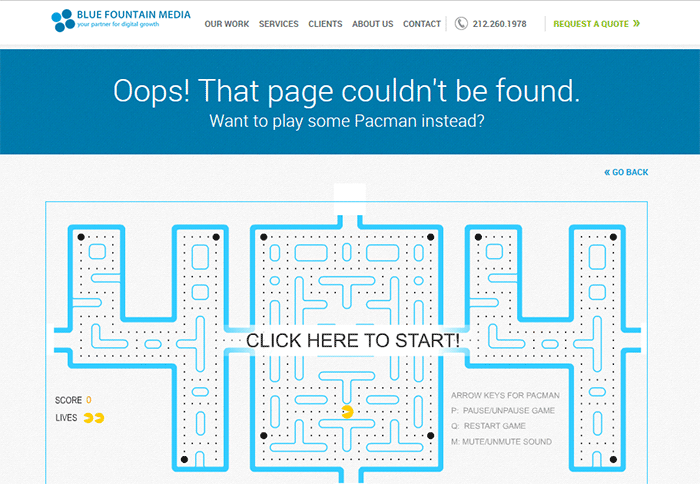
Blue Fountain Media

Blue Fountain Media makes a 404 page that you will look forward to – an actual PAC-MAN game. They retained their main navigation and a “Go Back” link that takes you to the last visited working page.

404-error-page_Blue-Fountain-Media_screenshot

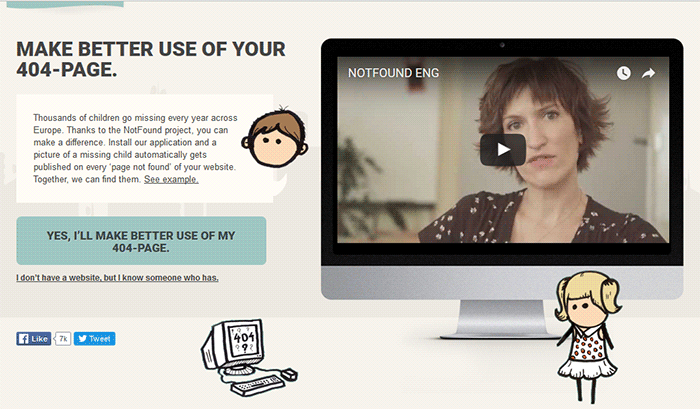
Not Found Org

NotFound.org actually uses its 404 error page to achieve a goal. It is an app that you can install in your website. It lets you customize your 404 page to help their cause – find thousands of children that go missing every year.

404-error-page_Not-Found-Org_screenshot

Creating a Custom 404 Error Page

Now that you have some inspiration, it’s time to create your own. You can check out WordPress’ basic guide here if you are able to code, if not you can check out the plugins below.

Since WooCommerce is installed on the WordPress platform, you can use the power of WordPress plugins to create awesome About Us pages.

Custom 404 Pro

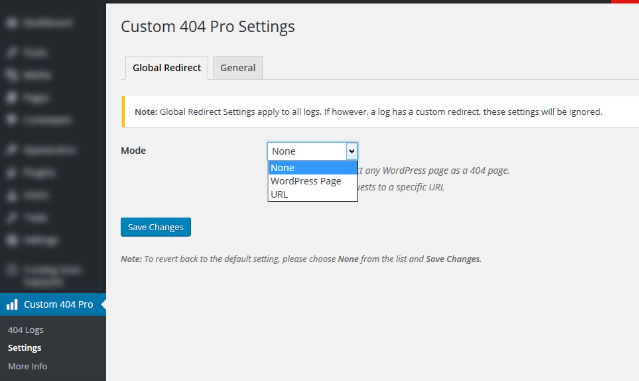
The Custom 404 Pro plugin lets you override the default 404 page with any page of your choice. To set your custom 404 error page:

  1. Install and activate the Custom 404 Pro plugin.
  2. Create a new page that you want to use as your 404 error page.
  3. Click on Custom 404 Pro on your WordPress Dashboard and then click on Settings.
  4. Set the page or URL that you want to use as your 404 error page and then click on Save Changes.

Create-custom-404-error-page_Plugin_Custom-404-Pro-Settings

404page

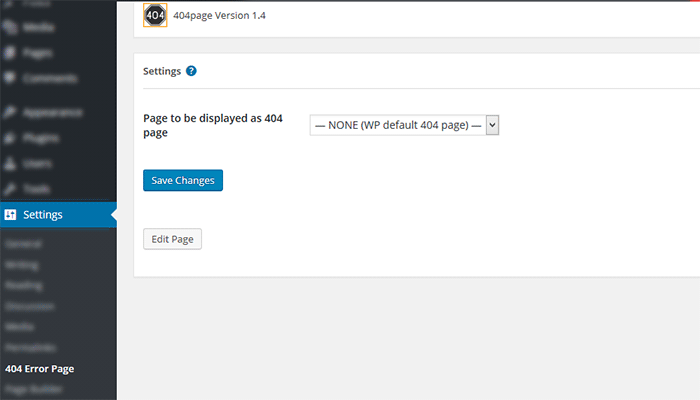
404page is another easy plugin to use to create custom 404 error pages. To create a custom 404 error page using the 404page plugin:

  1. Install and activate the plugin.
  2. Create a new page that you want to use as your 404 page.
  3. Click on Settings and then choose the page that you want to use as your 404 error page.
  4. Click on Save Changes.

Plugin_404page_Create-custom-404-error-page

Test Your 404 Error Page

To test if your new 404 error page is working, just pop any non-existent URL in your domain on your browser. If your new 404 error page does not appear, check if your website is set to redirect to your new 404 error page.

Create-custom-404-error-page_Plugin_404page

Conclusion

404 Error Pages can be annoying but you can use them to your advantage. Customize them to boost engagement and conversion. Align your new 404 error page with your brand image and website goals. It will do wonders for your WooCommerce store and your brand. Do you have any other suggestions for creating a good 404 error page?

Filed Under: Code Snippets, How-To Articles Tagged With: best practices, design tweaks, navigation, plugins, redirection, WordPress

How to Create a Child Theme for Storefront

February 26, 2016 By John 2 Comments

how-to-create-a-child-theme-for-storefront

Optimizing your website usually means making changes to your theme. These changes can range from simple to complex. It’s easy to make changes on your website but the problem is that you will lose all your changes when you update your theme.

There are ways to update your theme without losing your customizations and the best way is to use a child theme. In this post, we will teach you how you can use a child theme to make the website development process easier.

We’ll teach you how to create a child theme for Storefront theme. Storefront is the official theme for WooCommerce. It’s a good parent theme to work on as it’s built with the same high standards as WooCommerce. It is entirely free and 100% compatible with WooCommerce.

What is a Child Theme

A child theme is not a full theme. It only inherits all the code, styling and functionality of the main or parent theme. Changes made in a child theme do not affect the parent theme. This allows users to tweak a theme without having to worry about losing the customizations when updating the theme. Using a child theme is best practice for altering an existing theme.

A parent theme is the default of all your WordPress themes. It contains the templates, design and functionality needed to run your website on WordPress. Note that parent themes are different from theme frameworks. A parent theme is a complete theme that you can use right away while a theme framework like Genesis is a developmental template.

Why You Should Use a Child Theme

There are thousands of themes out there that you can use for your WordPress installation. The problem is they all look generic and may not exactly fit your website needs. Modifying the theme with CSS is recommended. Here are some reasons why you should use a child theme:

Speed Up Site Development

Child themes allow you to quickly add or modify specific functions or template files. It allows you to significantly speed up site development as you would not need to write a lot of code from scratch. You’ll get a great deal of flexibility especially from powerful theme frameworks like Genesis.

Preserve Theme Changes

Themes get updates from time to time. These updates are important as these address security exploits that come to light. Updating your theme will wipe all the changes you made to the base theme. However, if you use a child theme, you can preserve any changes you make to the child theme when you update the base theme.

Safe Fallback

Creating or editing a theme entails a lot of work. However, when you make customizations on a child theme, you have your parent theme’s codes and functionality as fallback in case you mess up something. The child theme will only change a specific function or style when you want it to.

Secure Your Site

WPBeginner found out that 83% of hacked WordPress sites are not upgraded properly. The safest way to update your theme is by using a child theme.

When to Use Child Themes

If you are in any way customizing your theme, then you should be using a child theme. Using a child theme is best practice.

If you are not familiar with CSS and PHP, creating your own child theme can be a challenge. You would also need to learn about the functionalities of your parent theme.

Robust frameworks can be more challenging as they have their own filters and hooks.

How to Create a Child Theme

Setting up a child theme for any WordPress theme is easy but you need to pick a good parent theme. Not all themes can be good parent themes. We recommend Storefront or the Genesis framework.

A good parent theme is a solid foundation for your site. You will be building your child theme over it so it has to be flexible and coded properly.

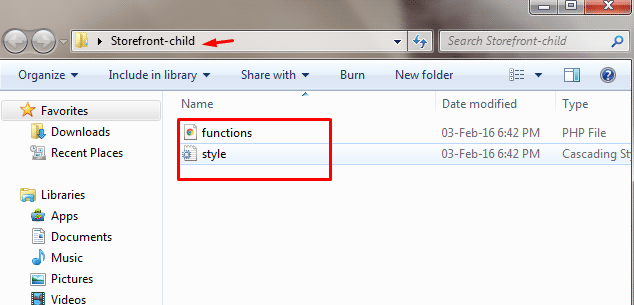
You can use plugins to generate a child theme or you can do it manually. You just need three things to start: child theme directory, style.css file and functions.php file.

Child Theme Folder

This folder will serve as the container for your stylesheet and function files. It is ideal to use the name of your parent theme as folder name and append it with “-child”. In this case, we named our directory “Storefront-child”. Make sure that your child theme’s directory name has no spaces to avoid possible errors. For the meantime, you can create this folder in your computer.

child-theme-folder

Child Theme Stylesheet

This is a basic style.css file. You need to set this stylesheet to inherit the styles from your parent theme. To do that, insert the stylesheet header below and replace them with relevant details. Note that customizations done here will override parent theme styles.

/*
 Theme Name:   Storefront Child
 Theme URI:    http://sitename.com/storefront/
 Description:  Storefront Child Theme
 Author:       Nick J
 Author URI:   http://sitename.com
 Template:     storefront /*this is case sensitive*/
 Version:      1.0.0
 License:      GNU General Public License v2 or later
 License URI:  http://www.gnu.org/licenses/gpl-2.0.html
 Tags:         light, dark, full-width, responsive-layout, accessibility-ready
 Text Domain:  storefront-child
*/
/*Theme customisations start here*/

We won’t teach you how to use CSS. It is impossible to cover that in one article. You can learn CSS here or have a developer do the CSS tweaks on your website.

Child Theme Function

Previous methods suggest that you use “@import” in your stylesheet to load your child theme. This is no longer considered best practice. You just need to “enqueue” your parent theme’s stylesheet in your child theme’s functions.php file. To do this, you can use “wp_enqueue_scripts action” and use “wp_enqueue_style()”.

The stylesheet for your child theme is usually loaded automatically. If not, you will need to enqueue it as well. You also need to make sure that the child stylesheet gets priority. You can use the code below instead. This code sets ‘parent-style’ as a dependency so your child-theme stylesheet loads after it.

<?php
function theme_enqueue_styles() {
$parent_style = 'parent-style';
wp_enqueue_style( $parent_style, get_template_directory_uri() . '/style.css' ); wp_enqueue_style( 'child-style', get_stylesheet_directory_uri() . '/style.css', array( $parent_style ) ); } add_action( 'wp_enqueue_scripts', 'theme_enqueue_styles' );
?>

Activation

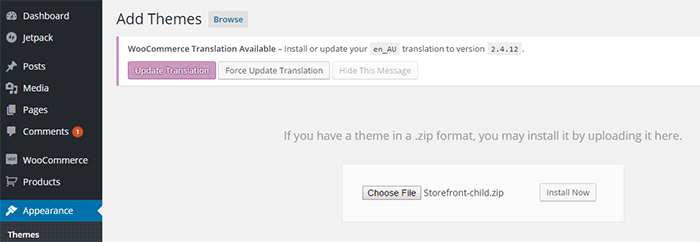
To add a child theme to your WordPress themes, you need to create a .zip file of your child theme folder. You can use 7-zip or Winrar to do this. Make sure that you have your style.css and functions.php inside your child theme folder.

It is best to take note and keep records of other plugin settings before you activate your child theme. Once you’re done, you can upload this in your WordPress via Appearance > Add Themes.

child-theme-activation-storefront

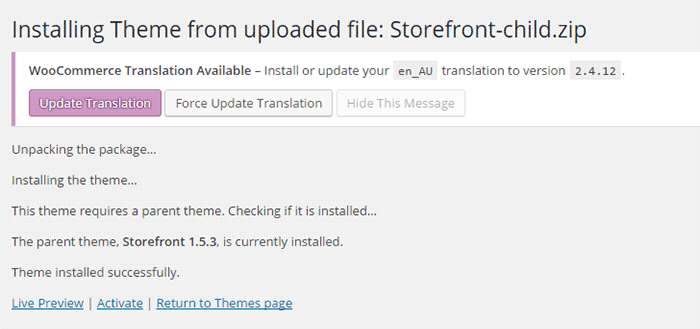
WordPress will install your child theme just like any other theme. Once installed, you need to activate this by clicking on ‘Activate’.

child-theme-activation-storefront-2

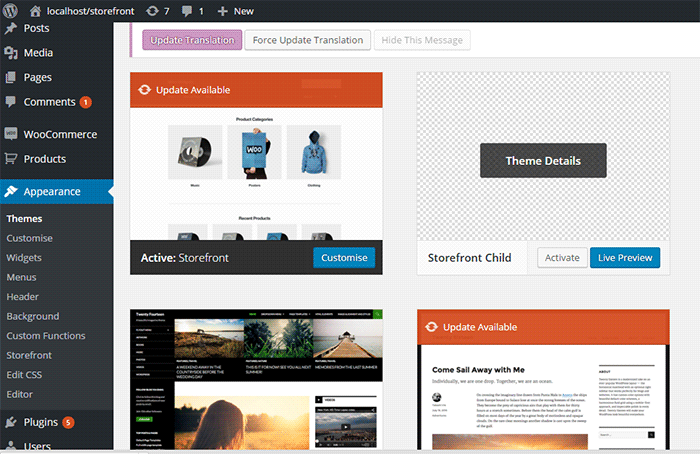
You can also choose to activate your child theme later when you go to Appearance > Themes.

child-theme-activation-storefront-appearance-themes

Once installed or activated, you can apply any edits to functions.php and to the stylesheet directly on the child theme files

Popular Child Themes for Storefront

If creating your own child theme is proving to be a bit too difficult for you, you can always purchase one.

There are a handful of child themes for Storefront right now. Note that you should install Storefront base theme first before installing these child themes.

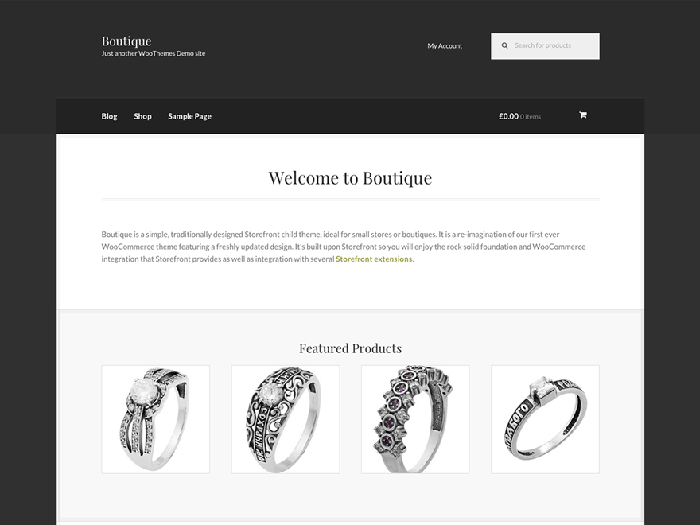
Boutique

boutique_popular-child-themes-for-storefront

Boutique is simple and easy to customize. You can start selling after you create your color theme, add your logo and content.

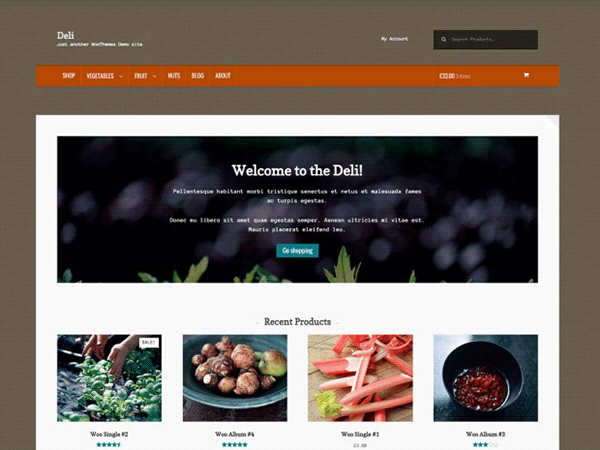
Deli

deli_popular-child-themes-for-storefront

If you want to add more personality to your store, you can use Deli. This child theme is great for small businesses. It has color schemes and textures that are inspired by nature.

Conclusion

Having a child theme is best practice when doing development work on your WooCommerce site. More importantly, using a child theme allows you to freely update your theme without losing any customizations you made on the child theme. A good and solid foundation is important for child themes. Hope this article has been helpful. Do you have any questions about child themes or anything you’d like to add? Let us know in the comments.

Filed Under: Code Snippets, How-To Articles Tagged With: best practices, child theme, code snippet, CSS, design tweaks, how-to, optimizations, Storefront, website development, website maintenance, WooCommerce, WordPress

  • 1
  • 2
  • 3
  • 4
  • Next Page »
Let us support your online store so you can manage your business

Get started today

Get 2 Hours of FREE SUPPORT

We are so confident that you will love our services that we will give you your first 4 hours at a 50% discount

That’s 4 hours for only $75

BUY NOW

Free eBook

5 Things Every Online Store Can Fix On Their Website In The Next Week To Increase Sales

Quick Links

  • How it Works
  • Pricing
  • Blog
  • Contact
  • About Wooassist
  • My Account
  • Checkout
  • Privacy Policy
  • Cookie Policy
  • Terms and Conditions

Wooassist

Australia:
59 Luke St.
Hemmant QLD 4174

Philippines:
San Miguel St.
Poblacion, Iligan City 9200

Connect


Copyright © 2026 · Wooassist

Yours FREE!

5 Things Every Online Store Can Fix On Their Website In The Next Week To Increase Sales