Wooassist

Assistance for Your Woocommerce Store

  • How it Works
  • Pricing
  • Services
    • Site Maintenance
    • AI SEO and Content Marketing
  • Blog
    • How-To Articles
    • Code Snippets
    • SEO For E-Commerce
    • Theme and Plugin Reviews
    • Wooassist News
    • WordPress/WooCommerce News
    • Interviews
  • About Us
  • Contact
You are here: Home / Archives for security

How to Counter Brute Force Attacks on WordPress

January 15, 2016 By John Leave a Comment

Counter Brute Force

WordPress is one of the most popular Content Management System (CMS) available. Its popularity is the reason why it is highly targeted by attackers. A secure website is a must if you’re operating an online business so you can protect your business and your customers.

In this article, you will learn:

  • What is a brute force attack?
  • How to know if someone is brute forcing into your site
  • How to counter brute force attacks on WordPress
  • What to do when someone succeeds at brute forcing into your website

WordPress does not currently have any built-in feature to stop brute force attacks so you are responsible in preventing them on your own website.

What is a Brute Force Attack?

Brute Force Fist

Brute force attack or brute forcing is one of the leading causes of website compromises and is similar to a trial and error method. The objective of the attacker is to gain access to the server level of your site by using various username and password combinations repeatedly until it succeeds. Not only that, it can also be utilized to find hidden pages and content in a web application.

Brute Force Attack is, simply put, an attack to the weakest link in a website’s security. Sucuri, a security company focusing on spotting and repairing compromised websites, reports at least 770,000 brute force attacks every hour. Your website is vulnerable to this type of hacking if you require user authentication or login access.

There are endless catastrophic possible events that could happen once an attacker gains access to your site. The access will be exploited and accounts can be locked out, malware or viruses can be injected, important financial transactions can be compromised or blocked, or data can be changed or stolen. All the hard work you have invested in your business could go down the drain in an instant and hurt your virtual presence.

Brute Force Attack Methods

WordPress LoginBrute forcing can be done in different systematic ways. It can be done manually or with automated tools. This can be done in a matter of minutes or years depending on the complexity of your authentication data and process. In most cases, it is done by automated tools that use bots to crawl the web and look for weak preset conditions and weak targets. For WordPress, the common targets are the /wp-admin extensions, /wp-login.php and the XML-RPC.

Brute Force Attacks can be used positively if the goal is to test a website’s security but unfortunately, most of the time, it is used by hackers to crack encrypted data for their own advantage. There is a growing number and improving array of automated tools that can be used for brute force attacks. They are simple to use that even a teenager can use them. These tools determine the length of usernames or passwords and try different possible combinations to gain access. The following are commonly used methods:

Dictionary Attack

The common targets here are administrator accounts. In this method, the attacker will use a database or ‘dictionary’ containing millions of words that are commonly used as a login password. Each one will be tried for authentication. The attacker will succeed once the password is accepted as correct.

These attacks can lock out one account or more and gather more information from the site depending on the error responses. This is actually resource- and time- consuming but this can be done quickly with better computing power. It does not decrypt information. It only cycles through a list of words until it becomes successful.

Hybrid Brute Force Attack

This is similar to the dictionary attack but the attacker may use permutations of words from a password dictionary, your real or site user name, website and company name. It uses a smarter set of rules, such as adding numbers and doubling up some characters or words, to intelligently guess passwords. An attack can occur and succeed quicker if more information is available to the attacker.

Reverse Brute Force Attack

This is less common but your website is vulnerable to this if your site users use weak passwords. In this method, the attacker will try to use one password and try to match it against many user names.

How Do You Know if Someone is Brute Forcing into Your Site?

brute-force-maskThe tough reality is Brute Force attacks can be the same as DDoS (Distributed Denial of Service) or DoS (Denial of Service) attacks. You can differentiate them by the intent. DDoS/DoS is after disruption of service while Brute Forcing is after gaining access. DDoS/DoS however can be a byproduct of Brute Forcing as the access attempts can overload your servers. Some attacks are easy to detect but some are harder to detect because they use different open proxy servers.

Careful observation and monitoring is necessary to detect Brute Force Attacks. Be on the lookout for irregularities and malicious activities in your site. To help you out, these are the most common ones experienced by victims of brute forcing:

  • Numerous failed logins coming from the same IP address
  • Multiple usernames used to login from the same IP address
  • Continuous login for one username from various IP addresses
  • Logins with suspicious usernames and passwords
  • Overloaded server memory that results from excessive bandwidth consumption from a single use
  • Performance problems
  • Weird links
  • Notice from the webserver of attacks and an unusually large amount of data being used in a short period of time
  • Website redirects to a different page or website
  • Unwanted popups and ads are all over their site
  • Malware or virus
  • Spam emails or comments
  • Help desk flooded by complaints of locked out accounts.

How to Avoid Brute Force Attacks

A Brute Force Attack can be minimized, if not avoided, as long as you follow these steps.

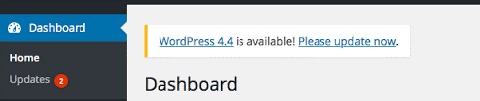
Keep Everything Updated

WordPress themes and other plugins update their version to keep them safe from vulnerabilities and to fix bugs. Updating can be tedious but this will help protect your site from known exploits. Just make sure that you keep a backup before doing updates. Be on the lookout for updates in your WordPress Dashboard for the following:

  • WordPress Version
  • WordPress Theme
  • WordPress Plugins

dashboard-update-message

Use Strong Passwords and Change Them Regularly

The best way to protect your site is to use strong passwords and avoid keeping the same password for a long time. If your site allows numerous login accounts, it is best to make sure that all your users follow these basic rules in making strong passwords:

  • Keep your passwords long. Use a minimum of 8 characters.
  • Keep it complex. Do not use dictionary words.
  • Keep it mixed. Use a combination of numbers, upper- and lower-case alphabets and non-alphanumeric characters.
  • Check if your password is a common password.

Avoid Common Usernames

sucuri-common-usernames-1
“admin” is the most used username for Brute Force attacks. Image Source: https://blog.sucuri.net/2014/03/understanding-denial-of-service-and-brute-force-attacks-wordpress-joomla-drupal-vbulletin.html

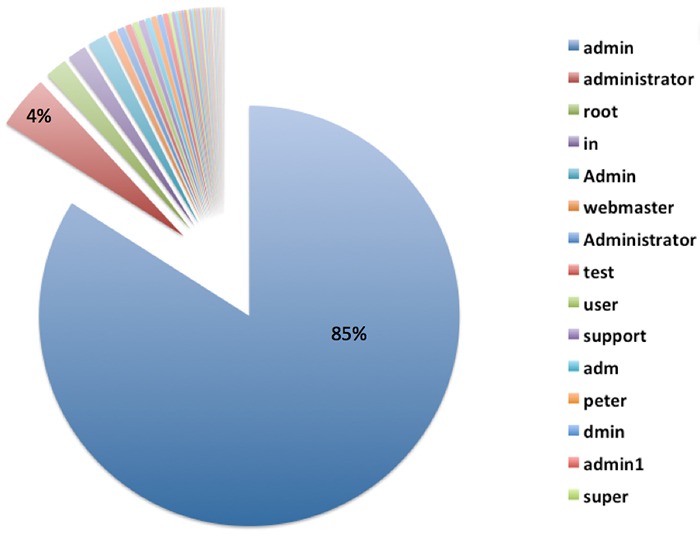
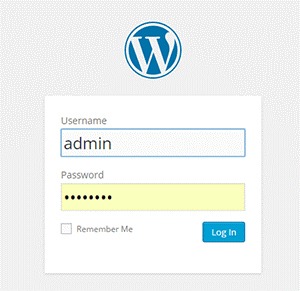
This is very important especially for administrator accounts. Do not use the default username ‘admin’ or any similar usernames containing the same word. Doing so will significantly increase the likelihood of your site being attacked by malicious users.

Use Two-Way Authentication for Administrator Accounts

For extra security, you can activate two-way authentication in your Cpanel or use a plugin such as miniOrange’s Two-Factor Authentication (Google Authenticator). The con to this, however, is you would need to have your phone with you all the time and your log-in process would take more effort and time from you.

Set Administrator Logins to Certain IP Addresses

If you have the privilege of getting a static IP address, this is a great added security option. You can actually block all sign in attempts from all other IP addresses by editing your .htaccess file. However, this can be a problem if your network uses dynamic IP addresses that can change over time.

Design Your Site to Not Use Predictable and Data Exposing Behavior for Failed Login Attempts.

If you are tech savvy, this is one option that you can do by changing the error messages that your website shows. For example, an error message that shows ‘bad username or password’ will make the attacker try the next information in their list. Adding progressive delays every failed attempt can also help improve your website’s security. You can also prompt your users to answer a captcha or a secret question after failed attempts. Be wary of using captcha though as it can negatively affect your websites user experience.

Secure Your Site with Tools and Plugins

There are many available tools and plugins that you can use. Some are free and some come with a price. Here are some tools, plugins and features that you should consider to significantly improve your website’s security. They can help you counter brute force attacks on your WordPress site. Before adding a plugin, you need to check if it’s compatible with your theme, other plugins, and WordPress version first. Some of the tools mentioned below may overlap with other ones in the list.

Security Scanner

There are so many security scanner plugins available for WordPress and most of them also include various tools that improve your website’s security. Top plugins that you can check out are:

  • Wordfence Security
  • VaultPress
  • iThemes Security
  • All In One WP Security & Firewall
  • Sucuri Security
  • Theme Authenticity Checker

Login attempt limit, blocks, and delay

There are plugins that can limit the rate of login attempts and block IP addresses temporarily to protect your site from brute force attacks such as WP Limit Login Attempts. You can also be on the lookout by tracking IP, usernames, passwords and adding idle timeout in your login with Login Security Solution.

Hide Login Page and Data

Attackers would normally target your /wp-login.php or /wp-admin. To hide your login page, you can use WPS Hide Login plugin.

Strong Passwords

brute-force-login

WordPress already generates a strong password for new users but if you are not a new user, you might want to create a very strong password by using a mix of upper case and lower case letters, numbers and symbols.

One way of creating a strong password that is easy to remember is to think of a sentence. For example: “The quick brown fox jumped over the lazy dog.” Take the first letter of every word and you will get “TQBFJOTLD”. Convert some letters to numbers or symbols and you can get “7Q3FJ0T1D” and then vary the remaining letters to upper case and lower case. Your strong password could be “7q3Fj0T1d”. Whenever you want to type your password, just recall the sentence that you used to generate your password.

Cloud/Proxy Services

You can use the aid of cloud or proxy services to help mitigate attacks all over the web as these block the IPs before they even reach your server. Cloudflare and Sucuri CloudProxy are notable services to check out.

What if Someone Already Got into My Site?

Brute Force Unlocked

Don’t Do Anything Rash

The worst mistake you can do is to delete things without backing up data first or cause further problems by troubleshooting. If your site has been compromised, the best option is to seek professional help.

Keep Calm and Regain Control of Your Site

Keep Calm and Chill

Take a step back and calm yourself down. You can still recover from this miserable event. Try to regain admin access of your site. If your password was changed, you can simply get access again by using the ‘forgot password’ option. If this has failed, get in touch with your hosting provider.

Change All Your Backend Passwords

This is an important step that you should do when you regain access to your hacked website. Make sure that you use a strong password so you can avoid further damage being done to your website.

Identify the Damage Done

Once you’ve gotten access to your site, scan your website with online malware scanners like Sucuri’s or with Google’s Safe Browsing. You can do the latter by typing this in your url: google.com/safebrowsing/diagnostic?site=yoursiteaddresshere.com

Check with Your Hosting Company

Some hosting services provide technical support for issues like this. Getting professional help is still recommended.

Restore from Backup

If you keep regular backups, you can restore your most recent backup just make sure the backup that you chose was from before your site was compromised.

Check and Change User Permissions

Checking user permissions, especially if there are many accounts that can access administrator settings, should be done to further prevent other users’ access while you’re cleaning up.

Close Hacker Backdoors

Secure your wp-config.php file and close all the backdoors that the hacker may have left. You will need professional help for this.

Change Your Passwords Again

Yes, again. The hacker may have gotten wind of your new password through a malware so change your password again when you are done cleaning up.

Have Your Site and IP Address Whitelisted

Once you have finished cleaning your site up, find out where you have been blacklisted. You may still be marked as spam by some online services like Unmask Parasites.

Summary

Your e-commerce website being compromised is one of the worst experiences an entrepreneur can go through. So planning ahead and hardening your websites security should never be taken lightly. The adage “An ounce of prevention is better than a pound of cure” rings true. If you did the hardening methods we have shown in this article, give yourself a pat on the back. If you are here because your website was compromised, get professional help as soon as possible.

Filed Under: How-To Articles Tagged With: brute force, CloudFlare, how-to, redirection, security, sucuri, website maintenance, WordPress

Wooassist Reviews the Best WooCommerce Hosting Services

June 16, 2016 By John Leave a Comment

serverThe right hosting service should be secure. Your hosting service should be able to help you solve hosting-related problems and quick. Your hosting service should be fast because quick page loads are critical in retaining site visitors. So what is the best WooCommerce hosting service?

Here is our review of some of the more popular hosting services around.

GoDaddy

GoDaddy_logo

Our rating: 7/10

GoDaddy has one of the cheapest plans available for website owners. They have a basic plan for those on a tight budget. Their basic plan has limited features and may not be a good choice. Make sure to check if these features will fit your needs as you might end up spending more with add-ons. Choose their higher priced packages if you need better functionalities such as a staging site to aid in development work.

Its performance and speed are acceptable but not that outstanding. As for support, it is not as good as other hosting services. All in all, it’s a decent hosting service. There is not much to worry about if you decide to go with them.

Bluehost

Bluehost

Our rating: 8/10

Bluehost is one of the most popular hosting services. For us, this popularity is reasonable. We haven’t had much trouble with the sites hosted in Bluehost that we’ve handled. Its server response time or speed can range from average to fast. It is still better than other shared hosting providers.

Their basic plan has less storage compared to GoDaddy’s but they offer more features. Features include a Global CDN, domain privacy, and SiteBackup. Your online store can benefit from better speed and security. In a hostbenchmarker study, Bluehost support takes some time to respond compared to other hosting services. We haven’t had much opportunity to work with their support though. To us, this gives them more value in that we or our clients haven’t had much to complain about.

Web Synthesis

Web-Synthesis

Our rating: 7/10

Synthesis is another good hosting service for online stores. It is a managed hosting service so it’s a bit pricier than others. They offer features that optimize site performance and security. Their speed is one of the fastest around. They also have an efficient support team.

The downside is that they don’t provide a staging site feature. This might complicate the development of your site. The usage of a staging/development site is best practice for website development. With a staging site, you’re able test your website updates before applying them to your live site.

Their processing power is also great but they have metered bandwidths. It’s not much to worry about as they provide 2TB-6TB plans. Unless you get huge bursts of traffic from content going viral, you’ll be okay. Overall, it provides a reliable hosting service.

Siteground

Siteground

Our rating: 9/10

We consider Siteground as one of the best hosting services for online stores and websites in general. Other review sites have pegged it as their top hosting service. Our experience with it has also been great.

The prices for its plans are reasonable. It has a metered bandwidth but the speed is top-notch with their super-caching feature. At the time of writing, they have servers in 3 continents and offer free CDN to each account.

All plans provide a decent backup service. Based on our experience, their customer service is good. You won’t find many hosting services giving the same value for money as Siteground.

WP Engine

WPEngine

Our rating: 9/10

WP Engine is a managed WordPress hosting service. This makes it work well for WooCommerce sites. It’s our hosting of choice for Wooassist.com. We chose this as it works great and comes with a host of other features.

In our experience, speed has not been a problem. They use EverCache for speed and massive scalability. They are also CDN-ready and this helps in delivering global content. They also offer good security and backup features to boot.

In addition, they also have the best support service compared to other hosting sites we have worked with. They don’t have the cheapest plans but they have reasonable and flexible value-for-money plans. We consider it the best hosting for low to medium volume online stores.

VPS Hosting Services

VPS-Hosting

Our rating: 5/10

This isn’t a review on a particular hosting but VPS or Virtual Private Server hosting in general. This type of hosting service is well suited for large websites. It is also a type of shared hosting that benefits most advanced users. Its pricing is not as cheap as the hosting services we reviewed in this post, but it’s not as expensive as dedicated servers.

The downside is its standard interface requires a lot of digging. Some services may be inflexible or frustrating because of its steep learning curve. Most VPSs do not come with a myriad of features, unlike the hosting services we reviewed in this post.

Not exclusive to VPS, but bursts of traffic tend to slow down a VPS-hosted site too much. The entire website could also go down because of this. They have failed in speed and reliability. For your WooCommerce store, we’d recommend to stay away from VPS hosting services in general.

Conclusion

Choosing a hosting service is something that you should do after thorough consideration. Read the fine print and the features before you pay for the service. This will keep you from wasting your time and money for hosting that is not a good fit for your WooCommerce store. Please note that even if we are affiliates with Siteground and WP Engine, we chose them based on years of experience. We have dealt with these hosting services for our clients’ and our own sites. We can attest that these two are among the best. If you were to sign up to either of them, we’d be grateful if you did so by clicking either of the links above.

Filed Under: Theme and Plugin Reviews Tagged With: backup, page speed, security, site speed optimization, Siteground, WooCommerce, WPengine

How to Make Your WooCommerce Store GDPR-Compliant

June 18, 2018 By John Leave a Comment

How to Make Your WooCommerce Store GDPR-Compliant

The GDPR took effect on May 25. WooCommerce store owners are still scrambling to make sure that their sites are compliant with GDPR requirements. If you serve clients from the European Union, then it is imperative that you make your WooCommerce store GDPR-compliant. Don’t know what to do? Read on below.

What is the GDPR?

First off, a brief introduction about the GDPR. The General Data Protection Regulation (GDPR) is a new regulation in the European Union that sets out standards and regulations for data protection. Data protection reform was initiated way back in 2012 and the GDPR is one fruit of that labor. If you are interested in seeing the GDPR in its purest form, you can check out this link.

Why Comply with GDPR Regulations?

If you do not serve customers from the European Union, then there is no need for you to comply with GDPR regulations. Still, your customers will appreciate the gesture if you make an effort to comply. This shows that you value their data and privacy.

If you serve a specific country in the EU or serve a global audience, then you are covered by the GDPR. That means you may receive hefty penalties of up to €20 million if you are found to be in violation of its provisions.

How Can I Make My WooCommerce Store GDPR Compliant?

Due to harsh penalties, it is recommended to act to make your WooCommerce store compliant. We will now detail the tasks that you need to do to comply with GDPR regulations.

Step 1: Update Your Site

The first thing you should do is update your site. The latest versions of WordPress and WooCommerce have implemented features to be GDPR-compliant. WooCommerce now has a feature that allows users to export their data and delete their data. Site administrators are also granted tools to determine how long data will be retained as well as an option to delete user data. Don’t forget to back up your site and test updates on a development site before updating your live site. For more information on the changes relating to the GDPR, you can check out this post.

Other popular plugins that manage user data such as MailChimp and Google Analytics have also implemented measures to make their services GDPR-compliant.

Step 2: Secure Your Site

Another mandate of the GDPR is that store owners should make their site secure. One way of keeping your site secure is by using the HTTPS protocol. You’ll need an SSL certificate to use HTTPS. You can follow this guide on how to install an SSL Certificate on your WooCommerce store.

There are a few other things that you can do to increase the security of your WooCommerce store. This includes keeping your site updated or using a security plugin. You can check this blog post for other important security tweaks.

Step 3: Create Important Pages

You will need to create a Terms and Conditions page, a Privacy Policy page and a Cookie Policy page. We would still recommend consulting your legal department about creating these pages. If you already have these pages, you need to make sure that you add provisions specific to the GDPR.

Create a Terms and Conditions Page

You can create your own Terms and Conditions page or you can generate a terms and conditions page using this tool from Shopify. If you choose to generate a terms and conditions page, you’ll still need to tweak it. And make sure to add any specific terms and conditions unique to your business.

Create a Privacy Policy Page

You can create your own Privacy Policy page or you can download a template here that you can tweak depending on your needs.

Create a Cookie Policy Page

You can create your own Cookie Policy page or you can download this template and tweak it according to your needs.

Notes on Important Pages

After you’ve created all the pages above, you will need to ensure that these pages can be accessed from any page on your site. For this purpose, we recommend adding links leading to these pages on your WooCommerce store’s footer.

Step 4: Create a Data Breach Response Plan

As per GDPR requirements, you will need to detail how your organization deals with a security breach. You can download a template here. Populate it with pertinent information about your Security Incident Response Team and external contacts.

In case of a security breach, you must also inform all customers whose data may have been leaked. You will need to have a template ready for communicating the breach. You can download the email template here.

Step 5: Add a Cookie Notification Pop-Up

You might have noticed that most, if not all, websites that you visit now have a pop-up that declares that the site uses cookies. That’s because the GDPR also requires website to declare that they are using cookies to track user data. Implementing this is easy on WordPress. You can use the UK Cookie Consent plugin to create a cookie notification pop-up on your WooCommerce store.

Step 6: Ensure that Your Email Opt-in Forms are GDPR-Compliant

If you are using MailChimp, you will need to turn on the GDPR fields on your opt-in forms. Note that this does not make your opt-in forms GDPR-compliant. Rather, this is the first step to making your WooCommerce store GDPR-compliant.

You will still need to get consent from new contacts and existing contacts. You read that right. Even if users have already consented to receive emails from you prior to the GDPR, you will still need to get consent again. For more information on how to get consent, you can check out this article from MailChimp.

If you are using a different tool for your email marketing, you can check with your service provider. Check if they have made any changes to help you comply with GDPR.

Step 7: Ensure that the Plugins You Use are GDPR Compliant

To ensure that your plugins are GDPR compliant, you will need to do a plugin audit. This task may be tedious as you have to sift through all the plugins that you use. First, you’ll need to check if the plugins are still being updated by the plugin author. If that plugin author has not updated the plugin in months (or worse, years), then that’s a red flag. A plugin that is not being updated is a security concern and GDPR requires that websites need to be secure.

Once you’ve weeded out the outdated plugins, you’ll need to identify which plugins manage or use user data. Example of plugins that deal with user data are analytics plugins, contact form plugins, and opt-in form plugins. Check if the plugins that manage user data have taken steps to become GDPR compliant. If they have not, consider finding another plugin that is GDPR-compliant.

Final Notes

Doing all the steps above does not guarantee that your WooCommerce store will be fully GDPR-compliant. We still recommend seeking legal advice. If you need any help getting any of these tasks done, you can contact the Wooassist team and we should be able to help.

Do you have any other tips on how to make a WooCommerce store GDPR-compliant? Let us know in the comments.

Filed Under: How-To Articles Tagged With: email marketing, GDPR, mailchimp, security, WooCommerce, WooCommerce updates, WordPress updates

Things to Do Before Your Website Goes Live

May 7, 2015 By John Leave a Comment

checklist
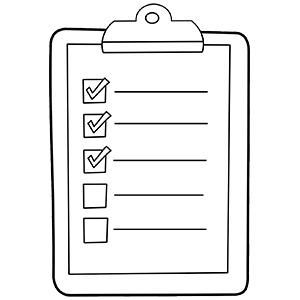
The bulk of the work is done. Your website is ready to go live. But are you sure it is really ready? Here’s a handy checklist of things to do before your website goes live. Make sure everything is working fine before you click that “Go Live” button.

Page Content

  1. Proof read web copywriting, spelling and grammar are correct
  2. Paragraphs and headers and formatting are correct
  3. Copywriting date on the footer shows current year
  4. Company details and contact info are accurate all throughout the website.
  5. Lorem Ipsum has been removed
  6. Images, videos and audio files are properly formatted and are working on different devices
  7. Premium content such as PDFs, whitepaper, ebooks, etc. have been proofread, spelling and grammar are correct. These files are properly stored in their respective libraries.
  8. Images, font and other content are properly licensed or have proper citation

Design

  1. Site pages are compatible across different browsers (Firefox, Safari, IE 7, 8, 9, and 10, Chrome, Opera)
  2. Pages are compatible across different devices (tablets, laptops, desktops, and other mobile devices)
  3. Check for CSS and HTML error, fix and validate
  4. Favicon is uploaded and is rendering properly
  5. Paragraph and styles are working properly

design

Functionality

  1. Forms are submitting data properly
  2. Thank you message or confirmation message displays after the form is submitted.
  3. Form data is emailed to the recipient
  4. Auto-responders (if any) are working properly
  5. Internal links are working
  6. External links are working
  7. Social media icons are working properly
  8. Feeds are working properly
  9. Company logo is linked to the homepage
  10. Site load time should take not more than 2-3 seconds
  11. 404 Redirects are in place
  12. Integration with third-party tools such as e-commerce software, CRM, Marketing software platforms are running smoothly
  13. Site structure is clean and should be easy to navigate and maneuvered by your users
  14. Payment processing should be live
  15. Shipping options checked
  16. Credit card transaction checked
  17. Run a test order. Check tax, sub-total, total, coupons, etc
  18. Confirm order is placed
  19. Reset order number
  20. Verify MyAccount
  21. Dummy orders and test accounts are cleared.
  22. Test email from client to merchant
  23. Cart icon is on each page
  24. Checkout button should be large and is strategically located on the page.
  25. Search box with suggestive search
  26. Feedback tab at the bottom of each page for users to notify the webmasters when having problems with the site.

SEO

  1. Page titles should be unique, less than 70 characters and should include keywords.
  2. Meta Descriptions are unique and should not exceed 156 characters
  3. Keyword per page not more than 10, depending on the # of words per page
  4. Metadata for RSS in place
  5. Metadata for social media sharing in place
  6. Metadata spelling and grammar correct
  7. Alt tags for images
  8. Dynamic XML sitemap created and submitted to search engines
  9. Breadcrumbs in place
  10. Slugs should reflect site structure and should be short with relevant keywords.
  11. 301 redirects for old URLs are in place
  12. rel=”nofollow” tags are in place on applicable links and pages
  13. Site indexing is on

Google Analytics

  1. Analytics codes are properly inserted
  2. Relevant IP addresses have been excluded from analytics tracking.
  3. Google Webmaster Tools and Google Analytics are synced
  4. Google Adwords and Google Analytics are synced

Security and Backups

security

  1. Monitoring scripts installed.
  2. Copy of the final website stored in a safe place
  3. Ongoing copies of the site is being generated everyday (depending on how large the site is)
  4. Usernames and passwords stored in a secure database
  5. Check robots.txt file to restrict access to sensitive pages

Compliance to Web Rules and Regulations

This may vary depending on the country and industry.

  1. Pages offer accessibility to users with disabilities
  2. Users need to be informed if site is using cookies
  3. Compliant to usage rights of images, fonts, videos, etc.
  4. Terms and Privacy policy for users should be readily accessible and visible to site visitors
  5. Website is PCI compliant
  6. SSL certificate properly installed. Check receipt and checkout page, my account and my account details in SSL mode.
  7. SSL mode for logins and registrations

Filed Under: How-To Articles Tagged With: 404 error, backup, best practices, breadcrumbs, Google Analytics, Google Webmaster Tools, how-to, redirection, security, SEO strategy, website development, WordPress

How to Fix Checkout Problems in WooCommerce

June 6, 2016 By John 84 Comments

how to fix checkout problems in WooCommerce

One of the biggest problems a WooCommerce store owner can encounter is when the checkout fails. There are a lot of different types of issues that could happen during checkout, but these can be fixed easily if you can identify what is causing the problem. However, finding out the cause is not always easy for the average user. In this post, we will teach you how to fix the common checkout problems in WooCommerce.

The information in this post may or may not help with the specific problem that you are experiencing with your checkout. You may have a similar problem but the source could be different, hence the solutions mentioned here may not work for everyone. It is best to have a developer adept in both WordPress and WooCommerce make the suggested fixes for you. We also recommend that you create a staging/development site and do your debugging there rather than on the live site.

Most Common WooCommerce Checkout Issues

Here at Wooassist, a lot of new clients come to us with problems on their checkout. Having issues on the checkout page can be daunting as it can be difficult to figure out the cause. The checkout page is crucial because it is the last page of the “user shopping experience”. A simple error that could be fixed in a few minutes can hurt your business if it is not addressed swiftly. You could end up losing business opportunities and customers. To fix the problem, we need to figure out what the error is first.

Below are some common issues we encounter that you could be experiencing right now on your WooCommerce store.

Checkout Page Isn’t Available and is Just Redirecting Back to an Empty Cart

cart-is-currently-empty

While there are many reasons why checkout would redirect to an empty cart, it’s usually because your hosting is not totally compatible with WooCommerce.

The issue is most common with stores that enabled “force https on checkout”. In this case, the issue could be caused by a PHP security module called Suhosin. WooCommerce already has an official fix posted for this.

Simply paste the code below in your server’s PHP settings.

suhosin.session.cryptdocroot = Off

Review Order Section is Stuck on Loading

review-order-session-stuck-on-loading

When a customer enters their shipping/billing information, this triggers a script to reload the review order data. When there is an error in the script, it will just get stuck without an error shown that would’ve helped you understand what’s happening.

This usually happens when the returned data is not what WooCommerce expects. This is caused by either a plugin or template conflict. To fix this, you will need to check compatibility with all plugins installed and update any outdated WooCommerce templates.

Payment Option is Not Working

Some popular payments options are PayPal, Stripe, Authorize.net and eWay. These are the services that you’ve installed in your store to handle the payment process between you and your customers. This is the page where users enter their credit card information and hit the “place order” button.

Here are some scenarios where the payment option does not work:

Payment option is not available on checkout

You are sure that you have completely configured your payment option but it’s not showing up on the checkout page. This usually happens with stores that don’t have an SSL certificate installed and the payment option requires one. You can learn more about SSL in this post.

Authentication error pops up

When an authentication error pops up, this means there is something wrong between the connection of your store and your payment option service provider. To fix this, check that the credentials you entered in the payment option’s settings are correct.

Unknown error pops up

Checkout-unknown-error

Unknown error popping up could mean that a PHP script in WooCommerce isn’t working properly. There are many things that could cause this. It may be due to a plugin conflict, or your hosting doesn’t support the custom AJAX endpoints utilized by WooCommerce. To fix this you will need to check each plugin installed. Try disabling the plugins one at a time and see if that fixes your problem.

Nothing happens after clicking “Place order” button

If nothing happens when you click the place order button, then most likely there is a JavaScript conflict in the checkout page. The best way to fix this is to check your browser’s console to see which scripts are in conflict. You’ll want a developer to do this for you though.

Did any of these help solve your checkout page problem? If you have any other problems with checkout on your WooCommerce store, you can hit the comments or contact us and we’ll see what we can do for you.

Filed Under: How-To Articles Tagged With: best practices, checkout form, code snippet, how-to, security, website maintenance, WooCommerce

  • 1
  • 2
  • 3
  • 4
  • Next Page »
Let us support your online store so you can manage your business

Get started today

Get 2 Hours of FREE SUPPORT

We are so confident that you will love our services that we will give you your first 4 hours at a 50% discount

That’s 4 hours for only $75

BUY NOW

Free eBook

5 Things Every Online Store Can Fix On Their Website In The Next Week To Increase Sales

Quick Links

  • How it Works
  • Pricing
  • Blog
  • Contact
  • About Wooassist
  • My Account
  • Checkout
  • Privacy Policy
  • Cookie Policy
  • Terms and Conditions

Wooassist

Australia:
59 Luke St.
Hemmant QLD 4174

Philippines:
San Miguel St.
Poblacion, Iligan City 9200

Connect


Copyright © 2026 · Wooassist

Yours FREE!

5 Things Every Online Store Can Fix On Their Website In The Next Week To Increase Sales