Wooassist

Assistance for Your Woocommerce Store

  • How it Works
  • Pricing
  • Services
    • Site Maintenance
    • AI SEO and Content Marketing
  • Blog
    • How-To Articles
    • Code Snippets
    • SEO For E-Commerce
    • Theme and Plugin Reviews
    • Wooassist News
    • WordPress/WooCommerce News
    • Interviews
  • About Us
  • Contact
You are here: Home / Archives for mailchimp

How to Start an Email Marketing Campaign on WooCommerce from Scratch

April 30, 2018 By John Leave a Comment

How to Start an Email Marketing Campaign on WooCommerce from Scratch

Social media marketing is abuzz. But did you know that email marketing is more effective than social media? In comparison, email marketing gets an average click-through rate of 3.57% while you can only get a 0.07% click-through on Facebook. In this post, we’ll teach you how to start an email marketing campaign on WooCommerce.

Why Email Marketing Works?

More than 90% of consumers check their emails daily and 77% prefer email for marketing. Cold calls, text messages and even social media ads are considered intrusive. If you do good email marketing, you’ll have an email list of people that have already shown interest in what you offer.

Also, email is a platform that you own and you don’t need to abide by Facebook, Twitter and Google’s rules which regularly get updated.

Social Media Not Without Merit

While email marketing is more effective, social media marketing is not without merit. Social media will allow you to tap into the entire social media user base while email marketing entails that you build your own mailing list. Also social media can become a gold mine if you have what it takes to go viral.

How to Get Started on Email Marketing on WooCommerce

Have a Clear Goal

Before you go jump on email marketing, it’s important that you don’t jump in blind. You should have a clear goal in mind. What do you want to achieve with the emails that you will be sending out? Drive more traffic to your site? Promote your product? Increase sales? Keep your customers engaged? Send special offers? Whatever your goal is, it should be clear from the start.

Find a Platform to Use

There are plenty of platforms that you can use for email marketing but we’ll focus on MailChimp. MailChimp integrates well with WordPress and WooCommerce. To get started, you’ll need to create an account on MailChimp. Other well-known email marketing platforms are Active Campaign, AWeber, ConvertKit, ConstantContact, Drip and GetResponse.

SubscribeBuild Your Email List

Don’t be Lured into Buying Emails

The success of your email campaign depends a lot on how you build you email list. There are plenty of ways to build your email list. You might be tempted to take a shortcut and buy an email list from a shady company. Don’t do this, you’ll only get a list of emails that has been spammed endlessly and thus has lost any value.

Gathering Emails

Importing Emails You Already Have

If you already have a list of client emails, you can import this list to your MailChimp account. Make sure the people in your list have consented to receive emails from you.

Create an Email Opt-In Form

You can create an email opt-in form in a prominent area of your site. It can be your main call-to-action on your home page. You can add it to your side-bar. You can add it on the top-bar. Or you can choose to create a pop-up. Contrary to popular belief, pop-ups do work well when they are implemented properly. In fact, email opt-in pop-ups can drive up to 1,375% more email sign ups. Don’t spam your visitors with pop-ups. You can show them one pop-up every set number of days. You can show a pop-up when a visitor has spent a specific amount of time on your site. You can show a pop-up when your visitor has scrolled down to the end of your landing page. Getting the right timing to show a pop-up is critical.

Add Email Opt-In to Your Contact Form

Another way of building your list is by having your form contacts become a part of your list. Note that you must expressly indicate that you are going to add them to your mailing list. If you are using Contact Form 7, you can use the Contact Form 7 MailChimp Extension to automatically add form submission to your Mailchimp lists.

Add Email Opt-in to Your Checkout

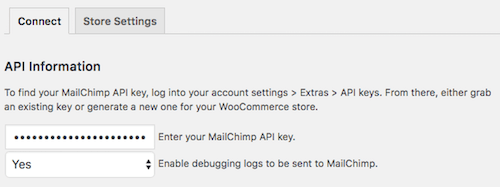
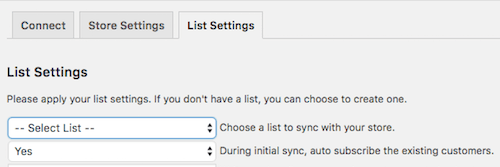
You can also automatically add your new customers to your MailChimp list by adding an opt-in form at checkout. You can do this using the MailChimp for WooCommerce plugin. You can check out our post on how to set up email opt-in on WooCommerce checkout.

Create Your First Newsletter

Create Your First Newsletter

After you’ve determined your goal and gathered enough emails, you can get started on your first campaign. We’re not going to tell you how to create your campaign because that depends on your strategy but there are a few important pointers to keep in mind.

Optimize Your Campaign for Ease of Reading

Your campaign should be easy to read. Avoid big words that are difficult to understand. Simple words work best. Avoid using passive voice and adverbs. If your campaign is a mess and hard to read, people will not read it.

Optimize Your Campaign for Clicks on Your Call-to-Action

Make sure your call-to-action is clearly visible. If your campaign can’t encourage your email list to take action, then it is useless. Also, test that your campaign looks good on a mobile device. Many of your contacts will browse emails over their phone and if your call-to-action is not visible on mobile view, you will be losing out on a lot of clicks.

Make Sure Your Campaign is Relevant to Your Customers

If the campaigns you send out are not relevant to your email list, you’re risking your contacts unsubscribing from your campaign. People unsubscribe from email lists all the time. That’s to be expected. But if your unsubscribe rates are too high, MailChimp may put restrictions on your account. You can prevent this by not subscribing emails that did not agree to receive emails from you and sending them campaigns that are relevant to them.

When everything is set, get ready to send your first newsletter. After you’ve sent your campaign, what’s next?

Check Your Data

After you’ve sent your first newsletter, it’s time to look at your data. Most email marketing platforms will have built in analytics reporting. How many opened your emails and clicked, were converted and unsubscribed?

When you’ve sent your second newsletter, check your analytics data again and compare. Determine how you can improve your conversion rates. You can even split test your campaigns to see which works best and what are the best times for sending out your newsletters.

Got any questions about starting your own email marketing campaign on WooCommerce? Let us know in the comments.

Filed Under: How-To Articles Tagged With: ecommerce, email, email marketing, mailchimp, WooCommerce

How to Make Your WooCommerce Store GDPR-Compliant

June 18, 2018 By John Leave a Comment

How to Make Your WooCommerce Store GDPR-Compliant

The GDPR took effect on May 25. WooCommerce store owners are still scrambling to make sure that their sites are compliant with GDPR requirements. If you serve clients from the European Union, then it is imperative that you make your WooCommerce store GDPR-compliant. Don’t know what to do? Read on below.

What is the GDPR?

First off, a brief introduction about the GDPR. The General Data Protection Regulation (GDPR) is a new regulation in the European Union that sets out standards and regulations for data protection. Data protection reform was initiated way back in 2012 and the GDPR is one fruit of that labor. If you are interested in seeing the GDPR in its purest form, you can check out this link.

Why Comply with GDPR Regulations?

If you do not serve customers from the European Union, then there is no need for you to comply with GDPR regulations. Still, your customers will appreciate the gesture if you make an effort to comply. This shows that you value their data and privacy.

If you serve a specific country in the EU or serve a global audience, then you are covered by the GDPR. That means you may receive hefty penalties of up to €20 million if you are found to be in violation of its provisions.

How Can I Make My WooCommerce Store GDPR Compliant?

Due to harsh penalties, it is recommended to act to make your WooCommerce store compliant. We will now detail the tasks that you need to do to comply with GDPR regulations.

Step 1: Update Your Site

The first thing you should do is update your site. The latest versions of WordPress and WooCommerce have implemented features to be GDPR-compliant. WooCommerce now has a feature that allows users to export their data and delete their data. Site administrators are also granted tools to determine how long data will be retained as well as an option to delete user data. Don’t forget to back up your site and test updates on a development site before updating your live site. For more information on the changes relating to the GDPR, you can check out this post.

Other popular plugins that manage user data such as MailChimp and Google Analytics have also implemented measures to make their services GDPR-compliant.

Step 2: Secure Your Site

Another mandate of the GDPR is that store owners should make their site secure. One way of keeping your site secure is by using the HTTPS protocol. You’ll need an SSL certificate to use HTTPS. You can follow this guide on how to install an SSL Certificate on your WooCommerce store.

There are a few other things that you can do to increase the security of your WooCommerce store. This includes keeping your site updated or using a security plugin. You can check this blog post for other important security tweaks.

Step 3: Create Important Pages

You will need to create a Terms and Conditions page, a Privacy Policy page and a Cookie Policy page. We would still recommend consulting your legal department about creating these pages. If you already have these pages, you need to make sure that you add provisions specific to the GDPR.

Create a Terms and Conditions Page

You can create your own Terms and Conditions page or you can generate a terms and conditions page using this tool from Shopify. If you choose to generate a terms and conditions page, you’ll still need to tweak it. And make sure to add any specific terms and conditions unique to your business.

Create a Privacy Policy Page

You can create your own Privacy Policy page or you can download a template here that you can tweak depending on your needs.

Create a Cookie Policy Page

You can create your own Cookie Policy page or you can download this template and tweak it according to your needs.

Notes on Important Pages

After you’ve created all the pages above, you will need to ensure that these pages can be accessed from any page on your site. For this purpose, we recommend adding links leading to these pages on your WooCommerce store’s footer.

Step 4: Create a Data Breach Response Plan

As per GDPR requirements, you will need to detail how your organization deals with a security breach. You can download a template here. Populate it with pertinent information about your Security Incident Response Team and external contacts.

In case of a security breach, you must also inform all customers whose data may have been leaked. You will need to have a template ready for communicating the breach. You can download the email template here.

Step 5: Add a Cookie Notification Pop-Up

You might have noticed that most, if not all, websites that you visit now have a pop-up that declares that the site uses cookies. That’s because the GDPR also requires website to declare that they are using cookies to track user data. Implementing this is easy on WordPress. You can use the UK Cookie Consent plugin to create a cookie notification pop-up on your WooCommerce store.

Step 6: Ensure that Your Email Opt-in Forms are GDPR-Compliant

If you are using MailChimp, you will need to turn on the GDPR fields on your opt-in forms. Note that this does not make your opt-in forms GDPR-compliant. Rather, this is the first step to making your WooCommerce store GDPR-compliant.

You will still need to get consent from new contacts and existing contacts. You read that right. Even if users have already consented to receive emails from you prior to the GDPR, you will still need to get consent again. For more information on how to get consent, you can check out this article from MailChimp.

If you are using a different tool for your email marketing, you can check with your service provider. Check if they have made any changes to help you comply with GDPR.

Step 7: Ensure that the Plugins You Use are GDPR Compliant

To ensure that your plugins are GDPR compliant, you will need to do a plugin audit. This task may be tedious as you have to sift through all the plugins that you use. First, you’ll need to check if the plugins are still being updated by the plugin author. If that plugin author has not updated the plugin in months (or worse, years), then that’s a red flag. A plugin that is not being updated is a security concern and GDPR requires that websites need to be secure.

Once you’ve weeded out the outdated plugins, you’ll need to identify which plugins manage or use user data. Example of plugins that deal with user data are analytics plugins, contact form plugins, and opt-in form plugins. Check if the plugins that manage user data have taken steps to become GDPR compliant. If they have not, consider finding another plugin that is GDPR-compliant.

Final Notes

Doing all the steps above does not guarantee that your WooCommerce store will be fully GDPR-compliant. We still recommend seeking legal advice. If you need any help getting any of these tasks done, you can contact the Wooassist team and we should be able to help.

Do you have any other tips on how to make a WooCommerce store GDPR-compliant? Let us know in the comments.

Filed Under: How-To Articles Tagged With: email marketing, GDPR, mailchimp, security, WooCommerce, WooCommerce updates, WordPress updates

How to Set Up MailChimp Opt-In Form in WooCommerce Checkout

January 29, 2018 By John Leave a Comment

How to Set Up MailChimp Opt-In Form in WooCommerce Checkout

If your WooCommerce store is not set up to capture your customer’s emails, then you’re missing out on a lot of potential sales. According to data gathered by Campaign Monitor, transactional emails can help you generate up to 6 times more revenue. Your prospective customers are also five times more likely to see the emails you send out compared to when posting it on your Facebook. With increasing competition in Facebook post reach, email marketing is only becoming more lucrative. In this post, we’ll teach you how to set up MailChimp opt-in form in WooCommerce checkout so you can increase your conversion rates.

What Do You Need to Set Up Email Opt-in Forms in WooCommerce Checkout?

To get started with adding email-opt in forms to your WooCommerce store, you need two things. The first one is a MailChimp account. You can sign up to MailChimp for free and continue to use it until you exceed a thousand subscribers. At this point, you will need to purchase a plan. You can sign up for a MailChimp account here.

Once you’ve set up a MailChimp account, you will need to generate an API key which you will use to connect MailChimp to your WooCommerce store. To get your API key, log in to your MailChimp account and click on your name on the upper right corner and then click on Account; click on Extras and then on API keys. From here, you can copy the existing API key or create a new one. Save your API key for now. We’ll need this later.

The second thing that you need is the MailChimp for WooCommerce plugin which you can download here. You can also install the plugin from the Plugins page of your WordPress Dashboard. Once you install the plugin, make sure you activate it.

How to Set Up MailChimp for WooCommerce Plugin

After activating the plugin, head over to the Plugins page on your WordPress Dashboard and look for MailChimp for WooCommerce and then click on Settings.

On the Connect Tab, you will need to input your API key. If you followed the steps in the previous section, you should have your API key ready. Just input your API key in the API key field and click on “Save all changes”.

When that’s done, click on Store Setting and set your store information and then click on “Save all changes”.

The next step is to set up your subscriber lists. Click on List Settings and choose a list to sync with your WooCommerce store. You can also indicate whether you want to automatically subscribe your existing customers to your list.

If you want to switch to a different list, you will need to remove and reinstall the plugin.

You can also set other setting such as checkbox display options, subscription opt-in message, and the location of the opt-in checkbox form on checkout.

When that’s done, you can sync your list with your MailChimp account.

To view your site details and change other settings, you can log in to your MailChimp account, click on your profile name and click on “Connected Sites”.

Final Notes

Now that your store is set up to sync your customer’s emails to your MailChimp list, you can easily email them special offers and other deals to help boost your sales.

If you have any questions, let us know in the comments.

If you need help setting up the plugin on your WooCommerce store, you can contact us.

Filed Under: How-To Articles Tagged With: checkout, checkout form, conversion optimization, email, email marketing, mailchimp, plugins, WooCommerce

Let us support your online store so you can manage your business

Get started today

Get 2 Hours of FREE SUPPORT

We are so confident that you will love our services that we will give you your first 4 hours at a 50% discount

That’s 4 hours for only $75

BUY NOW

Free eBook

5 Things Every Online Store Can Fix On Their Website In The Next Week To Increase Sales

Quick Links

  • How it Works
  • Pricing
  • Blog
  • Contact
  • About Wooassist
  • My Account
  • Checkout
  • Privacy Policy
  • Cookie Policy
  • Terms and Conditions

Wooassist

Australia:
59 Luke St.
Hemmant QLD 4174

Philippines:
San Miguel St.
Poblacion, Iligan City 9200

Connect


Copyright © 2026 · Wooassist

Yours FREE!

5 Things Every Online Store Can Fix On Their Website In The Next Week To Increase Sales