Wooassist

Assistance for Your Woocommerce Store

  • How it Works
  • Pricing
  • Services
    • Site Maintenance
    • AI SEO and Content Marketing
  • Blog
    • How-To Articles
    • Code Snippets
    • SEO For E-Commerce
    • Theme and Plugin Reviews
    • Wooassist News
    • WordPress/WooCommerce News
    • Interviews
  • About Us
  • Contact
You are here: Home / Archives for plugins

How to Optimize Email Opt-in Forms for Increased Conversions in WooCommerce

May 17, 2016 By John Leave a Comment

how to optimize email opt-in formsAs part of your sales funnel, your goal probably is to convert site visitors into subscribers and later on, into paying customers. Email marketing is still one of the best means to connect with your potential customers after they’ve left your site. As you get visitors in your WooCommerce store, you’ll want to get their emails. To do this, you need to learn how to optimize email opt-in forms.

In this post, we’ll show you what you should put in an opt-in form and how to position it strategically on your e-commerce store. We’ll also introduce you to some popular WordPress plugins to easily add opt-in forms on your site.

Where can You Add Opt-in Forms?

It is useful to add opt-in forms in different sections and pages on your e-commerce store.

Landing page

Using a landing page (or a squeeze page) is the traditional method of collecting leads. Because your goal is to get people to sign up to your mailing list, every element of the landing page should support that desired action. Don’t add a side-bar because it will just distract the users from the real goal. Remove links that will take the site visitor away from the landing page before they even fill out and submit the opt-in form.

Feature Box

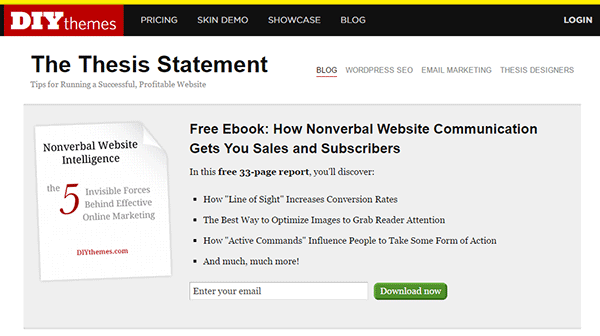
A feature box is a full-width email opt-in box usually added on top of your homepage. Some do not use a feature box because of two things: it takes up the most valuable space on your homepage, and it seems pushy to immediately ask for an email address. To validate the feature box’s location and avoid getting negative attention from site visitors, make sure that what you’re offering is definitely useful in exchange for their email address.

As an example, the use of a feature box on DIYthemes’ blog resulted in a 51.7% increase in its daily blog subscription.feature-box_DIYthemes
Pop-up Window

Because of its nature of ‘popping-up’ and interrupting the user while browsing the site, many visitors don’t like pop-ups. Nevertheless, a pop-up window is still one of the most effective lead generation tools. A lightbox works the same way as a pop-up window, but the rest of the site is darkened to make the form stand out.

Note that the timing should be perfect to avoid hindering good user experience. Once seen, you have only 1-2 seconds to grab the user’s attention and pique their interest before they close the window. Here are some examples of high converting pop-up email forms.

Opt-In Forms in Other Pages

options-2Apart from the feature box in the homepage, you can insert more opt-in forms in other pages (About page and Splash page) and in other page sections (top of sidebar, sticky top bar and below the footer).

The About Us page is usually one of the most visited pages in any website, so it’s a good idea to make the most of that traffic.

In a Kissmetrics review, using a splash page might be a better idea than a pop-up on the homepage. A pop-up is frowned upon because it interrupts the user while browsing the site. A splash page appears as a preliminary message. As such, it is better perceived.

Sidebar Opt-In Form

A sidebar opt-in form is the most common email list building method mainly because it is built in to most website templates. Keep your opt-in form to the top of your sidebar though, to maximize results.

Sticky Top Bar

Because a sticky top bar remains visible on top of the page even as you scroll down, visitors have plenty of time and opportunity to notice the message and eventually subscribe.

Components of an Opt-In Form

Once you’ve determined where you want your opt-in forms, the next step is to create them. To increase your chances of getting sign-ups, your opt-in form should have the right timing, design, form fields and copy.

Timing

15-seconds_traffic-stoplightIn using a pop-up window, you need to properly time it. You can set a time delay before showing the pop-up. If it’s too early, you’ll annoy site visitors even before they’ve taken a look of your site and what you have to offer. A 15-second delay is enough time for visitors to look around your site and not be too bothered with a pop-up. Note that this does not necessarily apply to your target audience. It’s best to conduct your own tests.

You can also show pop-ups as visitors reach the bottom of your content or as they exit your site.

Design

To effectively connect with your visitors as they quickly scan your opt-in form, you need to add visual elements that enhance your messaging. Humanize your opt-in form with a photo. Inject credibility with a testimonial or statistic. If your opt-in form is not a pop-up, make sure it will get noticed but at the same match your site’s theme.

Form Fields

More people sign up when less form data is requested. Note that you just need the email address of your site visitors for email marketing purposes. Usually just a name and email in the form will suffice. You can even make the name optional.

Concise Copy

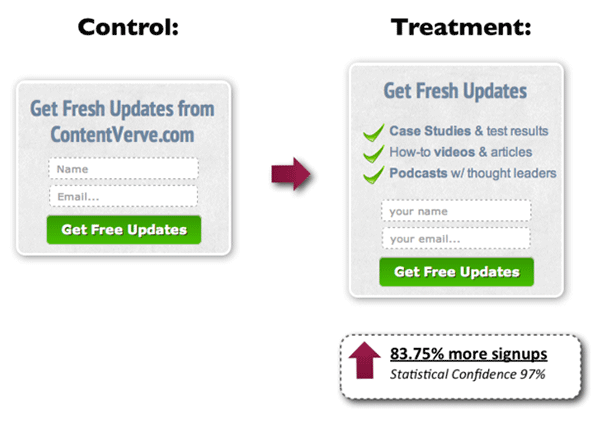
Make your opt-in form copy as concise as possible. It’s important to present a clear purpose when asking for personal information. Spell out what your site visitors will get in return. You can also assure them that you won’t sell their addresses to a third party or spam them. BeemDigital showed an 83.75% increase in sign-ups when they added value and relevance to their opt-in form.
concise-copy_Contentverve
Image Credit: http://contentverve.com/how-to-write-high-converting-signup-form-copy/

Another effective tactic is to offer a lead magnet, like a free e-book, product trial, discount, or even free shipping. On a side note, you can set up the incentive in such a way that your new subscribers won’t unsubscribe immediately. If you’re offering a free e-book, break it up in parts and offer them in a series of emails. Entice them to want to wait for what’s coming next.

Recommended Opt-In Form Plugins for Your WooCommerce Store

In choosing your opt-in plugin, consider what features you need and choose a plugin that provides just that and nothing more. Anything more is just extra bloat on your site. Below we list some of opt-in form plugins that we can recommend.

OptinMonster
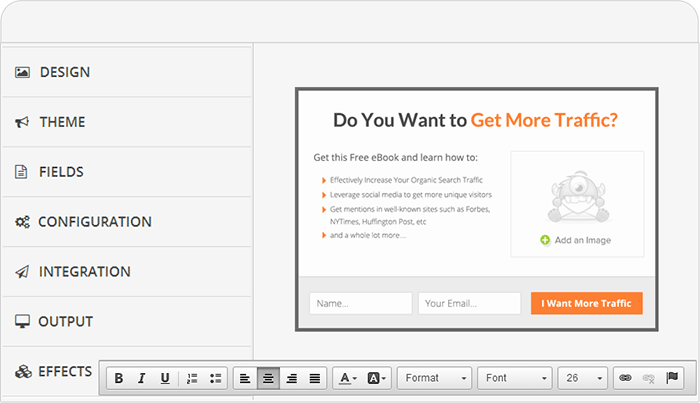
optinmonsterOptinMonster is a paid pop-up plugin that offers a wide range of functionality. It comes with an easy-to-use form builder that allows you to create various types of opt-in forms including WordPress popup forms, floating header and footer bars, slide-ins also known as scroll triggered boxes, sidebar forms, after post forms, in-line forms, mobile-specific forms, and welcome gates. Other features are exit-intent technology, page-level targeting, behavior automation and A/B testing, and a 2-step opt-in process.

PopupAlly
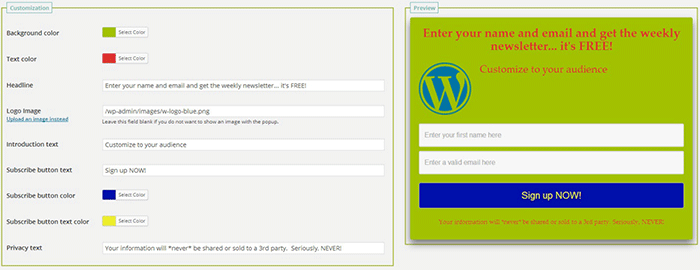
popupallyPopupAlly’s free version allows you to create advanced popup signup forms even if you don’t know how to code. You can also embed opt-in forms at the bottom of your posts, set a few seconds’ delay or have the pop-up appear as the users leave your site.

Its premium version, PopupAlly Pro, has an optimized interface and extra features. This includes more customizable templates, more opt-in options (horizontal, sidebar, below-the-post, etc) and allows for any web fonts to be used. Click-based and scroll activation timing features and one-on-one email support are available only with the premium version.

Hello Bar
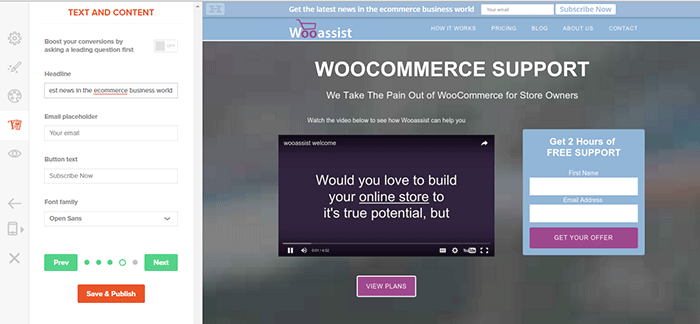
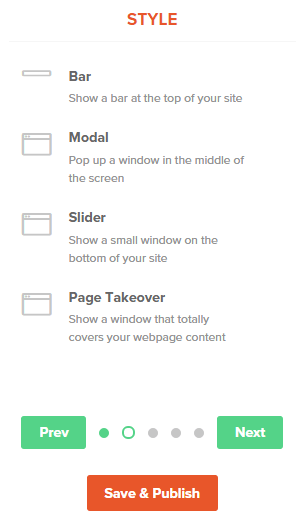
hellobar_wooassist pagehellobar_style menuHello Bar is a free plugin that allows you to copy and paste a code snippet from HelloBar.com straight to your WordPress admin interface. Above is the HelloBar interface from the website. You can choose from several goals like grow your email list, promote your social pages, promote an offer, or add a contact form. You can choose from several styles of opt-in forms and even change the colors to match your website’s colors. To set up HelloBar, just visit the site to configure. The interface is very straight forward so you should have the design in minutes. To apply this to your site, just install the free plugin that is generated specifically for your website. This plugin will only work for the site that you registered it for. You can just create a new one for another site.

This plugin also comes with A/B testing so you can easily optimize for increased conversion.

Ninja Forms
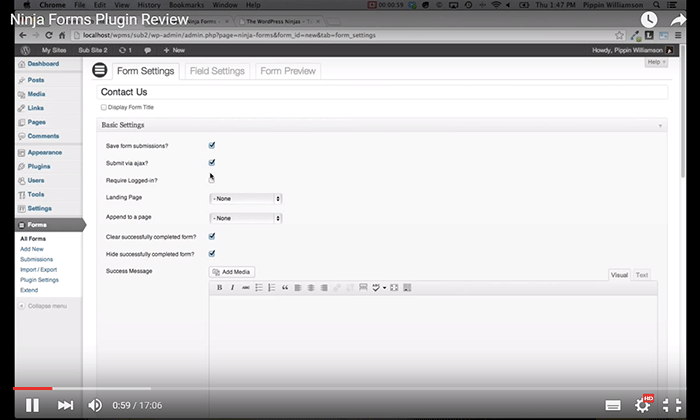
ninjaformsNinja Forms is a plugin built with developers in mind. Included are hundreds of functions, action hooks, and filters that developers can use to create their own custom functionality. Customize field options and forms with its extensive settings. Add a Ninja Form to your e-commerce site easily with a widget, shortcode, template function, or append it automatically to any content. Upgraded bundles include automatic updates, add-ons and sites per add-on, and email support with faster response time.

Which Opt-in Forms Leads to More Conversions?

arm-wrestling-2There is no single correct answer to this question. Different websites vary in terms of design and market. This article could help point you in the right direction, but there are a lot of things you need to figure out for yourself. Get to know your customers by creating a customer persona. When you are able to identify your customers, you’ll know how to market to them. From there, you can create a sales funnel that works for you. Use heat maps like CrazyEgg to find out where your visitors click. Constant A/B split testing will help you determine what variation converts better.

Conclusion

Opt-in forms should be placed strategically throughout your website. Optimize them so they are easily visible. Make them stand out. These forms should offer value and relevance to encourage users to subscribe. Enhance copy with visual elements and keep form fields to a minimum. If you decide to use pop-ups, you need to time them correctly so as not to be intrusive. Make sure you’re getting the most of your opt-in plugin’s features without sacrificing site performance. When your opt-in forms are set up, you need to conduct your own split testing to optimize for maximum conversion.

Hope this article helped you out. Do you have any strategies you’d like to share for increasing opt-in form conversion? Do you want to add something that we might have missed? Let us know in the comments section.
Filed Under: How-To Articles, Theme and Plugin Reviews Tagged With: best practices, conversion optimization, design tweaks, how-to, marketing strategy, plugins, PopupAlly, website development, WordPress

Storefront Theme Review

January 1, 2016 By John Leave a Comment

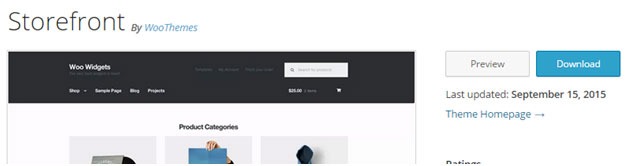
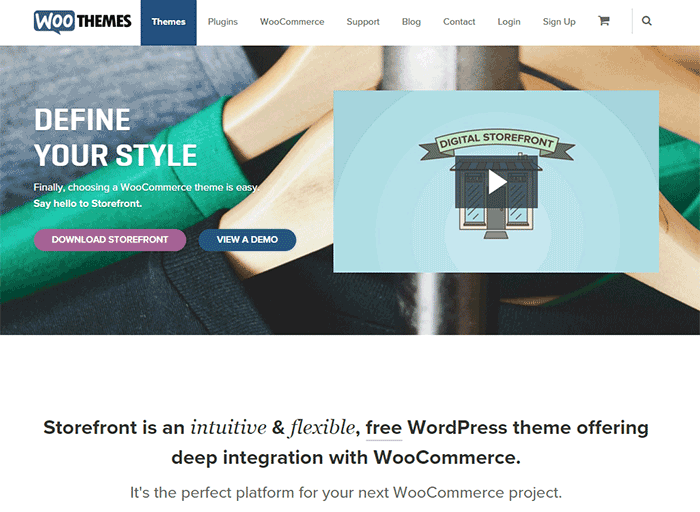
Storefront is the official WooCommerce theme built to the same high standards as WooCommerce itself. Best of all? It’s free!

storefront

A Storefront theme review is due. Here’s what’s included in this article:

  • Storefront Theme Overview
  • Storefront Key Features
  • What Makes Storefront Great
  • WooCommerce Integration
  • Storefront Setup
  • Arrival of Storefront 1.5
  • Storefront WooCommerce Styling
  • Popular Storefront Extensions
  • Choosing A Theme

Why WooCommerce?

WooCommerce is still the most popular e-commerce platform.

This open source e-commerce plugin for WordPress was launched in 2011 and is aimed at small-to-medium online merchants already comfortable with a WordPress set up.

There are a lot of free and premium themes to choose from, one of the most popular is – Storefront.

Storefront Theme Overview

Storefront is described as an intuitive, lightweight, and flexible theme offering deep integration with WooCommerce. It has several layout and color options to personalize your shop, multiple widget regions, a responsive design, and much more.

The main goal in developing Storefront is to provide a rock-solid foundation for your WooCommerce store without extra bloat or features.

It comes to no surprise that it reaches up to 3,000 downloads per day:

Integration:

Storefront theme is built and maintained by the same team that developed WooCommerce. This is why the integration between WooCommerce, its extensions, and Storefront is water-tight.

No Conflicts:

For e-commerce sites, uptime is of utmost importance. With the new Storefront, there will be no conflicts between theme and plugin during major WooCommerce updates.

storefront-reviews

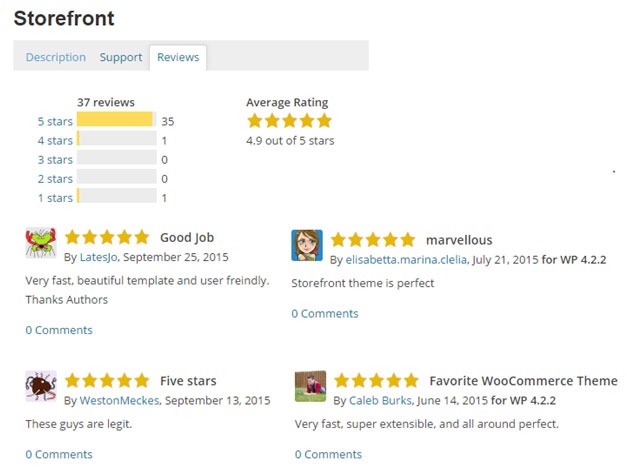
Here’s a glimpse of some of its great reviews:

Solid Foundation:

Based on the popular Underscores starter theme, Storefront features a responsive layout, and schema markup for enhanced SEO performance.

Clean and Simple:

storefront-clean-simple-design

Storefront allows you to customize your store to match your brand by providing a clean and simple design.

Storefront Key Features

Most store owners want their e-commerce theme design to be simple and flexible. Storefront can offer exactly that.

Here are some of the key included features:

WooCommerce Integration

storefront-woocommerce-integration

Storefront features an unrivalled deep integration with WooCommerce. Of course, having been developed by WooCommerce authors, this integration is compliant with the latest WooCommerce developments and standards.

Lightweight and Robust Core

Storefront-Lightweight-and-Robust-Core

Storefront is based on Automattic’s popular underscores starter theme. Its codebase is under constant review ensure it is kept nice and clean to provide as little disruption and conflicts as possible..

Design Customization

storefront-design-and-customization

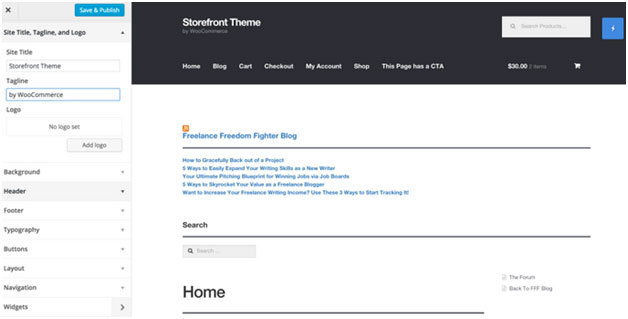
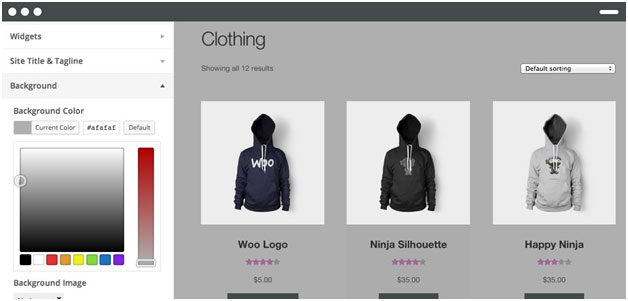
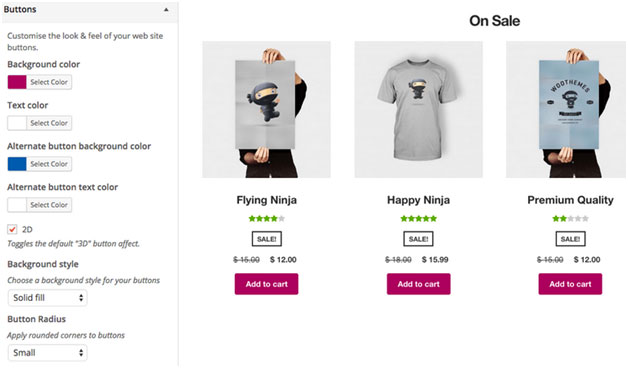
Every store owner would want to create a look and feel that matches their business. There are several display settings in Storefront that let you customize the design of your page to meet your requirements. Settings are all accessible in the WordPress Customizer.

What Makes Storefront Great

what-makes-store-front-great

The Storefront philosophy is to do one thing well and provide a solid foundation for your online store. Although the theme appears to be plain, it’s meant to be a starting place that includes deep WooCommerce integration.

Keep in mind that simple is usually more profitable. Unless you are spending a few grand on a professional designer then the fancy design you try and add yourself will most likely distract the user and lose sales.

No Shortcodes and Page Builders

Shortcodes in WordPress are little bits of code that allow you to do various things with little effort. You only get what you need with Storefront, which means you won’t encounter any superfluous shortcodes and page builders.

The Storefront team believes that not including these features allows you to add them via whichever plugin you prefer. Even if you switch themes later on, all of those features will remain. According to the release announcement, Storefront was built with data portability in mind. This means that users will be able to switch themes without losing their content.

Appropriate Sliders

Whether you should use slider is a highly debated topic. While other WordPress themes bundle sliders, Storefront lets you choose the appropriate plugin for your slider needs if you decide you do want one. It is also compatible with the WooSlider plugin.

WordPress offers many slider plugins to add them to your home page, landing pages, posts, or anywhere you want.

storefront-slider

Schema Markup

Schema markup is code that you put on your website to help the search engines return more informative results for users. The content on your website gets indexed and returned in search results. Storefront has valid schema markup for improved SEO performance.

Display Options

storefront-display-option

In addition to attractive products, the design of your shop is equally crucial. It’s important to make a good first impression with the help of professional design. With Storefront, you can change the look and feel of your store in a few clicks, and see your tweaks in real-time.

Responsive

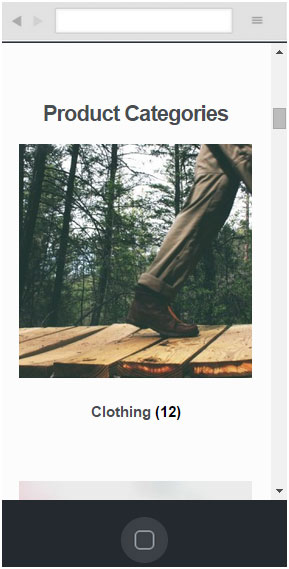
If your site can’t be viewed effectively on mobile devices, you could be losing almost 50% of your customers.

Storefront on mobile device:

storefront-on-mobile

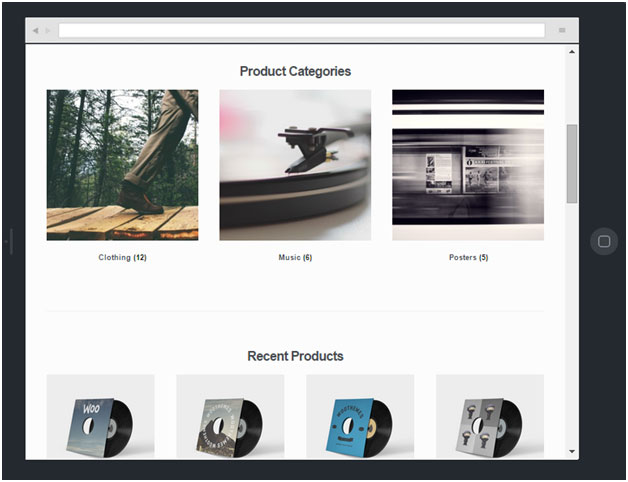
Storefront on tablet:

storefront-on-tablet

Non-responsive sites are now considered second-class businesses by Google. Storefront will adapt and display beautifully whether you view your store on a laptop, desktop computer, or handheld device.

Localized and Accessible

Storefront is fully localized and ready for your translations. It also adheres to the strict wordpress.org accessibility guidelines. That is why your store will be accessible to the widest audience possible.

Custom Homepage Template

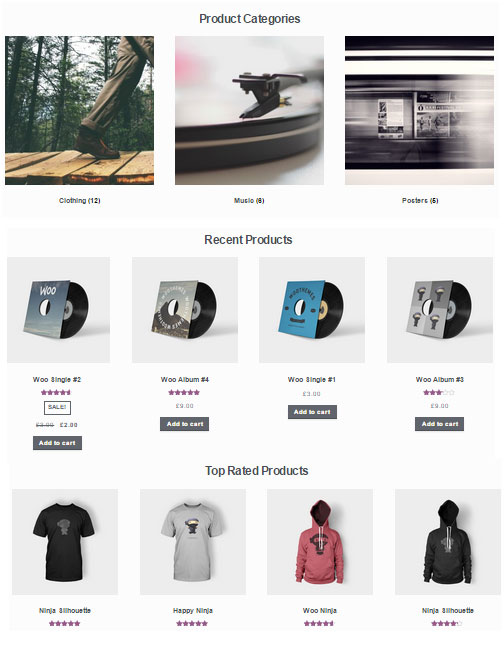
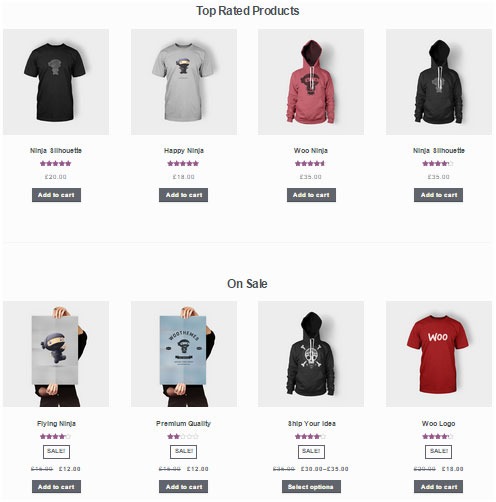
The homepage template in Storefront has been tested for user experience and conversion. It displays product categories, recent, featured, on sale & top-rated products.

storefront-custom-homepage-template

It’s a great start for most small businesses to immerse the visitor in your products, while providing enough flexibility to promote the products that will make you the most profit.

WooCommerce Integration

It includes deep integration for WooCommerce and it’s most popular extensions. This means everything will look nice straight away and you won’t have to hire a professional developer or designer to make things fit in.

Some of the more popular extensions supported are:

WooCommerce Bookings

storefront-woocommerce-bookings

This extension is perfect for those wanting to offer services, appointments, or rentals. It allows you to sell your time or date based bookings, adding a new product type to your WooCommerce site.

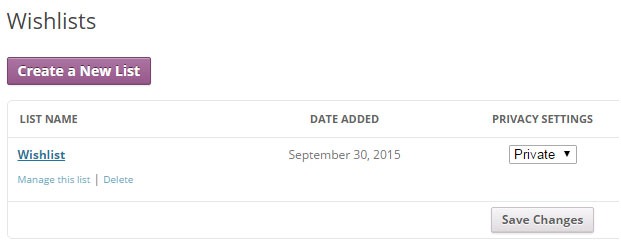
WooCommerce Wishlists

storefront-wishlist

From birthdays to weddings, and everything in between, this extension allows guests and customers to create and add products to an unlimited number of Wishlists.

WooCommerce Brands

storefront-brands

This extension for WooCommerce allows you to create brands for your shop; each brand can be named, described and assigned an image.

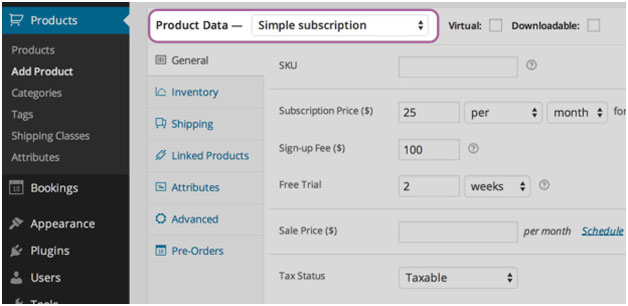
WooCommerce Subscriptions

storefront-subscriptions

WooCommerce Subscriptions is an extension that allows you to introduce a variety of subscriptions for physical or virtual products and services. Create product of the month clubs, weekly service subscriptions, or even yearly software billing packages.

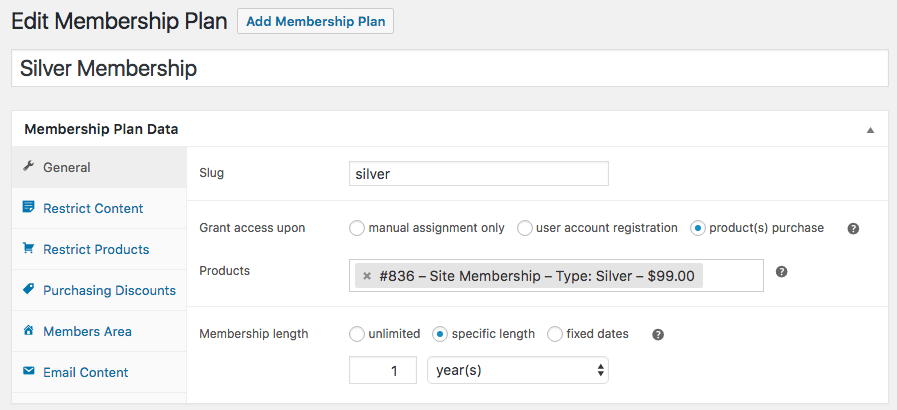
WooCommerce Memberships

WooCommerce Memberships

WooCommerce Memberships allows you to create a membership system that is tied completely to your WooCommerce Store. It is fully compatible with Storefront theme. You can restrict content to certain memberships classes. You can also turn your store into a membership club by restricting purchases to members. Among other useful features, you can even give members special discounts.

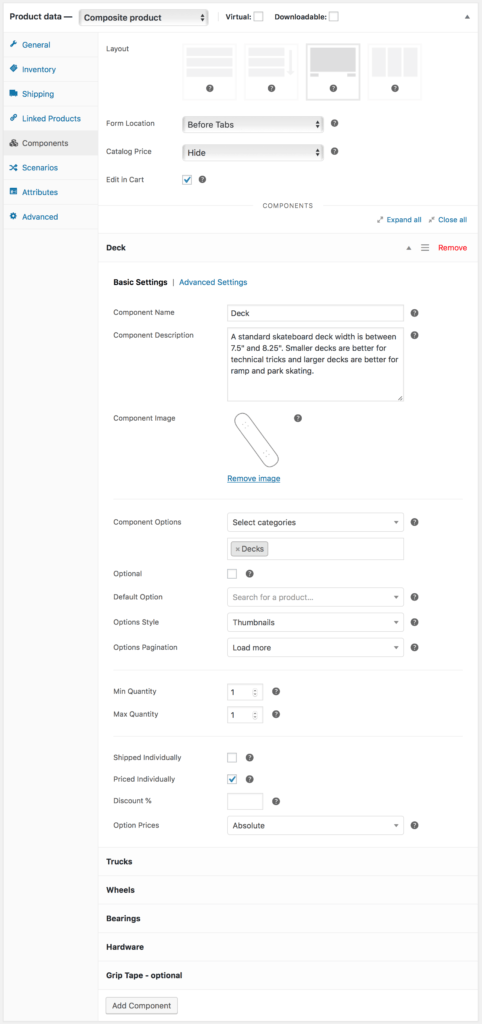
Composite Products

Composite Products allows you to create customizable products for your WooCommerce store. It is now fully compatible with Storefront theme. You can allow your customers to customize certain parts of their order.

WooCommerce Composite Products

Storefront Setup

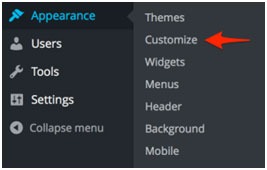
Almost all of the Storefront setup can be done via the theme Customizer.

storefront-setup

The easiest way to install Storefront is through the WordPress dashboard.

  1. Navigate to Appearance > Themes > Add New
  2. Hover over the Storefront screenshot and click the ‘Install’ button to install the theme.
  3. Activate Storefront as you would any other WordPress theme.

To install Storefront manually:

storefront-manual-install
  1. Download the latest version here.
  2. Upload the extracted folder to the /wp-content/themes/ directory on your server via FTP
  3. Activate Storefront from the Appearance > Themes screen in your dashboard

Read more on how to install and use themes here.

Menus

Storefront has two menu locations, Primary and Secondary. If you do not assign a Menu to the primary navigation, it will display each of your pages. On the other hand, the secondary navigation will display nothing.

storefront-menus

After activating Storefront for the first time, you won’t see anything in the secondary navigation. Here’s your guide to creating and assigning menus to theme locations.

Page Templates

Storefront comes with just two page templates.

Full Width

storefront-fullwidth

This is just a standard page template without a sidebar, allowing the content to span the full width of your site.

Homepage

storefront-homepage

The homepage template allows you to display a multitude of products and product categories.

Here’s a Woothemes guide on installing and configuring Storefront.

Arrival of Storefront 1.5

After the success of Storefront comes the newly improved Storefront 1.5, which achieves another coveted tag on wordpress.org. Its primary feature? A support for right-to-left languages in Storefront. The traditional RTL support standard overloads an additional stylesheet on top of the primary one.

storefront-version1-5

With Storefront 1.5, if you install WordPress in a right-to-left language, the theme will automatically recognize it. It will then load a different set of stylesheets tailored to that language. This makes Storefront a stronger global theme solution for WooCommerce.

You can also expect the following improvements:

Integration with More Extensions

storefront-integration-extentsion

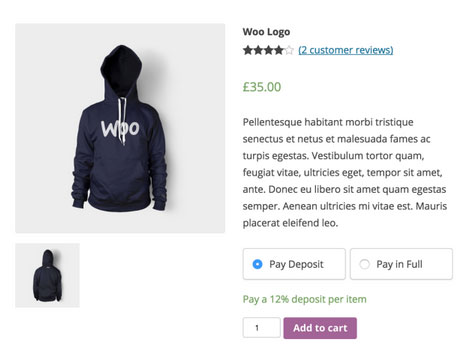
Storefront 1.5 has increased the number of customer-facing extensions it integrates with to 11. It offers added support for WooCommerce Deposits and Product Bundles.

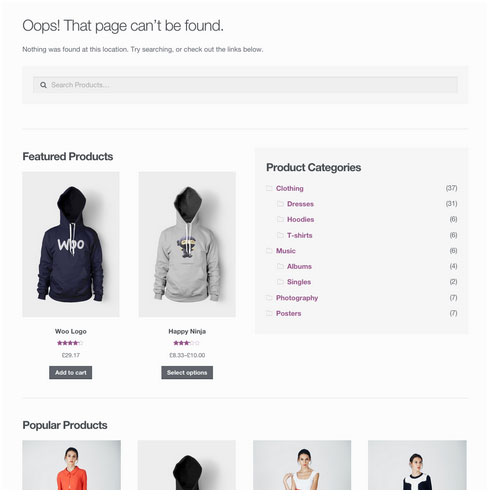
Revamped 404 Page

storefront-revamped-404

Storefront 1.5 is now made to be more useful to folks browsing a shop. The new 404 page now includes a product search box, links to product categories, featured products and popular products.

Featured Images

The previous version of Storefront didn’t cater to adding featured images to pages. Now, once you add a featured image to a page, it will appear on the frontend directly above the page title.

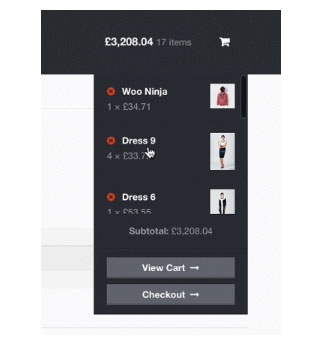
Scrolling Header Cart

storefront-header-cart

Considered a handy feature, the header cart lets visitors access their cart total, and the number of items it contains. It also reveals the carts contents upon hover. Using Storefront 1.5, the cart dropdown now has a set height that scroll as more items are added.

You can check out their awesome video about Storefront here.

Storefront WooCommerce Styling

A lot of themes we see, from Themeforest especially, do not style WooCommerce according to the best practice standards set by the Woocommerce authors.

The most common problem is overriding templates.  This causes the cost to update WordPress, Woocommerce and the theme itself to sky rocket down the track. You won’t have this problem with Storefront.

Shop Pages

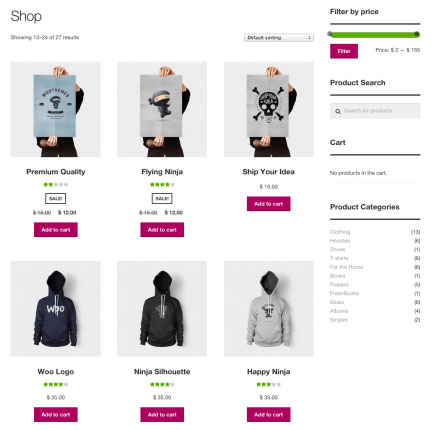
storefront-shop-pages

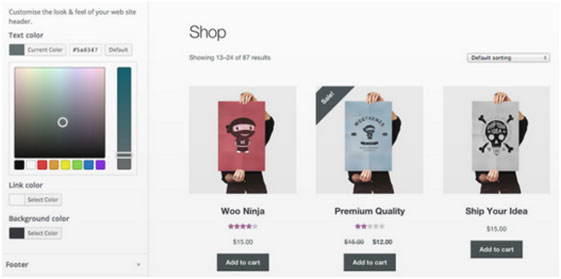
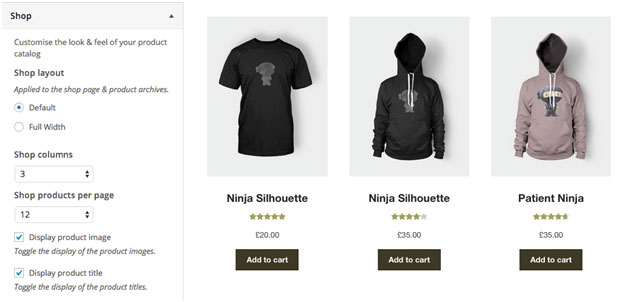
When it comes to shop pages, you can style for all product details and WooCommerce widgets, such as the price filter. The number of products per page is also automatically adjusted to 12.

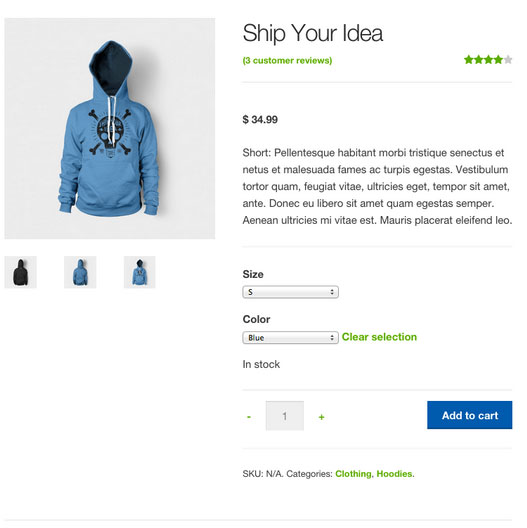
Single Product Page

storefront-single-product

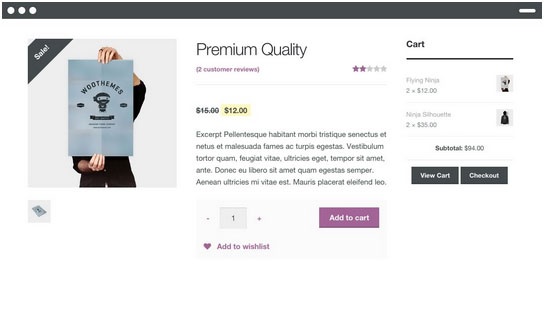
Single product pages include appropriate WooCommerce styling as well. The product tabs are presented in a vertical layout, and the number of related products is adjusted to three.

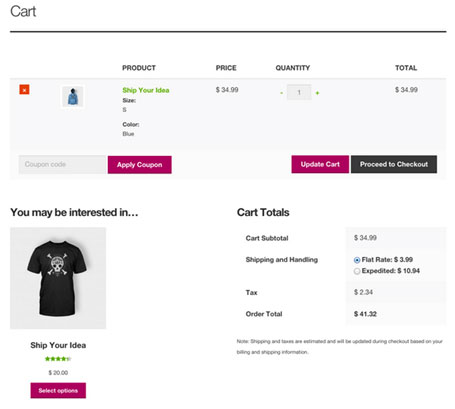
Cart and Checkout Page

storefront-cart-checkout

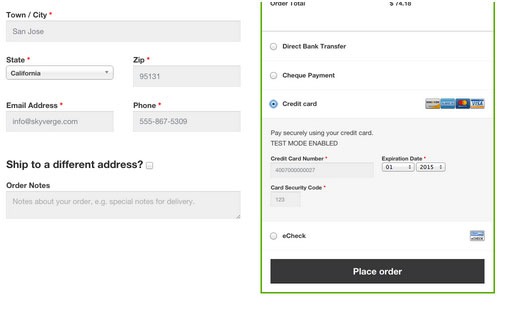
The checkout template features a two-column layout, with customer details on the left, and order details on the right. The ‘Place Order’ button is also always in view, making it easy to complete orders for customers.

storefront-place-order

And Now, It’s Storefront 2.5

Improved Mobile Design

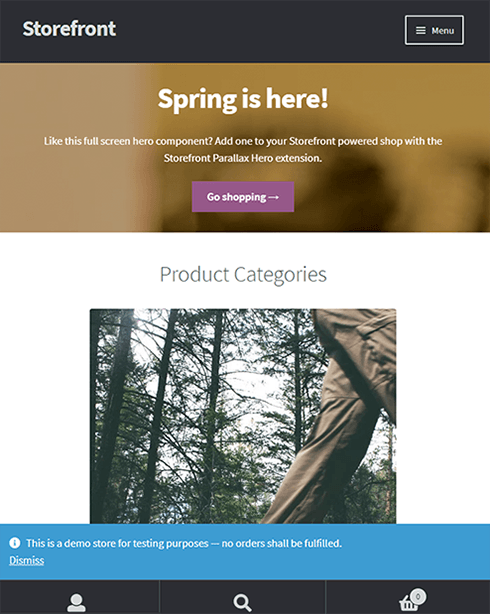
From Storefront 2.0 and up, the theme now offers an improved mobile design for better mobile experience. The header section has been redesigned so that the content appears further up. This ensures that your visitors see more of the content on your WooCommerce store right away.

Storefront 2.0 Mobile View

New typography

Storefront 2.0 and up introduces a new font. Default font for WooCommerce has been changed from Helvetica to Source Sans. The font change provides users “greater depth and cohesion”. Some other small changes have been made to the design to fit the new font.

Introducing “Best Selling” Products

The theme also now offers a “best selling” products section on the home page. This is separate from product categories, recent products, featured products, top rated products and on sale products. Also, “Recent Products” has been renamed to “New In” and “Featured Products” have been changed to “We Recommend”.

Improved Appearance for Better Overall User Experience

Some other small changes have been put in place for better user experience. These include changes to styles, tables and embeds. The developers have also integrated with WordPress 4.5’s custom logo functionality. Adding a logo to your WooCommerce store is now made easier. Now there’s no need to install a plugin just to add your logo.

Popular Storefront Extensions

While Storefront provides a lot for free, there are some premium \add-ons that can add functionality or styling options to the theme.

Storefront WooCommerce Customiser

storefront-customizer

Without any custom code you can change or adjust labels and number of products displayed in homepage sections, which product details are shown on shop pages, and more.

It also lets you remove the product search and cart from the header.

Storefront Designer

storefront-designer

The Storefront Designer plugin adds the ability to change header layouts and make the header remain at the top of the page on scroll (sticky header). It also allows you to adjust button layouts and styles, and change some typography options.

Storefront Parallax Hero

storefront-paralax-hero

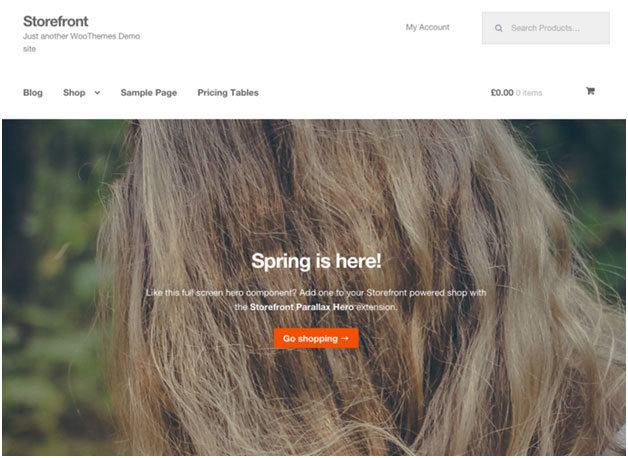
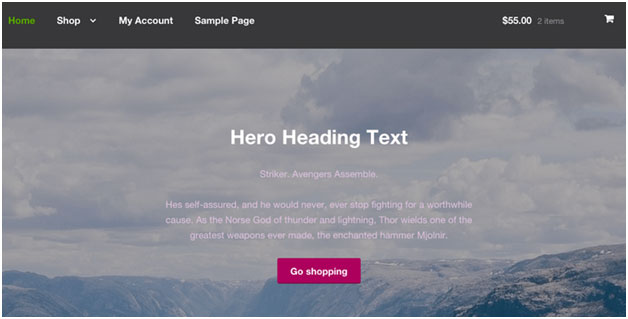
This plugin can be used to display a message and call to action over the top of an image on your homepage. It has a parallax effect, which means as the user scrolls the text and button appear to move over the image.

Child Themes

What is a child theme? According to the WordPress Codex:

A child theme is a theme that inherits the functionality and styling of another theme, called the parent theme. Child themes are the recommended way of modifying an existing theme.

In the case of Storefront, Storefront is the parent theme. You can check out the available child themes here.

Importance of a Child Theme – Easy and Safe Updates

When using a child theme, you will not lose any custom code or any custom styles that you have added to the child theme whenever you update the parent theme. Many website owners have learned the hard way losing custom code they have added to their themes after updating it. If you have a child theme, your custom updates are safe whenever a new version of the parent theme is available. We still recommend creating website backups every time you update your theme though.

Storefront: The Final Analysis

Simple, clear, and customizable, the Storefront theme for WordPress has everything to help you achieve success in e-commerce. For a free theme, the design is simple and no-nonsense and WooCommerce integration is unmatched by any other theme.

It may be too plain for some and if you are one of those, just ask yourself. Is it your personal taste and desire for it to look pretty, or is it a decision based on your user experience and the ultimate profitability of your site? In our experience, often the simpler the site the better is the user experience and the more profitable the website.

However, if you can’t find a Storefront child theme that resonates with you and don’t want the cost of a professional designer you might want to take a look at http://www.studiopress.com. They are the only other theme author we recommend if you don’t want to have troubles down the track when it comes to updates and customizations. It will take a bit more time to integrate with WooCommerce, but they have some lovely designs.

Filed Under: Theme and Plugin Reviews Tagged With: 404 error, checkout form, child theme, e-commerce, mobile friendly, plugins, shopping cart, Storefront, WooCommerce, woothemes

How to Create a Custom 404 Error Page for Your WooCommerce Store

February 25, 2016 By John Leave a Comment

What is a 404 Error

A 404 Error is an error message displayed when an accessed page is not found in the server that you want to access. It is a standard response when an entered address does not match a data from a server.

This happens when you rename, move, or delete a page. This message also appears when the URL is incomplete, mistyped or misspelled. You can change the way your WooCommerce store responds to this error by redirecting or just letting your visitors arrive at a custom 404 Error page.

Creating a Custom 404 Error Page

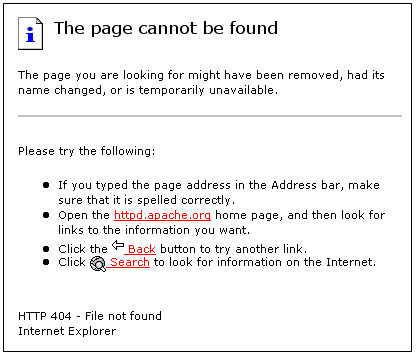
default-404-error-page_screenshot-pngYou can actually just leave it and most websites would just send out a typical text response. So why create a custom 404 error page for your Woocommerce store? A lot of people are highly visual.

Web design is a huge factor in discerning a company’s credibility. Zabisco found out that 40% will respond to visual information better than plain text. This alludes to the importance of creating a visually-appealing custom 404 error page.

Custom content will not only boost your branding but will make customers have a more positive view of your company. Custom content is one of the many reasons that make a customer feel positive about your website.

Statistics/Case Studies on 404 Error Pages

From a search engine ranking standpoint, 404 error pages will not hurt your ranking per se. It only matters when an important link in your site returns a 404 error. This important link could be your “about” page or “contact” page. Your rankings could suffer since these important pages are actually ranking factors.

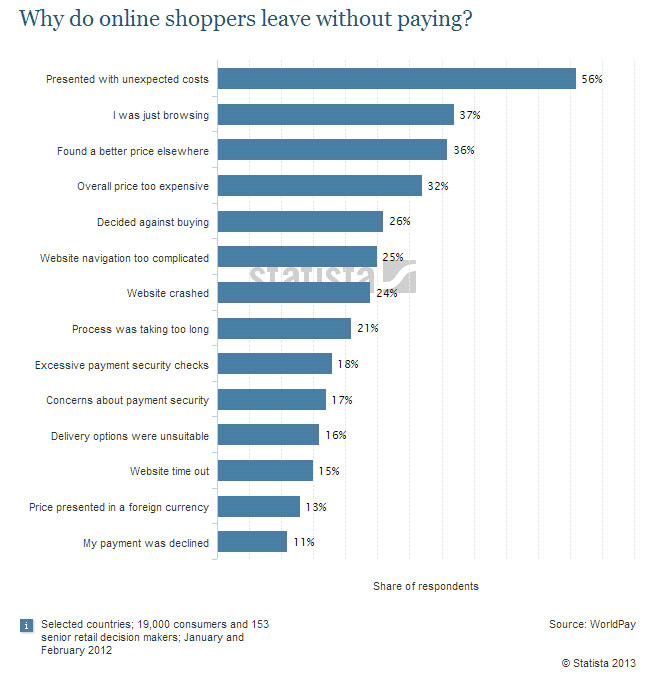
Any other 404 error could also frustrate your visitors and just leave your website. Shopify surveyed why online retailers are losing 67.45% of their sales. They discovered that some of the most common mentioned issues are website problems.

Shopify-survey-why-online-shoppers-leave_screenshot-png

A 404 error also affects a website’s bounce rate. A bounce happens when a visitor comes to your website, does not click on any other page and leaves. Search engines like Google use bounce rate as ranking factor.

A high bounce rate raises several red flags for your WooCommerce store. It may imply poor user experience and your website may be deemed irrelevant to your market.

Elements of a Custom 404 Error Pagelabyrinth

Now before you go and make any changes, keep in mind that each theme is different. There are different ways on how you can create a custom 404 Error page. Here are some important things that you need to consider.

Use Simple Language

A regular site visitor will not understand a typical technical 404 message. Use simple human language to inform your site visitor of what went wrong. You can even use language translations or location specific pages. The goal is to deliver a clear message.

How You Can Help

Apologizing and offering a helpful suggestion should be the main theme. The aim is to change the negative experience from 404 pages into a positive one. You can do this by:

touch-screen_touchscreen

  • Adding a search box
  • Showing your menu navigation
  • Adding a contact, subscription or ticket submission form
  • Adding a sitemap, category lists or key links
  • Linking popular posts or social media accounts
  • Giving out coupons, discounts, or other offers

Time spent in your site should not end in your 404 page. These elements are also engagement and conversion boosters. Your customers stay happy and you get a positive rep.

Examples of Good 404 Error Pages

A lot of huge brands out there appeal to human emotions in their marketing strategy. This is because customers are not buying products, they buy the experience. 404 Error pages in the past are just simple text warnings. Websites now use humor or a bit of personality to communicate their brand to the customers. You can use graphics, animations, or even videos. Here’s some inspiration to get you started.

Popscreen

Popscreen showcases a clean and bright but simple and straightforward 404. You can see a link to the home page and popular videos as well as search bar.

404-error-page_Popscreen_screenshot

GOG

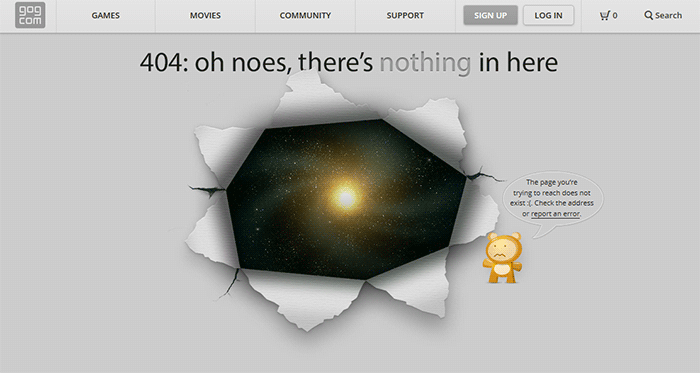
GOG displays a unique design to say that you lost your way. The 404 error page retains the navigation and footer menu so it is easy for users to navigate. Users can also report the error.

404-error-page_GOG_screenshot

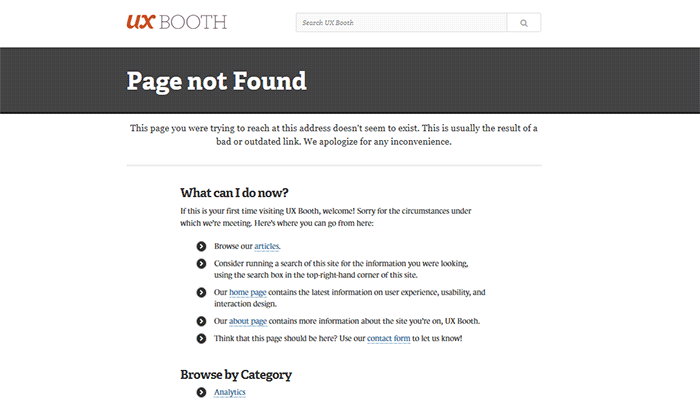
UX Booth

The UX Booth 404 error page uses simple, concise and direct language and an immediate apology. The page suggests popular links on the website as well as the list of categories. It also retains the footer links and the search bar.

404-error-page_UX-Booth_screenshot

Average Joes Blog

Average Joes Blog is a good example of category-rich 404 error page. In fact, the 404 error page is a replica of the home page.

404-error-page_Average-Joes-Blog_screenshot

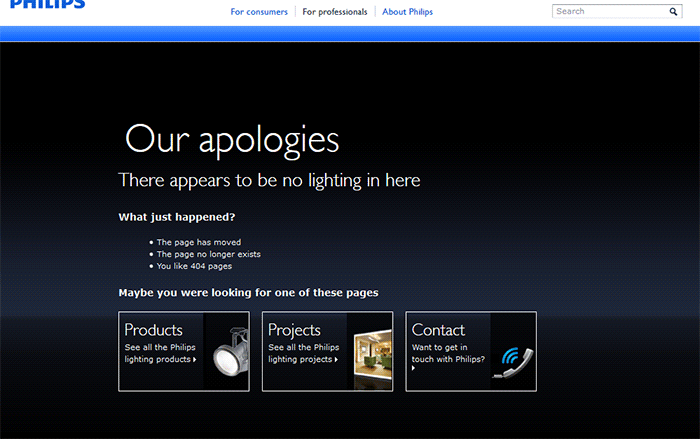
Philips

Philips goes creative and witty with its 404 error page. It mentions the absence of lighting then explains what happened and suggests popular links.

404-error-page_Philips_screenshot

Email Center UK

The Email Center UK website uses humor. Since you are at an error page, it means someone messed up and you get to choose who to fire for the fiasco. Below all that is a simple link to the home page.

404-error-page_Email-Center-UK_screenshot

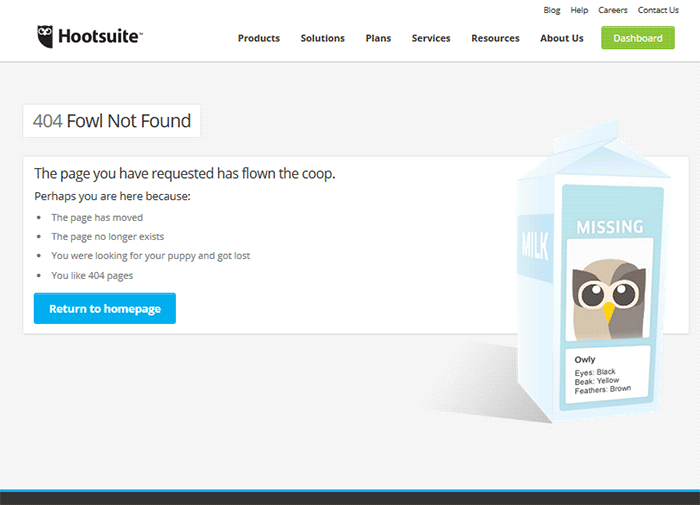
Hootsuite

The Hootsuite 404 error page lists down possible reasons for the error. They used ‘fowl” language to keep the identity of the brand/mascot.

404-error-page_Hootsuite_screenshot

IMDB

The IMDB 404 error page uses a simple layout with a clever idea. Every visit to a 404 error displays a random movie quote. Movie buffs will definitely find this entertaining. A convenient link to the home page is also positioned at the top.

404-error-page_IMDB_screenshot

404-error-page_IMDB2_screenshot

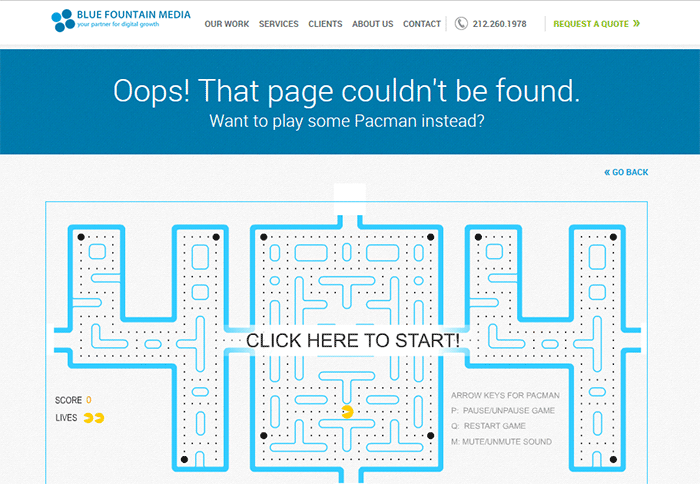
Blue Fountain Media

Blue Fountain Media makes a 404 page that you will look forward to – an actual PAC-MAN game. They retained their main navigation and a “Go Back” link that takes you to the last visited working page.

404-error-page_Blue-Fountain-Media_screenshot

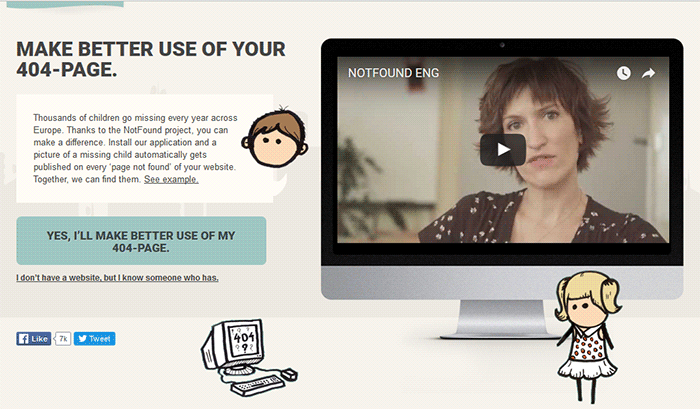
Not Found Org

NotFound.org actually uses its 404 error page to achieve a goal. It is an app that you can install in your website. It lets you customize your 404 page to help their cause – find thousands of children that go missing every year.

404-error-page_Not-Found-Org_screenshot

Creating a Custom 404 Error Page

Now that you have some inspiration, it’s time to create your own. You can check out WordPress’ basic guide here if you are able to code, if not you can check out the plugins below.

Since WooCommerce is installed on the WordPress platform, you can use the power of WordPress plugins to create awesome About Us pages.

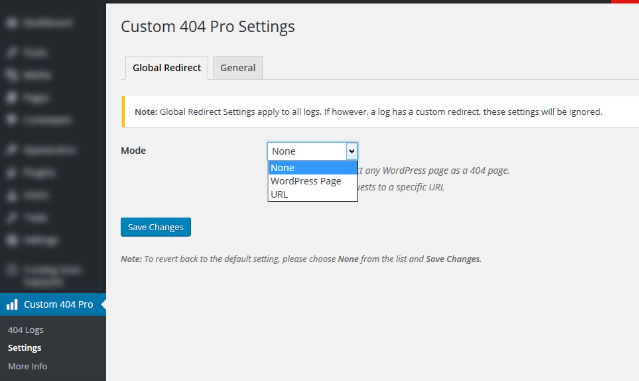
Custom 404 Pro

The Custom 404 Pro plugin lets you override the default 404 page with any page of your choice. To set your custom 404 error page:

  1. Install and activate the Custom 404 Pro plugin.
  2. Create a new page that you want to use as your 404 error page.
  3. Click on Custom 404 Pro on your WordPress Dashboard and then click on Settings.
  4. Set the page or URL that you want to use as your 404 error page and then click on Save Changes.

Create-custom-404-error-page_Plugin_Custom-404-Pro-Settings

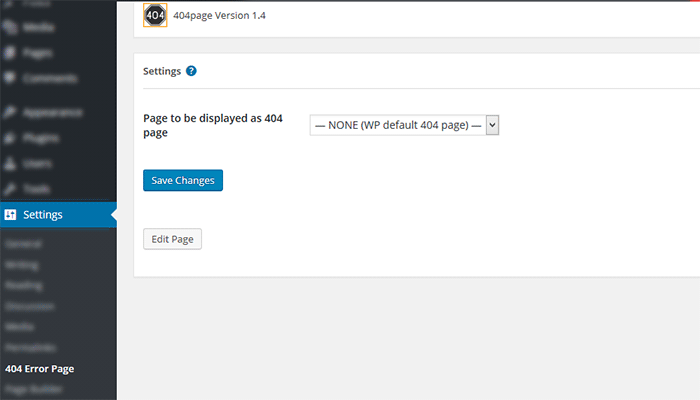
404page

404page is another easy plugin to use to create custom 404 error pages. To create a custom 404 error page using the 404page plugin:

  1. Install and activate the plugin.
  2. Create a new page that you want to use as your 404 page.
  3. Click on Settings and then choose the page that you want to use as your 404 error page.
  4. Click on Save Changes.

Plugin_404page_Create-custom-404-error-page

Test Your 404 Error Page

To test if your new 404 error page is working, just pop any non-existent URL in your domain on your browser. If your new 404 error page does not appear, check if your website is set to redirect to your new 404 error page.

Create-custom-404-error-page_Plugin_404page

Conclusion

404 Error Pages can be annoying but you can use them to your advantage. Customize them to boost engagement and conversion. Align your new 404 error page with your brand image and website goals. It will do wonders for your WooCommerce store and your brand. Do you have any other suggestions for creating a good 404 error page?

Filed Under: Code Snippets, How-To Articles Tagged With: best practices, design tweaks, navigation, plugins, redirection, WordPress

How to Create an Awesome About Us Page for your WooCommerce Store

March 3, 2016 By John Leave a Comment

awesome about us page main-imageYour e-commerce site is the face of your company and your brand on the web. Your “About Us” page tells your visitors who you are and what you do. In this post, we will teach you how to create an awesome About Us page.

What is an About Us Page?

The About Us page introduces your brand to your visitors. More people check a website’s About Us page before making online purchases.

About Us Page Statistics

According to the NN Group, while most websites do have an About Us page, these websites often do a poor job of presenting their About pages. They also found that there are more people who couldn’t find information about a company or organization. Factual information from these websites was replaced by out of place marketing. As a result, the subjective satisfaction of website users decreased from 5.2 to 4.6, on a 1-7 scale.

Importance of an About Us Page

Increased Trust Rating

People who shop online check for proof that the company they are buying from is legit. Showing your website’s legitimacy boosts your credibility. This just shows that consumers are very wary of where they spend their money. The About Us page helps you show consumers that you are worthy of their trust, money, and time.

Increased Conversion

In another study, consumers spent five times more when shops tweaked their About Us page. They even spent 22.5% more, on average. These figures may rise depending on how good your About Us page is. Increase your profit by connecting with your visitors on a more personal level.

about-us-boost-conversion

SEO Opportunity

The SEO opportunity in About Us pages is no rocket science. This page can just contain more keywords related to your niche than other pages in your website. It’s a good idea to fit niche-related keywords all over the page, just don’t over-optimize.

Increased Engagement

Adding important internal links, other media and links to social media pages can help increase engagement. You can also add a contact form to serve as a lead generation tool to gather emails.

What Info Should I Put on My About Us Page?

Before creating an About Us page, here are a couple of things you need to do.

First, identify your audience or target market. Better yet, create a customer persona. Use this knowledge to customize the content on your page and reach out to that audience. Stay away from the typical general corporate-speak. Rather, use a personal but professional tone and feel.

Second, provide key context. The About Us page should show what your customers want to know about you. Every element, from text to multimedia, should be a part of your story. Make this page appear ‘human’. Customers enjoy getting a sense of the company behind a product and website.

How to Structure Your About Us page

Teaser or Tagline

This is a brief phrase or statement that summarizes your organization. Copyblogger was witty enough with their power statement. What is your company about in a nutshell?

about-sample-copyblogger

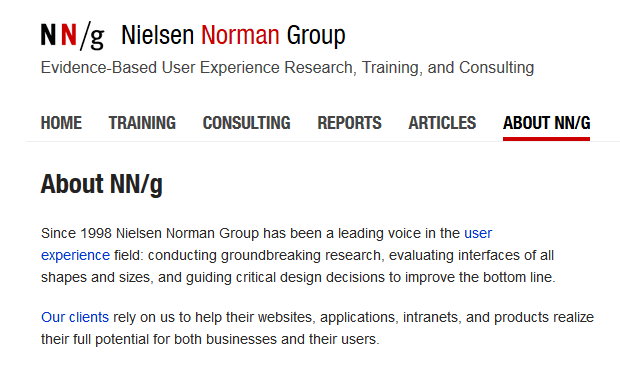
The Round-Up

This section usually contains a paragraph or two. It features your company information, vision, goals and main accomplishments. Be careful not to overdo this by using empty superlatives. The goal here is to provide information and not to gloat.

about-sample-nng
A straightforward About Us page example from the Nielsen Norman Group.

Quick Facts

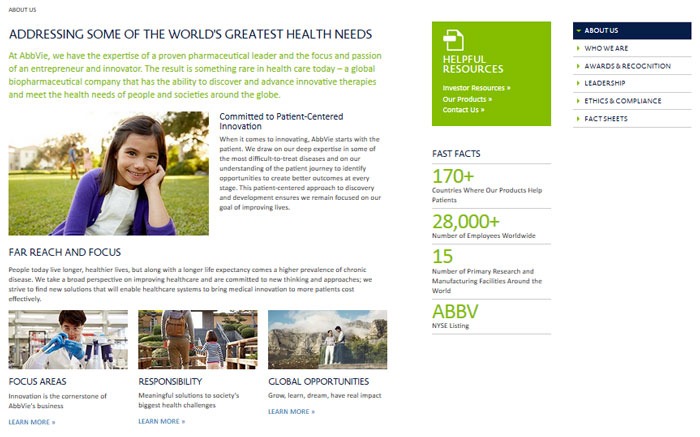
Add some quick facts on your About Us page. This can come in different forms. You can add information about your team, history, performance, or your office culture. Stay with the facts and let your customers be the judge. Get creative by using different multimedia or graphic elements. Just remember that whatever you put should be accurate and verifiable.

about-sample-abbvie
Easy on the eyes information from AbbVie.

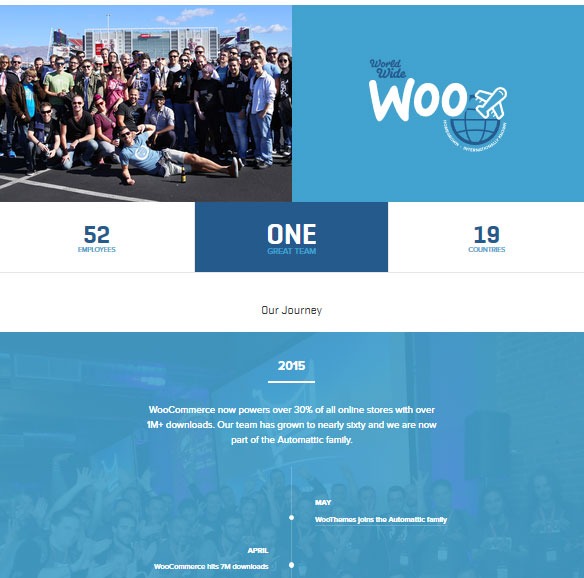
about-sample-woothemes
Simple but informative layout from Woothemes.

Outsider’s Perspective

If you have industry awards, reviews and testimonials, let them be known in your About Us page. If you have a lot, you can add some highlights in the About Us page and link to a sub-page where the rest of the info is placed.

about-sample-blue-fountain-media-awards

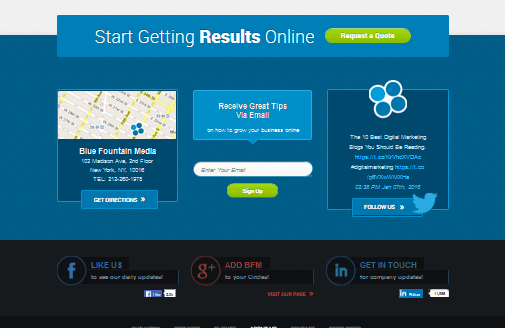
Engagement

This is an avenue for interaction. Add elements like a contact form, social media buttons, and calls-to-action.
about-sample-blue-fountain-media-2

Introduce Your Team

Adding information about the people behind your company will boost your credibility. Take time to post photos or some quick information about your team. The National Center for Biotechnology Information found that photos inflate subjective feelings of truth.

How to Create an Awesome About Us Page

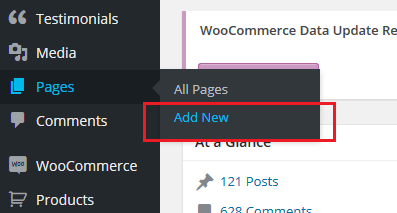
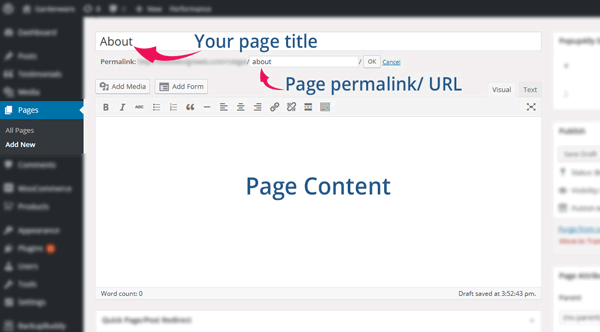
You can create your About Us page just as you would any other page. Some WordPress themes have a built-in special About Us page template. If your theme does not have that, you can create a simple About Us page by going to Pages and clicking on Add new. Add your content and then click on Publish to save your page.

about-us-add-new-page

Add content to your About Us page as you would to any other kind of page.

about us create page add content
Name your page “About”, “About Us” or “About ”. Use the same for the permalink.

about us create page

How to Add Your About Us Page to Navigation Menu

Once you’re done saving your page, you need to add it to your navigation menu. Go to Appearance > Menus.

To display your About Us page in your menu navigation, select About Us page in the list of pages. After that, click Add to Menu. Drag it to desired position. Click on ‘Save Menu’ when you’re done.
Plugins that Can Help Create an About Us Page

Plugins are your go-to solution if you don’t know how to code. Here’s a list of plugins that you can use to create an awesome About Us page.
Powr About Us

powr-about-us-pluginPowr About Us is a plugin with free and premium versions. The free version lets you create profiles for your company and employees. It has the features from the premium version, but it shows the plugin’s watermark logo and has limited support. The premium version has premium support, analytics, no access limits and no watermark logo. Once installed and activated, you will see a plug icon integrated in your Pages editor. It’s a drop down menu that lets you add shortcodes in the content area. This will help you create a professional About Us page. Once added, you will be able to edit them on the front end of your site.

Page Builder by SiteOrigin

page-builder-site-origin-pluginPage Builder by SiteOrigin is a free drag and drop page builder. It adds a ‘Page Builder’ tab in the Pages editor after installation and activation. This plugin has a lot of options that you can use to create an About Us page. It allows customization of page dimensions, layouts, and adding different elements to the page. For more advanced users, you can also use CSS to further tweak the look of your page. The plugin allows for creating some very unique About Us pages.

Team

team-about-us-pluginThe Team plugin by ParaThemes will help you build a responsive grid team profiles in WordPress. It uses pure HTML & CSS3 and is easy to customize. It lets you create profiles that include descriptions and links to social media profiles. The free version gives you enough customizations with unlimited team members. If you are not satisfied with the free version’s options, you can get their pro version which gives more in-depth custom controls. It has drag and drop, pop-up profiles, and more display options.

In Summary

The About Us page is an essential part of any website as it introduces your company or organization to your audience. For a Woocommerce site, having a good About Us page may result to an increase in the site’s performance. Creating an About Us page is simple and easy but you need to build it with your users in mind. You may also enlist the help of a plugin to help you create one. Do you have any more tips or ideas that you’d like to share regarding About Us? Let us know in the comments.

Filed Under: How-To Articles Tagged With: best practices, conversion optimization, how-to, plugins, WordPress

Improve Website Page Load Speed by Optimizing Images for Web

February 15, 2015 By John Leave a Comment

optimize-images-for-web

Optimizing images on your website whether it’s an e-commerce store, a blog, or both is one of the most important things thing that you can do to improve its performance. And it shouldn’t be a complex task really. Sure, high-res images look great but when you’re loading a 2MB image, it’s going to do more harm than good.

Essentially, you’re going to want to aim for a small image file size without compromising quality. As a rule of thumb, don’t let the images look bad or pixelated just for the sake of being smaller in size. You should strike a balance between a good-looking image and an acceptable image size. Here are a few ways on how to optimize images for the web.

Optimizing Images for Web Using Photoshop

Optimizing images for the web is not at all difficult. If you have Photoshop (or any other image editing software), it’s a very simple process. Open the image on Photoshop and resize or crop your image to the appropriate size.  Remember, when sizing images, the images you plan to use should not have a larger resolution than the image placeholder.

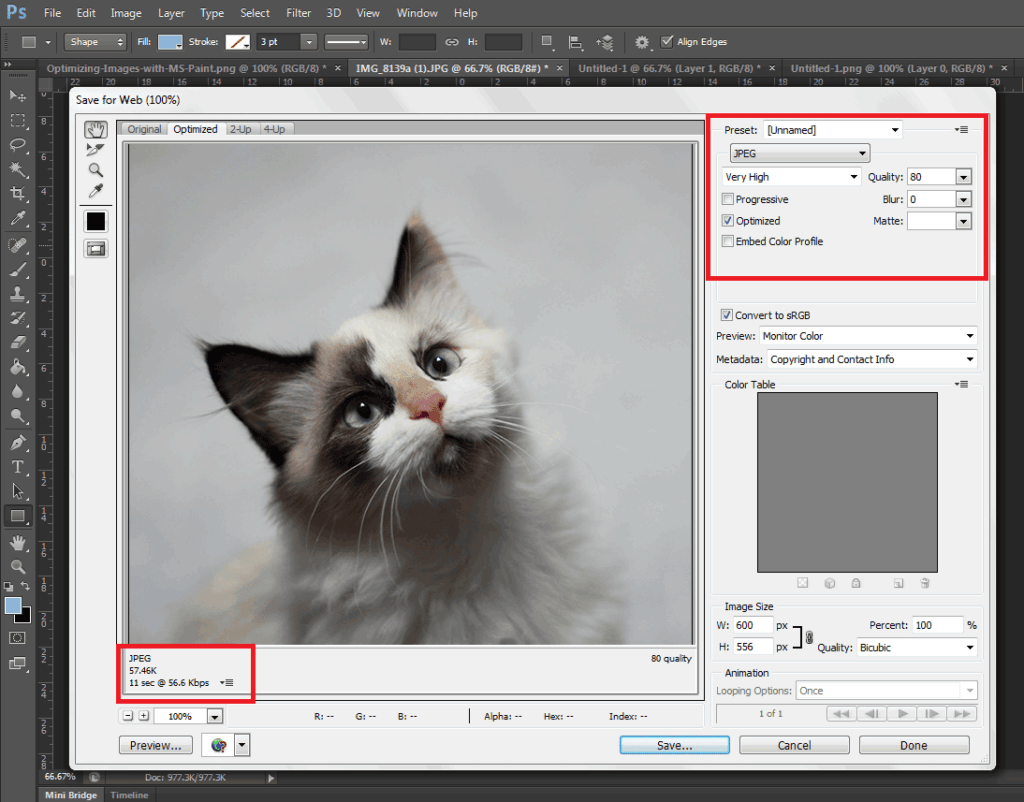
When you have resized your image to the appropriate resolution, click on File and Save for Web (Ctrl + Shift + Alt + S). Here you’ll be able to set the quality of the image while being able to see if the image still looks good. The image should not look pixelated and not have artifacts. In the bottom left section, you can see the file size of the image. You’re going to want to aim for an image that looks good, is not pixelated, and is less than 100kb in size — the smaller the size the faster the image loads on the page. On the upper right-hand section of the “Save for Web” window, you can use available presets or set the quality to your desired quality. Make sure you have the Optimized box is ticked and choose the correct file type. When you achieve a small file size with a good-looking image, click on Save.

Optimizing-Images-with-Photoshop

A Note on Image Types

image-file-types

An important thing to note to make images look good even as you scale them down is to set the correct file type. Notably, the JPEG type is used for photos as it supports the most number of colors at 16 million. PNG is the better choice if you’re working with graphics such as logos and icons since it makes use of lossless compression. Lossless compression means that the image can be made smaller without affecting quality. PNG supports thousands of colors as well as transparency. JPEGs don’t support transparency.

GIF images are similar to PNG. It uses lossless compression and supports transparency. It however can only store a measly 256 colors. Using GIF images on web pages is generally not recommended.

Serve Images in WebP Format

We also recommend converting your image files to the modern webp image file format since these are smaller in size and are thus recommended for achieving optimum site performance. Uploading webp files are still not recommended however as there are still devices and browsers that do not support it. There are however plugins and services that allow converting regular image file types to webp and serve these images when it is supported by the user’s device. WP-Optimize is one plugin that provides free webp conversion.

Optimize Images Using WordPress Plugins

We also recommend having an image optimization plugin installed on your WooCommerce store. There are many image optimization plugins to choose from such as EWWW Image Optimizer, reSmush.it, Robin Image Optimizer. Once you set up these plugins, they will optimize your images on upload. Do note, however, that these image optimization plugins will not alter image resolution so it is still recommended to upload images in the correct resolution not exceeding the image placeholder size.

Properly Naming Files

A thing to note when naming files is to name files as they are. Don’t name files after a keyword when it is not appropriate. If you’ve got an image of a child playing the violin, name it something like “child-playing-violin.jpg” and not something like “learn-violin-online.jpg” or “free-violin-course-online.jpg”. If you try to force your SEO keywords on your image file names, your site may be flagged for overoptimization.

Optimize your images to ensure your site performs well. A fast e-commerce website provides a good user experience which translates to better SEO rankings and improved conversion rates.

Filed Under: How-To Articles Tagged With: best practices, conversion optimization, how-to, image optimization, optimizations, page speed, photoshop, plugins, site speed optimization

  • 1
  • 2
  • 3
  • …
  • 8
  • Next Page »
Let us support your online store so you can manage your business

Get started today

Get 2 Hours of FREE SUPPORT

We are so confident that you will love our services that we will give you your first 4 hours at a 50% discount

That’s 4 hours for only $75

BUY NOW

Free eBook

5 Things Every Online Store Can Fix On Their Website In The Next Week To Increase Sales

Quick Links

  • How it Works
  • Pricing
  • Blog
  • Contact
  • About Wooassist
  • My Account
  • Checkout
  • Privacy Policy
  • Cookie Policy
  • Terms and Conditions

Wooassist

Australia:
59 Luke St.
Hemmant QLD 4174

Philippines:
San Miguel St.
Poblacion, Iligan City 9200

Connect


Copyright © 2026 · Wooassist

Yours FREE!

5 Things Every Online Store Can Fix On Their Website In The Next Week To Increase Sales