Wooassist

Assistance for Your Woocommerce Store

  • How it Works
  • Pricing
  • Services
    • Site Maintenance
    • AI SEO and Content Marketing
  • Blog
    • How-To Articles
    • Code Snippets
    • SEO For E-Commerce
    • Theme and Plugin Reviews
    • Wooassist News
    • WordPress/WooCommerce News
    • Interviews
  • About Us
  • Contact
You are here: Home / Archives for plugins

How to Use a CDN to Speed Up Your Website

March 1, 2015 By John Leave a Comment

How to Use a CDN to Speed Up Your WebsiteSo far, we’ve talked about optimizing images, caching, and minification. This time around, we’ll talk about Content Delivery Networks or CDN. You will learn how to use a CDN to speed up your website.

What is a CDN and How Does it Help?

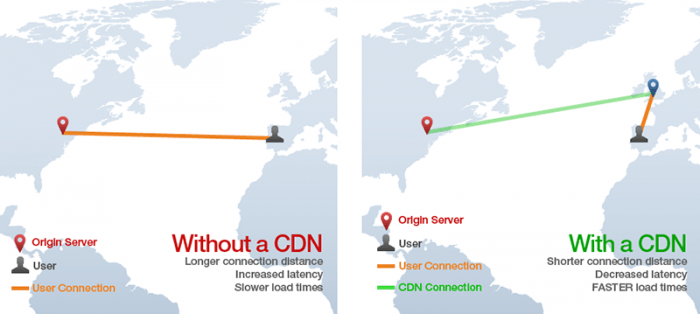
A CDN is basically a network of servers located at different locations around the world. As a service, a CDN will function to cache the content of your website so that it can be delivered faster to your visitors based on their location. Your static content will be saved on the servers so that when someone visits your site, it will send a request to the server nearest to them which will then deliver the content to the user. Basically, if you are a website owner and your server is based in Australia, your visitors from the US or Europe will have a hard time connecting to your website since the browsers will request data from servers that are too far away. This would result in delayed responses from the server known as lag.. With a CDN in place, browsers will always have a nearby server that they can connect to that will deliver your content much faster.

If that’s a bit too hard to swallow, here’s an infographic from GTmetrix with a visual representation of how CDNs work.
cdn

CDNs will mostly benefit the websites that cater to a global audience or market because if you are catering to a local audience, server requests will most likely be near your server’s location.

How to Use a CDN to Speed Up Your Website

Right now, you might be thinking that setting up a CDN is a complex endeavor. I’m telling you that it isn’t. We are in the age of web development where every service strives to be as user-friendly as possible. You can easily set up a CDN in a few clicks depending on your hosting service.

Setting Up CloudFlare CDN through CPanel

CloudFlare is one of the more popular CDN solutions out there and it has a free service for small website owners.

If your website is hosted on a CloudFlare hosting partner, then setting up CloudFlare is very easy. If you’re not sure if your hosting is a partner, check out this list. If your hosting is included in that list, then you can use the CloudFlare tool available on CPanel. Just go to CPanel and CloudFlare.

cloudflare

After that, just click on “Activate Free” for the free version or Activate PLUS for the paid version on the domain where you want to activate the CDN. You will then be prompted to enter your email to create an account with CloudFlare or just enter your email if you already have an account.
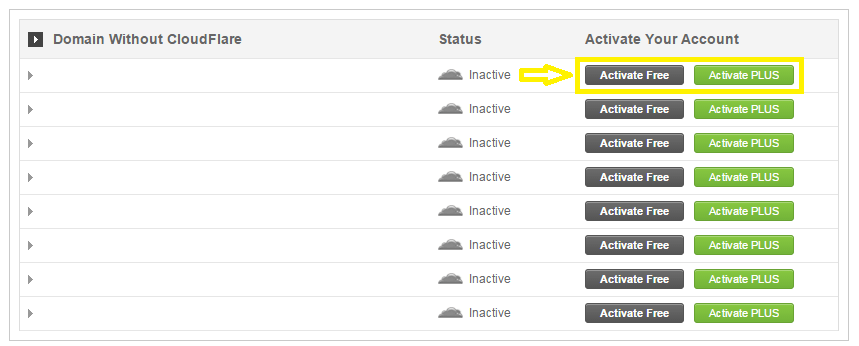
cloudflare-1

Once activated, you can tweak certain settings by clicking on Manage.
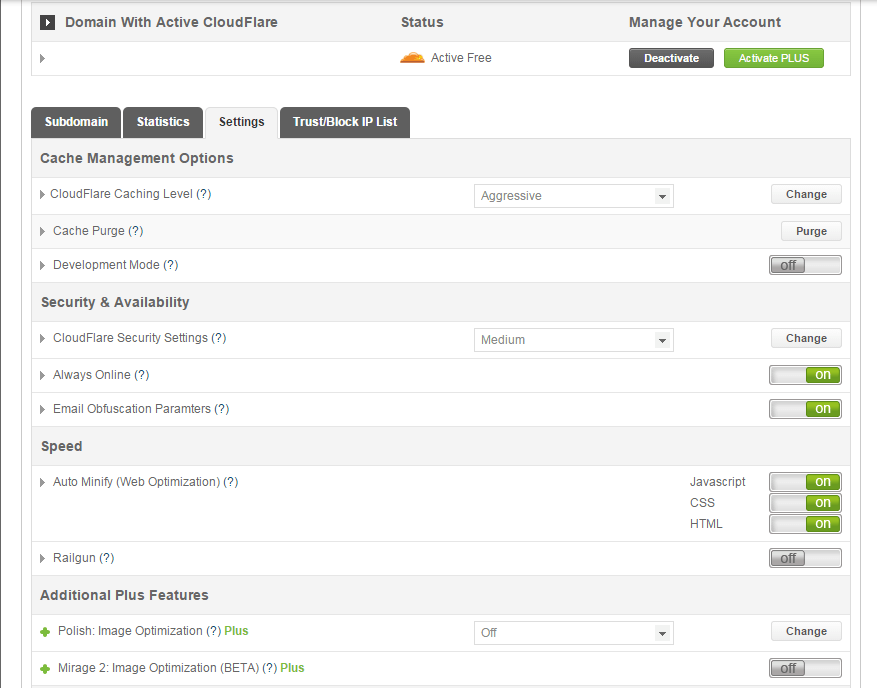
cloudflare-settings

And that’s it. Your CloudFlare CDN is all set and the performance of your website should be improving soon.

Setting Up CloudFlare Manually
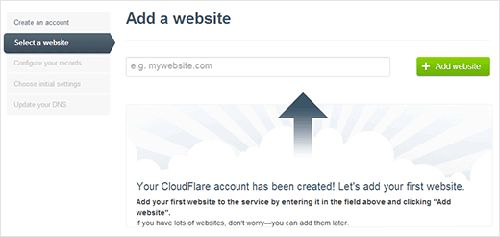
cloudflare-add-websiteTo set up CloudFlare manually, sign up for an account. After signing up, you will then be prompted to add your website to be scanned.

After the scan, you will be shown a list of all found DNS records. At this point, you should also set any subdomains that you would like to pass through CloudFlare. When you’re ready, just click on “I’ve added all missing records, continue”. The next page will let you choose a plan. You can choose the free version or the paid version, SSLs won’t work with the free version.

You will then need to change the name servers on your hosting service. You can do this by going to CPanel and clicking on Domain Manager. From there, just edit the name server to the new one provided by CloudFlare. If your hosting does not make use of CPanel, you can contact them on how to get this done.
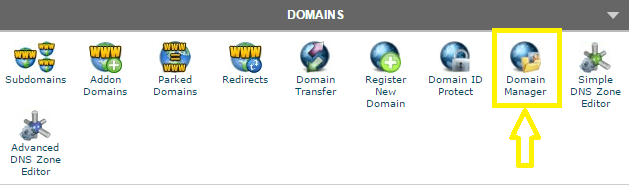
domain-manager

As a final step, go back to CloudFlare settings and click on “I’ve updated my nameservers, continue”. Note that it may take up to 24 hours for the name servers to be completely active.

Setting Up Photon

Photon which is part of the Jetpack plugin is a sort of CDN although it’s not a complete CDN solution. Photon is mainly an image acceleration service which optimizes images on your site and caches them on the WordPress.com server to be served directly from there. Essentially, it only acts as a CDN for images and not all your static content like a normal CDN would.

If you are already using Jetpack, which hosts a number of other useful functionalities, then you can easily give Photon a go. However, if you are planning to install Jetpack just for Photon, you’ll be much better off going with a complete CDN solution like CloudFlare.

To activate Photon, just install Jetpack on your WordPress site and navigate to the Jetpack settings. From there, find Photon and click on Activate. Easy-peasy.
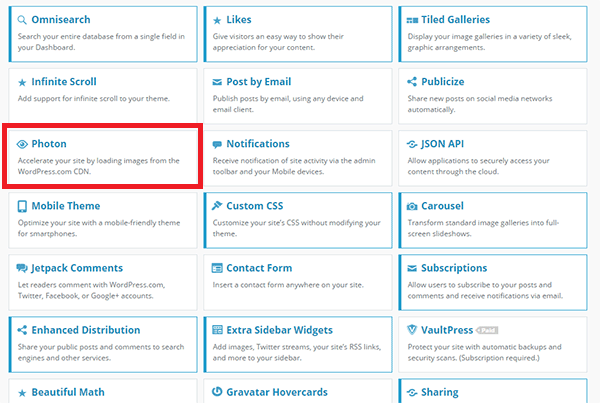
photon

With a CDN in place, your website should be running a lot faster which will improve overall user experience and probably even boost your conversion rates.

Filed Under: How-To Articles Tagged With: caching, CDN, CloudFlare, CPanel, how-to, optimizations, page speed, plugins, site speed optimization, WooCommerce

How to Create a Sitemap for your WooCommerce Store

March 19, 2015 By John 2 Comments

sitemapYou might have heard about XML sitemaps and that it’s good for your website’s SEO but don’t really know what it is. Or maybe you don’t know how to create a sitemap for your WooCommerce store. We can help with that. For starters, Google defines a sitemap as:
…a file where you can list the web pages of your site to tell Google and other search engines about the organization of your site content.

In short, a sitemap tells search engine crawlers about the structure of your site. Whenever you add something new to your website, whether that’s a new blog post, a new page or a new WooCommerce product, your sitemap is updated and communicates with web crawlers to tell search engine that there is something new on your website.

Even without a sitemap, the content on your website will still eventually be crawled by search engine crawlers but if the structure of your website is not well-organized, some pages may not be indexed. Also, having a sitemap will make crawling your website easier and much sooner. And if you have a new website, you probably don’t have a lot of other websites linking to your pages so it is highly likely that some of your pages may not get indexed. Having a sitemap almost ensures that all your pages get indexed.

How to Generate a Sitemap for Your WordPress Site

There are a couple of plugins that you can use to create a sitemap for your e-commerce website. We’ll list them down here.

How to Create a Sitemap Using WordPress SEO by Yoast

WordPress SEO by Yoast is the all-in-one plugin for your SEO needs. It is easily one of the best SEO plugins in the WordPress plugin repository. It has a lot of useful features and that includes the creation of a sitemap. If you are already using WordPress SEO by Yoast, then look nowhere else for creating your own XML sitemap. If you are not using WordPress SEO yet, I would suggest joining the bandwagon that is unless you are already using an SEO plugin that works well for you.

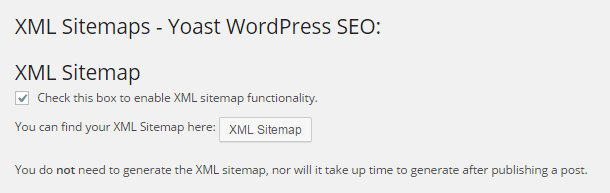
To enable XML sitemaps in WordPress SEO, go to SEO and click on XML sitemaps. Afterwards, just tick the box where it says “Check this box to enable XML sitemap functionality” and then “Save Changes”. When that’s done, just click on the button below and you will be taken to your sitemap.

sitemaps

How to Create a Sitemap Using Google XML Sitemaps

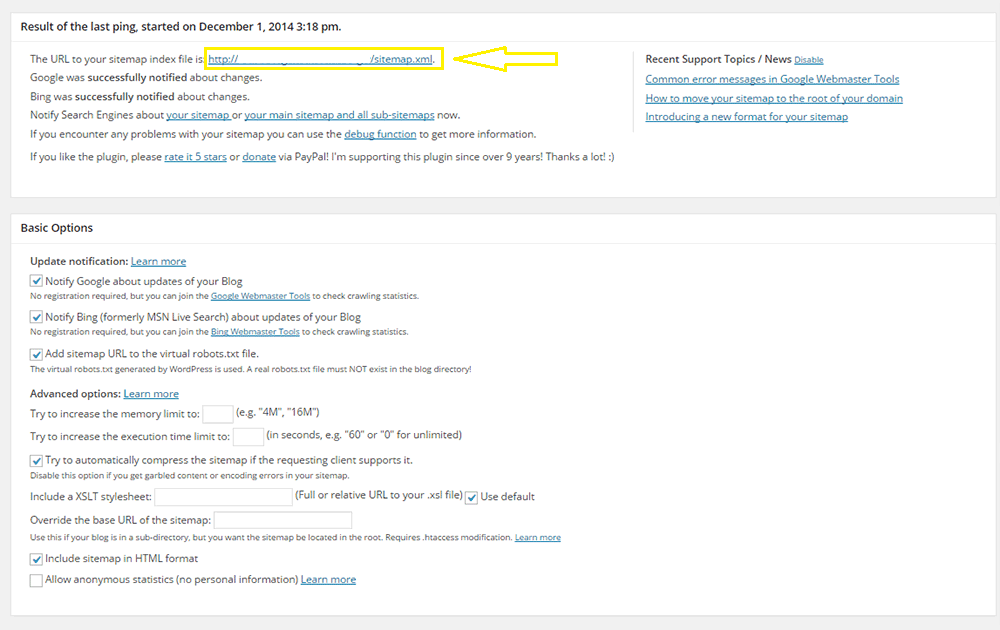
Creating a sitemap with the Google XML Sitemaps plugin is very easy. Simply download and install the plugin here. After you activate the plugin, just head over to Settings and click on XML-Sitemap. You should see a section that indicates the URL for your sitemap. There are a bunch of other settings that you can tweak. The default settings are good as is but if you want to change anything depending on your needs, feel free to do so.

google-xml-sitemaps

How to Create a Sitemap Using XML Sitemaps

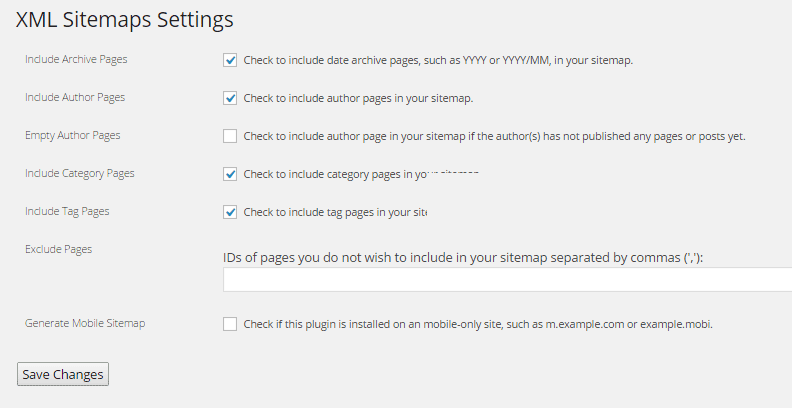
To create a sitemap using the XML Sitemaps plugin, simply install the plugin from this link. Activate the plugin and head over to yourdomain.com/sitemap.xml. That’s your sitemap. There are a few settings that you can tweak if you head over to Settings and click on XML Sitemaps.

xml-sitemaps

Adding a Link to Sitemap for Your WooCommerce Store

adding-sitemap-to-footerMost SEO experts say that adding a link to your sitemap on your website does not serve any purpose since the search engines find the sitemap through the robots.txt file or when you manually submit the sitemap to Google Webmaster Tools or Bing’s. Some disagree however and mention that having a link in the footer adds value.


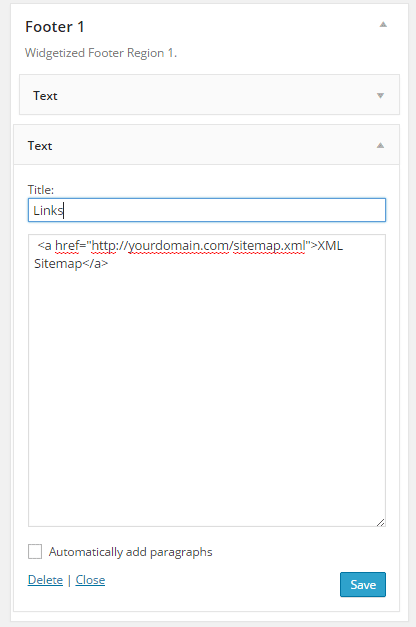
If you do want to add a link to your sitemap on your WordPress site’s footer, it is very easy to do. Just go to Appearance and click on Widgets. Afterwards, drag a text widget to the footer where you want to have the link. Just link your sitemap using HTML code.

If you are not sure how to do this, use the code below and just replace the URL with your sitemap’s URL:

<a href=”http://yourdomain.com/sitemap.xml”>XML Sitemap</a>

Submitting your Sitemap to Search Engines

When you get your sitemap ready, you should submit it to search engines using Webmaster Tools. Before you do this however, you need to verify your website with Webmaster Tools. You can check our post about the WordPress SEO plugin by Yoast which has links to some useful resources that can help you verify your site if you haven’t done that yet.

How to Submit Your Sitemap to Google Webmaster Tools

To submit your sitemap to Google Webmaster Tools, log in to your account and click on the website that you want to add a sitemap to. On the left sidebar, you should see Site Configuration, click that and then click on Sitemaps. There should be an Add/Test sitemap button in the upper right corner. Add your sitemap and then click on Submit.

How to Submit Your Sitemap to Bing Webmaster Tools

To submit your sitemap to Bing Webmaster Tools, log in to your account and click on Sitemaps. Then click on Submit a Sitemap. A text box should appear where you can specify the URL to your sitemap. Save your settings.

The Verdict: Which one is for you?

Between the XML sitemap plugins mentioned above, which one is for you? WordPress SEO by Yoast has a ton of other features and is one of, if not the best SEO plugin for WordPress. If you are already using this plugin for your SEO, then there’s no reason to get another plugin to get a sitemap. You’ll just be adding extra bloat to your site by going with another plugin. Between Google XML Sitemap and XML Sitemap Plugin, there’s not much of a difference. Both are easy to set up but Google XML Sitemaps has a slight advantage for having more options such as:

  • Automatically notifying search engines whenever you post new content
  • Creation of an HTML sitemap
  • Compressing the sitemap
  • Adding the sitemap URL to the robots.txt file

Got some questions about sitemaps? Let us know in the comments.

Filed Under: How-To Articles, SEO For E-Commerce Tagged With: Google Webmaster Tools, Google+, how-to, plugins, WooCommerce, WordPress SEO, XML sitemap, Yoast

How to Set up Redirects for WordPress Sites

January 5, 2016 By John Leave a Comment

dead-end-404
Error messages discourage site visitors from coming back to your website. It is frustrating for users to receive 404 Not Found Errors and this is bad user experience. Often, the visitor would just exit after reaching a 404 error.

Now you wouldn’t want that would you? In this post, we will teach you:

  • What is a 404 error?
  • Why you should fix 404 errors?
  • What is a redirect?
  • How to fix 404 errors.
  • How to set up redirects for WordPress
  • How to create custom 404 error pages

404-errorWhat is a 404 Error?

A 404 Error (or HTTP Errror 404 – Not Found) appears when a website or page that want to access on the server could not be found. It is a standard response showing an error on the client’s side or browser and may appear in different ways because this can be customized. This is typically caused by a broken link for moved, renamed or deleted pages. You also get a 404 error mistyped or misspelled URLs.

Why You Should Fix 404 Errors?

This type of Error message might appear simple and unimportant but this can do a lot of harm to your business. It affects your web presence and your reputation as a business as it is reflective of how well you manage your website.

Experts say that attention span of the average user decreased greatly due to the huge amount of data available online. A site visitor would normally just spend a few seconds to and sometimes a few minutes when visiting a website. Getting 404 Errors can be annoying to site visitors and it usually results in a bounce.

Your site will be remembered as “that site with the 404 error” which could discourage them from visiting your site again. In a survey of online shoppers in Spain, 14% of the participants indicated ’page errors’ as the reason why they did not return to a website.

In the technical aspect, numerous dead links can negatively impact your SEO so it is best to create redirects for any changed URLs or deleted pages especially if you have backlinks pointing to that URL. Redirects help with your SEO as it salvages any backlinks that 404 error page might have.

What is a Redirect?

redirection person on arrowsA redirect is a means of pointing a URL to another URL. There are many types of redirects but you only need to know two of them. A 301 redirect is a permanent redirect whereas as a 302 redirect is a temporary redirect. A 302 redirect is generally not recommended unless you are an SEO expert and you know what you are doing because different search engines process 302 redirects differently. To know more about the different types of redirects, you can check this blog post.
How to Fix a 404 Error using Redirect Plugin

Redirection is not yet a standard feature in WordPress so you would need a plugin to help you with this. The first thing you have to do is install the Redirection Plugin for WordPress and activate it after installation.

This plugin by far is the most popular and actively used among many other similar plugins. You can use CSV files to easily manage a huge list of redirects. Just head over to the “Import” section and upload your CSV file. This is a pretty useful when migrating a website and you need to edit hundreds of URLs.

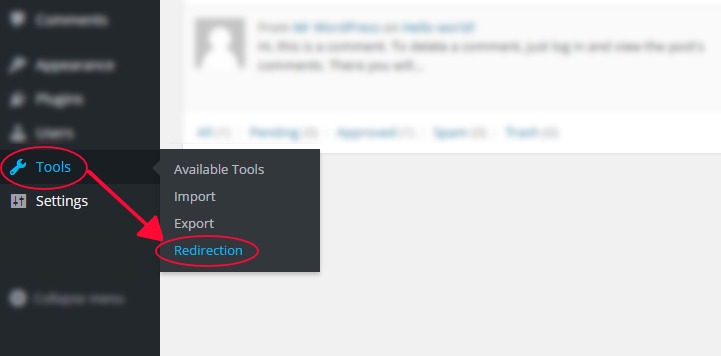
Once you have the plugin installed and activated, go to Tools and then click on Redirection. This plugin allows you to set your redirects complete with logs for all the URLs that you redirect, the plugin also helps you find 404 errors within your website.

tools-redirection-plugin

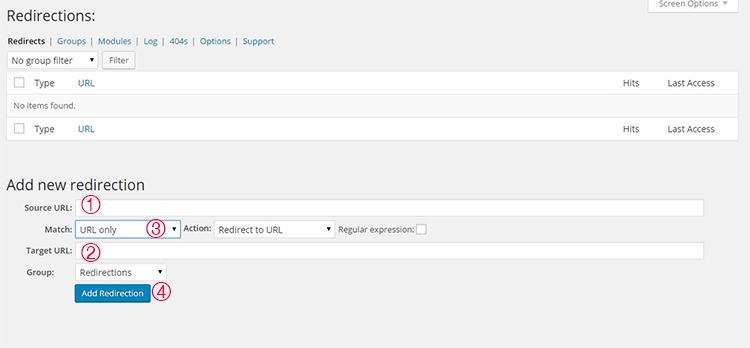
Once you have accessed the tool you will see that you will be presented with a list of redirects that you have set. Below that, you can see the “Add New Redirection” section and this where you add new redirects.

To add a redirect, just follow these 4 simple steps.

  1. Enter the URL of the link that you want to redirect in the ‘Source URL’ field. You don’t need to input the entire URL, just the slug will do. For example, instead of typing ‘http://www.mywebsite.com/page’, you can just input ‘/page’.
  2. Input your destination URL inside the ‘Target URL’ box. If needed, you can actually point the destination URL to an external URL. And just same, you can just type the slug.
  3. Make sure that ‘Match’ is set to ‘URL only’ and ‘Action’ is set to ‘Redirect to URL’. You can choose different settings based on your needs but if you want a standard redirect, the above will do.
  4. Submit by clicking on ‘Add Redirection’.

redirection-plugin

If you want to organize your redirects, you can create groups by clicking on the ‘Groups’ tab. You can just add future redirects in the groups you have created to keep them categorized. For more information on the plugin, you can visit the plugin developer’s documentation.

Other Plugins for Managing Redirects

There are many plugins for WordPress that could help you manage your redirects. Here are some top plugins that you could also check out.

Quick Page/Post Redirect Plugin

quick-page-post-redirect-plugin

True to its name, this plugin is easy to install and setup. It makes restructuring your website easier. You can choose two types of redirect functions — ‘Individual Redirects’ and ‘Quick Redirects’. Their ‘Individual Redirects’ are for redirecting existing pages and posts while the ‘Quick Redirects’ can be set up for pages that do not exist which is great for fixing typo errors and pointing an old URL to a new one.

All 404 Redirect to Homepage

As the name of the plugin suggests, this is a pretty straightforward tool that you can use. This is recommended for people who want to manage their 404 Errors by using the 301 redirection method. All your 404 will simply be redirected to your homepage. The plugin is simple uses minimal resources.

SEO Redirection Plugin

seo-redirection-plugin

This plugin, from the same developer of the previous plugin, helps you set redirections with ease. It allows for setting up various types of redirects. It also helps you monitor your website for 404 error pages. It has a Free and Pro version. The free version is good as is but if you want more options like redirecting folders and all its content and redirect all 404 Error Pages with ease, you can upgrade to the Pro version.

404 to Start

404-to-start-plugin

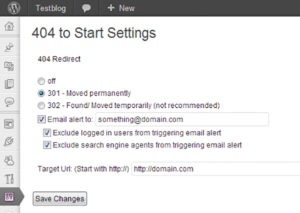
This has an optional email alert and a simple interface that will help you set redirects. You can set a 301 redirect or a 302 redirect which is generally not recommended.

404 Redirection

This plugin has surprisingly a very good rating. It is upfront, simple, and does the job well. It permanently points all your 404 Errors to your main blog URL so you can use the ranking from those missing pages and not let them go to waste.

404 to 301

404-to-301-plugin

Similar to the other plugins mentioned above, 404 to 301 does its job of redirecting 404 errors. But as a plus, it has a sweet email notification for any 404 errors so you can fix them quickly.

Creating Custom 404 error pages

Another way of effectively dealing with 404 pages is by creating a custom 404 error page. Having a custom 404 error page is a good thing to have for those 404 errors that are beyond your control such as when a user mistypes a URL. A custom 404 error page should show the visitor why they are receiving a 404 error and what they can do to fix it. It should also suggest some links on your website that they were probably looking for. You can check out our other post on creating custom 404 error pages for a detailed guide on how you can do this for your own site.

Conclusion

Having errors on your website is not good user experience. 404 errors in particular can harm your conversion rates. Setting up redirects to fix 404 errors is easy with the help of a plugin. Checking for 404 Errors and setting up redirects should be a part of your monthly or weekly website maintenance. And while a 404 error will not harm your SEO, a little extra time fixing them can save you from bigger problems in the long run. How do you fix 404 errors on your website? Let us know in the comments.

Filed Under: How-To Articles Tagged With: 404 error, best practices, how-to, plugins, redirection, WordPress

Woocommerce 2.3 Update: New Features and Common Issues Encountered

March 11, 2015 By John 4 Comments

It has been a month now since Woocommerce 2.3 was officially released. There has been mixed feelings about the new version. Some users find the new features awesome while others struggle to keep it together. To give you a recap, here are the new features of Woocommerce 2.3 “Handsome Hippo”.

Woocommerce 2.3 Features

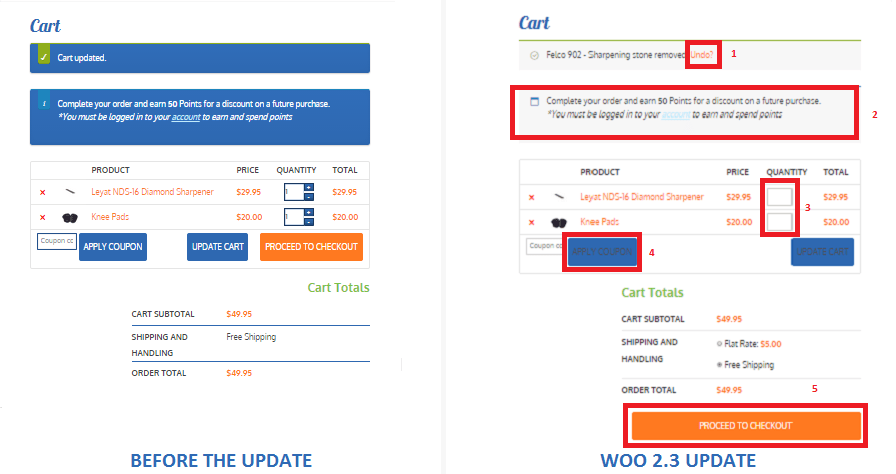
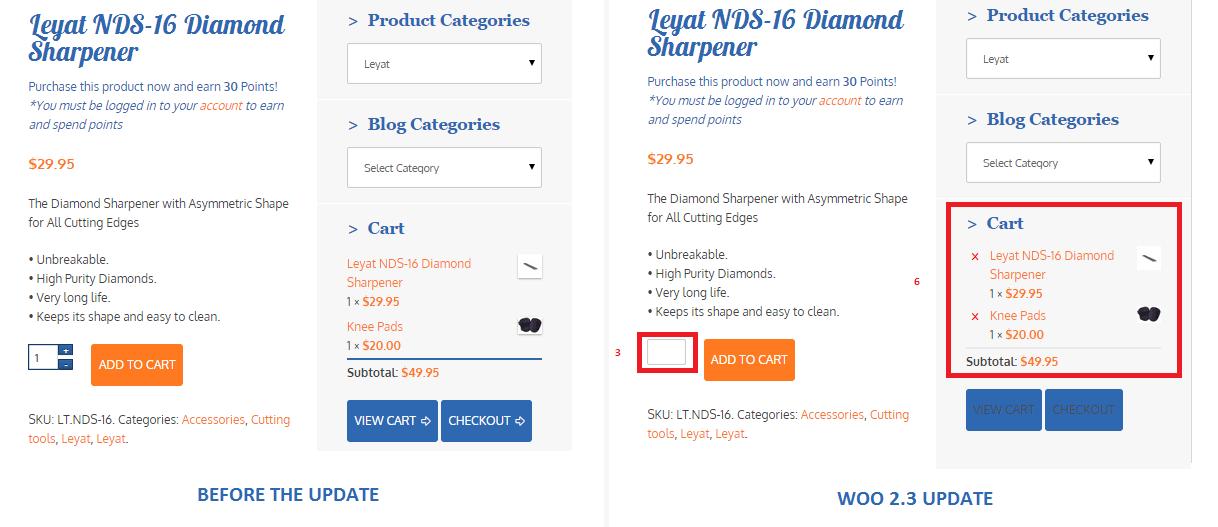
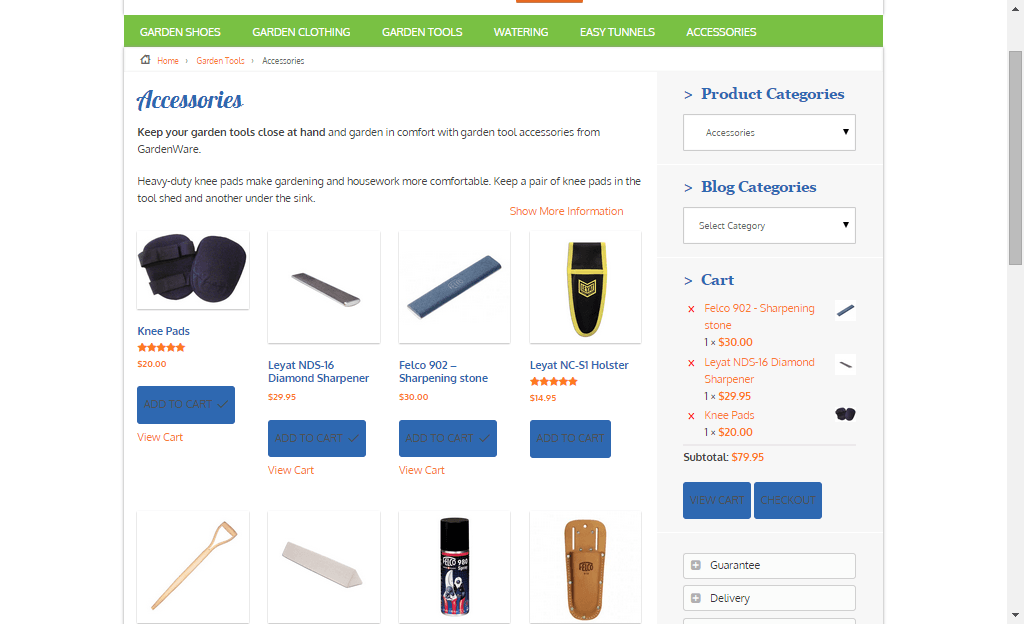
  • User Interface and User Experience Update- Woocommerce 2.3, also known as the handsome hippo, has a flat design that goes well with many themes. The messages, notices (2 in the figure below), buttons (4), and the payment box during checkout has an updated look.Woocommerce 2.3 Cart Update

The cart template is also updated. The “Proceed to Checkout” button (5) was moved under the cart totals to enhance user experience. Another cool feature is the undo option (1) in the cart. That means that if you accidentally removed a product on your cart you can easily add it back in using the undo button. You also have the option to remove product from the cart widget (6), which I think is a really cool update on the default style template.

Woocommerce 2.3 cart_widget

There are also several features that were removed due to redundancy. The option to change the colors of the buttons as well as the increment and decrement button (3) were removed. Now, if you want to add those features back, you need to install additional plugins.

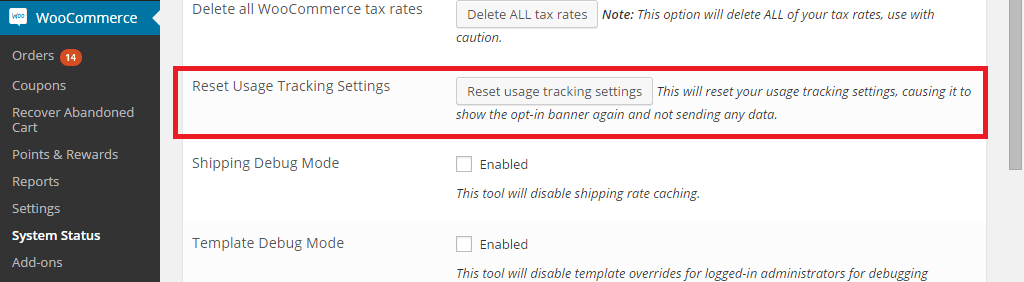
Woocommerce 2.3 also introduced an opt-in usage tracking that allows the Woocommerce team to view the settings of sites. This will allow them to upgrade their system to fit the requirements of their users. You will have an option to disable tracking in the woocommerce dashboard using this path: Woocommerce/System Status/Tools. Simply click the Reset Usage Tracking Settings button.

Woocommerce 2.3 usage_tracking

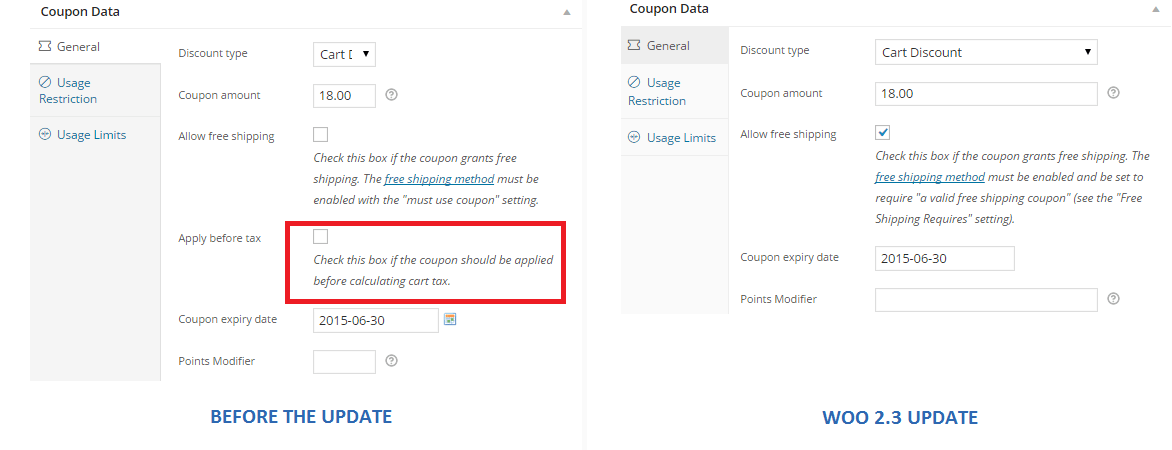
  • Coupons Update- This is probably one of the major updates in Woocommerce 2.3. Coupons will no longer be applied before taxes. The “apply before tax” option has been removed in the woocommerce settings.

Woocommerce 2.3 coupon

Aside from that, the rest of the coupons settings are left untouched. However, there are still a few issues with coupons that has not yet been sorted out on the latest version of woocommerce 2.3. We will get to that in a sec.

  • Emails- woocommerce 2.3 makes it easier for developers to override the CSS of emails sent through woocommerce. Additional hooks are created so that developers can easily adjust the CSS templates according to their preferences. In addition to that, emails sent will be using the woocommerce core templates but will also allow plugin templates to blend in with the shop emails.
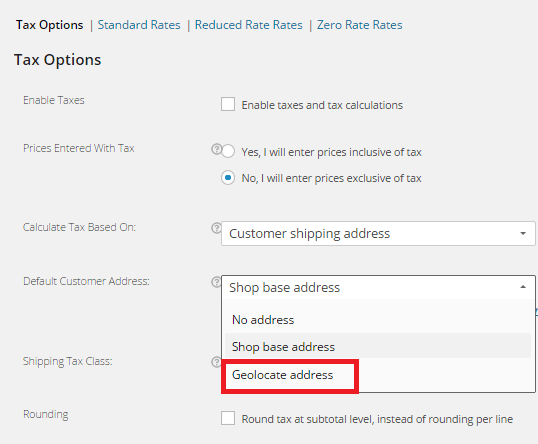
  • Geolocation- Now, with “Handsome Hippo”, you can easily locate your customers by using their IPs. This can be used to calculate tax based on the users estimated location.

Woocommerce 2.3 Geo_Location

Issues Encountered

Woocommerce informed large theme companies about the changes before releasing Woocommerce 2.3. Prior to the official release, Woocommerce also released Woocommerce 2.3 beta so that they can work hand in hand with theme companies and plugin authors to make the release as smooth as possible. Though a lot of site owners welcome the design update on the front-end, some sites suffered from CSS and theme incompatibility and had to do a complete overhaul. Woocommerce 2.3 started using Sass, and there are inevitable plugin incompatibilities encountered by sites that use plugins using LESS.

The image below is taken from one of our sites that we manage. You will notice that the buttons, due to the flat design, need fixing. You can barely see the labels of the buttons.

Woocommerce 2.3 buttons_and_option_to_remove_products_from_cart_widget

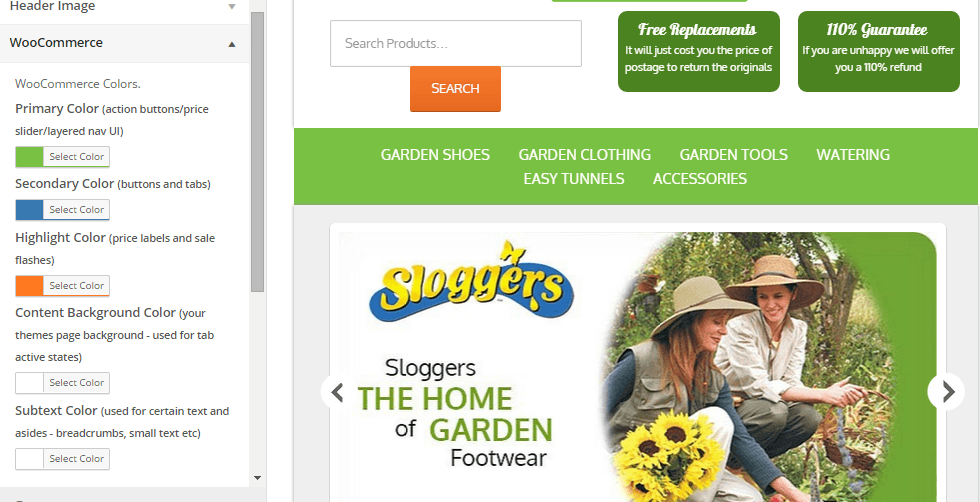
To fix this issue, Woocommerce suggests installing a plugin that will allow site owners to easily change the colors of buttons and other elements on their sites. You can customize the buttons by clicking Appearance/Customize/Woocommerce.

Woocommerce 2.3 buttons

On the same site, we also encountered problems with the application of coupon codes. Though the products added are exclusive of tax, which means that the tax calculations will not be affected, we experienced a weird issue with the application of coupons on top of a free shipping rule. The free shipping rule allows customers to get free shipping when the item bought is more than $49.

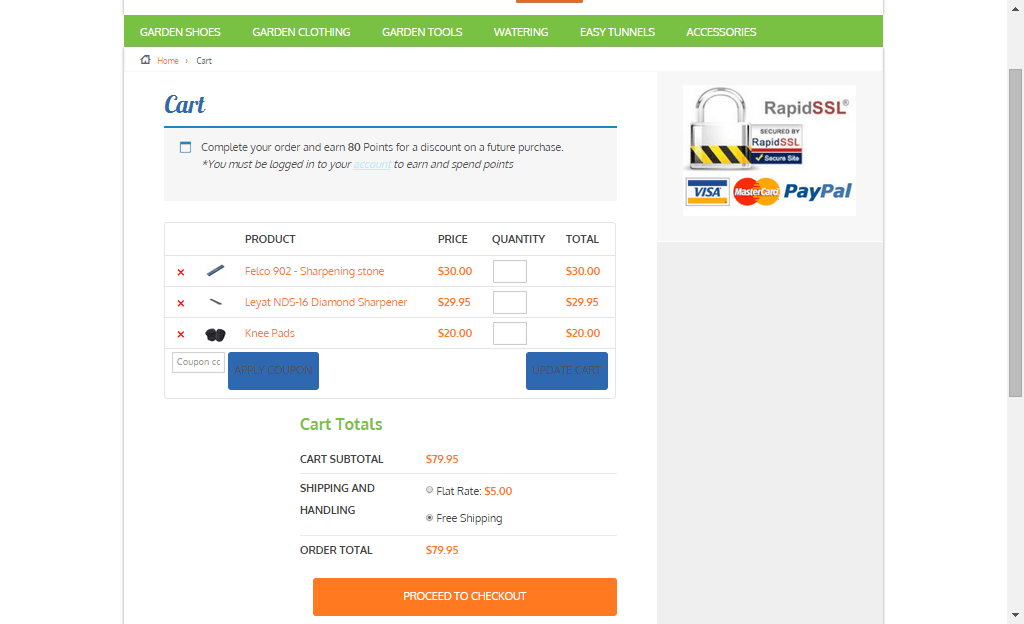
If you look at the image below, instead of displaying the free shipping note on the “Shipping and Handling”, it has been replaced by a radio. Here you will have the option to either choose free shipping or flat rate, which doesn’t make sense because customers would always want to choose the free shipping option. Aside from that, if you apply a coupon and the order total falls below $49, the flat rate automatically kicks in without the free shipping option. The store owner would not want that to happen and this issue only started after the Woocommerce 2.3 update. We will be discussing the solution to this issue on our next article.

Woocommerce 2.3 increment_decrement,_notices-2.3

Conclusion

Keeping your plugins up to date is very important. However, with major updates like this, it is best that you create several backups of your live site before doing anything. In some cases, it might even be necessary to copy your live site to a development site. Doing plugin updates on the development site allows you to fix errors caused by the update and at the same time reduce losses due to downtime.

The woocommerce team spend so much time and dedication for this update. Though there may be some hiccups along the way, their proactive communication with theme companies have been really helpful in ensuring that the update will not cause serious problems to their users.

If you have encountered some issues regarding the woocommerce 2.3 update or if you want to share your take on the new features of woocommerce, feel free to leave your comments below.


Filed Under: Theme and Plugin Reviews Tagged With: checkout form, colors, CSS, email, plugins, shopping cart, WooCommerce, woothemes, WordPress updates

  • « Previous Page
  • 1
  • …
  • 6
  • 7
  • 8
Let us support your online store so you can manage your business

Get started today

Get 2 Hours of FREE SUPPORT

We are so confident that you will love our services that we will give you your first 4 hours at a 50% discount

That’s 4 hours for only $75

BUY NOW

Free eBook

5 Things Every Online Store Can Fix On Their Website In The Next Week To Increase Sales

Quick Links

  • How it Works
  • Pricing
  • Blog
  • Contact
  • About Wooassist
  • My Account
  • Checkout
  • Privacy Policy
  • Cookie Policy
  • Terms and Conditions

Wooassist

Australia:
59 Luke St.
Hemmant QLD 4174

Philippines:
San Miguel St.
Poblacion, Iligan City 9200

Connect


Copyright © 2026 · Wooassist

Yours FREE!

5 Things Every Online Store Can Fix On Their Website In The Next Week To Increase Sales