Wooassist

Assistance for Your Woocommerce Store

  • How it Works
  • Pricing
  • Services
    • Site Maintenance
    • AI SEO and Content Marketing
  • Blog
    • How-To Articles
    • Code Snippets
    • SEO For E-Commerce
    • Theme and Plugin Reviews
    • Wooassist News
    • WordPress/WooCommerce News
    • Interviews
  • About Us
  • Contact
You are here: Home / Archives for how-to

How to Build Links for your Online Store with Guest Posting

April 1, 2015 By John 1 Comment

how-to-build-links-for-your-woocommerce-store

Most online store owners want to get links to their website for the sake of SEO. In this article, we’ll show you how to build links for your online store with guest posting.

There are many ways to get links such as through social media shares and directory listings. Social media is a powerful tool. Directory listings though might have a negative impact in your SEO efforts. For the past few years, Google has been penalizing many web directories. The single most promising way of earning free and quality links to your website is through guest posting in other blogs related to your industry.

How Does Guest Posting Work

Guest posting is creating content to post in another person’s blog or website with a link back to your own website. The more the links pointing to your website you have, the better it is for your SEO. Search engines such as Google look at your link network. The more popular the website that links to you, the better it is for your link profile. To learn more about the importance of links, check out this post.

How to Get Guest Posting Opportunitiesguest-post

Website Owners that You Know

To get guest posting opportunities, you can start with the people you know. You may have some friends who have a blog on a niche related to your website. You can ask them if they would let you guest post on their website or blog.

Social Networks

linkedin-logo

If you have a LinkedIn account, you can use that to reach out to other people that own websites within your niche.  You can then ask for guest posting opportunities. You can also use Facebook, Twitter or any other social network. LinkedIn better serves this purpose though since it is all about building a professional network.

Blog Search

Perhaps the most popular means of searching for guest posting opportunities is by searching for blogs on Google. You can do this by entering “your niche + blogs” in the search bar. When looking at the search results, analyse the website more closely. Ask yourself; is this a real fit for my niche? Do they accept guest posts? Try to see if they have accepted guest posts in the past or if they explicitly say that they don’t accept guest posts. If they haven’t had any guest posts in the past, don’t let that discourage you, there’s always a first time for everything. Also, make sure that the website is not a competitor.

guest-post-search

If you want to search specifically for blogs or websites that accepts guest posts, you can try these keywords on Google.

“your niche + guest post”

“your niche + submit guest post”

“your niche + write for us”

Once you’ve found a good website or blog, you should search for the owner’s email or a contact page. It will allow you to reach out to them about your concern.

Guest Posting Communities

Another means of getting guest post opportunities is by joining guest posting communities. One of the most popular was MyBlogGuest but the site has already been shut down. MyBlogGuest was  a community for people looking for guest posting opportunities. People looking for bloggers to get free quality content also go to it. If you think about it, it’s a win-win situation. You get a link and the other person gets free quality content.
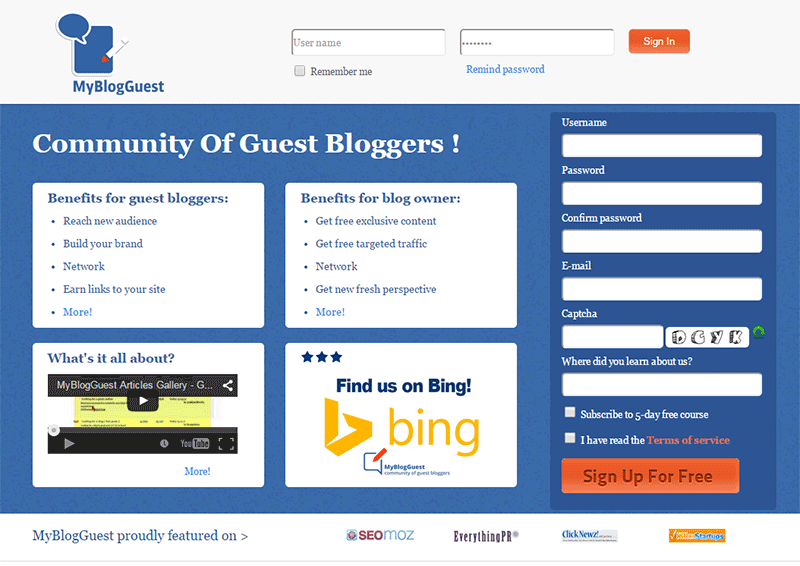
myblogguest

How to Request a Guest Post

When you request for a guest post, the golden rule is to not sound like spam.  Before emailing someone, check out the website first and read the blog. If they have a dedicated page for guest posting, they’ll have guidelines posted there. Read it and follow the guidelines strictly. If they ask you to email them a certain subject or to have a certain sentence as the first sentence in your email, then do so. By doing what they ask, you’ll come by as someone genuinely interested in a partnership and won’t be writing crappy content. This kind of practice separates the spammers from the real quality guest posters.

If they don’t have specific guidelines, just email them in a normal manner. It helps a lot if you address the recipient with using his/her first name. This is usually written in the ‘contact us’ page. If you can’t find it, that’s not a problem. Just be courteous. You can also write something about how you loved a specific post on their website. This shows that you’re not just interested in the guest post for a link. You’ll also show that you’re interested in the content that they publish. An important bit: Try not to come off as someone trying too hard to please them just so they would allow you to guest post.

In your email, you should also include one or two topics that you’re interested in writing about. Including a short summary of what your post will look like will go a long way.  Make sure that what you’re proposing is relevant to their audience otherwise it will just get rejected.

Many blogs don’t accept links within the content of the posts unless it’s integrated  well into the content. Usually, in cases like these, they will allow a link to your website in the author bio. Now here’s a pro-tip. When writing the author bio,  include your email and ask the readers to contact you if they would like you to guest post on their website. You’ll need to write some really good content for this to work though.

Getting Seconds

guest-blogging

­­In getting guest posts, it is more helpful if you guest post in a lot of different websites. But if you get offered another chance to guest post in the same website, always grab the opportunity. It will help you build your reputation as a guest blogger. Your second post can still contain a link back to your site. And while it will not be as valuable as your first post, it will still show on your link profile. It can also get you some organic traffic. This is true when your guest post is being posted in a popular website with a large following.

What Makes a Good Guest Post

A “good” guest post is subjective, but ideally, a good guest post should provide new information and is insightful. Reading  the guidelines of the website where you are guest posting will help you write a post which is “good” by their standards.

How-To posts that teach the readers how to do something are always a good idea. Try to target a specific topic. If you write an article entitled “How to Write an Essay” that’s not good at all. Just think of the thousands, maybe millions, of articles with the same title all over the internet. Something more specific is “How to Write an Essay Optimized for SEO” or “How to Write a Good Expository Essay”.

Always try to use subheadings on your guest post especially when it is long. If you write a 1000-word guest post without any subheadings, it’s not enticing to read. It will look like a big wall of text. While images can help make it more attractive, it’s not as helpful as subheadings.

Also, whenever possible, you should reference any claims on your post unless that is your expert opinion. You should establish that your opinion is credible. Claiming something without backing it up is akin to spouting gibberish and readers will take notice of that. If a claim links to some example or some study that proves your point, then it gets better.

Another important bit to remember is not to hard sell your products or services when guest posting. The blog or website you are guest posting on trusts that you will create good readable content and not a marketing gimmick. Don’t spam your article with links to different product pages, rather if you should add a link, make it a useful link. Maybe link to a related blog post on your own website’s blog. This is all the more reason, among the many other reasons, why you should have a blog on your online store with a bunch of useful and good posts.

Adding Your Links

This is the most important part of your guest post. You can post a link anywhere on the body of your post going to your website unless otherwise specified. The link can be on your home page or any other relevant page. Your link should integrate well into the content. To be integrated well into the content, the reader should know what to expect when they click a link. Are they going to get more information on the subject of your blog post or maybe an important resource? Just because you used a keyword that you are targeting doesn’t mean you should add a link there.

As I’ve mentioned earlier, some website owners refuse to add links in the body of the content. This is because many guest posters don’t integrate it well into the content. In these cases, they allow links in author bios.

So, that’s it. You got your crash course on guest posting. If you have any questions, feel free to hit the comments.

Filed Under: How-To Articles, SEO For E-Commerce Tagged With: blog, email, Google+, how-to, link building, LinkedIn, SEO strategy

How to Speed Up Your WooCommerce Store

August 3, 2015 By John 3 Comments

SnapCrab_2015-07-03_10-57-18_No-0000

Aside from the products or services you offer, there’s another crucial factor that may affect your conversion rate. We’re talking about your site speed. Any delay is enough reason to make your customers leave. This converts to lost revenue, which can hurt your bottom-line. How can you prevent or change this? This article will serve as an in-depth guide to and will teach you how to speed up your WooCommerce store.

In this article, you’ll learn about the following:

  • Why invest in site speed optimization?
  • What hardware and software you need?
  • Improving Site Speed by Caching and Minifying
  • Speed Up Site by Optimizing Images for Web
  • Using a CDN to Increase Site Speed
  • Cleaning Your Database to Speed Up Site
  • More Ways on How to Speed Up Your WooCommerce store

Why Invest in Site Speed Optimization?

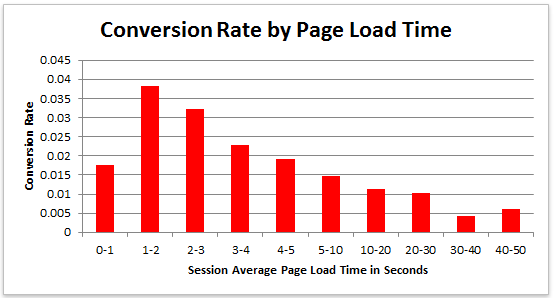
Studies reveal revealed that 47% of visitors expect a page to load in under 2 seconds. Around 40% of these will abandon a web page if it takes more than 3 seconds to load. Meanwhile, 52% claim that quick page loads are important for their loyalty to a site.

conversion-rate-by-page-load-time

What do these findings tell you, a site owner?

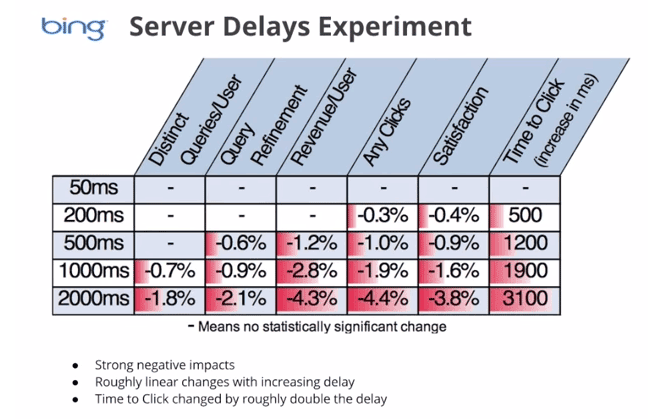
It just shows that site speed is very important. Those two seconds are crucial to capture your visitor’s attention, convince them to hang around, and increase your chance for conversion. Microsoft Bing also conducted a research about server delays and the effect they bring on user behavior.

server-delays-experiment

According to the results, a 2-second longer delay in page responsiveness reduced user satisfaction by 3.8%. They navigated 4.4% fewer pages, with a 4.3% lesser e-commerce revenue per user. Every second matters online.

Here’s the thing: visitors – your potential customers – can’t really tell the difference if a page is ‘just’ slow, or isn’t working at all. Thus, a slow website is quite the same as not having one. Most users won’t stare at the screen and wait. They move on to the next website and never come back.

site-visitors

Google announced that it has included site speed in its ranking algorithm. If your site speed is slow, it can affect SEO by having reduced rankings. They even launched a new web-based tool, which analyzes the performance of web pages.

With these information, we now know that site speed not only sells, but also leads to customer satisfaction and increased conversion.

If your site speed is slow, it’s time to fix that. Read on.

What Hardware And Software You Need?

The foundation you set up for your e-commerce site has a lot to do with its speed. If it’s the root of the problem, quick fixes won’t help. But, what makes a good foundation, and how can you set up a website that runs at lightning speed?

Web Hosting Provider.

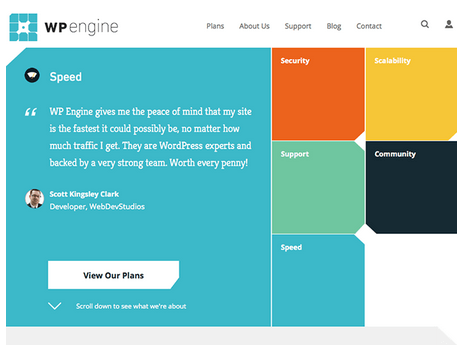
What’s your current hosting package? For an e-commerce site, you shouldn’t go with the cheapest. They may have limited RAM, processing power, and disk space which won’t benefit your site at all.

wp-engine

Wooassist recommends:
Wpengine and Siteground

Please note that we are affiliates of these hosts but we have only chosen them based on our years of experience dealing with hosting services for our clients’ and our own sites. And we can say that these two are among the best. If you were to sign up to either of them, we’d be grateful if you did so by clicking either of the links above.

WordPress Themes

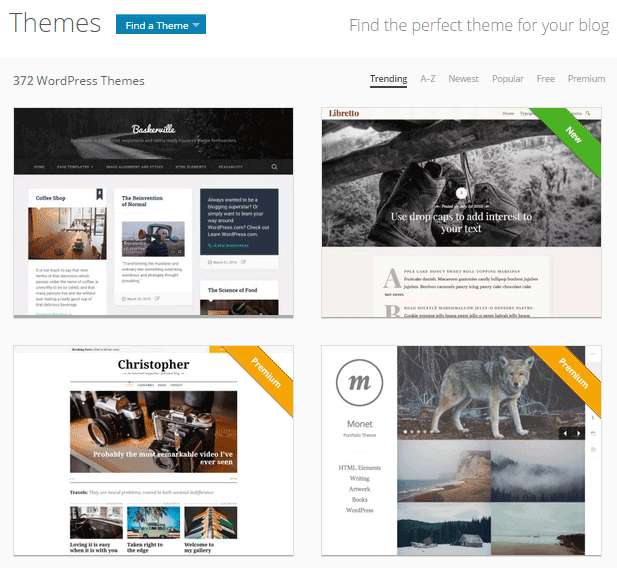
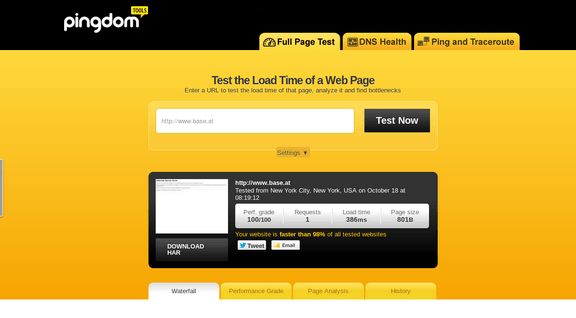
Not all WordPress themes are created equal, and not all are extremely fast and well-coded. In choosing a theme, checking the demo speed is a must. Tools such as Pingdom will give you an idea of how well-coded it is.

wp-themes

Wooassist recommends:
Storefront by Woothemes or Any HTML5 theme at Studio Press

Content Delivery Network

CDN is a system of distributed servers that accelerate the delivery of web content, and rich media to internet-connected devices. Since your bandwidth is spread across many different servers, the load on a single server is reduced.

Wooassist recommends:
Wpengine comes with CDN included or Cloudflare

Improving Site Speed by Caching and Minifying

caching-and-minification

Let’s start with the most popular, and probably, the easiest thing: Caching.

What is Caching?

Caching is storing your dynamic content in the server as static content. Serving static content is faster as opposed to dynamic content, which means longer page load times. It’s a fundamental technique of reducing database load and speeding up WordPress websites.

There are two types of Caching:

  • Client-Side
  • Server-Side

Let’s move on to Minification.

When developers make code, they make code with a lot of white space. This practice makes the code easier to read and understand for humans. However, computers don’t need that white space. It just makes reading the code take longer.

Minification is removing all that white space and optimizing the code. This makes it easier for machines to make parsing the webpage faster.

How to Implement Caching and Minification?

It may sound all too complicated, but don’t worry. It is really very simple. All you need is one plugin to do both, and it has all the caching and minification solutions you need.

W3 Total Cache

It’s the second most popular plugin with almost 4 million downloads and a 4.5 star rating. W3 Total Cache is more suitable for high traffic websites running from a VPS or a better hosting environment.

How to Set up Caching with W3 Total Cache?

  1. Before installing W3 Total Cache, uninstall other caching plugins like WP Super Cache
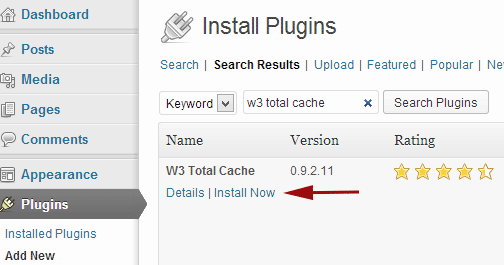
  2. Go to your WordPress admin panel and click on Plugins > Add New

w3-total-cache

  1. Search for “W3 Total Cache”
  2. Click on the ‘Install Now’ button and then activate
  3. Click on Performance on your WordPress dashboard and go to General Settings
  4. The first option that you see on this page is Page Cache.
  5. Check the ‘Enable’ box
  6. Click on ‘Save all settings’

By having this enabled, you will significantly decrease your load time.

How to Set up Minification with W3 Total Cache?

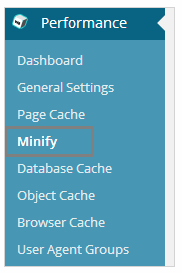
  1. minifyGo to your WordPress dashboard and click on Performance
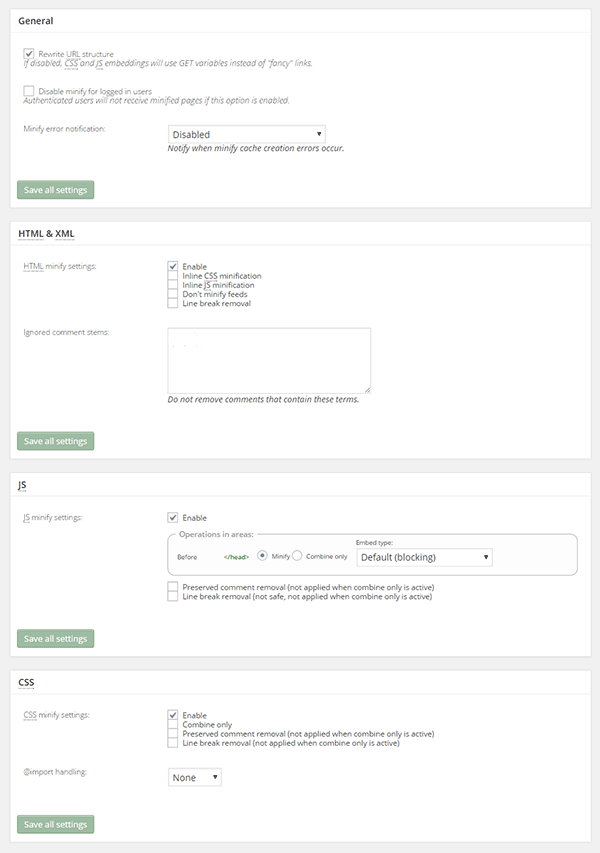

  2. Look for ‘Minify’ under the Performance menu
  3. Tick “Enable” for HTML & XML, JS, and CSS.

minify-2

  1. Click on ‘Save all settings’

The goal of minification is to make the source code “smaller” in order to improve your site’s performance. Get a more detailed information on each of the settings offered in Minification here.

Speed Up Site by Optimizing Images for Web

Your customers won’t wait around for that picture to load.

customers

Another technique to improve your online store’s performance is optimizing images on your website. High-resolution images may look great, but when you’re loading a 2MB image, it’s going to do more harm than good.

Aim for an image size of less than 100KB, but if you can go smaller without compromising quality, then better. It’s a rule of thumb to not let the images look bad or pixelated.

Striking a balance between a good looking image, and an acceptable image size, shouldn’t be a complex task.

Here are a few ways on how to optimize images for the web:

Using Photoshop

Before you upload your next product photo, logo, or banner image to your store, check the image size first.

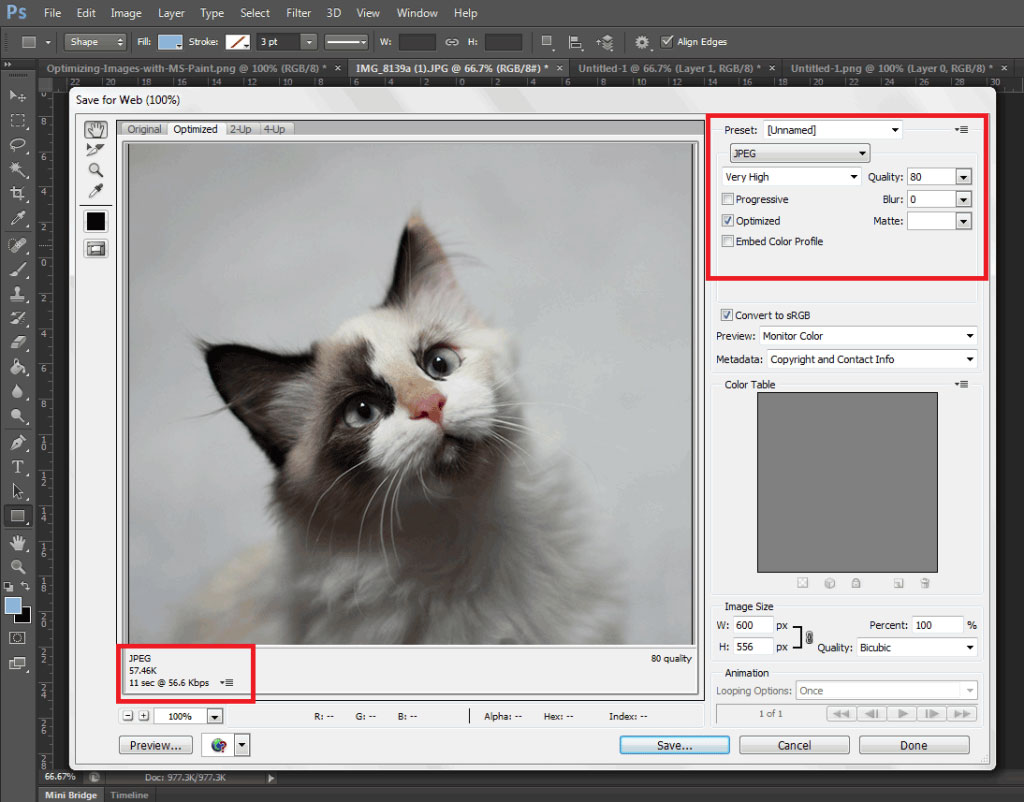
optimizing-images-in-Photoshop

Open the image in Photoshop and view it at a 100%.

If the exact size is too large to be displayed on a computer monitor, you need to edit the size of the image. You don’t have to be a Photoshop wizard. Just open the image on Photoshop, and resize or crop your image to the appropriate size. Apart from that, you also need to consider its format and compression.

If you have a style, preset image sizes that you should be using. Click on File and Save for Web (Ctrl + Shift + Alt + S). The smaller the size the faster the image loads on the page.

Using WordPress Plugins

What if you don’t have Photoshop? And, you don’t have the time to optimize every image you add to your e-commerce store? You can always rely on some WordPress Plugins.

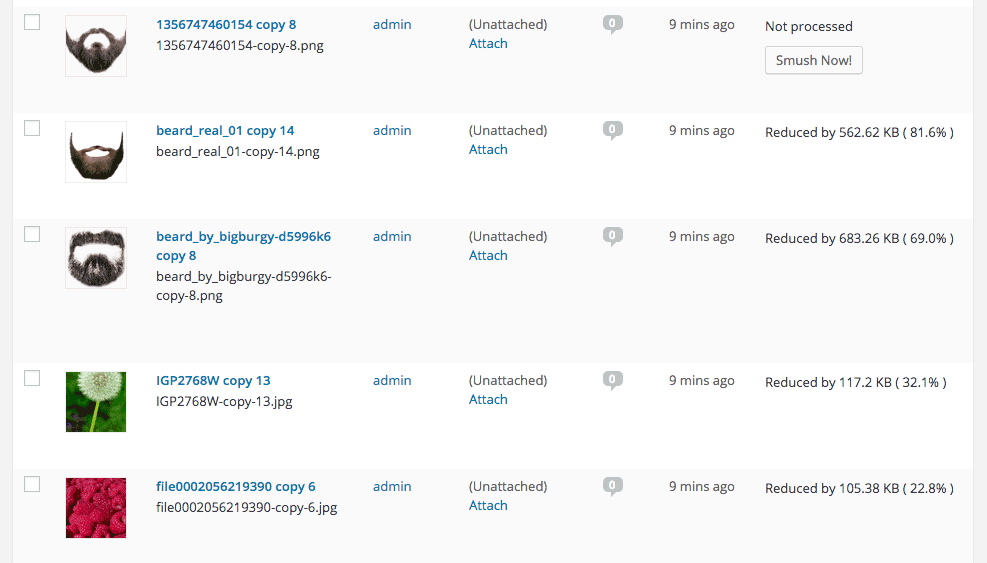
WP-Smush

Take WP Smush, for example. It’s popular for stripping hidden, bulky information from your images, reducing the file size without losing quality. You just need to upload your images, as you normally would, and the plugin will do its work behind the scenes.

The free version of the plugin cannot optimize images larger than 1M. You need to upgrade to WP Smush Pro to optimize images up to 8 MB.

Using a CDN to Increase Site Speed

CDN

So far, we’ve talked about optimizing images, caching, and minification. Now, it’s time to explore the concept of using a Content Delivery Network or CDN, and how it can help increase your site speed.

What is a CDN?

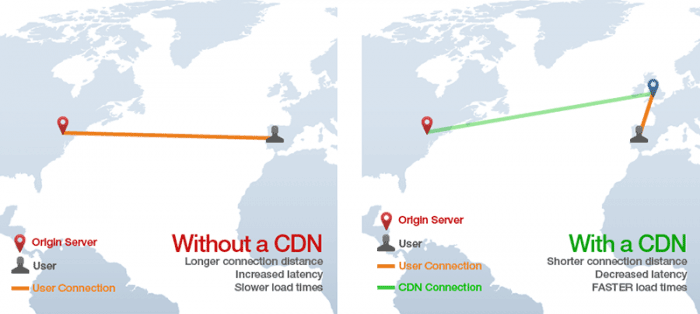
As mentioned earlier, CDN is a network of servers located at different locations around the world. It functions to cache the content of your website, so it can be delivered faster to your visitors based on their location.

Let’s say you’re server is based in Australia. Visitors far away from your geographic location will have a hard time connecting to your website. This would result in delayed responses.

With a Content Delivery Network, browsers will have a nearby server that they can connect to. This will deliver your content much faster. CDNs will mostly benefit the websites that cater to a global audience.

Because there are many options available, choosing the right CDN for your website can be tricky. It depends entirely on your needs, and the popularity of your site. Large-scale enterprise sites usually use popular CDN companies Akamai and Level3.

Setting Up CloudFlare CDN through CPanel

When it comes to small website owners, one of the more popular CDN solutions is CloudFlare. They offer a basic free plan that includes fast site performance, board security protection, and powerful stats about your visitors.

If you’re not sure if your hosting is a partner, you can check this list from CloudFlare.

According to CloudFlare, on average, a website using the CDN will load twice as fast, use 60 percent less bandwidth, have 65 percent fewer requests, and is more secure.

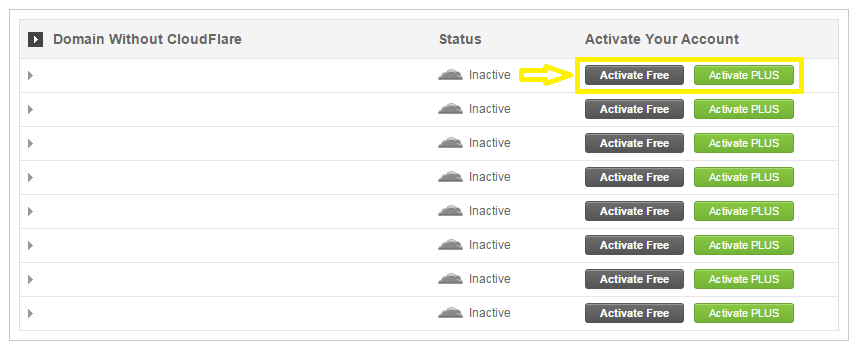
If your website is hosted on a CloudFlare hosting partner, you can easily use the tool available on CPanel.

  1. Go to CPanel’s ‘Site Improvement Tools’

cloudflare

  1. Click on the CloudFlare icon
  2. Tick ‘Activate Free’ for the free version or ‘Activate PLUS’ for the paid version

cloudflare-in-cpanel

  1. Enter your email to create an account with CloudFlare
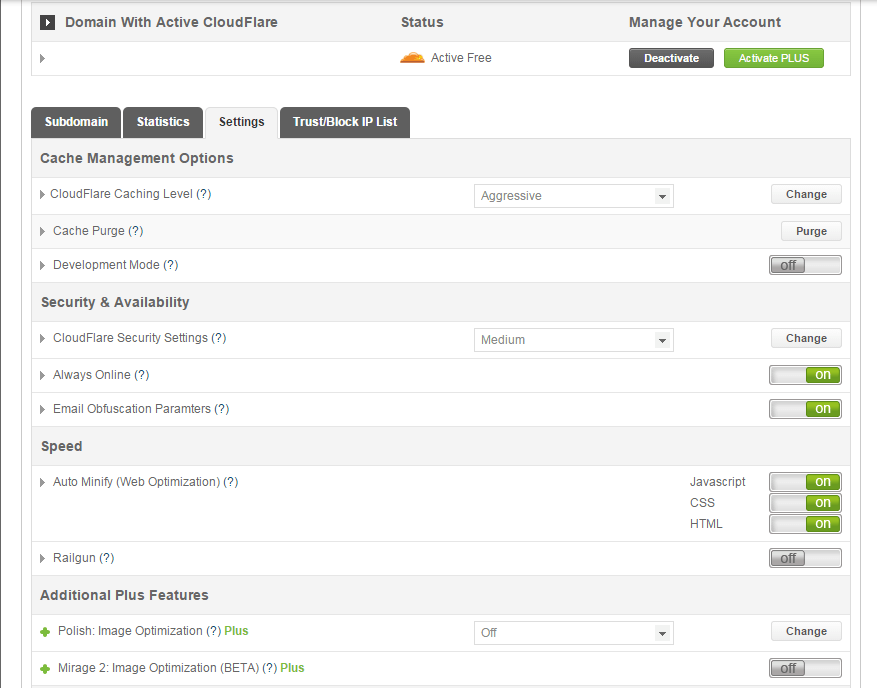
  2. Once activated, click ‘Manage’ to tweak certain settings

cloudflare-settings

And that’s it. Your CloudFlare CDN is all set and the performance of your website should be improving soon.

Setting Up CloudFlare Manually

Here’s what you need to do too set up CloudFlare manually:

  1. Sign up for an account
  2. Add your website on “Select a website” page for scanning
  3. A list of all found DNS records will be shown
  4. Set any subdomains that you would like to pass through CloudFlare
  5. Click on “I’ve added all missing records, continue” once you’re ready.
  6. Choose a plan, free or paid (SSLs won’t work with the free version)

You also need to edit the name server to the new one provided by CloudFlare. You can do this by going to CPanel, and clicking on Domain Manager. Then, go back to CloudFlare settings and click on “I’ve updated my name servers, continue”.

Note: It may take up to 24 hours for the name servers to be completely active.

With a CDN in place, your site should be running a lot faster. This improves the overall user experience and even boost your conversion rates.

Cleaning Your Database to Speed Up Your Site

cleaning-your-database

It’s a strategy that’s rarely discussed. Nevertheless, it can speed up your site just as well as the other methods. It’s maintaining and cleaning your database.

You might think that database is just one of the requirements for a WordPress install. It is, however, more than just that. If you keep your database clean and optimized, it can shave a few seconds of loading speed.

Remember, one or two seconds saved could mean the difference between a bounce and a conversion.

What’s In Your Database?

A database is just like your computer’s hard drive. It’s where all your data is stored. It contains important information such as: posts, pages, your WooCommerce products, comments and product reviews, users and customer information, URLs, etc.

For those who have been using WordPress for a while, doing regular clean ups allow you to reduce your database size. This can lead to quicker, and smaller backup files.

What’s there to clean?

cleaning-your-database-2

Over continued use of WordPress, your database accumulates many spam comments, copies of post revisions, trashed comments, remnants from plugins you are no longer using, themes, and more. When that becomes too large and bloated then website performance will suffer.

Backup Your Website First!

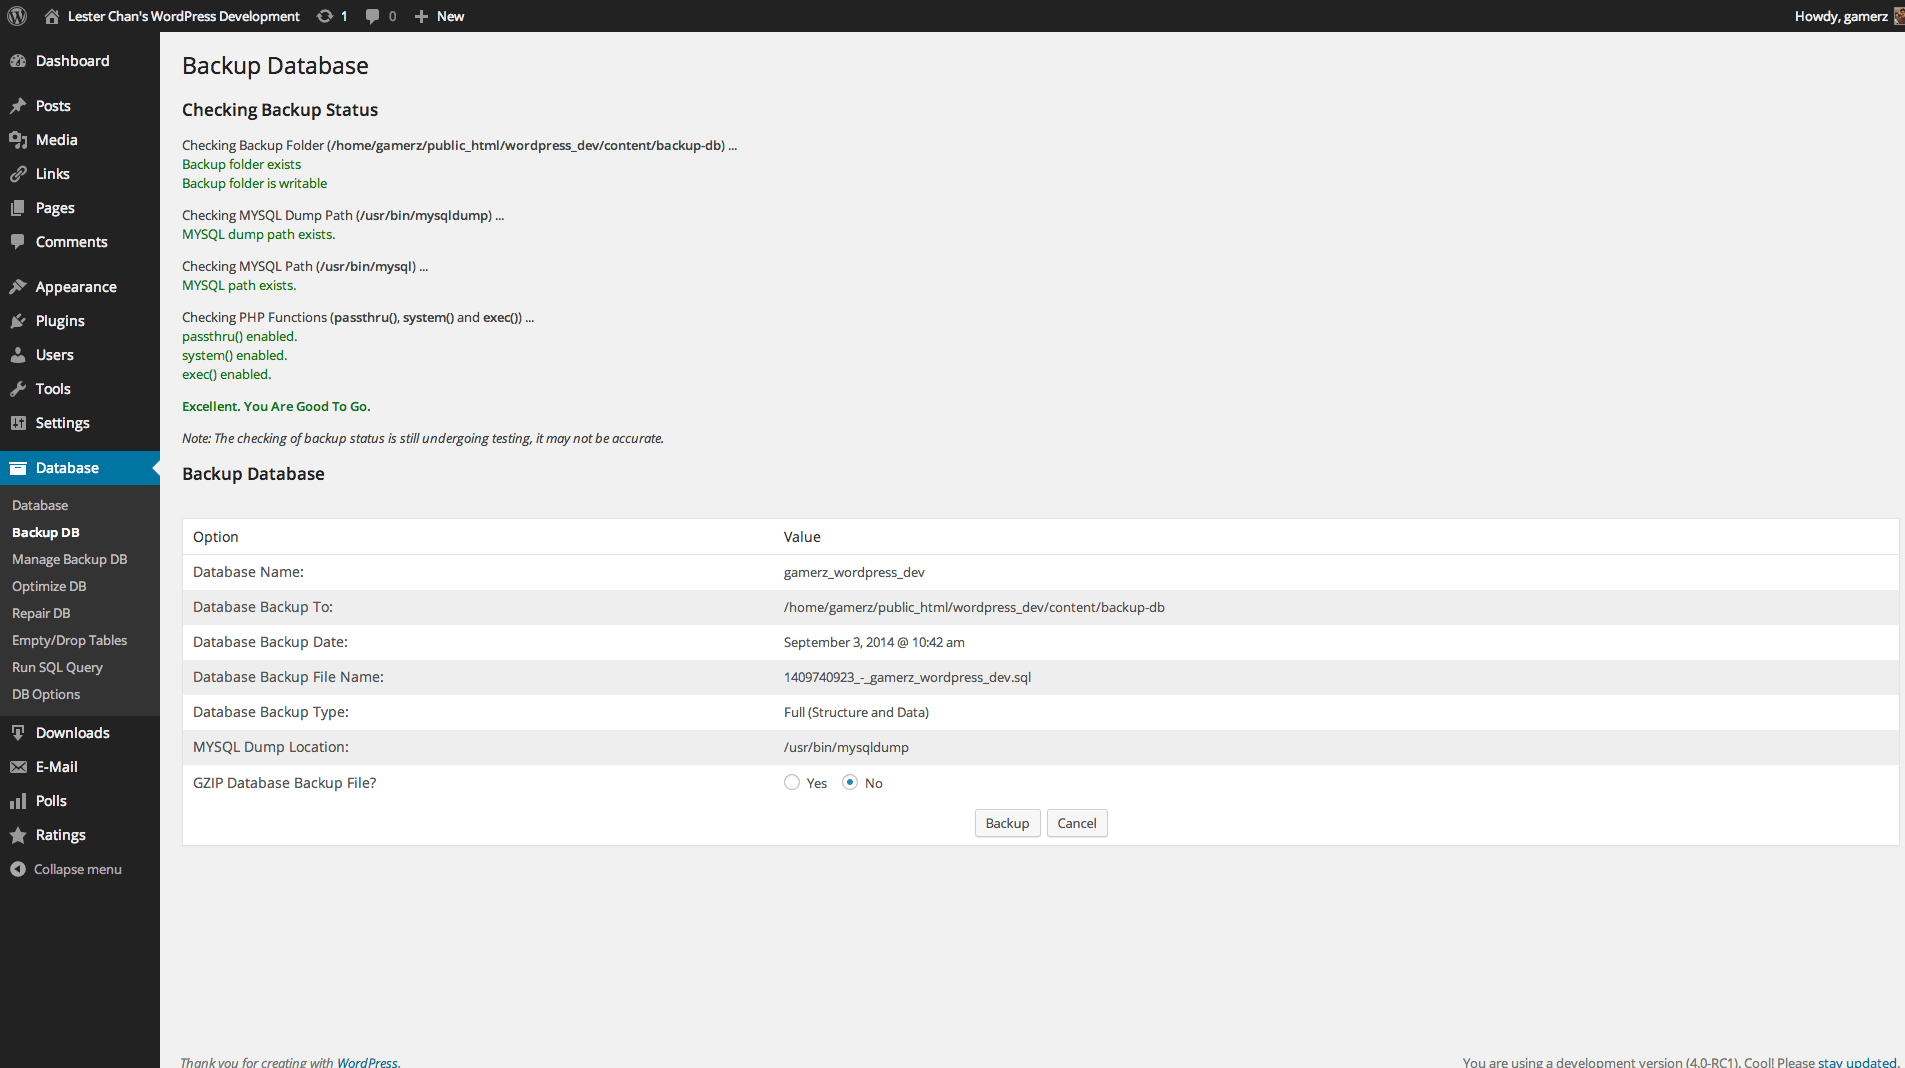
Before you start any database cleaning, it’s very important to create a backup of your website. If your database gets erased or corrupted, you stand to lose everything you have written. There are a couple of plugins in WordPress that can help you do this.

Your hosting provider will most likely have a backup of your website too. Here’s more detailed information on backing up your database in WordPress.

Cleaning Your Database

You may clean up your website database manually, or use these awesome plugins:

  1. WP-Optimize

wp-optimize

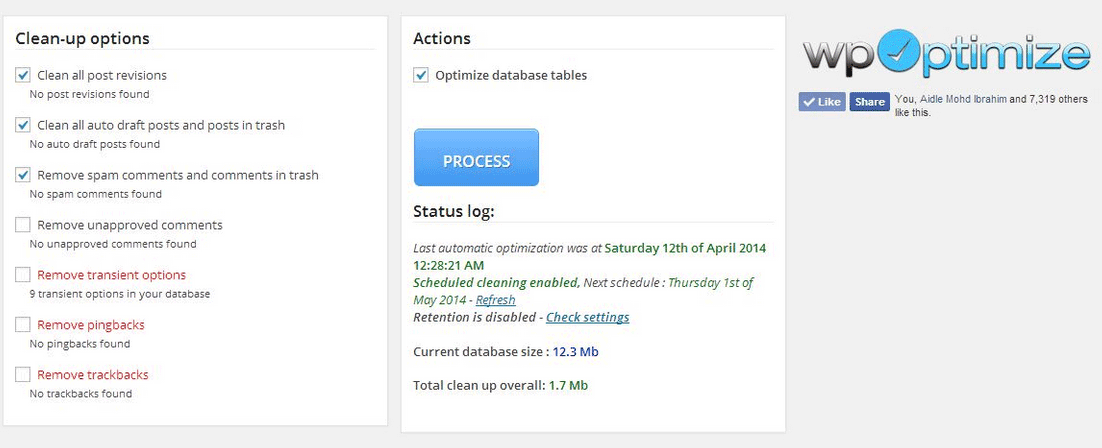
One of the most popular and easiest plugins for cleaning your database. It allows you to schedule a regular database cleanup which can be pretty handy. However, WP-Optimize plugin uses direct delete SQL queries which can leave orphaned data left behind.

  1. WP-Sweep

This plugin allows you to clean up unused, orphaned and duplicated data in your WordPress. It can also show you a report of how much clutter you can clean. WP-Sweep uses proper WordPress delete functions.

  1. WP-DBManager

wp-dbmanager

Geared for more advanced users, setting up WP-DBManager can be tricky if you’re not familiar with database elements. It offers more customizable options and features, but it cannot clear bloat.

If you want to use WP-DBManager for its features, look for other means to clear database bloat.

More Ways on How to Speed Up Your WooCommerce Store

woocommerce

Once you’ve set up a solid foundation for your e-commerce site, it’s time to do some fine-tuning. That is, if you’re still having speed issues with your WooCommerce website. Here are more useful tips to help you to solve this matter.

1. Upgrade your hosting account

As soon as you can afford it, do upgrade your hosting account. It would be better to use a good hosting publisher rather than shared hosting. Not only it can improve your site speed, but also prevent down time during high traffic periods.

2. Test your current speed

Checking the current performance of the website gives you a benchmark to compare against after you make the changes. There are various tools to help you check your loading speed:

  • Yahoo! Y slow
  • Google Page Speed
  • Pingdom is the quickest and easiest one

pingdom

3. Use minimum number of WordPress plugins

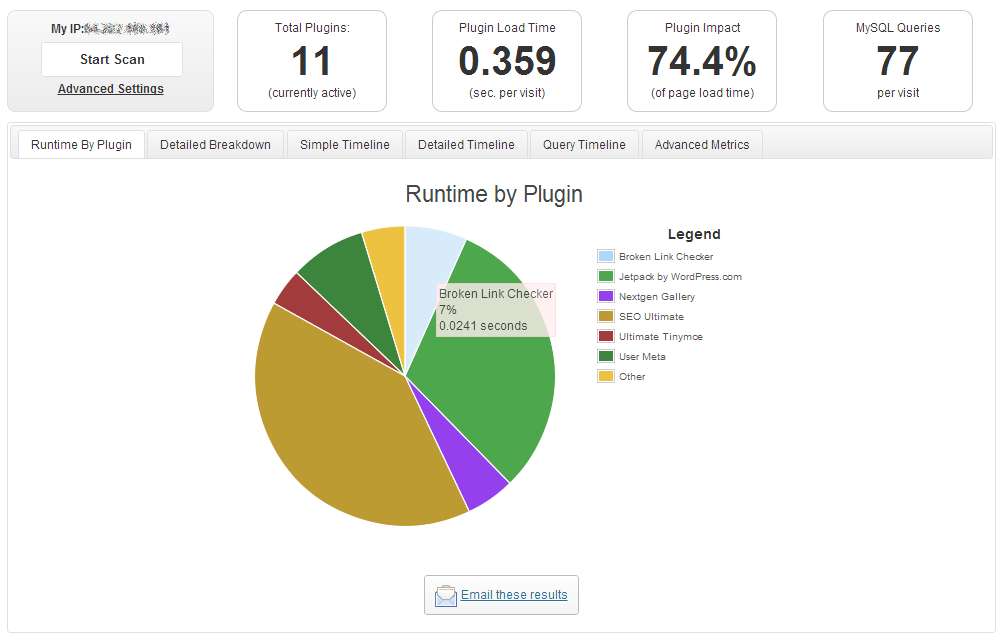
Using too many plugins in a website can slow your website speed, particularly if you’re using social-sharing plugins. It will help to identify plugins that are slowing you down.

P3 (Plugin Performance Profiler) is a well-known diagnostic plugin that shows which plugins are slowing down your site. It creates a profile of your WordPress site’s plugins’ performance by measuring their impact on your site’s load time.

p3

Once you’ve identified them, you can make an informed decision about whether to keep them, replace them or remove them entirely.

4. Compress your website

Gzip is the most popular, and effective compression method that reduces the response size by about 70%.

Compressing files on your computer as a ZIP file can reduce its total size, which makes it both easier and faster to send to someone. Gzip works the same way, but with your Web page files.

After installation, Gzip automatically compresses your website’s files as ZIP files. This can save bandwidth, and speed up page-loading times. When a user visits your site, their browser will automatically unzip the files and show their contents.

Some plugins will add Gzip to your website in a few simple clicks. For those who want to install it manually, it’s actually very simple.

    1. Open your .htaccess file, which is found in the root directory on your server
    2. Add the following code
AddOutputFilterByType DEFLATE text/plain
AddOutputFilterByType DEFLATE text/html
AddOutputFilterByType DEFLATE text/xml
AddOutputFilterByType DEFLATE text/css
AddOutputFilterByType DEFLATE application/xml
AddOutputFilterByType DEFLATE application/xhtml+xml
AddOutputFilterByType DEFLATE application/rss+xml
AddOutputFilterByType DEFLATE application/javascript
AddOutputFilterByType DEFLATE application/x-javascript
  1. Test whether it’s working by going to Check Gzip Compression

5. Optimize your homepage

Your homepage is a crucial part of your site because visitors land there the most. There are a few easy ways to ensure that your homepage loads quickly.

  • Show excerpts instead of full posts
  • Reduce the number of posts to 5 or 7
  • Remove unnecessary sharing widgets
  • Remove inactive plugins and widgets that you don’t need

A clean and focused homepage design will help your page not only look good, but load quicker as well.

6. CSS on Top and JavaScript at the Bottom

It’s widely recommended to link your style sheets as close to the top of the page. The reason is that browsers won’t render a page before rendering the CSS file.

Meanwhile, JavaScript should be as close to the bottom of the footer. Doing so can prevent browsers from parsing anything until it has fully loaded.

With just this simple fix, page-loading speed will improve, since files are forced to be downloaded in the optimal order.

7. Disable content hot linking and leeching

When other sites direct link to the images on your site, it can make your server load increasingly high. This adds up as more and more people “scrape” your posts.

Conclusion:

Just How Important is Site Speed?

importance-of-site-speed

Consumers take advantage of online shopping because of the convenience it offers. Most people can’t stand waiting in lines. And, they especially get frustrated when it’s taking longer than expected.

Now, going back to your website, users won’t wait for your site to load. If it takes too long, they’ll definitely find another online store.

Another thing to keep in mind is that Google wants the best experience for their users, giving site speed utmost importance. They even reward sites that have clean codes and download quickly.

Page speed is now one of 200 or so signals Google uses to determine rank. More importantly, do it for your existing and potential customers. The faster a page loads, the more satisfied they will be.

Filed Under: How-To Articles Tagged With: best practices, caching, CDN, CloudFlare, conversion optimization, CPanel, Genesis, how-to, minification, optimizations, photoshop, SEO tools, site speed optimization, Siteground, Storefront, W3 Total Cache, website maintenance, WooCommerce, woothemes, WordPress, WPengine

How to Optimize Email Opt-in Forms for Increased Conversions in WooCommerce

May 17, 2016 By John Leave a Comment

how to optimize email opt-in formsAs part of your sales funnel, your goal probably is to convert site visitors into subscribers and later on, into paying customers. Email marketing is still one of the best means to connect with your potential customers after they’ve left your site. As you get visitors in your WooCommerce store, you’ll want to get their emails. To do this, you need to learn how to optimize email opt-in forms.

In this post, we’ll show you what you should put in an opt-in form and how to position it strategically on your e-commerce store. We’ll also introduce you to some popular WordPress plugins to easily add opt-in forms on your site.

Where can You Add Opt-in Forms?

It is useful to add opt-in forms in different sections and pages on your e-commerce store.

Landing page

Using a landing page (or a squeeze page) is the traditional method of collecting leads. Because your goal is to get people to sign up to your mailing list, every element of the landing page should support that desired action. Don’t add a side-bar because it will just distract the users from the real goal. Remove links that will take the site visitor away from the landing page before they even fill out and submit the opt-in form.

Feature Box

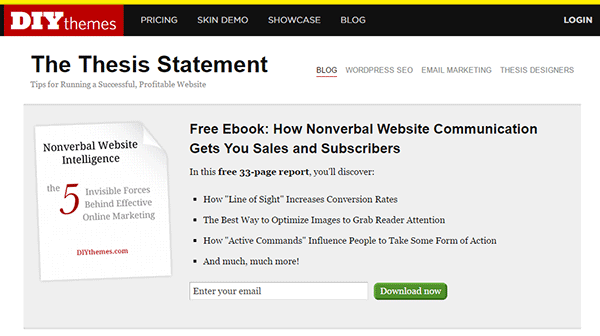
A feature box is a full-width email opt-in box usually added on top of your homepage. Some do not use a feature box because of two things: it takes up the most valuable space on your homepage, and it seems pushy to immediately ask for an email address. To validate the feature box’s location and avoid getting negative attention from site visitors, make sure that what you’re offering is definitely useful in exchange for their email address.

As an example, the use of a feature box on DIYthemes’ blog resulted in a 51.7% increase in its daily blog subscription.feature-box_DIYthemes

Pop-up Window

Because of its nature of ‘popping-up’ and interrupting the user while browsing the site, many visitors don’t like pop-ups. Nevertheless, a pop-up window is still one of the most effective lead generation tools. A lightbox works the same way as a pop-up window, but the rest of the site is darkened to make the form stand out.

Note that the timing should be perfect to avoid hindering good user experience. Once seen, you have only 1-2 seconds to grab the user’s attention and pique their interest before they close the window. Here are some examples of high converting pop-up email forms.

Opt-In Forms in Other Pages

options-2Apart from the feature box in the homepage, you can insert more opt-in forms in other pages (About page and Splash page) and in other page sections (top of sidebar, sticky top bar and below the footer).

The About Us page is usually one of the most visited pages in any website, so it’s a good idea to make the most of that traffic.

In a Kissmetrics review, using a splash page might be a better idea than a pop-up on the homepage. A pop-up is frowned upon because it interrupts the user while browsing the site. A splash page appears as a preliminary message. As such, it is better perceived.

Sidebar Opt-In Form

A sidebar opt-in form is the most common email list building method mainly because it is built in to most website templates. Keep your opt-in form to the top of your sidebar though, to maximize results.

Sticky Top Bar

Because a sticky top bar remains visible on top of the page even as you scroll down, visitors have plenty of time and opportunity to notice the message and eventually subscribe.

Components of an Opt-In Form

Once you’ve determined where you want your opt-in forms, the next step is to create them. To increase your chances of getting sign-ups, your opt-in form should have the right timing, design, form fields and copy.

Timing

15-seconds_traffic-stoplightIn using a pop-up window, you need to properly time it. You can set a time delay before showing the pop-up. If it’s too early, you’ll annoy site visitors even before they’ve taken a look of your site and what you have to offer. A 15-second delay is enough time for visitors to look around your site and not be too bothered with a pop-up. Note that this does not necessarily apply to your target audience. It’s best to conduct your own tests.
You can also show pop-ups as visitors reach the bottom of your content or as they exit your site.

Design

To effectively connect with your visitors as they quickly scan your opt-in form, you need to add visual elements that enhance your messaging. Humanize your opt-in form with a photo. Inject credibility with a testimonial or statistic. If your opt-in form is not a pop-up, make sure it will get noticed but at the same match your site’s theme.

Form Fields

More people sign up when less form data is requested. Note that you just need the email address of your site visitors for email marketing purposes. Usually just a name and email in the form will suffice. You can even make the name optional.

Concise Copy

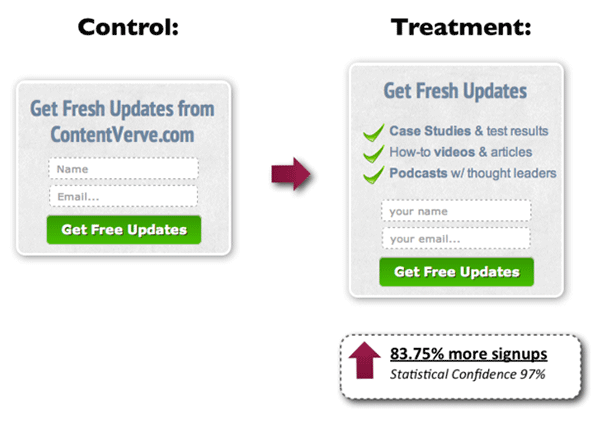
Make your opt-in form copy as concise as possible. It’s important to present a clear purpose when asking for personal information. Spell out what your site visitors will get in return. You can also assure them that you won’t sell their addresses to a third party or spam them. BeemDigital showed an 83.75% increase in sign-ups when they added value and relevance to their opt-in form.

concise-copy_Contentverve
Image Credit: http://contentverve.com/how-to-write-high-converting-signup-form-copy/

Another effective tactic is to offer a lead magnet, like a free e-book, product trial, discount, or even free shipping. On a side note, you can set up the incentive in such a way that your new subscribers won’t unsubscribe immediately. If you’re offering a free e-book, break it up in parts and offer them in a series of emails. Entice them to want to wait for what’s coming next.

Recommended Opt-In Form Plugins for Your WooCommerce Store

In choosing your opt-in plugin, consider what features you need and choose a plugin that provides just that and nothing more. Anything more is just extra bloat on your site. Below we list some of opt-in form plugins that we can recommend.

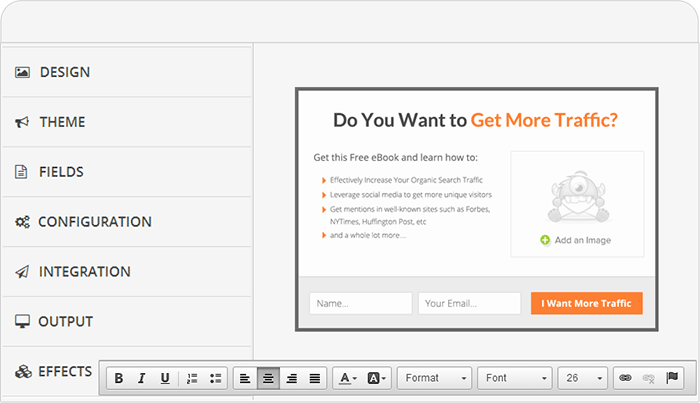
OptinMonster

optinmonsterOptinMonster is a paid pop-up plugin that offers a wide range of functionality. It comes with an easy-to-use form builder that allows you to create various types of opt-in forms including WordPress popup forms, floating header and footer bars, slide-ins also known as scroll triggered boxes, sidebar forms, after post forms, in-line forms, mobile-specific forms, and welcome gates. Other features are exit-intent technology, page-level targeting, behavior automation and A/B testing, and a 2-step opt-in process.

PopupAlly

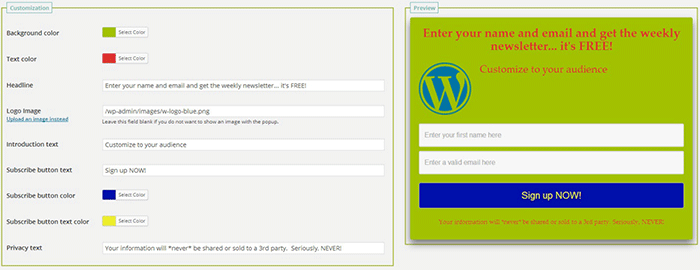
popupallyPopupAlly’s free version allows you to create advanced popup signup forms even if you don’t know how to code. You can also embed opt-in forms at the bottom of your posts, set a few seconds’ delay or have the pop-up appear as the users leave your site.

Its premium version, PopupAlly Pro, has an optimized interface and extra features. This includes more customizable templates, more opt-in options (horizontal, sidebar, below-the-post, etc) and allows for any web fonts to be used. Click-based and scroll activation timing features and one-on-one email support are available only with the premium version.

Hello Bar

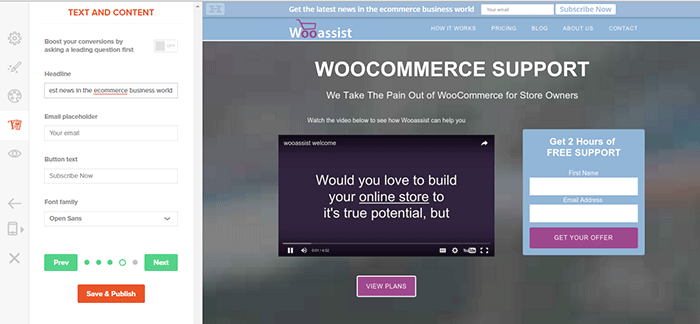
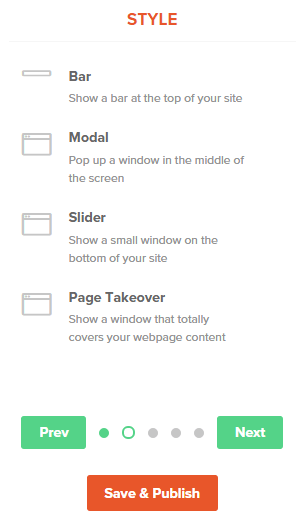
hellobar_wooassist pagehellobar_style menuHello Bar is a free plugin that allows you to copy and paste a code snippet from HelloBar.com straight to your WordPress admin interface. Above is the HelloBar interface from the website. You can choose from several goals like grow your email list, promote your social pages, promote an offer, or add a contact form. You can choose from several styles of opt-in forms and even change the colors to match your website’s colors. To set up HelloBar, just visit the site to configure. The interface is very straight forward so you should have the design in minutes. To apply this to your site, just install the free plugin that is generated specifically for your website. This plugin will only work for the site that you registered it for. You can just create a new one for another site.

This plugin also comes with A/B testing so you can easily optimize for increased conversion.

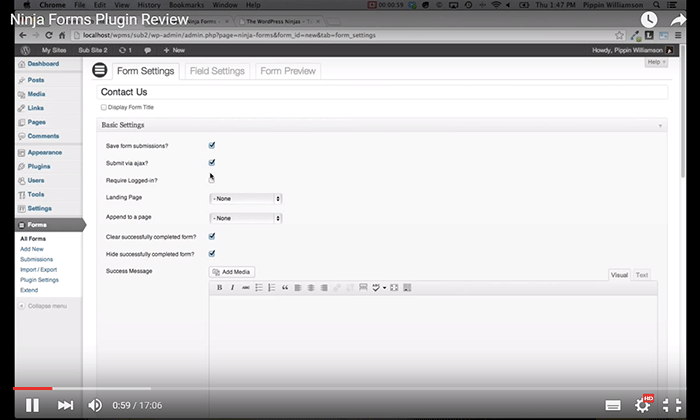
Ninja Forms

ninjaformsNinja Forms is a plugin built with developers in mind. Included are hundreds of functions, action hooks, and filters that developers can use to create their own custom functionality. Customize field options and forms with its extensive settings. Add a Ninja Form to your e-commerce site easily with a widget, shortcode, template function, or append it automatically to any content. Upgraded bundles include automatic updates, add-ons and sites per add-on, and email support with faster response time.

Which Opt-in Forms Leads to More Conversions?

arm-wrestling-2There is no single correct answer to this question. Different websites vary in terms of design and market. This article could help point you in the right direction, but there are a lot of things you need to figure out for yourself. Get to know your customers by creating a customer persona. When you are able to identify your customers, you’ll know how to market to them. From there, you can create a sales funnel that works for you. Use heat maps like CrazyEgg to find out where your visitors click. Constant A/B split testing will help you determine what variation converts better.

Conclusion

Opt-in forms should be placed strategically throughout your website. Optimize them so they are easily visible. Make them stand out. These forms should offer value and relevance to encourage users to subscribe. Enhance copy with visual elements and keep form fields to a minimum. If you decide to use pop-ups, you need to time them correctly so as not to be intrusive. Make sure you’re getting the most of your opt-in plugin’s features without sacrificing site performance. When your opt-in forms are set up, you need to conduct your own split testing to optimize for maximum conversion.

Hope this article helped you out. Do you have any strategies you’d like to share for increasing opt-in form conversion? Do you want to add something that we might have missed? Let us know in the comments section.

Filed Under: How-To Articles, Theme and Plugin Reviews Tagged With: best practices, conversion optimization, design tweaks, how-to, marketing strategy, plugins, PopupAlly, website development, WordPress

4 Steps to Creating Better Customer Personas for Online Stores

July 27, 2015 By John Leave a Comment

Not everyone is your customer. So, before spending thousands of dollars on your marketing campaigns, it’s important to know who you are trying to reach.

Creating customer personas should be the first step to any marketing campaign.

What you will learn:

  • How to increase sales using customer personas
  • How to create customer personas without breaking the bank?
  • Case studies on popular brands’ success and failure.
  • How to use your customer persona to 10X revenues?

To learn more, keep reading.

Susan, David, Matt, Monica, or John – one of these personas can be your customer. Consider them hypothetical representations of your target audience’s fears, favorite places online, and motivation to purchase your product.

If you’re like many small business owners who don’t have the means to hire a full-blown marketing team, it’s up to you to identify what makes your customers tick. Here is what we have done for our customer personas at Wooassist.

According to eMarketer’s latest forecasts, e-commerce sales will top $7 trillion by 2025.

With many ecommerce stores found on the web today, coming up with an effective marketing campaign can help a company get ahead of the competition.

Why Do Some Marketing Campaigns Succeed And Others Fail?

marketing-fail

It’s very important for marketers to put themselves into the shoes of their target audience. Companies that know how to think like, feel like and behave like their potential customers have the definite advantage.

It’s not a new technique.

Think of your favorite book author or screenwriter. When working on a new character, they write about every possible detail, from that character’s life, background and thought process.

Why Creating Customer Personas are Important?

Customer personas are becoming increasingly useful not only for large companies, but also for smaller online retailers. It’s now possible to have ultra-targeted ads and communications.

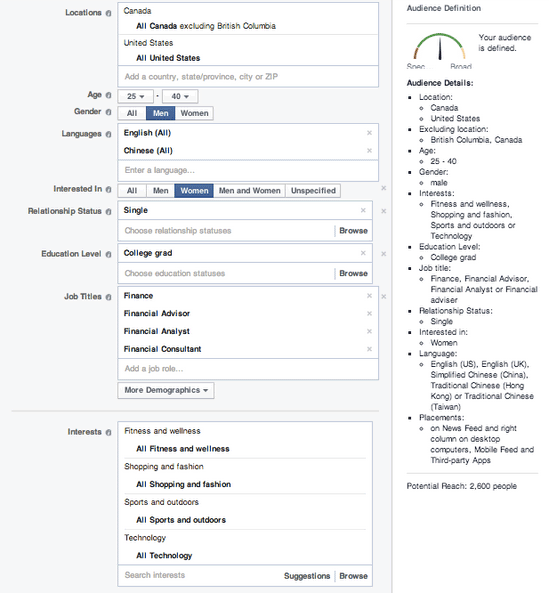
Take a look at Facebook’s advanced targeting when it comes to their advertising:

facebook-targetting

One can target a very specific audience. You can base it on a customer’s location, age, language spoken, education level and interests. To do this effectively, a company needs to define their customer personas.

Case Study 1: Subway’s Jared

Subway, a popular fast-food franchise for sandwiches, named their fictional persona Jared. He is an overweight American who wants an easy-to-follow, affordable diet plan with lots of choices and familiar foods.

subway

When Subway has to make a marketing decision, they first ask, “Would Jared want this?”

This buyer persona helped Subway redefine itself as a healthy place to eat, and they reorganized its menu to highlight its low-calorie meal options.

So, are you ready to revamp your advertising?

If you’re planning to start an e-commerce business, or already have an existing one, it’s time to discover the concept of Customer Persona, and how it can help you grow success.

Step 1: Meet Your Potential Customer

Personas are fictional, generalized characters built from the real words of real consumers. They incorporate the various goals, needs, and observed behavior patterns among your real and potential customers.

It is not merely a description.

More than a one-dimensional profile, it delves more on the specific attitudes, concerns and criteria that drive prospective customers to choose you, or your competitor. When you have these insights, you have the knowledge to align your marketing decisions.

SUSAN is one example of a customer persona.

Watch the video below:

Before going through the basic customer persona template, it’s important to know where to get all the information you need – sources to help your persona take shape.

Take a look on these three places:

  1. Site analytics.
analytics

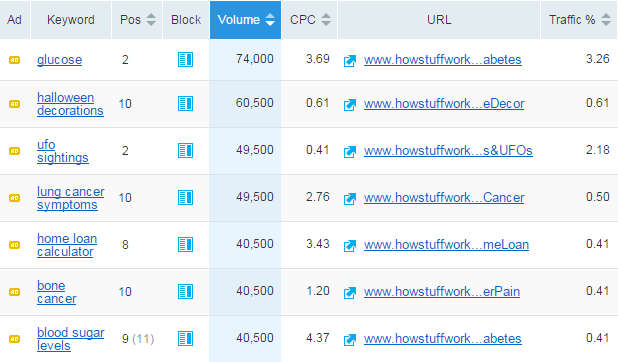
Take advantage of your site’s analytics. It’ll allow you to see what led your audience to your site, and even the device they used. Take note of where they came from, the keywords they’ve used, and how long they’ve spent on your site.

  1. Social Media.
social-media

They call it ‘social media listening’. Twitter, Facebook, LinkedIn, YouTube, etc. – explore on the different social media platforms to find your potential customers and get to know them. What are their questions, or common problems? How can your products or services be the solution?

  1. Surveys and interviews.
survey

Personas will become more useful if they’re based on interviews, or surveys, gathered from the buyers themselves, customer service interactions, and even sales people. These data can reveal a deeper insight into a customer’s goals and values.

Components of a Customer Persona

persona-components

When creating your persona, you need to address include several of its components. Take a closer look at your customer base. Identify both ‘good’ and ‘bad’ customers to get a more rounded understanding.

Let’s go through the ABCs of creating your customer personas:

Name.

It may seem unnecessary, but giving the persona a name is essential. It makes the persona closer to resembling a real person. It will also be easier to refer to your persona, instead of having to refer to it as a broad idea.

Background.

This includes the basic background information, including demographics and psychographics. Age, gender, location, family life, likes and dislikes, and location – these data will help you understand the motivations of your audience when it comes to navigating.

Goals.

Remember SUSAN – what was her goal when looking for a product? It’s to get the best price. Setting goals for your persona helps in identifying the results they want. Do they shop by price? Do they want to find a vendor they can work with quickly?

Online Skills.

How comfortable is your character online? Understanding their technical skills lets a business build its website in a way that customers can navigate with ease. It tells you how your audience interacts with your brand.

Platform.

What platforms are they using to get to your website? Your website should have a responsive design, so it can render correctly in any device. Including this in your persona ensures that your website is optimized.

Step 2: Create Your Customer Persona

Once you really get to know your customers, you will be able to make a more meaningful connection. Using a combination of raw data and educated guesses, which can include demographics and behavior, you will be able to create a client persona that portrays your model customer.

Give Your Persona a Name

It can be whatever you choose. Humanize it – give it a real name and even a photo. This psychological detail allows a marketer to see his products from the persona’s perspective.

persona-name

GardenWare does a good job of identifying their customer persona by creating two distinct profiles of their customers.

Job, role, and company.

The best resource for these data is from surveys or interview results. Build surveys that include a field for job title, or type of business.

Demographic information.

analytics-1

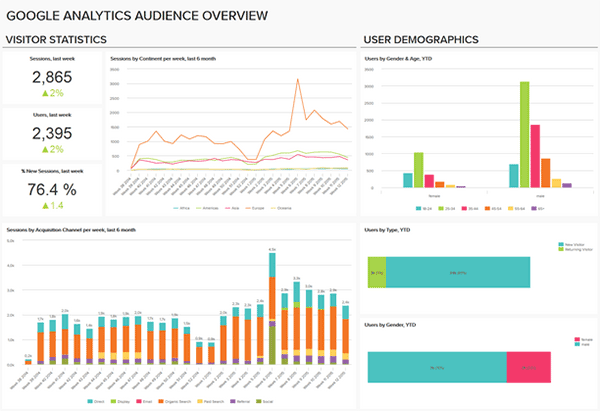
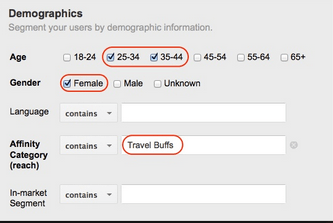
For this section of your template, don’t just rely on your best educated guesses. You can get some insight from Google Analytics and survey results.

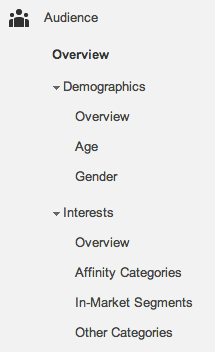
Five dimensions available include Age, Gender, Affinity Categories, In-Market Segments, and Other Categories.

Affinity Categories identifies users in terms of lifestyle. In-Market Segments identifies users in terms of their product-purchase interests. On the other hand, ‘Other Categories’ provides a more specific, focused view.

analytics-2

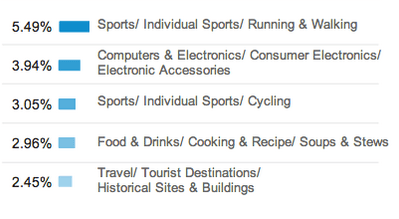
Google Analytics can also reveal the interests of your site’s visitors. Once you know their interests, you can come up with more customer-oriented posts and ads, in any platform.

analytics-3

For data which are not found on your analytics, you can check on your survey or interview results. Make sure to ask the right questions to get the most accurate responses.

Goals, Obstacles, Values and Fears.

To determine objectives, customer interviews will be of great help. As you identify these data, also come up with your solutions in order to help them meet their goals and overcome their challenges.

goals

Marketing Message.

After creating your fictional buyer, tailor your marketing message by identifying words that are likely to gain their attention. Make an effort to find out what triggers them to make a purchase. Common buzz words may include coupon, bargain, and sale.

marketing--message

How Many Do You Need?

You don’t have to minimize a thousand clients into just one representative. Ideally, there should be about 3 to 5 buyer personas for each business. These personas will be changing along with the growth of your store. You’ll have to review them from time to time.

Modern consumers are smarter. They know when they’re being manipulated.

poor-content

With a poorly-written content that’s all ‘sales talk’, that’s exactly what you’re making them feel. Be strategic and relate to them more as ‘human beings’. You’ll need a persona template, which you could apply in your marketing campaigns.

Case Study 2: MailChimp Persona Research

mailchimp-persona
Fred. MailChimp’s ideal user

Let’s take a look at MailChimp’s persona research. Their objective was to ‘find out who really uses MailChimp’. They believed that what they needed was a clear idea of their current users, to better empathize with them.

Here’s the process of their research:

  1. They interviewed stakeholders in order to identify who uses MailChimp. They were given the same characteristics – smart, self-reliant, and techie. Thus, they came up with the customer persona ‘Fred’.
  2. As for their next step, they ranked their pool of active users by industry. It was found that a huge number of MailChimp customers were represented by the nonprofits, education, and the arts.
  3. Subjects from popular industries were identified and interviewed. Customers were met at their workplaces, in different locations of North America and Europe. Data gathered also included the workplace’s environment, the customer’s emotional state, etc.
  4. Findings were organized and analyzed, and MailChimp discovered a lot of similarities across different roles or types of customers.
  5. MailChimp ended up with five archetypical personas, which they used as guides in developing MailChimp. The last step was sharing the outcome with the team. So, they created posters that now adorn the walls of their HQ.
Step 3: Put Your Persona to Work

Done with your customer persona? Great!

Now, it’s time to put those personas to work. Here are ways for you to start using them in order to make smarter marketing decisions.

Post Social Updates in Their Language.

social-media

When you post social updates, use the language your buyer persona uses. Is your persona a stay-at-home mom, or the head of the human resources? Speak like how you’d talk to someone in real life. Doing so can make your brand relatable.

Create Their Favorite How-To Blogs.

Even Google reminds online marketers to create relevant, educational content. With customer personas, you will be able to create content that makes a more meaningful connection. Write about the solution to their problems.

Customize Your Keyword Strategy.

Part of creating your persona is knowing their challenges. What’s the phrasing they’ll most likely use to search for solutions? Take this opportunity to customize your SEO, optimize content, and target keywords your buyer persona uses.

keyword-strategy

Create Offers That Can Solve Their Problems.

What does your target audience want help with? Since you have identified your customer persona’s fears and common obstacles, you will be able to offer effective solutions. This will mean more leads!

Align Campaigns With Your Persona’s Lifestyle

Is your buyer persona a night owl, or more of a morning person? What’s his or her daily lifestyle nuances? Let’s say your target audience goes on a vacation every summer. You can align your campaigns during that month.

campaign-personal-style

Apply Technology They Know How to Use.

Asking your customers to use a technology type that they aren’t comfortable using is not really a smart move. Take for example – making them download a mobile app when they don’t have a smartphone. Again, the platform they’re using is an important component to consider.

apply-technology

Mold Sales to Your Persona’s Decision-Making.

Is your buyer persona the budget conscious type? During the buying cycle, what information does he or she need to go through with the sale? This is a crucial information which can help your sales.

Case Study 3: JC Penney’s Big Mistake

JCP

JC Penney Corp. is a well-known chain of American mid-range department stores based in Texas. In June 2011, the company announced that they’ve hired Ron Johnson as CEO. He was the man in charge of Apple’s profitable retail stores, dubbed as Steve Jobs’ acolyte.

In just a month of his being CEO, Johnson suggested a radical rebranding.

Johnson

The plan was to create a more youth-oriented Penney, getting rid of its addiction to price promotions. The outcome was disastrous. JC Penney totally abandoned their existing customer personas. They have alienated traditional customers, without attracting new ones.

Around 16 months later, Johnson was out. Penney lost $1 billion during his one full year as CEO. After Johnson was gone, the company restored its past philosophy.

Ron Johnson admitted that he didn’t understand what his customers wanted. He didn’t take into account what drove JC Penney customers to shop.

How to Use Customer Personas

how-to-use-customer-personas

Don’t make the same mistake as Ron Johnson did. By clearly defining your buyer personas, you’ll have a much better idea of who, how, and where you should be marketing to achieve the greatest level of success.

Demographic data can help you target your ads, and psychographic information can help you create more engaging campaigns.

Step 4: Keep them on Target

Google always reminds us to keep our content fresh. One of the best ways to do that is keeping your customer personas on target.

How to keep your customer personas on target?

This means that you have to always keep their problems and concerns top of mind. You need to write directly to and for your buyer personas. Use them to modify and improve your marketing strategies.

Re-examine and Refresh.

It’s a competitive world out there. Make sure that your customer personas accurately reflect your target audience’s current life situation and purchasing needs. Do this on a regular basis. Put it in your calendar as necessary.

refresh

Prioritize Conversations with Customers.

It wouldn’t hurt to browse your blog and social media accounts and read customer comments. Include both positive and negative feedback. Doing so will provide your business with some fresh insights.

Use the Best Data Resources.

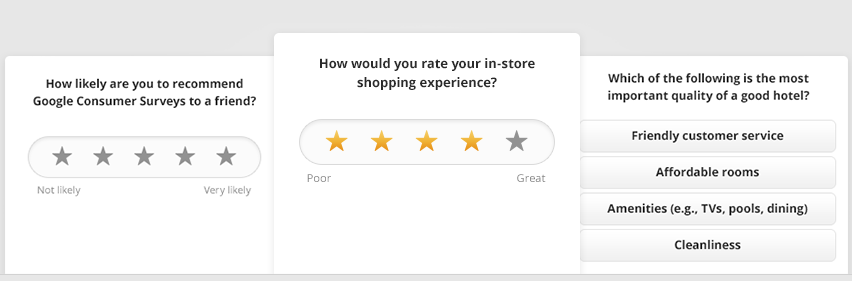
Google Consumer Surveys, Quora, Mechanical Turk, and other similar sources can help supplement your current data. Put them to good use in order to keep your personas fresh, and on target.

Google-survey
Google Consumer Survey

Add and Delete Personas.

The marketplace is ever evolving. In the months to come, there may be a need to add new personas and delete those who can no longer help. Personas are working tools that should be aligned to the present and the foreseeable future.

Visualize Your Audience.

You can either assign a photo to your customer persona, or keep photos of actual customers where you can see them. They’ll represent your target personas and remind you that you’re creating content for real people.

visualize

Popular Brands That Totally Get Their Buyer Personas

Do you ever buy products from the same brand, and stopped to think, ‘They totally get me’? It’s obviously a company that gets their target audience. Let’s take a look at some companies that totally “get” their buyer personas!

piece-of-cake

Seventeen Magazine

Believe it or not, Seventeen started shaping their customer personas back in the 1950s. The first buyer persona they’ve made was named Teena. They’ve based it on survey data from teenage girls and their mothers.

Seventeen Mag described Teena as the ‘High School Girl who has a peck of problems’.

seventeen

“She’s what older folks call an awkward adolescent — too tall, too plump, too shy — a little too much of a lot of little things. But they’re big things to Teena. She writes her favorite magazine for the tip-off on the clothes she wears, the food she eats, the lipstick she wields, the room she bunks in, the budget she keeps, the boy she has a crush on.”

Seventeen may have adjusted to the modern world, but its content still caters to girls like Teena, who have problems with their diet, boys, and dating. We can say that Seventeen has successfully channeled what was going on in high school girls’ minds.

Apple’s iPad 2

ipad2

When Apple launched its iPad2, the campaign was no longer geared towards consumers in general. Instead, Apple identified their customer persona as the on-the-go business professional who needs access at stock options, investment portfolios, etc.

They’ve promoted their iPad 2 into a device for a business professional who wants to make their job more effective and efficient.

JetBlue

jetblue

JetBlue finally took advantage of social media to reach a younger group of audience. The company’s buyer persona is now the low-budget traveler, who wants a comfortable yet affordable solution to flying.

fly-like-a-boss

They even tweeted their campaign ‘Fly like a BOSS’, and as expected, quick responses from their target audience were achieved.

Procter & Gamble

P&G

Procter & Gamble is known for the thousands of products they provide for households. And, one of their personas is the one who’s in charge of shopping for these items – moms!

One of their most unforgettable campaigns happened in 2012, which showed an ad dedicated to the Olympics. They called it ‘Raising an Olympian’, wherein the company focused on a mother’s role in her child’s success. Who can resist such a heart-moving story?

Conclusion

success

At the end of the day, you want to increase conversion rates and make more sales for your online store. And, creating buyer personas is an essential part of building a successful marketing strategy. You just have to know where, when and how to use it.

For your website.

Because of your customer persona, you will be able to craft a better user experience on your online store. You will be able to generate content that speaks directly to each persona, giving them solutions, instead of just generic content.

For your sales.

Your sales pitch is an important factor to your ecommerce conversion rate. It’s the last thing a customer reads before hitting the ‘buy now’ button. Customer personas can give ideas regarding the motivation, and psychology, behind the purchase.

For your content marketing.

You already know what type of articles your customer persona reads. Thus, you can create blog posts for your target audience. This makes your content relevant. It’ll attract more leads since you’re offering information they want, and they can actually use.

For your advertisements.

You may even use personas to optimize your PPC campaigns. Apply the same keywords your customer persona uses to make your ads more relevant. You can place banner ads on websites that your customers frequent. This will definitely improve your CTR.

Now that you have this information, you have the chance to make your marketing campaigns more effective. Don’t be afraid to meet your customers. The next time you launch a promotion, you can ask yourself the question…

‘Would Susan or Matt be interested in this news?’

Filed Under: How-To Articles Tagged With: customer persona, e-commerce, Google Analytics, how-to, keyword research, LinkedIn, marketing strategy, social media, Twitter

How to Integrate WooCommerce into a Non-WooThemes Theme

March 2, 2015 By John Leave a Comment

how to integrate WooCommerce into a non-WooThemes theme

WooCommerce (WC) and themes from WooThemes go hand in hand when building an e-commerce website. But what if you wanted to use a theme not from WooThemes? There may be some compatibility issues but it could still work. To solve these problems, we’ll need to set it up in such a way that your non-WooCommerce or custom theme supports Woocommerce and make the integration flawless.

WooCommerce provides two methods to do this. Either we use hooks or make use of their catch-all woocommerce_content() function. The second method is the easier of the two so we’ll only talk about the second method of the catch-all woocommerce_content() function in this post.

To start, know that it’s divided into 5 simple steps which we’ll outline below:

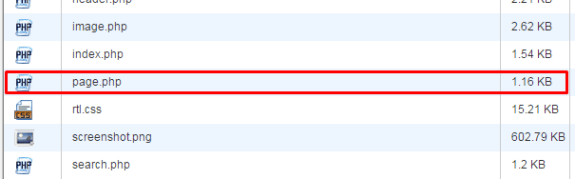
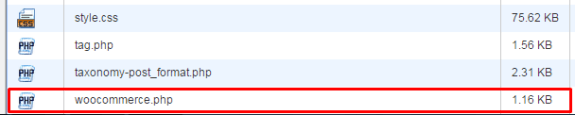
STEP 1: Duplicate your page.php file and rename it as woocommerce.php

For this, you’ll need to access your website files using an FTP program or cPanel file manager. Find your page.php file which is usually located in wp-content/themes/[YOURTHEME]/page.php.

copying page-php
creating woocommerce.php

All themes should have this file so make a copy of yours then rename it to woocommerce.php. Basically, you’re creating a file called woocommerce.php where the content is the same as page.php.

If you’re using a child theme, you’ll need to copy the page.php of the parent theme and place woocommerce.php on the child theme so that you don’t have to worry about it being overwritten when the theme is updated.

STEP 2: Edit woocommerce.php and locate the loop

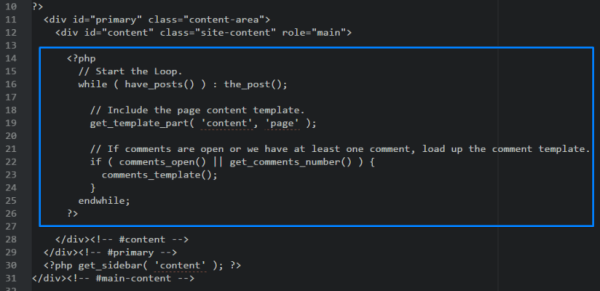
After creating the file woocommerce.php, you then need to edit it with the editor of your choice. When it’s opened, browse through and look for code that looks like the one below:

the loop

It usually starts with

<?php if ( have_posts() ) :

and ends with

<?php endif; ?>

but in our case it ends with

endwhile; ?>

so it’s not always the same. This bit is called the loop and you need to determine where it starts and where it ends.

STEP 3: Replace the loop with <?php woocommerce_content(); ?>

Now, after finding the loop, replace it with:

<?php woocommerce_content(); ?>

That lengthy bit of code will be replaced by just this one line. And that’s entirely the point – nothing to be alarmed of. And when you’ve done that, it should look like the one below:

woocommerce-content

Now, save it.

STEP 4: Declare support for WooCommerce

Next, we’ll do something about the notice message that looks like the one below.

woocommerce does not support notice

To do this, we’ll need to add:

add_theme_support( 'woocommerce' );

to our functions.php. If you’re using a child theme, you’ll need to find the functions.php file that is inside the child theme folder. Once you’ve found the correct functions.php, place the code exactly at the end. Now, save. And that’s it. That notice should be gone now.

STEP 5: Bask in your success

And that’s how to integrate WooCommerce with a non-Woothemes Theme. For the unavoidable instances that you need to make use of a non-WooCommerce or custom theme, you need to follow the steps above.
Do you have any other suggestions? Feel free to comment below.

Filed Under: How-To Articles Tagged With: code snippet, design tweaks, e-commerce, how-to, WooCommerce, woothemes

  • 1
  • 2
  • 3
  • …
  • 15
  • Next Page »
Let us support your online store so you can manage your business

Get started today

Get 2 Hours of FREE SUPPORT

We are so confident that you will love our services that we will give you your first 4 hours at a 50% discount

That’s 4 hours for only $75

BUY NOW

Free eBook

5 Things Every Online Store Can Fix On Their Website In The Next Week To Increase Sales

Quick Links

  • How it Works
  • Pricing
  • Blog
  • Contact
  • About Wooassist
  • My Account
  • Checkout
  • Privacy Policy
  • Cookie Policy
  • Terms and Conditions

Wooassist

Australia:
59 Luke St.
Hemmant QLD 4174

Philippines:
San Miguel St.
Poblacion, Iligan City 9200

Connect


Copyright © 2026 · Wooassist

Yours FREE!

5 Things Every Online Store Can Fix On Their Website In The Next Week To Increase Sales