Wooassist

Assistance for Your Woocommerce Store

  • How it Works
  • Pricing
  • Services
    • Site Maintenance
    • AI SEO and Content Marketing
  • Blog
    • How-To Articles
    • Code Snippets
    • SEO For E-Commerce
    • Theme and Plugin Reviews
    • Wooassist News
    • WordPress/WooCommerce News
    • Interviews
  • About Us
  • Contact
You are here: Home / Archives for product management

Preparing Product Images for WooCommerce

March 12, 2018 By John Leave a Comment

Preparing product images for WooCommerce can be a tedious task. You can easily snap a picture of your products and just add it to your site. Unfortunately, snap and upload is not the way to go.

A digital image from a camera is usually very large. It can easily reach upwards of 2MB in size. When you put a 2MB image on your product page, your customers would have to wait at least a couple of seconds before they can see the image.

If you have more than one image, it’s going to take even longer. Eventually, someone would just get tired of waiting and head over to a competitor’s website. Not convinced? Check out this post on how loading time affects your bottom line.

How to Prepare Your Images for Web

product

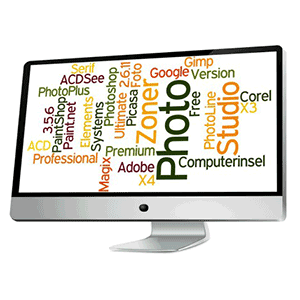
Preparing product images to upload into your WooCommerce store requires an image editing tool, such as Adobe Photoshop. Check out this post from our blog to learn how to use Photoshop to prepare your images for uploading on your website.

If you don’t have Photoshop, there are some alternatives in the form of web tools. You can check out this post on Mashable, which lists down a couple of tools that can help you optimize your images.

Understanding Image File Types

When working with images, understanding image file types is necessary. Certain types of images are best suited to a certain file type. You need to know what that file type is, so your images will look good even if they are scaled down.

Here’s a good article that details the most common image file types including when you should use each file type.

An important note: Using an image editing tool like Photoshop is still the better option since it gives you better control on how you want to optimize your images.

Using Descriptive Files Names

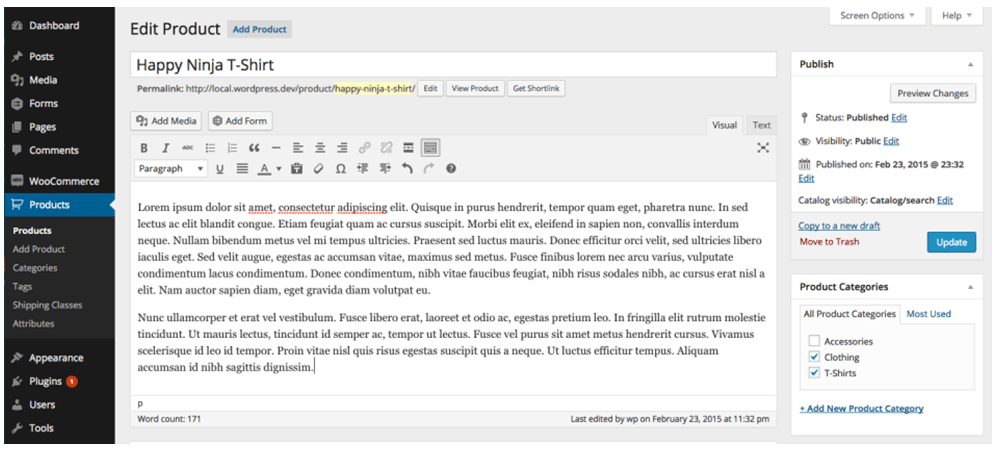
One more thing you need to do before uploading your image to your WooCommerce store is to name them properly. Ideally, you’d want to use a file name that describes your image like “red sling bag”. This would make managing your media library easier. Searching for specific images on your media library would be very difficult if you use default image file names such as IMG0001.jpg.

When you’ve finally uploaded your image file, you should also add an alt tag that will tell search engines what your image is. Using alt tags is best practice for SEO but that doesn’t mean you cram keywords on your alt tags. Your alt tags should describe what your image is.

Now that you have a better idea on how to prepare your images for your e-commerce store, you can improve its page load speed. Eventually, you’ll start to see its effect on your conversion rates.

If you don’t have time to spend on editing product images, the Wooassist team is here to help you out. With our experience, you’ll have your images optimized and look professional in no time.

Filed Under: How-To Articles Tagged With: best practices, how-to, image optimization, photoshop, product management, site speed optimization, WooCommerce

Create Product Descriptions for Your Woocommerce Store

January 29, 2015 By John Leave a Comment

product-description

Product descriptions exist for one specific purpose – to sell.

Imagine a potential customer browsing through your ‘Products’ page. She finds the perfect pair of shoes and decides to purchase it. She clicks on the image only to find a poor product description, with no material details, instructions for sizing, etc.

She then hesitates and moves on to another website. That’s a lost sale right there, and the next buyer will go through the exact same thing. How many more customers will you lose?

Make it effective.

The goal is to make a visitor click all the way to check out form. To do this, your product descriptions should be effective and dynamic to engage customers. They have to know how your product or service can change their lives. And, they won’t be able to – unless they read the description.

An effective product description is one that goes beyond simply informing potential buyers about the product. It needs to convince them to buy it. Visitors of your website should feel the need to buy your products and/or use your services.

Make it unique.

Creating original content for your product descriptions is also a must. Don’t just copy and paste from the manufacturer’s brochures or website. Otherwise, you’ll have similar descriptions with hundreds of other websites – and this will affect your site’s ranking. What’s more, Google may penalize your website for this.

Tell a story with your descriptions. Make it about the customer and how your product can help him. Also, be careful about your voice.

Don’t make it sound boring, or as if you are lecturing in the course of telling your story. Try and be personal with your voice and make it seem like you’re talking to a friend. Learn more about the voice you need to use.

Make it sell.

In the competitive e-commerce landscape, good product descriptions can give you an edge. You can even learn how to write your own. There is no need to be fancy about it. In fact, a simple approach is the best, as shown here.

You need to find the time to write them even though you’re busy with other aspects of growing your business. This useful resource can help you learn the secrets of creating product descriptions to help you find success.

So there you go. Tell the world about your products. Use stories and read about the resources mentioned above to guarantee that you are going to get results. However, if you feel that you are not up to it and need to put your focus elsewhere, our Wooassist team can help.

At the very least send your supplier’s descriptions to Wooassist and we will re-word them to make them unique.

Filed Under: How-To Articles Tagged With: admin, content marketing, copy writing, duplicate content, how-to, product management, WooCommerce products

How to Fix Blurry Product Images in WooCommerce

February 26, 2015 By John 10 Comments

Blurry ain't good
Blurry ain’t good

Sometimes you upload an image in WordPress/WooCommerce and it just doesn’t show up like you intended it. Sometimes they don’t align. Sometimes they don’t fit the placeholder. Sometimes the image just doesn’t show. And sometimes, the image gets blurry. Why the image gets blurry may be caused by one of a few problems. Here we discuss the common causes and how to fix blurry product images in WooCommerce.

You Uploaded a Blurry Image

If you uploaded a blurry image then don’t expect that you’re going to get a good image to show up. Maybe you viewed the image in a small screen so it looks okay but when you view it on a larger screen, you’ll find that it actually is blurry. If this is the case, there is hardly anything that you can do to fix the image. Image editing tools like Adobe Photoshop may be able to help a bit by making the image sharper but don’t be expecting any significant changes. Odds are you’ll have to get a better image.

WooCommerce Recommends Using Large Product Images

thumbnail cropping woocommerce

Before, WooCommerce images need to be a specific size that you set in WooCommerce settings. That is no longer the case. WooCommerce now uses a lighthouse so images pop up big when users click on it. Large images look great and will help sell your products. However, make sure they are properly optimized.

For most themes, WooCommerce recommends uploading an image that is at least 800×800 pixels. Don’t worry about the image being bigger than the placeholder as WooCommerce automatically sizes your images and will only show the full resolution when clicked.

To control thumbnail cropping of your product images, you can go to Appearance > Customize > WooCommerce >Product Images and then select your desired cropping settings.

If the image is not the problem, there might be a problem with how your images are rendered. You can try to regenerate image thumbnails.

How to Regenerate Thumbnails

Other than when changing image settings in WordPress and WooCommerce, you may also need to regenerate the image thumbnails on your website if they appear blurry after a redesign or changing to a different theme. The best and easiest way to regenerate image thumbnails is to use the Regenerate Thumbnails plugin. Simply install and activate the plugin and from there, go to “Tools” and “Regen. Thumbnails”. Just click on the button “Regenerate All Thumbnails” and the plugin will fix the blurry images like magic.

regenerate-thumbnails

If you want to regenerate thumbnails for specific images instead, you can do this on the Media page on your admin panel. Make sure you are viewing images with List view. Simply hover over the image and the link to regenerate thumbnail should appear. You can also mark all the images you want to regenerate thumbnails and use Regenerate Thumbnails from Bulk Actions and then apply.

regenerate-thumbnails-1

Best Practices on Image Use

There are a lot of things that you can do to avoid blurry images by following best practices. Once you set an image dimension, make sure that the images you upload comply with that requirement. Uploading a bigger image in WooCommerce is okay but make sure the image is optimized so as not to affect your page load speed. You can set how you want image thumbnails to be cropped. If you upload a smaller image, it might look okay on a mobile device but not on a PC or laptop. It is also important to know what image file types to use.

Another best practice for images is to always set an alt text for your image. If the image fails to load, the alt text will show up and the user will at least know what the image is about. Also, name your files properly. Don’t name your files after SEO keywords. If you have an image of a ukulele, give it a descriptive file name and not “buy-cheap-ukulele”.

Filed Under: How-To Articles Tagged With: admin, best practices, conversion optimization, how-to, image optimization, plugins, product management, WooCommerce

How to Change the Number of Related Products in WooCommerce

May 12, 2016 By John Leave a Comment

How to change the number of related products in woocommerce
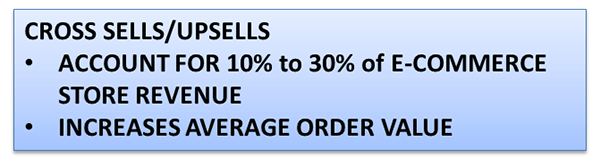
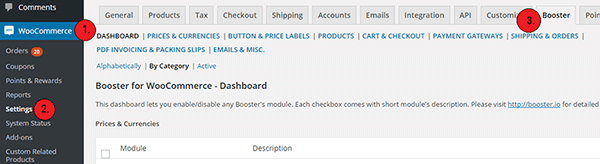
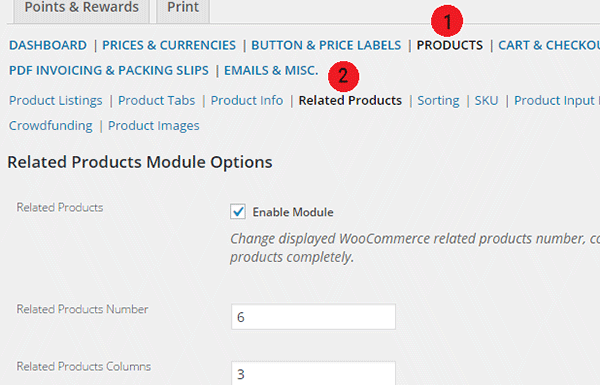
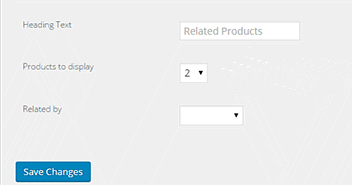
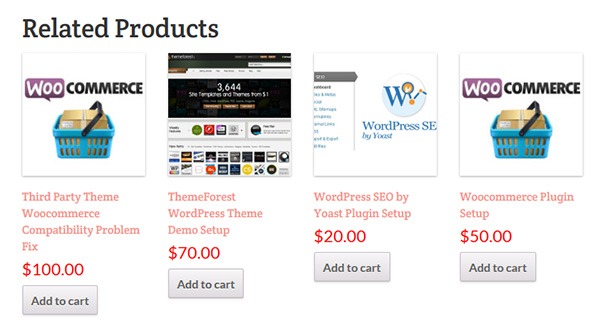
Changing the number of related products in WooCommerce is a relatively easy task if you know how to do it. WooCommerce defaults to two related products in the single product page but store owners may want to show their visitors more than just two related products.

Why Change the Number of the Related Products?

Showing more products in the Related Products section will increase and develop the browsing or buying choice of the user. This strategy is basically cross-selling/upselling. It is the strategic way of introducing your customers to other products that are related to what they are already interested in. Research shows that product recommendations account for 10% to 30% of e-commerce store revenue and increase average order value.Cross-Sells_Upsells

Setting up the Number of Related Products

There are two ways you can set up the number of related products. First is to insert a code snippet in the functions.php file on your theme. Second is to install a plugin to do it for you. The first method may seem intimidating to some WooCommerce shop owners, but it is actually as easy as copy and pasting a code. This method is recommended because it doesn’t bloat your site with unnecessary code.

In some themes, authors have added custom functions that allow users to edit WooCommerce and this includes the number of related products. Buying themes that come with a lot of custom functions however are generally not recommended as they can add unnecessary bloat to your site.

How to Change the Number of Related Products in WooCommerce Using Code Snippets

The best way to edit the number of related products is by using a code snippet that you insert into your child theme so that the code doesn’t get overwritten when you update your theme. Don’t get discouraged by the thought of coding but do take extra caution as one wrong code can break your entire site. If you do not know what you are doing, it would do you well to hire a developer to do this for you. If you are comfortable working with code snippets, then proceed with the steps below.

    1. To start, locate functions.php in the WordPress file system. Go to your WordPress Dashboard. Navigate to Appearance > Editor. Choose the theme you are using from the dropdown in the upper right sidebar and locate at the bottom right the functions.php file. You can also access your site’s file through an FTP client and edit the functions.php file from there.

WordPress-Dashboard_Edit-Themes_Themes-Function

  1. Next is to copy and paste the code below at the very bottom of your functions.php file.
    /**
    * WooCommerce Extra Feature
    * --------------------------
    *
    * Change number of related products on product page
    * Set your own value for 'posts_per_page'
    *
    */ 
    function woo_related_products_limit() {
      global $product;
      
      $args['posts_per_page'] = 6;
      return $args;
    }
    add_filter( 'woocommerce_output_related_products_args', 'jk_related_products_args' );
      function jk_related_products_args( $args ) {
      $args['posts_per_page'] = 4; // 4 related products
      $args['columns'] = 2; // arranged in 2 columns
      return $args;
    }
    
  2. The piece of code above will make the number of related products into 4 per page arranged in 2 columns. This is defined in these lines of code:

    “$args[‘posts_per_page’] = 4; // 4 related products”, and “$args[‘columns’] = 2; // arranged in 2 columns”.

    In order to have the desired number of related products, you just need to vary the values. For example you want to have 6 related products in a single column, change the 4 to 6 and 2 to 1. So it will be:

    “$args[‘posts_per_page’] = 6; // 6 related products” and “$args[‘columns’] = 1; // arranged in 1 columns”.

  3. Save the file when you are done.

How to Change the Number of Related Products in WooCommerce Using a Plugin

For less technical store owners, you may want to change the number of the Related Products in your WooCommerce store by using a plugin. Using a plugin will save you from editing important website files that can break your site. Here are some plugins that we can recommend:

Booster for WooCommerce

Booster for WooCommerce was previously called WooCommerce Jetpack. This enables you to tweak a lot of settings for WooCommerce not just changing the number of related products. For anyone using the WooCommerce platform, this plugin is highly recommended because it provides a lot of functionality.

To change the number of related products, follow the steps below:

    1. First, install and activate the plugin.
    2. Go to WooCommerce > Settings > Booster.

Booster-for-WooCommerce

    1. In the Booster menu, click on the Products tab > Related Products.

Booster-for-WooCommerce_Related-Products-Tab_Options

  1. Enter the number of Related Products that you want. You can also change the number of columns for the Related Products Section.
  2. Check the Enable Module, save and you’re done.

While WooCommerce Booster is a powerful plugin in itself, you may want to use a different plugin if you just need to edit the number of related products. This is because the number of features that you wouldn’t be using would just add extra bloat to your site.

Woo Related Products

Woo Related Products is one of the simplest plugins out there for editing related products in WooCommerce. It is light and easy to navigate. It also allows you to change the heading text on the related products section.

  1. To start, install and activate the plugin.
  2. Locate “Related Products” from your WP admin menu panel.
  3. Select the number of related products you want to display. And then click on Save Changes.Woo-Related-Products_Products-to-Display

You want to increase your conversions. By increasing the number of related products from WooCommerce’s default to introduce more products to your customers, you can increase your revenue and average order value. You can follow the steps mentioned in this article to accomplish this for your own website.

Do you know of other strategies that can help increase conversions through cross sells and upsells? Let us know in the comments.

Filed Under: Code Snippets, How-To Articles Tagged With: admin, code snippet, conversion optimization, design tweaks, how-to, navigation, plugins, product management, WooCommerce, WooCommerce products, WordPress

Creating and Editing Products on WooCommerce

January 29, 2015 By John Leave a Comment

Creating and Editing Products

Want to boost your online conversion and sales? Adding more products to an already existing store, with an already existing user base, is the way to go!

You are not as limited by shelf space as a physical store, so make use of this and add more products. It makes sense that the more you have to offer the more you can sell, right? But should you be adding them yourself?

Our Solution for Convenience

If you have a lot of products in your WooCommerce store, it may be difficult to manage it on your own.Tweaking the look of your product page, as well as creating variable and grouped products can be a little too complicated.

Adding and managing products can take a lot of your precious time. For one, you have to familiarize yourself with how the product categories, tags and attributes work. Then, all product data should be input.

large

If you own the business, wouldn’t you rather have someone else do all this while you focus on growing your business?

Here’s the thing – you should spend more time working ‘on’ rather than ‘in’ your business. It means doing developmental activities to improve your business, rather than routine activities that you do every day to keep the business going. Why? Read more about this post here.

Instead of staring at your WordPress dashboard and clicking on Add New Product day in and day out,use the time in planning, marketing, and following up on leads. Or, spend the time with your family.

Our team can help you out with your WooCommerce store so you can prioritize on your tasks that really matter. Leverage your time by hiring people who can create, add, and edit products on your online store – fast.

Filed Under: How-To Articles Tagged With: admin, how-to, outsourcing, product management, Wooassist, WooCommerce, WooCommerce products

Let us support your online store so you can manage your business

Get started today

Get 2 Hours of FREE SUPPORT

We are so confident that you will love our services that we will give you your first 4 hours at a 50% discount

That’s 4 hours for only $75

BUY NOW

Free eBook

5 Things Every Online Store Can Fix On Their Website In The Next Week To Increase Sales

Quick Links

  • How it Works
  • Pricing
  • Blog
  • Contact
  • About Wooassist
  • My Account
  • Checkout
  • Privacy Policy
  • Cookie Policy
  • Terms and Conditions

Wooassist

Australia:
59 Luke St.
Hemmant QLD 4174

Philippines:
San Miguel St.
Poblacion, Iligan City 9200

Connect


Copyright © 2026 · Wooassist

Yours FREE!

5 Things Every Online Store Can Fix On Their Website In The Next Week To Increase Sales