Aside from the products or services you offer, there’s another crucial factor that may affect your conversion rate. We’re talking about your site speed. Any delay is enough reason to make your customers leave. This converts to lost revenue, which can hurt your bottom-line. How can you prevent or change this? This article will serve as an in-depth guide to and will teach you how to speed up your WooCommerce store.
In this article, you’ll learn about the following:
- Why invest in site speed optimization?
- What hardware and software you need?
- Improving Site Speed by Caching and Minifying
- Speed Up Site by Optimizing Images for Web
- Using a CDN to Increase Site Speed
- Cleaning Your Database to Speed Up Site
- More Ways on How to Speed Up Your WooCommerce store
Why Invest in Site Speed Optimization?
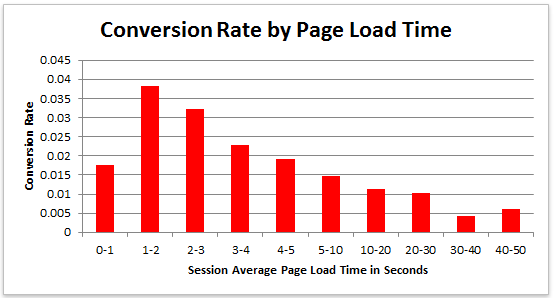
Studies reveal revealed that 47% of visitors expect a page to load in under 2 seconds. Around 40% of these will abandon a web page if it takes more than 3 seconds to load. Meanwhile, 52% claim that quick page loads are important for their loyalty to a site.
What do these findings tell you, a site owner?
It just shows that site speed is very important. Those two seconds are crucial to capture your visitor’s attention, convince them to hang around, and increase your chance for conversion. Microsoft Bing also conducted a research about server delays and the effect they bring on user behavior.
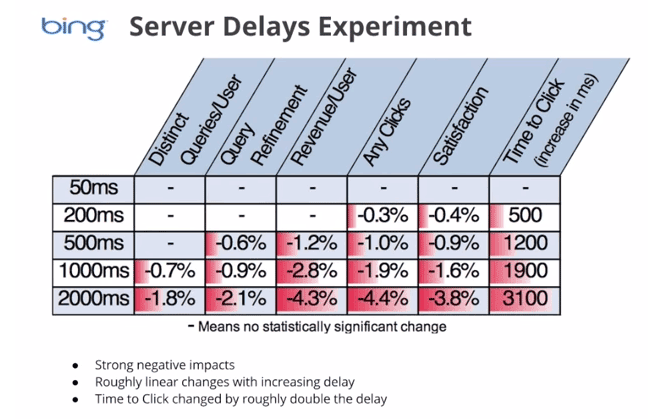
According to the results, a 2-second longer delay in page responsiveness reduced user satisfaction by 3.8%. They navigated 4.4% fewer pages, with a 4.3% lesser e-commerce revenue per user. Every second matters online.
Here’s the thing: visitors – your potential customers – can’t really tell the difference if a page is ‘just’ slow, or isn’t working at all. Thus, a slow website is quite the same as not having one. Most users won’t stare at the screen and wait. They move on to the next website and never come back.

Google announced that it has included site speed in its ranking algorithm. If your site speed is slow, it can affect SEO by having reduced rankings. They even launched a new web-based tool, which analyzes the performance of web pages.
With these information, we now know that site speed not only sells, but also leads to customer satisfaction and increased conversion.
If your site speed is slow, it’s time to fix that. Read on.
What Hardware And Software You Need?
The foundation you set up for your e-commerce site has a lot to do with its speed. If it’s the root of the problem, quick fixes won’t help. But, what makes a good foundation, and how can you set up a website that runs at lightning speed?
Web Hosting Provider.
What’s your current hosting package? For an e-commerce site, you shouldn’t go with the cheapest. They may have limited RAM, processing power, and disk space which won’t benefit your site at all.
Wooassist recommends:
Wpengine and Siteground
Please note that we are affiliates of these hosts but we have only chosen them based on our years of experience dealing with hosting services for our clients’ and our own sites. And we can say that these two are among the best. If you were to sign up to either of them, we’d be grateful if you did so by clicking either of the links above.
WordPress Themes
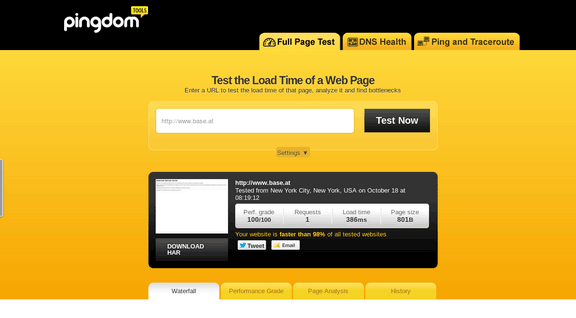
Not all WordPress themes are created equal, and not all are extremely fast and well-coded. In choosing a theme, checking the demo speed is a must. Tools such as Pingdom will give you an idea of how well-coded it is.
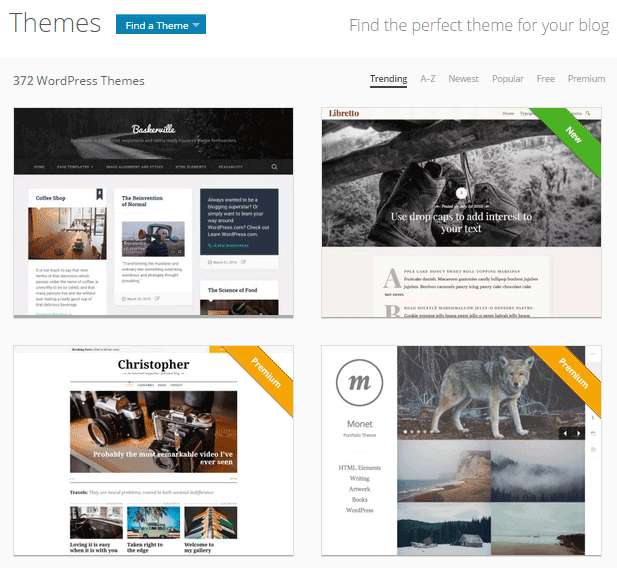
Wooassist recommends:
Storefront by Woothemes or Any HTML5 theme at Studio Press
Content Delivery Network
CDN is a system of distributed servers that accelerate the delivery of web content, and rich media to internet-connected devices. Since your bandwidth is spread across many different servers, the load on a single server is reduced.
Wooassist recommends:
Wpengine comes with CDN included or Cloudflare
Improving Site Speed by Caching and Minifying
Let’s start with the most popular, and probably, the easiest thing: Caching.
What is Caching?
Caching is storing your dynamic content in the server as static content. Serving static content is faster as opposed to dynamic content, which means longer page load times. It’s a fundamental technique of reducing database load and speeding up WordPress websites.
There are two types of Caching:
- Client-Side
- Server-Side
Let’s move on to Minification.
When developers make code, they make code with a lot of white space. This practice makes the code easier to read and understand for humans. However, computers don’t need that white space. It just makes reading the code take longer.
Minification is removing all that white space and optimizing the code. This makes it easier for machines to make parsing the webpage faster.
How to Implement Caching and Minification?
It may sound all too complicated, but don’t worry. It is really very simple. All you need is one plugin to do both, and it has all the caching and minification solutions you need.
It’s the second most popular plugin with almost 4 million downloads and a 4.5 star rating. W3 Total Cache is more suitable for high traffic websites running from a VPS or a better hosting environment.
How to Set up Caching with W3 Total Cache?
- Before installing W3 Total Cache, uninstall other caching plugins like WP Super Cache
- Go to your WordPress admin panel and click on Plugins > Add New
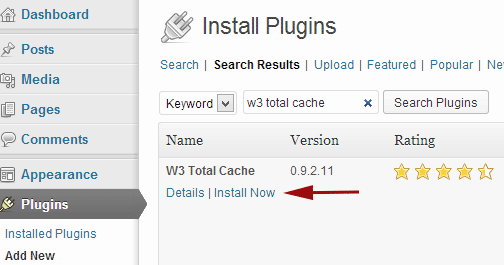
- Search for “W3 Total Cache”
- Click on the ‘Install Now’ button and then activate
- Click on Performance on your WordPress dashboard and go to General Settings
- The first option that you see on this page is Page Cache.
- Check the ‘Enable’ box
- Click on ‘Save all settings’
By having this enabled, you will significantly decrease your load time.
How to Set up Minification with W3 Total Cache?
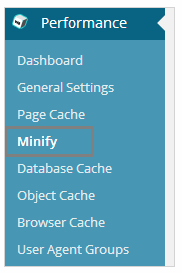 Go to your WordPress dashboard and click on Performance
- Look for ‘Minify’ under the Performance menu
- Tick “Enable” for HTML & XML, JS, and CSS.
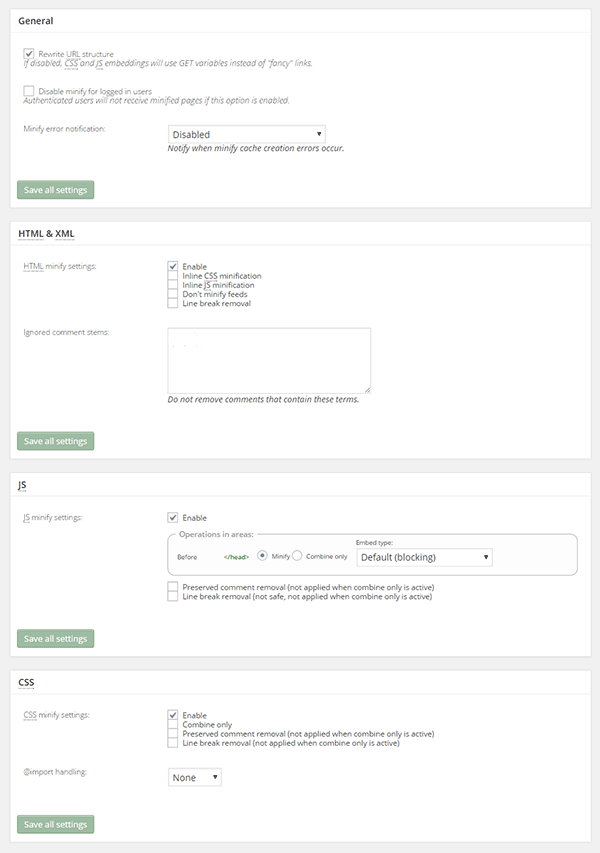
- Click on ‘Save all settings’
The goal of minification is to make the source code “smaller” in order to improve your site’s performance. Get a more detailed information on each of the settings offered in Minification here.
Speed Up Site by Optimizing Images for Web
Your customers won’t wait around for that picture to load.

Another technique to improve your online store’s performance is optimizing images on your website. High-resolution images may look great, but when you’re loading a 2MB image, it’s going to do more harm than good.
Aim for an image size of less than 100KB, but if you can go smaller without compromising quality, then better. It’s a rule of thumb to not let the images look bad or pixelated.
Striking a balance between a good looking image, and an acceptable image size, shouldn’t be a complex task.
Here are a few ways on how to optimize images for the web:
Using Photoshop
Before you upload your next product photo, logo, or banner image to your store, check the image size first.
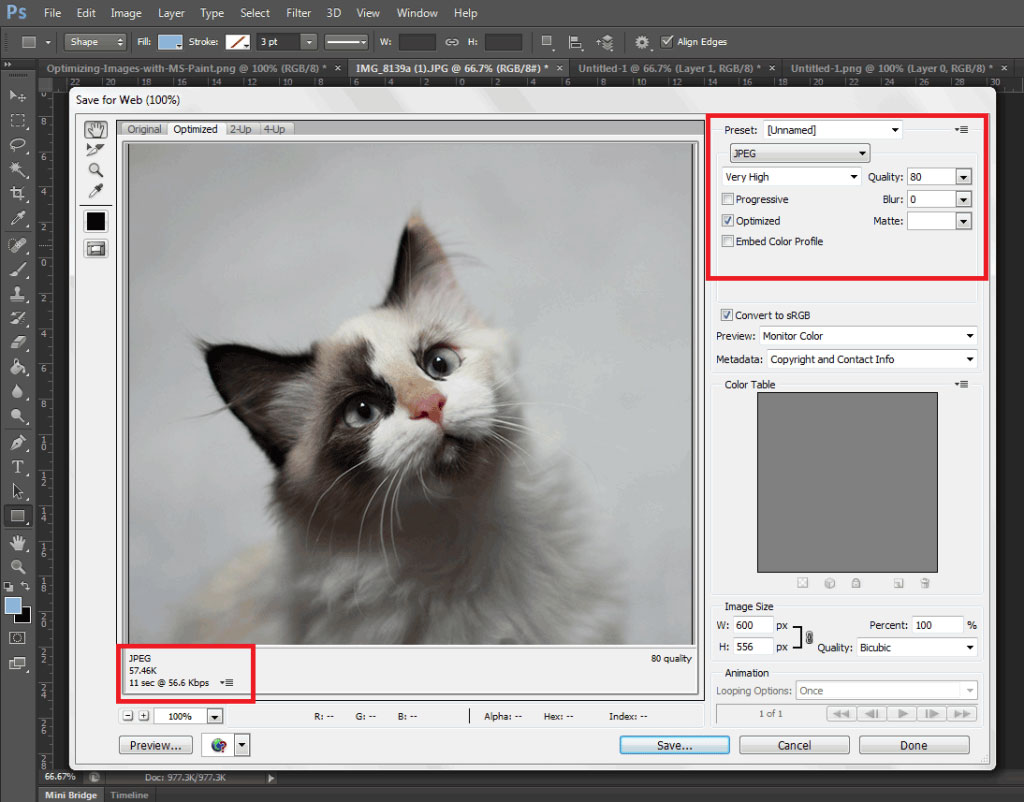
Open the image in Photoshop and view it at a 100%.
If the exact size is too large to be displayed on a computer monitor, you need to edit the size of the image. You don’t have to be a Photoshop wizard. Just open the image on Photoshop, and resize or crop your image to the appropriate size. Apart from that, you also need to consider its format and compression.
If you have a style, preset image sizes that you should be using. Click on File and Save for Web (Ctrl + Shift + Alt + S). The smaller the size the faster the image loads on the page.
Using WordPress Plugins
What if you don’t have Photoshop? And, you don’t have the time to optimize every image you add to your e-commerce store? You can always rely on some WordPress Plugins.
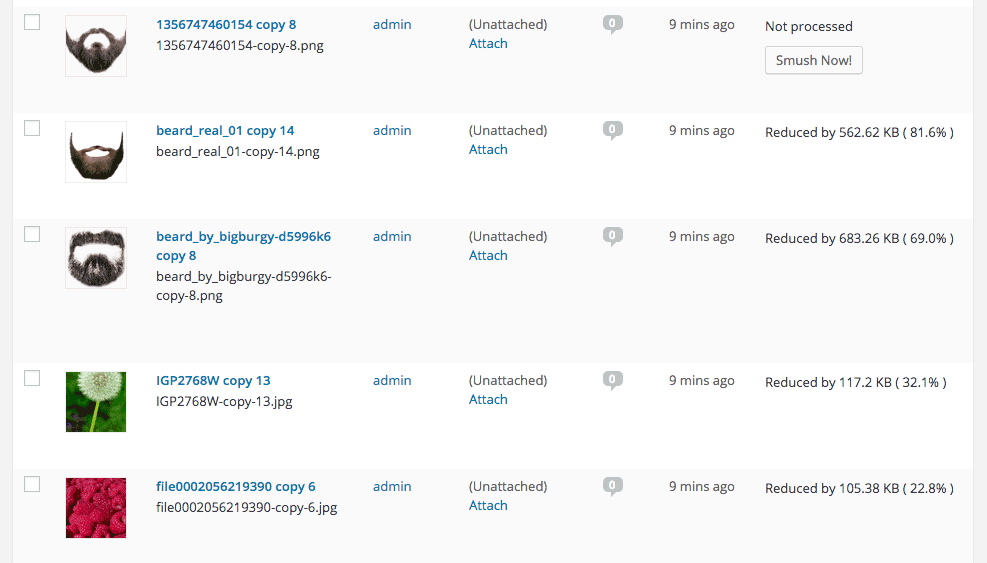
Take WP Smush, for example. It’s popular for stripping hidden, bulky information from your images, reducing the file size without losing quality. You just need to upload your images, as you normally would, and the plugin will do its work behind the scenes.
The free version of the plugin cannot optimize images larger than 1M. You need to upgrade to WP Smush Pro to optimize images up to 8 MB.
Using a CDN to Increase Site Speed
So far, we’ve talked about optimizing images, caching, and minification. Now, it’s time to explore the concept of using a Content Delivery Network or CDN, and how it can help increase your site speed.
What is a CDN?
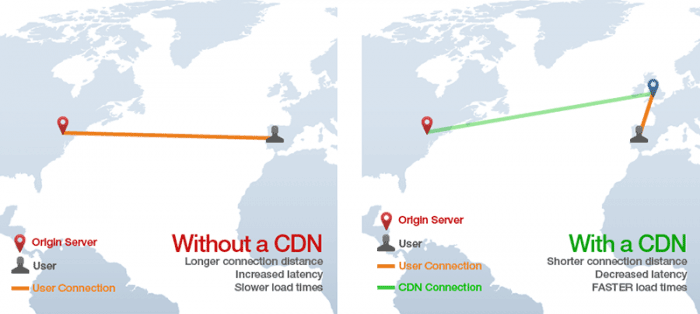
As mentioned earlier, CDN is a network of servers located at different locations around the world. It functions to cache the content of your website, so it can be delivered faster to your visitors based on their location.
Let’s say you’re server is based in Australia. Visitors far away from your geographic location will have a hard time connecting to your website. This would result in delayed responses.
With a Content Delivery Network, browsers will have a nearby server that they can connect to. This will deliver your content much faster. CDNs will mostly benefit the websites that cater to a global audience.
Because there are many options available, choosing the right CDN for your website can be tricky. It depends entirely on your needs, and the popularity of your site. Large-scale enterprise sites usually use popular CDN companies Akamai and Level3.
Setting Up CloudFlare CDN through CPanel
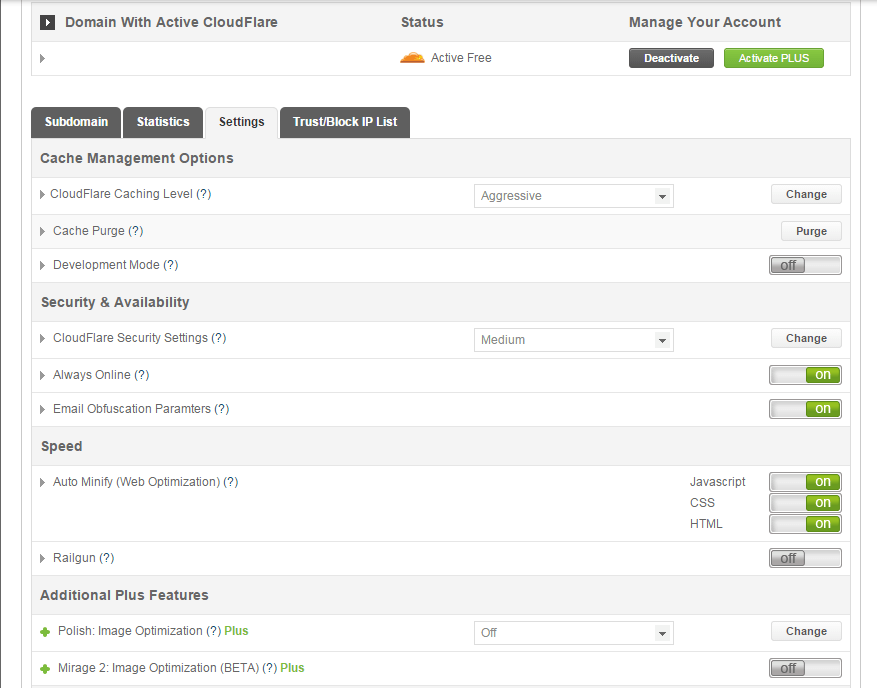
When it comes to small website owners, one of the more popular CDN solutions is CloudFlare. They offer a basic free plan that includes fast site performance, board security protection, and powerful stats about your visitors.
If you’re not sure if your hosting is a partner, you can check this list from CloudFlare.
According to CloudFlare, on average, a website using the CDN will load twice as fast, use 60 percent less bandwidth, have 65 percent fewer requests, and is more secure.
If your website is hosted on a CloudFlare hosting partner, you can easily use the tool available on CPanel.
- Go to CPanel’s ‘Site Improvement Tools’

- Click on the CloudFlare icon
- Tick ‘Activate Free’ for the free version or ‘Activate PLUS’ for the paid version
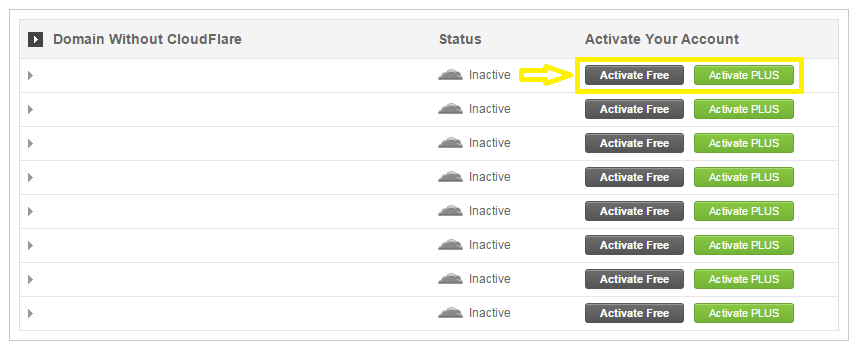
- Enter your email to create an account with CloudFlare
- Once activated, click ‘Manage’ to tweak certain settings
And that’s it. Your CloudFlare CDN is all set and the performance of your website should be improving soon.
Setting Up CloudFlare Manually
Here’s what you need to do too set up CloudFlare manually:
- Sign up for an account
- Add your website on “Select a website” page for scanning
- A list of all found DNS records will be shown
- Set any subdomains that you would like to pass through CloudFlare
- Click on “I’ve added all missing records, continue” once you’re ready.
- Choose a plan, free or paid (SSLs won’t work with the free version)
You also need to edit the name server to the new one provided by CloudFlare. You can do this by going to CPanel, and clicking on Domain Manager. Then, go back to CloudFlare settings and click on “I’ve updated my name servers, continue”.
Note: It may take up to 24 hours for the name servers to be completely active.
With a CDN in place, your site should be running a lot faster. This improves the overall user experience and even boost your conversion rates.
Cleaning Your Database to Speed Up Your Site

It’s a strategy that’s rarely discussed. Nevertheless, it can speed up your site just as well as the other methods. It’s maintaining and cleaning your database.
You might think that database is just one of the requirements for a WordPress install. It is, however, more than just that. If you keep your database clean and optimized, it can shave a few seconds of loading speed.
Remember, one or two seconds saved could mean the difference between a bounce and a conversion.
What’s In Your Database?
A database is just like your computer’s hard drive. It’s where all your data is stored. It contains important information such as: posts, pages, your WooCommerce products, comments and product reviews, users and customer information, URLs, etc.
For those who have been using WordPress for a while, doing regular clean ups allow you to reduce your database size. This can lead to quicker, and smaller backup files.
What’s there to clean?

Over continued use of WordPress, your database accumulates many spam comments, copies of post revisions, trashed comments, remnants from plugins you are no longer using, themes, and more. When that becomes too large and bloated then website performance will suffer.
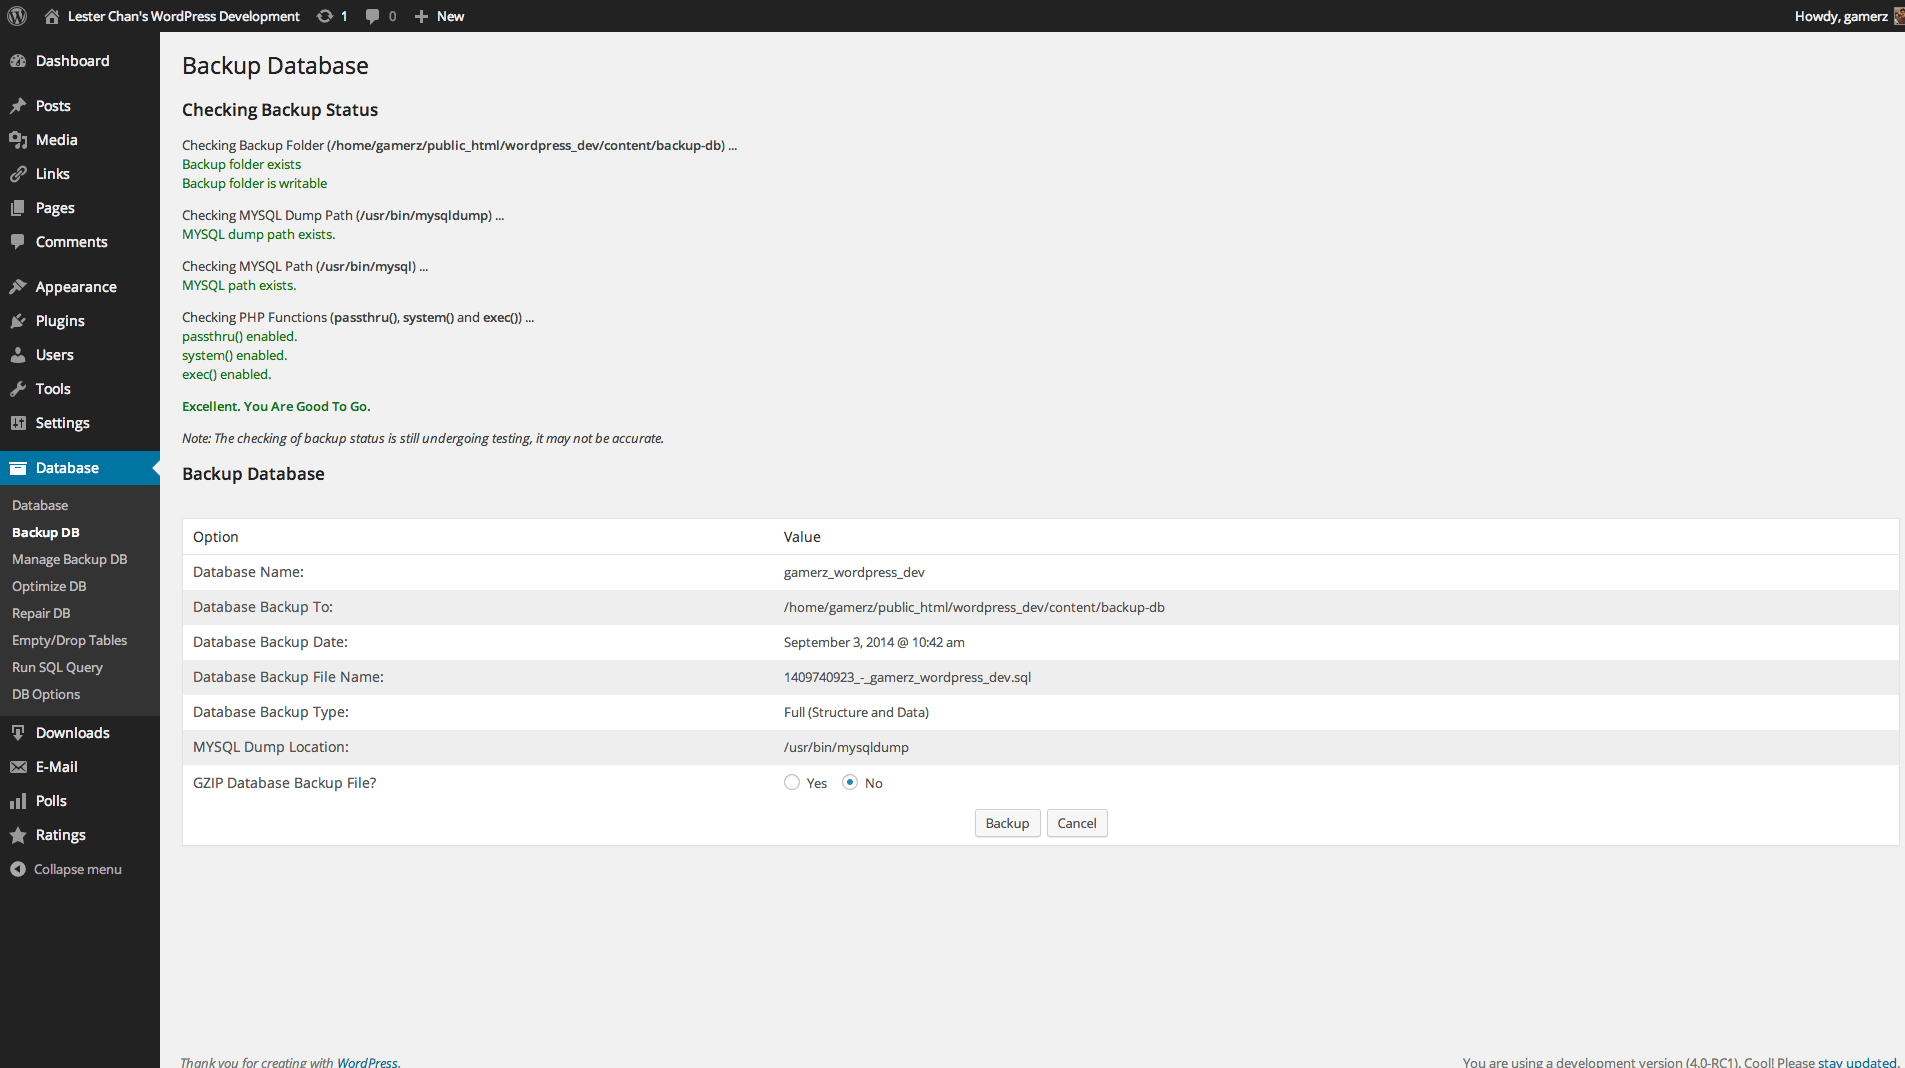
Backup Your Website First!
Before you start any database cleaning, it’s very important to create a backup of your website. If your database gets erased or corrupted, you stand to lose everything you have written. There are a couple of plugins in WordPress that can help you do this.
Your hosting provider will most likely have a backup of your website too. Here’s more detailed information on backing up your database in WordPress.
Cleaning Your Database
You may clean up your website database manually, or use these awesome plugins:
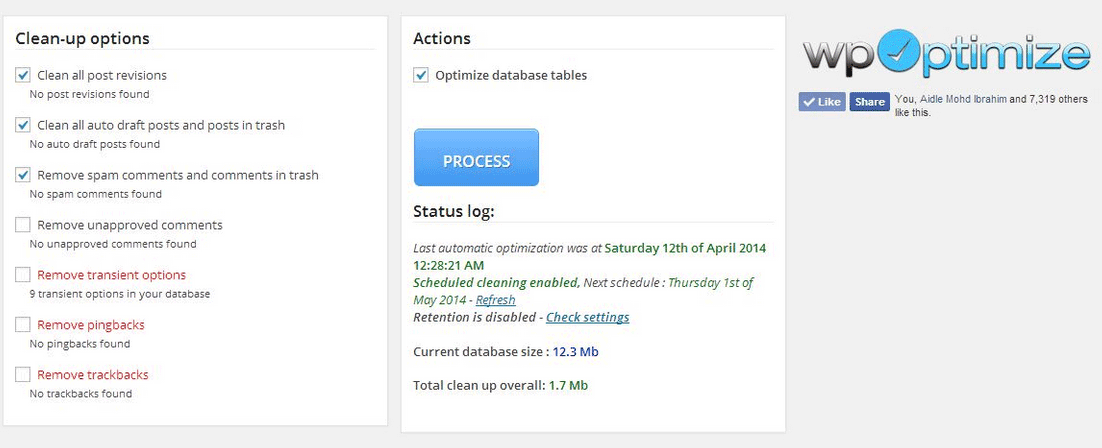
One of the most popular and easiest plugins for cleaning your database. It allows you to schedule a regular database cleanup which can be pretty handy. However, WP-Optimize plugin uses direct delete SQL queries which can leave orphaned data left behind.
This plugin allows you to clean up unused, orphaned and duplicated data in your WordPress. It can also show you a report of how much clutter you can clean. WP-Sweep uses proper WordPress delete functions.
Geared for more advanced users, setting up WP-DBManager can be tricky if you’re not familiar with database elements. It offers more customizable options and features, but it cannot clear bloat.
If you want to use WP-DBManager for its features, look for other means to clear database bloat.
More Ways on How to Speed Up Your WooCommerce Store

Once you’ve set up a solid foundation for your e-commerce site, it’s time to do some fine-tuning. That is, if you’re still having speed issues with your WooCommerce website. Here are more useful tips to help you to solve this matter.
1. Upgrade your hosting account
As soon as you can afford it, do upgrade your hosting account. It would be better to use a good hosting publisher rather than shared hosting. Not only it can improve your site speed, but also prevent down time during high traffic periods.
2. Test your current speed
Checking the current performance of the website gives you a benchmark to compare against after you make the changes. There are various tools to help you check your loading speed:
- Yahoo! Y slow
- Google Page Speed
- Pingdom is the quickest and easiest one

3. Use minimum number of WordPress plugins
Using too many plugins in a website can slow your website speed, particularly if you’re using social-sharing plugins. It will help to identify plugins that are slowing you down.
P3 (Plugin Performance Profiler) is a well-known diagnostic plugin that shows which plugins are slowing down your site. It creates a profile of your WordPress site’s plugins’ performance by measuring their impact on your site’s load time.
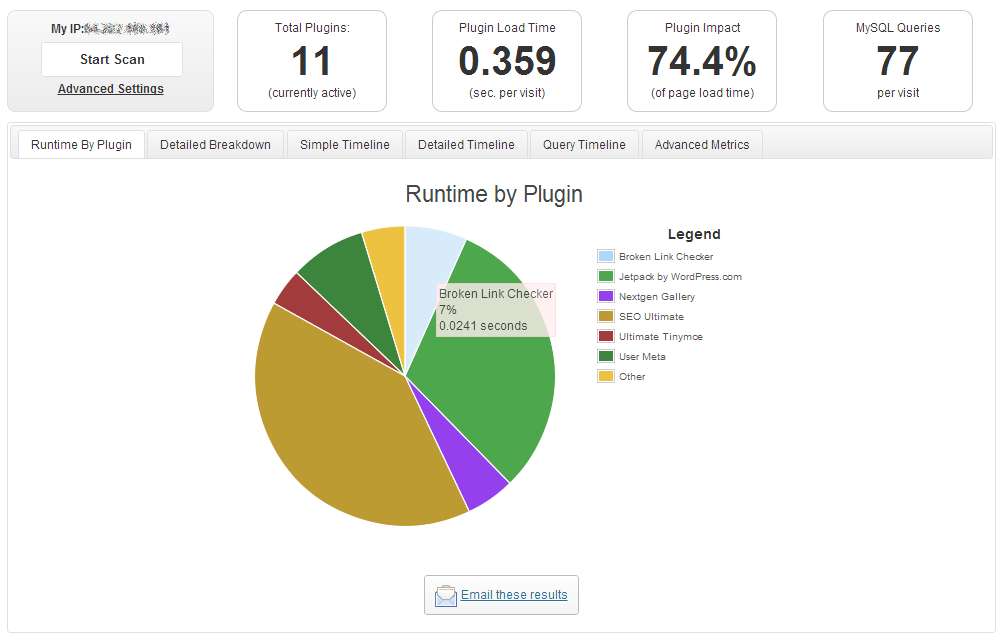
Once you’ve identified them, you can make an informed decision about whether to keep them, replace them or remove them entirely.
4. Compress your website
Gzip is the most popular, and effective compression method that reduces the response size by about 70%.
Compressing files on your computer as a ZIP file can reduce its total size, which makes it both easier and faster to send to someone. Gzip works the same way, but with your Web page files.
After installation, Gzip automatically compresses your website’s files as ZIP files. This can save bandwidth, and speed up page-loading times. When a user visits your site, their browser will automatically unzip the files and show their contents.
Some plugins will add Gzip to your website in a few simple clicks. For those who want to install it manually, it’s actually very simple.
-
- Open your .htaccess file, which is found in the root directory on your server
- Add the following code
AddOutputFilterByType DEFLATE text/plain
AddOutputFilterByType DEFLATE text/html
AddOutputFilterByType DEFLATE text/xml
AddOutputFilterByType DEFLATE text/css
AddOutputFilterByType DEFLATE application/xml
AddOutputFilterByType DEFLATE application/xhtml+xml
AddOutputFilterByType DEFLATE application/rss+xml
AddOutputFilterByType DEFLATE application/javascript
AddOutputFilterByType DEFLATE application/x-javascript
- Test whether it’s working by going to Check Gzip Compression
5. Optimize your homepage
Your homepage is a crucial part of your site because visitors land there the most. There are a few easy ways to ensure that your homepage loads quickly.
- Show excerpts instead of full posts
- Reduce the number of posts to 5 or 7
- Remove unnecessary sharing widgets
- Remove inactive plugins and widgets that you don’t need
A clean and focused homepage design will help your page not only look good, but load quicker as well.
6. CSS on Top and JavaScript at the Bottom
It’s widely recommended to link your style sheets as close to the top of the page. The reason is that browsers won’t render a page before rendering the CSS file.
Meanwhile, JavaScript should be as close to the bottom of the footer. Doing so can prevent browsers from parsing anything until it has fully loaded.
With just this simple fix, page-loading speed will improve, since files are forced to be downloaded in the optimal order.
7. Disable content hot linking and leeching
When other sites direct link to the images on your site, it can make your server load increasingly high. This adds up as more and more people “scrape” your posts.
Conclusion:
Just How Important is Site Speed?

Consumers take advantage of online shopping because of the convenience it offers. Most people can’t stand waiting in lines. And, they especially get frustrated when it’s taking longer than expected.
Now, going back to your website, users won’t wait for your site to load. If it takes too long, they’ll definitely find another online store.
Another thing to keep in mind is that Google wants the best experience for their users, giving site speed utmost importance. They even reward sites that have clean codes and download quickly.
Page speed is now one of 200 or so signals Google uses to determine rank. More importantly, do it for your existing and potential customers. The faster a page loads, the more satisfied they will be.
 As part of your
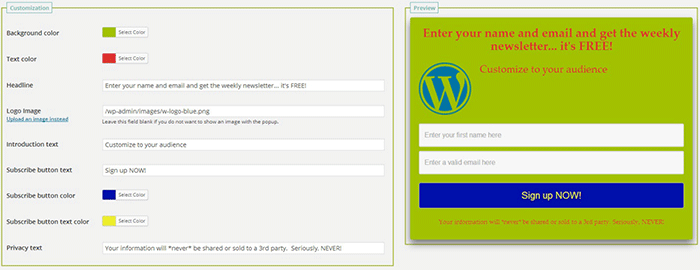
 Apart from the feature box in the homepage, you can insert more opt-in forms in other pages (About page and Splash page) and in other page sections (top of sidebar, sticky top bar and below the footer).
 In using a pop-up window, you need to properly time it. You can set a time delay before showing the pop-up. If it’s too early, you’ll annoy site visitors even before they’ve taken a look of your site and what you have to offer.
 Hello Bar
 There is no single correct answer to this question. Different websites vary in terms of design and market. This article could help point you in the right direction, but there are a lot of things you need to figure out for yourself. Get to know your customers by creating a