Wooassist

Assistance for Your Woocommerce Store

  • How it Works
  • Pricing
  • Services
    • Site Maintenance
    • AI SEO and Content Marketing
  • Blog
    • How-To Articles
    • Code Snippets
    • SEO For E-Commerce
    • Theme and Plugin Reviews
    • Wooassist News
    • WordPress/WooCommerce News
    • Interviews
  • About Us
  • Contact
You are here: Home / Archives for conversion optimization

How to Use Google Analytics to Track Website Goals in WooCommerce

May 25, 2016 By John 4 Comments

Google-Analytics

Knowing your site’s stats is critical in decision making to guide your site to success. Google Analytics is a web analytics service designed for this particular job. If you have a WooCommerce store, you probably have it set up to gather traffic data. In this article, we will teach you how to use Google Analytics to track website goals. Get more value from Google Analytics by tracking the completion of your site goals.

What is Google Analytics?

Google Analytics is a free web service from Google that tracks and reports website traffic data. It was launched in 2005 and is available to all users, whether they use Google for advertising or not. It is tightly integrated with Google Adwords, the company’s main advertising service, as it helps users keep track of their online web marketing campaigns. But using Adwords is not a necessity in order to get the most out of the Analytics.

Why Should You Use Google Analytics?

Google Analytics yields valuable information to help you make smarter marketing decisions, generate more leads and improve user experience. Traffic data can help you identify which of your blog posts provides the most user engagement and which one results in a conversion whether it’s a sale or an email sign-up. You can pinpoint the best time to post a new article. You can see the number of visitors who exit your site and from what page they exit. With that information on hand, you can look for ways to improve that specific page to reduce exit or what is known as bounce rate. In a nutshell, this treasure trove of data will be invaluable in your decision making for optimizing your website.

How to Track Completion of Goals in Google Analytics?

In Google Analytics, tracking page views and visitors is just the tip of the iceberg. Finding out if your website is actually accomplishing the goals you’ve set for your e-commerce site is more important. In fact, even if your traffic is ranging in the millions but you are not getting your intended conversions, that traffic is mostly worthless. This is where setting goals in Analytics come in. A ‘goal’ is a completed activity in your website that is tracked in Google Analytics. Defining your goals will depend on what kind of website you have. For an e-commerce site, goals can be a newsletter sign up, a purchase, downloading a trial software or e-book, or adding a product to a wish list.

Tracking your goals in Google Analytics will yield crucial data. If you see that many of your visitors add your products to the cart but exit when they reach checkout, there must be something in your checkout process that is preventing your visitors from completing purchases. You can then proceed to analyze and identify what factors you need to try and solve the problem After applying fixes, data from Analytics will help you identify if your tweaks have helped your conversion rates or not.

There are 4 ways to track goal completion: Destination, Duration, Pages per session, and Event.

Destination/URL Tracking

Your website is basically a network of pages represented by an identifier address or URL. Google Analytics provides an easy way to track specific URLs through destination goals. Each time someone navigates to a specific destination URL, it will trigger the goal as completed. This is the easiest and most common way to track goals because it is straightforward and easy to set up. This is ideal for tracking thank you pages every time someone subscribes, makes a purchase, or sends a contact email using the contact form, etc. which registers as a completed goal in analytics.

To setup a URL tracking goal, navigate to the Goals section in Analytics first. Go to Admin and click Goals.

how to use google analytics to track website goals

In Goal Setup, we set our goal name as “Place an order” and this goal will track how many visitors placed their orders/completed the checkout. Since checkout is normally closed with a thank you page, we can track how many times the thank you page is visited to track the number of purchases. Google Analytics also allows users to view other important statistics such as time on site and the referring URL which led to the sale.

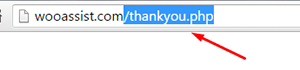
In Goal Description, set the goal type as Destination and enter the URL of your thank you page. You don’t have to enter the full URL, just the slug after the domain name will do. So, instead of www.example.com/thankyou.php, just enter /thankyou.php.

domain-slug

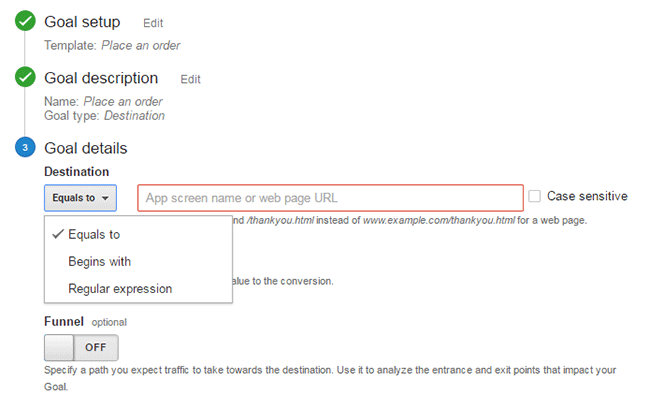
In Goal Details, select which of the below corresponds to your desired action.

  • Equals to – Requires the exact same string to trigger a goal. Good for tracking single pages.
  • Begins with – Only requires that string begins with the inputted URL. So if you put “/products” it will track any URL that starts with “/products”. This includes “/products/bags”, “/products/shirts”, etc. This is ideal for tracking a group of related pages under the same category.
  • Regular Expression – This is meant for advanced users. You can write wildcard terms to select a variety of URLs. You can read more about regular expressions in this guide.Google-Analytics_URL-Tracking_Goal-Details

Funnels

The basic concept of funnels for destination goals is to track a series of pages. These pages form the path you expect traffic to take. For example, you might want to get your visitors to watch a video of the product demo, proceed to add the product to cart, checkout and finally the thank you page.

Funnels are optional and not all e-commerce sites have a defined sales funnel. Still this should not be neglected. Tracking your funnel provides insights on how effective your website setup is in achieving your goal. When your visitor exits at the end of your funnel, the goal is triggered.

Setting up a funnel is very handy because you’ll also know how many visitors proceeded to each step. You’ll know at which step most of your visitors abandoned the process so you can make the necessary adjustments.

Google-Analytics_Funnel

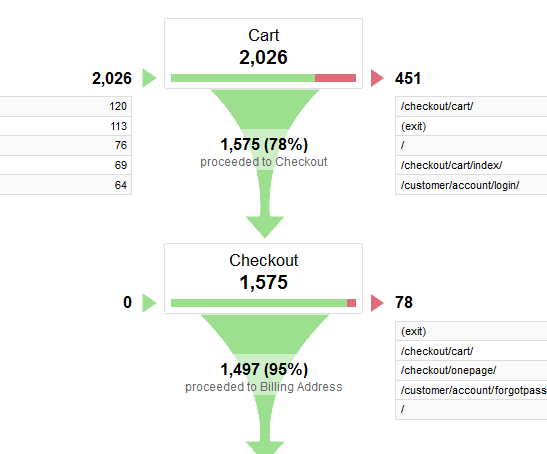
Here is a sample data from a funnel. Notice that you can easily view how many proceeded to the checkout from the carts page.

Duration Tracking

This tracks how much time the user spends on your site. To set this up, you just need to set a minimum amount of time in “Goal details” and if the user spends more than that, the goal will trigger. This tracking is useful for tracking goal pages with important content such as infographics, your portfolio or any other content that you want your visitors to view.

Google-Analytics_Duration-Tracking

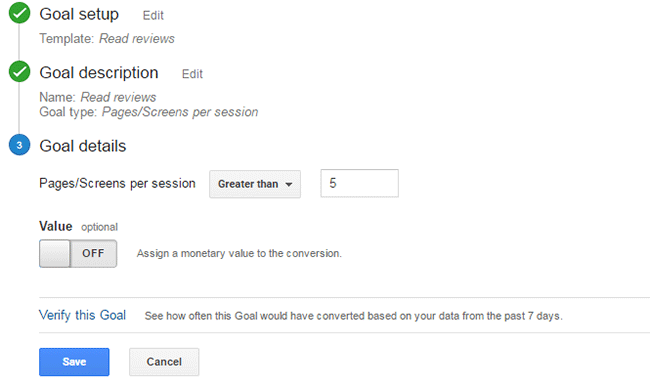
Pages/Screens per Session

If your visitors reach a specific number of pages before exiting, it will trigger this goal type. This is useful when you have a lot of content that you want your visitors to view. This goal is used mostly by news and other media sites that earn advertising income.

To set this up, set Pages/Screens per session in “Goal details” and then choose a number that you want to target for your goal.

Google-Analytics_Pages-per-Screen

Event

This goal is meant for advanced users. You need to know some script coding to trigger the event. And it can be as specific as you want it to be. Using scripts on your site, you can track a click of the button, scroll on a page, and more specific actions that are happening during the visit.

Wooassist_Call-to-Action_View-Plans

Mostly, an event goal is used on button clicks. While you can use URL tracking to track button click, it becomes a problem when you have multiple buttons on different pages that point to the same URL. You won’t know which button was clicked. With event tracking you can keep track of each button individually. This is very useful in identifying which particular button or button design is more effective in completing your goals. To know more about setting up event tracking, you can visit Google’s guide for event tracking.

Conclusion

Remember that Google doesn’t retroactively track your goals. So it is important that you set up your goals as soon as you have your site running so that you can effectively start collecting data right away. Use the data you gather to improve your conversion rates. Google has provided you the resources to improve your site and increase your income. Now it’s up to you how you will use that data to your benefit.

Was this post helpful? Do you have any tips you’d like to share about Google Analytics conversion tracking? Let us know in the comments.

Filed Under: How-To Articles Tagged With: best practices, call-to-action, conversion optimization, e-commerce, Google Analytics, how-to, marketing strategy, optimizations

Improve Website Page Load Speed by Optimizing Images for Web

February 15, 2015 By John Leave a Comment

optimize-images-for-web

Optimizing images on your website whether it’s an e-commerce store, a blog, or both is one of the most important things thing that you can do to improve its performance. And it shouldn’t be a complex task really. Sure, high-res images look great but when you’re loading a 2MB image, it’s going to do more harm than good.

Essentially, you’re going to want to aim for a small image file size without compromising quality. As a rule of thumb, don’t let the images look bad or pixelated just for the sake of being smaller in size. You should strike a balance between a good-looking image and an acceptable image size. Here are a few ways on how to optimize images for the web.

Optimizing Images for Web Using Photoshop

Optimizing images for the web is not at all difficult. If you have Photoshop (or any other image editing software), it’s a very simple process. Open the image on Photoshop and resize or crop your image to the appropriate size.  Remember, when sizing images, the images you plan to use should not have a larger resolution than the image placeholder.

When you have resized your image to the appropriate resolution, click on File and Save for Web (Ctrl + Shift + Alt + S). Here you’ll be able to set the quality of the image while being able to see if the image still looks good. The image should not look pixelated and not have artifacts. In the bottom left section, you can see the file size of the image. You’re going to want to aim for an image that looks good, is not pixelated, and is less than 100kb in size — the smaller the size the faster the image loads on the page. On the upper right-hand section of the “Save for Web” window, you can use available presets or set the quality to your desired quality. Make sure you have the Optimized box is ticked and choose the correct file type. When you achieve a small file size with a good-looking image, click on Save.

Optimizing-Images-with-Photoshop

A Note on Image Types

image-file-types

An important thing to note to make images look good even as you scale them down is to set the correct file type. Notably, the JPEG type is used for photos as it supports the most number of colors at 16 million. PNG is the better choice if you’re working with graphics such as logos and icons since it makes use of lossless compression. Lossless compression means that the image can be made smaller without affecting quality. PNG supports thousands of colors as well as transparency. JPEGs don’t support transparency.

GIF images are similar to PNG. It uses lossless compression and supports transparency. It however can only store a measly 256 colors. Using GIF images on web pages is generally not recommended.

Serve Images in WebP Format

We also recommend converting your image files to the modern webp image file format since these are smaller in size and are thus recommended for achieving optimum site performance. Uploading webp files are still not recommended however as there are still devices and browsers that do not support it. There are however plugins and services that allow converting regular image file types to webp and serve these images when it is supported by the user’s device. WP-Optimize is one plugin that provides free webp conversion.

Optimize Images Using WordPress Plugins

We also recommend having an image optimization plugin installed on your WooCommerce store. There are many image optimization plugins to choose from such as EWWW Image Optimizer, reSmush.it, Robin Image Optimizer. Once you set up these plugins, they will optimize your images on upload. Do note, however, that these image optimization plugins will not alter image resolution so it is still recommended to upload images in the correct resolution not exceeding the image placeholder size.

Properly Naming Files

A thing to note when naming files is to name files as they are. Don’t name files after a keyword when it is not appropriate. If you’ve got an image of a child playing the violin, name it something like “child-playing-violin.jpg” and not something like “learn-violin-online.jpg” or “free-violin-course-online.jpg”. If you try to force your SEO keywords on your image file names, your site may be flagged for overoptimization.

Optimize your images to ensure your site performs well. A fast e-commerce website provides a good user experience which translates to better SEO rankings and improved conversion rates.

Filed Under: How-To Articles Tagged With: best practices, conversion optimization, how-to, image optimization, optimizations, page speed, photoshop, plugins, site speed optimization

How to Set up AMP for WooCommerce and Speed Up Your Mobile Site

October 28, 2018 By John 2 Comments

For WooCommerce store owners, it is important to present your customers with a fast WooCommerce store. This is especially important for mobile the mobile platform. One means of achieving top speeds is to set up AMP. In this post, we’ll show you how to set up AMP for WooCommerce.

What is AMP?

Accelerated Mobile Pages, or simply AMP, makes websites load faster on mobile devices. This is an open-source initiative that Google started.

As Google pushes for a faster web experience, it approves of websites that have fast page loads speeds. And since AMP is  a pet project of Google, you have everything to gain and nothing to lose by adopting it. To be clear, AMP is not yet a ranking factor for SEO. However, you and your customers would still benefit from AMP since more searches are now being done on mobile devices.

How to Set Up AMP for WordPress

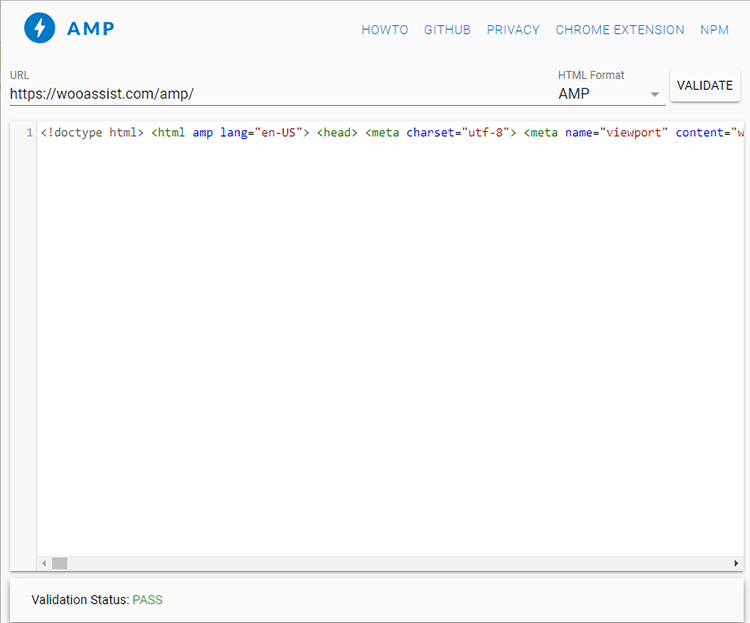
Before you can set up AMP for WooCommerce, you first need to set up AMP for WordPress.

To set up AMP for WordPress, you will need to use a plugin. On your WordPress Dashboard, go to Plugins then Click on ‘Add New’. Search for AMP for WordPress. Once you find the plugin, click on Install Now and then activate it.

You can also download the plugin directly from the WordPress plugin repository and upload  it on your site. After that, you will need to activate the plugin from your plugins page.

If you are running a multisite network, you can install the AMP plugin on the multisite and activate it for the network.

Now that you have set up AMP for WordPress, you can get started on setting up AMP for your WooCommerce pages.

How to Set up AMP for WooCommerce

For integrating AMP for WooCommerce, you will need another plugin. Currently, there are no free plugins that add AMP functionality to WooCommerce so you will have to purchase a premium plugin. You can choose between the WooCommerce Pro for AMP plugin or the Publisher AMP plugin.

To enable AMP for WooCommerce, simply install and activate the plugin.

As you can see, setting up AMP for WordPress and WooCommerce is easy. But the work doesn’t stop there. You will still need to test your AMP site.

How to Test AMP

There are a few tools that can help you test your AMP set up. Simply input any of your AMP pages on the two sites below and you will be provided with results.

  • https://search.google.com/test/amp

  • https://validator.ampproject.org/

You might also want to check Google Search Console for any errors in your AMP set up. If you are not connected to Google Search Console, you can use Yoast SEO plugin to connect your WooCommerce store.

If you find any errors in your AMP set-up, you can get started on fixing them. If you are stuck and need help fixing any errors, you can contact the Wooassist team and we should be able to help out.

Check Your AMP Speed

You can also check your AMP site for any improvements in site speed using GTmetrix or Pingdom.

Ensure Your AMP Pages are Indexed by Google

One way to ensure that your AMP pages will be indexed by Google is to generate a sitemap that includes the AMP pages. You can then upload it on Google Search Console. Just log in to your Google Search Console and then click on sitemap. In the field, just indicate your sitemap URL and click on “Submit”.

Ensure AMP Works with Yoast SEO Plugin

If you are using Yoast’s SEO  plugin, which we recommend you do, you will need to integrate Yoast SEO with AMP. This is a simple tasks and just requires that you install the Glue for Yoast SEO & AMP.

Final Notes

Now that you’ve set up AMP for your WooCommerce store, the mobile experience should be much faster. If you are having issues setting up your AMP, you contact us and we’ll see what we can do to help.

If you are looking for other ways to speed up your site, you can check out our post on how to speed up your WooCommerce store.

Filed Under: How-To Articles Tagged With: conversion optimization, seo, site speed optimization, WooCommerce

How to Fix Blurry Product Images in WooCommerce

February 26, 2015 By John 10 Comments

Blurry ain't good
Blurry ain’t good

Sometimes you upload an image in WordPress/WooCommerce and it just doesn’t show up like you intended it. Sometimes they don’t align. Sometimes they don’t fit the placeholder. Sometimes the image just doesn’t show. And sometimes, the image gets blurry. Why the image gets blurry may be caused by one of a few problems. Here we discuss the common causes and how to fix blurry product images in WooCommerce.

You Uploaded a Blurry Image

If you uploaded a blurry image then don’t expect that you’re going to get a good image to show up. Maybe you viewed the image in a small screen so it looks okay but when you view it on a larger screen, you’ll find that it actually is blurry. If this is the case, there is hardly anything that you can do to fix the image. Image editing tools like Adobe Photoshop may be able to help a bit by making the image sharper but don’t be expecting any significant changes. Odds are you’ll have to get a better image.

WooCommerce Recommends Using Large Product Images

thumbnail cropping woocommerce

Before, WooCommerce images need to be a specific size that you set in WooCommerce settings. That is no longer the case. WooCommerce now uses a lighthouse so images pop up big when users click on it. Large images look great and will help sell your products. However, make sure they are properly optimized.

For most themes, WooCommerce recommends uploading an image that is at least 800×800 pixels. Don’t worry about the image being bigger than the placeholder as WooCommerce automatically sizes your images and will only show the full resolution when clicked.

To control thumbnail cropping of your product images, you can go to Appearance > Customize > WooCommerce >Product Images and then select your desired cropping settings.

If the image is not the problem, there might be a problem with how your images are rendered. You can try to regenerate image thumbnails.

How to Regenerate Thumbnails

Other than when changing image settings in WordPress and WooCommerce, you may also need to regenerate the image thumbnails on your website if they appear blurry after a redesign or changing to a different theme. The best and easiest way to regenerate image thumbnails is to use the Regenerate Thumbnails plugin. Simply install and activate the plugin and from there, go to “Tools” and “Regen. Thumbnails”. Just click on the button “Regenerate All Thumbnails” and the plugin will fix the blurry images like magic.

regenerate-thumbnails

If you want to regenerate thumbnails for specific images instead, you can do this on the Media page on your admin panel. Make sure you are viewing images with List view. Simply hover over the image and the link to regenerate thumbnail should appear. You can also mark all the images you want to regenerate thumbnails and use Regenerate Thumbnails from Bulk Actions and then apply.

regenerate-thumbnails-1

Best Practices on Image Use

There are a lot of things that you can do to avoid blurry images by following best practices. Once you set an image dimension, make sure that the images you upload comply with that requirement. Uploading a bigger image in WooCommerce is okay but make sure the image is optimized so as not to affect your page load speed. You can set how you want image thumbnails to be cropped. If you upload a smaller image, it might look okay on a mobile device but not on a PC or laptop. It is also important to know what image file types to use.

Another best practice for images is to always set an alt text for your image. If the image fails to load, the alt text will show up and the user will at least know what the image is about. Also, name your files properly. Don’t name your files after SEO keywords. If you have an image of a ukulele, give it a descriptive file name and not “buy-cheap-ukulele”.

Filed Under: How-To Articles Tagged With: admin, best practices, conversion optimization, how-to, image optimization, plugins, product management, WooCommerce

How to Increase Mobile Conversion Rates for Your WooCommerce Store

January 21, 2020 By John Leave a Comment

Over the last few years, optimizing for mobile devices has become increasingly more important. More and more users browse the internet using their phone. According to Statista, 52.2 percent of web traffic comes from mobile phones and it has only been increasing from the previous years. As a WooCommerce store owner, you must optimize your website for conversion on these smaller screen sizes. Learn how to increase mobile conversion rates for your WooCommerce store by following the tips below.

How to Increase Mobile Conversion Rates for Your WooCommerce Store

How to Optimize Your WooCommerce Store for Mobile Devices

Use a Responsive Theme

All modern themes are now built to be responsive. A responsive theme adjusts to various screen sizes. You can check with your theme developer if your theme is responsive. You can also do a quick test by going to your WooCommerce store and then try scaling down the size of your browser. If you see the elements on your website move to adjust to the smaller window, then you are using a responsive theme. If you find that your theme is not responsive, don’t worry. You can switch to a responsive theme. We can recommend Storefront and the Genesis framework.

Storefront was made by the same developers that developed WooCommerce. It is built specifically for WooCommerce so you can expect full compatibility with WooCommerce and official WooCommerce plugins.

Genesis, on the other hand, is a framework. You need to use a Genesis child theme with the Genesis framework. Genesis is well-maintained, responsive and compatible with WooCommerce. 

User Test Your Mobile Site

Open your WooCommerce store on your smartphone and do some user testing. Perform actions that you expect your customers to do on your WooCommerce store. Important elements to test are:

  • making a purchase
  • subscribing to your newsletter
  • sending a message using your contact form
  • filling out the checkout fields
  • updating your shopping cart
  • commenting on blog posts
  • tapping on call-to-action buttons

There may be more that you need to test that is specific to your website. Take note of any difficulties that you encounter and get them fixed. Should you need help fixing any issues, the Wooassist team can help.

Use White Space and Large Fonts

Don’t skimp on using white space on your mobile site. Use it to your advantage. Since mobile devices have small screens, it makes it hard for the user to navigate or read your site if the elements are too close together. Also, make sure your site is easy to read by increasing font size.

Optimize Your Checkout Page

Your checkout page is one of the most important pages on your website. Limit your checkout form fields to only the necessary details. Remove any distractions to completing checkout. Make sure that the form fields are tall enough that they are easy to tap and fill out. Make the checkout button large enough so it is easy to tap. Don’t make the checkout process a burden to your customers.

Remove AutoPlay Videos and Pop-ups

Pop-ups and autoplay videos are annoying for desktop sites. Even more so on a mobile site. Don’t burden your customers with extra data charges from autoplay media. In some cases, these elements may be necessary. But if they don’t help you increase your sales, consider removing them. Instead, focus on making your customers click on your call-to-action buttons.

Improve Your Site Speed

Site speed has become very important as it is now a ranking factor for SEO. On the mobile platform, site speed is critical with mobile data speeds being slower than a wired internet connection. If your mobile site takes too long to load, the user will just leave. There are a lot of tools at your disposal to determine how you can improve your site speed. Google PageSpeed Insights even shows recommendations specific to your mobile site. Other tools that we can recommend are GTmetrix and Pingdom Website Speed Test. 

Optimize Your Images

This is related to site speed but deserves its own section. Many WooCommerce store owners neglect optimizing images and just upload willy nilly. If you upload large images without optimizing them, your mobile conversion rates would take a hit. You can use a plugin to optimize the images you’ve already uploaded. However, if you’ve uploaded images that have dimensions bigger than the image placeholders, they will need to be manually optimized. If you’ve been doing this for years, then you’ve got a big task ahead of you. To manually optimize images, you can follow the instructions in this blog post.

Optimize Your Site Navigation on Mobile

Poor navigation can make or break a mobile website. Make sure that your mobile website is easy to navigate otherwise your customers will leave your site out of frustration. Use a hamburger menu. If you are using a responsive theme, the hamburger menu should be built in. If not, you can custom code your mobile menu or use a plugin.

Offer Multiple Payment Gateways

It is important to offer the payment gateway that your customers prefer. On the mobile platform especially, depending on your location, mobile wallets are a thing. If you can tap into that market, you can improve your conversion rate. For iPhone users, there’s Apple Pay which you can enable on WooCommerce.

Just follow all the tips above to increase your mobile site’s conversion rates. If you have any tips that you can add or any questions at all, let us know in the comments.

Filed Under: How-To Articles Tagged With: checkout, checkout form, conversion optimization, image optimization, mobile friendly, navigation, responsive design, site speed optimization, woocommerce checkout

  • « Previous Page
  • 1
  • 2
  • 3
  • 4
  • 5
  • …
  • 7
  • Next Page »
Let us support your online store so you can manage your business

Get started today

Get 2 Hours of FREE SUPPORT

We are so confident that you will love our services that we will give you your first 4 hours at a 50% discount

That’s 4 hours for only $75

BUY NOW

Free eBook

5 Things Every Online Store Can Fix On Their Website In The Next Week To Increase Sales

Quick Links

  • How it Works
  • Pricing
  • Blog
  • Contact
  • About Wooassist
  • My Account
  • Checkout
  • Privacy Policy
  • Cookie Policy
  • Terms and Conditions

Wooassist

Australia:
59 Luke St.
Hemmant QLD 4174

Philippines:
San Miguel St.
Poblacion, Iligan City 9200

Connect


Copyright © 2026 · Wooassist

Yours FREE!

5 Things Every Online Store Can Fix On Their Website In The Next Week To Increase Sales