Wooassist

Assistance for Your Woocommerce Store

  • How it Works
  • Pricing
  • Services
    • Site Maintenance
    • AI SEO and Content Marketing
  • Blog
    • How-To Articles
    • Code Snippets
    • SEO For E-Commerce
    • Theme and Plugin Reviews
    • Wooassist News
    • WordPress/WooCommerce News
    • Interviews
  • About Us
  • Contact
You are here: Home / Archives for navigation

How to Fix Your Website Structure

April 13, 2021 By John Leave a Comment

how to fix your website structure

Have you ever considered looking at your WooCommerce store’s site structure? Probably not. After all, it doesn’t look like an urgent issue that warrants a lot of immediate attention. However, if your WooCommerce site suffers from poor structure, you could actually be hurting your SEO rankings. Odds are you are also making it difficult for your customers to navigate your site. In fact, depending on how bad your site structure is, it could be causing your customers a lot of frustration. You should make it a top priority to learn how to fix your website structure.

Why Should You Fix Your Site Structure?

If you know your site structure has problems, then do not delay. Address it right away so you can reap the benefits of following best SEO practices. If you are serious about getting on page of Google’s search results page, then you should not skimp on fixing your site structure. Not to mention, a good site structure will make it easier for your customers to navigate your site. This leads to good user experience which can increase your sales by as much as 30%.

What Does Good Site Structure Look Like?

Good site structure should look like a proper flow chart. The home page should have a link to all stand-alone pages this includes the about page, contact page, privacy policy page, pricing page, portfolio page, my account page, blog page, shop page and any other important pages.

Blog posts should make full use of blog categories and blog tags, if necessary. The same goes for products. Make full use of product categories and blog tags. Your blog categories and product categories should never have the same name as they will cannibalize each other. They will compete with each other for SEO rankings. Also, categories and tags should not be the same.

What You Should Do to Fix Site Structure?

Do a Content Audit

Before you go about fixing your WooCommerce store’s structure, it is important to understand your content. You can do a content audit to better understand your content assets and determine how to optimize your website’s structure. After doing a content audit and getting a clear picture of your content assets, the next step is to identify site structure problems.

Identify Site Structure Problems

Check and Fix Your Navigation Menu

Check all your navigation menus. From a user perspective, do they make sense? Do you use dropdown menus? More important menu items should go to your main navigation menu. Less important links to pages like Privacy Policy, Cookie Policy, Terms and Conditions should go to your secondary or footer menu. Having a privacy policy and cookie policy page is essential if you want to comply with GDPR regulations which you should.

You can even have people try using your site and ask them feedback about your site’s navigation.

What Should Be on Your Main Navigation

Your main navigation should contain your most important pages or all pages you want your visitors to have easy access to. We recommend your Shop Page, Blog Page, About Page, Contact Page, or depending on your business, a portfolio or pricing page.

Find 404 Errors

Isn’t annoying when you go a certain website, you click a link and then land at a 404 error page?

Google has been putting more attention on good user experience and having 404 errors on your website is not good user experience. Fixing 404 errors should be included in your website maintenance tasks. You can find 404 errors by using this Broken Link Checker tool. Once you determine which links lead to a 404 error, remove that link or point it to the appropriate page.

Redirect 404 Errors

In some cases, your broken links could be because of a change in your website’s URL structure. In this case, you might want to redirect all your all URLs to the new URLs. Make sure you use a 301 redirect. You can use the Redirection plugin to set up your redirects. For SEO purposes, it is important to set up a 301 redirect to tell search engines that the old page has been permanently moved to a new address.

Update or Remove Outdated Content

It is important for SEO to have fresh content so you should be updating your content regularly. In some cases, you might find that some of your old content may no longer be relevant so you can either update or delete that page. If you have updated content, you should redirect the deleted page to the updated content.

Make the Most of Your Internal Links

Proper internal linking creates a smooth flow between all your site’s pages. When you’re writing a blog post and you mention another blog post that is related to your current post, link to it. When you mention a specific page on your site, link to it. When you mention a specific product, link to it. Google appreciates good internal links.

Learn How to Properly Use Posts and Pages

Think of categories as a file cabinet where you place files that belong together so everything remains organized. So if a user is interested in a specific kind of product or blog post, the user can find them all in one place. Tags, on the other hand, are used differently. You can think of tags as the index section of a book. Properly tagging your posts and products makes it easier for users to find posts or products that mention a specific keyword or topic.

Should You Revise Your Categories?

If you found out that you’ve been using your categories all wrong and want to revise it to make it clearer, you should do it sooner rather than later. Making sure your category structure is optimum will go a long way in helping your SEO. Just make sure you properly redirect everything to the new URL.

Changing the Permalink Structure

By default, WordPress sets your permalink structure to something that is not optimal. It is ideal to have a custom structure or a post name structure. It should be one of the first things you should change when you create a new WordPress site. So if you didn’t do it before and now have hundreds of posts and pages, then changing your site structure could become a major issue.
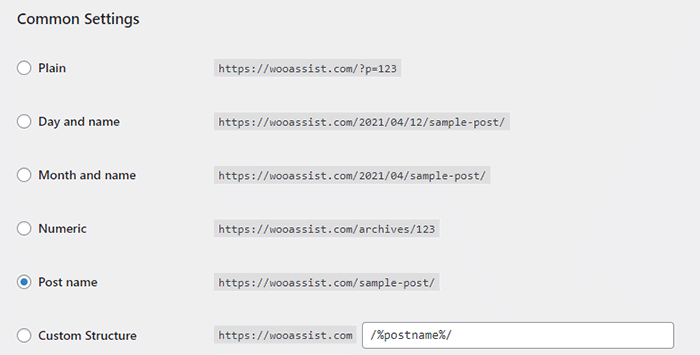
When you change your site structure, you will lose many external links pointing to your site and that’s a big SEO disaster. You have to make sure you make proper 301 redirects to the new URLs.

It might be a lot of work but you will soon reap better SEO rankings. If you already have good content, the benefits of optimizing your permalink structure could be significant. This means you should not skip doing this.

Resubmit Your Site Map

When you finish all your site structure optimizations, you should resubmit your sitemap to major search engines. That would be Bing and Google. Resubmitting your sitemaps ensure that search engines index the changes in your site structure.

Have you checked your site structure lately? What problems did you find?
Filed Under: How-To Articles Tagged With: 404 error, best practices, content marketing, navigation, SEO strategy, woocommerce seo, WordPress SEO, XML sitemap

How to Create a Custom 404 Error Page for Your WooCommerce Store

February 25, 2016 By John Leave a Comment

What is a 404 Error

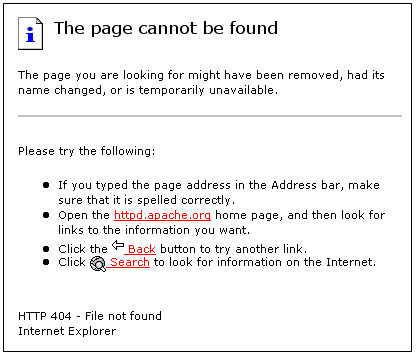
A 404 Error is an error message displayed when an accessed page is not found in the server that you want to access. It is a standard response when an entered address does not match a data from a server.

This happens when you rename, move, or delete a page. This message also appears when the URL is incomplete, mistyped or misspelled. You can change the way your WooCommerce store responds to this error by redirecting or just letting your visitors arrive at a custom 404 Error page.

Creating a Custom 404 Error Page

default-404-error-page_screenshot-pngYou can actually just leave it and most websites would just send out a typical text response. So why create a custom 404 error page for your Woocommerce store? A lot of people are highly visual.


Web design is a huge factor in discerning a company’s credibility. Zabisco found out that 40% will respond to visual information better than plain text. This alludes to the importance of creating a visually-appealing custom 404 error page.

Custom content will not only boost your branding but will make customers have a more positive view of your company. Custom content is one of the many reasons that make a customer feel positive about your website.

Statistics/Case Studies on 404 Error Pages

From a search engine ranking standpoint, 404 error pages will not hurt your ranking per se. It only matters when an important link in your site returns a 404 error. This important link could be your “about” page or “contact” page. Your rankings could suffer since these important pages are actually ranking factors.

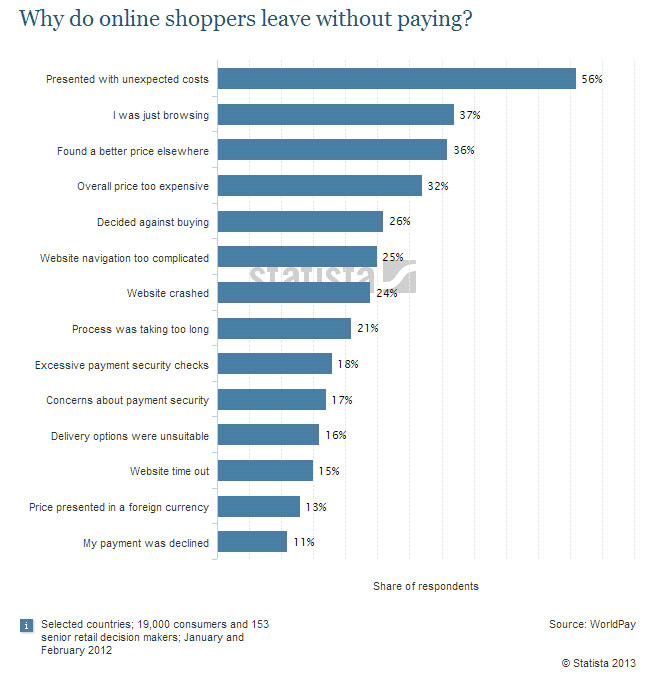
Any other 404 error could also frustrate your visitors and just leave your website. Shopify surveyed why online retailers are losing 67.45% of their sales. They discovered that some of the most common mentioned issues are website problems.

Shopify-survey-why-online-shoppers-leave_screenshot-png

A 404 error also affects a website’s bounce rate. A bounce happens when a visitor comes to your website, does not click on any other page and leaves. Search engines like Google use bounce rate as ranking factor.

A high bounce rate raises several red flags for your WooCommerce store. It may imply poor user experience and your website may be deemed irrelevant to your market.

Elements of a Custom 404 Error Pagelabyrinth

Now before you go and make any changes, keep in mind that each theme is different. There are different ways on how you can create a custom 404 Error page. Here are some important things that you need to consider.

Use Simple Language

A regular site visitor will not understand a typical technical 404 message. Use simple human language to inform your site visitor of what went wrong. You can even use language translations or location specific pages. The goal is to deliver a clear message.

How You Can Help

Apologizing and offering a helpful suggestion should be the main theme. The aim is to change the negative experience from 404 pages into a positive one. You can do this by:

touch-screen_touchscreen

  • Adding a search box
  • Showing your menu navigation
  • Adding a contact, subscription or ticket submission form
  • Adding a sitemap, category lists or key links
  • Linking popular posts or social media accounts
  • Giving out coupons, discounts, or other offers

Time spent in your site should not end in your 404 page. These elements are also engagement and conversion boosters. Your customers stay happy and you get a positive rep.

Examples of Good 404 Error Pages

A lot of huge brands out there appeal to human emotions in their marketing strategy. This is because customers are not buying products, they buy the experience. 404 Error pages in the past are just simple text warnings. Websites now use humor or a bit of personality to communicate their brand to the customers. You can use graphics, animations, or even videos. Here’s some inspiration to get you started.

Popscreen

Popscreen showcases a clean and bright but simple and straightforward 404. You can see a link to the home page and popular videos as well as search bar.

404-error-page_Popscreen_screenshot

GOG

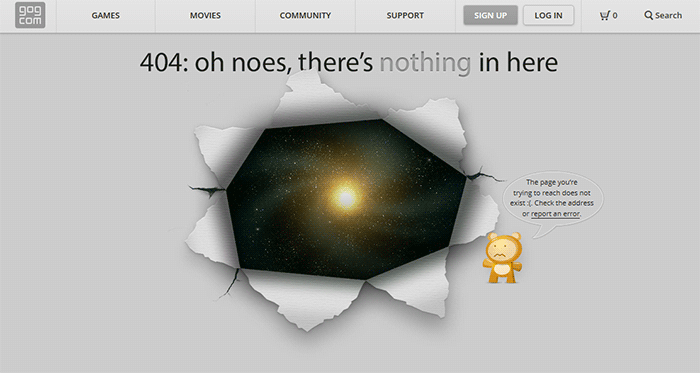
GOG displays a unique design to say that you lost your way. The 404 error page retains the navigation and footer menu so it is easy for users to navigate. Users can also report the error.

404-error-page_GOG_screenshot

UX Booth

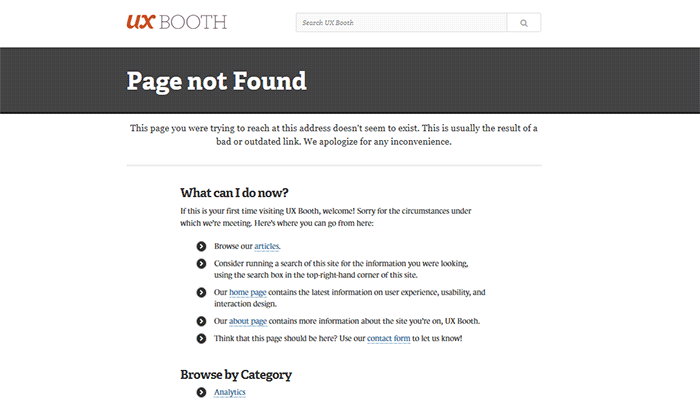
The UX Booth 404 error page uses simple, concise and direct language and an immediate apology. The page suggests popular links on the website as well as the list of categories. It also retains the footer links and the search bar.

404-error-page_UX-Booth_screenshot

Average Joes Blog

Average Joes Blog is a good example of category-rich 404 error page. In fact, the 404 error page is a replica of the home page.

404-error-page_Average-Joes-Blog_screenshot

Philips

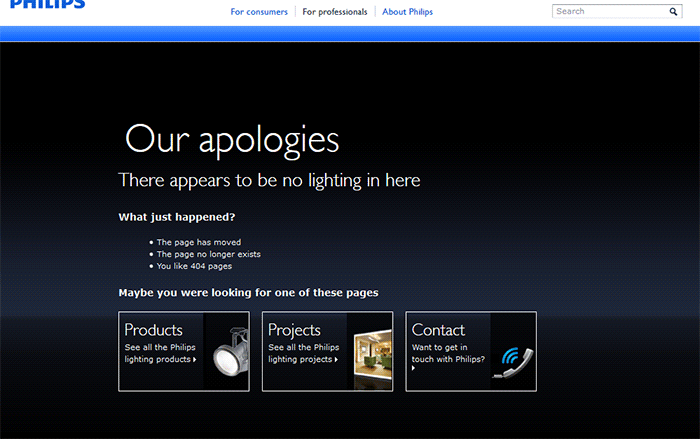
Philips goes creative and witty with its 404 error page. It mentions the absence of lighting then explains what happened and suggests popular links.

404-error-page_Philips_screenshot

Email Center UK

The Email Center UK website uses humor. Since you are at an error page, it means someone messed up and you get to choose who to fire for the fiasco. Below all that is a simple link to the home page.

404-error-page_Email-Center-UK_screenshot

Hootsuite

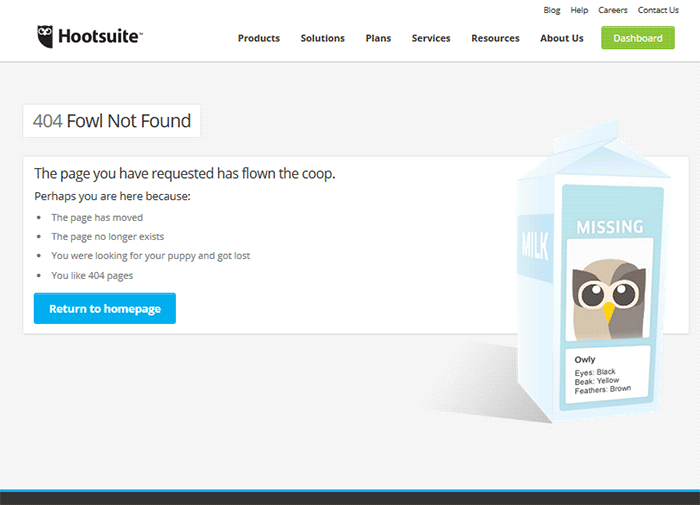
The Hootsuite 404 error page lists down possible reasons for the error. They used ‘fowl” language to keep the identity of the brand/mascot.

404-error-page_Hootsuite_screenshot

IMDB

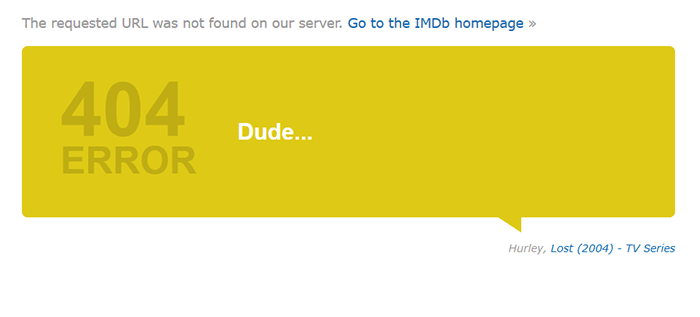
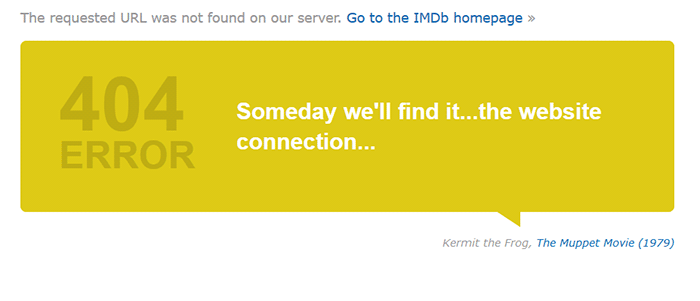
The IMDB 404 error page uses a simple layout with a clever idea. Every visit to a 404 error displays a random movie quote. Movie buffs will definitely find this entertaining. A convenient link to the home page is also positioned at the top.

404-error-page_IMDB_screenshot

404-error-page_IMDB2_screenshot

Blue Fountain Media

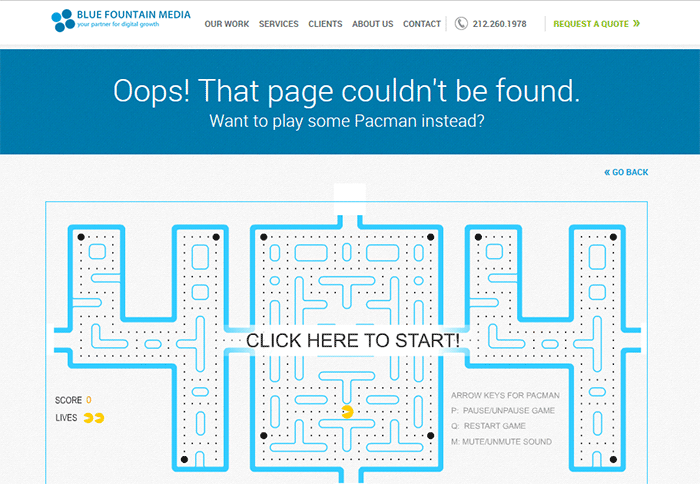
Blue Fountain Media makes a 404 page that you will look forward to – an actual PAC-MAN game. They retained their main navigation and a “Go Back” link that takes you to the last visited working page.

404-error-page_Blue-Fountain-Media_screenshot

Not Found Org

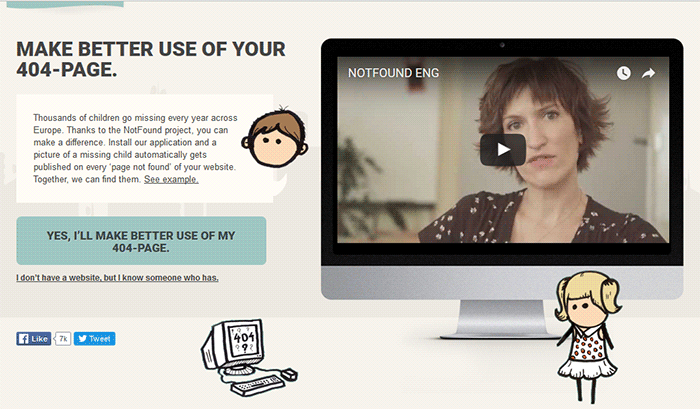
NotFound.org actually uses its 404 error page to achieve a goal. It is an app that you can install in your website. It lets you customize your 404 page to help their cause – find thousands of children that go missing every year.

404-error-page_Not-Found-Org_screenshot

Creating a Custom 404 Error Page

Now that you have some inspiration, it’s time to create your own. You can check out WordPress’ basic guide here if you are able to code, if not you can check out the plugins below.

Since WooCommerce is installed on the WordPress platform, you can use the power of WordPress plugins to create awesome About Us pages.

Custom 404 Pro

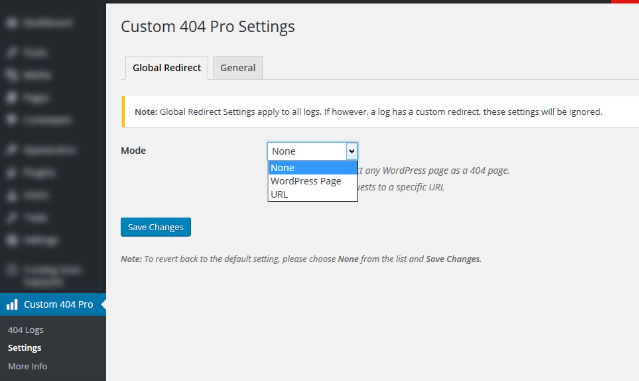
The Custom 404 Pro plugin lets you override the default 404 page with any page of your choice. To set your custom 404 error page:

  1. Install and activate the Custom 404 Pro plugin.
  2. Create a new page that you want to use as your 404 error page.
  3. Click on Custom 404 Pro on your WordPress Dashboard and then click on Settings.
  4. Set the page or URL that you want to use as your 404 error page and then click on Save Changes.

Create-custom-404-error-page_Plugin_Custom-404-Pro-Settings

404page

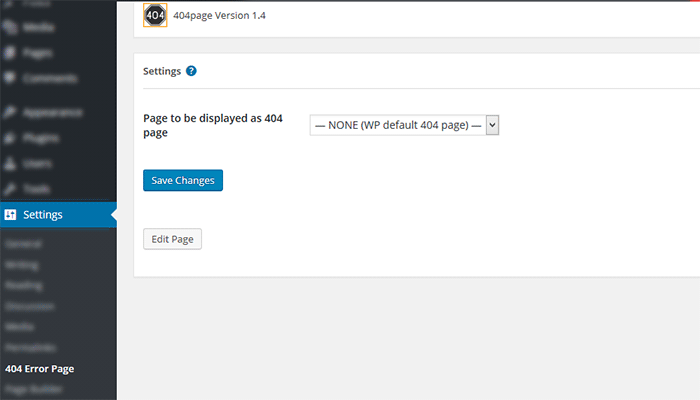
404page is another easy plugin to use to create custom 404 error pages. To create a custom 404 error page using the 404page plugin:

  1. Install and activate the plugin.
  2. Create a new page that you want to use as your 404 page.
  3. Click on Settings and then choose the page that you want to use as your 404 error page.
  4. Click on Save Changes.

Plugin_404page_Create-custom-404-error-page

Test Your 404 Error Page

To test if your new 404 error page is working, just pop any non-existent URL in your domain on your browser. If your new 404 error page does not appear, check if your website is set to redirect to your new 404 error page.

Create-custom-404-error-page_Plugin_404page

Conclusion

404 Error Pages can be annoying but you can use them to your advantage. Customize them to boost engagement and conversion. Align your new 404 error page with your brand image and website goals. It will do wonders for your WooCommerce store and your brand. Do you have any other suggestions for creating a good 404 error page?

Filed Under: Code Snippets, How-To Articles Tagged With: best practices, design tweaks, navigation, plugins, redirection, WordPress

How to Set Up WordPress SEO by Yoast for WooCommerce

March 26, 2015 By John Leave a Comment

How to Set Up WordPress SEO by Yoast

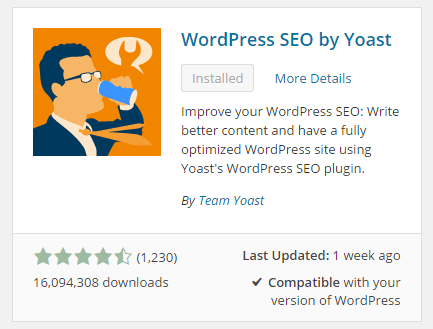
The WordPress SEO plugin by Yoast with over 16 million downloads is easily one of the best plugins that you need to have on your website. Whether it’s a personal blog, an e-commerce store, or a company website, you should have this plugin. In fact, many WordPress developers have WordPress SEO by Yoast in their list of plugins to install each time they create a new website. Many of you may already know a bit (or a lot) about SEO and that’s okay. That just means you’ll make better use of this plugin. And for those that don’t know much about SEO, don’t worry. The plugin is user friendly. I’ll walk you through all the functionalities so you’ll know how to set up WordPress SEO by Yoast for WooCommerce.

Installing WordPress SEO by Yoast for WooCommerce

To install the plugin, head over to the plugin developer’s website. Once there, download the plugin and upload it at the plugin page of your WordPress Dashboard.

You can search for the plugin on the plugin repository by going to your WordPress Dashboard. Click on “Plugins” and then “Add New”. From there just use the search bar to search for the WordPress SEO plugin and click on “Install Now”.

SEO Plugin Especially for WooCommerce

For WooCommercestore owners, getting the premium Yoast WooCommerce SEO plugin is a worthwhile buy. When used with the WordPress SEO plugin, you can better optimize your WooCommerce store. It enhances the existing Open Graph and Twitter Card enhancements in the WordPress SEO plugin. It will also optimize your sitemap for an ecommerce store setup, among other things. For a guide on how to set this up, check out this post.

Optimizing Product Pages for SEO for WooCommerce

The single most important function of the WordPress SEO plugin by Yoast is its ability to help you optimize your blog posts and pages for SEO. That includes WooCommerce products. WooCommerce products work just like posts/pages so it is the same procedure. So when I say page or post, the same applies to WooCommerce products.

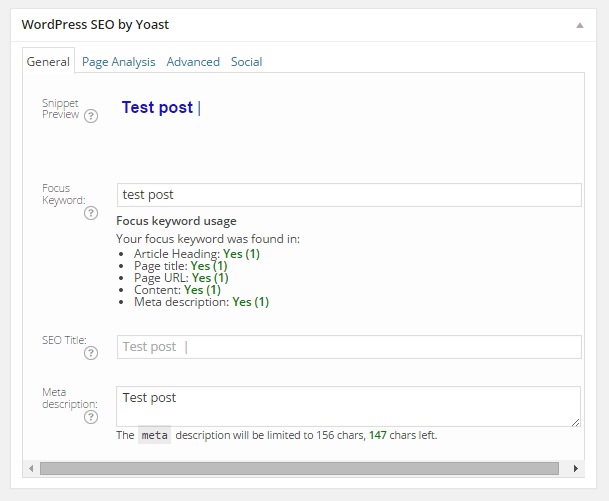
Optimizing posts/pages is easy enough. You can do it right after you finish creating the post/page in WordPress. When you’re on the post or page, just scroll down and there will be a section named “WordPress SEO by Yoast”. On the General tab, you’ll see a Snippet Preview. This is how your post/page will show up on the Google search results page. And the fun part is that you can edit how your post will show up. First off, you set a focus keyword. This should be the keyword that you want your blog post or page to rank for. What you should be aiming for is to have this focus keyword in:

  • the title of your article
  • in the body of the content especially in the first paragraph
  • and the meta description which you can set in the field where it says meta description

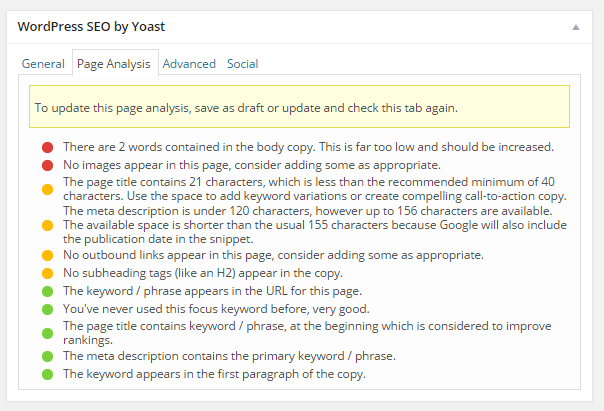
If you got that all right, you should be seeing all green below the focus keyword that you set.

post-optimization

You can also click on the Page Analysis tab to get more information and other suggestions to improve your post/page. You don’t have to follow all the suggestions. But following everything will help increase the quality of your post/page.

page-analysis

You can tweak a bunch of other settings under the Advanced tab so feel free to change them as you see fit. You can even change how your post would appear when it gets shared on social media under the Social tab.

Optimizing WooCommerce Product Categories for SEO

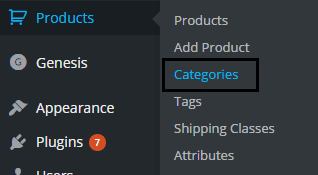
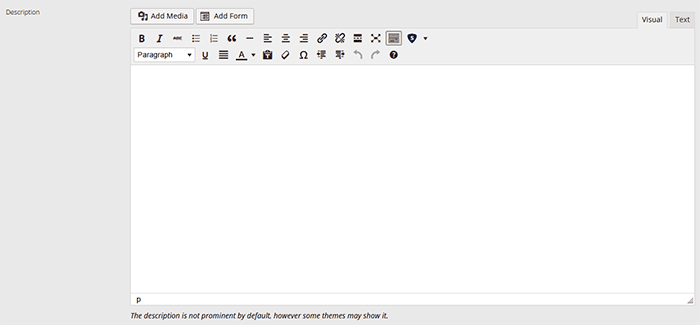
woocommerce-product-categoriesSimilarly, you can also optimize WooCommerce product categories for SEO. Just go to “Products” and click on “Categories” Edit the category that you want to optimize. When you scroll down to the bottom of the “Edit Category” page, you’ll see a section called Yoast SEO Settings. Fill in the SEO Title and SEO Description fields and click on Update.
optimizing-product-categories

Unlike when optimizing product pages, you don’t get to set a focus keyword. However, you can still target a keyword by including the keyword in the SEO Title and SEO Description fields. You should also put it in the Category Description field above the Yoast SEO Settings section.

Note that not all themes are able to display product category description on the category page but if your theme supports this function, the text that you put will appear on your product category page.

product-description

Verifying Your Website with Search Console

Verifying your website with different Google Search Console tools is important if you want your site crawled. It will have your website crawled by spiders. I don’t mean actual spiders. I mean search engine spiders that index websites on different search engines. Verifying with different webmaster tools can be a complex process but this is made easy with the WordPress SEO plugin.

Linking with Social Media Profiles

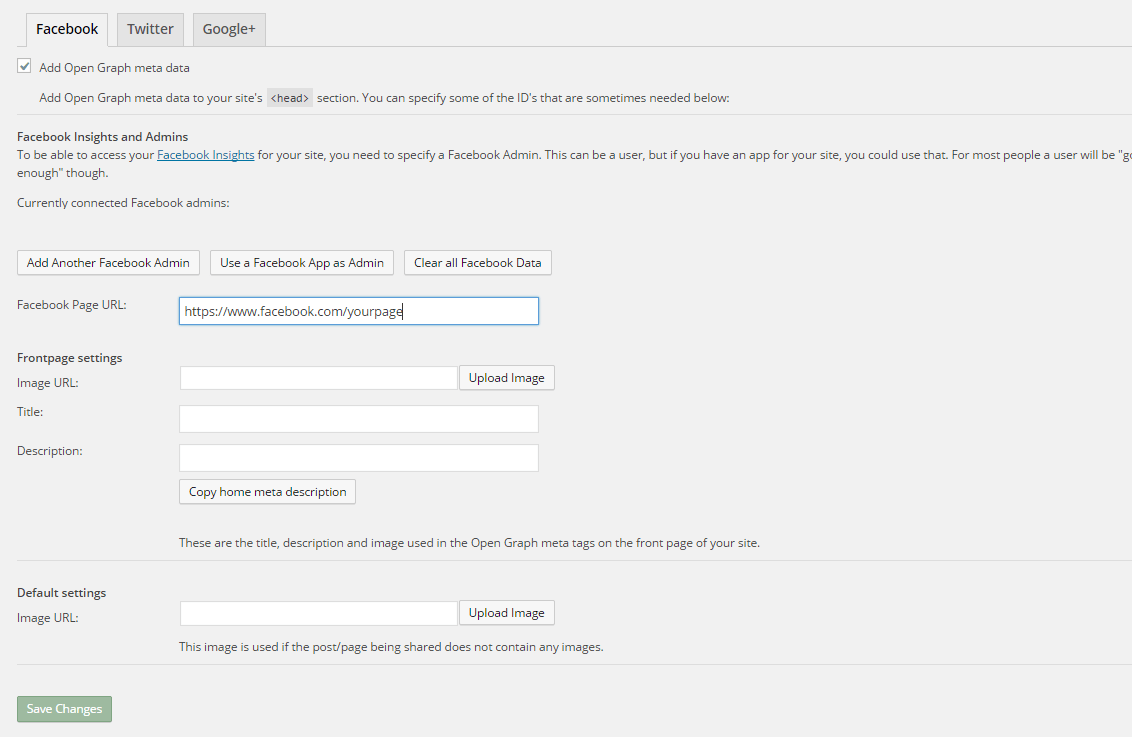
You can connect your website with your social media pages with the WordPress SEO plugin. You can do this by going to “SEO” and then clicking on “Social”. Here there are three tabs: Facebook, Twitter and Google+.

How to Connect Facebook

Linking Facebook to your site allows you access to Facebook Insights. If you already have a Facebook page, you just need to get the URL of your Facebook page. Copy the URL and then paste it where it says “Facebook Page URL”. You can then set the administrators for your page by clicking on Add Facebook Admin. If you are an advanced user, you can tweak a bunch of other settings. When you’re done, just click on “Save Changes”.

facebook

How to Set Up Twitter Cards

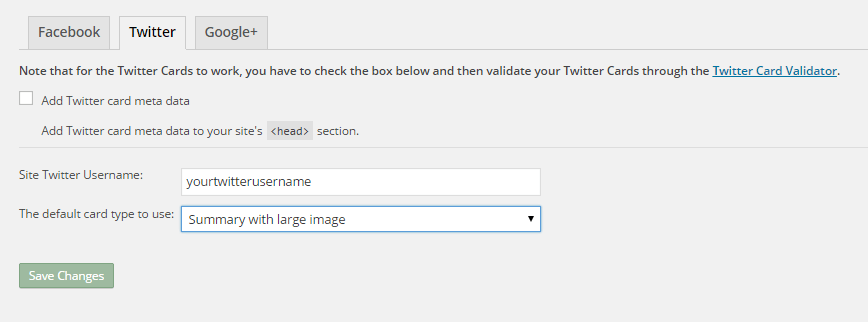
Do you use Twitter? Have you ever seen links in Twitter that show a snippet of the page that it links to? That’s called a Twitter card and you can enable that on your website using WordPress SEO. The usual thing is that enabling Twitter cards would call for you to add some lines of code to your header. But WordPress SEO eliminates the need for that.

twitter

How do you do this? On the Social section of the plugin, click on Twitter. Fill in your Twitter username on the appropriate field. Specify the kind of Twitter card that you want to have then click on “Save Changes”. You’re not done yet. You still need to confirm your Twitter card. Head over to this link. Specify the URL and click on “Preview Card”. After that, click on “Request Approval” and fill out the form. Finally, click on another “Request Approval”.

Soon, you’ll be able to see Twitter cards on your Twitter links.

The premium YoastWooCommerce SEO plugin will further help you optimize your Twitter Cards if you have that.

How to Connect Google+

To connect your website with Google+ means setting your Google+ profile as the publisher of your content with the “rel=publisher” markup. “Rel=publisher” is an authorship markup which connects websites to Google+ pages (not personal profiles).

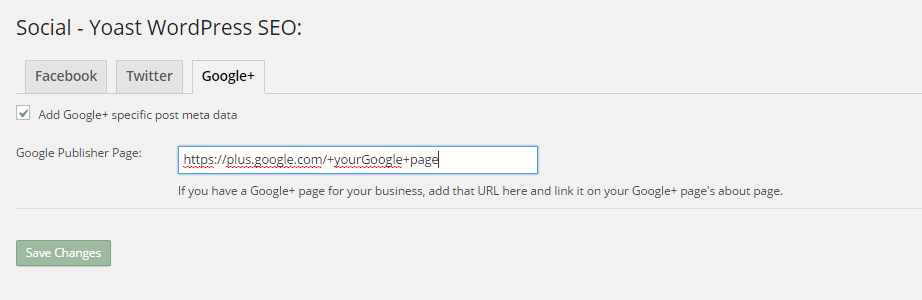
To connect your Google+ company page, head over to the “Social” section of the plugin and click on Google+. Fill out the field with the URL of your company page on Google+ and click on “Save Changes”.

google+

You might have heard of “rel=author” which links the content to the Google+ profile of the author. When implemented in the proper way, “rel=author” should show a snippet of the content with a photo of the author in the SERPs page. If you’re a writer and you’re hyped by that, I’d hate to burst your bubble but “rel=author” is no longer supported by Google. You can read more about it here.

Improving Sharing on Pinterest

Pinterest is another social media platform that’s worth mentioning. It has great potential for e-commerce stores. Why? Because Pinterest is image-based. The YoastWooCommerce SEO plugin makes sharing on Pinterest more worthwhile. After setting Twitter products and Schema Open Graph additions, your pins on Pinterest will start to show in a different way. In most cases, WooCommerce product will show up like posts. But with the plugin configured, your products will show up as “products”. They will show product related information such as price and variations.

Implementing Sitemaps with WordPress SEO

In a nutshell, sitemaps communicate with search engines to let the latter know when there are changes to the website. There are a lot of plugins that lets you create a sitemap. If you are already using the WordPress SEO plugin, just use the built-in sitemap module. Looking for another plugin just add an extra load to your server.

sitemaps

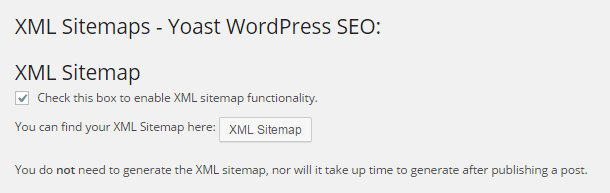
To get your sitemap, go to the plugin’s “XML Sitemaps” tab and then tick on the first box to enable sitemaps and click on “Save Changes”. There are a bunch of settings that you can tweak. You can have a look at them and change them as you please. They are pretty much self-explanatory.

You also might want to get the WooCommerce SEO plugin, which was mentioned above a couple of times. This removes some unnecessary bits from your sitemap in automatic fashion.

Check out our post on how to create a sitemap for your WooCommerce store to learn about sitemaps and other means of creating it.

Permalink Settings

Permalink settings all have to do with your URLs. I would not recommend changing any of the settings here but you are free to check them out and change them as you please.

Enabling Breadcrumbs with WordPress SEO

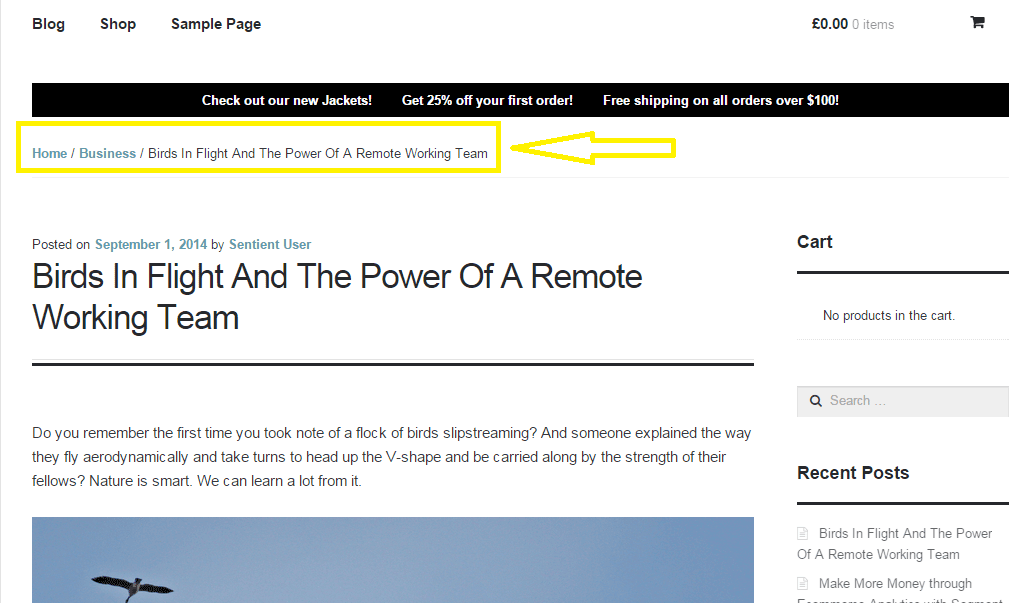
Breadcrumbs, when enabled, helps users identify where they are on your website. It also helps search engines determine your website’s structure. See the image below.  Where the yellow arrow is pointing at, that’s the breadcrumbs.

Enabling breadcrumbs on your website is simpler than snapping your fingers. Just go to SEO and then click on Internal Links. You should see a box that says “Enable Breadcrumbs”. So just tick that box and save. There are a few settings that you can tweak so just change them up as you need.

breadcrumbs

Did we miss anything? Or do you have any questions about the WordPress SEO plugin? Let us know in the comments.

Filed Under: How-To Articles, SEO For E-Commerce Tagged With: blog, breadcrumbs, content marketing, Google Webmaster Tools, Google+, how-to, navigation, optimizations, plugins, SEO tools, social media, Twitter, WooCommerce, WordPress, WordPress SEO, XML sitemap, Yoast

How to Add a Quantity Field on Your WooCommerce Shop Page

April 7, 2017 By John 30 Comments

counting-cubes-quantity-on-shop-page

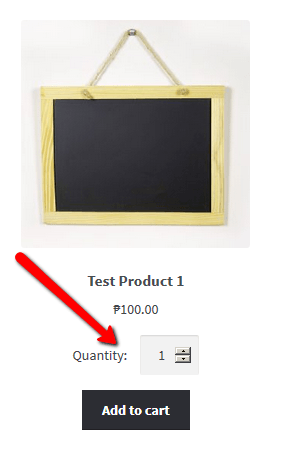
By default, WooCommerce does not allow users to change the quantity of the product on the shop page before adding to cart. To change the quantity, users would have to proceed to the cart page which can be an arduous process. In this post, we will show you how to add a quantity field on your WooCommerce shop page.

If a customer wants to buy three sunglasses, and you only have the “Add to Cart” button on the shop page, the user will have to go to the Cart to edit the quantity that he/she wants to buy. This takes a few extra clicks and can become a real problem if the customer wants to shop for more items.

Less Clicks to Checkout

It is important to note that less clicks leading to the checkout page leads to more sales. As an e-commerce store owner, making your store more profitable should be on top of your priority list. Another way to reduce clicks to checkout is allowing the customer to check out as guests without the need to create an account.

Also, refrain from asking unnecessary information. At the very least, your checkout page should only have the name, address, email and phone number fields aside from the payment details.

Quality of Life Improvement

Adding the quantity field to the shop page is a good quality of life improvement that many of your visitors would appreciate. Instead of having to navigate to the cart or the product page to increase the quantity, they can increase the quantity from the shop page. If you think about it, making it easier for your customers to purchase more of your products means more sales for you.

A Necessity for Some Online Stores

How to Add a Quantity Field on Your WooCommerce Shop PageAdding the quantity field to the shop page is a necessity to some stores where buying several pieces and having repeat sales are common. For example, buying canned cat food in bulk is common so if you own a store selling pet food, having the quantity field on the shop page will really help. Many of your customers will be buying again after some time. They can just add the products directly from the shop page since they know what they are buying and no longer need to see the product details.

How to Add a Quantity Field on Your Shop

You can use the Quantity Field on Shop Page for WooCommerce plugin to add a quantity field on your WooCommerce shop. Just install the plugin and activate it. There are no settings to tweak. Once the plugin is activated, the quantity field should be on your shop page.

Did this plugin work for you? Do you have any questions or ideas on how the plugin can be improved? Let us know in the comments.

Filed Under: How-To Articles, Theme and Plugin Reviews Tagged With: best practices, e-commerce, how-to, navigation, plugins, website development, Wooassist, WooCommerce

How to Edit Footer Credit Text in Storefront Theme

March 20, 2017 By John Leave a Comment

Like most themes, Storefront theme comes with a generic footer text. As a WooCommerce store owner, this doesn’t really help your site so you will want to change it.

Storefront-Default-Footer

Why Edit Footer Credit Text Area?

Well, you certainly wouldn’t want the default one. You can edit your site footer credit text area to include your business name and declare your copyright. You can also use this area to include whatever best fits your needs.

But first off…

How Do You Edit the Edit Footer Credit Text in Storefront Theme?

By editing your e-commerce store’s footer, you can make it a part of your strategy. You can easily edit it if you know how to code. However, this can prove challenging to the average user. In this case, there’s a plugin for that. Just follow the steps below:

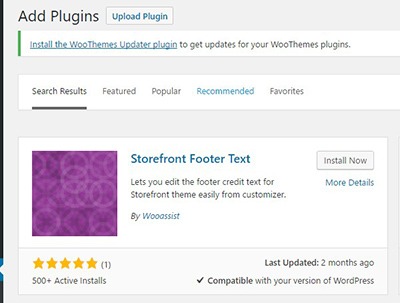
  1. Storefront-Footer-Text-Plugin-400x300Head over to your WordPress Dashboard and go to plugins

  2. Click on “Add New”. In the Search field, input “Storefront Footer Text” and press Enter.
  3. Click on ‘Install Now’ on the plugin and then click Activate.
  4. Once Activated, head over Appearance > Customizer
  5. Under the Footer section, you will find a text area for you to enter your custom credit text. You can use HTML tags so you can be creative when adding your footer text.
  6. When you’re done, just click on Save.

What Can I Add to My WooCommerce Store’s Footer Credit Area?

There are a lot of things you can add to your store’s footer credit section. Below are just some of them.

Declare Copyright and Other Important Declarations

The most common use of this area is to declare a copyright. This has three elements: the copyright icon, the company name and the year that you started the e-commerce store/business up to the current year.

If there are other important declarations that you want to add for legal purposes, you can add them in this section as well. Some websites have been known to use this area to declare the use of cookies.

Declare-Copyright-in-Footer

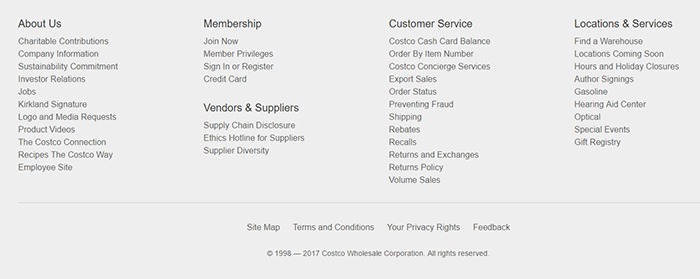
Here’s how it looks like on the Costco website.

Contact Details

In addition to copyright information, you can add your contact details on the footer credit section to increase your credibility. You can add your phone number, address, email as well as a link to your contact us page.

Social Media Icons

You can add social media icons in this section in a way that is not intrusive. When you add social icons at the top of your page, it can be a distraction from your website’s goal. But when you add it at the bottom of your site, it becomes another way for you to engage with your visitors if they ignored your main call-to-action.

Social-Media-Icons-in-Footer
Newegg.com adds both social icons and security seals in the footer credit area.

Show Security Seals and Certificates

Newegg.com adds the security seals on their footer credit section along with their social media icons. You can add your own Norton Security Seal here.

Payment Options

You can also add icons of the payment options that you accept on your e-commerce store. This makes it easier for your visitors to know what payment options you accept without having to look for the FAQ section.

Add Other Important Links

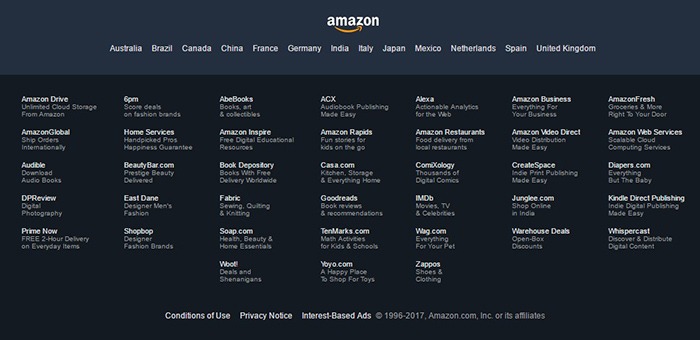
You can also use the footer credit area to add other important links such as your terms and conditions and privacy policy. This is how Amazon does it.

Terms-Conditions-Footer

No matter what you put on your footer credit text area, it must be an element that helps you achieve your e-commerce store’s goals.

Did this plugin help you edit footer credit text in Storefront? Did you experience any problems using it? What elements did you add to your footer credit area? Let us know in the comments.

Filed Under: How-To Articles, Theme and Plugin Reviews Tagged With: best practices, design tweaks, e-commerce, how-to, navigation, plugins, Storefront, Wooassist, WooCommerce

  • 1
  • 2
  • 3
  • Next Page »
Let us support your online store so you can manage your business

Get started today

Get 2 Hours of FREE SUPPORT

We are so confident that you will love our services that we will give you your first 4 hours at a 50% discount

That’s 4 hours for only $75

BUY NOW

Free eBook

5 Things Every Online Store Can Fix On Their Website In The Next Week To Increase Sales

Quick Links

  • How it Works
  • Pricing
  • Blog
  • Contact
  • About Wooassist
  • My Account
  • Checkout
  • Privacy Policy
  • Cookie Policy
  • Terms and Conditions

Wooassist

Australia:
59 Luke St.
Hemmant QLD 4174

Philippines:
San Miguel St.
Poblacion, Iligan City 9200

Connect


Copyright © 2026 · Wooassist

Yours FREE!

5 Things Every Online Store Can Fix On Their Website In The Next Week To Increase Sales