Wooassist

Assistance for Your Woocommerce Store

  • How it Works
  • Pricing
  • Services
    • Site Maintenance
    • AI SEO and Content Marketing
  • Blog
    • How-To Articles
    • Code Snippets
    • SEO For E-Commerce
    • Theme and Plugin Reviews
    • Wooassist News
    • WordPress/WooCommerce News
    • Interviews
  • About Us
  • Contact
You are here: Home / Archives for navigation

How to Change the Number of Related Products in WooCommerce

May 12, 2016 By John Leave a Comment

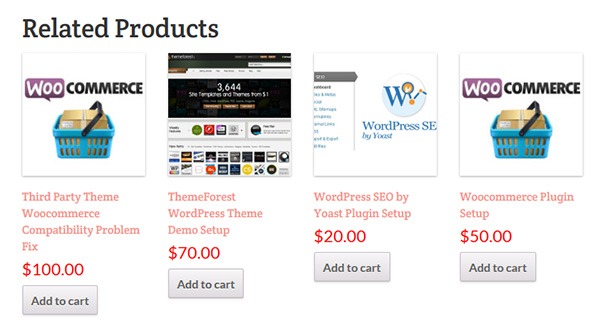
How to change the number of related products in woocommerceChanging the number of related products in WooCommerce is a relatively easy task if you know how to do it. WooCommerce defaults to two related products in the single product page but store owners may want to show their visitors more than just two related products.

Why Change the Number of the Related Products?

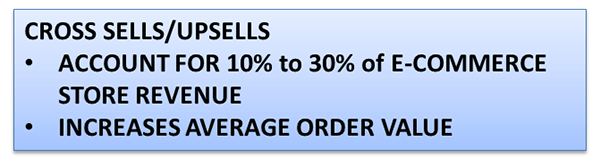
Showing more products in the Related Products section will increase and develop the browsing or buying choice of the user. This strategy is basically cross-selling/upselling. It is the strategic way of introducing your customers to other products that are related to what they are already interested in. Research shows that product recommendations account for 10% to 30% of e-commerce store revenue and increase average order value.Cross-Sells_Upsells
Setting up the Number of Related Products

There are two ways you can set up the number of related products. First is to insert a code snippet in the functions.php file on your theme. Second is to install a plugin to do it for you. The first method may seem intimidating to some WooCommerce shop owners, but it is actually as easy as copy and pasting a code. This method is recommended because it doesn’t bloat your site with unnecessary code.

In some themes, authors have added custom functions that allow users to edit WooCommerce and this includes the number of related products. Buying themes that come with a lot of custom functions however are generally not recommended as they can add unnecessary bloat to your site.

How to Change the Number of Related Products in WooCommerce Using Code Snippets

The best way to edit the number of related products is by using a code snippet that you insert into your child theme so that the code doesn’t get overwritten when you update your theme. Don’t get discouraged by the thought of coding but do take extra caution as one wrong code can break your entire site. If you do not know what you are doing, it would do you well to hire a developer to do this for you. If you are comfortable working with code snippets, then proceed with the steps below.

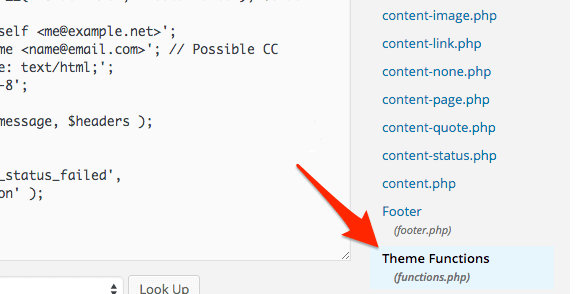
    1. To start, locate functions.php in the WordPress file system. Go to your WordPress Dashboard. Navigate to Appearance > Editor. Choose the theme you are using from the dropdown in the upper right sidebar and locate at the bottom right the functions.php file. You can also access your site’s file through an FTP client and edit the functions.php file from there.
WordPress-Dashboard_Edit-Themes_Themes-Function

  1. Next is to copy and paste the code below at the very bottom of your functions.php file.
    /**
    * WooCommerce Extra Feature
    * --------------------------
    *
    * Change number of related products on product page
    * Set your own value for 'posts_per_page'
    *
    */ 
    function woo_related_products_limit() {
      global $product;
      
      $args['posts_per_page'] = 6;
      return $args;
    }
    add_filter( 'woocommerce_output_related_products_args', 'jk_related_products_args' );
      function jk_related_products_args( $args ) {
      $args['posts_per_page'] = 4; // 4 related products
      $args['columns'] = 2; // arranged in 2 columns
      return $args;
    }
    
  2. The piece of code above will make the number of related products into 4 per page arranged in 2 columns. This is defined in these lines of code:

    “$args[‘posts_per_page’] = 4; // 4 related products”, and “$args[‘columns’] = 2; // arranged in 2 columns”.

    In order to have the desired number of related products, you just need to vary the values. For example you want to have 6 related products in a single column, change the 4 to 6 and 2 to 1. So it will be:

    “$args[‘posts_per_page’] = 6; // 6 related products” and “$args[‘columns’] = 1; // arranged in 1 columns”.

  3. Save the file when you are done.

How to Change the Number of Related Products in WooCommerce Using a Plugin

For less technical store owners, you may want to change the number of the Related Products in your WooCommerce store by using a plugin. Using a plugin will save you from editing important website files that can break your site. Here are some plugins that we can recommend:

Booster for WooCommerce

Booster for WooCommerce was previously called WooCommerce Jetpack. This enables you to tweak a lot of settings for WooCommerce not just changing the number of related products. For anyone using the WooCommerce platform, this plugin is highly recommended because it provides a lot of functionality.

To change the number of related products, follow the steps below:

    1. First, install and activate the plugin.
    2. Go to WooCommerce > Settings > Booster.
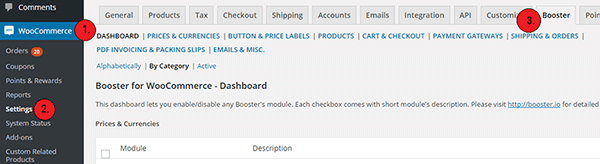
Booster-for-WooCommerce

    1. In the Booster menu, click on the Products tab > Related Products.
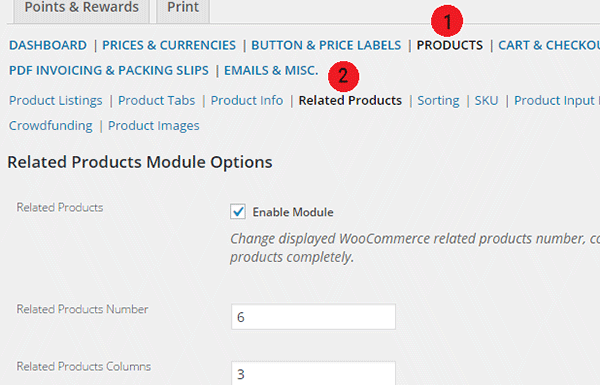
Booster-for-WooCommerce_Related-Products-Tab_Options

  1. Enter the number of Related Products that you want. You can also change the number of columns for the Related Products Section.
  2. Check the Enable Module, save and you’re done.

While WooCommerce Booster is a powerful plugin in itself, you may want to use a different plugin if you just need to edit the number of related products. This is because the number of features that you wouldn’t be using would just add extra bloat to your site.

Woo Related Products

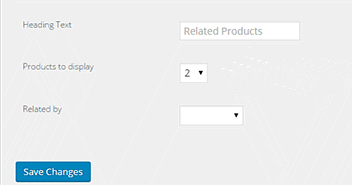
Woo Related Products is one of the simplest plugins out there for editing related products in WooCommerce. It is light and easy to navigate. It also allows you to change the heading text on the related products section.

  1. To start, install and activate the plugin.
  2. Locate “Related Products” from your WP admin menu panel.
  3. Select the number of related products you want to display. And then click on Save Changes.Woo-Related-Products_Products-to-Display

You want to increase your conversions. By increasing the number of related products from WooCommerce’s default to introduce more products to your customers, you can increase your revenue and average order value. You can follow the steps mentioned in this article to accomplish this for your own website.

Do you know of other strategies that can help increase conversions through cross sells and upsells? Let us know in the comments.
Filed Under: Code Snippets, How-To Articles Tagged With: admin, code snippet, conversion optimization, design tweaks, how-to, navigation, plugins, product management, WooCommerce, WooCommerce products, WordPress

How to Rename Primary Menu in Mobile View for Storefront Theme

February 26, 2015 By John 6 Comments

Updated 18/2/16 : Storefront Theme was updated. Adding a filter hook to rename the navigation.

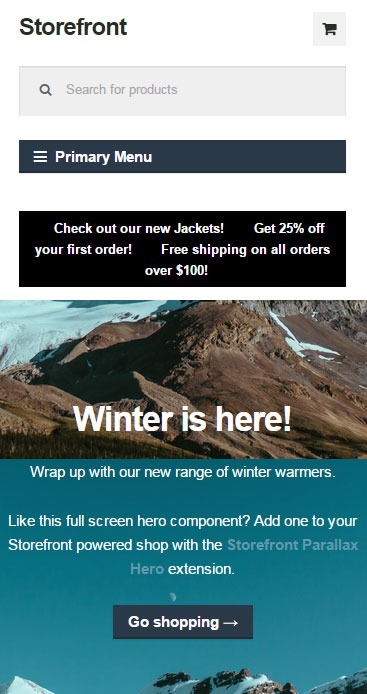
Rename Primary Menu in Mobile View for Storefront ThemeIf you have donned the Storefront Theme by WooThemes and tested the mobile view, you might have noticed that your main navigation/menu turns into a collapsible menu. While this menu does serve its purpose in the mobile view, it being named “Primary Menu” isn’t very desirable. You most likely need to change it to something more appropriate for your needs.
Different websites have different navigations so from the theme developer’s standpoint, putting in a not very descriptive text like “Primary Menu” will serve its purpose just fine. But for a website owner like you who knows what he wants, you’d want something more specific for that mobile collapsible menu. Maybe you’re selling your own line of apparel and your menu is filled with different product categories, so you want the text to be something like “Product Categories”, “Browse Clothing Line” or maybe even make it a call-to-action like “Shop Now” or “Shop Online”. Bottomline, you know what you need the text to be on that mobile collapsible menu. Lucky for you, it’s easy enough to accomplish with a few lines of code.

Get a Child Theme

Before we proceed, make sure you are running your website on a child theme. To begin with, there is really no reason why you shouldn’t have a child theme unless you want any changes you made to your theme to disappear whenever the theme updates. If you don’t have a child theme yet, get one.

Add the Filter

Now that you have a child theme, paste this code into your child theme’s functions.php file.

add_filter( 'storefront_menu_toggle_text', 'jk_storefront_menu_toggle_text' );
function jk_storefront_menu_toggle_text( $text ) {
 $text = __( 'MY NAVIGATION' );
 return $text;
}


Change the Text

Do you see the line with the following code?

$text = __( 'MY NAVIGATION' );

You’ll just need to modify the text “MY NAVIGATION” and change it with the text that you want on your collapsible mobile menu.


Filed Under: Code Snippets, How-To Articles Tagged With: call-to-action, child theme, code snippet, design tweaks, how-to, mobile friendly, navigation, responsive design, Storefront, woothemes

How to Move the Navigation Menu Outside of Header for Storefront

February 26, 2015 By John 9 Comments

Here’s another tweak that you can do on the Storefront theme.

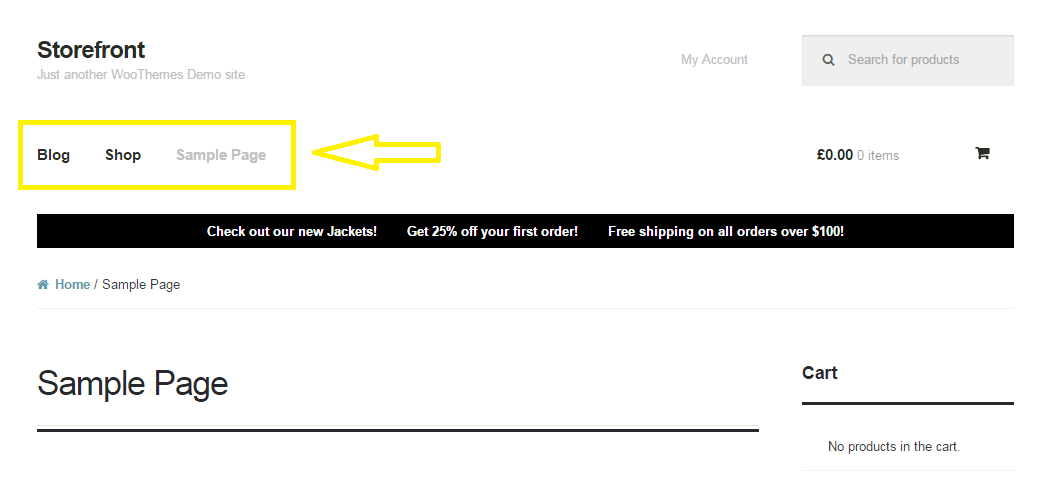
Move the Navigation Menu Outside of Header

If you want to move the main navigation/menu below or outside the header, you just need a few lines of code. There is no need to create a new header.php file on your child theme. Instead, just add this piece of code to your child theme’s functions.php file and you’re all set.

function child_theme_init() 
{
remove_action( 'storefront_header', 'storefront_primary_navigation', 50 );
add_action( 'storefront_before_content', 'storefront_primary_navigation', 5 );
}
add_action( 'init', 'child_theme_init' );

Before you do this, do know that it’s not really recommended to move the styles outside of its original location. After doing this, you will need to redo all the menu styles and that’s a lot of work.

Now you know how to move the navigation menu outside of header for storefront theme. Hope this worked for you. If not, feel free to post a comment and we’ll see what we can do to help you out.

Filed Under: Code Snippets, How-To Articles Tagged With: code snippet, design tweaks, how-to, navigation, Storefront, woothemes

How to Change the Arrows in Pagination for Storefront and WooCommerce

March 18, 2015 By John 2 Comments

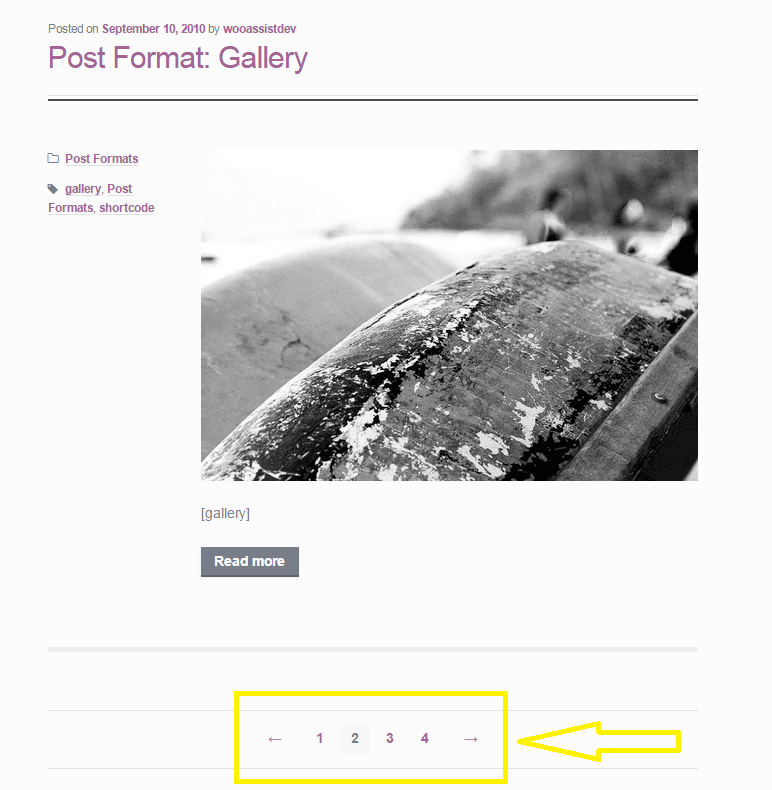
When looking at category pages for posts and WooCommerce products in Storefront theme, you can navigate to different pages by clicking on the default left and right pointing arrows. Notably, most themes would use a “Previous” or “Next” text instead of an arrow. If you want to change these arrows to text, it is easy enough to do by tweaking a few lines of code. Just follow the steps below.

pagination-2

Change the Arrows in Pagination for Storefront Theme

Since Storefront does not have a default filter for pagination, we’ll need to remove the function of the default pagination and replace it with our own function. Notably, the code in the function `woa_sf_paging_nav_replace` is just a copy of the original pagination function in Storefront and we just need to replace the text in the ‘prev_text’ and ‘next_text’ parameters. You don’t need to touch the other attributes.

Go to your functions.php and find the following code:

---- php-code ----

add_action( 'init', 'woa_sf_change_pagination_init' );
 
 
function woa_sf_change_pagination_init() {

 //remove current function used for Storefront's pagination
      remove_action( 'storefront_loop_after', 'storefront_paging_nav', 10 );

 //replaces pagination function with our own function
      add_action( 'storefront_loop_after', 'woa_sf_paging_nav_replace', 10 );
}
 
 
function woa_sf_paging_nav_replace() {
 
 global $wp_query;

      $big = 999999999; // need an unlikely integer
      $translated = __( 'Page', 'storefront' ); // Supply translatable string

      echo '<nav class="storefront-pagination">';

      echo wp_kses_post( paginate_links( array(
           'base' => str_replace( $big, '%#%', esc_url( get_pagenum_link( $big ) ) ),
           'format' => '?paged=%#%',
           'current' => max( 1, get_query_var( 'paged' ) ),
           'prev_text' => '<',
           'next_text' => '>',
           'type' => 'list',
           'total' => $wp_query->max_num_pages,
           'before_page_number' => '<span class="screen-reader-text">' . esc_attr( $translated ) . ' </span>',
 ) ) );

 echo '</nav>';
}

---- /php-code ----

Where it says:

'prev_text' => '<',
'next_text' => '>',

Change it to:

'prev_text' => 'Previous',
'next_text' => 'Next',

Change The Arrows in Pagination for WooCommerce Products

Editing the pagination for WooCommerce products is a bit simpler. We just need to find and use the filter `woocommerce_pagination_args`.
Head over to your functions.php and look for:

---- php-code ----

woa_wc_change_pagination_init() {

    add_filter( 'woocommerce_pagination_args', 	'woa_wc_woocommerce_pagination' );
}

function woa_sf_woocommerce_pagination( $args ) {

	$args['prev_text'] = '<';
	$args['next_text'] = '>';

	return $args;
}

---- /php-code ----

Where it says:

$args['prev_text'] = '<';
$args['next_text'] = '>';

Simply change it to:

$args['prev_text'] = 'Previous';
$args['next_text'] = 'Next;

Or replace ‘<‘ and ‘>’ to whatever text you prefer.

You just learned how to change the arrows in pagination for Storefront and WooCommerce. Did this post help solve your problem? Do you have any questions? Let us know in the comments.

Filed Under: Code Snippets, How-To Articles Tagged With: code snippet, design tweaks, how-to, navigation, Storefront, WooCommerce, woothemes

  • « Previous Page
  • 1
  • 2
  • 3
Let us support your online store so you can manage your business

Get started today

Get 2 Hours of FREE SUPPORT

We are so confident that you will love our services that we will give you your first 4 hours at a 50% discount

That’s 4 hours for only $75

BUY NOW

Free eBook

5 Things Every Online Store Can Fix On Their Website In The Next Week To Increase Sales

Quick Links

  • How it Works
  • Pricing
  • Blog
  • Contact
  • About Wooassist
  • My Account
  • Checkout
  • Privacy Policy
  • Cookie Policy
  • Terms and Conditions

Wooassist

Australia:
59 Luke St.
Hemmant QLD 4174

Philippines:
San Miguel St.
Poblacion, Iligan City 9200

Connect


Copyright © 2026 · Wooassist

Yours FREE!

5 Things Every Online Store Can Fix On Their Website In The Next Week To Increase Sales