Wooassist

Assistance for Your Woocommerce Store

  • How it Works
  • Pricing
  • Services
    • Site Maintenance
    • AI SEO and Content Marketing
  • Blog
    • How-To Articles
    • Code Snippets
    • SEO For E-Commerce
    • Theme and Plugin Reviews
    • Wooassist News
    • WordPress/WooCommerce News
    • Interviews
  • About Us
  • Contact
You are here: Home / Archives for Yoast

How to Set Up WordPress SEO by Yoast for WooCommerce

March 26, 2015 By John Leave a Comment

How to Set Up WordPress SEO by Yoast

The WordPress SEO plugin by Yoast with over 16 million downloads is easily one of the best plugins that you need to have on your website. Whether it’s a personal blog, an e-commerce store, or a company website, you should have this plugin. In fact, many WordPress developers have WordPress SEO by Yoast in their list of plugins to install each time they create a new website. Many of you may already know a bit (or a lot) about SEO and that’s okay. That just means you’ll make better use of this plugin. And for those that don’t know much about SEO, don’t worry. The plugin is user friendly. I’ll walk you through all the functionalities so you’ll know how to set up WordPress SEO by Yoast for WooCommerce.

Installing WordPress SEO by Yoast for WooCommerce

To install the plugin, head over to the plugin developer’s website. Once there, download the plugin and upload it at the plugin page of your WordPress Dashboard.

You can search for the plugin on the plugin repository by going to your WordPress Dashboard. Click on “Plugins” and then “Add New”. From there just use the search bar to search for the WordPress SEO plugin and click on “Install Now”.

SEO Plugin Especially for WooCommerce

For WooCommercestore owners, getting the premium Yoast WooCommerce SEO plugin is a worthwhile buy. When used with the WordPress SEO plugin, you can better optimize your WooCommerce store. It enhances the existing Open Graph and Twitter Card enhancements in the WordPress SEO plugin. It will also optimize your sitemap for an ecommerce store setup, among other things. For a guide on how to set this up, check out this post.

Optimizing Product Pages for SEO for WooCommerce

The single most important function of the WordPress SEO plugin by Yoast is its ability to help you optimize your blog posts and pages for SEO. That includes WooCommerce products. WooCommerce products work just like posts/pages so it is the same procedure. So when I say page or post, the same applies to WooCommerce products.

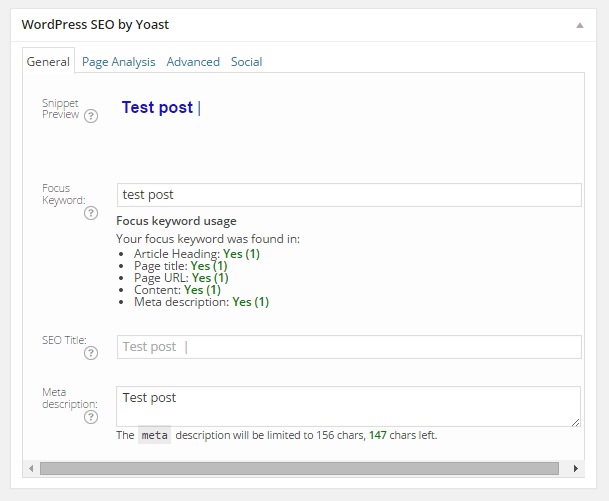
Optimizing posts/pages is easy enough. You can do it right after you finish creating the post/page in WordPress. When you’re on the post or page, just scroll down and there will be a section named “WordPress SEO by Yoast”. On the General tab, you’ll see a Snippet Preview. This is how your post/page will show up on the Google search results page. And the fun part is that you can edit how your post will show up. First off, you set a focus keyword. This should be the keyword that you want your blog post or page to rank for. What you should be aiming for is to have this focus keyword in:

  • the title of your article
  • in the body of the content especially in the first paragraph
  • and the meta description which you can set in the field where it says meta description

If you got that all right, you should be seeing all green below the focus keyword that you set.
post-optimization

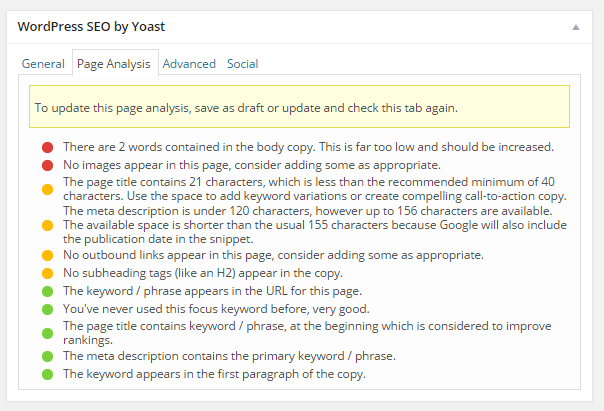
You can also click on the Page Analysis tab to get more information and other suggestions to improve your post/page. You don’t have to follow all the suggestions. But following everything will help increase the quality of your post/page.
page-analysis

You can tweak a bunch of other settings under the Advanced tab so feel free to change them as you see fit. You can even change how your post would appear when it gets shared on social media under the Social tab.

Optimizing WooCommerce Product Categories for SEO
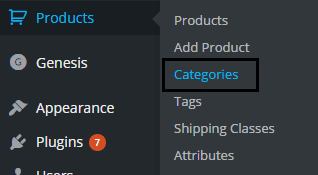
woocommerce-product-categoriesSimilarly, you can also optimize WooCommerce product categories for SEO. Just go to “Products” and click on “Categories” Edit the category that you want to optimize. When you scroll down to the bottom of the “Edit Category” page, you’ll see a section called Yoast SEO Settings. Fill in the SEO Title and SEO Description fields and click on Update.

optimizing-product-categories

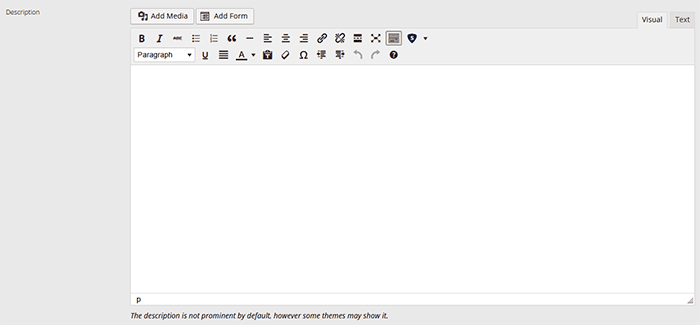
Unlike when optimizing product pages, you don’t get to set a focus keyword. However, you can still target a keyword by including the keyword in the SEO Title and SEO Description fields. You should also put it in the Category Description field above the Yoast SEO Settings section.

Note that not all themes are able to display product category description on the category page but if your theme supports this function, the text that you put will appear on your product category page.
product-description

Verifying Your Website with Search Console

Verifying your website with different Google Search Console tools is important if you want your site crawled. It will have your website crawled by spiders. I don’t mean actual spiders. I mean search engine spiders that index websites on different search engines. Verifying with different webmaster tools can be a complex process but this is made easy with the WordPress SEO plugin.

Linking with Social Media Profiles

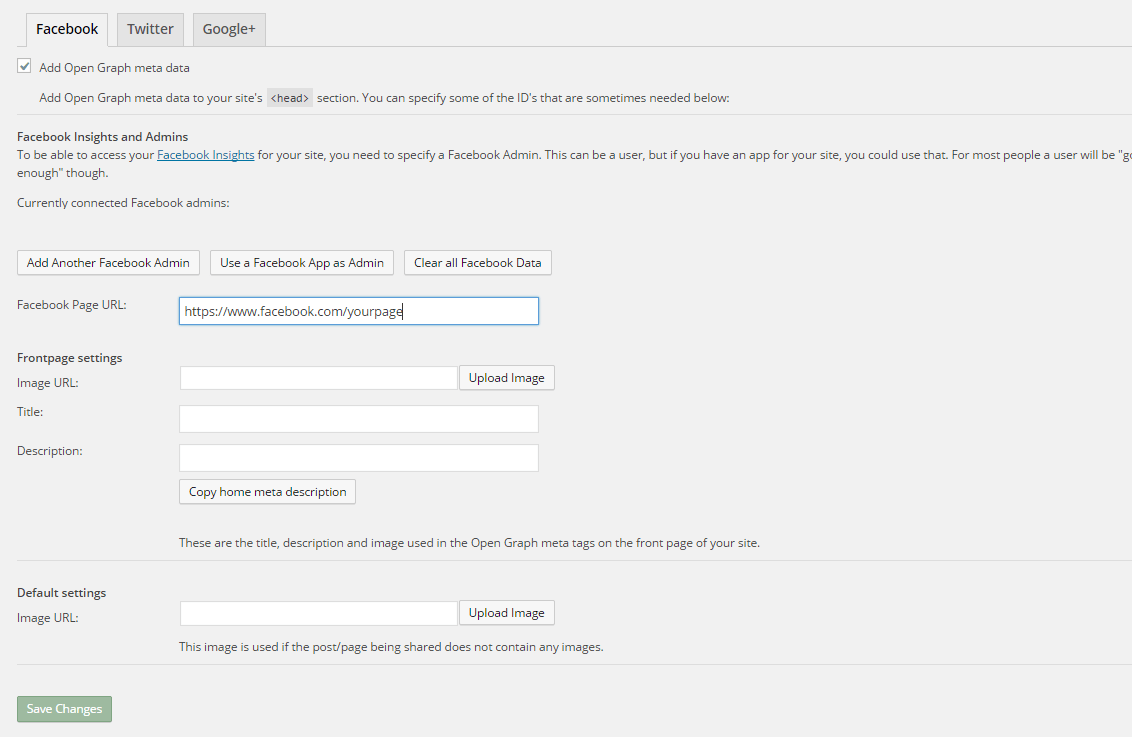
You can connect your website with your social media pages with the WordPress SEO plugin. You can do this by going to “SEO” and then clicking on “Social”. Here there are three tabs: Facebook, Twitter and Google+.

How to Connect Facebook

Linking Facebook to your site allows you access to Facebook Insights. If you already have a Facebook page, you just need to get the URL of your Facebook page. Copy the URL and then paste it where it says “Facebook Page URL”. You can then set the administrators for your page by clicking on Add Facebook Admin. If you are an advanced user, you can tweak a bunch of other settings. When you’re done, just click on “Save Changes”.
facebook

How to Set Up Twitter Cards

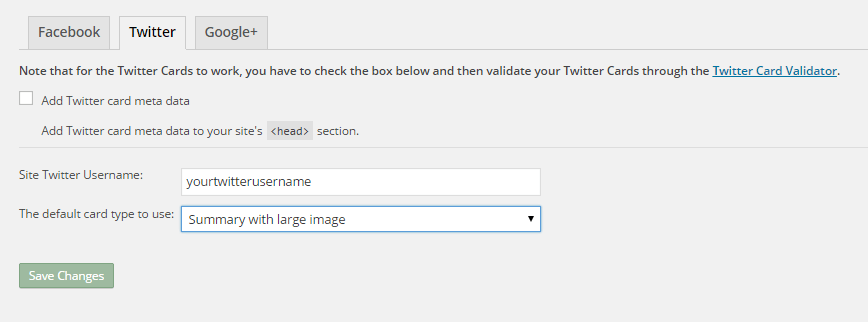
Do you use Twitter? Have you ever seen links in Twitter that show a snippet of the page that it links to? That’s called a Twitter card and you can enable that on your website using WordPress SEO. The usual thing is that enabling Twitter cards would call for you to add some lines of code to your header. But WordPress SEO eliminates the need for that.
twitter

How do you do this? On the Social section of the plugin, click on Twitter. Fill in your Twitter username on the appropriate field. Specify the kind of Twitter card that you want to have then click on “Save Changes”. You’re not done yet. You still need to confirm your Twitter card. Head over to this link. Specify the URL and click on “Preview Card”. After that, click on “Request Approval” and fill out the form. Finally, click on another “Request Approval”.

Soon, you’ll be able to see Twitter cards on your Twitter links.

The premium YoastWooCommerce SEO plugin will further help you optimize your Twitter Cards if you have that.

How to Connect Google+

To connect your website with Google+ means setting your Google+ profile as the publisher of your content with the “rel=publisher” markup. “Rel=publisher” is an authorship markup which connects websites to Google+ pages (not personal profiles).

To connect your Google+ company page, head over to the “Social” section of the plugin and click on Google+. Fill out the field with the URL of your company page on Google+ and click on “Save Changes”.
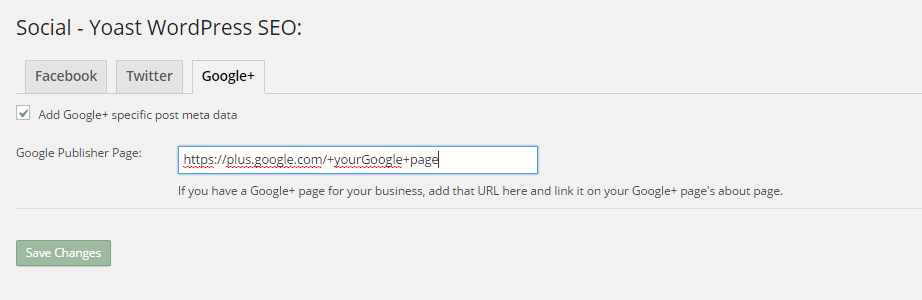
google+

You might have heard of “rel=author” which links the content to the Google+ profile of the author. When implemented in the proper way, “rel=author” should show a snippet of the content with a photo of the author in the SERPs page. If you’re a writer and you’re hyped by that, I’d hate to burst your bubble but “rel=author” is no longer supported by Google. You can read more about it here.

Improving Sharing on Pinterest

Pinterest is another social media platform that’s worth mentioning. It has great potential for e-commerce stores. Why? Because Pinterest is image-based. The YoastWooCommerce SEO plugin makes sharing on Pinterest more worthwhile. After setting Twitter products and Schema Open Graph additions, your pins on Pinterest will start to show in a different way. In most cases, WooCommerce product will show up like posts. But with the plugin configured, your products will show up as “products”. They will show product related information such as price and variations.

Implementing Sitemaps with WordPress SEO

In a nutshell, sitemaps communicate with search engines to let the latter know when there are changes to the website. There are a lot of plugins that lets you create a sitemap. If you are already using the WordPress SEO plugin, just use the built-in sitemap module. Looking for another plugin just add an extra load to your server.
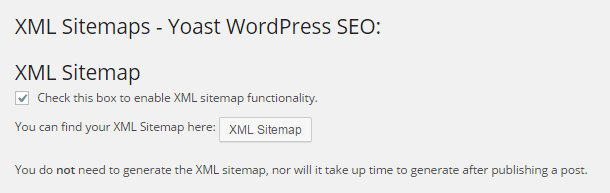
sitemaps

To get your sitemap, go to the plugin’s “XML Sitemaps” tab and then tick on the first box to enable sitemaps and click on “Save Changes”. There are a bunch of settings that you can tweak. You can have a look at them and change them as you please. They are pretty much self-explanatory.

You also might want to get the WooCommerce SEO plugin, which was mentioned above a couple of times. This removes some unnecessary bits from your sitemap in automatic fashion.

Check out our post on how to create a sitemap for your WooCommerce store to learn about sitemaps and other means of creating it.

Permalink Settings

Permalink settings all have to do with your URLs. I would not recommend changing any of the settings here but you are free to check them out and change them as you please.

Enabling Breadcrumbs with WordPress SEO

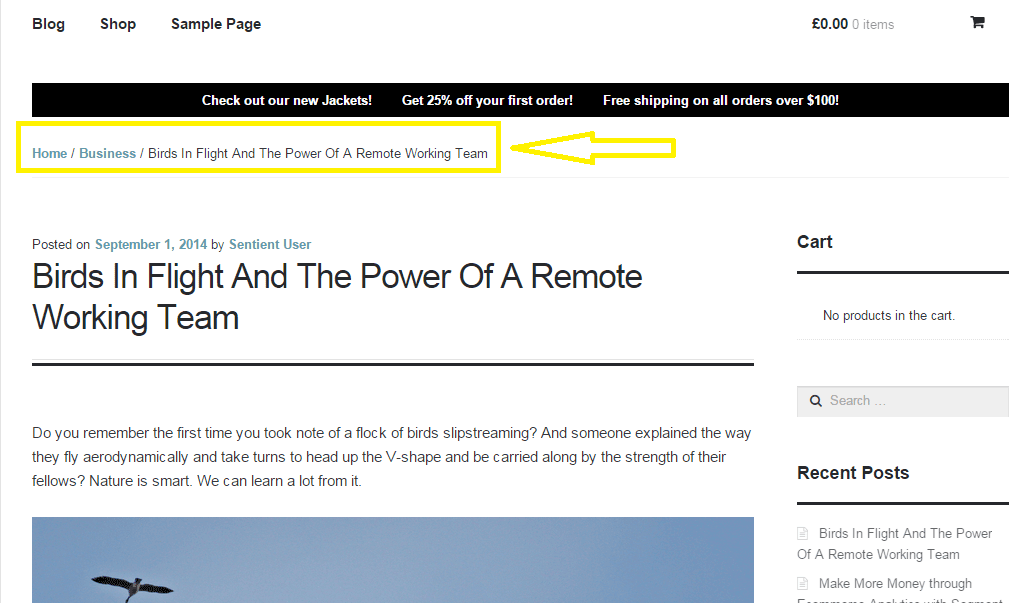
Breadcrumbs, when enabled, helps users identify where they are on your website. It also helps search engines determine your website’s structure. See the image below.  Where the yellow arrow is pointing at, that’s the breadcrumbs.

Enabling breadcrumbs on your website is simpler than snapping your fingers. Just go to SEO and then click on Internal Links. You should see a box that says “Enable Breadcrumbs”. So just tick that box and save. There are a few settings that you can tweak so just change them up as you need.
breadcrumbs

Did we miss anything? Or do you have any questions about the WordPress SEO plugin? Let us know in the comments.

Filed Under: How-To Articles, SEO For E-Commerce Tagged With: blog, breadcrumbs, content marketing, Google Webmaster Tools, Google+, how-to, navigation, optimizations, plugins, SEO tools, social media, Twitter, WooCommerce, WordPress, WordPress SEO, XML sitemap, Yoast

How to Optimize WooCommerce Products for SEO

May 31, 2018 By John 1 Comment

You’ve set up your WooCommerce store but you’re not getting any traffic. You wonder what you’re doing wrong. Have you optimized your product pages for SEO? If not, that could be one of the reasons why you’re not getting any traffic. In this article, we’ll teach you how to optimize your WooCommerce products for SEO.

Why Optimize for SEO?

You can do all the link-building you want but if the pages that you want to rank for are not properly optimized for SEO, then you’ll have a hard getting ranked on top of Google.

Still, traffic is just a metric and what really matters is your conversion rate. Even if you are getting thousands in traffic but they are not converting, you still have a problem. On the other hand, you can’t convert anyone if you are not getting any traffic at all. Essentially, SEO and conversion optimization go hand-in-hand.

You have to optimize for SEO to make sure you are attracting the right people to your WooCommerce store.

Steps on How to Optimize WooCommerce Products for SEO

Identify What Keywords to Optimize For

Normally, it will be difficult to rank for regular keywords. For example, if you are selling digital cameras, it will be difficult to compete with Wikipedia or Amazon unless your WooCommerce store is already an authority on digital cameras. So optimizing for the keyword “digital cameras” won’t work for you. This is where long-tail keywords come in.

What is a Long-Tail keyword?

Compared to a regular keyword, long tail keywords are longer and more specific. Instead of optimizing for “digital camera”, you can optimize for specific camera models or for specific features of digital cameras. Optimize for anything unique about the product that you are selling. A few examples of long-tail keywords can be “digital camera for underwater photography”, “digital cameras for beginners”, or “sports action digital camera”.

Do Your Keyword Research

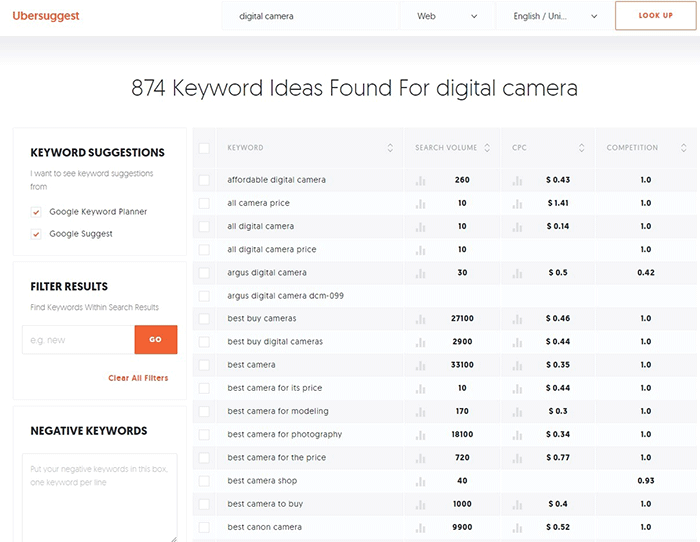
Don’t start optimizing until you do your keyword research. You can use whatever keyword research tool you have at your disposal. We can also recommend Ubersuggest. Just pop in a basic keyword and you can get a list of long-tail keywords that you can optimize for along with some valuable search data. You can even filter the keyword ideas and remove negative keywords. You can also export the keywords into a handy CSV file.

Ubersuggest Keyword Research

Add the Long-Tail Keyword to Your Product Page

To help with optimizing your WooCommerce Products for SEO, you can use the WordPress SEO plugin by Yoast. The plugin provides detailed information on how you can optimize your products for SEO. It also has a boatload of other features that will help boost your SEO. Just install the plugin and you’ll gain access to the SEO optimizations block on your WooCommerce product editor.

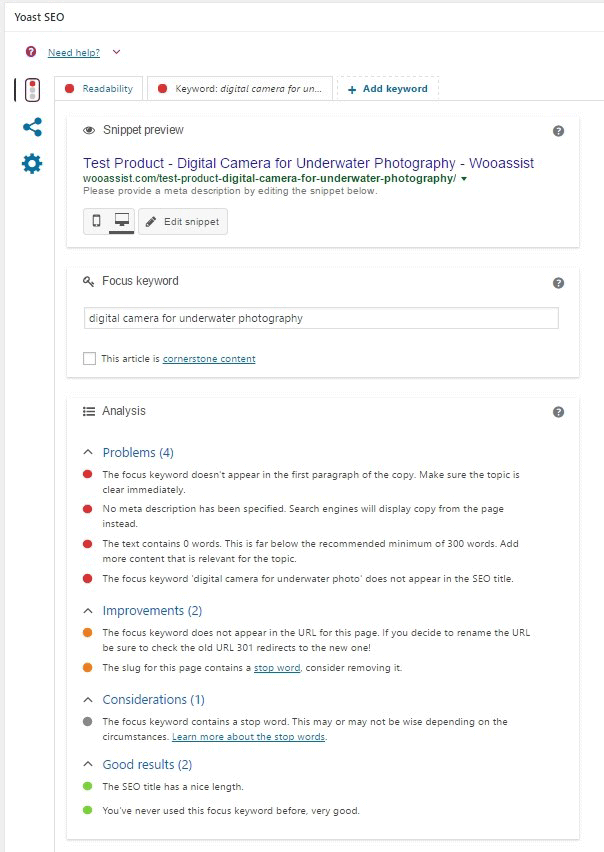
When optimizing products for SEO, input the long-tail keyword that you wish to target on the “Focus Keyword” field. After doing this, you can see the analysis section below will show you recommendations on how you can improve your product’s SEO score.

How to Optimize WooCommerce Products for SEO

Generally, you will need to add your focus keywords to:

  1. The article title
  2. The first paragraph of the article
  3. One of the heading tags
  4. On the body of the article
  5. In one of the image alt tags
  6. In the URL/slug

You don’t need to force yourself to do every little thing that the Yoast SEO section recommends. Just use it a rough guide since it does recommend the currently known best practices.

Improving Content Readability

Google now also considers content readability as an SEO ranking factor. So it is important to ensure that your product descriptions are easy to read. In some cases, you may have to use some technical terms when writing your product descriptions and that’s totally fine. Depending on your products, that may actually be best practice. Still, it’s a good idea to check the readability of your content.

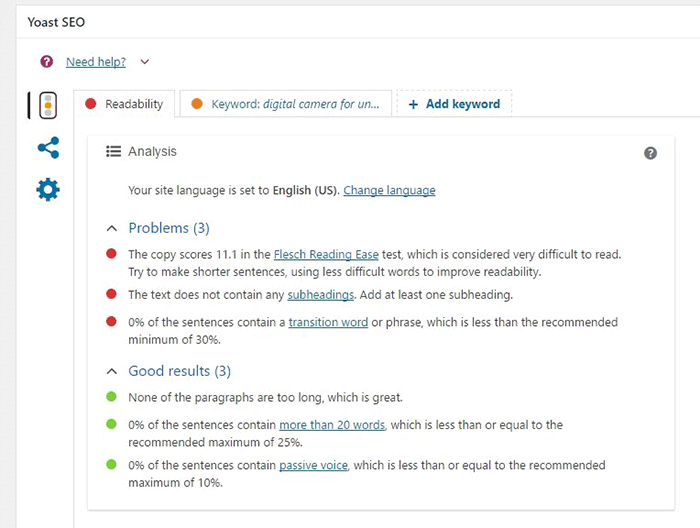
The Yoast SEO section also gives recommendations on Readability. Just click on the readability tab and you’ll see the problems that need to be addressed.

WooCommerce Products Optimize for Readability

When creating your product descriptions, you can also use Hemingwayapp to optimize its readability. You can also use this tool when writing blog posts.

Now that you know how to optimize your content for SEO, people who are interested in your products are now more likely to find your products. If you need help with SEO optimizations, the Wooassist Team can help. We’ll start off by doing an SEO audit of your site so we can determine what needs to be addressed and move forward from there.

Optimizing your WooCommerce store does not end with product optimizations. There are other optimizations that need to be done to ensure you are maximizing your conversion rates.

Filed Under: How-To Articles, SEO For E-Commerce Tagged With: keyword research, optimizations, seo, SEO strategy, SEO tools, WooCommerce, WooCommerce products, woocommerce seo, WordPress SEO, Yoast

The Wooassist Blueprint: What Goes on in the Wooassist Backend

July 22, 2016 By John Leave a Comment

We’ve created our fair share of WordPress sites and provided support for other WooCommerce store owners since 2014. At the same time, we maintain and improve Wooassist.com. But what goes on in the Wooassist backend? Here we’ll provide a sneak peek of what goes on behind the scenes.

Publishing Platform

wordpress-logo

WordPress is one of the best Content Management System (CMS) with over 60 million websites powered, Woasssist included. It is free and open-source, with thousands of available plugins and themes to change and extend the look and functionality of your site.

Hosting Provider

WPEngine-logo-white

WPEngine provides one of the best WordPress hosting services on the web. Our hosting plan with WPEngine comes with caching, backup features and Content Delivery Network (CDN) provided by their partner MaxCDN. They use Ever Cache for speed and massive scalability. They also have one of the best support compared to other hosting providers.

WordPress Themes

Genesis Framework

logo-Genesis-Framework

Genesis Framework is a powerful foundation for building websites in WordPress. It is compatible with WooCommerce and anything can be customized around its core code using child themes. It is also SEO optimized.

 Parallax Pro

logo-Parallax-Pro-white

We use Parallax Pro theme on top of the Genesis framework. Notice how the Wooassist homepage content has a vertical design for easy visual eye movement and flow. As you scroll down the page, you will see that the content is divided into sections. The theme is also mobile responsive.

Installed Plugins

It is best practice to deactivate and delete any unused plugins on your site to minimize site bloat. Just stick to what features you need and the plugin that offers just that.

WooCommerce

WooCommerce

Since Wooassist provides WooCommerce support, it makes sense that we use WooCommerce.

Built with developers in mind, WooCommerce is extendable, adaptable and open source. It works with the core features of WordPress and is one of the most widely used ecommerce plugins. It’s free and allows for maximum flexibility and customization. You can even expand its features with a growing collection of more than 300 extensions.

WooCommerce Customizer

WooCommerce-Customizer

WooCommerce Customizer is a free plugin that adds an extra settings page for WooCommerce. This helps you make quick changes which otherwise would require writing some custom PHP functions. Basically, you can optimize the look of your WooCommerce store for optimum conversion, without writing any code.

Genesis Connect for WooCommerce

Genesis-Connect-for-WooCommerce

When WooCommerce is installed on a site using the Genesis platform, you may find some product pages do not display properly. Genesis Connect for WooCommerce fixes this by replacing WooCommerce’s built-in shop templates with its own Genesis-ready versions. These templates are single-product.php, archive-product.php and taxonomy.php.

WooCommerce Google Analytics Integration

WooCommerce-Google-Analytics-Integration

WooThemes created WooCommerce Google Analytics Integration plugin and is a must to integrate analytics in WooCommerce versions 2.1 and up. This plugin inserts tracking codes into your store pages.

WP-Optimize

WP-Optimize

We use WP-Optimize to clean and keep our database down to a reasonable size. The plugin helps clean up your WordPress database by removing old revisions of posts and stale/trashed comments. It also allows for optimization of your WordPress core tables.

WordPress Related Posts

WordPress-Related-Posts

WordPress Related Posts automatically adds thumbnails at the footer of your content. This helps readers find other relevant posts in our blog for further reading.

WooCommerce Paypal Pro

WooCommerce-PayPal-Pro

We use WooCommerce Paypal Pro as our payment gateway. Our clients can pay with their credits cards. A Paypal account is not necessary.

WooCommerce Checkout Manager

WooCommerce-Checkout-Manager

We use WooCommerce Checkout Manager to customize the fields on our checkout page. This allows for faster and easier checkout.

Akismet

Akismet

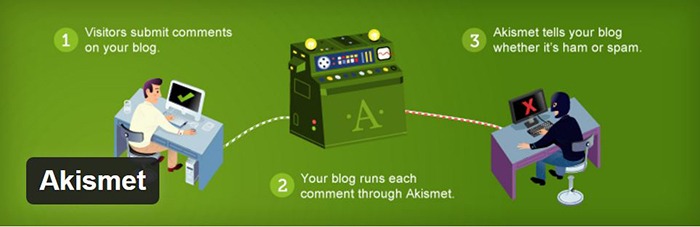
We trust Akismet to safeguard our site against spam comments. This product by Automattic comes bundled with WordPress installations. You just need to sign up at their website and get your API key to activate it. Akismet automatically checks incoming comments and moves ‘spam-like’ comments to the Spam folder.

PopupAlly

PopupAlly

We use PopupAlly to show time-delayed and exit intent popups for our free e-book offer and newsletter subscription, respectively. The plugin makes it easy to customize popup forms even for novice users.

Yoast SEO

Yoast-SEO

We use Yoast SEO to optimize our blog post and pages for SEO. It is a powerful plugin that helps to give any site an SEO boost. This plugin can also help optimize product pages and product categories in WooCommerce.

Visual Form Builder

Visual-Form-Builder

We use Visual Form Builder to create forms such as our contact form and custom package form. Visual Form Builder is easy to set up and use even for novice users.

Responsive Pricing Table

Responsive-Pricing-Table

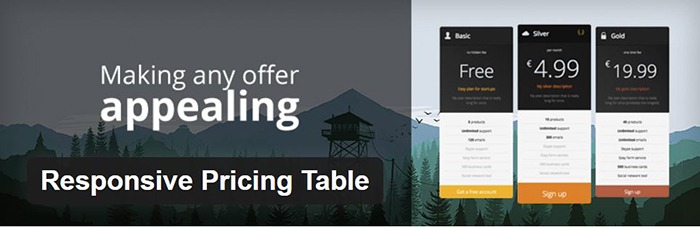
We use Responsive Pricing Table plugin to add a ‘Pricing Tables’ tab in the WordPress admin panel . This allows for creating pricing tables without coding. You can add features of up to 5 plans and display the price table anywhere with a shortcode.

Redirection

Redirection

Redirection is a free plugin that makes managing our 301 redirects easier. It also helps us keep tabs on any 404 errors. We use this mainly when changing slugs of blogs post when optimizing for SEO.

Filed Under: Theme and Plugin Reviews, Wooassist News Tagged With: Genesis, navigation, optimizations, plugins, PopupAlly, redirection, website development, Wooassist, WooCommerce, WooCommerce products, woothemes, WordPress, WPengine, Yoast

How to Create a Sitemap for your WooCommerce Store

March 19, 2015 By John 2 Comments

sitemapYou might have heard about XML sitemaps and that it’s good for your website’s SEO but don’t really know what it is. Or maybe you don’t know how to create a sitemap for your WooCommerce store. We can help with that. For starters, Google defines a sitemap as:

…a file where you can list the web pages of your site to tell Google and other search engines about the organization of your site content.

In short, a sitemap tells search engine crawlers about the structure of your site. Whenever you add something new to your website, whether that’s a new blog post, a new page or a new WooCommerce product, your sitemap is updated and communicates with web crawlers to tell search engine that there is something new on your website.

Even without a sitemap, the content on your website will still eventually be crawled by search engine crawlers but if the structure of your website is not well-organized, some pages may not be indexed. Also, having a sitemap will make crawling your website easier and much sooner. And if you have a new website, you probably don’t have a lot of other websites linking to your pages so it is highly likely that some of your pages may not get indexed. Having a sitemap almost ensures that all your pages get indexed.

How to Generate a Sitemap for Your WordPress Site

There are a couple of plugins that you can use to create a sitemap for your e-commerce website. We’ll list them down here.

How to Create a Sitemap Using WordPress SEO by Yoast

WordPress SEO by Yoast is the all-in-one plugin for your SEO needs. It is easily one of the best SEO plugins in the WordPress plugin repository. It has a lot of useful features and that includes the creation of a sitemap. If you are already using WordPress SEO by Yoast, then look nowhere else for creating your own XML sitemap. If you are not using WordPress SEO yet, I would suggest joining the bandwagon that is unless you are already using an SEO plugin that works well for you.

To enable XML sitemaps in WordPress SEO, go to SEO and click on XML sitemaps. Afterwards, just tick the box where it says “Check this box to enable XML sitemap functionality” and then “Save Changes”. When that’s done, just click on the button below and you will be taken to your sitemap.

sitemaps

How to Create a Sitemap Using Google XML Sitemaps

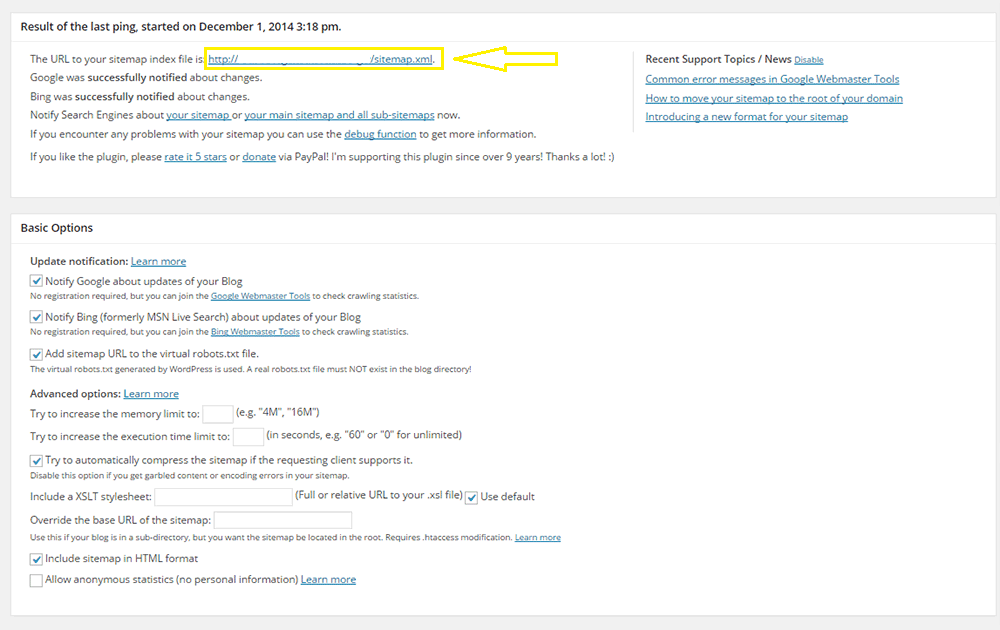
Creating a sitemap with the Google XML Sitemaps plugin is very easy. Simply download and install the plugin here. After you activate the plugin, just head over to Settings and click on XML-Sitemap. You should see a section that indicates the URL for your sitemap. There are a bunch of other settings that you can tweak. The default settings are good as is but if you want to change anything depending on your needs, feel free to do so.

google-xml-sitemaps

How to Create a Sitemap Using XML Sitemaps

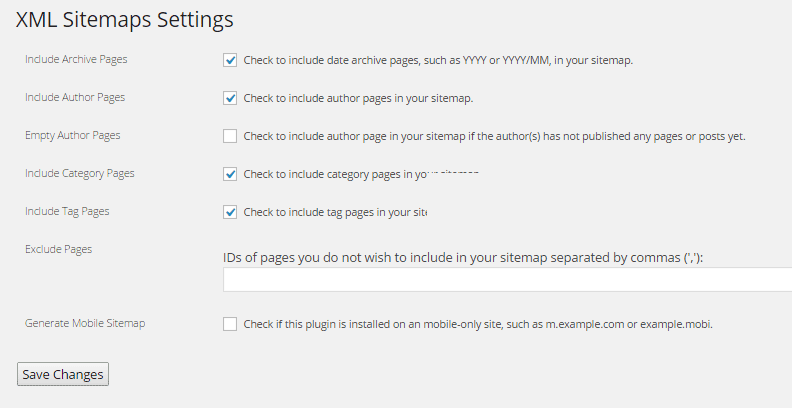
To create a sitemap using the XML Sitemaps plugin, simply install the plugin from this link. Activate the plugin and head over to yourdomain.com/sitemap.xml. That’s your sitemap. There are a few settings that you can tweak if you head over to Settings and click on XML Sitemaps.

xml-sitemaps

Adding a Link to Sitemap for Your WooCommerce Store

adding-sitemap-to-footerMost SEO experts say that adding a link to your sitemap on your website does not serve any purpose since the search engines find the sitemap through the robots.txt file or when you manually submit the sitemap to Google Webmaster Tools or Bing’s. Some disagree however and mention that having a link in the footer adds value.

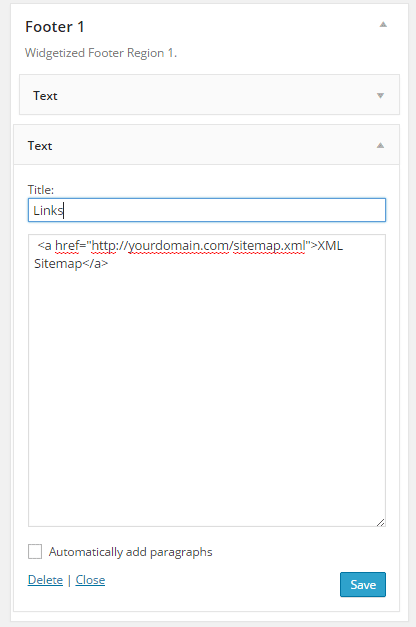
If you do want to add a link to your sitemap on your WordPress site’s footer, it is very easy to do. Just go to Appearance and click on Widgets. Afterwards, drag a text widget to the footer where you want to have the link. Just link your sitemap using HTML code.

If you are not sure how to do this, use the code below and just replace the URL with your sitemap’s URL:

<a href=”http://yourdomain.com/sitemap.xml”>XML Sitemap</a>

Submitting your Sitemap to Search Engines

When you get your sitemap ready, you should submit it to search engines using Webmaster Tools. Before you do this however, you need to verify your website with Webmaster Tools. You can check our post about the WordPress SEO plugin by Yoast which has links to some useful resources that can help you verify your site if you haven’t done that yet.

How to Submit Your Sitemap to Google Webmaster Tools

To submit your sitemap to Google Webmaster Tools, log in to your account and click on the website that you want to add a sitemap to. On the left sidebar, you should see Site Configuration, click that and then click on Sitemaps. There should be an Add/Test sitemap button in the upper right corner. Add your sitemap and then click on Submit.

How to Submit Your Sitemap to Bing Webmaster Tools

To submit your sitemap to Bing Webmaster Tools, log in to your account and click on Sitemaps. Then click on Submit a Sitemap. A text box should appear where you can specify the URL to your sitemap. Save your settings.

The Verdict: Which one is for you?

Between the XML sitemap plugins mentioned above, which one is for you? WordPress SEO by Yoast has a ton of other features and is one of, if not the best SEO plugin for WordPress. If you are already using this plugin for your SEO, then there’s no reason to get another plugin to get a sitemap. You’ll just be adding extra bloat to your site by going with another plugin. Between Google XML Sitemap and XML Sitemap Plugin, there’s not much of a difference. Both are easy to set up but Google XML Sitemaps has a slight advantage for having more options such as:

  • Automatically notifying search engines whenever you post new content
  • Creation of an HTML sitemap
  • Compressing the sitemap
  • Adding the sitemap URL to the robots.txt file

Got some questions about sitemaps? Let us know in the comments.
Filed Under: How-To Articles, SEO For E-Commerce Tagged With: Google Webmaster Tools, Google+, how-to, plugins, WooCommerce, WordPress SEO, XML sitemap, Yoast

Let us support your online store so you can manage your business

Get started today

Get 2 Hours of FREE SUPPORT

We are so confident that you will love our services that we will give you your first 4 hours at a 50% discount

That’s 4 hours for only $75

BUY NOW

Free eBook

5 Things Every Online Store Can Fix On Their Website In The Next Week To Increase Sales

Quick Links

  • How it Works
  • Pricing
  • Blog
  • Contact
  • About Wooassist
  • My Account
  • Checkout
  • Privacy Policy
  • Cookie Policy
  • Terms and Conditions

Wooassist

Australia:
59 Luke St.
Hemmant QLD 4174

Philippines:
San Miguel St.
Poblacion, Iligan City 9200

Connect


Copyright © 2026 · Wooassist

Yours FREE!

5 Things Every Online Store Can Fix On Their Website In The Next Week To Increase Sales