Wooassist

Assistance for Your Woocommerce Store

  • How it Works
  • Pricing
  • Services
    • Site Maintenance
    • AI SEO and Content Marketing
  • Blog
    • How-To Articles
    • Code Snippets
    • SEO For E-Commerce
    • Theme and Plugin Reviews
    • Wooassist News
    • WordPress/WooCommerce News
    • Interviews
  • About Us
  • Contact
You are here: Home / Archives for plugins

How to Set Up WordPress SEO by Yoast for WooCommerce

March 26, 2015 By John Leave a Comment

How to Set Up WordPress SEO by Yoast

The WordPress SEO plugin by Yoast with over 16 million downloads is easily one of the best plugins that you need to have on your website. Whether it’s a personal blog, an e-commerce store, or a company website, you should have this plugin. In fact, many WordPress developers have WordPress SEO by Yoast in their list of plugins to install each time they create a new website. Many of you may already know a bit (or a lot) about SEO and that’s okay. That just means you’ll make better use of this plugin. And for those that don’t know much about SEO, don’t worry. The plugin is user friendly. I’ll walk you through all the functionalities so you’ll know how to set up WordPress SEO by Yoast for WooCommerce.

Installing WordPress SEO by Yoast for WooCommerce

To install the plugin, head over to the plugin developer’s website. Once there, download the plugin and upload it at the plugin page of your WordPress Dashboard.

You can search for the plugin on the plugin repository by going to your WordPress Dashboard. Click on “Plugins” and then “Add New”. From there just use the search bar to search for the WordPress SEO plugin and click on “Install Now”.

SEO Plugin Especially for WooCommerce

For WooCommercestore owners, getting the premium Yoast WooCommerce SEO plugin is a worthwhile buy. When used with the WordPress SEO plugin, you can better optimize your WooCommerce store. It enhances the existing Open Graph and Twitter Card enhancements in the WordPress SEO plugin. It will also optimize your sitemap for an ecommerce store setup, among other things. For a guide on how to set this up, check out this post.

Optimizing Product Pages for SEO for WooCommerce

The single most important function of the WordPress SEO plugin by Yoast is its ability to help you optimize your blog posts and pages for SEO. That includes WooCommerce products. WooCommerce products work just like posts/pages so it is the same procedure. So when I say page or post, the same applies to WooCommerce products.

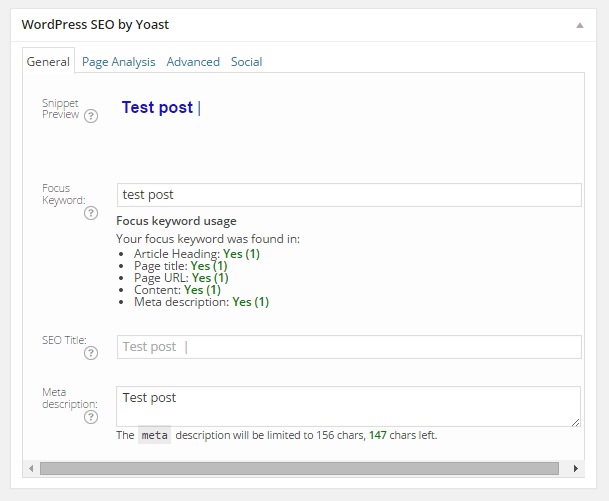
Optimizing posts/pages is easy enough. You can do it right after you finish creating the post/page in WordPress. When you’re on the post or page, just scroll down and there will be a section named “WordPress SEO by Yoast”. On the General tab, you’ll see a Snippet Preview. This is how your post/page will show up on the Google search results page. And the fun part is that you can edit how your post will show up. First off, you set a focus keyword. This should be the keyword that you want your blog post or page to rank for. What you should be aiming for is to have this focus keyword in:

  • the title of your article
  • in the body of the content especially in the first paragraph
  • and the meta description which you can set in the field where it says meta description

If you got that all right, you should be seeing all green below the focus keyword that you set.

post-optimization

You can also click on the Page Analysis tab to get more information and other suggestions to improve your post/page. You don’t have to follow all the suggestions. But following everything will help increase the quality of your post/page.

page-analysis

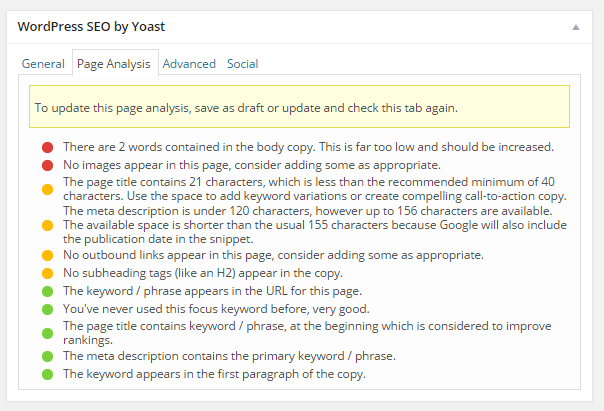
You can tweak a bunch of other settings under the Advanced tab so feel free to change them as you see fit. You can even change how your post would appear when it gets shared on social media under the Social tab.

Optimizing WooCommerce Product Categories for SEO

woocommerce-product-categories
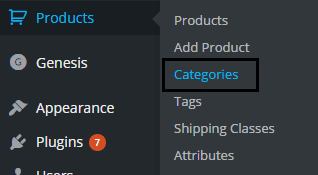
Similarly, you can also optimize WooCommerce product categories for SEO. Just go to “Products” and click on “Categories” Edit the category that you want to optimize. When you scroll down to the bottom of the “Edit Category” page, you’ll see a section called Yoast SEO Settings. Fill in the SEO Title and SEO Description fields and click on Update.

optimizing-product-categories

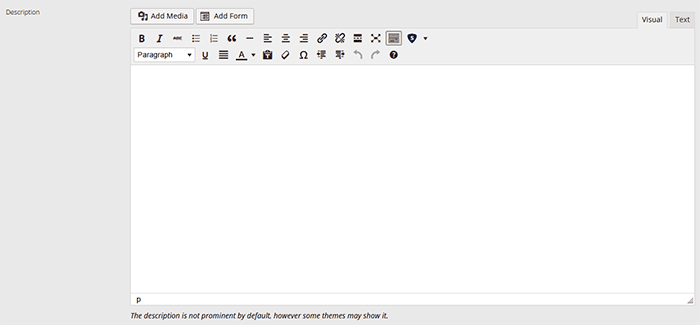
Unlike when optimizing product pages, you don’t get to set a focus keyword. However, you can still target a keyword by including the keyword in the SEO Title and SEO Description fields. You should also put it in the Category Description field above the Yoast SEO Settings section.

Note that not all themes are able to display product category description on the category page but if your theme supports this function, the text that you put will appear on your product category page.

product-description

Verifying Your Website with Search Console

Verifying your website with different Google Search Console tools is important if you want your site crawled. It will have your website crawled by spiders. I don’t mean actual spiders. I mean search engine spiders that index websites on different search engines. Verifying with different webmaster tools can be a complex process but this is made easy with the WordPress SEO plugin.

Linking with Social Media Profiles

You can connect your website with your social media pages with the WordPress SEO plugin. You can do this by going to “SEO” and then clicking on “Social”. Here there are three tabs: Facebook, Twitter and Google+.

How to Connect Facebook

Linking Facebook to your site allows you access to Facebook Insights. If you already have a Facebook page, you just need to get the URL of your Facebook page. Copy the URL and then paste it where it says “Facebook Page URL”. You can then set the administrators for your page by clicking on Add Facebook Admin. If you are an advanced user, you can tweak a bunch of other settings. When you’re done, just click on “Save Changes”.

facebook

How to Set Up Twitter Cards

Do you use Twitter? Have you ever seen links in Twitter that show a snippet of the page that it links to? That’s called a Twitter card and you can enable that on your website using WordPress SEO. The usual thing is that enabling Twitter cards would call for you to add some lines of code to your header. But WordPress SEO eliminates the need for that.

twitter

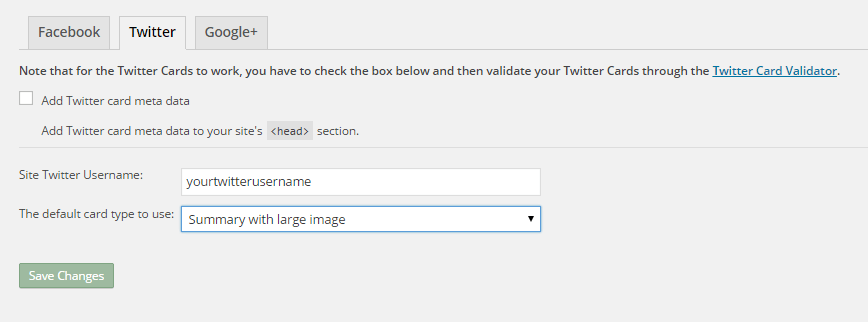
How do you do this? On the Social section of the plugin, click on Twitter. Fill in your Twitter username on the appropriate field. Specify the kind of Twitter card that you want to have then click on “Save Changes”. You’re not done yet. You still need to confirm your Twitter card. Head over to this link. Specify the URL and click on “Preview Card”. After that, click on “Request Approval” and fill out the form. Finally, click on another “Request Approval”.

Soon, you’ll be able to see Twitter cards on your Twitter links.

The premium YoastWooCommerce SEO plugin will further help you optimize your Twitter Cards if you have that.

How to Connect Google+

To connect your website with Google+ means setting your Google+ profile as the publisher of your content with the “rel=publisher” markup. “Rel=publisher” is an authorship markup which connects websites to Google+ pages (not personal profiles).

To connect your Google+ company page, head over to the “Social” section of the plugin and click on Google+. Fill out the field with the URL of your company page on Google+ and click on “Save Changes”.

google+

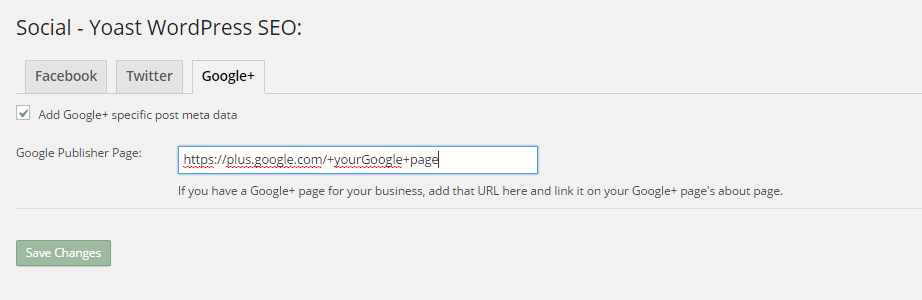
You might have heard of “rel=author” which links the content to the Google+ profile of the author. When implemented in the proper way, “rel=author” should show a snippet of the content with a photo of the author in the SERPs page. If you’re a writer and you’re hyped by that, I’d hate to burst your bubble but “rel=author” is no longer supported by Google. You can read more about it here.

Improving Sharing on Pinterest

Pinterest is another social media platform that’s worth mentioning. It has great potential for e-commerce stores. Why? Because Pinterest is image-based. The YoastWooCommerce SEO plugin makes sharing on Pinterest more worthwhile. After setting Twitter products and Schema Open Graph additions, your pins on Pinterest will start to show in a different way. In most cases, WooCommerce product will show up like posts. But with the plugin configured, your products will show up as “products”. They will show product related information such as price and variations.

Implementing Sitemaps with WordPress SEO

In a nutshell, sitemaps communicate with search engines to let the latter know when there are changes to the website. There are a lot of plugins that lets you create a sitemap. If you are already using the WordPress SEO plugin, just use the built-in sitemap module. Looking for another plugin just add an extra load to your server.

sitemaps

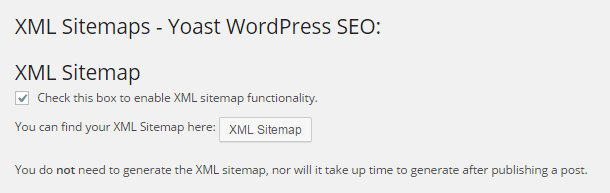
To get your sitemap, go to the plugin’s “XML Sitemaps” tab and then tick on the first box to enable sitemaps and click on “Save Changes”. There are a bunch of settings that you can tweak. You can have a look at them and change them as you please. They are pretty much self-explanatory.

You also might want to get the WooCommerce SEO plugin, which was mentioned above a couple of times. This removes some unnecessary bits from your sitemap in automatic fashion.

Check out our post on how to create a sitemap for your WooCommerce store to learn about sitemaps and other means of creating it.

Permalink Settings

Permalink settings all have to do with your URLs. I would not recommend changing any of the settings here but you are free to check them out and change them as you please.

Enabling Breadcrumbs with WordPress SEO

Breadcrumbs, when enabled, helps users identify where they are on your website. It also helps search engines determine your website’s structure. See the image below.  Where the yellow arrow is pointing at, that’s the breadcrumbs.

Enabling breadcrumbs on your website is simpler than snapping your fingers. Just go to SEO and then click on Internal Links. You should see a box that says “Enable Breadcrumbs”. So just tick that box and save. There are a few settings that you can tweak so just change them up as you need.

breadcrumbs

Did we miss anything? Or do you have any questions about the WordPress SEO plugin? Let us know in the comments.

Filed Under: How-To Articles, SEO For E-Commerce Tagged With: blog, breadcrumbs, content marketing, Google Webmaster Tools, Google+, how-to, navigation, optimizations, plugins, SEO tools, social media, Twitter, WooCommerce, WordPress, WordPress SEO, XML sitemap, Yoast

How to Add a Quantity Field on Your WooCommerce Shop Page

April 7, 2017 By John 30 Comments

counting-cubes-quantity-on-shop-page

By default, WooCommerce does not allow users to change the quantity of the product on the shop page before adding to cart. To change the quantity, users would have to proceed to the cart page which can be an arduous process. In this post, we will show you how to add a quantity field on your WooCommerce shop page.

If a customer wants to buy three sunglasses, and you only have the “Add to Cart” button on the shop page, the user will have to go to the Cart to edit the quantity that he/she wants to buy. This takes a few extra clicks and can become a real problem if the customer wants to shop for more items.

Less Clicks to Checkout

It is important to note that less clicks leading to the checkout page leads to more sales. As an e-commerce store owner, making your store more profitable should be on top of your priority list. Another way to reduce clicks to checkout is allowing the customer to check out as guests without the need to create an account.

Also, refrain from asking unnecessary information. At the very least, your checkout page should only have the name, address, email and phone number fields aside from the payment details.

Quality of Life Improvement

Adding the quantity field to the shop page is a good quality of life improvement that many of your visitors would appreciate. Instead of having to navigate to the cart or the product page to increase the quantity, they can increase the quantity from the shop page. If you think about it, making it easier for your customers to purchase more of your products means more sales for you.

A Necessity for Some Online Stores

How to Add a Quantity Field on Your WooCommerce Shop Page
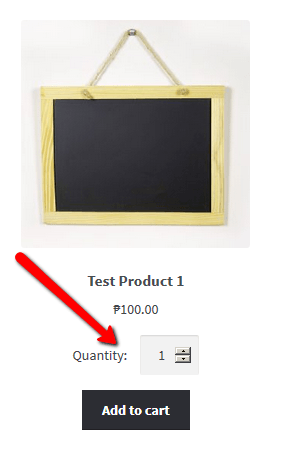
Adding the quantity field to the shop page is a necessity to some stores where buying several pieces and having repeat sales are common. For example, buying canned cat food in bulk is common so if you own a store selling pet food, having the quantity field on the shop page will really help. Many of your customers will be buying again after some time. They can just add the products directly from the shop page since they know what they are buying and no longer need to see the product details.

How to Add a Quantity Field on Your Shop

You can use the Quantity Field on Shop Page for WooCommerce plugin to add a quantity field on your WooCommerce shop. Just install the plugin and activate it. There are no settings to tweak. Once the plugin is activated, the quantity field should be on your shop page.

Did this plugin work for you? Do you have any questions or ideas on how the plugin can be improved? Let us know in the comments.

Filed Under: How-To Articles, Theme and Plugin Reviews Tagged With: best practices, e-commerce, how-to, navigation, plugins, website development, Wooassist, WooCommerce

How to Edit Footer Credit Text in Storefront Theme

March 20, 2017 By John Leave a Comment

Like most themes, Storefront theme comes with a generic footer text. As a WooCommerce store owner, this doesn’t really help your site so you will want to change it.

Storefront-Default-Footer

Why Edit Footer Credit Text Area?

Well, you certainly wouldn’t want the default one. You can edit your site footer credit text area to include your business name and declare your copyright. You can also use this area to include whatever best fits your needs.

But first off…

How Do You Edit the Edit Footer Credit Text in Storefront Theme?

By editing your e-commerce store’s footer, you can make it a part of your strategy. You can easily edit it if you know how to code. However, this can prove challenging to the average user. In this case, there’s a plugin for that. Just follow the steps below:

  1. Storefront-Footer-Text-Plugin-400x300Head over to your WordPress Dashboard and go to plugins
  2. Click on “Add New”. In the Search field, input “Storefront Footer Text” and press Enter.
  3. Click on ‘Install Now’ on the plugin and then click Activate.
  4. Once Activated, head over Appearance > Customizer
  5. Under the Footer section, you will find a text area for you to enter your custom credit text. You can use HTML tags so you can be creative when adding your footer text.
  6. When you’re done, just click on Save.

What Can I Add to My WooCommerce Store’s Footer Credit Area?

There are a lot of things you can add to your store’s footer credit section. Below are just some of them.

Declare Copyright and Other Important Declarations

The most common use of this area is to declare a copyright. This has three elements: the copyright icon, the company name and the year that you started the e-commerce store/business up to the current year.

If there are other important declarations that you want to add for legal purposes, you can add them in this section as well. Some websites have been known to use this area to declare the use of cookies.

Declare-Copyright-in-Footer

Here’s how it looks like on the Costco website.

Contact Details

In addition to copyright information, you can add your contact details on the footer credit section to increase your credibility. You can add your phone number, address, email as well as a link to your contact us page.

Social Media Icons

You can add social media icons in this section in a way that is not intrusive. When you add social icons at the top of your page, it can be a distraction from your website’s goal. But when you add it at the bottom of your site, it becomes another way for you to engage with your visitors if they ignored your main call-to-action.

Social-Media-Icons-in-Footer
Newegg.com adds both social icons and security seals in the footer credit area.

Show Security Seals and Certificates

Newegg.com adds the security seals on their footer credit section along with their social media icons. You can add your own Norton Security Seal here.

Payment Options

You can also add icons of the payment options that you accept on your e-commerce store. This makes it easier for your visitors to know what payment options you accept without having to look for the FAQ section.

Add Other Important Links

You can also use the footer credit area to add other important links such as your terms and conditions and privacy policy. This is how Amazon does it.

Terms-Conditions-Footer

No matter what you put on your footer credit text area, it must be an element that helps you achieve your e-commerce store’s goals.

Did this plugin help you edit footer credit text in Storefront? Did you experience any problems using it? What elements did you add to your footer credit area? Let us know in the comments.

Filed Under: How-To Articles, Theme and Plugin Reviews Tagged With: best practices, design tweaks, e-commerce, how-to, navigation, plugins, Storefront, Wooassist, WooCommerce

How to Fix Blurry Product Images in WooCommerce

February 26, 2015 By John 10 Comments

Blurry ain't good
Blurry ain’t good

Sometimes you upload an image in WordPress/WooCommerce and it just doesn’t show up like you intended it. Sometimes they don’t align. Sometimes they don’t fit the placeholder. Sometimes the image just doesn’t show. And sometimes, the image gets blurry. Why the image gets blurry may be caused by one of a few problems. Here we discuss the common causes and how to fix blurry product images in WooCommerce.

You Uploaded a Blurry Image

If you uploaded a blurry image then don’t expect that you’re going to get a good image to show up. Maybe you viewed the image in a small screen so it looks okay but when you view it on a larger screen, you’ll find that it actually is blurry. If this is the case, there is hardly anything that you can do to fix the image. Image editing tools like Adobe Photoshop may be able to help a bit by making the image sharper but don’t be expecting any significant changes. Odds are you’ll have to get a better image.

WooCommerce Recommends Using Large Product Images

thumbnail cropping woocommerce

Before, WooCommerce images need to be a specific size that you set in WooCommerce settings. That is no longer the case. WooCommerce now uses a lighthouse so images pop up big when users click on it. Large images look great and will help sell your products. However, make sure they are properly optimized.

For most themes, WooCommerce recommends uploading an image that is at least 800×800 pixels. Don’t worry about the image being bigger than the placeholder as WooCommerce automatically sizes your images and will only show the full resolution when clicked.

To control thumbnail cropping of your product images, you can go to Appearance > Customize > WooCommerce >Product Images and then select your desired cropping settings.

If the image is not the problem, there might be a problem with how your images are rendered. You can try to regenerate image thumbnails.

How to Regenerate Thumbnails

Other than when changing image settings in WordPress and WooCommerce, you may also need to regenerate the image thumbnails on your website if they appear blurry after a redesign or changing to a different theme. The best and easiest way to regenerate image thumbnails is to use the Regenerate Thumbnails plugin. Simply install and activate the plugin and from there, go to “Tools” and “Regen. Thumbnails”. Just click on the button “Regenerate All Thumbnails” and the plugin will fix the blurry images like magic.

regenerate-thumbnails

If you want to regenerate thumbnails for specific images instead, you can do this on the Media page on your admin panel. Make sure you are viewing images with List view. Simply hover over the image and the link to regenerate thumbnail should appear. You can also mark all the images you want to regenerate thumbnails and use Regenerate Thumbnails from Bulk Actions and then apply.

regenerate-thumbnails-1

Best Practices on Image Use

There are a lot of things that you can do to avoid blurry images by following best practices. Once you set an image dimension, make sure that the images you upload comply with that requirement. Uploading a bigger image in WooCommerce is okay but make sure the image is optimized so as not to affect your page load speed. You can set how you want image thumbnails to be cropped. If you upload a smaller image, it might look okay on a mobile device but not on a PC or laptop. It is also important to know what image file types to use.

Another best practice for images is to always set an alt text for your image. If the image fails to load, the alt text will show up and the user will at least know what the image is about. Also, name your files properly. Don’t name your files after SEO keywords. If you have an image of a ukulele, give it a descriptive file name and not “buy-cheap-ukulele”.

Filed Under: How-To Articles Tagged With: admin, best practices, conversion optimization, how-to, image optimization, plugins, product management, WooCommerce

How to Find and Remove Abandoned Plugins from Your WooCommerce Store to Keep Your Site Secure

December 4, 2020 By John Leave a Comment

How to Find and Remove Abandoned Plugins

You probably already know that keeping your site updated is important for security and to keep everything running. But did you know that just updating your WordPress core, themes and plugins might not be enough? What else should you be doing? You should find and remove abandoned plugins.

WordPress does not automatically warn users using a plugin when plugins are abandoned by their developers. This is important because when developers abandon their, they do not receive updates. This includes critical security updates and other updates to make sure that the plugins stay compatible the current versions of WordPress and WooCommerce and your theme.

Why is it Important to Find Abandoned Plugins?

Abandoned plugins are critical security issues as they are likely to contain deprecated code and vulnerabilities that may be exploited by hackers. Abandoned plugins can also break functionality on your WooCommerce. Your lucky if it breaks a layout or something else minor. In some cases, abandoned plugins can affect your product purchase process. Imagine breaking your WooCommerce store’s checkout because of an abandoned plugin.

How to Find Abandoned Plugins?

You can search for abandoned plugins manually by going to your plugins page and clicking on the “View Details” link on each plugin. Clicking on this link would take you to a different page and your next action would depend on where the link takes you.

If the plugin is not in the plugin repository, you might find a different link to visit the plugin’s site.

It Takes You to a Page with the Plugin Details

If you got the plugin from the WordPress plugin repository, you will most likely be taken to a plugin page with all the plugin details. There you can see when the plugin was last updated. You should be wary of plugins that have not been updated for several months. If you find that the plugin has not been updated in over a year, note it down.

It Takes You to a Page that Tells You that Plugin Has Been Remove From the WordPress Repository

If you find yourself on a page that tells that the plugin has been removed from the WordPress plugin repository, this is a major red flag. There are several reasons why a plugin could be removed from the repository. The less alarming reasons are if the plugin author has requested removal of the plugin or there are some licensing issues. However, in some cases, it would be because the plugin has violated the WordPress Plugin Guidelines or has been identified to have a security vulnerability severe enough to warrant a removal. If this is the case, remove the plugin immediately and scan your site for malware.

It Takes You to a Third-Party Plugin Vendor’s Site

If clicking on the link takes you to a plugin vendor’s site, you might need to do some further digging to find if the plugin is still being updated. Search for the developer’s change logs on the plugin to see when it was last updated. It might also be worth checking how often the plugin developers release an update. Also check if you have the latest version of the plugin installed. If it is a premium plugin, there is a likelihood that you are not getting automatic updates because of an expired license. In this case, renew your license and update.

It Takes You to a 404 Error

If it takes you to a page with a 404 error page, check the site’s home page and try to find information on your plugin. The plugin developers may have already gone out of business which means the plugin has been abandoned.

As you are probably thinking by now, scanning your site for abandoned plugins can be a handful. Thankfully, you can use WordFence to scan your site for abandoned plugins. Just install the WordFence plugin and run a scan, if there are any abandoned or outdated plugins on your site, WordFence should alert you of it.

So You Found One or More Abandoned Plugins on Your Site. What now?

In a perfect world, you just remove abandoned plugins and be done with it. However, things are usually more complicated than that. Chances are you are actively using the plugin and you might not be noticing any problems with it. But that doesn’t make the plugin any less of a security threat. We recommend removing the plugin and finding an alternative plugin that is not abandoned. If there are no alternatives available, you can customize the functionality instead. These should all be done on a staging site so as not to disrupt your live site.

But What if the Plugin is Critical to Your Site Functionality?

There’s not really much you can do in this case. You can try to contact the plugin developer or hire a developer to create your own plugin. It is most likely a bigger risk to your business if you keep using an unstable and unsecure plugin. Under the General Data Protection Regulation (GDPR), you will be liable to your customers if their data gets leaked because of a security breach. The fines are hefty so it might be best to err on the side of caution.

If you’ve fixed all the abandoned plugins on your WooCommerce store, you might want to keep yourself updated on the latest security news concerning WordPress and WooCommerce. You can subscribe to our newsletter to receive security updates on your inbox.

If you are looking for more things to do to make your site more secure, you can also check if your site is running the latest version of PHP.

Filed Under: How-To Articles Tagged With: GDPR, plugins, security, WooCommerce updates, WordPress updates

  • « Previous Page
  • 1
  • 2
  • 3
  • 4
  • …
  • 8
  • Next Page »
Let us support your online store so you can manage your business

Get started today

Get 2 Hours of FREE SUPPORT

We are so confident that you will love our services that we will give you your first 4 hours at a 50% discount

That’s 4 hours for only $75

BUY NOW

Free eBook

5 Things Every Online Store Can Fix On Their Website In The Next Week To Increase Sales

Quick Links

  • How it Works
  • Pricing
  • Blog
  • Contact
  • About Wooassist
  • My Account
  • Checkout
  • Privacy Policy
  • Cookie Policy
  • Terms and Conditions

Wooassist

Australia:
59 Luke St.
Hemmant QLD 4174

Philippines:
San Miguel St.
Poblacion, Iligan City 9200

Connect


Copyright © 2026 · Wooassist

Yours FREE!

5 Things Every Online Store Can Fix On Their Website In The Next Week To Increase Sales