
You might have used a good amount of your resources to create a website for your business. You have an inviting and irresistible call-to-action. The last thing you’d want to happen is for a potential customer to bounce away from your site because they couldn’t find your contact information.
The Contact Us page is one of the most important pages on your website. It is one of the easiest ways to give your visitors a means of getting in touch with you.
What Do You Need to Have on Your Contact Us Page?
Having a contact form is just about the easiest way that a user can contact you. If you have several departments such as customer support, sales, press, etc. it may be worthwhile listing the contact information for each department in addition to the contact form. This can include the name of the contact person, e-mail and a phone number. If you have an office that can accept visitors, then putting your office address and a map would help.
It is important to note that your contact information should also be easily visible on your website’s home page. This increases the trust rating of your website.
How to Create a Contact Form Using a Plugin?
There are several ways to add contact forms on your WordPress website. The easiest method is by using a plugin.
There are plenty of plugins to choose from and they easy are to set up. You can choose which fields you want to include on your contact form. Here are the ones that we can recommend.
How to Create a Contact Form Using Contact Form 7

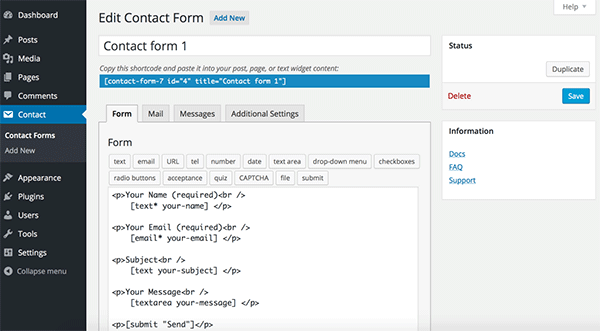
Contact Form 7 is one of the most popular plugins for creating contact forms. Currently, it has over one million active installs. It is free and it gives you the ability to create multiple forms that you can modify with markup. You can also place a contact form in any post or page using a shortcode.
To create a contact form using Contact Form 7, you need to do the following steps:
- After installing the plugin, mouse over “Contact” and then click “Contact Forms”.
- Customizing the form may take a bit of HTML skills. Basically you use shortcodes to customize the fields. For example, the shortcodes for a text field looks like [text* your-name].
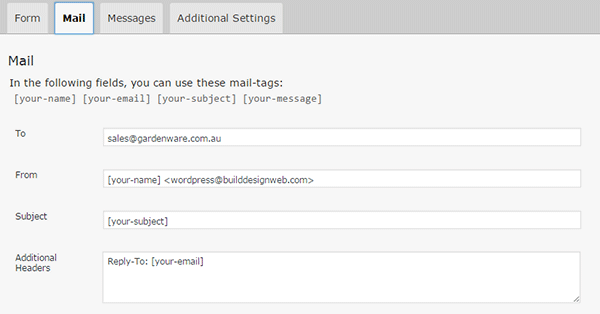
- Under the “Mail” tab, you can configure the email that will be sent after the confirmation. You can add the values of the fields to your email using the corresponding tags. For example, the email field [email* your-email] has the tag [your-email].
- Save the form.
- Copy and paste the shortcode to insert the form to your Contact Us page or wherever you want it shown.
How to Create a Contact Form Using Visual Form Builder

Visual Form Builder was designed for fast and easy form building. There are no coding requirements. It has an intuitive drag and drop interface which lets you build forms fast.
You can insert your forms in any page or post using shortcodes. It has a logic based anti-spam system, a customizable confirmation message, and a multiple field layout option. It has an extensive FAQ page for customization and troubleshooting. It has an affordable premium version but the free version offers a lot too.
To create a contact form using Visual Form Builder, you need to do the following steps:
- Install the plugin and navigate to “Visual Form Builder”.
- To create a new form, click on “Add New Form” and fill in the required information.
- Drag and drop the fields you need to the right and edit the details.
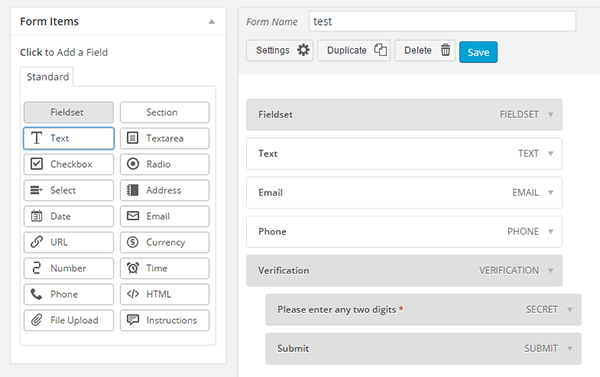
- Save the form when you are done.
- Under “Display Forms”, you can find the shortcode that you will paste on your Contact Us page.
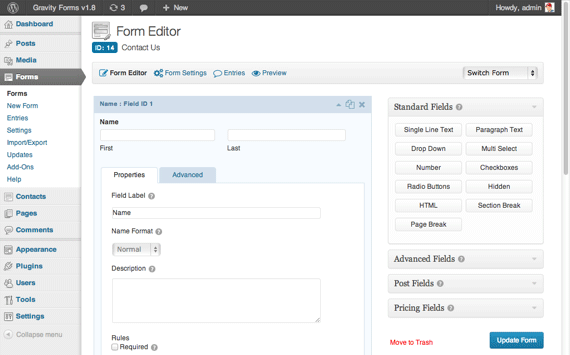
How to Create a Contact Form Using Gravity Forms

Gravity Forms is the most popular paid contact form plugin for WordPress. It is one of most beginner friendly WordPress form plugins. With the help of some other add-ons, Gravity Forms can also be used to create surveys. It comes with premium support options and that is something you can get for spending extra bucks for this plugin.
To set up Gravity Forms, follow these steps:
- Install the plugin and activate your product under Forms > Settings tab. Enter your activation key and you’re set to make your first contact form.
- Create a new form and then start adding the necessary fields.
- Customize the properties of each field.
- Save your form.
- Edit your contact page to insert the form by pasting the shortcode.
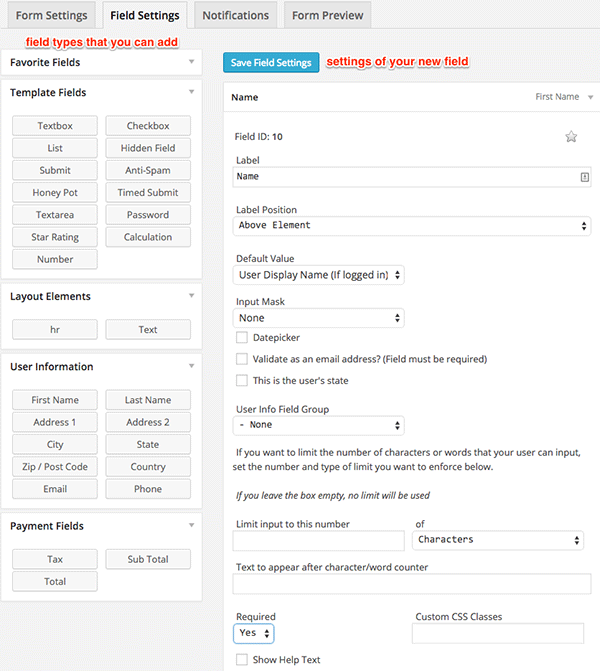
How to Create a Contact Form Using Ninja Forms

With its really simple, intuitive, drag-and-drop interface, Ninja Forms is an excellent and powerful tool for building contacts forms in WordPress. Ninja Forms’ base product is free. If you wish to extend its functionality like connecting with Campaign Monitor, Freshbooks, Salesforce, SMS notifications, etc., you can buy the corresponding premium extensions.
To create a contact form using Ninja Forms:
- Once plugin is installed, find the “Forms” tab on your WordPress Dashboard then click on “Add New”.
- In the “Form Settings” tab, you can see a lot of settings but the most important one to fill in is the form name. Other settings are quite intuitive but if you need some help, you can check out the Ninja Forms Documentation.
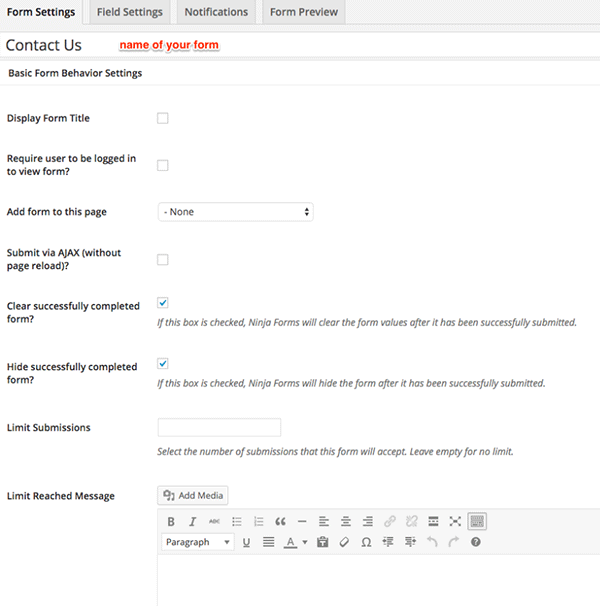
- The “Field Settings” tab is where you actually build your form. Drag and drop the needed fields and fill out the information. It is very easy to navigate so you can play around to learn the features. The best way to learn how to do it is actually doing it yourself.
- You can edit the email notifications in the “Notifications” tab.
- Once you’ve completed your contact form, you can preview it in the “Form Preview” tab. Don’t forget to save it after.
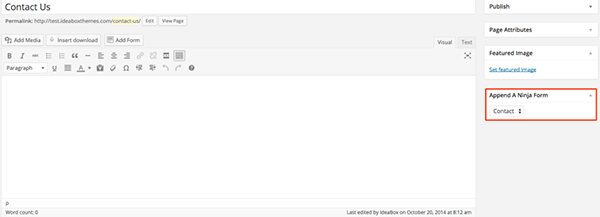
- Navigate to the ‘Edit’ mode of your Contact Us page. Find the section “Append A Ninja Form”, then select the form you just created and save the page.
How to Create a Contact Form Using Formidable Pro

Among WordPress users and developers, Formidable Pro is another popular choice. Formidable Pro provides a unique interface from which you can create stunning forms on your WordPress site. This form builder plugin has almost everything you’d need from a premium form plugin. Formidable Pro is a breath of fresh air. Its free version is powerful enough but going for the premium version gives you more features like integration with MailChimp, Aweber, Highrise, Twilio for SMS, WPML, and Zapier.
To set up a Formidable Pro contact form:
- After installing, go to Formidable > Forms and click “Add New”’ at the top of the page.
- You can start with a blank form or select from a template.
- Drag and drop the needed fields. The field settings are quite intuitive so you will learn as you select them.
- Click “Create” to save your form.
- There are two ways to publish a form on your Contact Us page:
- Use the shortcode builder. Click “Formidable”, select the correct form, and then click “Insert into Post”.

img1 – In the Edit mode of your page, click “Formidable” 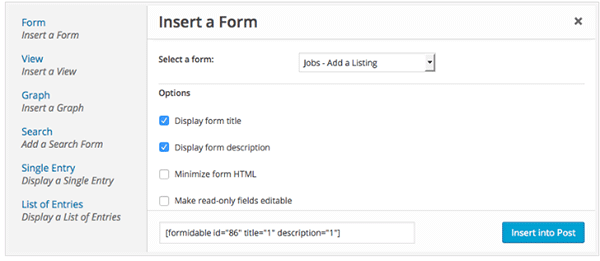
img2 – Select the correct form, then click “Insert into Post” - Insert the shortcode manually. Navigate to your form and in the upper right corner click “Show” then copy the form shortcode.

img1 – Click “Show” 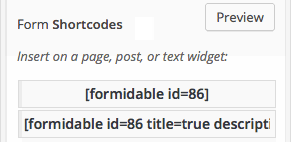
img2 – Copy either one of the two shortcodes
- Use the shortcode builder. Click “Formidable”, select the correct form, and then click “Insert into Post”.
Note that the first shortcode [formidable id = 86], only shows the form itself. If you want the title and description to be displayed as well, copy the second shortcode [formidable id = 86 title=true description=true].
How to Create a Contact Form Using Fast Secure Contact Form
Fast Secure Contact Form is another popular free WordPress contact form plugin. Its name says it all. If you hate spam with a passion, then this is the plugin for you. It includes Akismet support to block spammers. You can also install a companion plugin to add CAPTCHA support.
To set up Fast Secure Contact Form:
- Install the plugin.
- Click the Plugin tab in the WordPress admin interface, then click “FS Contact Form”.
- Under the basic setting fill in the form label and the welcome introduction. The most important thing is to fill in the email address where you should receive the user information.
- The “Field” tab is where you actually build your form. You will see a default form with the default fields.
- To add a field, click “Add New Field”. To edit the field, click on “Show Details”.
- You can remove a field by clicking the “Show Details” then checking the “Disable Field”.
- Save your form when you’re done and locate the form shortcode.
- Copy and paste the shortcode to the Contact Us page.
Which is the Best Contact Form Plugin for WordPress?
Well there you have it! These are some of the more popular contact form plugins out there but there are more. Now you might ask what the best contact form to use is. Unfortunately, there is no definitive answer to that question as it will all depend on what you need in a contact form.
What is your favorite contact form plugin? Tell us in the comments.


Leave a Reply