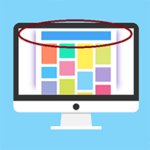
The release of Google’s Material design started the “top bar” trend. It was used mainly on mobile user experience (UX) designs but it found its way into desktop design. In this article, we’ll teach you how to add a top bar to the Storefront theme.
What Elements Can you Add to the Top Bar?
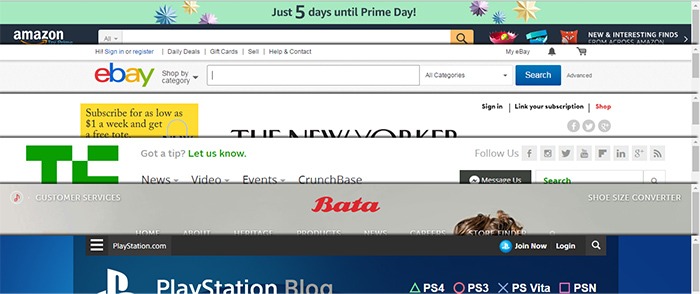
The top bar has been used in a variety of ways, depending on the UX design or the information you want to highlight. Let’s enumerate common items we see on the top bar.
- Promotions – This can be anything from a sale to a new product release. The top bar is a good noticeable area that you can use to post your promotions and other offers.
- User Login/Logout – When users want to log in or out, their eyes will scan the top right corner of the page to look for the link. Because of this, it makes sense to place the link in the top right corner.
- Social Links – The top bar is a common location for the site’s social media profile links.
- Mini Cart – The mini cart has a very important role in the UX design of e-commerce stores. It is an important element to have either on the main navigation or the top bar.
- Search Bar – The search bar is also a crucial piece in the UX design of most websites and it can be positioned in the top bar.
- Subscription Form/Link – Placing the subscription form on a very prominent location like the top bar draws the attention of your visitors to the form.
- Quick Links Menu – Quick links can be any important link that you want your visitors to see or something that your visitors will be looking for. Some common quick links are My Account, Shop, Terms and Conditions, Privacy Policy, About, Contact and FAQs.
Depending on your site, you can use the top bar to contain other elements as you see fit.
How to Add a Top Bar to Storefront
To add a top bar to Storefront, you can use the Storefront Top Bar plugin. Our developers at Wooassist developed this plugin specifically for Storefront which adds two widget areas on top of the header.
Getting Started

Install and activate Storefront Top Bar in your WordPress Dashboard.
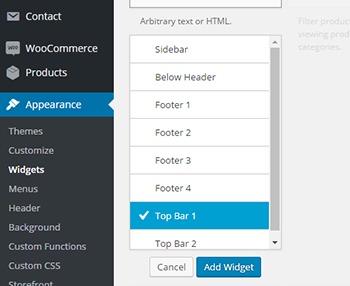
After installation, go to Appearance and click on Widgets. You should find two additional widget areas namely Top Bar 1 and Top Bar 2. These are the left and right widget areas on the top bar. You can add any content here just like in any widget area. Just make sure it looks good within the small space provided.
Adding a Simple Text
To add text to the top bar, find the text widget and add it to the top bar widget area. After that, you can just add any text in the text widget.

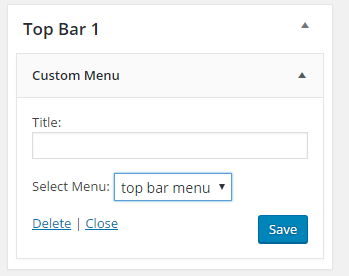
Adding a Menu

To add a custom menu to the top bar, you should first set up a custom menu in Appearance > Menu. After creating a menu, go back to the widgets area and add ‘custom menu widget’ in the top bar widget area. Select the menu you’ve just created and then click Save. Your custom menu should now appear in the top bar.
Adding a Subscription Form Shortcode
You can add shortcodes using the text widget. In this example, we are using Mailchimp for WordPress. The plugin allows for creating a custom form which can be linked to your Mailchimp account. If you want to follow along and are wondering about the HTML markup of the subscription form in this example, you will just need the input type email and the submit button.
<input type="email" name="EMAIL" placeholder="Your email address" required />
<input type="submit" value="Sign up" />
After that, copy the shortcode and paste it in the text widget on the top bar. You can easily tweak the look of your form with CSS. In this case, the CSS we used is below. Feel free to use the code below for your own site. You can make adjustments to fit your needs.
.mc4wp-form input[type=email]{
width: 50%;
}
.mc4wp-form {
margin-bottom: 0;
}

Adding Other Elements to the Top Bar
The top bar works like a regular widget area. You can add shortcodes for other items like social icons, mini-cart, login, etc. You can also insert HTML and scripts in the text widget so the possibilities are endless.
Customizing the Top Bar Widget
To customize the top bar widget, you can go to Appearance > Customize and click on “Top Bar”. Here you can change the background color, text color and link color. You can also set the top bar to be hidden in mobile view.
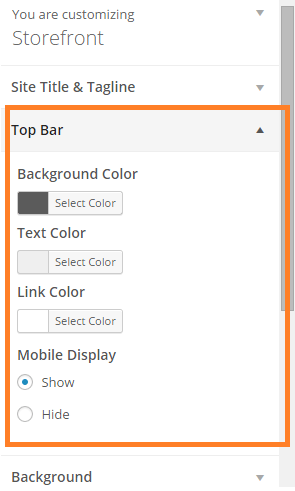
You can further tweak the top bar using CSS.
Align Top Bar 2 to the Right
By default, both Top Bar 1 and Top Bar 2 contents are left aligned. To make the content of Top Bar 2 align to the right, just use the CSS below.
.woa-top-bar.col-2 .woa-top-bar-2{
text-align: right;
}

Thickness/Height
To change the height of the bar, you can specify the height using CSS. Just use the code below and specify the height.
.woa-top-bar-wrap{
height: 35px;
}
Single Centered Top Bar
If you only want one top bar widget with a centered content, do not add any content to the Top Bar 2 widget area and then add the CSS below.
.woa-top-bar-wrap{
text-align: center;
}

Final Notes
The Top Bar is the first thing that your customers will see on your site. It is one of most prominent areas above the fold. You now have the tools to make use of the top bar. It’s now up to how you will maximize the use of this valuable real estate.
Was this tutorial helpful? Do you have any questions about adding or tweaking the top bar in Storefront? Let us know in the comments.


Hi,
I want to add 4 widgets to the top bar – search, language switcher, my account and cart. I’ve added the first 2 to top bar 1 and the 2nd two to top bar 2.
instead of appearing horizontally in a straight line they’re appearing vertically on top of each other.
search bar is on above the language switcher and cart is above my account. is there any way to make these 4 widgets appear horizontally in a neat row?
Hi Nishant, yes you can do it by adjusting the width of the widgets.
Hi,
I have the same problem, my widgets appear vertically instead of horizontally on the top bar. Please enlighten me on how to edit the width of the widgets using CSS when those widgets appear in other places in the website?
I have for instance a search box, a cart and some links in topbar 1, but the search box also appears on my sidebar on the same page. If I add a CSS style to the class that search box belongs to wouldn’t that affect the appearance of the search box on the side bar as well? I wish to edit the width of the search box (and all the other widgets) only on the top bar so as to ensure they appear horizontally instead of vertically.
Thank you for your assistance.
Upon installation, when I click the arrow to open up Top Bar 1 or 2 in Appearance > Widget, the area enlarges but it’s blank: No text box or anything. Searched for a solution in no avail.
I made a stage site and an admin account in case you would like to take a look so please let me know. Any help is much appreciated.
Hey:),
respect, you have a nice Blog ! It help me alot.
But i have a question. How i can change the size of the Text in the Top bar. I can´t find the option. Can you help me please :)?
greetings from germany
Hi! Guys
I nee your help. For some reason the button is not aligned to the right of the placeholder. Can you guys assist me with this issue?
Good day,
I’m having trouble with the top bar, I want it to be just one bar in the middle, I’ve added the CSS but it doesn’t work.. The ‘edit’ buttons do shift, but the content stays the same.