
The idea of using hero images came about because of issues caused by homepage sliders. Using a homepage slider is discouraged as it will slow down your WooCommerce store and it doesn’t have good conversion rates. If your WooCommerce store running on Storefront has sliders and you are looking for a good alternative, you should consider using a hero image instead.
What is a Hero Image?
To better explain what a hero image is, let’s define what is the “fold” and “above the fold content”. Originally, the fold is a term used in the newspaper industry. Since newspapers are normally folded in half, the upper half of the front page will be the part of the newspaper that is exposed. This is where the most important content is featured, hence the term “above the fold content”. In web design, this is the area of the page that can be seen without scrolling down.
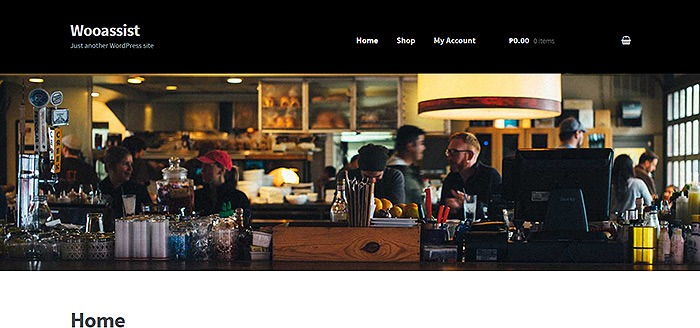
A hero image takes up most of the space above the fold. The trend is to make it large, attractive and relative to the content of the entire site.
It is important that you provide a complete overview of what your company/site is about with just a glance of your hero image. 90% of the time, the hero image has a large text in the center that is related to the branding of the site.
Preparing Your Images
Before you add your image, make sure you have it optimized for web use. You’d want to have the best image quality for the hero image, but you have to take into account the image size as well. As of 2016, the most common screen resolution is 1920x1080px. You should try not to go over this mark. Any excess is just a waste of page size and will just slow down your page load time.
Once you get the right resolution, try to further reduce the image size by down-scaling the image quality. You can actually reduce the image quality without having noticeable pixelation in the image. This is because the human eye can only see limited minute differences in the color changes. Try to strike a balance between having a small image size and having a good looking image. Check out this other post on how to optimize images. Once you are done preparing your image, just upload it to your WordPress site.
Adding a Hero Image in Storefront
To add a full-width hero image in Storefront, we need to use Storefront’s extensive hooks. We’ll just need to insert a few lines of code.
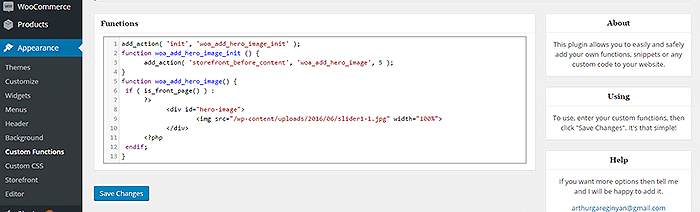
If you are comfortable working with code, you can paste the code below in the functions.php of your child theme. If you are a novice user, we recommend using My Custom Functions plugin to insert the code. Note that one error can cause your entire site to crash.
Copy and paste the code below. Just replace the “/wp-content/uploads/imageurl.jpg” with the URL of the image you uploaded earlier. Width set to 100% makes your image responsive to different screen sizes.
add_action( 'init', 'woa_add_hero_image_init' );
function woa_add_hero_image_init () {
   add_action( 'storefront_before_content', 'woa_add_hero_image', 5 );
}
function woa_add_hero_image() {
   if ( is_front_page() ) :
      ?>
         <div id="hero-image">
             <img src="/wp-content/uploads/imageurl.jpg" width="100%">
         </div>
      <?php
   endif;
}
Your hero image should now appear on your homepage below the main navigation.
If you want to add a link to the shop page or any other url on your image, copy and paste the code below. Just replace the “http://change_me_to_your_url” with the URL you want to link to.
add_action( 'init', 'woa_add_hero_image_init' );
function woa_add_hero_image_init () {
   add_action( 'storefront_before_content', 'woa_add_hero_image', 5 );
}
function woa_add_hero_image() {
   if ( is_front_page() ) :
      ?>
         <div id="hero-image">
             <a href="http://change_me_to_your_url"><img src="/wp-content/uploads/imageurl.jpg" width="100%"></a>
         </div>
      <?php
   endif;
}
Final Notes
Hero images are more effective than sliders in terms of aesthetics. You don’t have to keep using sliders if it’s slowing down your site. Explore more options. Keep your site simple and fast.
If you are still using sliders, you are most likely hurting your site speed. And a slow WooCommerce store will convert less. Your Google rankings could also suffer as a result. It’s time to do away with the slider. Go with a hero image instead.
Was this tutorial helpful? If you have any questions or anything you’d like to add, please let us know in the comments.


Thanks for the tutorial !!!
can i ask, how to add action button to the hero image?
Thanks
very nice and effective tutorial, thnx
Thank you, Minhaz! We hope it serves you well!
Thank you for the very clear instructions and the code. Very nice!
As you mentioned, installing the “My Custom Functions” plugin by Arthur Gareginyan is a great way to add the custom code you provided.
I went the child theme route and uploaded a child theme to my site from Stuart Duff found here:
https://github.com/stuartduff/storefront-child-theme
Thanks and best regards
I’m new to woocomerce and this tutorial has been fantastic. Thank you. Going to look around the rest of the site now and see what other gems you’ve done 🙂
Very Good Code and Very Helpful Articles for me! No conflict & still works with the latest version of Storefront Themes, WooCommerce, WordPress and the other plugins on my site.
Awesome, Thank you so much to Wooassist people @Nick J – five stars 🙂
Ive been editing my site with your instructions and is working great!
i have a question though. i would like to put a hero banner under the body of my front page, is there away to changethe : if ( is_front_page() ) : , section to like under the body of the front page, is there different “IF” options, could you provide any others options.
if you’d like to take a look
I want the bottom image under the welcome button to be a hero image that doesnt have any margins, is that possible ?
Guys/Girls , i used your piece of code and it worked fine. Thanks alot . it Makes the homepage look so much better.
Is it possible to add a or so, on top of the image?
a” piece of text ” H2 or so.
HI there!
I am looking to replicate the hero image from your homepage BUT without the actual products… I want to use this on any other page – like blog posts perhaps or a simple page.
To be clear I want to have the hero image, the page title overlay on the image and a text element too… so just like the homepage – without the product listings!
Can I achieve this easily?
Thanks!
Hello guys/girls, it works great.
Though, is there a way to add an overlay text to this hero? right now i have done it with photoshop directly on the image, but i’d rather avoid that.
Oh, You already answerd my question before 😉 , excuse me and thanks alot!!!!!!
You guys are the best!
Thank you for the code! It works perfectly on the Storefront Homepage but my question is: how do I get it to display on other pages? Is there a way to get it to work on individual Pages I have created?
For example, I have this code working perfectly on my home page at http://www.kaishostudios.com but would like to have a different hero image also on another page.
Is there an easy solution?
Thank you!
Hi Travis,
you need to modify this bit: if ( is_front_page() ).
So lets say you want to add the hero image on your shinju page, you would use: if ( is_front_page() || is_page(‘shinju’) )
This basically means that if the current page is the front page or (||) the shinju page then it will do this and that. If you want to add it to multiple pages, you need to use if ( is_front_page() || is_page(array(‘page1’, ‘page2′, page3’)) ). Just enter the page slugs of the pages you want the hero image to be on.
Let me know if that helps.
Hola!! Quiero hacer lo mismo pero no comprendo donde poner el link de referencia hacia la segunda imagen:
En la homepage tengo una imagen y quiero agregar también una imagen de héroe en la pagina contacto (pero distinta a la de la home) , me puedes ayudar?
Gracias
Hi, thanks for the awesome tutorial. I have one question, how to remove gap between navigation bar and hero image? Its displayed perfectly on my site if i am using homepage template but if i am using the default template, it have a little gap. Is there any code to display it correctly? Thanks
How do i make the image a clickable link to the “shop page”?
Amazing tutorial, thank you for sharing. Code works perfectly. Is there a way to actually swap the hero image with another image based on screen size? I would like my desktop optimized hero image to change to another image that I is optimized for a mobile screen size.
thank you. it works!
Hi, i was looking exactly for this solution, now i tried your snippet and everything works just perfectly i even manage to place a different image for different pages as long as they are conditional tags for woocommerce pages, such as shop, cart, checkout etc…but…..when i tried to place a hero image in a custom page i made, the code does not work for me…..you posted a solution here about that using the “if (is_page(‘your page‘)):” but i can manage to make it work for my contact page……i used the slug “contact” for the page, but is not working.
Can you give me a hint on how to make it work with custom pages……im from México and hope make myself clear about my problem with my english writing skills.
My site is down under construction…..
Thaks for the tutorial, works great, but how can I add 2 colums inside the banner, because I try it but I can´t do it.
I try adding this:
LEAF
Let´s see
enter
But the CSS properties like background image or color doesn´t work.
Do you have any tutorial?
As a beginner with WooCommerce, I’ve gotten so much help from your articles (including this one), I have now bookmarked your site. Thank you so much for all the great stuff.