Wooassist

Assistance for Your Woocommerce Store

  • How it Works
  • Pricing
  • Services
    • Site Maintenance
    • AI SEO and Content Marketing
  • Blog
    • How-To Articles
    • Code Snippets
    • SEO For E-Commerce
    • Theme and Plugin Reviews
    • Wooassist News
    • WordPress/WooCommerce News
    • Interviews
  • About Us
  • Contact
You are here: Home / Archives for Code Snippets

How to Make WooCommerce Pages Full Width in Storefront Theme

April 23, 2015 By John 20 Comments

storefront full width template

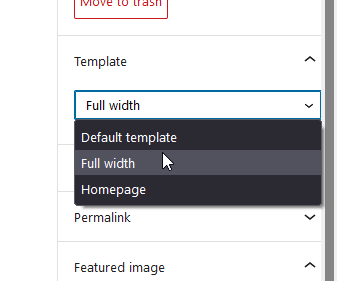
EDIT: Storefront now has a full-width page template so you no longer need to use the custom code in this article. To remove the sidebar on WooCommerce pages, you can set the page template to Full Width.

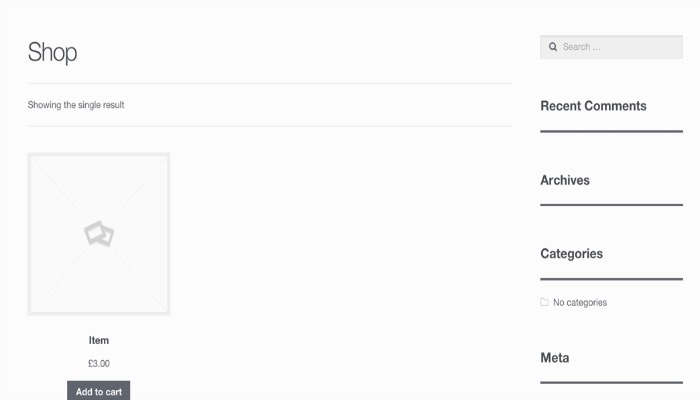
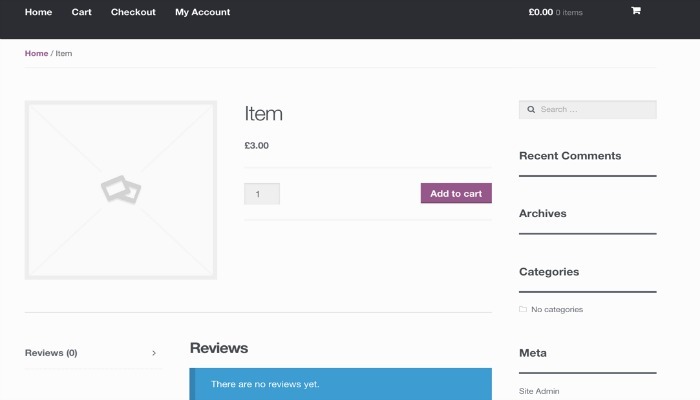
If you are using Storefront theme and you want to use the Full Width template for your store and other pages, you might come across a problem. After you’ve set your page to the Full Width template, you can still see the sidebar. And that’s not the case with the other pages, since setting the template to Full Width effectively hid the sidebar.
shopimage
Here is a shop page that is supposed to be full-width but still shows the sidebar
itemimage

And here is a product page which is supposed to be full-width but still shows the sidebar

This happens because all WooCommerce pages use the templates on the WooCommerce plugin. They do not use the Storefront templates. To resolve the problem, add the following code to your child theme’s functions.php.

add_action( 'wp', 'woa_remove_sidebar_shop_page' );
function woa_remove_sidebar_shop_page() {

if ( is_shop() || is_tax( 'product_cat' ) || get_post_type() == 'product' ) {

remove_action( 'storefront_sidebar', 'storefront_get_sidebar', 10 );
add_filter( 'body_class', 'woa_remove_sidebar_class_body', 10 );
}
}

function woa_remove_sidebar_class_body( $wp_classes ) {

$wp_classes[] = 'page-template-template-fullwidth-php';
return $wp_classes;
}

This code would remove the sidebars on the product page, product categories, and the shop page. It would also add the page-template-template-fullwidth-phpclass that causes the layout to be in full width.

Now you know how to make WooCommerce pages full width in Storefront Theme! If you have further questions please let us know.

Filed Under: Code Snippets, How-To Articles Tagged With: code snippet, design tweaks, how-to, Storefront, website development, WooCommerce

How to Make a Sticky Header in Storefront Theme

February 5, 2016 By John 65 Comments

REVISED 03/04/2020 : Updated stickyheader.js path file

One popular trend in web design today is making the logo and the navigation bar to stick to the top. There are many names for this type of layout. Sticky, floating or persistent headers, and floating navigation are all the same thing.

Developers can “stick” their navigation at the top using simple CSS code. This helps visitors to click on other pages from the navigation menu while scrolling. Here’s how:

Preparation

Before anything else, you should install a child theme on your site. Additionally, you can install customization plugins such as My Custom Functions and Simple Custom CSS. We recommend using these plugins if you are not comfortable working with code as errors can break your site.

sticky-header-1
The test site looks like this at the start of this tutorial. In this case, the logo is centered. If you want to learn how to center the logo in Storefront theme, you can check out this post. The search bar and secondary menu was also removed.

Adding the CSS

To make this header layout stick to the top, just paste the CSS code below at the bottom of your style.css file.

#masthead {
		position: fixed;
		top: 0;
		width: 100%;
}

One obvious design pitfall here is that the large default header of Storefront is too big. It gets in the way of the page contents and is too distracting. To solve that, we need to make our header layout smaller first.

We aim to end up with this layout.

sticky-header-2

To achieve this, we need to do some CSS positioning. The positioning values of the elements depend on the size of your elements. If you have a different sized logo, play around with the height value in the CSS code to move it around. Here is a good article to get familiar with CSS positioning techniques. The code below will position and resize the header elements. It also applies the “position: fixed; top:0;” to the masthead. Paste this to your style.css file.

@media screen and (min-width: 768px) {
  	/*resizing the logo image */
	#masthead .custom-logo-link img {
		width: auto;
		height: 40px;
	}
  
	/*positioning the main-navigation */
	#masthead .main-navigation {
		text-align: right;
		position: fixed;
		top: 0;
		right: 300px;
		padding: 0;
		width: auto;
	}
  	
	
	/*positioning the logo*/
	#masthead .custom-logo-link {
		position: fixed;
		top: 0;
		margin: 0;
		padding: 0;
	}
    /*adjusting default margins and paddings*/
    #masthead .site-header-cart .cart-contents{
        padding:1em 0;
    }
    #masthead .main-navigation ul.menu>li>a, .main-navigation ul.nav-menu>li>a {
        padding: 1em 1em;
    }
    #masthead .site-branding{
        margin-bottom: 1em;
    }
	
	/*positioning the cart-menu */
	#masthead .site-header-cart {
		width: 14% !important;
		position: fixed !important;
		top: 0;
		right: 12%;
		padding: 0;
	}
	
	/*applying the position fixed on the masterhead */
	#masthead{
		position: fixed;
		top: 0;
		width: 100%;
	}
    /*removing the site search*/
    #masthead .site-search{
        display:none;
    }

Note that as the page scrolls down, the header stays on top. We have achieved the basic sticky header layout that is not intrusive to the content. It is concise and doesn’t get in the way of the rest of the page.

If you are happy with this, it’s okay to stop here. If you want to take it up to another level, a very common variation of the sticky header is the shrinking header. The shrinking header allows a default full header view when you are at the top of the page. When you start scrolling, the header automatically resizes itself to get out of the way. If you want more coding challenge, read on.

The Shrinking Header

First is to create a js file in your theme’s /assets/js/ folder.

Copy and paste the code below and save it as “stickyheader.js” to the js folder of your theme.

(function($){
	$(document).ready(function () {
		$(window).scroll(function() {
			  if ($(this).scrollTop() > 100){  
				jQuery('#masthead').addClass('sticky');
			  }
			  else{
				jQuery('#masthead').removeClass("sticky");
			  }
        		});
	});	
})(jQuery);

The code basically says it will add the “sticky” class to the header when you’ve scrolled 100px from the top. Else, it will remove it.

Adding the jQuery file to WordPress

Next step is to tell WordPress to include the JS file you just created. Copy and paste the code below to the My Custom Function plugin.

$path = get_stylesheet_directory_uri() .'/assets/js/';
if (!is_admin()) wp_enqueue_script('stickyheader', $path.'stickyheader.js', array('jquery'));

jquery My Customs Function plugin

After this, your JS file will load together with the other js files within your theme. Every time you scroll down, your script will now add the class “sticky” to your header. At this stage, you will not see anything happen yet. This is because we haven’t styled our sticky class yet.

The CSS Code

To style the sticky class, copy this code to your style.css file. Same as before, this is just CSS positioning and resizing. The only difference this time is we attached the “sticky” class on the selectors.

@media screen and (min-width: 768px) {
  	/*resizing the logo image */
	#masthead.sticky .custom-logo-link img {
		width: auto;
		height: 40px;
	}
  
	/*positioning the main-navigation */
	#masthead.sticky .main-navigation {
		text-align: right;
		position: fixed;
		top: 0;
		right: 300px;
		padding: 0;
		width: auto;
	}
  	
	
	/*positioning the logo*/
	#masthead.sticky .custom-logo-link {
		position: fixed;
		top: 0;
		margin: 0;
		padding: 0;
	}
    /*adjusting default margins and paddings*/
    #masthead.sticky .site-header-cart .cart-contents{
        padding:1em 0;
    }
    #masthead.sticky .main-navigation ul.menu>li>a, .main-navigation ul.nav-menu>li>a {
        padding: 1em 1em;
    }
    #masthead.sticky .site-branding{
        margin-bottom: 1em;
    }
	
	/*positioning the cart-menu */
	#masthead.sticky .site-header-cart {
		width: 14% !important;
		position: fixed !important;
		top: 0;
		right: 12%;
		padding: 0;
	}
	
	/*applying the position fixed on the masterhead */
	#masthead.sticky{
		position: fixed;
		top: 0;
		width: 100%;
	}
    /*removing the site search*/
    #masthead.sticky .site-search{
        display:none;
    }
	
} 

The jQuery script above inserts the sticky class to the master head. We just need to implement the CSS positioning as we did before using the sticky class selector.

For example, our selectors will now be “#masthead.sticky”. We just insert “.sticky” to our selectors so it will only be implemented when we scroll down.

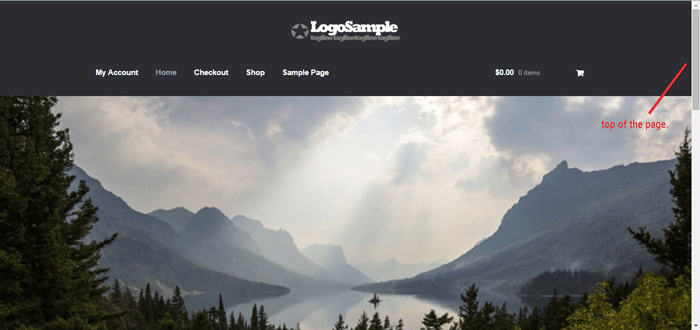
When everything is done, we will be able to see the full header on top of our page.

sticky-header-3

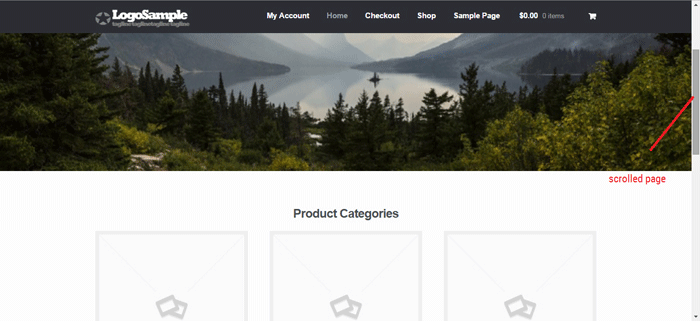
When scrolling down, the compact header replaces the full sticky header.

sticky-header-4

We hope you found this tutorial helpful. If you have any questions or if this didn’t work for you, drop a comment in the comments section and we’ll see what we can do.

Filed Under: Code Snippets, How-To Articles Tagged With: code snippet, design tweaks, navigation, responsive design, Storefront

How to Add a Hero Image in Storefront

July 1, 2016 By John 36 Comments

laptop_Hero-Image

The idea of using hero images came about because of issues caused by homepage sliders. Using a homepage slider is discouraged as it will slow down your WooCommerce store and it doesn’t have good conversion rates. If your WooCommerce store running on Storefront has sliders and you are looking for a good alternative, you should consider using a hero image instead.

What is a Hero Image?

To better explain what a hero image is, let’s define what is the “fold” and “above the fold content”. Originally, the fold is a term used in the newspaper industry. Since newspapers are normally folded in half, the upper half of the front page will be the part of the newspaper that is exposed. This is where the most important content is featured, hence the term “above the fold content”. In web design, this is the area of the page that can be seen without scrolling down.

A hero image takes up most of the space above the fold. The trend is to make it large, attractive and relative to the content of the entire site.

It is important that you provide a complete overview of what your company/site is about with just a glance of your hero image. 90% of the time, the hero image has a large text in the center that is related to the branding of the site.

Preparing Your Images

Before you add your image, make sure you have it optimized for web use. You’d want to have the best image quality for the hero image, but you have to take into account the image size as well. As of 2016, the most common screen resolution is 1920x1080px. You should try not to go over this mark. Any excess is just a waste of page size and will just slow down your page load time.

Once you get the right resolution, try to further reduce the image size by down-scaling the image quality. You can actually reduce the image quality without having noticeable pixelation in the image. This is because the human eye can only see limited minute differences in the color changes. Try to strike a balance between having a small image size and having a good looking image. Check out this other post on how to optimize images. Once you are done preparing your image, just upload it to your WordPress site.

Adding a Hero Image in Storefront

To add a full-width hero image in Storefront, we need to use Storefront’s extensive hooks. We’ll just need to insert a few lines of code.

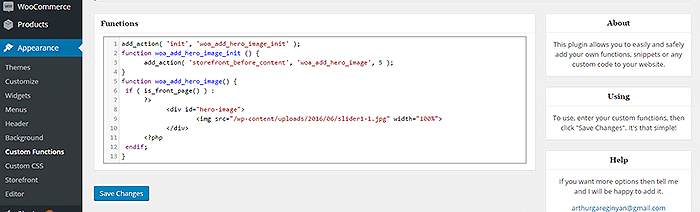
How-to-add-a-hero-image-in-Storefront-Appearance-Functions

If you are comfortable working with code, you can paste the code below in the functions.php of your child theme. If you are a novice user, we recommend using My Custom Functions plugin to insert the code. Note that one error can cause your entire site to crash.

how to add a hero image in storefront

Copy and paste the code below. Just replace the “/wp-content/uploads/imageurl.jpg” with the URL of the image you uploaded earlier. Width set to 100% makes your image responsive to different screen sizes.

add_action( 'init', 'woa_add_hero_image_init' );
function woa_add_hero_image_init () {
   add_action( 'storefront_before_content', 'woa_add_hero_image', 5 );
}
function woa_add_hero_image() {
   if ( is_front_page() ) :
      ?>
         <div id="hero-image">
             <img src="/wp-content/uploads/imageurl.jpg" width="100%">
         </div>
      <?php
   endif;
}

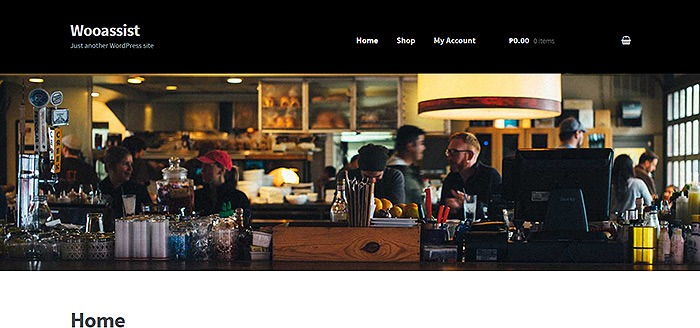
Your hero image should now appear on your homepage below the main navigation.

If you want to add a link to the shop page or any other url on your image, copy and paste the code below. Just replace the “http://change_me_to_your_url” with the URL you want to link to.

add_action( 'init', 'woa_add_hero_image_init' );
function woa_add_hero_image_init () {
   add_action( 'storefront_before_content', 'woa_add_hero_image', 5 );
}
function woa_add_hero_image() {
   if ( is_front_page() ) :
      ?>
         <div id="hero-image">
             <a href="http://change_me_to_your_url"><img src="/wp-content/uploads/imageurl.jpg" width="100%"></a>
         </div>
      <?php
   endif;
}

Final Notes

Hero images are more effective than sliders in terms of aesthetics. You don’t have to keep using sliders if it’s slowing down your site. Explore more options. Keep your site simple and fast.

If you are still using sliders, you are most likely hurting your site speed. And a slow WooCommerce store will convert less. Your Google rankings could also suffer as a result. It’s time to do away with the slider. Go with a hero image instead.

Was this tutorial helpful? If you have any questions or anything you’d like to add, please let us know in the comments.

Filed Under: Code Snippets, How-To Articles Tagged With: admin, best practices, code snippet, conversion optimization, design tweaks, how-to, image optimization, plugins, site speed optimization, Storefront

11 Things You Can Do to Increase the Security of Your WooCommerce Store

March 11, 2018 By John Leave a Comment

Increase the security of your WooCommerce store

Keeping your WooCommerce store secure is important. Hackers discover new exploits every day. In fact, more than thirty thousand websites get hacked on a daily basis. Don’t be a part of that statistic. Increase the security of your WooCommerce store before it’s too late.

At Wooassist, we’ve had our fair share of clients that have had their websites hacked. Cleaning up after a hack is a lot of trouble. You have to get rid of the exploit and weed out any remaining backdoors that would allow the hacker to regain access to the hacked site. Worse, a hacking incident can lead to a website being penalized by search engines for containing malware. In this post, we’ll share some tips that you can do right now to increase the security of your WooCommerce store. Following these tips will reduce the odds of your site getting hacked.

1. Check Your Login Information.

Often, hacks happen because of the user’s fault. Almost 90% of cyber-attacks are caused by human error or behavior.

The first step to increase your website’s security is to make sure that your login information is secure. First, don’t use “admin” as your username. Why? Because brute force attacks usually target this username. And if you use admin as your username and have a weak password, it is almost guaranteed that your site will fall victim to a brute force attack. But what if you are already using admin as your username? You’ll just need to create a new administrator account using a unique username and a strong password. WordPress will already recommend a strong password that you can use. After creating a new account, log in to the new account and you can then proceed to delete the “admin” account.

2. Keep your WordPress/WooCommerce Site Updated

Keep your WordPress/WooCommerce Site UpdatedKeeping your WooCommerce store updated will protect your site from the latest known vulnerabilities. Developers regularly patch exploits that are found in their systems so it is imperative that you update on a regular basis.



Before updating however, it is important to test your updates first on a development site or at least create a backup. Often, updates can break your site and this can harm your conversion rates if you don’t have a backup that you can revert to. Websites breaking due to site updates are common. Some hosting providers such as WPEngine provide their customers an easy-to-set-up staging environment. Here you can test your updates before applying them to your live site.

3. Use Two-Factor Authentication.

Using 2-factor authentication greatly increases the security of your website. Even when a brute force attack manages to get into your site, you can block the hack with two-factor authentication. Unless the hackers get a hold of your phone, you’re safe.

4. Install a Security Plugin

A WordPress/WooCommerce site without a security plugin is like a computer without anti-virus software. Wordfence and Sucuri Security are some good options. Just install the plugins and then activate. After activating, just go to the plugin’s settings and configure depending on your needs.

Prevent Brute Force Attacks

5. Limit Login Attempts.

Limiting login attempts will deter brute force attacks. A brute force attack will attempt to guess your username and password sending hundreds if not thousands of requests every minute. Limiting login attempts pretty much renders brute force attacks powerless unless you have a weak password. There are a couple plugins that can help you limit login attempts such as Login Lockdown.

6. Protect your wp-config File

The wp-config file is a crucial part of the WordPress ecosystem. It contains important configuration information of your WordPress site which is why many hackers try to target this file. There is however a workaround to block intruders from getting access to this file. Simply place this code in your .htaccess file.

7. Hide Login Error Messages

Whenever you enter the wrong login credentials on WordPress, it returns an error message saying your username is wrong, your password is wrong, or your password does not match the username. You may think little of this, but for hackers, this bit of information is priceless. You can prevent hackers from getting clues on your WordPress logins. You can hide these error messages by adding the script below to your functions.php file. Do note however that making a mistake when tinkering with your functions.php file can cause your entire site to go down. Unless, you’re a web developer or know your way around the file, it is recommended to have a developer do this for you.

function wrong_login(){

Return ‘Wrong username or password.’;

}

Add_filter(‘login_errors’, ‘wrong_login’);

Hide WordPress Version

8. Hide WordPress Version

For hackers, discovering that your WordPress version is outdated is like finding a gold mine. So it is imperative that you always update to the latest version of WordPress. Many hosting providers will automatically update your WordPress version. However, this is not always ideal since automatic updates can mess up your site. If you’d like to do your WordPress updates at your own pace, then you should hide your WordPress version. To hide your WordPress version, paste the following code on your functions.php file.

function remove_version(){

Return”;

}

Add_filter(‘the_generator’, ‘remove_version’);

9. Do a Plugin Audit

A plugin audit is a process of reviewing the plugins installed on your site. You’ll want to look out for plugins that are no longer being updated by the developer. Outdated plugins usually become backdoors for hackers. When analyzing your plugins, you can categorize them in a number of ways.

  • Plugins that you want to keep.
  • Plugins that you don’t use or your customer’s don’t use. If you have a plugin that adds a certain functionality to your site but your customers are not using it, you might as well get rid of it. This just adds extra bloat to your site.
  • Plugins that are no longer being updated by the plugin author. This is a major security threat and you should get rid of these immediately. If you still need the functionality that the plugin provides, just find an alternative plugin. Just make sure that the new plugin is being constantly updated.

You can do a plugin audit every few months to keep your site spiffy clean.

10. Install Only Reliable Plugins

You’ve done your plugin audit. Great! Now, don’t go down the same road. Don’t just install any plugin that you find. Look at the plugin rating. Check reviews. Check when the plugin was last updated. If the plugin fails any of those three elements, consider finding something else.

11. Prevent Directory Access

If you do not block directory access on your WordPress site, users may be able to freely view the files on your site. These files may contain sensitive information that hackers can use to exploit vulnerabilities on your site. Disabling directory access can be done with a minor tweak. Just place the following code in your .htaccess file:

# Prevent folder browsing

Options All –Indexes

If you’ve done all these things, your WooCommerce store will be protected from most known threats. Should you need help getting any of these done, you can contact the Wooassist team and we’ll be able to help you out.

Do you know of any other things that you can do to help keep your WooCommerce store more secure? Let us know in the comments.

Filed Under: Code Snippets, How-To Articles Tagged With: admin, brute force, hacker, optimizations, plugin audit, plugins, security, WooCommerce, WordPress, WordPress updates

How to Change Fonts in Storefront Theme

April 13, 2016 By John 8 Comments

UPDATED 19/06/2017: Revised steps in adding Google Fonts

how to change fonts in storefront themeBy default, Storefront theme uses the Helvetica Neue font. This default font is simple and simple is good. However simple may not always fit the design that you are aiming for. You may want to use a different font. But how do you go about changing the theme’s font? In this post, we’ll teach you how to change fonts in Storefront theme using Google Fonts.


What Type of Fonts Should I Use?

There are fonts that are expressive and stylish. There are some that just work in a lot of situations. Even though you would want to express yourself with a certain type of font, you would also want to use the font type suitable for your needs. The key is to find the right balance.

Four Basic Types of Fonts

font-types

Serif

Serif fonts are characterized by small lines attached to the end of a stroke. These small lines are called serifs. In general, they are thought to be traditional font types. Serif fonts are easier to read in print so they are preferred for use in print.

Sans-serif

Sans-serif literally means ‘without serifs’. These fonts are modern and minimalistic. Sans-serif fonts are recommended for web publishing.

Scripts

Also called cursive font types, Scripts mimic the cursive handwriting. They generally have connecting letters. This type is often portrayed to be feminine and elegant.

Decorative

Halloween fonts, Christmas fonts or the iconic Star Wars font, there are a lot of fonts out there that fall under the decorative type. They are novelty, used for specific purposes. As the name suggests, decorative fonts should only be used as for decoration and never for the main copy.

Serif vs Sans Serif?

It’s best to choose fonts wherein readers won’t notice the font but the message. Decorative and scripts type fonts can be a distraction when reading content. Hence, serif and sans-serif fonts are typically used in the body or in the copy.

yes-no-wood-postLet’s break down the difference between Serif’s and Sans-serif type fonts.
The purpose of the serif is to guide the horizontal “flow” of the words. These little decorations increase the contrast of the spacing. The serif helps the eyes and the brain in distinguishing each chunk of words as one making it easier to read.

This is not the case for texts made for the web though. Because of the limited dot per inch (DPI) in our monitors, the thick and thin lines of the serif types may not be as recognizable in small texts. This is why a simplified font is needed. Minimalist, modern and simplistic sans-serif is suitable for this purpose.

Serif fonts are good for reading that’s why it is mainly used in books, newspapers magazines and other print media. On the other hand, online publishing favors the use of sans-serif fonts because of the DPI limitations.

In some cases Serif works just fine even for online publishing. A good example for of a website using Serif fonts is the The Guardian. We can say the serif font type fits the news site’s identity as an online newspaper. The key to maintaining readability when using a serif font for online publishing is the proper use of font sizes and line spacing. This removes DPI problem.

information-boardSo what font should you use for your WooCommerce store? The correct answer would be a sans serif font and this is true in most cases. However, you should not let this limit your design choices. If you think a serif font will work towards your purpose, then use it by all means.
What is Google Fonts?

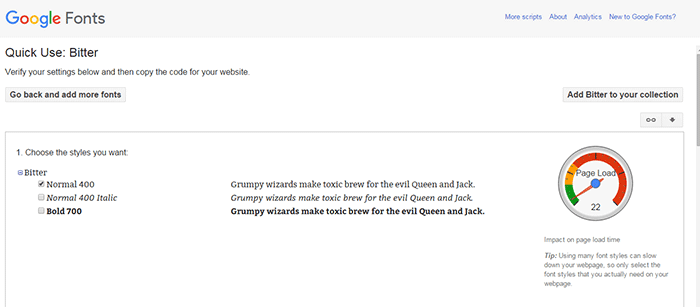
Google Fonts is a free service by Google that makes it easier for websites to use custom fonts. If you want to use a particular font from the Google Fonts directory, you only need to copy a piece of code and Google will host the font for your website. If you want to change your font easily, Google Fonts is one of the best solutions out there.

Google-Fonts

Google Fonts Pros and Cons

The Pros

  • Google Fonts are released as open source and can be used for any commercial or non-commercial project for free.
  • It is easy to install and set up.
  • Analytics show most popular fonts by usage across the web

The Cons

  • The font is hosted outside your site. Meaning, it could add a slight page loading time. Actually, Google displays a gauge for each font’s impact on page load time.
  • Open source fonts can have some quality issues. Except for the popular ones, most of the fonts in the directory are made by the community. Some may have been poorly executed. Issues like bad scalability, fonts not showing on iOS, and missing glyphs may arise depending on the font.

How to Find the Right Google Font for You

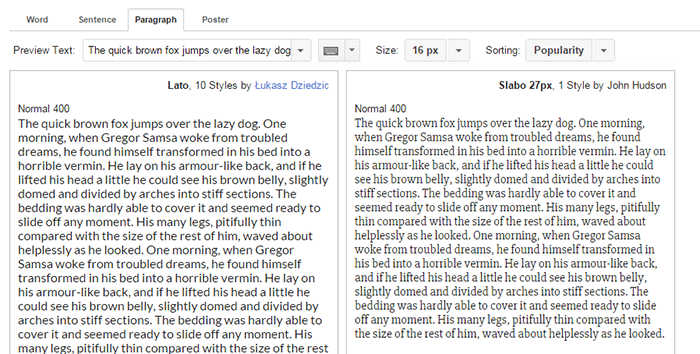
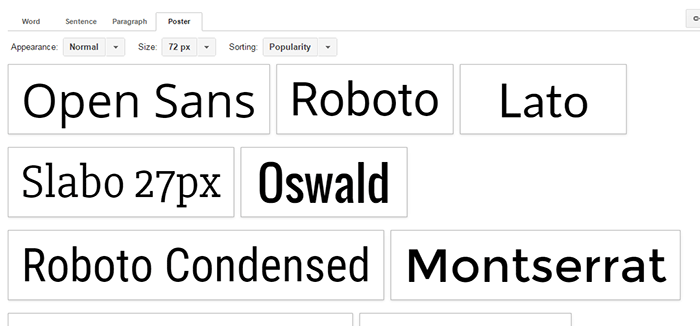
To help you choose the right font for your WooCommerce site, just go to Google Fonts then use the extensive font preview. You can preview the fonts as a word, sentence, paragraph or as a poster. This will help you decide what font to use.

Check a font type’s readability using the Paragraph preview. Here is Lato (a Sans-serif type) with Slabo (a Serif type) previewed in a paragraph.

Google-Fonts_Paragraph-preview

For headings and other large texts, use the Poster preview.

Google-Fonts_Poster-preview

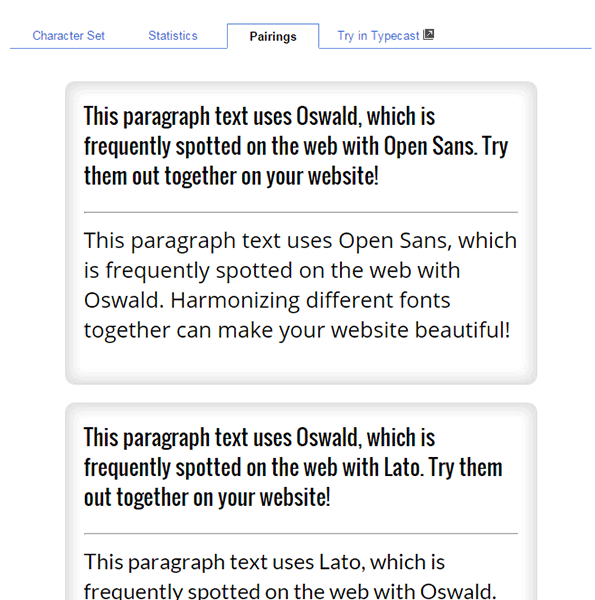
If you are looking for font pairs that look good together, click the ‘pop-out’ button, then the Pairings tab. Google offers a lot of suggestions there and you can preview it in multiple layouts.

Google-Fonts_Pairings-tab

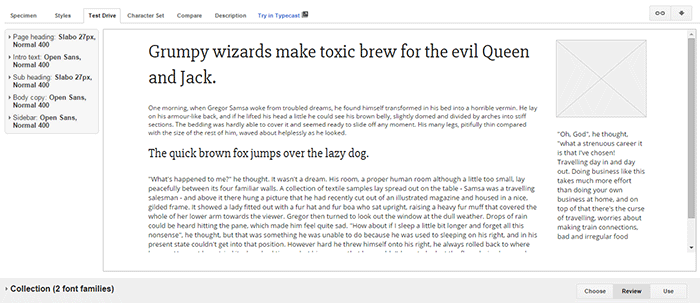
When you have decided what fonts you want to use, add them to your collection and click ‘Review’. Go to the ‘Test Drive’ tab and see your selected fonts in action.

Google-Fonts_Test-Drive-tab

How to Add Google Fonts in Storefront

Implementing Google Fonts on your website is as simple as copy and paste. Here is a step-by-step instruction.

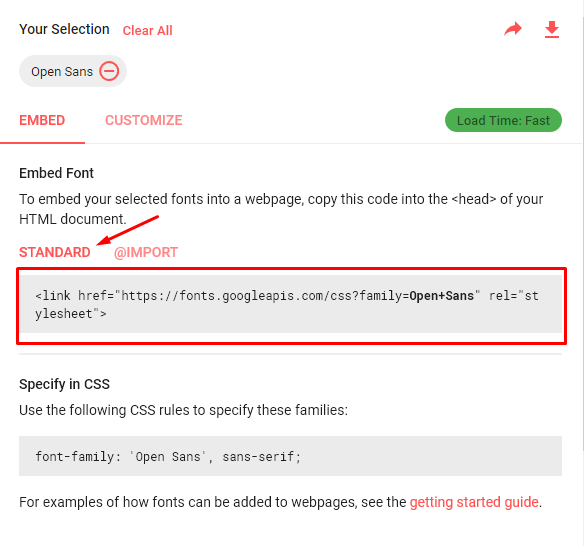
  1. Choose a font that you want to embed. Select the standard code and copy.Google Fonts - Standard Code
  2. Add a hook function to your child theme’s functions.php. Note that using a child theme is important here. If you don’t use a child theme, the changes you make will be lost when you update Storefront. Alternatively you can use the My Custom Functions plugin and paste the code snippet there.
    add_action( 'storefront_header', 'jk_storefront_header_content', 40 );
    	function jk_storefront_header_content() { ?>
    		// Replace this line with the copied google font code here
    		<?php
    	}
    

    *Note the part where you need to insert the code you got in Step 1.

After this, your WooCommerce site is now capable of using the fonts you’ve selected.

How to Apply the Fonts on the Contents

You still need to add the font to your CSS for the fonts to be live on your site. The code below will replace the default font in Storefront to ‘Open Sans’. You just need to replace the font name with the font that you added in the previous section and then paste the code to your child theme’s styles.css. You can also use Simple Custom CSS plugin to add the CSS to your site and not have to worry about it disappearing when you update your theme.

h1, h2, h3, h4, h5, h6, body, button, input, textarea {
	font-family: 'Open Sans', sans-serif;	
}

If you want to use a different set of fonts for your headers, use the code below instead. In this case, the headings will have the Slabo font and the rest will have the Open Sans font. Just replace the font name with the fonts that you added.

body, button, input, textarea {
	font-family: 'Open Sans', sans-serif;	
}
h1, h2, h3, h4, h5, h6 {
	font-family: 'Slabo 27px', serif;
}

Note that the above codes may not work if you are using a child theme that uses a more specific selector. It will give more priority to Storefront’s default selectors. You will need to update the selectors with the selectors used in your child theme. Check out this neat guide for a firm understanding on how CSS specificity works. You may need to apply a few more custom CSS codes to get the right look and feel for your site.

And that’s how you change Storefront theme’s font. Hope this article helped you out. If you have any questions or if this didn’t work for you, let us know in the comments. We’ll do our best to help.

Filed Under: Code Snippets, How-To Articles Tagged With: best practices, code snippet, design tweaks, how-to, Storefront, website development, WooCommerce

  • « Previous Page
  • 1
  • 2
  • 3
  • 4
  • Next Page »
Let us support your online store so you can manage your business

Get started today

Get 2 Hours of FREE SUPPORT

We are so confident that you will love our services that we will give you your first 4 hours at a 50% discount

That’s 4 hours for only $75

BUY NOW

Free eBook

5 Things Every Online Store Can Fix On Their Website In The Next Week To Increase Sales

Quick Links

  • How it Works
  • Pricing
  • Blog
  • Contact
  • About Wooassist
  • My Account
  • Checkout
  • Privacy Policy
  • Cookie Policy
  • Terms and Conditions

Wooassist

Australia:
59 Luke St.
Hemmant QLD 4174

Philippines:
San Miguel St.
Poblacion, Iligan City 9200

Connect


Copyright © 2026 · Wooassist

Yours FREE!

5 Things Every Online Store Can Fix On Their Website In The Next Week To Increase Sales