REVISED 03/04/2020 : Updated stickyheader.js path file
One popular trend in web design today is making the logo and the navigation bar to stick to the top. There are many names for this type of layout. Sticky, floating or persistent headers, and floating navigation are all the same thing.
Developers can “stick” their navigation at the top using simple CSS code. This helps visitors to click on other pages from the navigation menu while scrolling. Here’s how:
Preparation
Before anything else, you should install a child theme on your site. Additionally, you can install customization plugins such as My Custom Functions and Simple Custom CSS. We recommend using these plugins if you are not comfortable working with code as errors can break your site.

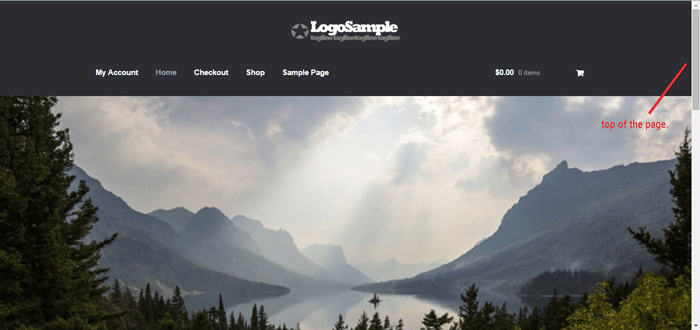
The test site looks like this at the start of this tutorial. In this case, the logo is centered. If you want to learn how to center the logo in Storefront theme, you can check out this post. The search bar and secondary menu was also removed.
Adding the CSS
To make this header layout stick to the top, just paste the CSS code below at the bottom of your style.css file.
#masthead {
		position: fixed;
		top: 0;
		width: 100%;
}
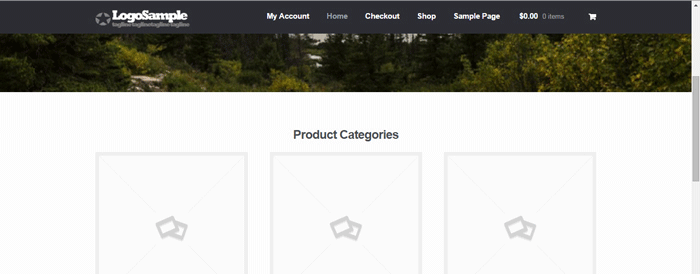
One obvious design pitfall here is that the large default header of Storefront is too big. It gets in the way of the page contents and is too distracting. To solve that, we need to make our header layout smaller first.
We aim to end up with this layout.
To achieve this, we need to do some CSS positioning. The positioning values of the elements depend on the size of your elements. If you have a different sized logo, play around with the height value in the CSS code to move it around. Here is a good article to get familiar with CSS positioning techniques. The code below will position and resize the header elements. It also applies the “position: fixed; top:0;” to the masthead. Paste this to your style.css file.
@media screen and (min-width: 768px) {
  	/*resizing the logo image */
	#masthead .custom-logo-link img {
		width: auto;
		height: 40px;
	}

	/*positioning the main-navigation */
	#masthead .main-navigation {
		text-align: right;
		position: fixed;
		top: 0;
		right: 300px;
		padding: 0;
		width: auto;
	}


	/*positioning the logo*/
	#masthead .custom-logo-link {
		position: fixed;
		top: 0;
		margin: 0;
		padding: 0;
	}
    /*adjusting default margins and paddings*/
    #masthead .site-header-cart .cart-contents{
        padding:1em 0;
    }
    #masthead .main-navigation ul.menu>li>a, .main-navigation ul.nav-menu>li>a {
        padding: 1em 1em;
    }
    #masthead .site-branding{
        margin-bottom: 1em;
    }

	/*positioning the cart-menu */
	#masthead .site-header-cart {
		width: 14% !important;
		position: fixed !important;
		top: 0;
		right: 12%;
		padding: 0;
	}

	/*applying the position fixed on the masterhead */
	#masthead{
		position: fixed;
		top: 0;
		width: 100%;
	}
    /*removing the site search*/
    #masthead .site-search{
        display:none;
    }
Note that as the page scrolls down, the header stays on top. We have achieved the basic sticky header layout that is not intrusive to the content. It is concise and doesn’t get in the way of the rest of the page.
If you are happy with this, it’s okay to stop here. If you want to take it up to another level, a very common variation of the sticky header is the shrinking header. The shrinking header allows a default full header view when you are at the top of the page. When you start scrolling, the header automatically resizes itself to get out of the way. If you want more coding challenge, read on.
The Shrinking Header
First is to create a js file in your theme’s /assets/js/ folder.
Copy and paste the code below and save it as “stickyheader.js” to the js folder of your theme.
(function($){
	$(document).ready(function () {
		$(window).scroll(function() {
			  if ($(this).scrollTop() > 100){
				jQuery('#masthead').addClass('sticky');
			  }
			  else{
				jQuery('#masthead').removeClass("sticky");
			  }
        		});
	});
})(jQuery);
The code basically says it will add the “sticky” class to the header when you’ve scrolled 100px from the top. Else, it will remove it.
Adding the jQuery file to WordPress
Next step is to tell WordPress to include the JS file you just created. Copy and paste the code below to the My Custom Function plugin.
$path = get_stylesheet_directory_uri() .'/assets/js/';
if (!is_admin()) wp_enqueue_script('stickyheader', $path.'stickyheader.js', array('jquery'));

After this, your JS file will load together with the other js files within your theme. Every time you scroll down, your script will now add the class “sticky” to your header. At this stage, you will not see anything happen yet. This is because we haven’t styled our sticky class yet.
The CSS Code
To style the sticky class, copy this code to your style.css file. Same as before, this is just CSS positioning and resizing. The only difference this time is we attached the “sticky” class on the selectors.
@media screen and (min-width: 768px) {
  	/*resizing the logo image */
	#masthead.sticky .custom-logo-link img {
		width: auto;
		height: 40px;
	}

	/*positioning the main-navigation */
	#masthead.sticky .main-navigation {
		text-align: right;
		position: fixed;
		top: 0;
		right: 300px;
		padding: 0;
		width: auto;
	}


	/*positioning the logo*/
	#masthead.sticky .custom-logo-link {
		position: fixed;
		top: 0;
		margin: 0;
		padding: 0;
	}
    /*adjusting default margins and paddings*/
    #masthead.sticky .site-header-cart .cart-contents{
        padding:1em 0;
    }
    #masthead.sticky .main-navigation ul.menu>li>a, .main-navigation ul.nav-menu>li>a {
        padding: 1em 1em;
    }
    #masthead.sticky .site-branding{
        margin-bottom: 1em;
    }

	/*positioning the cart-menu */
	#masthead.sticky .site-header-cart {
		width: 14% !important;
		position: fixed !important;
		top: 0;
		right: 12%;
		padding: 0;
	}

	/*applying the position fixed on the masterhead */
	#masthead.sticky{
		position: fixed;
		top: 0;
		width: 100%;
	}
    /*removing the site search*/
    #masthead.sticky .site-search{
        display:none;
    }

}
The jQuery script above inserts the sticky class to the master head. We just need to implement the CSS positioning as we did before using the sticky class selector.
For example, our selectors will now be “#masthead.sticky”. We just insert “.sticky” to our selectors so it will only be implemented when we scroll down.
When everything is done, we will be able to see the full header on top of our page.
When scrolling down, the compact header replaces the full sticky header.

We hope you found this tutorial helpful. If you have any questions or if this didn’t work for you, drop a comment in the comments section and we’ll see what we can do.


I used the first code to make header sticky on Storefront and it works thank!
But I am using one of yours plugin (https://br.wordpress.org/plugins/storefront-top-bar/) and this confi on the post header (https://docs.woothemes.com/document/add-a-informational-bar-to-the-storefront-header/).
Do you know if it is possible to make header sticky working with the 2 options above?
Thanks!
Hi Ricardo,
If you want to make the top bar sticky as well, we need to make adjustments to the code. If you are using the storefront-top-bar, you can use this CSS instead.
#masthead {

    position: fixed;

    top: 31px;

    width: 100%;

}
.woa-top-bar-wrap {
position: fixed;
top: 0;
width: 100%;
z-index: 9999;
}
I have a smaller version of my logo that I want to be used when the header shrinks, how would I use that image when using the smaller header?
I make a Sticky Header in Storefront, but after, all site-content jump to up.
You may have to add margin at the top of your body. If you can share with us a link to your site, we can help you with the exact CSS for it.
Hi,
I just used your first code to make the header sticky on my storefront theme. It works very well thank you.
Though, I have a couple of questions, now the body of my website starts at the top of my website, and my header is just over the top part of my website. Do you have any mean to get the body of my website to start at the bottom of my header?
Also, I would like to use your 2nd code, but I have no idea how to create a js file in your theme’s /js/ folder. Would you mind explaining how to do this?
Best,
You may have to add proper margins to the body depending on the height of the header. If you can share with us a link of your site we can help you with the exact CSS for that.
As for the JS code, I would strongly suggest not to mess with it if you are not confident about it. It would be best to let a developer handle this to avoid breaking your site.
hi…
I used your code and it was workin pretty well until I found that after 100 pixel I hardluy could scroll down.
Do you know how to solvethis?
thanks in advance
Hi! We’re not sure we understand the issue. Can you share a link of the site so that we can see what’s wrong?
Hi,
Thank you very much for the tip, it works so good !
However I think I made a mistake in my code. Indeed, when I reach the scrollbar value which applies the sticky menu, the current page scrolls down and “forgot” some contents. I think it is because the sticky menu’s height is too big… Any suggestion??
Thank you !
Regards,
Thibault (from France :D)
You can add to the margins to the top of the main content area. This happens because the header is floating above the main content area.
Hello,
I’ve done all of the steps mentioned in the guide.
Yet my menu isn’t quite sticky. ^^
I’ve added the custom CSS + .js file in the folder.
The only thing I didn’t add somewhere is the line above, since I don’t know where to add it, this might be the problem I guess?
Thanks in advance!
Hi! We have updated the snippets for WordPress 4.7.2 and Storefront 2.1.7. The snippets should work now.
I’m attempting this on my site, I got this error: Notice: wp_enqueue_script was called incorrectly. Scripts and styles should not be registered or enqueued until the wp_enqueue_scripts, admin_enqueue_scripts, or login_enqueue_scripts hooks. Please see Debugging in WordPress for more information. (This message was added in version 3.3.0.) in /Applications/wordpress-4.7-0/apps/wordpress/htdocs/wp-includes/functions.php on line 4136
Been going over everything to see what I’m missing.
Hi! We have updated the snippets for WordPress 4.7.2 and Storefront 2.1.7. Also, make sure you use the customization plugins instead of the functions.php and style.css this time.
Hi,
I have used this tutorial as well as the center the logo tutorial. the logo is centered after 100 px as well (when header shrinks.) and the menu wraps over the cart menu. I would like it to be on the left as it is in your tutorial.
I figured it out, I added
#masthead.sticky .site-branding {
text-align: center;
margin: 0 auto !important;
float: left !important;
}
to the css code and this corrected the issue.
Just in case someone else has this problem!
Hi Raine, thank you for the update. Glad to hear you were able to find a solution.
I used the js sticky code which is for shrinking header, but it doesn’t seem to be working. Could you help me with this.
Is there any alternative plugin to my custom functions? It crashed my website yesterday so I had to remove it. I did everything exactly like the instructions above!
I am using the Storefront childtheme “Galleria”
Great guide, Iam still beginner and it worked great for me , only would like to make this sticky header also transparent little bit, do you know how to make it transparent?
does this work with child themes? I have a child theme of storefront and I can get the header to stick but the javascript to shrink as you scroll header doesn’t seem to work.
Hi there,
Thanks for this article but… I got an issue ^^
When I scroll down to 99px:
https://dl.dropboxusercontent.com/u/26402567/Capture%20d%E2%80%99%C3%A9cran%202017-08-05%20%C3%A0%2017.11.21.png
The pixel after:
https://dl.dropboxusercontent.com/u/26402567/Capture%20d%E2%80%99%C3%A9cran%202017-08-05%20%C3%A0%2017.11.46.png
As you can see, I automatically scroll down approx. 200px.
Do you know how to solve this?
Thanks for your help
Hi Julien,
The links you have posted are broken. Could you please post the correct link to the screenshots?
Thanks for your reply.
The website is: https://www.royalloirevalley.fr
The sticky header starts too earlier.
Hello, I followed your tutorial and it worked after some configuration and adjusting. However one thing doesn’t work.
My main Nav menu is always right aligned, also in the non sticky state. I would like to have it left aligned in the normal view and right aligned in the sticky view.
I am using the max mega menu plugin.
thank you
Hi Marco,
Can you post a link of your site so we can see the format of your header?
Hi i have installed the storefront blank child theme, and all the plugins but doesnt work for me. the header size its correct but when i put the script code doesnt do anything, inclusive dont resize the header to normal size. thanks
Hi Manuel,
Did you add the script on the child style.css? Can you post a link to your site so we can take a look?
Hi Nicholas,
I don’t seem to have a Js folder in my child theme to place the stickyheader.js file?
Any clues?
thanks
Hi NJC,
You can just create the js folder and create the stickyheader.js inside of it.
Hi,
I’ve managed to get all of this done, works perfectly now I’ve made a couple of ever so slight adjustments to suit my website.
I was wondering if you might be able to post some code to make the transition between full header and shrunken header flow better? rather than just one pixel its full header and the next is shrunken, is there a way of doing that?
Thanks
Tom
hi please i need you help my website its that http://www.cygoodsupplements.com i use child theme from storefront and anything i add it appear like error to my custom fuction plugin.
Hi Chris,
We’ll need more information.
What kind of error do you see when you add the function?
Hi,
Thank you for your guide and code to implement a sticky menu for the Storefront theme. I have been able to get it all working, and can adjust the layout to how I need.
The one thing that I would like to be able to adjust is the transition between the normal header (#masthead) and the sticky header (#masthead.sticky). The transition between them is quick harsh, it is like the page jumps up beyond the scrolled amount.
If I understand correctly, you move the top header (original storefront #masthead) up beyond the top of page, and the remaining sections of the page jump up to fill the space.
Is there a way to adjust the way this is done? Or a way to make the transition smoother?
Would adjusting the value in the stickyheader.js file from 100 to something else help? Or is there a better way to do it?
I am unable to provide the web site url due to it being “Under Construction” and isn’t visible to the general public yet.
Any assistance you can provide would be greatly appreciated.
Thanks in advance,
Daniel.
I have a little problem.
Everything works fine, but while using a logo-image, the sticky header is transparent.
I can’t find the necessary css.
Works fine, but I wan’t to keep “old” header at place, because when I scroll down, it’s not looking good(the scroll down). Something like when you’re browsing product and then go down, the sticky add to cart appears. Thanks.
Hi there,
I cant seem to get the shrinking header to work, I have been fiddling around for about 4 hrs now trying to get it to work and here I am writing to you. Please help, here is what I did
1) installed storefront theme
2) installed child theme : Boutique
3) installed the My Custom Functions plugin
4) Created the stickyheader.js and put it in /wp-content/themes/storefront/assets/js/
5) Added the Jquery file into the My Custom Functions plugin
6) Added the CSS code for shrinking header to my wp-content/themes/storefront/styles.css
7) I have also installed one of your plugin storefront top bar
WordPress 4.9.8
storefront 2.3.4
Boutique child theme 2.0.15
Storefront top bar 1.1.1
My Custom Functions 4.29
I hope you can help
hello and thank you for this nice code!
It works great on my site.
One thing I am trying to achieve is to change the logo image via css after the header turns to sticky, but it seems impossible.
ANy suggestions?
Thank you in advance!
Also, I am trying to locate the logo in the header.php but I can’t. Do you have any idea, where the logo code is located?
thank you!
Someting wrong with include script in function.php WordPress and Woo 3.8 display some error in debug mode. wp_enqueue_script wrong?
For a current WordPress (I am suing 5.4) und WooCommerce installation with Storefront, you need to adapt the path in stickyheader.js:
it must now look like this:
$path = get_stylesheet_directory_uri() .’/assets/js/’;
Otherwise you get Error 404 for the stickyheader.js
Hi,
Tried this and it works well, my logo just isn’t clickable anymore. Any solution to that?
Hello i make sticky header to my storefront site
the problem when the sticky class active and my content area (#page) pulled to the top very fast. what i want it can move smooth like my header slideInDown smoth for .7s
please take a look on my and give suggestion to fix that
Really really good tutorial and I’m happy with the results. Out of interest, would you happen to know any JS that could be added to animate between the two states? Perhaps asking a bit much, but either way, thanks for the help!
Kind regards,
Chris
Thanks a lot for your help, I was looking for this solution for ages, and this was the only solution that worked!