Wooassist

Assistance for Your Woocommerce Store

  • How it Works
  • Pricing
  • Services
    • Site Maintenance
    • AI SEO and Content Marketing
  • Blog
    • How-To Articles
    • Code Snippets
    • SEO For E-Commerce
    • Theme and Plugin Reviews
    • Wooassist News
    • WordPress/WooCommerce News
    • Interviews
  • About Us
  • Contact
You are here: Home / Archives for John

Vulnerabilities Patched in Page Builder by SiteOrigin – Affects Over 1 Million Sites

May 12, 2020 By John Leave a Comment

 On May 4, 2020, two vulnerabilities were discovered on the Page Builder by SiteOrigin plugin, a WordPress plugin actively installed on over 1,000,000 sites.

If an attacker can trick a site administrator to perform a planned action such as clicking a malicious link, this can potentially allow attackers to forge requests on behalf of that site administrator and execute malicious code in the admin’s browser. This is a critical security issue that could lead to full site takeover.

The plugin developer has since released an update with the patch for these vulnerabilities.

If you are using the Page Builder by SiteOrigin plugin, we recommend an immediate update to the latest version available. At the time of writing, that is version 2.10.16.

For more information please check the official public release.


If you have questions, don’t hesitate to contact our support team.

Filed Under: WordPress/WooCommerce News

WooCommerce 4.1 + Storefront 2.5.6

May 8, 2020 By John Leave a Comment

WooCommerce 4.1 release

WooCommerce 4.1 is now available. It has been in development since March 2020 and has around 400 commits from 28 contributors. This release focuses on various performance improvements and stability fixes.

For more information please check the official public release.

Storefront 2.5.6 release

Storefront 2.5.5 is now available on WordPress.org. This is a minor release that contains several maintenance and compatibility fixes for existing issues.

For more information please check the official public release.


These are minor releases so there’s no need for an immediate update. But if you have existing issues with WooCommerce and/or Storefront, these releases might fix your issue. When you update, make sure to do thorough testing after.


If you have questions, don’t hesitate to contact our support team

Filed Under: WordPress/WooCommerce News

Elementor Pro and Ultimate Addons for Elementor – Ongoing Attack Puts 1 Million Sites at Risk

May 8, 2020 By John Leave a Comment

An ongoing attack is currently being carried out exploiting vulnerable users of the plugins: Elementor Pro and Ultimate Addons for Elementor.

It is estimated that Elementor Pro is installed on over 1 million sites and that Ultimate Addons has an install base of roughly 110,000.

If you are using any of these plugins on your website, upgrade to the latest versions immediately. On May 7, 2020, the Elementor team has released Elementor Pro 2.9.4 that has been verified to patch the vulnerability.

The vulnerability in Elementor Pro is determined to be a zero day vulnerability which is exploitable if users have open registration. Meanwhile, the vulnerability in Ultimate Addons for Elementor, allows the Elementor Pro vulnerability to be exploited, even if the site does not have user registration enabled.

For more information please check the official public release.


If you have questions, don’t hesitate to contact our support team.
Filed Under: WordPress/WooCommerce News

How to Move Your Offline Business Online with WooCommerce

May 5, 2020 By John 4 Comments

Nowadays, having an online presence is essential for any business. Moving your offline business online is a smart decision. With WooCommerce, you can easily set up an online store, manage products, and connect with customers worldwide. In this guide, we’ll walk you through the steps to transition your brick-and-mortar business to a successful ecommerce store using WooCommerce.

Move Your Offline Business Online

Creating an e-commerce store is not that difficult. Most of the tools you need are available for free. In this article, we’ll teach you how you can create an e-commerce store using WordPress and WooCommerce while keeping in line with e-commerce best practices.

What You’ll Need to Create an E-commerce Store

You will need the following to get started on your e-commerce store

  • a domain name – this will be the identity of your e-commerce store
  • a hosting provider – this will be the server where your e-commerce store is hosted
  • WordPress (free to download)
  • WooCommerce (free to download)
  • a responsive WordPress theme that is compatible with WooCommerce. We recommend Storefront theme which is also free.

How to Choose Your Domain Name for Your E-commerce Store

Here are some tips for choosing an ideal domain name for your e-commerce store.

  • Keep your domain name short and simple.
  • Avoid using numbers and hyphens.
  • Choose a .com domain.
  • Make sure your domain name identifies with your brand.

There are many places where you can buy a domain such as GoDaddy or NameCheap. Some hosting providers may also offer free domains so consider that when you buy a domain name.

How to Choose a Hosting Service for Your E-commerce Store

For hosting, we can recommend either Siteground or WPEngine. We’ve reviewed several hosting providers and these came out on top. These two companies both provide excellent WordPress hosting with excellent support.

How to Choose a Theme for Your E-commerce Store

You can think of a theme as the ‘skin’ of your e-commerce store. Some important elements to look for in a theme is that it must be responsive and fast. A responsive theme adapts to different screen size so your website is easy to use even on mobile devices. This is important because Google has been prioritizing websites that are easy to use on a mobile device.

A good theme should also be fast. This means it must have little to no bloat. If you’ve been searching for WordPress themes online, you have most likely come across several themes that have drag and drop editing tools. They might have some other nifty features such as changings colors, fonts and other styles. For the average user that has little to no coding knowledge, these themes may appear like a godsend. But here’s the caveat, these kinds of themes will come with a lot of bloated code that will add a few seconds to your page load speed. In the current e-commerce sphere, having a fast website is essential if you want to get customers. A slow website can and will:

  • cause visitors to leave your site. This is known as bounce rate.
  • provide bad user experience.
  • cause SEO rankings to drop.
  • result in loss of traffic
  • reduce revenue

We recommend Storefront theme because it is responsive and fast. More important is it was made by the same developers that created WooCommerce. Storefront was created specifically to work with WooCommerce so compatibility is guaranteed. It is compatible with many WooCommerce plugins if you want to extend the functionality of WooCommerce.

Next Steps

If you have decided on and purchased a domain name and hosting, then it’s time to get started on setting up your e-commerce store. We will be using WordPress and WooCommerce because they are the easiest to learn. There is still a learning curve so you’ll still need to put in some time to learn the platform.

Install WordPress

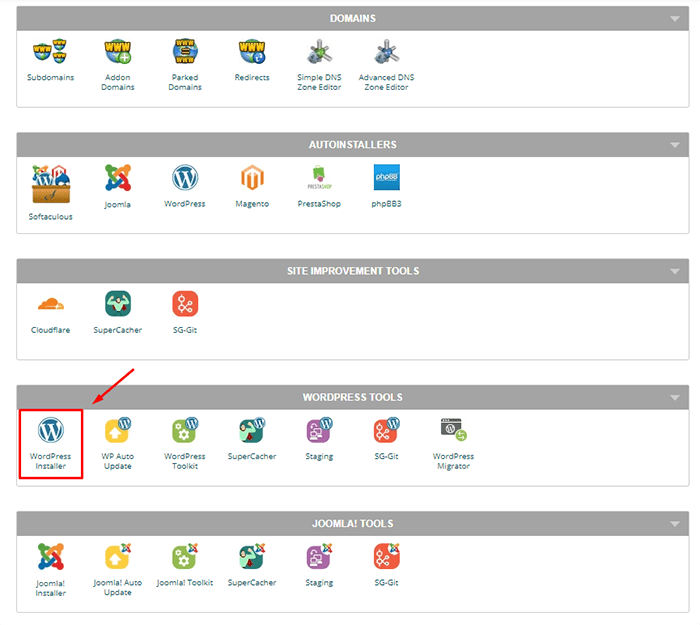
Log in to your hosting account’s cPanel, User Area or User Portal. Depending on your hosting account, the method of installing WordPress might be different. It is best to consult with your hosting provider’s documentation.

Most hosting providers would have cPanel. If you have cPanel, find the WordPress installation shortcut and just follow the on-screen instructions.

install wordpress

You will be asked to create a name for your WordPress site’s database, so just use an appropriate name. You will also be asked to create a database username and password. Keep this safe. For the next step, the installation will ask you to fill in some more details about your website such as your site title. You can change these later if you ever need to. You will be asked to create a user account. This will be your main login for your WordPress Dashboard. Don’t use ‘admin’ as your username and use a strong password. Run the installation for WordPress.

When the installation finishes, you should now be able to log in to your WordPress Dashboard using a temporary URL. You can access your website on your domain name after you’ve pointed the DNS to your WordPress installation and when the domain has propagated.

Point Your Domain to Your WordPress Installation

First, you’ll need to find your host’s nameservers. You can consult your hosting provider’s documentation or your hosting provider’s support. Then head over to your domain registrar and change the nameservers on your domain to your hosting provider’s domain.

After that, you’ll just have to wait for the DNS to propagate which may take up to 24 hours. You’ll know the DNS has propagated if you can access your new site when you open your domain on a browser. From here, you just need to append your domain with ‘/wp-admin’ to log in.

Turn on Maintenance Mode

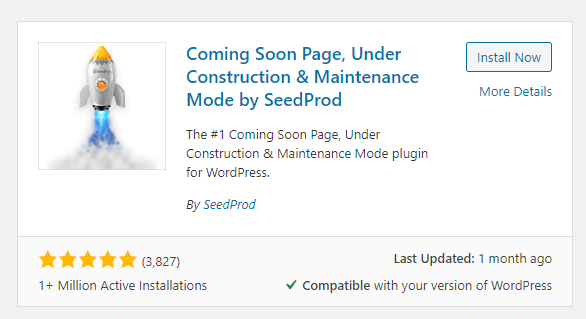
At this point, your site is not ready to go live so we recommend putting your site on maintenance mode. This will block non-logged-in users from accessing your website. Instead, they will be taken a temporary maintenance page. To enable maintenance mode, you will need to install a plugin. Log in to your WordPress Dashboard, click on Plugins and then click on Add New. In the keyword field, search for “Coming Soon Page, Under Construction & Maintenance Mode by SeedProd”. Click on Install and Activate.

enable maintenance mode

After that, click tick “Enable Coming Soon Mode” or “Enable Maintenance Mode” then click on Save Changes. Note that you can edit the content of the page in the “Page Settings” options. When you are ready to go live, you can turn off maintenance mode.

Install WooCommerce

The next step to do is to install WooCommerce. WooCommerce is the e-commerce platform that Automattic created for WordPress.

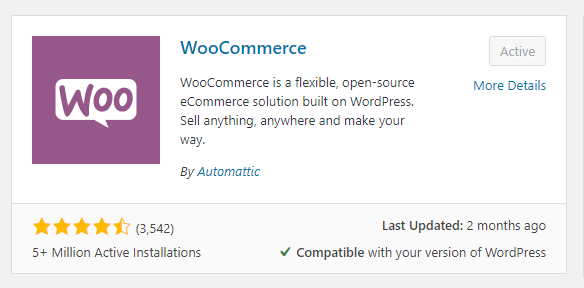
Go to Plugins and click on Add New. Search for WooCommerce and Install then Activate. When that’s done, you can head over to WooCommerce > Settings and tweak it depending on your needs.

install woocommerce

Install Your Theme

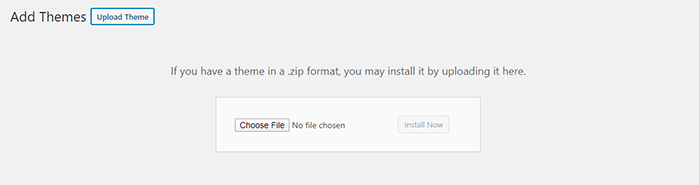
If you followed our advice, you’d be using Storefront theme. Regardless of what theme you chose, the installation process is the same. Download the theme files to your computer. On your WordPress Dashboard, click on Appearance > Themes. Click on Add New. Then click on Upload Theme. Choose the theme file you downloaded and click on Install Now. Activate your new theme when it finishes. From here, you’ll want to go to Appearance > Customize and then go to Theme Settings. Tweak the settings based on your needs.

install wordpress theme

And with that, you already have an e-commerce store but the work doesn’t stop here. Here’s a rough list of tasks that you still need to do before you can launch your e-commerce store.

There’s More Work to be Done

Whatever you need to do from here will depend on your specific needs. Here’s a list of the tasks and resources that can help you finish and optimize your e-commerce store. If you need any help with any of these tasks or some other customizations, you can drop us an email and the Wooassist team can help out.

learn wordpress and woocommerce
  • Finish Setting up Your Products
  • Use HTTPS
  • Set up Your Payment Gateways
  • Set up Your Product Shipping
  • Optimize Your Images
  • Optimize Your E-commerce Store’s Site Speed
  • Optimize Your E-commerce Store for SEO
  • Create a Blog – Creating a blog is not necessary but having one can help you improve your SEO and help you generate leads.
  • Set up Google Analytics and Google Search Console
  • Update Your WooCommerce Store Regularly
  • Optimize for Conversion Rate
  • Make Your WooCommerce Store GDPR Compliant
  • Improve WordPress Security

Should you have any other questions, you can also let us know in the comments section.

Filed Under: How-To Articles

How to Increase Conversion Rate By Adding WooCommerce Side Cart Plugin

March 4, 2020 By John Leave a Comment

Did you know that you can increase conversion rates by adding the WooCommerce Side Cart plugin to your website?

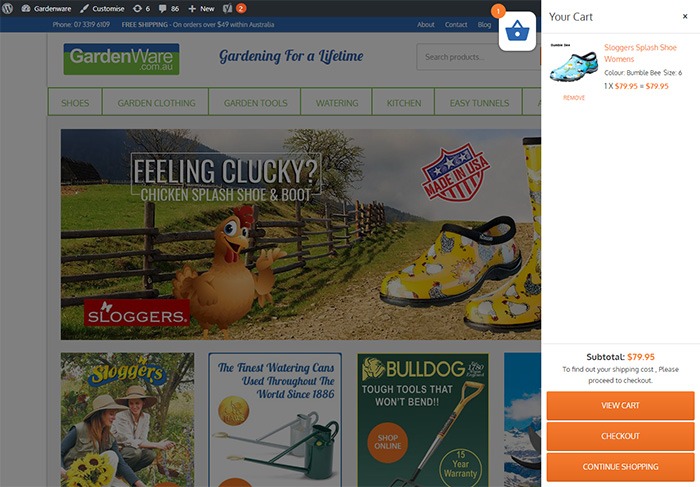
Improving the customer journey in your WooCommerce is a great way of boosting your conversion rate and this simple plugin gets the job done by adding an intuitive site-wide cart icon to your WooCommerce store. When you click on the icon, it brings up a view of your cart. When checking the cart contents, your customers don’t need to leave the page they are on which makes for great user experience.

Our Own Experience

We tested the plugin on GardenWare among others, but here’s how it looks on GardenWare. You can tweak the look to fit your brand with some custom CSS. You can adjust the position of the cart icon depending on your needs. You can also remove items or add quantity without refreshing the page.

Increase Conversion Rate By Adding WooCommerce Cart to Your Sidebar - GardenWare

Increasing Conversion Rate

After installing the plugin on Gardenware, we took the data after 3 months.

To account for seasonal data, we compared the data with the same months of the previous year, and we get an increase in conversion rate of almost 10%.

It is important to note that improving the customer journey and user experience leads to more conversions. From our user testing, the plugin does help improve user experience by a great deal.

How to Install and Set Up WooCommerce Side Cart

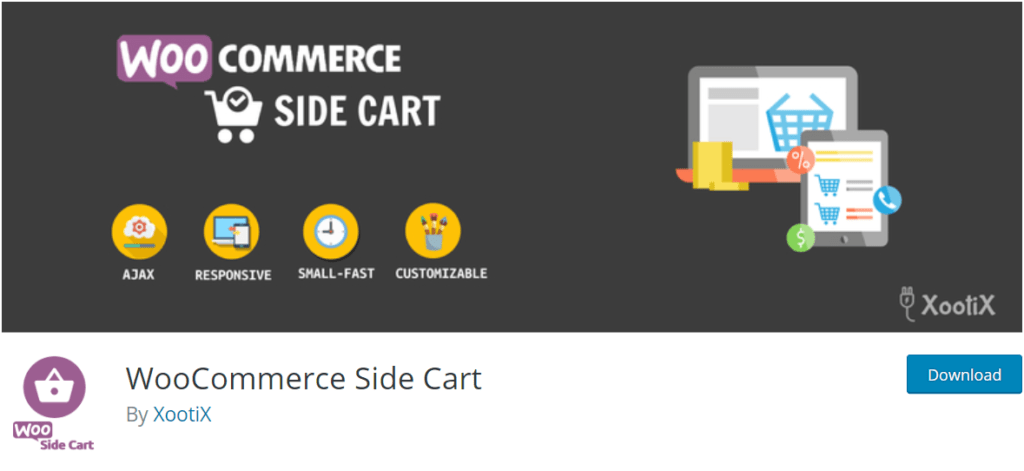
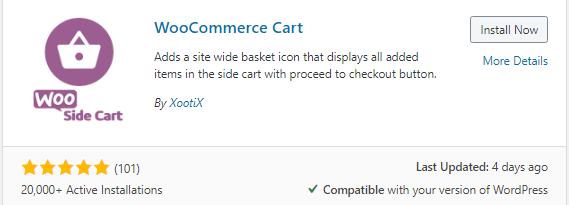
To get more conversions by using the WooCommerce Side Cart, you have to first install the WooCommerce Cart plugin. You can download the plugin here or search for it from the plugin repository. 

We recommend testing this first on a development site to make sure the plugin does not conflict with any other plugin you are using. It’s a good idea to extensively test your product purchase process to make sure there are no issues.

WooCommerce Side Cart Plugin

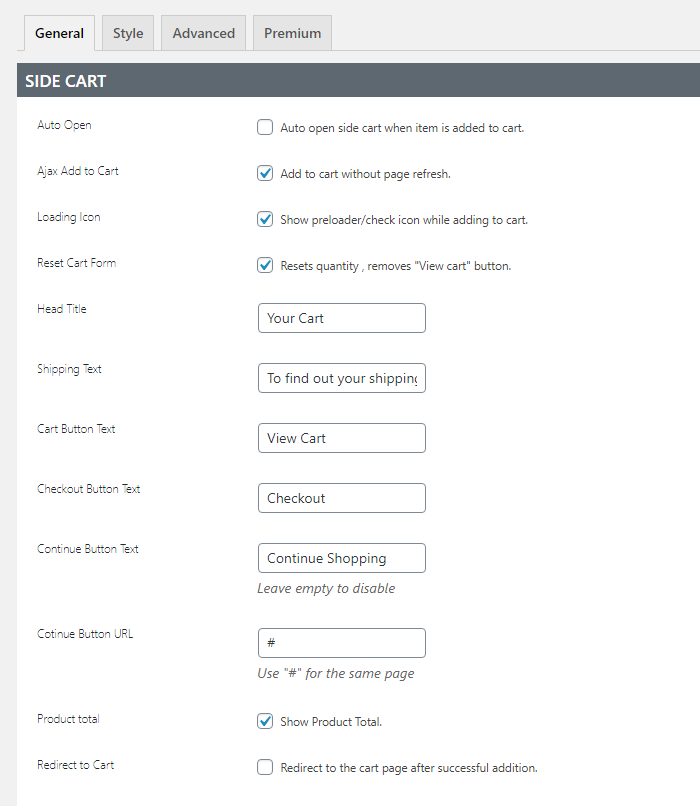
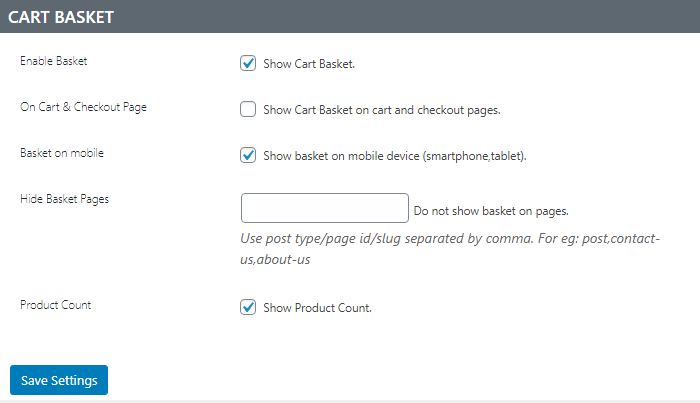
After installing and activating the plugin, click Woo Side Cart from your WordPress Dashboard to see the plugin settings. You can tweak the settings based on your needs.

WooCommerce Side Cart Plugin General Settings
WooCommerce Side Cart Plugin Other Settings

You can also tweak the CSS to make sure the sidebar cart colors and style fit your branding strategy.

Should you need assistance with setting up and customizing the plugin, we can help. Or if you have any questions, you can let us know in the comments.

Filed Under: How-To Articles Tagged With: conversion optimization, WooCommerce, woocommerce checkout

  • « Previous Page
  • 1
  • …
  • 12
  • 13
  • 14
  • 15
  • 16
  • …
  • 41
  • Next Page »
Let us support your online store so you can manage your business

Get started today

Get 2 Hours of FREE SUPPORT

We are so confident that you will love our services that we will give you your first 4 hours at a 50% discount

That’s 4 hours for only $75

BUY NOW

Free eBook

5 Things Every Online Store Can Fix On Their Website In The Next Week To Increase Sales

Quick Links

  • How it Works
  • Pricing
  • Blog
  • Contact
  • About Wooassist
  • My Account
  • Checkout
  • Privacy Policy
  • Cookie Policy
  • Terms and Conditions

Wooassist

Australia:
59 Luke St.
Hemmant QLD 4174

Philippines:
San Miguel St.
Poblacion, Iligan City 9200

Connect


Copyright © 2026 · Wooassist

Yours FREE!

5 Things Every Online Store Can Fix On Their Website In The Next Week To Increase Sales