 How fast your website loads affects your conversion rate and ultimately, your revenue. If it takes 12 seconds to load up your website, that’s just a little too long and many potential clients could be annoyed and just click on the close button; go back to Google and click on something else. If that’s not bad enough, that person could forever remember that your website is that one website that loads very slowly. Any chance of converting from that person is gone.
There are a lot of ways to speed up your website. One is by optimizing the images that you use for your e-commerce site which I discussed in another post. This time around, we’ll look at how to speed up your e-commerce site with caching and minification.
What is Caching?
Caching is a means of serving your content as static pages instead of being dynamic pages. Serving static content is faster as opposed to dynamic content which means longer page load times. Essentially, caching is storing your dynamic content in the server as static content which will then be served when a browser communicates with the server. The static content that is saved on the server is updated at set intervals.
What is Minification?
When developers make code, they make code with a lot of white space. This is best practice in the sense that the code becomes easier to read and understand for humans. This however is not best practice for servers that read and parse the code to load up all the elements of your website. Computers don’t need that white space. All that white space just makes reading the code take longer for the machine. Even when you’re using a premium theme, you’ll see a lot of white space when you try to look at the code. This is where minification comes in. Minification removes all that white space and optimizes your code so that it becomes easier to read for machines to make parsing the webpage faster.
Implementing Caching and Minification
 Now that we know what caching and minification is, it’s time to get to know how to implement it. If that sounds all too complicated, don’t worry. It is really very simple. All you need is one plugin to do both. That’s the beauty of WordPress. Seemingly complicated stuff becomes easy work. For this bit, we would recommend the W3 Total Cache plugin, because it has caching and minification solutions all in one plugin.
Setting up Caching with W3 Total Cache
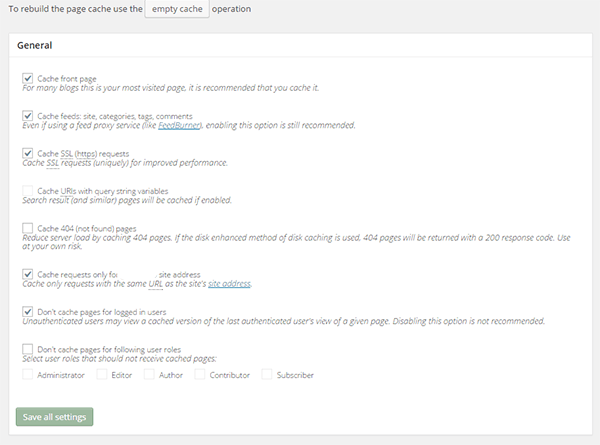
Install the plugin and activate it. After that, click on Performance on your WordPress dashboard and click on Page Cache. From there, you can turn on specific settings based on your caching needs. There is no single effective setting for all websites so feel free to go with your own settings and test page loads speeds after. When you’re done tweaking, just click on “Save all settings”.
A note on caching… When you’re updating your website like adding new products, editing blog posts, or adding new functionality, it would be best to turn off caching entirely while working so you can see all the changes you make right away. Just don’t forget to turn caching back on when you’re done.

Setting up Minification with W3 Total Cache
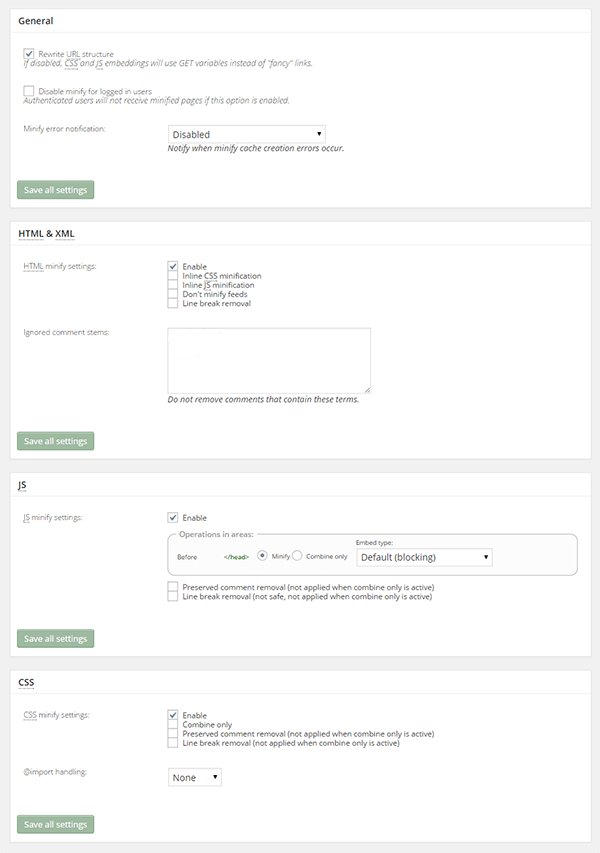
While you can set up minification manually, there’s no need to do it when all you need is a plugin and a few clicks. To set up minification with W3 Total Cache, just click on Performance then on Minify. After that, just tick “Enable“ for HTML & XML, JS, and CSS. You can tick other settings on and off as needed. When you’re done, just click on “Save all settings” and you’re all set for minification.


Leave a Reply