If your WooCommerce store is not set up to capture your customer’s emails, then you’re missing out on a lot of potential sales. According to data gathered by Campaign Monitor, transactional emails can help you generate up to 6 times more revenue. Your prospective customers are also five times more likely to see the emails you send out compared to when posting it on your Facebook. With increasing competition in Facebook post reach, email marketing is only becoming more lucrative. In this post, we’ll teach you how to set up MailChimp opt-in form in WooCommerce checkout so you can increase your conversion rates.
What Do You Need to Set Up Email Opt-in Forms in WooCommerce Checkout?
To get started with adding email-opt in forms to your WooCommerce store, you need two things. The first one is a MailChimp account. You can sign up to MailChimp for free and continue to use it until you exceed a thousand subscribers. At this point, you will need to purchase a plan. You can sign up for a MailChimp account here.
Once you’ve set up a MailChimp account, you will need to generate an API key which you will use to connect MailChimp to your WooCommerce store. To get your API key, log in to your MailChimp account and click on your name on the upper right corner and then click on Account; click on Extras and then on API keys. From here, you can copy the existing API key or create a new one. Save your API key for now. We’ll need this later.
The second thing that you need is the MailChimp for WooCommerce plugin which you can download here. You can also install the plugin from the Plugins page of your WordPress Dashboard. Once you install the plugin, make sure you activate it.
How to Set Up MailChimp for WooCommerce Plugin
After activating the plugin, head over to the Plugins page on your WordPress Dashboard and look for MailChimp for WooCommerce and then click on Settings.
On the Connect Tab, you will need to input your API key. If you followed the steps in the previous section, you should have your API key ready. Just input your API key in the API key field and click on “Save all changes”.

When that’s done, click on Store Setting and set your store information and then click on “Save all changes”.

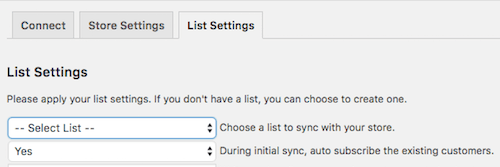
The next step is to set up your subscriber lists. Click on List Settings and choose a list to sync with your WooCommerce store. You can also indicate whether you want to automatically subscribe your existing customers to your list.

If you want to switch to a different list, you will need to remove and reinstall the plugin.
You can also set other setting such as checkbox display options, subscription opt-in message, and the location of the opt-in checkbox form on checkout.
When that’s done, you can sync your list with your MailChimp account.
To view your site details and change other settings, you can log in to your MailChimp account, click on your profile name and click on “Connected Sites”.
Final Notes
Now that your store is set up to sync your customer’s emails to your MailChimp list, you can easily email them special offers and other deals to help boost your sales.
If you have any questions, let us know in the comments.
If you need help setting up the plugin on your WooCommerce store, you can contact us.


Leave a Reply