Wooassist

Assistance for Your Woocommerce Store

  • How it Works
  • Pricing
  • Services
    • Site Maintenance
    • AI SEO and Content Marketing
  • Blog
    • How-To Articles
    • Code Snippets
    • SEO For E-Commerce
    • Theme and Plugin Reviews
    • Wooassist News
    • WordPress/WooCommerce News
    • Interviews
  • About Us
  • Contact
You are here: Home / Archives for WooCommerce

How to Change the Arrows in Pagination for Storefront and WooCommerce

March 18, 2015 By John 2 Comments

When looking at category pages for posts and WooCommerce products in Storefront theme, you can navigate to different pages by clicking on the default left and right pointing arrows. Notably, most themes would use a “Previous” or “Next” text instead of an arrow. If you want to change these arrows to text, it is easy enough to do by tweaking a few lines of code. Just follow the steps below.
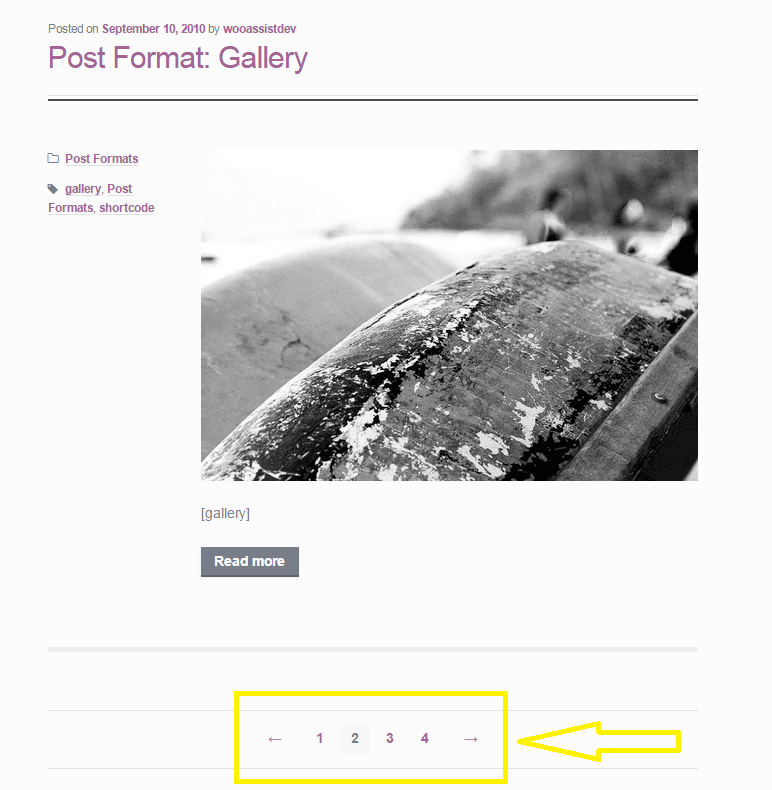
pagination-2

Change the Arrows in Pagination for Storefront Theme

Since Storefront does not have a default filter for pagination, we’ll need to remove the function of the default pagination and replace it with our own function. Notably, the code in the function `woa_sf_paging_nav_replace` is just a copy of the original pagination function in Storefront and we just need to replace the text in the ‘prev_text’ and ‘next_text’ parameters. You don’t need to touch the other attributes.

Go to your functions.php and find the following code:

---- php-code ----

add_action( 'init', 'woa_sf_change_pagination_init' );
 
 
function woa_sf_change_pagination_init() {

 //remove current function used for Storefront's pagination
      remove_action( 'storefront_loop_after', 'storefront_paging_nav', 10 );

 //replaces pagination function with our own function
      add_action( 'storefront_loop_after', 'woa_sf_paging_nav_replace', 10 );
}
 
 
function woa_sf_paging_nav_replace() {
 
 global $wp_query;

      $big = 999999999; // need an unlikely integer
      $translated = __( 'Page', 'storefront' ); // Supply translatable string

      echo '<nav class="storefront-pagination">';

      echo wp_kses_post( paginate_links( array(
           'base' => str_replace( $big, '%#%', esc_url( get_pagenum_link( $big ) ) ),
           'format' => '?paged=%#%',
           'current' => max( 1, get_query_var( 'paged' ) ),
           'prev_text' => '<',
           'next_text' => '>',
           'type' => 'list',
           'total' => $wp_query->max_num_pages,
           'before_page_number' => '<span class="screen-reader-text">' . esc_attr( $translated ) . ' </span>',
 ) ) );

 echo '</nav>';
}

---- /php-code ----

Where it says:

'prev_text' => '<',
'next_text' => '>',

Change it to:

'prev_text' => 'Previous',
'next_text' => 'Next',

Change The Arrows in Pagination for WooCommerce Products

Editing the pagination for WooCommerce products is a bit simpler. We just need to find and use the filter `woocommerce_pagination_args`.
Head over to your functions.php and look for:

---- php-code ----

woa_wc_change_pagination_init() {

    add_filter( 'woocommerce_pagination_args', 	'woa_wc_woocommerce_pagination' );
}

function woa_sf_woocommerce_pagination( $args ) {

	$args['prev_text'] = '<';
	$args['next_text'] = '>';

	return $args;
}

---- /php-code ----

Where it says:

$args['prev_text'] = '<';
$args['next_text'] = '>';

Simply change it to:

$args['prev_text'] = 'Previous';
$args['next_text'] = 'Next;

Or replace ‘<‘ and ‘>’ to whatever text you prefer.

You just learned how to change the arrows in pagination for Storefront and WooCommerce. Did this post help solve your problem? Do you have any questions? Let us know in the comments.

Filed Under: Code Snippets, How-To Articles Tagged With: code snippet, design tweaks, how-to, navigation, Storefront, WooCommerce, woothemes

How to Create a Sitemap for your WooCommerce Store

March 19, 2015 By John 2 Comments

sitemapYou might have heard about XML sitemaps and that it’s good for your website’s SEO but don’t really know what it is. Or maybe you don’t know how to create a sitemap for your WooCommerce store. We can help with that. For starters, Google defines a sitemap as:
…a file where you can list the web pages of your site to tell Google and other search engines about the organization of your site content.

In short, a sitemap tells search engine crawlers about the structure of your site. Whenever you add something new to your website, whether that’s a new blog post, a new page or a new WooCommerce product, your sitemap is updated and communicates with web crawlers to tell search engine that there is something new on your website.

Even without a sitemap, the content on your website will still eventually be crawled by search engine crawlers but if the structure of your website is not well-organized, some pages may not be indexed. Also, having a sitemap will make crawling your website easier and much sooner. And if you have a new website, you probably don’t have a lot of other websites linking to your pages so it is highly likely that some of your pages may not get indexed. Having a sitemap almost ensures that all your pages get indexed.

How to Generate a Sitemap for Your WordPress Site

There are a couple of plugins that you can use to create a sitemap for your e-commerce website. We’ll list them down here.

How to Create a Sitemap Using WordPress SEO by Yoast

WordPress SEO by Yoast is the all-in-one plugin for your SEO needs. It is easily one of the best SEO plugins in the WordPress plugin repository. It has a lot of useful features and that includes the creation of a sitemap. If you are already using WordPress SEO by Yoast, then look nowhere else for creating your own XML sitemap. If you are not using WordPress SEO yet, I would suggest joining the bandwagon that is unless you are already using an SEO plugin that works well for you.

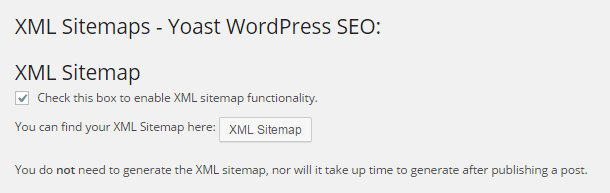
To enable XML sitemaps in WordPress SEO, go to SEO and click on XML sitemaps. Afterwards, just tick the box where it says “Check this box to enable XML sitemap functionality” and then “Save Changes”. When that’s done, just click on the button below and you will be taken to your sitemap.

sitemaps

How to Create a Sitemap Using Google XML Sitemaps

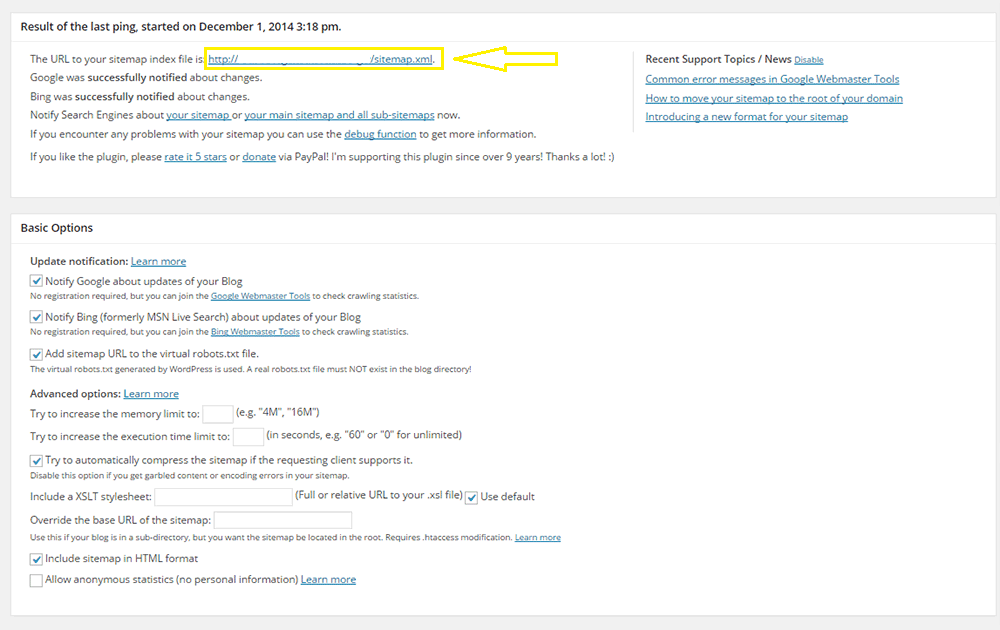
Creating a sitemap with the Google XML Sitemaps plugin is very easy. Simply download and install the plugin here. After you activate the plugin, just head over to Settings and click on XML-Sitemap. You should see a section that indicates the URL for your sitemap. There are a bunch of other settings that you can tweak. The default settings are good as is but if you want to change anything depending on your needs, feel free to do so.

google-xml-sitemaps

How to Create a Sitemap Using XML Sitemaps

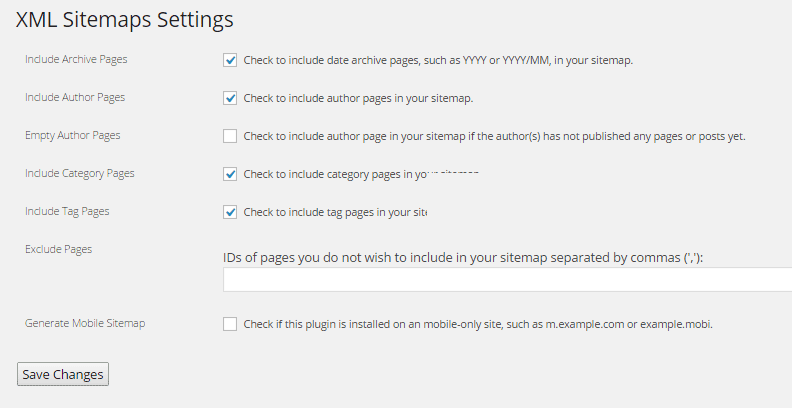
To create a sitemap using the XML Sitemaps plugin, simply install the plugin from this link. Activate the plugin and head over to yourdomain.com/sitemap.xml. That’s your sitemap. There are a few settings that you can tweak if you head over to Settings and click on XML Sitemaps.

xml-sitemaps

Adding a Link to Sitemap for Your WooCommerce Store

adding-sitemap-to-footerMost SEO experts say that adding a link to your sitemap on your website does not serve any purpose since the search engines find the sitemap through the robots.txt file or when you manually submit the sitemap to Google Webmaster Tools or Bing’s. Some disagree however and mention that having a link in the footer adds value.
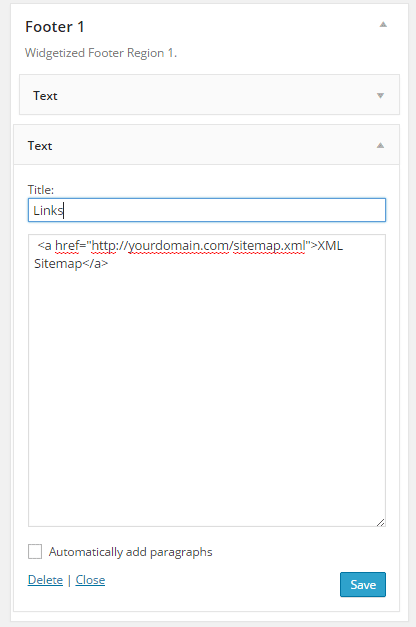
If you do want to add a link to your sitemap on your WordPress site’s footer, it is very easy to do. Just go to Appearance and click on Widgets. Afterwards, drag a text widget to the footer where you want to have the link. Just link your sitemap using HTML code.

If you are not sure how to do this, use the code below and just replace the URL with your sitemap’s URL:

<a href=”http://yourdomain.com/sitemap.xml”>XML Sitemap</a>

Submitting your Sitemap to Search Engines

When you get your sitemap ready, you should submit it to search engines using Webmaster Tools. Before you do this however, you need to verify your website with Webmaster Tools. You can check our post about the WordPress SEO plugin by Yoast which has links to some useful resources that can help you verify your site if you haven’t done that yet.

How to Submit Your Sitemap to Google Webmaster Tools

To submit your sitemap to Google Webmaster Tools, log in to your account and click on the website that you want to add a sitemap to. On the left sidebar, you should see Site Configuration, click that and then click on Sitemaps. There should be an Add/Test sitemap button in the upper right corner. Add your sitemap and then click on Submit.

How to Submit Your Sitemap to Bing Webmaster Tools

To submit your sitemap to Bing Webmaster Tools, log in to your account and click on Sitemaps. Then click on Submit a Sitemap. A text box should appear where you can specify the URL to your sitemap. Save your settings.

The Verdict: Which one is for you?

Between the XML sitemap plugins mentioned above, which one is for you? WordPress SEO by Yoast has a ton of other features and is one of, if not the best SEO plugin for WordPress. If you are already using this plugin for your SEO, then there’s no reason to get another plugin to get a sitemap. You’ll just be adding extra bloat to your site by going with another plugin. Between Google XML Sitemap and XML Sitemap Plugin, there’s not much of a difference. Both are easy to set up but Google XML Sitemaps has a slight advantage for having more options such as:

  • Automatically notifying search engines whenever you post new content
  • Creation of an HTML sitemap
  • Compressing the sitemap
  • Adding the sitemap URL to the robots.txt file

Got some questions about sitemaps? Let us know in the comments.

Filed Under: How-To Articles, SEO For E-Commerce Tagged With: Google Webmaster Tools, Google+, how-to, plugins, WooCommerce, WordPress SEO, XML sitemap, Yoast

How to Install WooCommerce on your WordPress Site

April 8, 2015 By John Leave a Comment

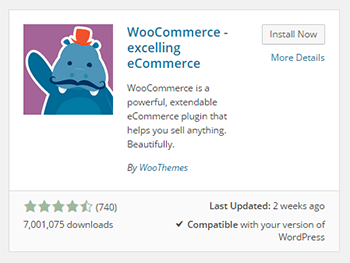
how-to-install-woocommerce-pluginGetting started on a WooCommerce store all starts with installing WooCommerce. It’s pretty simple and straightforward, but if you don’t know how to install it, we’ll help you out. There are two ways to install WooCommerce and we’ll detail them both in this post.
How to Install WooCommerce through the WordPress Plugin Repository

  1. On your WordPress Dashboard, head over to Plugins then click on Add New.
  2. On the search bar, type in WooCommerce and press Enter. WooCommerce should appear as the first plugin in the search results. To make sure, check that it is the one published by WooThemes and that you are not installing some other plugin.
  3. Just click on Install Now and wait for the plugin to install and activate.

How to Install WooCommerce by Upload

The other method of installing WooCommerce is by downloading and uploading.

  1. Head over to the WooThemes website to download the latest version of WooCommerce.
  2. After that, go to your WordPress Dashboard. Click on Plugins and then Upload Plugin.
  3. Choose the WooCommerce installer that you just downloaded and click on Install Now.
  4. After that, just wait for the file to finish uploading. It should install and activate by itself.

How to Install WooCommerce via FTP

Here’s a bonus – another means of installing WooCommerce. This is a little bit more complicated than the first two methods since you need to access your WordPress install files. It is not recommended for the average user since you might alter the install files for your WordPress site. Doing so can cause your website to go down. Use this only if the other two methods fail or if you really know what you are doing.

For this method, you’ll need an FTP client like FileZilla. You’ll need this to upload the plugin file to your WordPress install. And since you need to log in to the FTP server, you’ll need the login information for that too. If you don’t know the login information, you can contact your hosting provider. Here’s are the steps:

  1. Download the WooCommerce plugin and extract the file.
  2. Log in to your FTP server using FileZilla or any other FTP client. Navigate to the wp-content/plugins directory of your WordPress install.
  3. Place the extracted folder in the wp-content/plugins folder.
  4. After that, head over to the plugin page of your WordPress site and activate the WooCommerce plugin.

Now that you know how to install WooCommerce, you’re just a few steps away from setting up your own e-commerce store.

Filed Under: How-To Articles Tagged With: e-commerce, how-to, website development, WooCommerce, WordPress

How to Set Store Location and Currency in WooCommerce

May 13, 2015 By John Leave a Comment

After installing WooCommerce you have to make sure that it will run based on your geographic specifications. You will need to set store location and currency in WooCommerce. Changing these settings is really quite simple. You can do this if you head over to your WordPress dashboard and navigate to WooCommerce settings under the general tab.

Setting Your Location

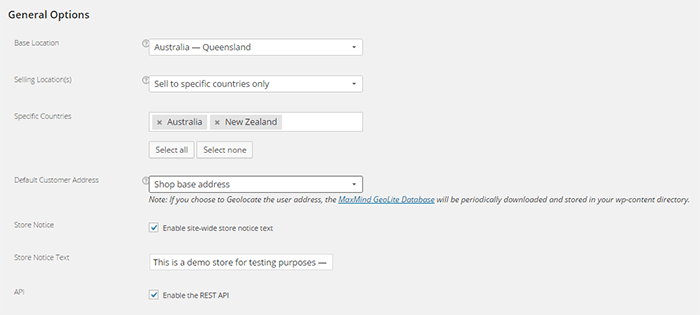
To set your location, head over to WooCommerce settings under the General Tab. Here you can set your store’s location.

Here’s what you should see:

location-settings

Base Location

Under Base Location, you should state your base country and/or state. This setting also affects tax rates and customer locations.

Selling Location

Under Selling Locations is where you state where you sell your products. You can choose just one location or a few countries/states. If you ship your products globally you should specify “Sell to All Countries”. If you are only selling to specific location, choose “Sell to specific countries only” and a new field will come up which will let you add specific locations.

Default Customer Address

Under Default Customer Address, you can choose what the system will identify as the client’s location before he/she enters her location. Choosing “Shop base address” assumes that the client is located where your store is located. Choosing “No address” assumes no location. Choosing “Geolocate address” will verify the client’s location through Maxmind Geolite Database.

Setting Your Currency

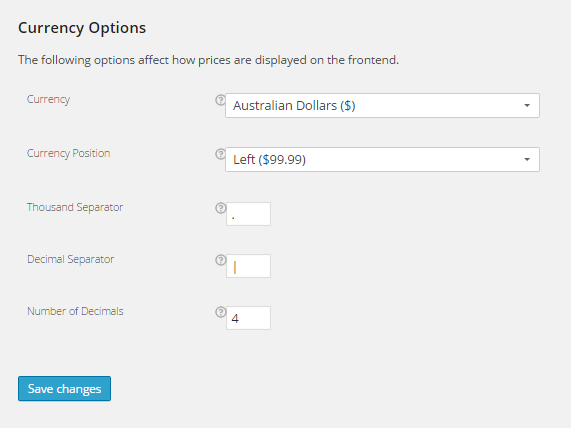
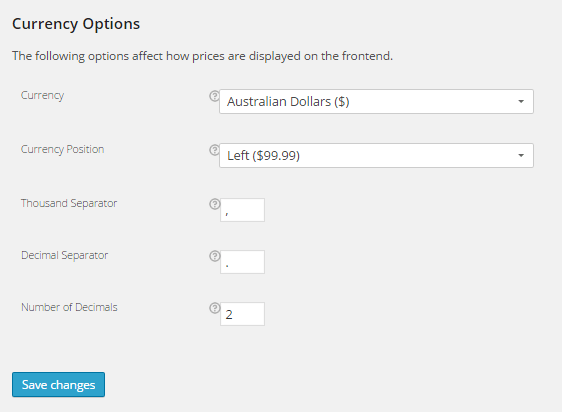
Below the location setting, you can see your WooCommerce store’s currency options.

Currency

Under Currency, you can set your store’s default currency. You can only set one currency here.

currency-options

Currency Position

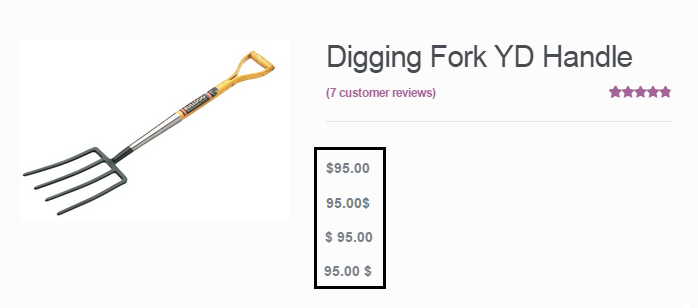
Currency position lets you set the default position for you currency symbol. You can set it to the left, right, left with space, or right with space. Below you’ll see a comparison of the different options for this setting.

different-prices

Thousand Separator and Decimal Separator

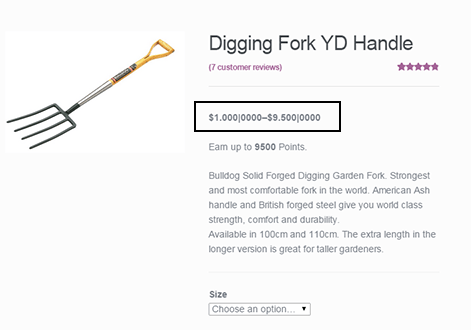
These settings let you set what symbol to use as the thousand and decimal separator for the prices displayed on your store. The image below show what the price would look like if you edit these.

changing-price-settings

changed-settings

Number of Decimals

This setting sets the number of decimal places shown on your prices. In most cases, 2 decimal places will do but if you should need more, you can always add more.

location-settings

Now that you’ve set your store’s location and currency, you can soon start selling to the market that you are targeting.

Filed Under: How-To Articles Tagged With: admin, e-commerce, how-to, WooCommerce, WordPress

How to Set Up a WooCommerce Store – Infographic

July 21, 2015 By John Leave a Comment

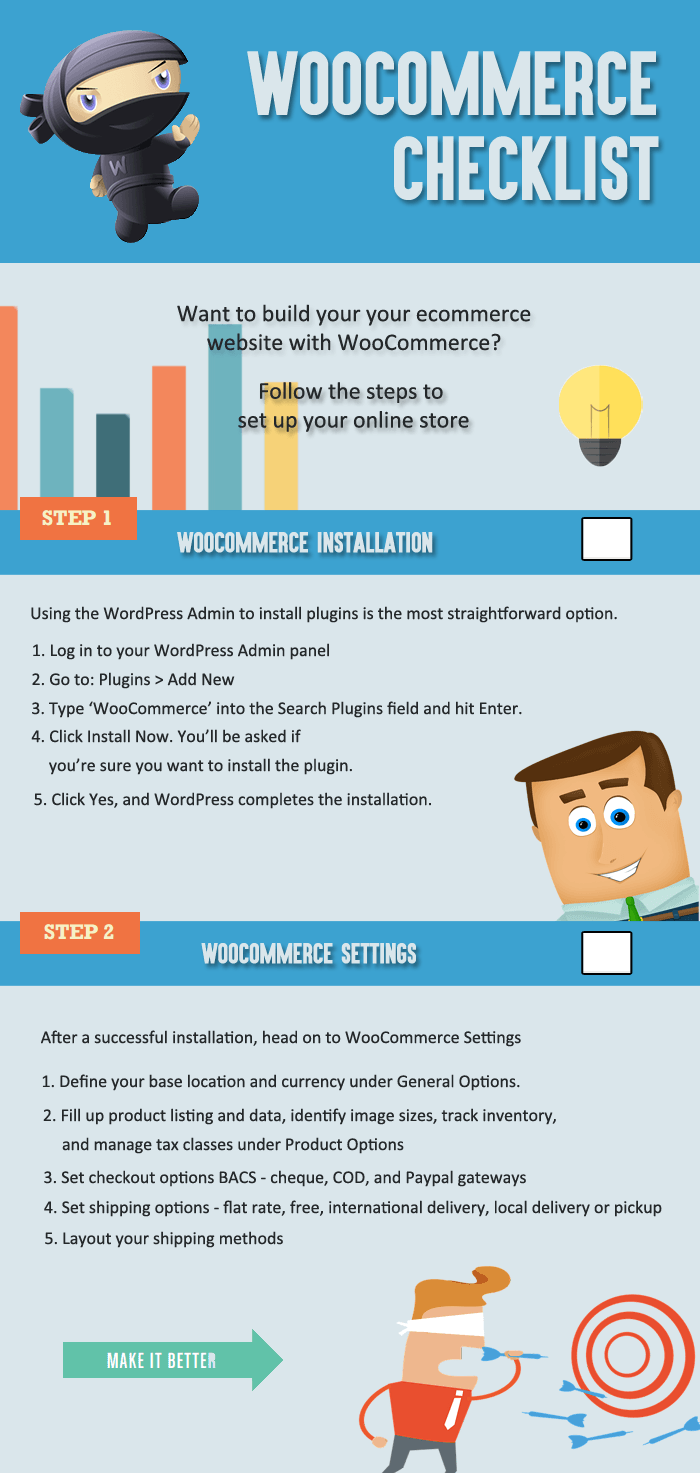
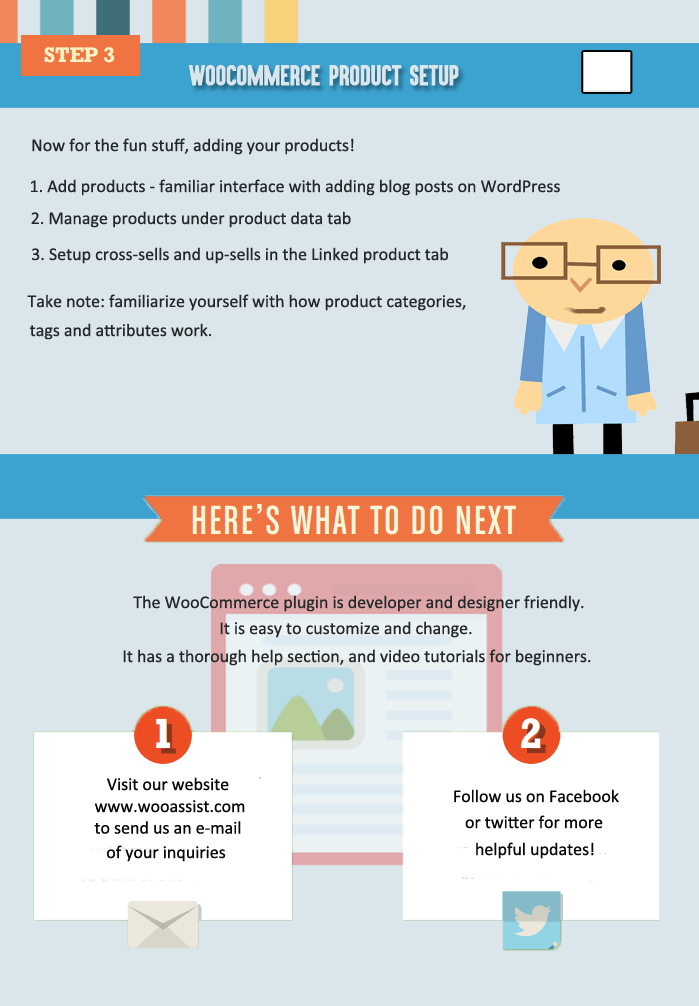
Do you want to build an on online store? Creating one is easy with WooCommerce. Here’s a handy WooCommerce infographic that can guide you on the process.

woocommerce_checklist_1 woocommercechecklist_2

Filed Under: How-To Articles Tagged With: e-commerce, how-to, infographic, website development, WooCommerce, WordPress

  • « Previous Page
  • 1
  • …
  • 12
  • 13
  • 14
  • 15
  • Next Page »
Let us support your online store so you can manage your business

Get started today

Get 2 Hours of FREE SUPPORT

We are so confident that you will love our services that we will give you your first 4 hours at a 50% discount

That’s 4 hours for only $75

BUY NOW

Free eBook

5 Things Every Online Store Can Fix On Their Website In The Next Week To Increase Sales

Quick Links

  • How it Works
  • Pricing
  • Blog
  • Contact
  • About Wooassist
  • My Account
  • Checkout
  • Privacy Policy
  • Cookie Policy
  • Terms and Conditions

Wooassist

Australia:
59 Luke St.
Hemmant QLD 4174

Philippines:
San Miguel St.
Poblacion, Iligan City 9200

Connect


Copyright © 2026 · Wooassist

Yours FREE!

5 Things Every Online Store Can Fix On Their Website In The Next Week To Increase Sales