Wooassist

Assistance for Your Woocommerce Store

  • How it Works
  • Pricing
  • Services
    • Site Maintenance
    • AI SEO and Content Marketing
  • Blog
    • How-To Articles
    • Code Snippets
    • SEO For E-Commerce
    • Theme and Plugin Reviews
    • Wooassist News
    • WordPress/WooCommerce News
    • Interviews
  • About Us
  • Contact
You are here: Home / Archives for WooCommerce

How to Change the Number of Related Products in WooCommerce

May 12, 2016 By John Leave a Comment

How to change the number of related products in woocommerceChanging the number of related products in WooCommerce is a relatively easy task if you know how to do it. WooCommerce defaults to two related products in the single product page but store owners may want to show their visitors more than just two related products.

Why Change the Number of the Related Products?

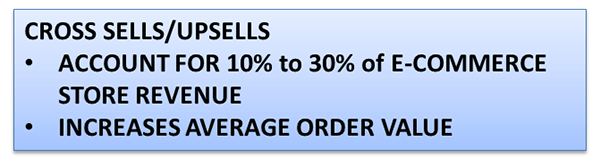
Showing more products in the Related Products section will increase and develop the browsing or buying choice of the user. This strategy is basically cross-selling/upselling. It is the strategic way of introducing your customers to other products that are related to what they are already interested in. Research shows that product recommendations account for 10% to 30% of e-commerce store revenue and increase average order value.Cross-Sells_Upsells
Setting up the Number of Related Products

There are two ways you can set up the number of related products. First is to insert a code snippet in the functions.php file on your theme. Second is to install a plugin to do it for you. The first method may seem intimidating to some WooCommerce shop owners, but it is actually as easy as copy and pasting a code. This method is recommended because it doesn’t bloat your site with unnecessary code.

In some themes, authors have added custom functions that allow users to edit WooCommerce and this includes the number of related products. Buying themes that come with a lot of custom functions however are generally not recommended as they can add unnecessary bloat to your site.

How to Change the Number of Related Products in WooCommerce Using Code Snippets

The best way to edit the number of related products is by using a code snippet that you insert into your child theme so that the code doesn’t get overwritten when you update your theme. Don’t get discouraged by the thought of coding but do take extra caution as one wrong code can break your entire site. If you do not know what you are doing, it would do you well to hire a developer to do this for you. If you are comfortable working with code snippets, then proceed with the steps below.

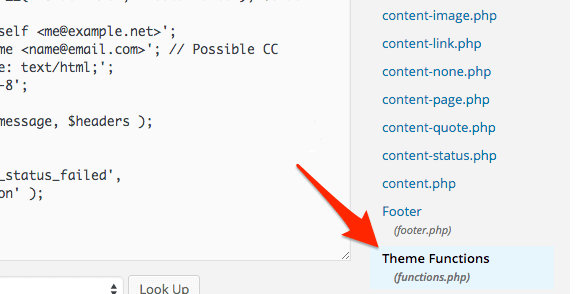
    1. To start, locate functions.php in the WordPress file system. Go to your WordPress Dashboard. Navigate to Appearance > Editor. Choose the theme you are using from the dropdown in the upper right sidebar and locate at the bottom right the functions.php file. You can also access your site’s file through an FTP client and edit the functions.php file from there.
WordPress-Dashboard_Edit-Themes_Themes-Function

  1. Next is to copy and paste the code below at the very bottom of your functions.php file.
    /**
    * WooCommerce Extra Feature
    * --------------------------
    *
    * Change number of related products on product page
    * Set your own value for 'posts_per_page'
    *
    */ 
    function woo_related_products_limit() {
      global $product;
      
      $args['posts_per_page'] = 6;
      return $args;
    }
    add_filter( 'woocommerce_output_related_products_args', 'jk_related_products_args' );
      function jk_related_products_args( $args ) {
      $args['posts_per_page'] = 4; // 4 related products
      $args['columns'] = 2; // arranged in 2 columns
      return $args;
    }
    
  2. The piece of code above will make the number of related products into 4 per page arranged in 2 columns. This is defined in these lines of code:

    “$args[‘posts_per_page’] = 4; // 4 related products”, and “$args[‘columns’] = 2; // arranged in 2 columns”.

    In order to have the desired number of related products, you just need to vary the values. For example you want to have 6 related products in a single column, change the 4 to 6 and 2 to 1. So it will be:

    “$args[‘posts_per_page’] = 6; // 6 related products” and “$args[‘columns’] = 1; // arranged in 1 columns”.

  3. Save the file when you are done.

How to Change the Number of Related Products in WooCommerce Using a Plugin

For less technical store owners, you may want to change the number of the Related Products in your WooCommerce store by using a plugin. Using a plugin will save you from editing important website files that can break your site. Here are some plugins that we can recommend:

Booster for WooCommerce

Booster for WooCommerce was previously called WooCommerce Jetpack. This enables you to tweak a lot of settings for WooCommerce not just changing the number of related products. For anyone using the WooCommerce platform, this plugin is highly recommended because it provides a lot of functionality.

To change the number of related products, follow the steps below:

    1. First, install and activate the plugin.
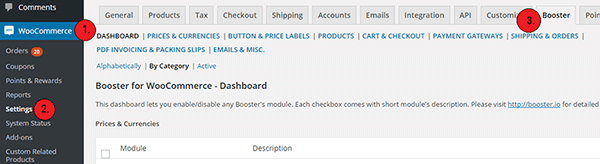
    2. Go to WooCommerce > Settings > Booster.
Booster-for-WooCommerce

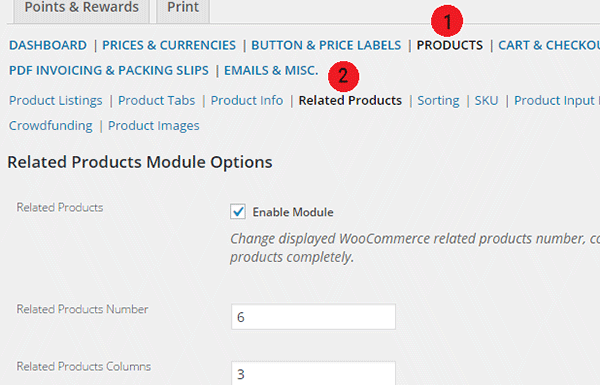
    1. In the Booster menu, click on the Products tab > Related Products.
Booster-for-WooCommerce_Related-Products-Tab_Options

  1. Enter the number of Related Products that you want. You can also change the number of columns for the Related Products Section.
  2. Check the Enable Module, save and you’re done.

While WooCommerce Booster is a powerful plugin in itself, you may want to use a different plugin if you just need to edit the number of related products. This is because the number of features that you wouldn’t be using would just add extra bloat to your site.

Woo Related Products

Woo Related Products is one of the simplest plugins out there for editing related products in WooCommerce. It is light and easy to navigate. It also allows you to change the heading text on the related products section.

  1. To start, install and activate the plugin.
  2. Locate “Related Products” from your WP admin menu panel.
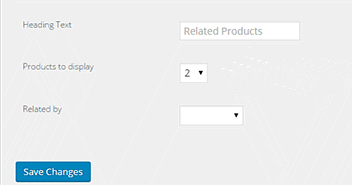
  3. Select the number of related products you want to display. And then click on Save Changes.Woo-Related-Products_Products-to-Display

You want to increase your conversions. By increasing the number of related products from WooCommerce’s default to introduce more products to your customers, you can increase your revenue and average order value. You can follow the steps mentioned in this article to accomplish this for your own website.

Do you know of other strategies that can help increase conversions through cross sells and upsells? Let us know in the comments.

Filed Under: Code Snippets, How-To Articles Tagged With: admin, code snippet, conversion optimization, design tweaks, how-to, navigation, plugins, product management, WooCommerce, WooCommerce products, WordPress

10 WooCommerce Plugins to Supercharge Your Store

April 5, 2016 By John Leave a Comment

ecommerce-cart-frog-mini-computer

WooCommerce is a great tool to sell online with unlimited possibilities for customization. One of WooCommerce’s best features is its extensive library of plugins available.

Many of the customizations you need for your WooCommerce store will most likely have been requested by a lot of WooCommerce users. This is where the plugin developers come in. Hence, there will almost always be a plugin for your specific needs.

Here we’ll list down 10 WooCommerce plugins to supercharge your store.

1. WooCommerce Customizer

WooCommerce-Customizer

WooCommerce Customizer is a free plugin from Skyverge. It adds an extra settings page for WooCommerce to help you make quick changes which otherwise would require writing some custom PHP functions. The plugin allows users to edit the text for Add to Cart and Submit Order buttons on the WooCommerce store. It allows you to edit the number of products shown as well as the number of columns on the category pages. You can also edit page coupons, tax labels, logins, product headers and additional information tab headers. The plugin only works on individual sites and does not support multisite networks. It is a great tool for A/B testing because you can change settings in a few clicks. You can optimize the look of your WooCommerce store for optimum conversion.

2. WooCommerce Products Filter

WooCommerce Products Filter is a great plugin especially when you have a lot of products on your WooCommerce store. It lets you set search categories for your visitors and use this to filter products by categories, tags, attributes, and taxonomies. It uses AJAX for easy product search. This allows the user to continuously search without the need to reload the page which is convenient. You can choose from various display formats like drop-downs, check-boxes or radio buttons. These display formats let you customize how users can search products in your WooCommerce site. It also has simple options if you want your product search filter to be less complicated. To add the filter, you just need to insert the shortcode.


3. WooCommerce Products Slider

Create a mobile-friendly slider of your products anywhere in your site using WooCommerce Products Slider. You just create your sliders then paste the generated shortcode where you want them to appear. This plugin lets you display featured items, latest products, or sort products posted by date and more. The height, column numbers, size, items and button colors are easy to customize. The free version comes with two themes to help you showcase your products across your WooCommerce store.


4. Booster for WooCommerce

Booster-for-WooCommerce

Booster for WooCommerce is a free plugin that supercharges your e-commerce site with features that will empower your standard WooCommerce store. It extends WooCommerce features and lets you add more customizations. It lets you customize prices and currencies, button and price labels, products, cart and checkout, payment and gateways, shipping, invoices, emails, etc. You can check out the long list of features in the plugin page.

5. WooDiscuz WooCommerce Comments

WooDiscuz WooCommerce Comments is a plugin that can help you build customer trust, boost engagement and increase sales. This can also double as your instant FAQ and support platform for specific products. It gives you a platform where your customers or users can discuss your products and add reviews. Visitors can ask pre-sale questions.

This plugin allows you to moderate comments, tweak permissions, and edit security options. It also has anti-spam, AJAX pagination, and redirect to “Thank you” page features.


6. WooCommerce – Store Exporter

WooCommerce-Store-Exporter

Take control of your store data with WooCommerce – Store Exporter. It lets you design advanced and concise exports of your data in minutes. This will benefit e-commerce businesses that need to deal with large amounts of data. The free version lets you export your products, categories, tags, and user data into a CSV file or WordPress Media. It is also compatible with WordPress multisite.

7. WooCommerce PDF Invoices and Packing Slips

WooCommerce-PDF-Invoices-and-Packing-Slips

WooCommerce PDF Invoices and Packing Slips will automatically create and add a PDF invoice to WooCommerce emails sent to your customers. Save time from having to send invoices manually and increase your WooCommerce store’s trust rating. You can easily modify the base template for the invoices or create your own template. The plugin also allows for generating and downloading invoices and packing slips in bulk. Monitoring your invoices is easier with the custom format sequential invoice numbers. It has multi-language functionality and lets you add custom fonts.

8. Stripe Payment Gateway WooCommerce Addon

Stripe-Payment-Gateway-WooCommerce-Addon

Stripe Payment Gateway WooCommerce Addon is a free payment gateway plugin for WooCommerce. Setting a payment gateway with Stripe is made easier through this plugin. When configured, the plugin allows your WooCommerce store to accept credit cards payment on checkout. Stripe does this with a generated API. Paying won’t seem like they are redirected to a different site with its overlay appearance. Customers can choose to use and edit saved cards to speed up the checkout process. It also integrates well with refund options in WooCommerce 2.2 versions and above. Do note that an SSL certificate is still required for this to work.

9. Smart Manager for WooCommerce & WPeC

Smart Manager for WooCommerce & WPeC plugin gives you the functionalities of spreadsheet software like Excel within the WordPress Dashboard. It helps you manage products, product variations, customers, coupons and orders quickly with ease. No more tedious importing and exporting of data. The browser-like spreadsheet interface gets rid of distractions with a full-screen view. Typical store administration with WooCommerce will require you hundreds of hours. This plugin would reduce that significantly so you can focus on other important business aspects. The advanced search function will help you to easily manage large amount of data at once. The free version allows you to edit up to 3 items at once.


10. UltimateWoo

UltimateWoo

UltimateWoo plugin is like the JetPack for WooCommerce. The plugin provides access to a multitude of WooCommerce extension modules. UltimateWoo has a total of 72 modules that you can use to customize your WooCommerce store. These modules help manage analytics, reporting, e-mail, payment, products, sales, marketing, and shipping. For a complete rundown of all the modules, you can check out this page. A word of caution though, plugins with a lot of functionalities tend to add a lot of bloat to the site.

Conclusion

These are just some of the most useful plugins for WooCommerce. These 10 plugins will make WooCommerce much better for you. However, do note that you should only install plugins that you really need. While plugins are powerful tools when used properly, they can slow down your site. If this should happen, you could lose customers and your conversion rates would suffer.

What are your thoughts on this post? What other WooCommerce plugins do you think deserve a spot in this list? Let us know in the comments.

Filed Under: Theme and Plugin Reviews Tagged With: plugins, website development, WooCommerce, WooCommerce products

How to Add a Home Page Slider in Storefront Theme

March 9, 2016 By John 7 Comments

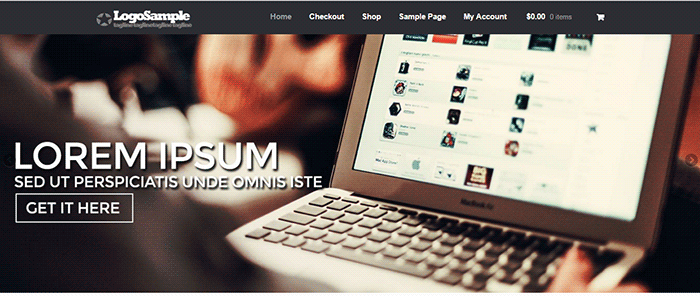
Storefront-home-page-slider_bannerContent sliders, also known as carousels, can contain complex arrangements of images, video and HTML content usually found top and center on your home page. Storefront however is about simplicity and by itself does not support sliders. You can however add a slider with the help of a plugin.

Should You Use a Content Slider on Your Site?

communication_i-am-rightMany websites overuse sliders and there has been a lot of debates about having sliders. E-commerce websites are able to present their products/services in a visually appealing way with the help of a slider. But a word of warning; sliders are not for every website. Many experts actually advise against the use of sliders.
It Causes Banner Blindness

Because many website owners are abusing the use of sliders, visitors tend to associate them with advertisements. And we all know what happens to advertisements, they get ignored. This is because web users have become increasingly indifferent with advertisements.

It Slows Down Your Site

The more complexity you add, the slower your page becomes. Packing three to five high resolution images alone can dramatically slow down your site. No matter how good or optimized your page is, no one can see it if your page takes too long to load. So keep your slides simple and avoid animations and layers. If you are only after the aesthetics value, there are a lot of alternatives to a home page slider that looks just as good and will not slow down your site.

Preparing Images for Sliders

There are a lot of things to consider when preparing images for your home page slider. Since this will be the largest element in your home page, it should be visually appealing and must convey the message efficiently.

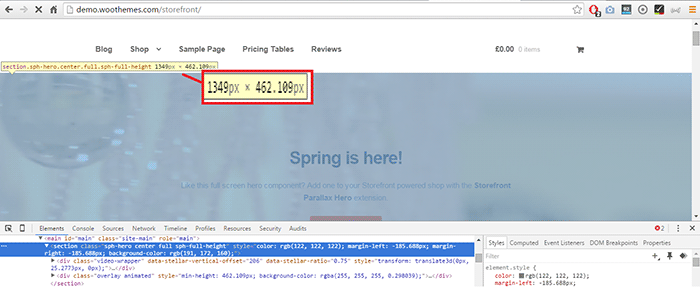
We recommend hiring a professional to do this for you. Before a graphic artist starts preparing your images, you must identify the size of your slider. This will depend on your placeholder. On your web browser, simply right click on the placeholder then click “Inspect Element”. You should be able to see the size of the placeholder in pixels.

Storefront_Placeholder_Inspect-ElementYou will most likely receive a large file from your graphic artist since the file will contain layers and other information about the image. You should request another copy that’s ready for web publishing or you can optimize the image yourself.
Here are some tips and ideas in preparing images for sliders.

  • Go for big, bold and bright images as these are what the human eye loves.
  • Avoid stock images. This will only make your images look like an advertisement and users will only ignore it. Taking your own photos or hiring a professional photographer is advantageous.
  • Your copy should be catchy. Avoid jargon and clichés. Make it short and simple. Copywriting isn’t easy so you might need to put in a bit more effort in finding the right words to help you sell your product/service. Have a strong call-to-action. Add some text or a button that tells the reader the action you want them to take like Shop Now or Download Free Trial.

Slider Plugins

Sliders use jQuery and CSS in its animations. Hence, it is necessary to have a lightweight slider plugin so that it won’t slow down your site significantly. Similarly, it is important to have a slider that is responsive. Since more and more people are browsing using mobile devices, a slider that works on small screen sizes is a necessity. Not to mention Google is now favoring mobile-friendly websites.

Here are some of the recommended slider plugins for WordPress.

Soliloquy Lite

Slider-plugin_Soliloquy-LiteSoliloquy Lite is built with performance in mind and is our slider plugin of choice. It is lightweight so it doesn’t add extra bloat to your site. Also, it is responsive making your WooCommerce site mobile friendly. In performance tests, Soliloquy has always been at the top. Its speed, responsiveness and ease of use are just top notch.

Meta Slider

Slider-plugin_Meta-SliderMeta Slider is both the best rated and the most downloaded slider plugin in the WordPress repository. It’s simple and has a user–friendly interface that it is well-received by the WordPress community.

WooSlider

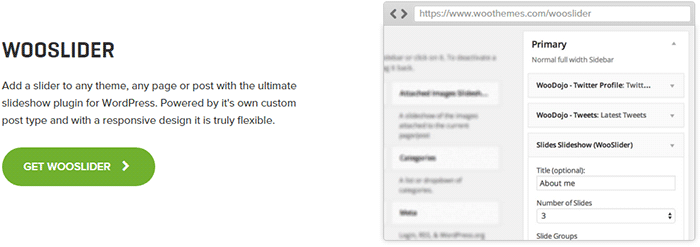
Slider-plugin_WooSliderWooSlider was made by WooThemes, the same people who developed WooCommerce and Storefront theme. Hence, you can expect that the plugin will work perfectly with WooCommerce and Storefront. WooSlider is a premium plugin and you can find out more about it in the plugin page.
Adding the Home Page Slider in Storefront

The guys that made Storefront built the theme with the philosophy to provide a basic, solid foundation to any WooCommerce project. Other WordPress themes already include multiple sliders in them and this adds unnecessary bloat to the website. Storefront lets you choose your own slider plugin should you decide you need one.

To add a full-width home page slider in Storefront, we need to make use of the extensive hooks conveniently provided by the makers of Storefront. For this example, we will use Soliloquy Lite.

How to Create a Home Page Slider in Storefront using Soliloquy Lite

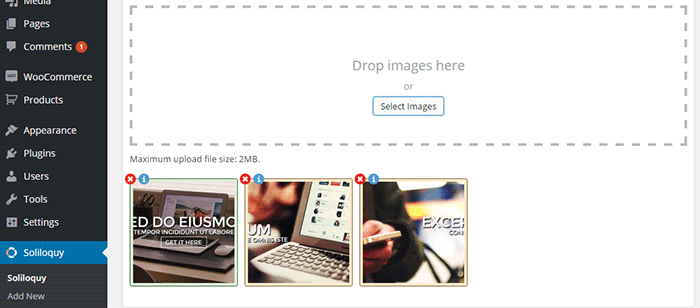
WordPress-Dashboard_Soliloquy_Add-New-Images

    1. Install and activate the Soliloquy Lite plugin.
    2. Prepare the images for the slider. Make sure they are of the right size and optimized for web publishing.
    3. On your WordPress Dashboard, click on Soliloquy > Add New. Select the slider images that you will be using.
    4. Go to the Config Tab to configure your slider settings. When you are done, click Update.
    5. Take note of the ‘shortcode’ for your slider. It will be something like [soliloquy id=“102”]. You have to remove the quotation marks inside the shortcode so it would look like [soliloquy id=102]
      • Note: The next steps require technical knowledge. This is a very delicate process and one mishap could cause your entire site to go down. If you do not know what you are doing, we would advise on having a developer do this step for you. An alternative is to use My Custom Functions plugin to prevent a fatal error on your site.
    6. Add the piece of code below to your theme’s functions.php file.
    7. Replace the shortcode in the code we provided with the shortcode of your slider.

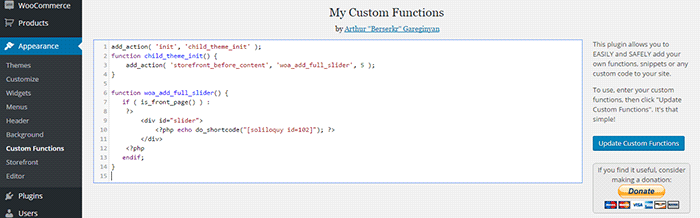
WordPress-Dashboard_Appearance_Shortcode-Slider

add_action( 'init', 'child_theme_init' );
function child_theme_init() {
      add_action( 'storefront_before_content', 'woa_add_full_slider', 5 );
}

function woa_add_full_slider() { 
 if ( is_front_page() ) :
      ?> 
            <div id="slider">
                    <?php echo do_shortcode("[soliloquy id=102]"); ?>
            </div> 
      <?php
 endif; 
}

Using Other Plugins

The code above makes a container where you can put your slider shortcode. You can use this code in any slider plugin as long as it has shortcode capabilities. Just replace the ‘shortcode’ in the code we provided and you’re all set.

There are a lot of free and premium sliders out there that you can try. The important thing is to choose a slider plugin that is lightweight, responsive and addresses your individual needs. It is very easy to get carried away and use a complex slider plugin that offers lots of animation and layers but note that this will significantly slow down your site. Always remember to keep sliders simple.

If you have any questions or anything you’d like to add, please let us know in the comments.

Filed Under: Code Snippets, How-To Articles Tagged With: code snippet, design tweaks, plugins, Storefront, WooCommerce

How to Center Logo in Storefront Theme

February 12, 2016 By John 35 Comments

Centering the logo on a WordPress site is a popular design concept, but doing it can be tricky. Most themes, Storefront included, are styled with the logo aligned to the left.

While you can use a premium plugin like Storefront Designer to center the logo, you can edit your child theme’s CSS instead. There are two benefits in doing this manually. For one, you don’t have to buy a plugin. Secondly, you don’t add extra bloat to your site.

How to Center Logo in Storefront with CSS

Centering Your Logo with CSS

Before anything else, you should install a child theme on your site otherwise the changes you make will be lost every time you update your theme. Alternatively, you can use Simple Custom CSS Plugin which creates a new stylesheet that won’t get overwritten.

Add the following code to your child theme’s styles.css:

@media screen and (min-width: 768px) {
	.site-branding{
		text-align: center;
		margin: 0 auto !important;
		float: none !important;
	}
}

Text align and margin set the margin to adjust accordingly to the sides. We need to place “!important” in that line to make sure that it gets priority and doesn’t get overridden by other CSS codes.

We also need to override the default “float:left;” code so that it won’t stick to the left. We do this using “float:none !important;”.

To make sure these styles don’t affect the mobile version of your site, we set a minimum width in the selector.

Doing Away with the Secondary Menu and Search Bar

If you are using Storefront out of the box, the secondary menu and the product search bar will still be in the way. We need to do something about that next. Temporarily, the header will look something like this.

Doing Away with the Secondary Menu and Search Bar

To remove the secondary menu, go to Appearance > Customize > Menu > Menu Locations and do not set the secondary menu to anything.

To move the search bar inline with the main navigation and cart menu, you have to paste the code below to your functions.php file. A word of warning, do not proceed with this step if you do not know what you are doing. One slip up here could cause your site to go down and become inaccessible. Alternatively, you can install My Custom Functions plugin to insert the code. The plugin warns the user the code will cause a fatal error.

add_action( 'init', 'jk_remove_storefront_header_search' );
function jk_remove_storefront_header_search() {
remove_action( 'storefront_header', 'storefront_product_search', 	40 );
add_action( 'storefront_header', 'storefront_product_search', 	70 );
}

After this step, your site will look something like this.

Move search bar inline with the main navigation and cart menu

The product search bar is still not inline with the main navigation as you can see. The CSS code below will adjust the width of the main navigation so that the search box won’t warp around to the bottom.

/*adjusting the width of the main-navigation*/
.woocommerce-active .site-header .main-navigation {
	width: 50%;
}

Applying the CSS code above will result to this. Now, the only thing left to do is to resize the search box using CSS.

Adjust width of main navigation for search box to un-warp around the bottom

Putting Everything Together

Put everything inside the media screen brackets, together with the CSS code for the resizing of the search box. The final CSS code will be:

@media screen and (min-width: 768px) {
	/*centers the logo*/
	.site-branding{
		text-align: center;
		margin: 0 auto !important;
		float: none !important;
	}
	/* adjusts the width of the main navigation container to accommodate the search box in the same line*/
	.woocommerce-active .site-header .main-navigation {
		width: 50%;
	}
	/* positions the search icon properly in the search box*/
	#masthead .site-search .widget_product_search form:before {
		top: 1.75em;
		left: .75em;
		position: relative;
	}
	/*  resizes the search box*/
	#masthead .site-search .widget_product_search input[type=search],#masthead .site-search .widget_product_search input[type=text] {
		padding: .5em .5em .5em 2em;
		line-height: 1;
	}
	/* places the search box to the left of the cart menu(optional)*/
	.woocommerce-active .site-header .site-search {
		float: left;
	}

}

And you’re done. The outcome should look something like this.

Storefront Center Logo_Final

If you are unable to achieve this with the above code snippets, it could be that you are using a child theme that has codes that conflict with the codes above. Feel free to post your questions in the comments section.

Filed Under: Code Snippets, How-To Articles Tagged With: code snippet, CSS, design tweaks, how-to, mobile friendly, Storefront, WooCommerce, WordPress

Update Plugins and WordPress Core of Your WooCommerce Store

January 29, 2015 By John Leave a Comment

Just like websites, hacking is changing and evolving. Hackers are always on the lookout for new ways to exploit and infect all kinds of websites, including online stores. They adapt, and can even get one step ahead of developers.

If you’re not careful, your WooCommerce store could be targeted and compromised. This underlines the need to update plugins and core of your WooCommerce store.

Protect Your Site from Hackers

One of the primary culprits of being targeted by hackers is the failure to update plugins.It has been proven to be disastrous to WordPress websites and blogs.

It’s a good idea to keep your plugins up-to-date and delete those that are not in use. There are also security plugins out there that will protect your website for free. This article can give you detailed tactics on what to do once your site gets infected, as well as tips on preventing a cyber-attack.

Some steps are being made to have this done automatically. You now have the option to do core updates through WordPress.org. Here’s an interesting post on what we might get in the future.

In the meantime, the responsibility lies with you. You need to arm yourself with the right knowledge, such as these WordPress security tips. As a WooCommerce store owner, it’s one of your top priorities to make hacking as difficult as possible. Keep these methods in mind.

Back-up Your Website

While updating plugins and WordPress might seem like an easy chore, it can be more complicated than that. It doesn’t work with just one click.

Before updating plugins such as WooCommerce, and your WordPress core, make sure that you have a current backup of your site. Just in case something goes wrong, you’ll have a fall-back.

SnapCrab_2015-06-26_15-32-30_No-0000

It’s not uncommon for many websites to go down after installing an update. In some cases, you can even be locked out of your WordPress admin panel. While it may seem like a serious problem, it is actually easy to solve.

Just access your website’s files with an FTP client, find the folder of the plugin you updated, and just delete that plugin. If you updated multiple plugins, you can try deleting or renaming the specific plugin folders to find the culprit.

If your site goes down after updating your WordPress core, that’s a little more complicated. Learn how to backup your WordPress site here.

Wooassist Team Site Updates

Make sure that your WordPress core and plugins are always updated. It isn’t too difficult once you take the necessary measures. However, it can escape your notice if you’re quite busy and have a lot of things on your mind.

To ensure that problems with updates are immediately addressed, it would be a good idea to have a developer on board to handle the job. Better yet, have a developer do all your updates at regular time intervals. Handing over the responsibility to the Wooassist team is a viable option for you. As long as you have pre-paid credits in your account, we can automatically work on updating your WP Core, Themes and Plugins at regular intervals, either every fortnight or every month, depending on your preference.

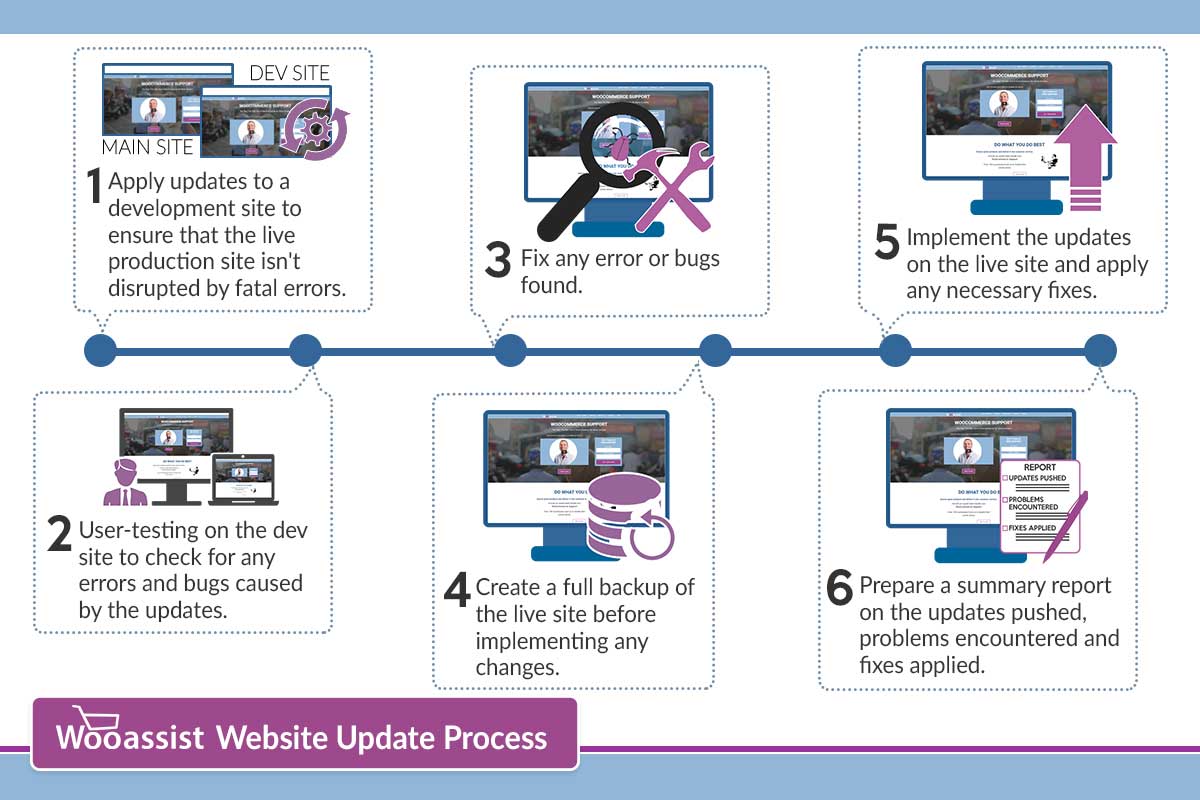
How we do updates (click to enlarge image):
wooassist-website-update-process

Although it might be possible to skip most of these steps, proceed directly to updating the live site and wait for whatever errors to come up, it may end up causing irreversible damage to your site. This could cost you thousands of dollars in lost sales and having support services spend more time fixing the issue when it could have been easily avoided in the first place.

On average, we take around 2 to 3 hours implementing the entire process when done once every month. We take pride in our service and do not cut corners and take shortcuts. If in the rare occassion that we miss an error that was created due to the updates, we will have it resolved at top priority.

Letting us do your site updates for you will rid you of having to worry about this part of website ownership altogether leaving you with peace of mind and time to focus on growing your business.

Filed Under: How-To Articles Tagged With: backup, how-to, plugins, security, Wooassist, WooCommerce, WordPress

  • « Previous Page
  • 1
  • …
  • 10
  • 11
  • 12
  • 13
  • 14
  • 15
  • Next Page »
Let us support your online store so you can manage your business

Get started today

Get 2 Hours of FREE SUPPORT

We are so confident that you will love our services that we will give you your first 4 hours at a 50% discount

That’s 4 hours for only $75

BUY NOW

Free eBook

5 Things Every Online Store Can Fix On Their Website In The Next Week To Increase Sales

Quick Links

  • How it Works
  • Pricing
  • Blog
  • Contact
  • About Wooassist
  • My Account
  • Checkout
  • Privacy Policy
  • Cookie Policy
  • Terms and Conditions

Wooassist

Australia:
59 Luke St.
Hemmant QLD 4174

Philippines:
San Miguel St.
Poblacion, Iligan City 9200

Connect


Copyright © 2026 · Wooassist

Yours FREE!

5 Things Every Online Store Can Fix On Their Website In The Next Week To Increase Sales