Wooassist

Assistance for Your Woocommerce Store

  • How it Works
  • Pricing
  • Services
    • Site Maintenance
    • AI SEO and Content Marketing
  • Blog
    • How-To Articles
    • Code Snippets
    • SEO For E-Commerce
    • Theme and Plugin Reviews
    • Wooassist News
    • WordPress/WooCommerce News
    • Interviews
  • About Us
  • Contact
You are here: Home / Archives for How-To Articles

Google Mobile Friendly Update: Is Your Online Store Ready?

May 4, 2015 By John Leave a Comment

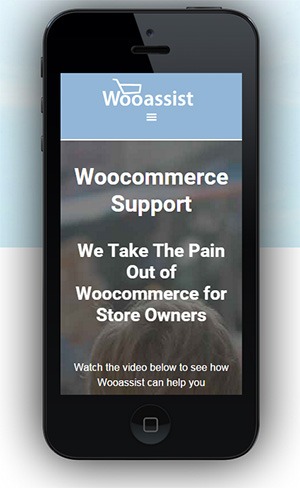
wooassist-iphoneGoogle mobile friendly update to penalize non-mobile friendly websites is out. Don’t tell me you didn’t see this coming. As more people used mobile devices to surf the internet, Google had to act. It was only a matter of time before Google started prioritizing websites that are optimized for mobile devices. The new algorithm came into effect April 21.

If you have an e-commerce store you should be concerned about all updates from Google. For a lot of online stores, the success of your business depends on Google. This update could destroy your rankings if your website is not mobile responsive. If ranking high in Google is a big part of your revenue strategy then this could be disastrous for your business.

What You Should Do

Use this Mobile-Friendly Test. If your website passes the test, then you have nothing to worry about. But if your website fails the test, you’ll be presented with suggestions on how you can resolve the problem.

If you have an e-commerce store using WooCommerce, there are a lot of responsive WordPress themes that you can use. These responsive themes are optimized for use on mobile devices. WooTheme’s own Storefront theme made especially for WooCommerce is responsive so that’s worth a look. We can also recommend Genesis themes from StudioPress.

How Much Will it Cost?
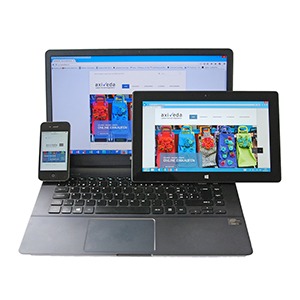
mobileThat question is a bit like. “I need a car. How much will that cost?” Of course, the answer is, “It depends”. But to give you an example, we have recently upgraded a few clients themes to the new Storefront theme for between $400-$600.

When upgrading a theme, you tend to notice things that you probably should have noticed on the original site, and need to update those as well. So setting a budget of $1000 – $1500 is probably more realistic.

Should You Have Made Your Site Responsive 12 Months Ago Anyway?

This update by Google might just be the thing that most store owners needed to push them into action. Non-responsive ecommerce sites are more than likely leaving a lot of money on table. There is some strong evidence to support this: 14-brands-that-increased-conversion-rates-via-responsive-design

For example, O’Neill Clothing’s redesign achieved some fairly spectacular results on iPhone/iPod:

  • Conversions increased by 65.71%.
  • Transactions went up 112.5%.
  • Revenue increased by 101.25%.

Similarly, on Android devices:

  • Conversions shot up by 407.32%.
  • Transactions increased by 333.33%.
  • Revenue increased by a whopping 591.42%.

Personally, we haven’t seen results this good on the sites we manage. But nonetheless, all responsive redesigns we have done have paid for themselves within 6 months.

The Mobile Friendly Algorithm

Like usual, Google’s algorithm remains a trade secret. It is now up to SEO experts to try to figure out what the algorithm considers in its ratings. Google is actually forgiving this time around as they did provide that tool that will let you check if your website meets their mobile-friendly standards.

If you want to see what your ecommerce store looks like on different mobile devices, you can use this mobile user testing tool. This tool emulates screen sizes of the most popular mobile devices so you can see exactly what your site looks like on a mobile device.

What Sites Were Affected

According to an article from USA Today, the algorithm update could affect as much as 40% of top websites.

Here is the test result of one website that did not meet Google’s mobile-friendly update.
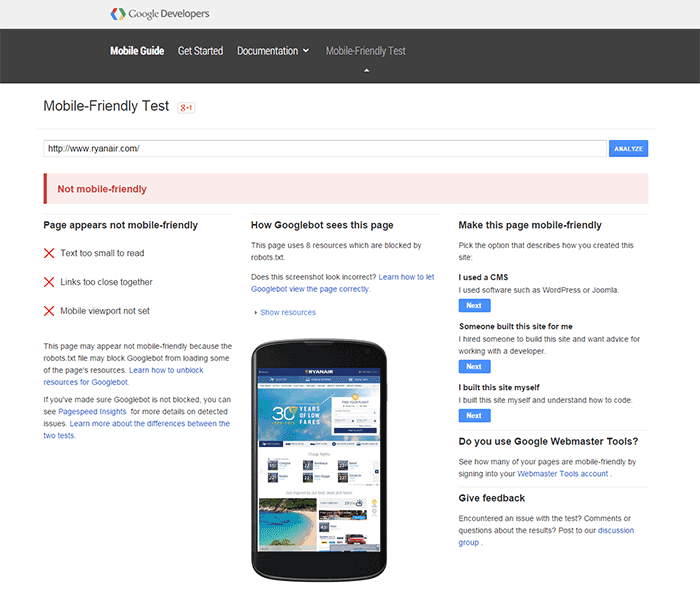
ryanair-non-mobile-friendly

A few weeks before the new algorithm came into effect, tech website TechCrunch tested the websites of Fortune 500 companies. Surprisingly, 44% of Fortune 500 companies’ websites did not pass the mobile-friendly test. So if your ecommerce store didn’t pass the test, you are not alone.

I Failed the Mobile Friendly Test. Should I be Worried?

Well, you should be worried. Still, according to an article from Search Engine Land, it’s not too late to act. You can still fix your website. While some changes in rankings were seen just a day after the update, these changes were not significant. This does not mean you shouldn’t bother doing anything. Sooner or later, Google could clamp down and bring harsher penalties to non-mobile friendly websites. Don’t wait for it to hit hard before you do something.
Filed Under: How-To Articles, SEO For E-Commerce Tagged With: e-commerce, Genesis, Google+, how-to, mobile friendly, responsive design, Storefront

How to Set Store Location and Currency in WooCommerce

May 13, 2015 By John Leave a Comment

After installing WooCommerce you have to make sure that it will run based on your geographic specifications. You will need to set store location and currency in WooCommerce. Changing these settings is really quite simple. You can do this if you head over to your WordPress dashboard and navigate to WooCommerce settings under the general tab.

Setting Your Location

To set your location, head over to WooCommerce settings under the General Tab. Here you can set your store’s location.

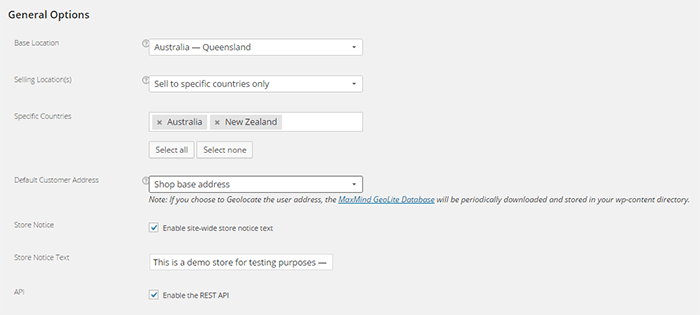
Here’s what you should see:

location-settings

Base Location

Under Base Location, you should state your base country and/or state. This setting also affects tax rates and customer locations.

Selling Location

Under Selling Locations is where you state where you sell your products. You can choose just one location or a few countries/states. If you ship your products globally you should specify “Sell to All Countries”. If you are only selling to specific location, choose “Sell to specific countries only” and a new field will come up which will let you add specific locations.

Default Customer Address

Under Default Customer Address, you can choose what the system will identify as the client’s location before he/she enters her location. Choosing “Shop base address” assumes that the client is located where your store is located. Choosing “No address” assumes no location. Choosing “Geolocate address” will verify the client’s location through Maxmind Geolite Database.

Setting Your Currency

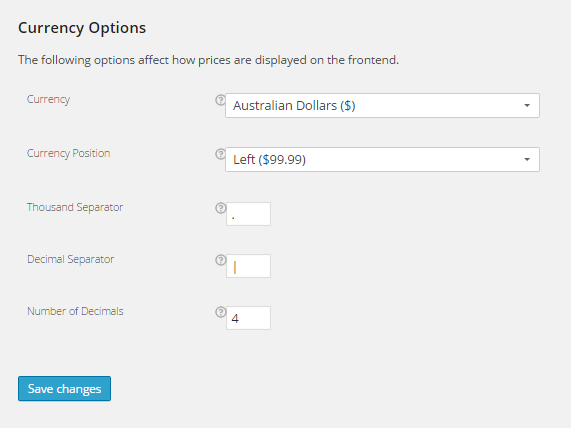
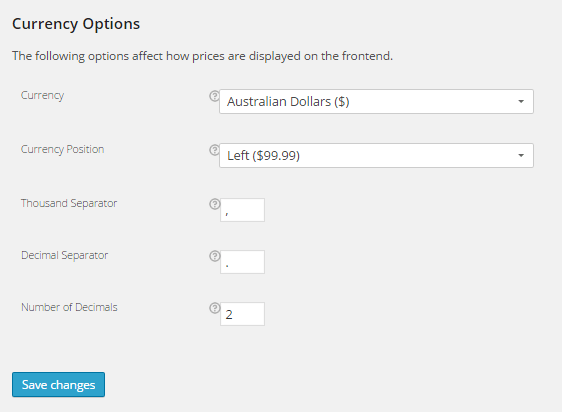
Below the location setting, you can see your WooCommerce store’s currency options.

Currency

Under Currency, you can set your store’s default currency. You can only set one currency here.

currency-options

Currency Position

Currency position lets you set the default position for you currency symbol. You can set it to the left, right, left with space, or right with space. Below you’ll see a comparison of the different options for this setting.

different-prices

Thousand Separator and Decimal Separator

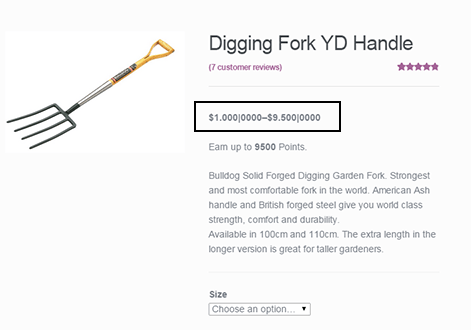
These settings let you set what symbol to use as the thousand and decimal separator for the prices displayed on your store. The image below show what the price would look like if you edit these.

changing-price-settings

changed-settings

Number of Decimals

This setting sets the number of decimal places shown on your prices. In most cases, 2 decimal places will do but if you should need more, you can always add more.

location-settings

Now that you’ve set your store’s location and currency, you can soon start selling to the market that you are targeting.

Filed Under: How-To Articles Tagged With: admin, e-commerce, how-to, WooCommerce, WordPress

How to Set Up a WooCommerce Store – Infographic

July 21, 2015 By John Leave a Comment

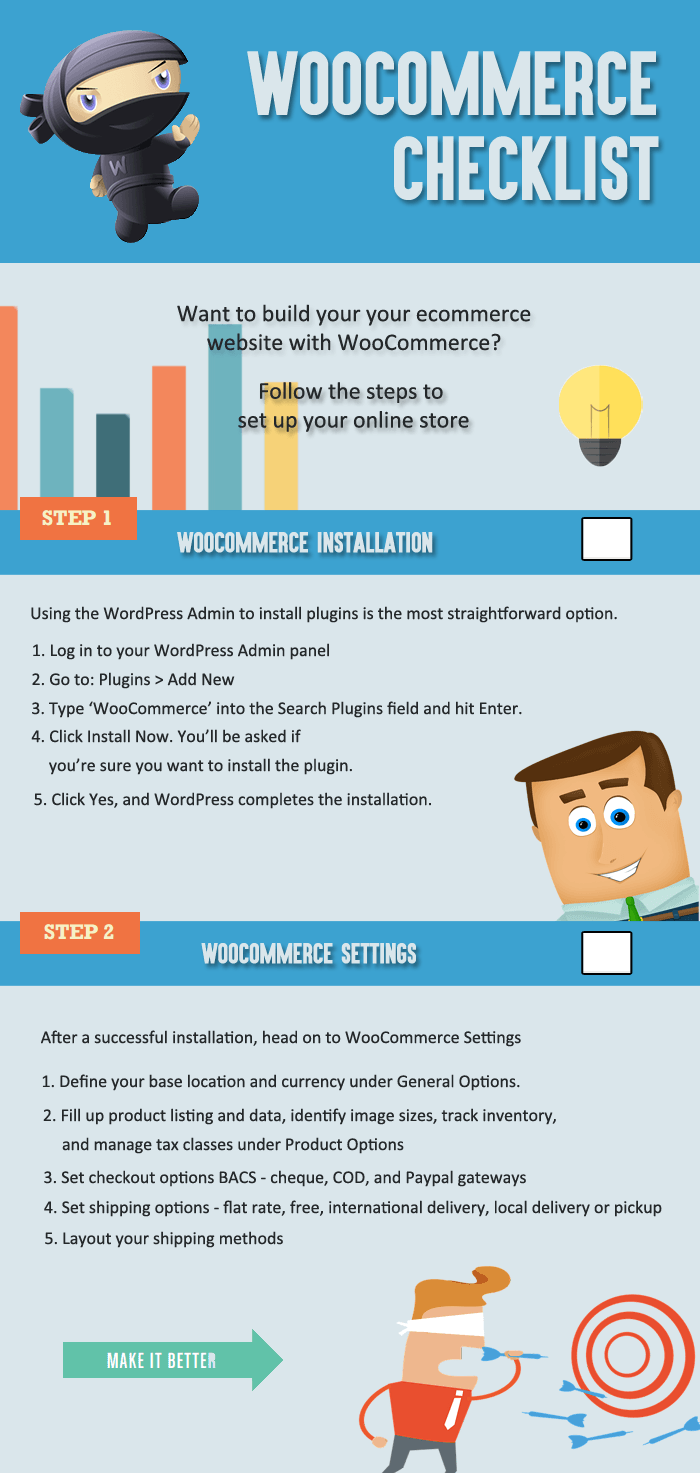
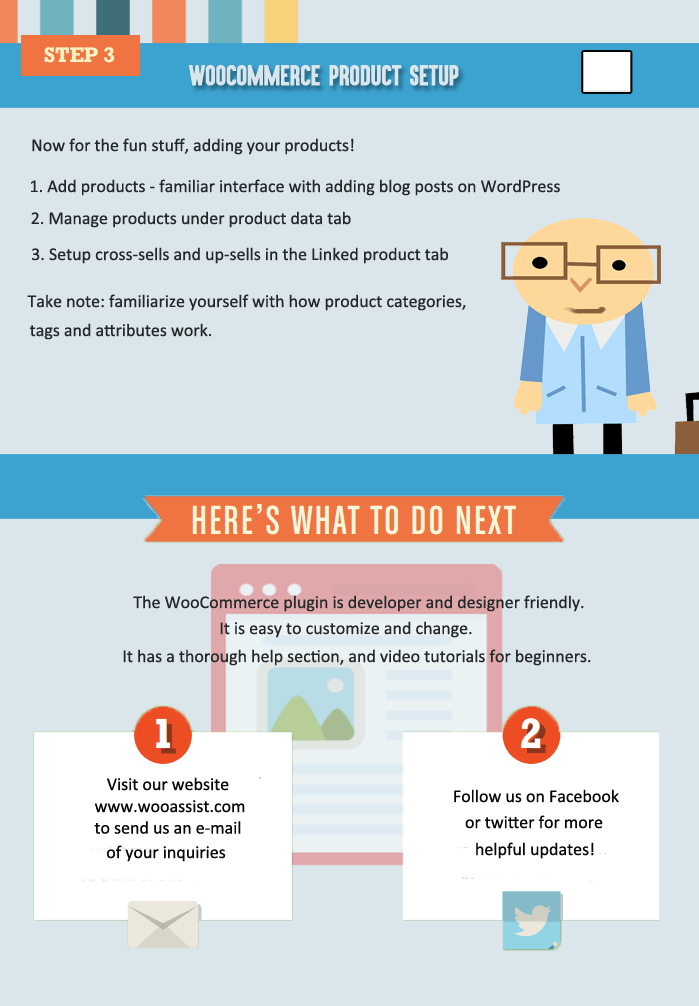
Do you want to build an on online store? Creating one is easy with WooCommerce. Here’s a handy WooCommerce infographic that can guide you on the process.

woocommerce_checklist_1 woocommercechecklist_2

Filed Under: How-To Articles Tagged With: e-commerce, how-to, infographic, website development, WooCommerce, WordPress

How to Outsource Creating Products for WooCommerce

October 14, 2015 By John Leave a Comment

Outsourcing tasks can make your e-commerce store more profitable. When managing a WooCommerce store, you will need to add new products regularly. Sure you can do it yourself but shouldn’t you be doing more important things? When you outsource creating products for WooCommerce, you save precious time.

outsource-creating-products

Before you outsource creating products for WooCommerce, you have to get your information organized. This ensures that the task will be done properly.

Here are a few things you should prepare before handing over any WooCommerce product creation task.

Documentation

You need to have a “workspace” where can you document all the elements of the products. This can be in project management software like Asana or Basecamp or a Google doc. We at Wooassist have created a spreadsheet template that you can use for handing over product creation tasks to a WooCommerce expert. You can download it here. Just fill it with the information on the products that you want to add to your WooCommerce store.

After you have the same contractor do this for you a few times and they are starting to get comfortable with your product range, they will be able to fill out a lot of this spreadsheet themselves. You will be able to just send them the links to suppliers and competitors sites and save you even more time.

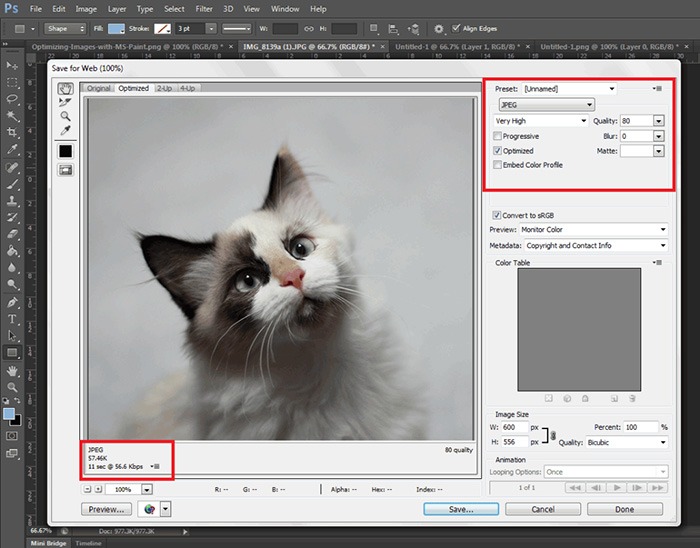
Optimizing Images for Product Pages

When selling online, having good images is crucial, since people need to see what they are buying.  Your contractor should have intermediate image editing skills.

optimizing-images

It is best practice have uniform image sizes on your site. When you set product image dimensions in WooCommerce settings, always keep your images to that same resolution and have this written clearly on your product creation documentation. Check out this post to learn more about optimizing images for web.

Writing Persuasive Copy

If you are at all serious about selling your products online, then you should have persuasive copy. We recommend outsourcing a professional copy writer. Putting a great deal of attention to writing persuasive copy for your products will help you convert more. For creating good product descriptions, you can check out our post on how to write persuasive copy.

persuasive-copy

You can give your product creation contractor a go at creating the copy and you might be pleasantly surprised, but more than likely you will need the help of a professional. Once you find a copy writer you are comfortable with, your product creation contractor can manage this specialist saving you time.

Different Types of Woocommerce Products

In WooCommerce, there are different product types: Simple, Grouped and Variable products. If you are not familiar with these product types, you can check out the WooCommerce Documentation for Managing Products.

Simple Products

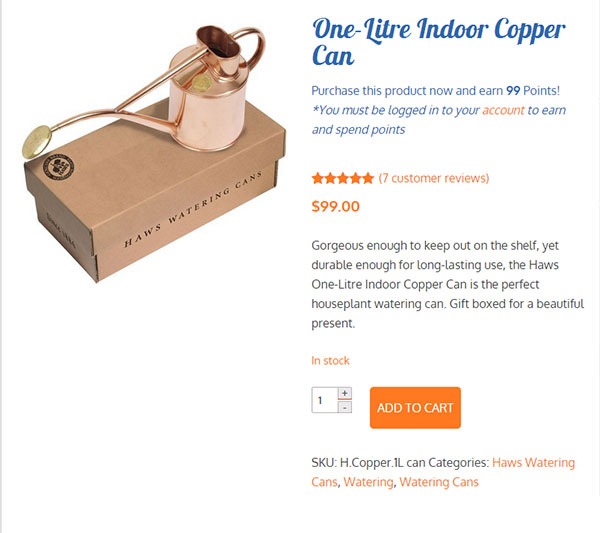
Simple products include: product name, SKU, inventory, price, sale price (if you are offering a discount), category, product tags if any, long and short product description, and any specific instructions.

simple-product

Upload your images to a file sharing website and be sure to include the download link in the spreadsheet. Before you do that, make sure you use folders and appropriate file names for easy identification. There is a field where you can put the link in the spreadsheet we created. For sharing files, we recommend Dropbox or Google Drive.

Grouped Products

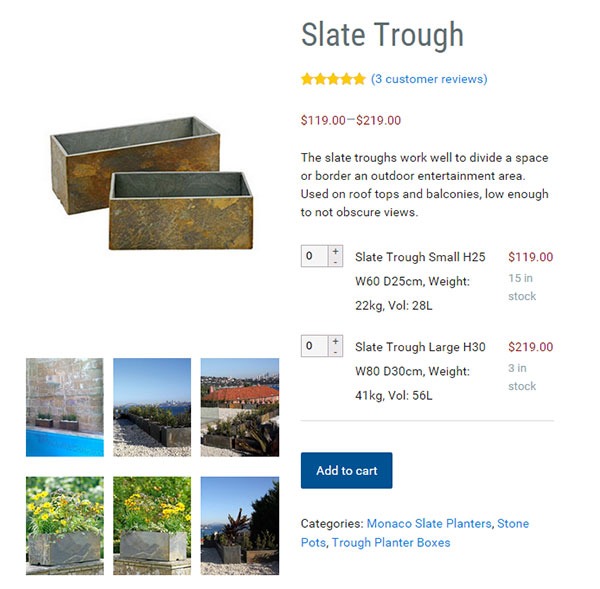
For Grouped Products, it becomes a bit more complex as this involves grouping two or more simple products. However, the information that you need to provide is no different from the information required for simple products.

grouped-products

If you are going to set the simple products as “not viewable individually”, you won’t need to provide images or descriptions for each simple product. You only need to state the product name, price and inventory for the simple products. All the other information should go to the grouped product.

If you are going to make each simple product viewable then it makes sense to outfit each simple product. And that means complete images, complete product descriptions and everything else necessary.

Variable Products

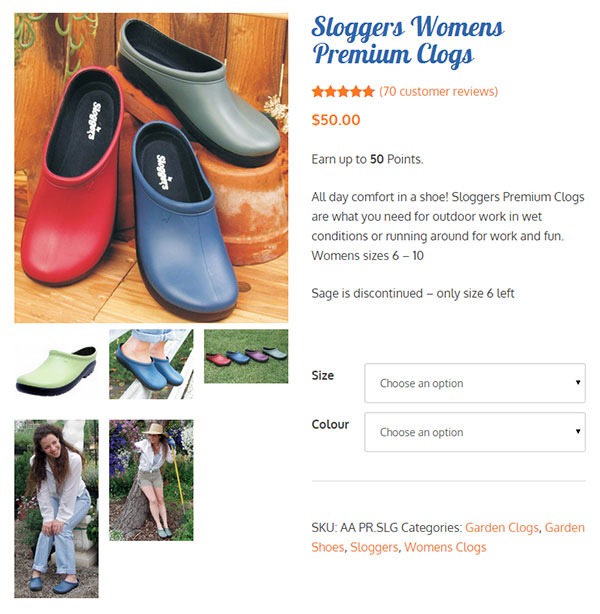
Variable Products deal with different product attributes. When sending information to your WooCommerce product expert, you should include the attributes for the product.

variable-products

For example, if you are selling shoes, you can have several product attributes such as size, color or type (laces or straps). That will result in multiple variations of the product.  You need to provide information for each product variation. In some cases, different product varieties will have different prices. So make sure you include the price for each product variation. If you downloaded the spreadsheet we prepared, you just need to fill in the details.

Recommended Websites to Outsource Work

There are a lot of websites out there that provide freelance services and they have a lot of WooCommerce experts. We can recommend Elance and Upwork, formerly known as Odesk. And of course, we also highly recommend our team of WooCommerce experts at Wooassist. Our expert team from the Philippines can help you out with whatever problems you are having with your WooCommerce store.

Summary

This process takes time to develop. Clear documentation is the key, followed closely by developing a good relationship with a Woocommerce product expert. The better and more familiar your contractor is with your products the easier it will be for you to create the documentation.

It will take you longer to create these processes than to do the task yourself initially, but will save you hundreds of hours in the long run. I have 2 Woocommerce stores that sell physical products and I have not created a product myself for over 3 years. I plan on keeping it that way.

Filed Under: How-To Articles Tagged With: admin, copy writing, how-to, image optimization, outsourcing, task management, WooCommerce, WooCommerce products

How to Set up Redirects for WordPress Sites

January 5, 2016 By John Leave a Comment

dead-end-404
Error messages discourage site visitors from coming back to your website. It is frustrating for users to receive 404 Not Found Errors and this is bad user experience. Often, the visitor would just exit after reaching a 404 error.

Now you wouldn’t want that would you? In this post, we will teach you:

  • What is a 404 error?
  • Why you should fix 404 errors?
  • What is a redirect?
  • How to fix 404 errors.
  • How to set up redirects for WordPress
  • How to create custom 404 error pages

404-errorWhat is a 404 Error?

A 404 Error (or HTTP Errror 404 – Not Found) appears when a website or page that want to access on the server could not be found. It is a standard response showing an error on the client’s side or browser and may appear in different ways because this can be customized. This is typically caused by a broken link for moved, renamed or deleted pages. You also get a 404 error mistyped or misspelled URLs.

Why You Should Fix 404 Errors?

This type of Error message might appear simple and unimportant but this can do a lot of harm to your business. It affects your web presence and your reputation as a business as it is reflective of how well you manage your website.

Experts say that attention span of the average user decreased greatly due to the huge amount of data available online. A site visitor would normally just spend a few seconds to and sometimes a few minutes when visiting a website. Getting 404 Errors can be annoying to site visitors and it usually results in a bounce.

Your site will be remembered as “that site with the 404 error” which could discourage them from visiting your site again. In a survey of online shoppers in Spain, 14% of the participants indicated ’page errors’ as the reason why they did not return to a website.

In the technical aspect, numerous dead links can negatively impact your SEO so it is best to create redirects for any changed URLs or deleted pages especially if you have backlinks pointing to that URL. Redirects help with your SEO as it salvages any backlinks that 404 error page might have.

What is a Redirect?

redirection person on arrowsA redirect is a means of pointing a URL to another URL. There are many types of redirects but you only need to know two of them. A 301 redirect is a permanent redirect whereas as a 302 redirect is a temporary redirect. A 302 redirect is generally not recommended unless you are an SEO expert and you know what you are doing because different search engines process 302 redirects differently. To know more about the different types of redirects, you can check this blog post.
How to Fix a 404 Error using Redirect Plugin

Redirection is not yet a standard feature in WordPress so you would need a plugin to help you with this. The first thing you have to do is install the Redirection Plugin for WordPress and activate it after installation.

This plugin by far is the most popular and actively used among many other similar plugins. You can use CSV files to easily manage a huge list of redirects. Just head over to the “Import” section and upload your CSV file. This is a pretty useful when migrating a website and you need to edit hundreds of URLs.

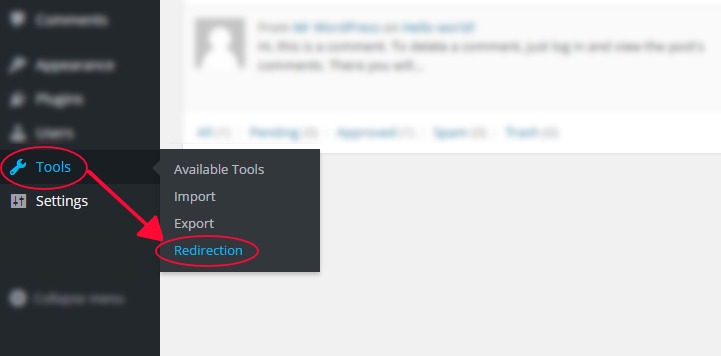
Once you have the plugin installed and activated, go to Tools and then click on Redirection. This plugin allows you to set your redirects complete with logs for all the URLs that you redirect, the plugin also helps you find 404 errors within your website.

tools-redirection-plugin

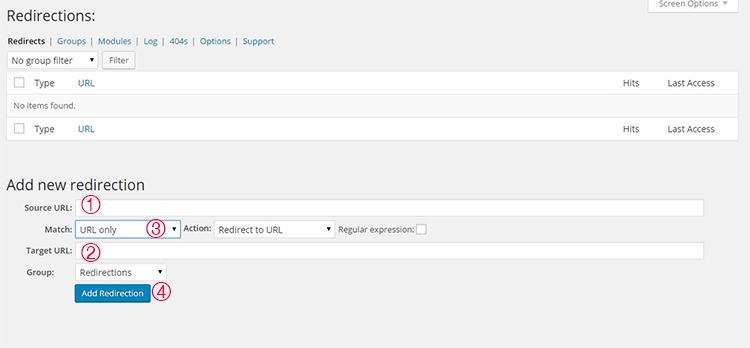
Once you have accessed the tool you will see that you will be presented with a list of redirects that you have set. Below that, you can see the “Add New Redirection” section and this where you add new redirects.

To add a redirect, just follow these 4 simple steps.

  1. Enter the URL of the link that you want to redirect in the ‘Source URL’ field. You don’t need to input the entire URL, just the slug will do. For example, instead of typing ‘http://www.mywebsite.com/page’, you can just input ‘/page’.
  2. Input your destination URL inside the ‘Target URL’ box. If needed, you can actually point the destination URL to an external URL. And just same, you can just type the slug.
  3. Make sure that ‘Match’ is set to ‘URL only’ and ‘Action’ is set to ‘Redirect to URL’. You can choose different settings based on your needs but if you want a standard redirect, the above will do.
  4. Submit by clicking on ‘Add Redirection’.

redirection-plugin

If you want to organize your redirects, you can create groups by clicking on the ‘Groups’ tab. You can just add future redirects in the groups you have created to keep them categorized. For more information on the plugin, you can visit the plugin developer’s documentation.

Other Plugins for Managing Redirects

There are many plugins for WordPress that could help you manage your redirects. Here are some top plugins that you could also check out.

Quick Page/Post Redirect Plugin

quick-page-post-redirect-plugin

True to its name, this plugin is easy to install and setup. It makes restructuring your website easier. You can choose two types of redirect functions — ‘Individual Redirects’ and ‘Quick Redirects’. Their ‘Individual Redirects’ are for redirecting existing pages and posts while the ‘Quick Redirects’ can be set up for pages that do not exist which is great for fixing typo errors and pointing an old URL to a new one.

All 404 Redirect to Homepage

As the name of the plugin suggests, this is a pretty straightforward tool that you can use. This is recommended for people who want to manage their 404 Errors by using the 301 redirection method. All your 404 will simply be redirected to your homepage. The plugin is simple uses minimal resources.

SEO Redirection Plugin

seo-redirection-plugin

This plugin, from the same developer of the previous plugin, helps you set redirections with ease. It allows for setting up various types of redirects. It also helps you monitor your website for 404 error pages. It has a Free and Pro version. The free version is good as is but if you want more options like redirecting folders and all its content and redirect all 404 Error Pages with ease, you can upgrade to the Pro version.

404 to Start

404-to-start-plugin

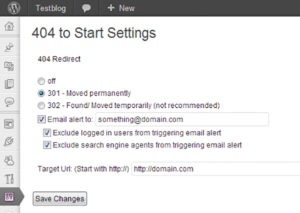
This has an optional email alert and a simple interface that will help you set redirects. You can set a 301 redirect or a 302 redirect which is generally not recommended.

404 Redirection

This plugin has surprisingly a very good rating. It is upfront, simple, and does the job well. It permanently points all your 404 Errors to your main blog URL so you can use the ranking from those missing pages and not let them go to waste.

404 to 301

404-to-301-plugin

Similar to the other plugins mentioned above, 404 to 301 does its job of redirecting 404 errors. But as a plus, it has a sweet email notification for any 404 errors so you can fix them quickly.

Creating Custom 404 error pages

Another way of effectively dealing with 404 pages is by creating a custom 404 error page. Having a custom 404 error page is a good thing to have for those 404 errors that are beyond your control such as when a user mistypes a URL. A custom 404 error page should show the visitor why they are receiving a 404 error and what they can do to fix it. It should also suggest some links on your website that they were probably looking for. You can check out our other post on creating custom 404 error pages for a detailed guide on how you can do this for your own site.

Conclusion

Having errors on your website is not good user experience. 404 errors in particular can harm your conversion rates. Setting up redirects to fix 404 errors is easy with the help of a plugin. Checking for 404 Errors and setting up redirects should be a part of your monthly or weekly website maintenance. And while a 404 error will not harm your SEO, a little extra time fixing them can save you from bigger problems in the long run. How do you fix 404 errors on your website? Let us know in the comments.

Filed Under: How-To Articles Tagged With: 404 error, best practices, how-to, plugins, redirection, WordPress

  • « Previous Page
  • 1
  • …
  • 22
  • 23
  • 24
Let us support your online store so you can manage your business

Get started today

Get 2 Hours of FREE SUPPORT

We are so confident that you will love our services that we will give you your first 4 hours at a 50% discount

That’s 4 hours for only $75

BUY NOW

Free eBook

5 Things Every Online Store Can Fix On Their Website In The Next Week To Increase Sales

Quick Links

  • How it Works
  • Pricing
  • Blog
  • Contact
  • About Wooassist
  • My Account
  • Checkout
  • Privacy Policy
  • Cookie Policy
  • Terms and Conditions

Wooassist

Australia:
59 Luke St.
Hemmant QLD 4174

Philippines:
San Miguel St.
Poblacion, Iligan City 9200

Connect


Copyright © 2026 · Wooassist

Yours FREE!

5 Things Every Online Store Can Fix On Their Website In The Next Week To Increase Sales