Wooassist

Assistance for Your Woocommerce Store

  • How it Works
  • Pricing
  • Services
    • Site Maintenance
    • AI SEO and Content Marketing
  • Blog
    • How-To Articles
    • Code Snippets
    • SEO For E-Commerce
    • Theme and Plugin Reviews
    • Wooassist News
    • WordPress/WooCommerce News
    • Interviews
  • About Us
  • Contact
You are here: Home / Archives for How-To Articles

How to Change Checkout Form Heading in WooCommerce

February 26, 2015 By John 2 Comments

Here’s a neat trick if, for some reason, you want to change the checkout form heading in WooCommerce. By default, the heading is named “Billing Details” and you can change this to whatever you want in just a few steps.
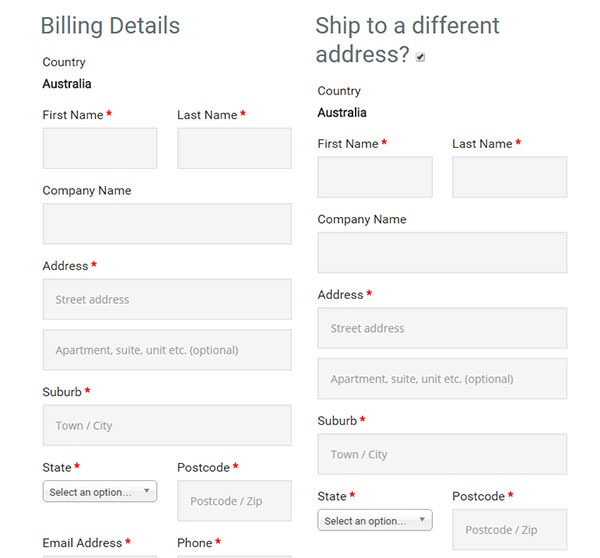
checkout form heading in WooCommerce billing-details

First off, you’ll need to copy the template to your theme or more specifically, your child theme since you definitely should be using one.

The template can be found at:

\woocommerce\templates\checkout\form-billing.php

You should copy and paste it at:

\yourtheme\woocommerce\checkout\form-billing.php

Afterwards, just open the copy that you pasted into your theme and find the following lines of code:

<?php if ( WC()->cart->ship_to_billing_address_only() && WC()->cart->needs_shipping() ) : ?>

	<h3><?php _e( 'Billing & Shipping', 'woocommerce' ); ?></h3>

<?php else : ?>

	<h3><?php _e( 'Billing Details', 'woocommerce' ); ?></h3>

<?php endif; ?>

Once you find it, simply change “Billing Details” to the text that you want to replace it with.
Filed Under: Code Snippets, How-To Articles Tagged With: checkout form, code snippet, design tweaks, how-to, shopping cart, WooCommerce

How to Rename Primary Menu in Mobile View for Storefront Theme

February 26, 2015 By John 6 Comments

Updated 18/2/16 : Storefront Theme was updated. Adding a filter hook to rename the navigation.

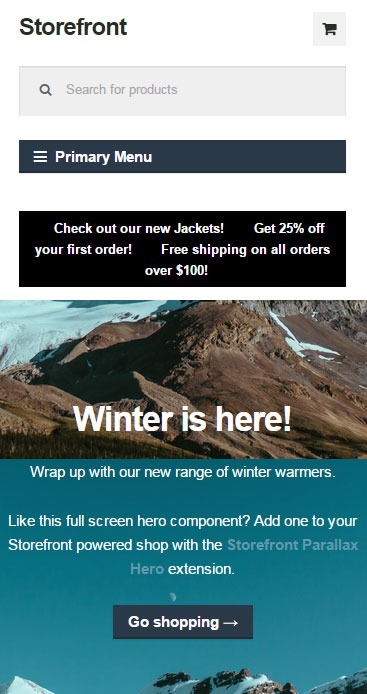
Rename Primary Menu in Mobile View for Storefront ThemeIf you have donned the Storefront Theme by WooThemes and tested the mobile view, you might have noticed that your main navigation/menu turns into a collapsible menu. While this menu does serve its purpose in the mobile view, it being named “Primary Menu” isn’t very desirable. You most likely need to change it to something more appropriate for your needs.

Different websites have different navigations so from the theme developer’s standpoint, putting in a not very descriptive text like “Primary Menu” will serve its purpose just fine. But for a website owner like you who knows what he wants, you’d want something more specific for that mobile collapsible menu. Maybe you’re selling your own line of apparel and your menu is filled with different product categories, so you want the text to be something like “Product Categories”, “Browse Clothing Line” or maybe even make it a call-to-action like “Shop Now” or “Shop Online”. Bottomline, you know what you need the text to be on that mobile collapsible menu. Lucky for you, it’s easy enough to accomplish with a few lines of code.

Get a Child Theme

Before we proceed, make sure you are running your website on a child theme. To begin with, there is really no reason why you shouldn’t have a child theme unless you want any changes you made to your theme to disappear whenever the theme updates. If you don’t have a child theme yet, get one.

Add the Filter

Now that you have a child theme, paste this code into your child theme’s functions.php file.

add_filter( 'storefront_menu_toggle_text', 'jk_storefront_menu_toggle_text' );
function jk_storefront_menu_toggle_text( $text ) {
 $text = __( 'MY NAVIGATION' );
 return $text;
}


Change the Text

Do you see the line with the following code?

$text = __( 'MY NAVIGATION' );

You’ll just need to modify the text “MY NAVIGATION” and change it with the text that you want on your collapsible mobile menu.


Filed Under: Code Snippets, How-To Articles Tagged With: call-to-action, child theme, code snippet, design tweaks, how-to, mobile friendly, navigation, responsive design, Storefront, woothemes

How to Remove Horizontal Line under Page Title in Storefront Theme

February 26, 2015 By John 2 Comments

Updated 18/2/16 due to Theme Update

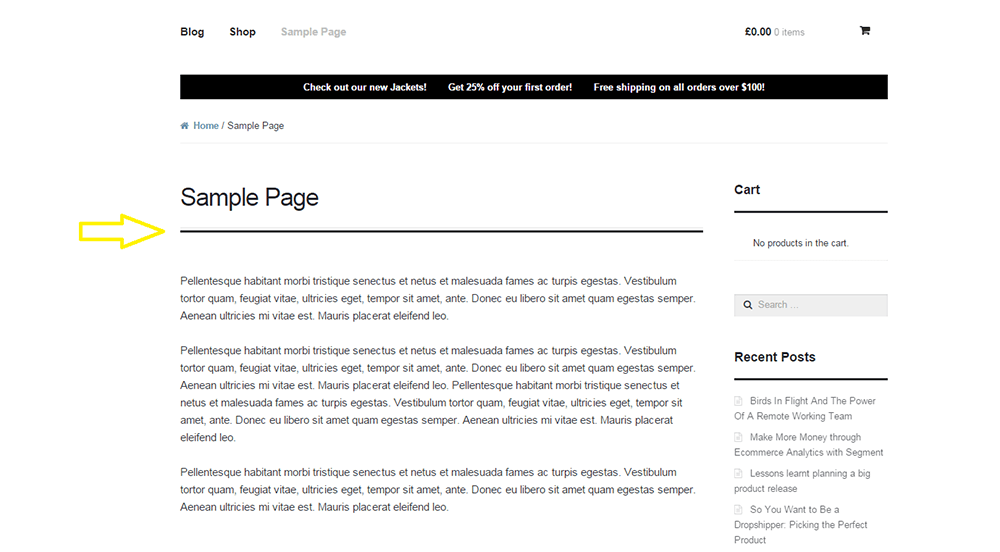
For one reason or another, you might find that you’d like to remove that horizontal line just below the page title in Storefront theme. The horizontal line becomes prominent when you don’t have a title for your page which could happen on home pages.

Remove Horizontal Line under Page Title in Storefront Theme
That line that the arrow is pointing at.

To remove the horizontal line, simply add the code below to your child theme Styles.css file.

.page-template-template-homepage-php .hentry .entry-header, .page-template-template-homepage-php .hentry .entry-header h1 {
 border-bottom: 0;
margin-bottom: 0px;
 }

The code “margin-bottom: 0px;” is necessary to remove the bit of extra spacing below where the line used to be.

Now you know how to remove horizontal line under page title in Storefront Theme but if that doesn’t fix your problem, let us know in the comments.

Filed Under: Code Snippets, How-To Articles Tagged With: code snippet, CSS, design tweaks, how-to, Storefront, woothemes

How to Move the Navigation Menu Outside of Header for Storefront

February 26, 2015 By John 9 Comments

Here’s another tweak that you can do on the Storefront theme.

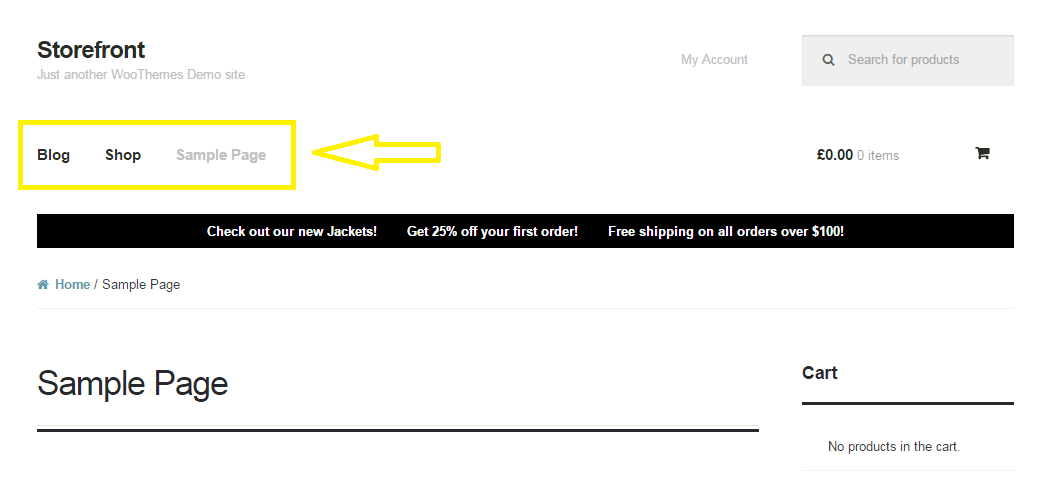
Move the Navigation Menu Outside of Header

If you want to move the main navigation/menu below or outside the header, you just need a few lines of code. There is no need to create a new header.php file on your child theme. Instead, just add this piece of code to your child theme’s functions.php file and you’re all set.

function child_theme_init() 
{
remove_action( 'storefront_header', 'storefront_primary_navigation', 50 );
add_action( 'storefront_before_content', 'storefront_primary_navigation', 5 );
}
add_action( 'init', 'child_theme_init' );

Before you do this, do know that it’s not really recommended to move the styles outside of its original location. After doing this, you will need to redo all the menu styles and that’s a lot of work.

Now you know how to move the navigation menu outside of header for storefront theme. Hope this worked for you. If not, feel free to post a comment and we’ll see what we can do to help you out.

Filed Under: Code Snippets, How-To Articles Tagged With: code snippet, design tweaks, how-to, navigation, Storefront, woothemes

How to Use a CDN to Speed Up Your Website

March 1, 2015 By John Leave a Comment

How to Use a CDN to Speed Up Your WebsiteSo far, we’ve talked about optimizing images, caching, and minification. This time around, we’ll talk about Content Delivery Networks or CDN. You will learn how to use a CDN to speed up your website.

What is a CDN and How Does it Help?

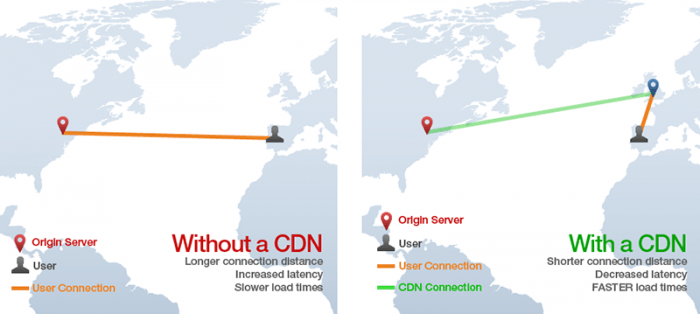
A CDN is basically a network of servers located at different locations around the world. As a service, a CDN will function to cache the content of your website so that it can be delivered faster to your visitors based on their location. Your static content will be saved on the servers so that when someone visits your site, it will send a request to the server nearest to them which will then deliver the content to the user. Basically, if you are a website owner and your server is based in Australia, your visitors from the US or Europe will have a hard time connecting to your website since the browsers will request data from servers that are too far away. This would result in delayed responses from the server known as lag.. With a CDN in place, browsers will always have a nearby server that they can connect to that will deliver your content much faster.

If that’s a bit too hard to swallow, here’s an infographic from GTmetrix with a visual representation of how CDNs work.

cdn

CDNs will mostly benefit the websites that cater to a global audience or market because if you are catering to a local audience, server requests will most likely be near your server’s location.

How to Use a CDN to Speed Up Your Website

Right now, you might be thinking that setting up a CDN is a complex endeavor. I’m telling you that it isn’t. We are in the age of web development where every service strives to be as user-friendly as possible. You can easily set up a CDN in a few clicks depending on your hosting service.

Setting Up CloudFlare CDN through CPanel

CloudFlare is one of the more popular CDN solutions out there and it has a free service for small website owners.

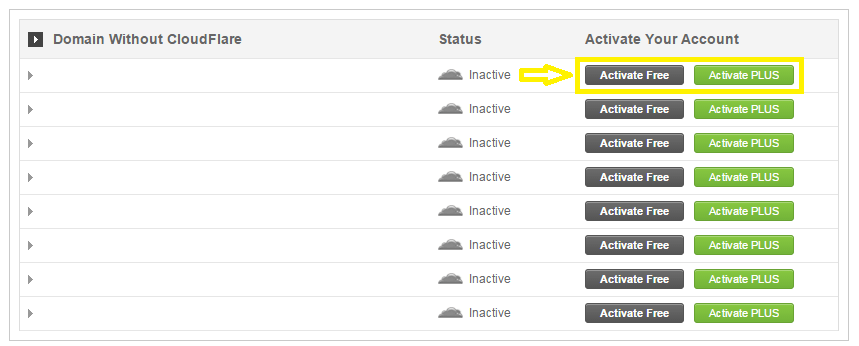
If your website is hosted on a CloudFlare hosting partner, then setting up CloudFlare is very easy. If you’re not sure if your hosting is a partner, check out this list. If your hosting is included in that list, then you can use the CloudFlare tool available on CPanel. Just go to CPanel and CloudFlare.

cloudflare

After that, just click on “Activate Free” for the free version or Activate PLUS for the paid version on the domain where you want to activate the CDN. You will then be prompted to enter your email to create an account with CloudFlare or just enter your email if you already have an account.

cloudflare-1

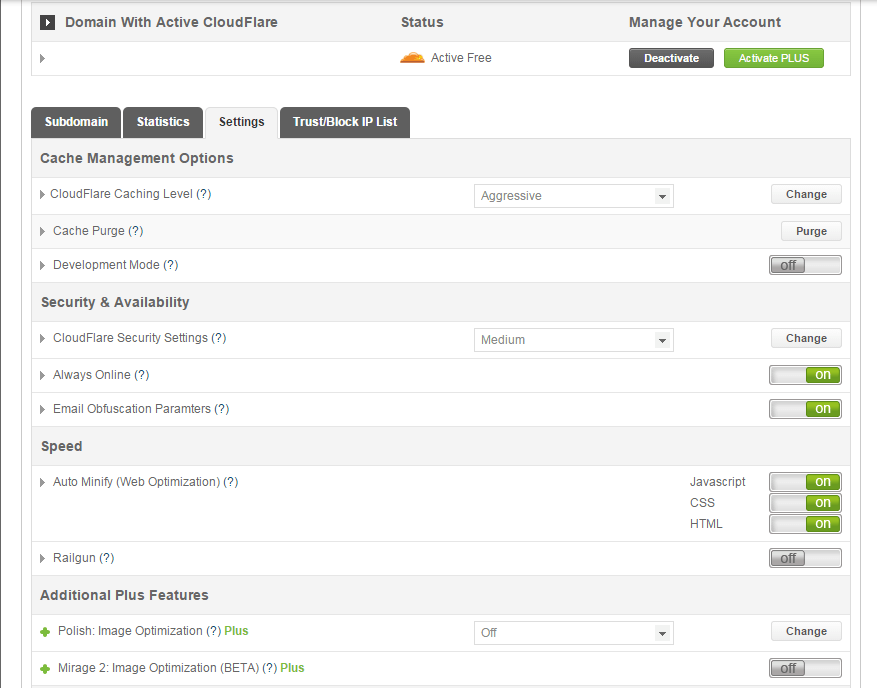
Once activated, you can tweak certain settings by clicking on Manage.

cloudflare-settings

And that’s it. Your CloudFlare CDN is all set and the performance of your website should be improving soon.

Setting Up CloudFlare Manually

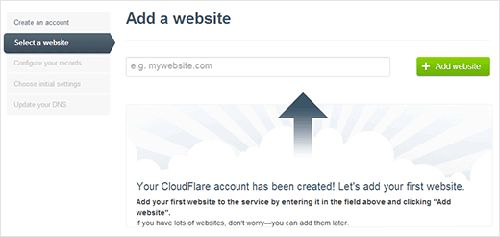
cloudflare-add-websiteTo set up CloudFlare manually, sign up for an account. After signing up, you will then be prompted to add your website to be scanned.

After the scan, you will be shown a list of all found DNS records. At this point, you should also set any subdomains that you would like to pass through CloudFlare. When you’re ready, just click on “I’ve added all missing records, continue”. The next page will let you choose a plan. You can choose the free version or the paid version, SSLs won’t work with the free version.

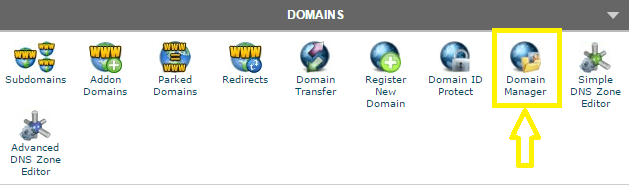
You will then need to change the name servers on your hosting service. You can do this by going to CPanel and clicking on Domain Manager. From there, just edit the name server to the new one provided by CloudFlare. If your hosting does not make use of CPanel, you can contact them on how to get this done.

domain-manager

As a final step, go back to CloudFlare settings and click on “I’ve updated my nameservers, continue”. Note that it may take up to 24 hours for the name servers to be completely active.

Setting Up Photon

Photon which is part of the Jetpack plugin is a sort of CDN although it’s not a complete CDN solution. Photon is mainly an image acceleration service which optimizes images on your site and caches them on the WordPress.com server to be served directly from there. Essentially, it only acts as a CDN for images and not all your static content like a normal CDN would.

If you are already using Jetpack, which hosts a number of other useful functionalities, then you can easily give Photon a go. However, if you are planning to install Jetpack just for Photon, you’ll be much better off going with a complete CDN solution like CloudFlare.

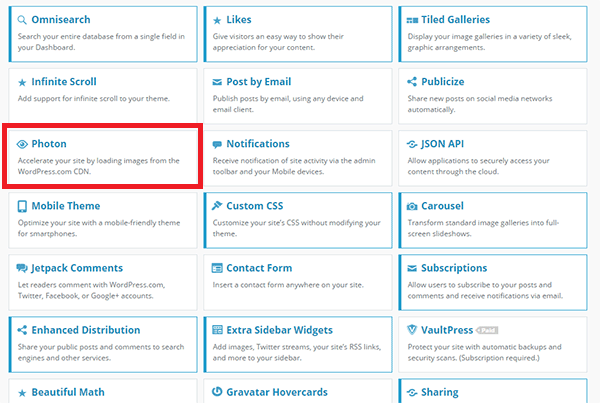
To activate Photon, just install Jetpack on your WordPress site and navigate to the Jetpack settings. From there, find Photon and click on Activate. Easy-peasy.

photon

With a CDN in place, your website should be running a lot faster which will improve overall user experience and probably even boost your conversion rates.

Filed Under: How-To Articles Tagged With: caching, CDN, CloudFlare, CPanel, how-to, optimizations, page speed, plugins, site speed optimization, WooCommerce

  • « Previous Page
  • 1
  • …
  • 20
  • 21
  • 22
  • 23
  • 24
  • Next Page »
Let us support your online store so you can manage your business

Get started today

Get 2 Hours of FREE SUPPORT

We are so confident that you will love our services that we will give you your first 4 hours at a 50% discount

That’s 4 hours for only $75

BUY NOW

Free eBook

5 Things Every Online Store Can Fix On Their Website In The Next Week To Increase Sales

Quick Links

  • How it Works
  • Pricing
  • Blog
  • Contact
  • About Wooassist
  • My Account
  • Checkout
  • Privacy Policy
  • Cookie Policy
  • Terms and Conditions

Wooassist

Australia:
59 Luke St.
Hemmant QLD 4174

Philippines:
San Miguel St.
Poblacion, Iligan City 9200

Connect


Copyright © 2026 · Wooassist

Yours FREE!

5 Things Every Online Store Can Fix On Their Website In The Next Week To Increase Sales