Wooassist

Assistance for Your Woocommerce Store

  • How it Works
  • Pricing
  • Services
    • Site Maintenance
    • AI SEO and Content Marketing
  • Blog
    • How-To Articles
    • Code Snippets
    • SEO For E-Commerce
    • Theme and Plugin Reviews
    • Wooassist News
    • WordPress/WooCommerce News
    • Interviews
  • About Us
  • Contact
You are here: Home / Archives for checkout form

How to Set Up MailChimp Opt-In Form in WooCommerce Checkout

January 29, 2018 By John Leave a Comment

How to Set Up MailChimp Opt-In Form in WooCommerce Checkout

If your WooCommerce store is not set up to capture your customer’s emails, then you’re missing out on a lot of potential sales. According to data gathered by Campaign Monitor, transactional emails can help you generate up to 6 times more revenue. Your prospective customers are also five times more likely to see the emails you send out compared to when posting it on your Facebook. With increasing competition in Facebook post reach, email marketing is only becoming more lucrative. In this post, we’ll teach you how to set up MailChimp opt-in form in WooCommerce checkout so you can increase your conversion rates.

What Do You Need to Set Up Email Opt-in Forms in WooCommerce Checkout?

To get started with adding email-opt in forms to your WooCommerce store, you need two things. The first one is a MailChimp account. You can sign up to MailChimp for free and continue to use it until you exceed a thousand subscribers. At this point, you will need to purchase a plan. You can sign up for a MailChimp account here.

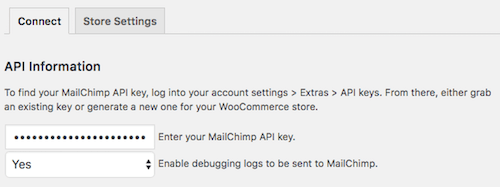
Once you’ve set up a MailChimp account, you will need to generate an API key which you will use to connect MailChimp to your WooCommerce store. To get your API key, log in to your MailChimp account and click on your name on the upper right corner and then click on Account; click on Extras and then on API keys. From here, you can copy the existing API key or create a new one. Save your API key for now. We’ll need this later.

The second thing that you need is the MailChimp for WooCommerce plugin which you can download here. You can also install the plugin from the Plugins page of your WordPress Dashboard. Once you install the plugin, make sure you activate it.

How to Set Up MailChimp for WooCommerce Plugin

After activating the plugin, head over to the Plugins page on your WordPress Dashboard and look for MailChimp for WooCommerce and then click on Settings.

On the Connect Tab, you will need to input your API key. If you followed the steps in the previous section, you should have your API key ready. Just input your API key in the API key field and click on “Save all changes”.

When that’s done, click on Store Setting and set your store information and then click on “Save all changes”.

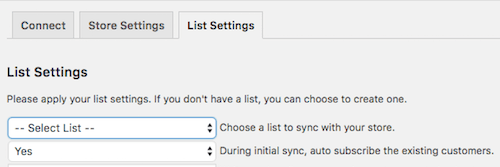
The next step is to set up your subscriber lists. Click on List Settings and choose a list to sync with your WooCommerce store. You can also indicate whether you want to automatically subscribe your existing customers to your list.

If you want to switch to a different list, you will need to remove and reinstall the plugin.

You can also set other setting such as checkbox display options, subscription opt-in message, and the location of the opt-in checkbox form on checkout.

When that’s done, you can sync your list with your MailChimp account.

To view your site details and change other settings, you can log in to your MailChimp account, click on your profile name and click on “Connected Sites”.

Final Notes

Now that your store is set up to sync your customer’s emails to your MailChimp list, you can easily email them special offers and other deals to help boost your sales.

If you have any questions, let us know in the comments.

If you need help setting up the plugin on your WooCommerce store, you can contact us.

Filed Under: How-To Articles Tagged With: checkout, checkout form, conversion optimization, email, email marketing, mailchimp, plugins, WooCommerce

How to Change Checkout Form Heading in WooCommerce

February 26, 2015 By John 2 Comments

Here’s a neat trick if, for some reason, you want to change the checkout form heading in WooCommerce. By default, the heading is named “Billing Details” and you can change this to whatever you want in just a few steps.

checkout form heading in WooCommerce billing-details

First off, you’ll need to copy the template to your theme or more specifically, your child theme since you definitely should be using one.

The template can be found at:

\woocommerce\templates\checkout\form-billing.php

You should copy and paste it at:

\yourtheme\woocommerce\checkout\form-billing.php

Afterwards, just open the copy that you pasted into your theme and find the following lines of code:

<?php if ( WC()->cart->ship_to_billing_address_only() && WC()->cart->needs_shipping() ) : ?>

	<h3><?php _e( 'Billing & Shipping', 'woocommerce' ); ?></h3>

<?php else : ?>

	<h3><?php _e( 'Billing Details', 'woocommerce' ); ?></h3>

<?php endif; ?>

Once you find it, simply change “Billing Details” to the text that you want to replace it with.

Filed Under: Code Snippets, How-To Articles Tagged With: checkout form, code snippet, design tweaks, how-to, shopping cart, WooCommerce

Woocommerce 2.3 Update: New Features and Common Issues Encountered

March 11, 2015 By John 4 Comments

It has been a month now since Woocommerce 2.3 was officially released. There has been mixed feelings about the new version. Some users find the new features awesome while others struggle to keep it together. To give you a recap, here are the new features of Woocommerce 2.3 “Handsome Hippo”.

Woocommerce 2.3 Features

  • User Interface and User Experience Update- Woocommerce 2.3, also known as the handsome hippo, has a flat design that goes well with many themes. The messages, notices (2 in the figure below), buttons (4), and the payment box during checkout has an updated look.Woocommerce 2.3 Cart Update

The cart template is also updated. The “Proceed to Checkout” button (5) was moved under the cart totals to enhance user experience. Another cool feature is the undo option (1) in the cart. That means that if you accidentally removed a product on your cart you can easily add it back in using the undo button. You also have the option to remove product from the cart widget (6), which I think is a really cool update on the default style template.

Woocommerce 2.3 cart_widget

There are also several features that were removed due to redundancy. The option to change the colors of the buttons as well as the increment and decrement button (3) were removed. Now, if you want to add those features back, you need to install additional plugins.

Woocommerce 2.3 also introduced an opt-in usage tracking that allows the Woocommerce team to view the settings of sites. This will allow them to upgrade their system to fit the requirements of their users. You will have an option to disable tracking in the woocommerce dashboard using this path: Woocommerce/System Status/Tools. Simply click the Reset Usage Tracking Settings button.

Woocommerce 2.3 usage_tracking

  • Coupons Update- This is probably one of the major updates in Woocommerce 2.3. Coupons will no longer be applied before taxes. The “apply before tax” option has been removed in the woocommerce settings.

Woocommerce 2.3 coupon

Aside from that, the rest of the coupons settings are left untouched. However, there are still a few issues with coupons that has not yet been sorted out on the latest version of woocommerce 2.3. We will get to that in a sec.

  • Emails- woocommerce 2.3 makes it easier for developers to override the CSS of emails sent through woocommerce. Additional hooks are created so that developers can easily adjust the CSS templates according to their preferences. In addition to that, emails sent will be using the woocommerce core templates but will also allow plugin templates to blend in with the shop emails.
  • Geolocation- Now, with “Handsome Hippo”, you can easily locate your customers by using their IPs. This can be used to calculate tax based on the users estimated location.

Woocommerce 2.3 Geo_Location

Issues Encountered

Woocommerce informed large theme companies about the changes before releasing Woocommerce 2.3. Prior to the official release, Woocommerce also released Woocommerce 2.3 beta so that they can work hand in hand with theme companies and plugin authors to make the release as smooth as possible. Though a lot of site owners welcome the design update on the front-end, some sites suffered from CSS and theme incompatibility and had to do a complete overhaul. Woocommerce 2.3 started using Sass, and there are inevitable plugin incompatibilities encountered by sites that use plugins using LESS.

The image below is taken from one of our sites that we manage. You will notice that the buttons, due to the flat design, need fixing. You can barely see the labels of the buttons.

Woocommerce 2.3 buttons_and_option_to_remove_products_from_cart_widget

To fix this issue, Woocommerce suggests installing a plugin that will allow site owners to easily change the colors of buttons and other elements on their sites. You can customize the buttons by clicking Appearance/Customize/Woocommerce.

Woocommerce 2.3 buttons

On the same site, we also encountered problems with the application of coupon codes. Though the products added are exclusive of tax, which means that the tax calculations will not be affected, we experienced a weird issue with the application of coupons on top of a free shipping rule. The free shipping rule allows customers to get free shipping when the item bought is more than $49.

If you look at the image below, instead of displaying the free shipping note on the “Shipping and Handling”, it has been replaced by a radio. Here you will have the option to either choose free shipping or flat rate, which doesn’t make sense because customers would always want to choose the free shipping option. Aside from that, if you apply a coupon and the order total falls below $49, the flat rate automatically kicks in without the free shipping option. The store owner would not want that to happen and this issue only started after the Woocommerce 2.3 update. We will be discussing the solution to this issue on our next article.

Woocommerce 2.3 increment_decrement,_notices-2.3

Conclusion

Keeping your plugins up to date is very important. However, with major updates like this, it is best that you create several backups of your live site before doing anything. In some cases, it might even be necessary to copy your live site to a development site. Doing plugin updates on the development site allows you to fix errors caused by the update and at the same time reduce losses due to downtime.

The woocommerce team spend so much time and dedication for this update. Though there may be some hiccups along the way, their proactive communication with theme companies have been really helpful in ensuring that the update will not cause serious problems to their users.

If you have encountered some issues regarding the woocommerce 2.3 update or if you want to share your take on the new features of woocommerce, feel free to leave your comments below.


Filed Under: Theme and Plugin Reviews Tagged With: checkout form, colors, CSS, email, plugins, shopping cart, WooCommerce, woothemes, WordPress updates

  • « Previous Page
  • 1
  • 2
Let us support your online store so you can manage your business

Get started today

Get 2 Hours of FREE SUPPORT

We are so confident that you will love our services that we will give you your first 4 hours at a 50% discount

That’s 4 hours for only $75

BUY NOW

Free eBook

5 Things Every Online Store Can Fix On Their Website In The Next Week To Increase Sales

Quick Links

  • How it Works
  • Pricing
  • Blog
  • Contact
  • About Wooassist
  • My Account
  • Checkout
  • Privacy Policy
  • Cookie Policy
  • Terms and Conditions

Wooassist

Australia:
59 Luke St.
Hemmant QLD 4174

Philippines:
San Miguel St.
Poblacion, Iligan City 9200

Connect


Copyright © 2026 · Wooassist

Yours FREE!

5 Things Every Online Store Can Fix On Their Website In The Next Week To Increase Sales