Wooassist

Assistance for Your Woocommerce Store

  • How it Works
  • Pricing
  • Services
    • Site Maintenance
    • AI SEO and Content Marketing
  • Blog
    • How-To Articles
    • Code Snippets
    • SEO For E-Commerce
    • Theme and Plugin Reviews
    • Wooassist News
    • WordPress/WooCommerce News
    • Interviews
  • About Us
  • Contact
You are here: Home / Archives for WordPress

How to Speed Up Your Website by Cleaning Your Database

February 18, 2015 By John Leave a Comment

cleaning-upYou might have read a few, or maybe a ton of articles about optimizing your website page load speeds. You might already know a few strategies like optimizing images, caching and minification, and getting a CDN. But here’s another strategy that is rarely discussed: maintaining and cleaning your database.

For many website owners, the database is just one of the requirements for a WordPress install. It is however more than just that. Keeping your database clean and optimized can also shave a few seconds of loading speed. We’re all suckers for that one or two seconds. And believe it or not, one or two seconds saved could mean the difference between a bounce and a conversion.

What’s in Your Database?
mysqlIf you don’t know what the database is for, then you might be surprised just how important it is. WordPress makes use of PHP to communicate with the database which contains important information such as posts, pages, your WooCommerce products, comments and product reviews, users and customer information, URLs, etc.

Why Do You Need to Clean Your Database?

Think of a database like it’s your computer’s hard drive. It’s where all your data is stored. ­ It’s where you keep everything and without it, your computer won’t work. If you want to keep your computer running in top form, you clean your hard drive. The same concept applies to a website, to keep your website running fast and smooth, you clean its database by removing all that gunk and clutter.

What’s there to clean? Over continued use, a website accumulates many spam comments, copies of post revisions, and remnants of deleted plugins and themes. When that becomes too large and bloated then website performance will suffer.

Back Up Your Website

Now that you know the importance of a database, you just want to jump in and clean your database. Halt! Before you start any database cleaning, it would be wise to create a backup of your website. There are a couple of plugins that can help you do this. Your hosting provider will most likely have a backup of your website so can also check in with them.

Clean ‘Em Up

You can clean up your website database manually or you can use these awesome plugins.

WP-Optimize

WP-Optimize is one of the most popular plugins for cleaning your database and it is also one of the easiest to use. Simply install the plugin and run it. The plugin also allows you to schedule a regular database cleanup which is pretty handy if you want to keep your database in peak condition.
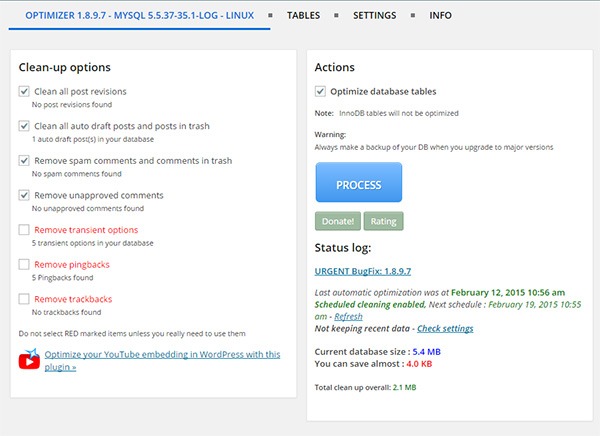
wp-optimize

WP-DBManager

WP-DBManager is another popular plugin for database optimization. It is however geared for more advanced users. Setting it up can be tricky if you’re not familiar with database elements. Being trickier however means that it has more customizable options and features. Some of its features include repairing a corrupted database, a database restore, running MySQL calls, and clearing tables. WP-DBManager however cannot clear bloat so if you want to go with this one for its host of other features, you still might want to consider getting WP-Optimize or any other means to clear database bloat.
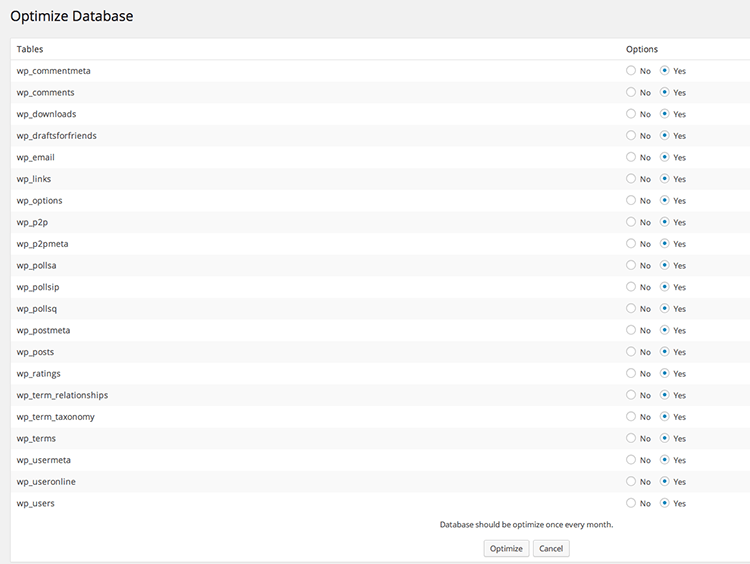
wpdbmanager

So when was the last time you optimized your database? What tool or plugin did you use to clean it?

Filed Under: How-To Articles Tagged With: backup, best practices, how-to, MySQL, optimizations, page speed, plugins, website maintenance, WordPress

How to Backup Your WordPress Site

February 22, 2015 By John 2 Comments

backupFor every website owner, there will always come a time when your website will go down. Often, this could be because of a downtime on your hosting service, but sometimes it’s because of some other reason. Maybe your website has been compromised or you did something that caused your site to go down. Notably, if you’re going to be doing some major work on your site, you shouldn’t be doing it without creating a backup first so you can restore your website to a working state just in case you mess something up. Here, we’ll teach you how to backup your WordPress site.
If you are adding some lines of your code to your functions.php file, it is best practice to create a backup copy. When you add your code and your site goes down, you simply replace your functions.php file with the working copy and voila! Your site will be back up. The same can be done for when you are tweaking your CSS files. Though errors in your CSS won’t cause your site to go down, it can really mess up how your website looks. So just create a copy of your CSS file and restore it if anything goes wrong. This basically sums up the concept of website backups only on a larger scale.

Your hosting service probably already has a few backups of your website. So you might think that creating your own backup is not necessary. That’s where you’re wrong. What’s your assurance that your hosting service creates regular backups? Certain situations can also render your host’s backups useless. So essentially, just to be on the safe side, you should have your own backup.

There are two ways to back up your website. The first one is through one of a few available plugins and the second is doing it manually.

Backing Up Your WordPress Site with BackUpWordPress

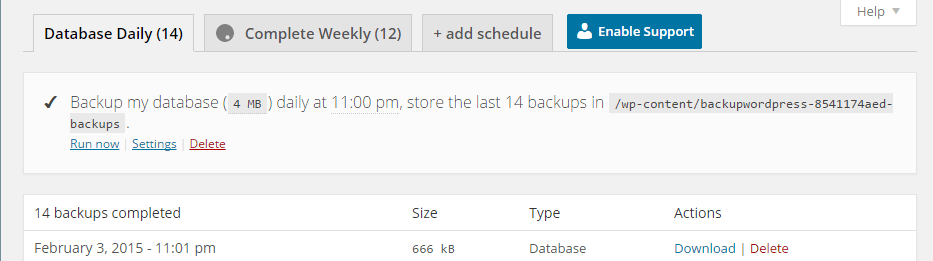
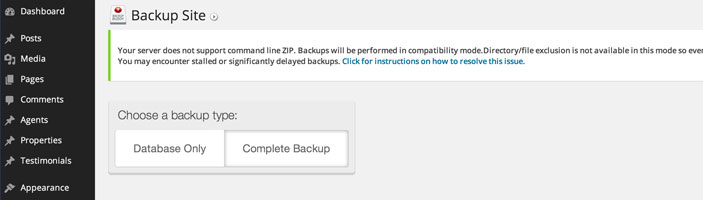
BackUpWordPress is the easiest means of backing up your website. Simply install the plugin and activate it. When that’s done, head over to tools and Backups. You can then choose between a Database Backup and a Complete Backup. To start backing up, just click on Run Now and wait until backup completes. You can also click on Settings to set the schedule for these backups. You can also add a custom schedule.

By default, your backups are stored on your server at /wp-content/backups. To restore a backup, simply find the latest working backup by navigating to the folder using an FTP client and unzip the backup on your server making sure to overwrite everything.

back-up

Backing Up Your WordPress Site with Backup Buddy

BackupBuddy is another popular backup plugin. Unlike BackupWordPress, BackupBuddy is a premium plugin so there is no free version. Once you get the plugin installed and set up, simply go to Backup. From there, you can choose to backup the database or do a complete backup. Next, you can choose to download the backup file so you can store it right in your computer’s hard drive.

BackupBuddy

You can also tweak your settings to have backups saved to Dropbox or Amazon S3, create custom backup profiles, and schedule backups.

How to Create Manual Backups

Backing Up Using MySQL

You can also backup your website manually using MySQL. To do this, head over to CPanel. From there, you can find phpMyAdmin. Click on the database and click on the Export tab. You can choose either quick or custom export. Set compression to gzip then click on Go.

Backing Up with CPanel

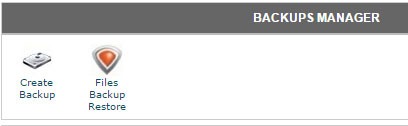
cpanel-backupTo create back-up using CPanel, navigate to Backup Manager and click on Create Backup. Where it says Download a MySQL Database Backup, just click on the database and download. A simple enough process but using a plugin just saves you from the trouble of doing this manually.


So when was the last time you backed up your website? Do you even have an existing backup? If you don’t, then it’s time to make one before it’s too late.

Filed Under: How-To Articles Tagged With: backup, best practices, CPanel, how-to, MySQL, plugins, website maintenance, WordPress

How to Specify CSS Styling on a Single WordPress Page  

March 5, 2015 By John Leave a Comment

Understanding a bit of CSS is a useful skill for a website owner. Now, suppose you wanted to apply a line of CSS styling on just a single page instead of the entire site. Learning how to target your CSS to specific pages can solve hours of frustration when a code snippet isn’t readily available on the internet.

Let’s use this example: we’re going to hide the page title of just the Home Page.

The basic CSS for hiding a page title will usually look like this:

.main-title {
display: none;
}

When you copy the code above and place it in your styles.css file, it should hide all the page titles in the website. Normally, we’d stop there if that was what we wanted but we just want to hide the page title on the home page.

Basically, the code right now is targeting the display attribute for the main-title element. There is however no indication of which main-title is targeted. Is it the main-title on the home page? Is it the main-title on the About page? For cases like these, all main-titles will be affected.

To target a specific page, you need to add another selector and it looks like this:

.home .main-title {
display: none;
}

The “.home” part is the part that indicates which main-title we are targeting.

Now, our next challenge will be figuring out what to write in the “.home” part. For that, we need to look at the page source. Look for the start of the <body> HTML. You will then see something like this:

page-classes

Notice those classes? Those are what we use for the selectors. We can’t just use any of those though because other pages might be using the same classes and if that’s the case, those other pages will be affected by your CSS as well. We have to find the class unique to that page and in this case it is “home”.

On this next example, the unique class which is also the page ID is “page-id-155”. When we make use of “.page-id-155”, we are basically specifying that only that page should be affected by any CSS you write next to it.

page id

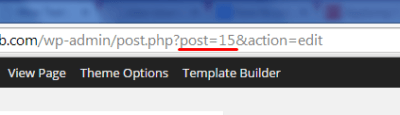
However, there are cases where you might have trouble finding the unique class or the page ID is not indicated as one of the classes. In this case, you should go edit that page in the WordPress dashboard. Once you are in the edit page, check out the URL in the address bar. The number corresponding to post= is your page ID that you can then use to target that page.

post id

That’s about it. And do keep in mind that this knowledge isn’t simply limited to your page titles. Here are some more applications:

  • Hiding the widget area for some of your pages.
  • Reducing/enlarging the main content area depending on the current page.
  • Keeping font/color styling on specific pages

When you know the unique class or page ID you can target specific pages with your CSS styling now and I hope it helps you make your website become the best it can be.

Now you know how to specify CSS styling on a single WordPress page. Got questions? Head over to the comments section.

Filed Under: How-To Articles Tagged With: CSS, design tweaks, how-to, website development, WordPress

How to Install WooCommerce on your WordPress Site

April 8, 2015 By John Leave a Comment

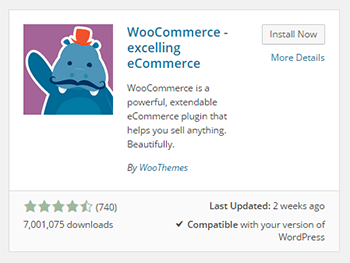
how-to-install-woocommerce-pluginGetting started on a WooCommerce store all starts with installing WooCommerce. It’s pretty simple and straightforward, but if you don’t know how to install it, we’ll help you out. There are two ways to install WooCommerce and we’ll detail them both in this post.
How to Install WooCommerce through the WordPress Plugin Repository

  1. On your WordPress Dashboard, head over to Plugins then click on Add New.
  2. On the search bar, type in WooCommerce and press Enter. WooCommerce should appear as the first plugin in the search results. To make sure, check that it is the one published by WooThemes and that you are not installing some other plugin.
  3. Just click on Install Now and wait for the plugin to install and activate.

How to Install WooCommerce by Upload

The other method of installing WooCommerce is by downloading and uploading.

  1. Head over to the WooThemes website to download the latest version of WooCommerce.
  2. After that, go to your WordPress Dashboard. Click on Plugins and then Upload Plugin.
  3. Choose the WooCommerce installer that you just downloaded and click on Install Now.
  4. After that, just wait for the file to finish uploading. It should install and activate by itself.

How to Install WooCommerce via FTP

Here’s a bonus – another means of installing WooCommerce. This is a little bit more complicated than the first two methods since you need to access your WordPress install files. It is not recommended for the average user since you might alter the install files for your WordPress site. Doing so can cause your website to go down. Use this only if the other two methods fail or if you really know what you are doing.

For this method, you’ll need an FTP client like FileZilla. You’ll need this to upload the plugin file to your WordPress install. And since you need to log in to the FTP server, you’ll need the login information for that too. If you don’t know the login information, you can contact your hosting provider. Here’s are the steps:

  1. Download the WooCommerce plugin and extract the file.
  2. Log in to your FTP server using FileZilla or any other FTP client. Navigate to the wp-content/plugins directory of your WordPress install.
  3. Place the extracted folder in the wp-content/plugins folder.
  4. After that, head over to the plugin page of your WordPress site and activate the WooCommerce plugin.

Now that you know how to install WooCommerce, you’re just a few steps away from setting up your own e-commerce store.

Filed Under: How-To Articles Tagged With: e-commerce, how-to, website development, WooCommerce, WordPress

How to Set Store Location and Currency in WooCommerce

May 13, 2015 By John Leave a Comment

After installing WooCommerce you have to make sure that it will run based on your geographic specifications. You will need to set store location and currency in WooCommerce. Changing these settings is really quite simple. You can do this if you head over to your WordPress dashboard and navigate to WooCommerce settings under the general tab.

Setting Your Location

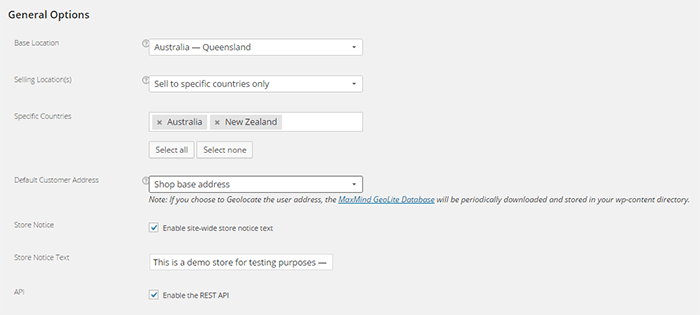
To set your location, head over to WooCommerce settings under the General Tab. Here you can set your store’s location.

Here’s what you should see:

location-settings

Base Location

Under Base Location, you should state your base country and/or state. This setting also affects tax rates and customer locations.

Selling Location

Under Selling Locations is where you state where you sell your products. You can choose just one location or a few countries/states. If you ship your products globally you should specify “Sell to All Countries”. If you are only selling to specific location, choose “Sell to specific countries only” and a new field will come up which will let you add specific locations.

Default Customer Address

Under Default Customer Address, you can choose what the system will identify as the client’s location before he/she enters her location. Choosing “Shop base address” assumes that the client is located where your store is located. Choosing “No address” assumes no location. Choosing “Geolocate address” will verify the client’s location through Maxmind Geolite Database.

Setting Your Currency

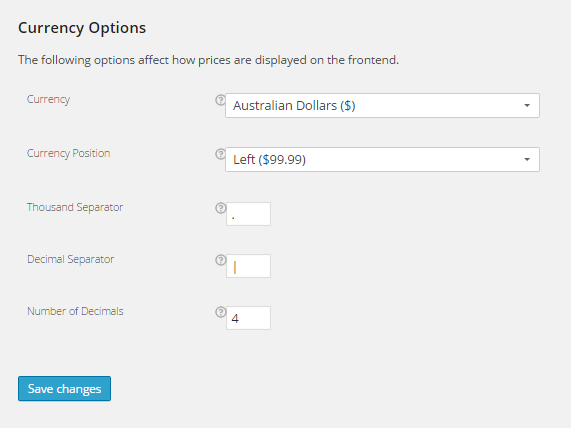
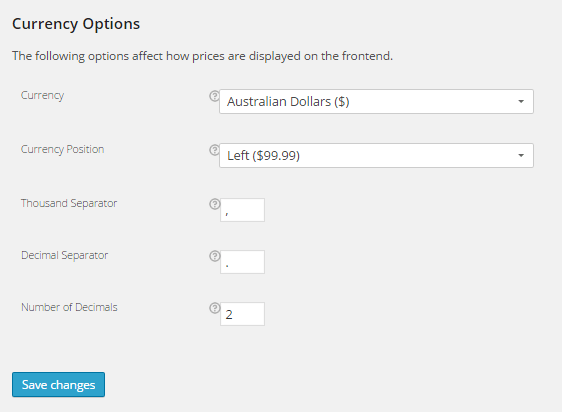
Below the location setting, you can see your WooCommerce store’s currency options.

Currency

Under Currency, you can set your store’s default currency. You can only set one currency here.

currency-options

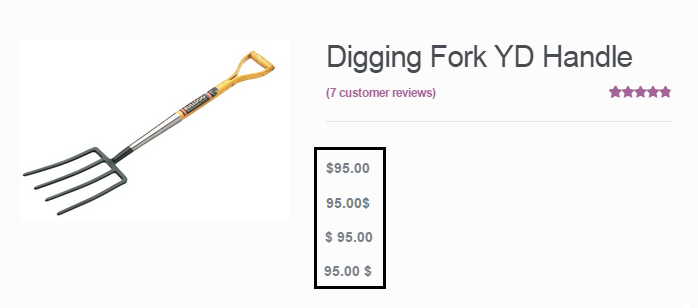
Currency Position

Currency position lets you set the default position for you currency symbol. You can set it to the left, right, left with space, or right with space. Below you’ll see a comparison of the different options for this setting.

different-prices

Thousand Separator and Decimal Separator

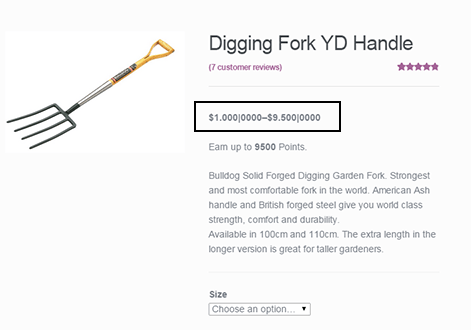
These settings let you set what symbol to use as the thousand and decimal separator for the prices displayed on your store. The image below show what the price would look like if you edit these.

changing-price-settings

changed-settings

Number of Decimals

This setting sets the number of decimal places shown on your prices. In most cases, 2 decimal places will do but if you should need more, you can always add more.

location-settings

Now that you’ve set your store’s location and currency, you can soon start selling to the market that you are targeting.

Filed Under: How-To Articles Tagged With: admin, e-commerce, how-to, WooCommerce, WordPress

  • « Previous Page
  • 1
  • …
  • 5
  • 6
  • 7
  • 8
  • Next Page »
Let us support your online store so you can manage your business

Get started today

Get 2 Hours of FREE SUPPORT

We are so confident that you will love our services that we will give you your first 4 hours at a 50% discount

That’s 4 hours for only $75

BUY NOW

Free eBook

5 Things Every Online Store Can Fix On Their Website In The Next Week To Increase Sales

Quick Links

  • How it Works
  • Pricing
  • Blog
  • Contact
  • About Wooassist
  • My Account
  • Checkout
  • Privacy Policy
  • Cookie Policy
  • Terms and Conditions

Wooassist

Australia:
59 Luke St.
Hemmant QLD 4174

Philippines:
San Miguel St.
Poblacion, Iligan City 9200

Connect


Copyright © 2026 · Wooassist

Yours FREE!

5 Things Every Online Store Can Fix On Their Website In The Next Week To Increase Sales