Wooassist

Assistance for Your Woocommerce Store

  • How it Works
  • Pricing
  • Services
    • Site Maintenance
    • AI SEO and Content Marketing
  • Blog
    • How-To Articles
    • Code Snippets
    • SEO For E-Commerce
    • Theme and Plugin Reviews
    • Wooassist News
    • WordPress/WooCommerce News
    • Interviews
  • About Us
  • Contact
You are here: Home / Archives for WordPress

How to Center Logo in Storefront Theme

February 12, 2016 By John 35 Comments

Centering the logo on a WordPress site is a popular design concept, but doing it can be tricky. Most themes, Storefront included, are styled with the logo aligned to the left.

While you can use a premium plugin like Storefront Designer to center the logo, you can edit your child theme’s CSS instead. There are two benefits in doing this manually. For one, you don’t have to buy a plugin. Secondly, you don’t add extra bloat to your site.

How to Center Logo in Storefront with CSS

Centering Your Logo with CSS

Before anything else, you should install a child theme on your site otherwise the changes you make will be lost every time you update your theme. Alternatively, you can use Simple Custom CSS Plugin which creates a new stylesheet that won’t get overwritten.

Add the following code to your child theme’s styles.css:

@media screen and (min-width: 768px) {
	.site-branding{
		text-align: center;
		margin: 0 auto !important;
		float: none !important;
	}
}

Text align and margin set the margin to adjust accordingly to the sides. We need to place “!important” in that line to make sure that it gets priority and doesn’t get overridden by other CSS codes.

We also need to override the default “float:left;” code so that it won’t stick to the left. We do this using “float:none !important;”.

To make sure these styles don’t affect the mobile version of your site, we set a minimum width in the selector.

Doing Away with the Secondary Menu and Search Bar

If you are using Storefront out of the box, the secondary menu and the product search bar will still be in the way. We need to do something about that next. Temporarily, the header will look something like this.
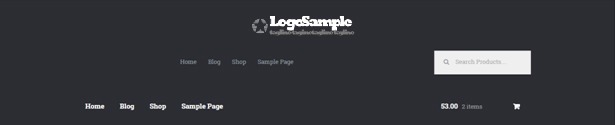
Doing Away with the Secondary Menu and Search Bar

To remove the secondary menu, go to Appearance > Customize > Menu > Menu Locations and do not set the secondary menu to anything.

To move the search bar inline with the main navigation and cart menu, you have to paste the code below to your functions.php file. A word of warning, do not proceed with this step if you do not know what you are doing. One slip up here could cause your site to go down and become inaccessible. Alternatively, you can install My Custom Functions plugin to insert the code. The plugin warns the user the code will cause a fatal error.

add_action( 'init', 'jk_remove_storefront_header_search' );
function jk_remove_storefront_header_search() {
remove_action( 'storefront_header', 'storefront_product_search', 	40 );
add_action( 'storefront_header', 'storefront_product_search', 	70 );
}

After this step, your site will look something like this.

Move search bar inline with the main navigation and cart menu

The product search bar is still not inline with the main navigation as you can see. The CSS code below will adjust the width of the main navigation so that the search box won’t warp around to the bottom.

/*adjusting the width of the main-navigation*/
.woocommerce-active .site-header .main-navigation {
	width: 50%;
}

Applying the CSS code above will result to this. Now, the only thing left to do is to resize the search box using CSS.

Adjust width of main navigation for search box to un-warp around the bottom

Putting Everything Together

Put everything inside the media screen brackets, together with the CSS code for the resizing of the search box. The final CSS code will be:

@media screen and (min-width: 768px) {
	/*centers the logo*/
	.site-branding{
		text-align: center;
		margin: 0 auto !important;
		float: none !important;
	}
	/* adjusts the width of the main navigation container to accommodate the search box in the same line*/
	.woocommerce-active .site-header .main-navigation {
		width: 50%;
	}
	/* positions the search icon properly in the search box*/
	#masthead .site-search .widget_product_search form:before {
		top: 1.75em;
		left: .75em;
		position: relative;
	}
	/*  resizes the search box*/
	#masthead .site-search .widget_product_search input[type=search],#masthead .site-search .widget_product_search input[type=text] {
		padding: .5em .5em .5em 2em;
		line-height: 1;
	}
	/* places the search box to the left of the cart menu(optional)*/
	.woocommerce-active .site-header .site-search {
		float: left;
	}

}

And you’re done. The outcome should look something like this.

Storefront Center Logo_Final

If you are unable to achieve this with the above code snippets, it could be that you are using a child theme that has codes that conflict with the codes above. Feel free to post your questions in the comments section.


Filed Under: Code Snippets, How-To Articles Tagged With: code snippet, CSS, design tweaks, how-to, mobile friendly, Storefront, WooCommerce, WordPress

Update Plugins and WordPress Core of Your WooCommerce Store

January 29, 2015 By John Leave a Comment

Just like websites, hacking is changing and evolving. Hackers are always on the lookout for new ways to exploit and infect all kinds of websites, including online stores. They adapt, and can even get one step ahead of developers.

If you’re not careful, your WooCommerce store could be targeted and compromised. This underlines the need to update plugins and core of your WooCommerce store.

Protect Your Site from Hackers

One of the primary culprits of being targeted by hackers is the failure to update plugins.It has been proven to be disastrous to WordPress websites and blogs.

It’s a good idea to keep your plugins up-to-date and delete those that are not in use. There are also security plugins out there that will protect your website for free. This article can give you detailed tactics on what to do once your site gets infected, as well as tips on preventing a cyber-attack.

Some steps are being made to have this done automatically. You now have the option to do core updates through WordPress.org. Here’s an interesting post on what we might get in the future.

In the meantime, the responsibility lies with you. You need to arm yourself with the right knowledge, such as these WordPress security tips. As a WooCommerce store owner, it’s one of your top priorities to make hacking as difficult as possible. Keep these methods in mind.

Back-up Your Website

While updating plugins and WordPress might seem like an easy chore, it can be more complicated than that. It doesn’t work with just one click.

Before updating plugins such as WooCommerce, and your WordPress core, make sure that you have a current backup of your site. Just in case something goes wrong, you’ll have a fall-back.

SnapCrab_2015-06-26_15-32-30_No-0000

It’s not uncommon for many websites to go down after installing an update. In some cases, you can even be locked out of your WordPress admin panel. While it may seem like a serious problem, it is actually easy to solve.

Just access your website’s files with an FTP client, find the folder of the plugin you updated, and just delete that plugin. If you updated multiple plugins, you can try deleting or renaming the specific plugin folders to find the culprit.

If your site goes down after updating your WordPress core, that’s a little more complicated. Learn how to backup your WordPress site here.

Wooassist Team Site Updates

Make sure that your WordPress core and plugins are always updated. It isn’t too difficult once you take the necessary measures. However, it can escape your notice if you’re quite busy and have a lot of things on your mind.

To ensure that problems with updates are immediately addressed, it would be a good idea to have a developer on board to handle the job. Better yet, have a developer do all your updates at regular time intervals. Handing over the responsibility to the Wooassist team is a viable option for you. As long as you have pre-paid credits in your account, we can automatically work on updating your WP Core, Themes and Plugins at regular intervals, either every fortnight or every month, depending on your preference.

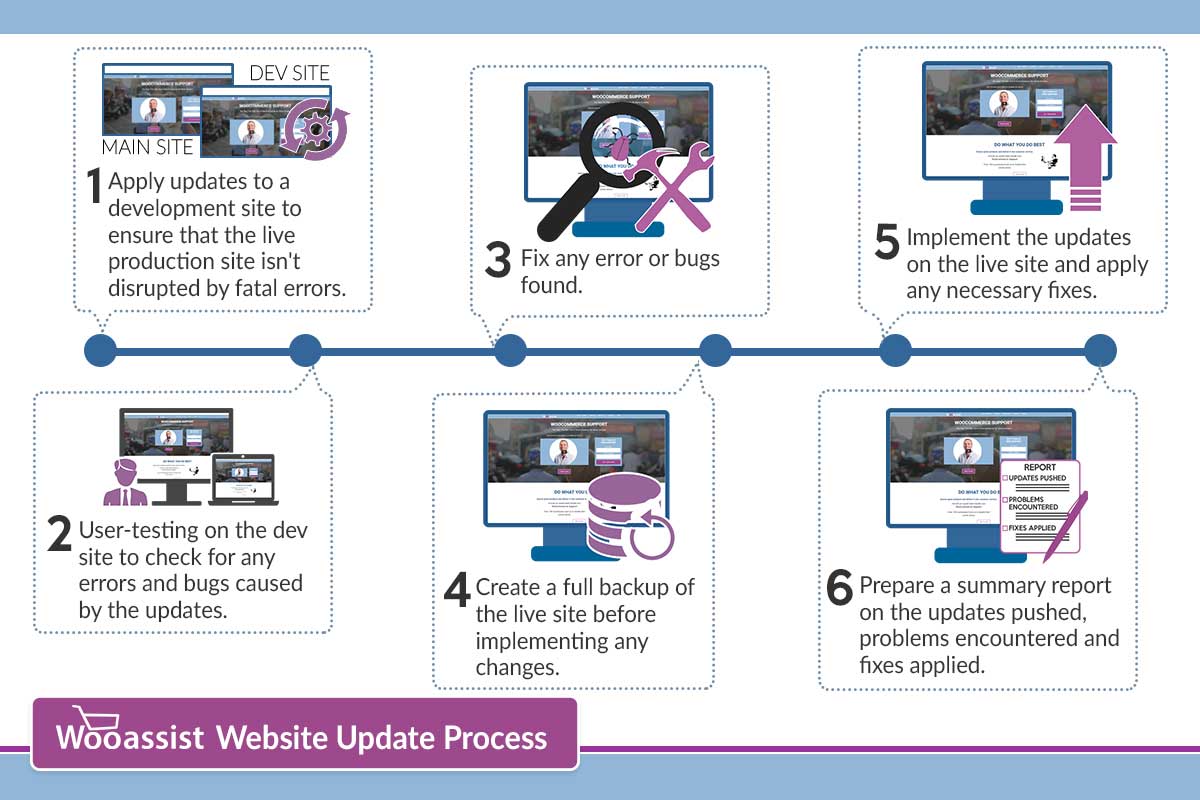
How we do updates (click to enlarge image):
wooassist-website-update-process

Although it might be possible to skip most of these steps, proceed directly to updating the live site and wait for whatever errors to come up, it may end up causing irreversible damage to your site. This could cost you thousands of dollars in lost sales and having support services spend more time fixing the issue when it could have been easily avoided in the first place.

On average, we take around 2 to 3 hours implementing the entire process when done once every month. We take pride in our service and do not cut corners and take shortcuts. If in the rare occassion that we miss an error that was created due to the updates, we will have it resolved at top priority.

Letting us do your site updates for you will rid you of having to worry about this part of website ownership altogether leaving you with peace of mind and time to focus on growing your business.

Filed Under: How-To Articles Tagged With: backup, how-to, plugins, security, Wooassist, WooCommerce, WordPress

Backup Your WooCommerce Store on WordPress

January 29, 2015 By John Leave a Comment

hard-drive-656122_1280

Your online store may be up and running, but it still requires consistent management. Your database grows as you add new products or post something on your blog. It would be a shame if you lose everything in an instant.

This can be avoided by backing up your data. It’s one of the best ways to protect your investment. This post explains the importance of being backed up.

Set Your Own Backup

Most site owners assume that their web host does all the backing up. While most web hosts do have backups, they are not as reliable as your own. What’s more, there’s always a chance that your host failed to do so.

unita-disco-rigido-arch-01r

Not setting up your own backup is an unacceptable mistake. You can either learn to backup your data on WooCommerce, or you could have others to do it for you. These simple steps can teach you how to backup the data on your site. It’s crucial to choose a reliable web host that provides better security, and has backup solutions in case something happens to your own database.

Doing this right from the moment you go live with your WooCommerce store assures you peace of mind. Having all your data backed up means you don’t need to worry as much about any security problems. Your original site and all-important data can always be recovered.

WordPress-Specific Options

You shouldn’t rely solely on the backups made by web host companies. It’s because the backups they make, are not specific to WordPress. You need to look for WordPress-specific options. Using remote backup services is one good example. These services use cloud servers and guarantees that your data would be safe and secure.

BlogVault provides real-time backup solution in WooCommerce. It guarantees immediate backup with each update done. For a more detailed description of BlogVault, you can check it here.

For more information on how to backup your data on WooCommerce, check our earlier post. Having a good backup process helps keep all your data safe. But if you have your hands full on other areas of your business, the Wooassist team can setup a solid process for your online store.

Filed Under: How-To Articles Tagged With: backup, how-to, website maintenance, WooCommerce, WordPress

How to Set Up a Static Page as Your Home Page in a WordPress Site

February 9, 2015 By John Leave a Comment

homeIf you are creating an e-commerce store, chances are you’ll want a static page as your home page and not a blog or posts page which is the default home page for many WordPress themes. We’ll cover how you can do this in this article.
Before we dive deeper into this and assuming you are using Woocommerce, it might be a good idea to try the Woocommerce Storefront Theme.  Since the theme was built and is being maintained by the people behind Woocommerce, you can be assured that it integrates well with all Woocommerce features. Whenever a new version of Woocommerce comes out, you can be sure that it is optimized for the Storefront Theme. There is less chance of updates breaking your site.

Create a Page

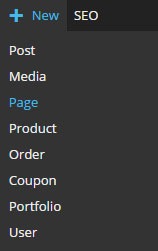
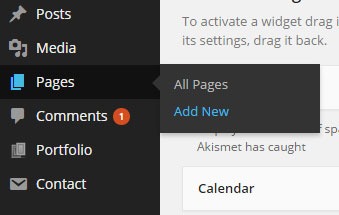
The first step to creating a static home page in WordPress is to create the page that you want to set as your home page. On your WordPress Dashboard, hover over “New” and click on “Page”. Alternatively, you can hover over “Pages” and click on “Add New”.

new-page      new-page-1

After that, just add the content you want on the page; format it accordingly then publish it. It is best practice to set the title of this page as “Home”.

Setting the Page as Home Page

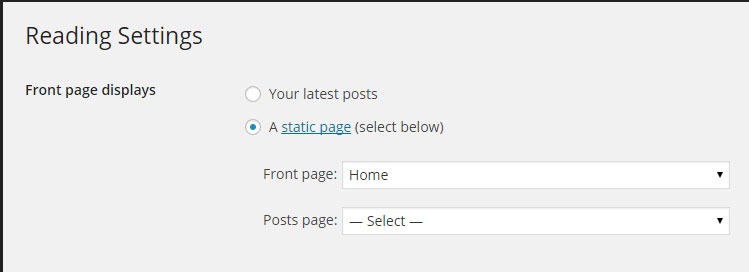
To set the page you just created as your home page, go to “Settings” then click on “Reading”. Under “Front page displays”, tick on “A static page” then under “Front page” choose “Home” or whatever you named the page you are going to use as your home page.

static-home-page

When that’s set, you’re done.

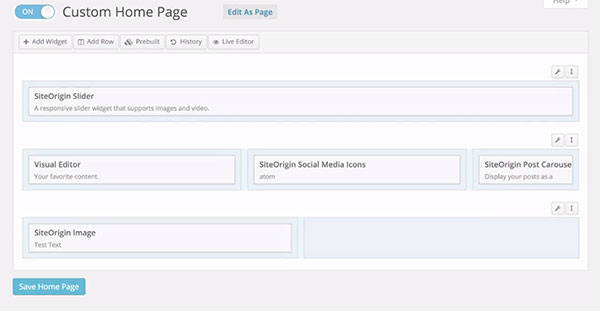
If you want a more powerful tool to help you create a good-looking home page without needing to know any sort of coding, we can recommend the SiteOrigin Page Builder plugin. This plugin enhances the content editor into a drag and drop widgetized editor which allows for easy creation of responsive grid-based pages. This plugin is optimized for the WordPress engine and will work with any theme that you are running. Let yourself create stunning pages that look like they were done by a professional web developer.

site-origin-page-builder

If you have any comments or questions, just hit the comments sections and we’ll get back to you.

Filed Under: How-To Articles Tagged With: e-commerce, how-to, plugins, Storefront, WordPress

How to Speed Up Your E-commerce Site through Caching and Minification

February 12, 2015 By John Leave a Comment

speed-up-your-websiteHow fast your website loads affects your conversion rate and ultimately, your revenue. If it takes 12 seconds to load up your website, that’s just a little too long and many potential clients could be annoyed and just click on the close button; go back to Google and click on something else. If that’s not bad enough, that person could forever remember that your website is that one website that loads very slowly. Any chance of converting from that person is gone.
There are a lot of ways to speed up your website. One is by optimizing the images that you use for your e-commerce site which I discussed in another post. This time around, we’ll look at how to speed up your e-commerce site with caching and minification.

What is Caching?

Caching is a means of serving your content as static pages instead of being dynamic pages. Serving static content is faster as opposed to dynamic content which means longer page load times. Essentially, caching is storing your dynamic content in the server as static content which will then be served when a browser communicates with the server. The static content that is saved on the server is updated at set intervals.

What is Minification?

When developers make code, they make code with a lot of white space. This is best practice in the sense that the code becomes easier to read and understand for humans. This however is not best practice for servers that read and parse the code to load up all the elements of your website. Computers don’t need that white space. All that white space just makes reading the code take longer for the machine. Even when you’re using a premium theme, you’ll see a lot of white space when you try to look at the code. This is where minification comes in. Minification removes all that white space and optimizes your code so that it becomes easier to read for machines to make parsing the webpage faster.

Implementing Caching and Minification

w3-total-cacheNow that we know what caching and minification is, it’s time to get to know how to implement it. If that sounds all too complicated, don’t worry. It is really very simple. All you need is one plugin to do both. That’s the beauty of WordPress. Seemingly complicated stuff becomes easy work. For this bit, we would recommend the W3 Total Cache plugin, because it has caching and minification solutions all in one plugin.
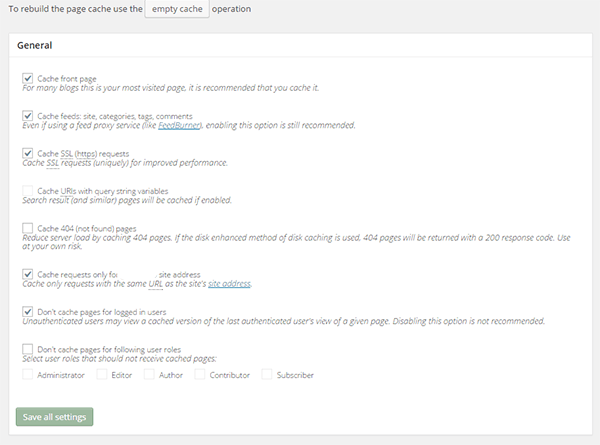
Setting up Caching with W3 Total Cache

Install the plugin and activate it. After that, click on Performance on your WordPress dashboard and click on Page Cache. From there, you can turn on specific settings based on your caching needs. There is no single effective setting for all websites so feel free to go with your own settings and test page loads speeds after. When you’re done tweaking, just click on “Save all settings”.

A note on caching… When you’re updating your website like adding new products, editing blog posts, or adding new functionality,  it would be best to turn off caching entirely while working so you can see all the changes you make right away. Just don’t forget to turn caching back on when you’re done.

caching

Setting up Minification with W3 Total Cache

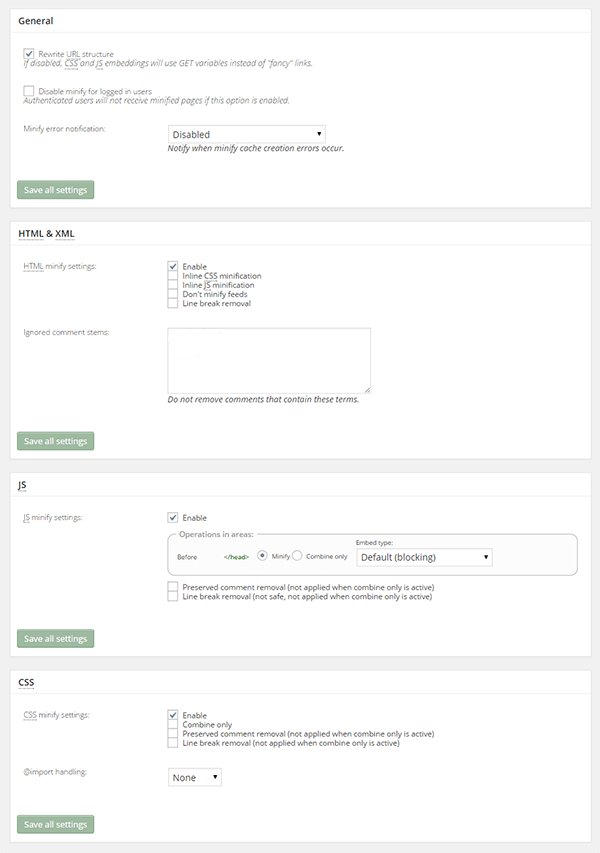
While you can set up minification manually, there’s no need to do it when all you need is a plugin and a few clicks. To set up minification with W3 Total Cache, just click on Performance then on Minify. After that, just tick “Enable“ for HTML & XML, JS, and CSS. You can tick other settings on and off as needed. When you’re done, just click on “Save all settings” and you’re all set for minification.

minification

Filed Under: How-To Articles Tagged With: caching, how-to, minification, optimizations, plugins, site speed optimization, W3 Total Cache, WordPress

  • « Previous Page
  • 1
  • …
  • 4
  • 5
  • 6
  • 7
  • 8
  • Next Page »
Let us support your online store so you can manage your business

Get started today

Get 2 Hours of FREE SUPPORT

We are so confident that you will love our services that we will give you your first 4 hours at a 50% discount

That’s 4 hours for only $75

BUY NOW

Free eBook

5 Things Every Online Store Can Fix On Their Website In The Next Week To Increase Sales

Quick Links

  • How it Works
  • Pricing
  • Blog
  • Contact
  • About Wooassist
  • My Account
  • Checkout
  • Privacy Policy
  • Cookie Policy
  • Terms and Conditions

Wooassist

Australia:
59 Luke St.
Hemmant QLD 4174

Philippines:
San Miguel St.
Poblacion, Iligan City 9200

Connect


Copyright © 2026 · Wooassist

Yours FREE!

5 Things Every Online Store Can Fix On Their Website In The Next Week To Increase Sales