Wooassist

Assistance for Your Woocommerce Store

  • How it Works
  • Pricing
  • Services
    • Site Maintenance
    • AI SEO and Content Marketing
  • Blog
    • How-To Articles
    • Code Snippets
    • SEO For E-Commerce
    • Theme and Plugin Reviews
    • Wooassist News
    • WordPress/WooCommerce News
    • Interviews
  • About Us
  • Contact
You are here: Home / Archives for WordPress

How to Add a Top Bar in Storefront Theme

July 29, 2016 By John 12 Comments

The release of Google’s Material design started the “top bar” trend. It was used mainly on mobile user experience (UX) designs but it found its way into desktop design. In this article, we’ll teach you how to add a top bar to the Storefront theme.

What Elements Can you Add to the Top Bar?
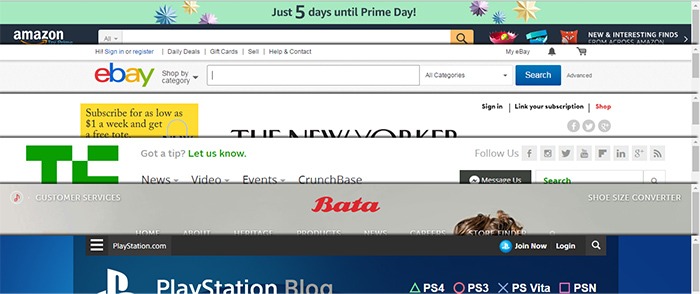
Top-Bar-examples

The top bar has been used in a variety of ways, depending on the UX design or the information you want to highlight. Let’s enumerate common items we see on the top bar.

  • Promotions – This can be anything from a sale to a new product release. The top bar is a good noticeable area that you can use to post your promotions and other offers.
  • User Login/Logout – When users want to log in or out, their eyes will scan the top right corner of the page to look for the link. Because of this, it makes sense to place the link in the top right corner.
  • Social Links – The top bar is a common location for the site’s social media profile links.
  • Mini Cart – The mini cart has a very important role in the UX design of e-commerce stores. It is an important element to have either on the main navigation or the top bar.
  • Search Bar – The search bar is also a crucial piece in the UX design of most websites and it can be positioned in the top bar.
  • Subscription Form/Link – Placing the subscription form on a very prominent location like the top bar draws the attention of your visitors to the form.
  • Quick Links Menu – Quick links can be any important link that you want your visitors to see or something that your visitors will be looking for. Some common quick links are My Account, Shop, Terms and Conditions, Privacy Policy, About, Contact and FAQs.

Depending on your site, you can use the top bar to contain other elements as you see fit.

How to Add a Top Bar to Storefront

To add a top bar to Storefront, you can use the Storefront Top Bar plugin. Our developers at Wooassist developed this plugin specifically for Storefront which adds two widget areas on top of the header.

Getting Started

Storefront-Top-Bar-Getting-Started

Install and activate Storefront Top Bar in your WordPress Dashboard.

After installation, go to Appearance and click on Widgets. You should find two additional widget areas namely Top Bar 1 and Top Bar 2. These are the left and right widget areas on the top bar. You can add any content here just like in any widget area. Just make sure it looks good within the small space provided.

Adding a Simple Text
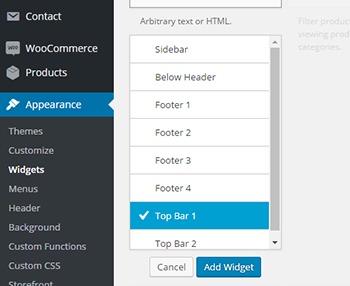
Storefront-Top-Bar-Appearance-Widgets

To add text to the top bar, find the text widget and add it to the top bar widget area. After that, you can just add any text in the text widget.

Storefront-Top-Bar-Adding-a-simple-text
Promotion 1 and Promotion 2 are the texts inserted in Top Bar 1 and Top Bar 2, respectively.

Adding a Menu

Storefront-Top-Bar-Adding-a-Menu

To add a custom menu to the top bar, you should first set up a custom menu in Appearance > Menu. After creating a menu, go back to the widgets area and add ‘custom menu widget’ in the top bar widget area. Select the menu you’ve just created and then click Save. Your custom menu should now appear in the top bar.
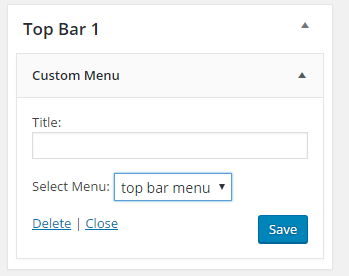
Storefront-Top-Bar-1-widget

Adding a Subscription Form Shortcode

You can add shortcodes using the text widget. In this example, we are using Mailchimp for WordPress. The plugin allows for creating a custom form which can be linked to your Mailchimp account. If you want to follow along and are wondering about the HTML markup of the subscription form in this example, you will just need the input type email and the submit button.

<input type="email" name="EMAIL" placeholder="Your email address" required />
<input type="submit" value="Sign up" />

After that, copy the shortcode and paste it in the text widget on the top bar. You can easily tweak the look of your form with CSS. In this case, the CSS we used is below. Feel free to use the code below for your own site. You can make adjustments to fit your needs.

.mc4wp-form input[type=email]{
width: 50%;
}
.mc4wp-form {
margin-bottom: 0;
}

Storefront-Top-Bar-Adding-Subscription-Form-Shortcode

Adding Other Elements to the Top Bar

The top bar works like a regular widget area. You can add shortcodes for other items like social icons, mini-cart, login, etc. You can also insert HTML and scripts in the text widget so the possibilities are endless.

Customizing the Top Bar Widget

To customize the top bar widget, you can go to Appearance > Customize and click on “Top Bar”. Here you can change the background color, text color and link color. You can also set the top bar to be hidden in mobile view.
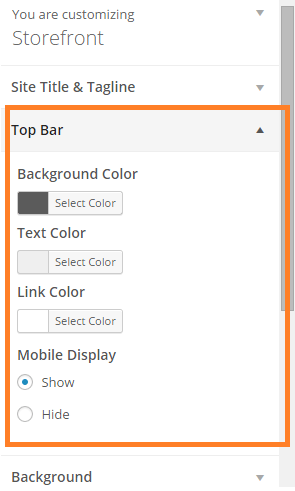
Storefront-Top-Bar-Customizing-Widget-Area

You can further tweak the top bar using CSS.

Align Top Bar 2 to the Right

By default, both Top Bar 1 and Top Bar 2 contents are left aligned. To make the content of Top Bar 2 align to the right, just use the CSS below.

.woa-top-bar.col-2 .woa-top-bar-2{
text-align: right;
}

Storefront-Top-Bar-Align-to-the-Right

Thickness/Height

To change the height of the bar, you can specify the height using CSS. Just use the code below and specify the height.

.woa-top-bar-wrap{
height: 35px;
}

Single Centered Top Bar

If you only want one top bar widget with a centered content, do not add any content to the Top Bar 2 widget area and then add the CSS below.

.woa-top-bar-wrap{
text-align: center;
}

Storefront-Top-Bar-Single-Centered

Final Notes

The Top Bar is the first thing that your customers will see on your site. It is one of most prominent areas above the fold. You now have the tools to make use of the top bar. It’s now up to how you will maximize the use of this valuable real estate.

Was this tutorial helpful? Do you have any questions about adding or tweaking the top bar in Storefront? Let us know in the comments.

Filed Under: How-To Articles, Theme and Plugin Reviews Tagged With: code snippet, CSS, design tweaks, how-to, navigation, plugins, Storefront, website development, Wooassist, WordPress

Why Use Storefront Theme on Your WooCommerce Store

August 26, 2016 By John Leave a Comment

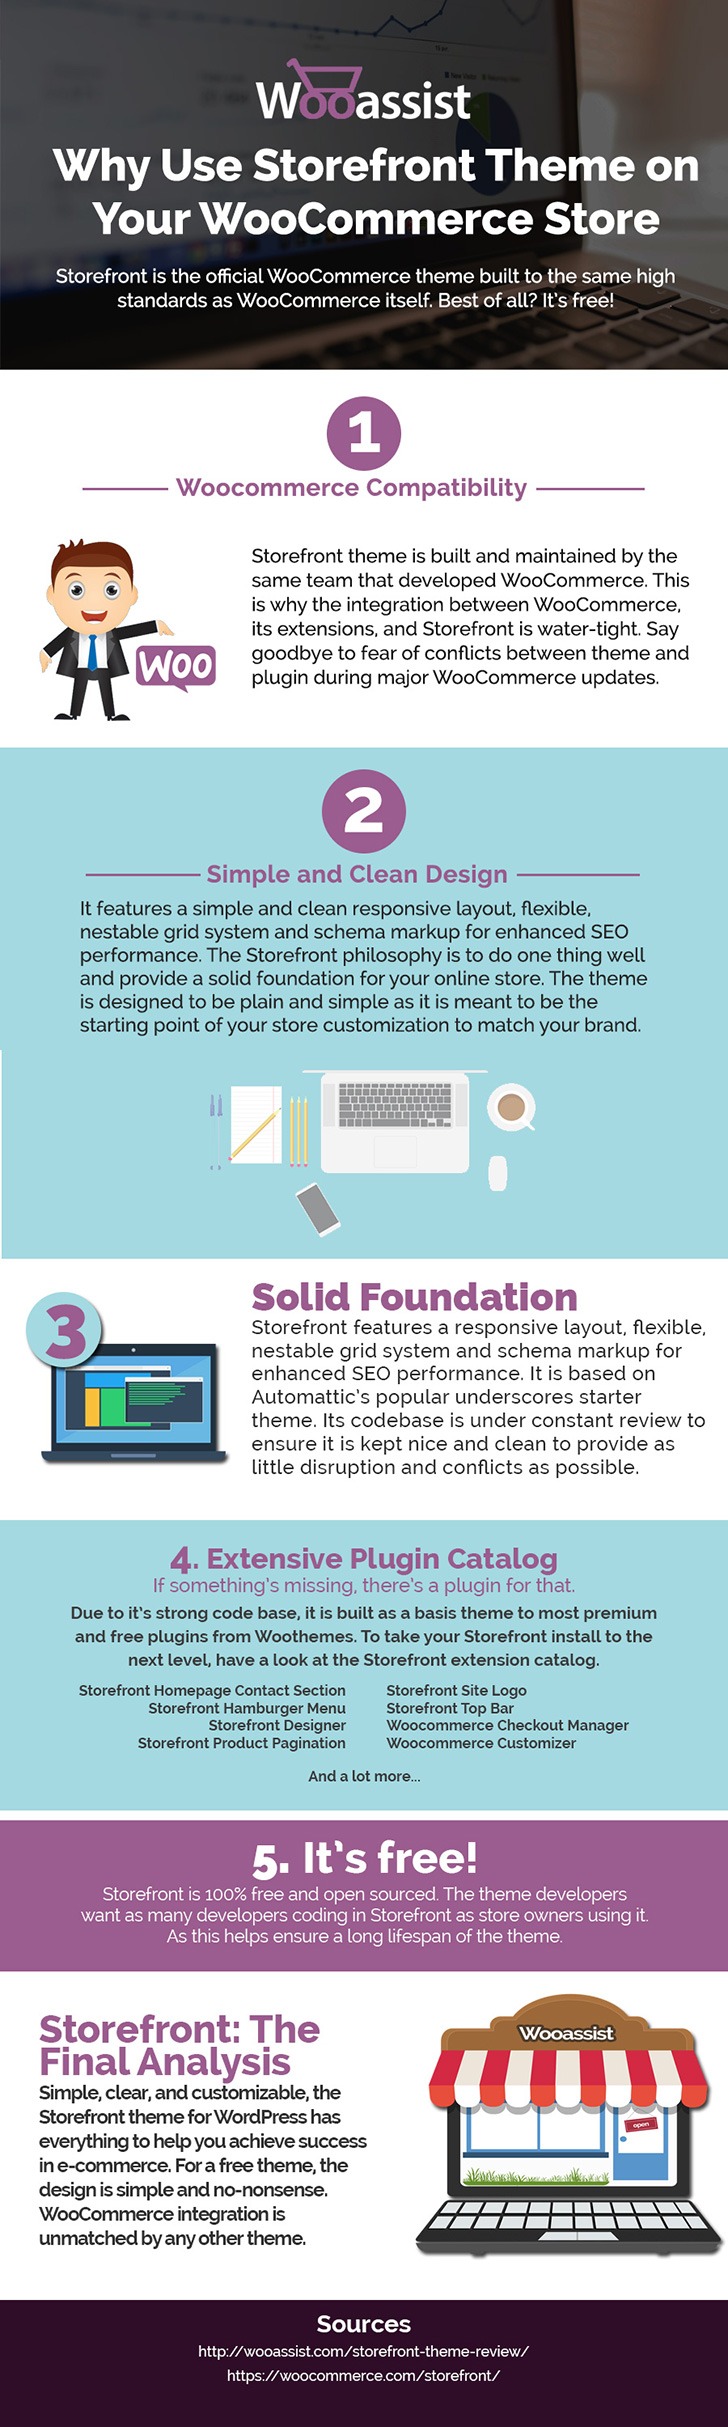
Storefront is the ideal platform for your WooCommerce store, providing a rock-solid foundation without the extra bloat or features. Developed by WooThemes, it reaches up to 3,000 downloads daily. But why use Storefront Theme on your WooCommerce Store? Find out in this infographic.

Why Use Storefront Theme on Your WooCommerce Store

To share this infographic on your site, just use the embed code below.

Filed Under: Theme and Plugin Reviews Tagged With: e-commerce, Storefront, website development, website maintenance, WooCommerce, WooCommerce products, woothemes, WordPress

The Wooassist Blueprint: What Goes on in the Wooassist Backend

July 22, 2016 By John Leave a Comment

We’ve created our fair share of WordPress sites and provided support for other WooCommerce store owners since 2014. At the same time, we maintain and improve Wooassist.com. But what goes on in the Wooassist backend? Here we’ll provide a sneak peek of what goes on behind the scenes.

Publishing Platform

wordpress-logo

WordPress is one of the best Content Management System (CMS) with over 60 million websites powered, Woasssist included. It is free and open-source, with thousands of available plugins and themes to change and extend the look and functionality of your site.

Hosting Provider

WPEngine-logo-white

WPEngine provides one of the best WordPress hosting services on the web. Our hosting plan with WPEngine comes with caching, backup features and Content Delivery Network (CDN) provided by their partner MaxCDN. They use Ever Cache for speed and massive scalability. They also have one of the best support compared to other hosting providers.

WordPress Themes

Genesis Framework

logo-Genesis-Framework

Genesis Framework is a powerful foundation for building websites in WordPress. It is compatible with WooCommerce and anything can be customized around its core code using child themes. It is also SEO optimized.

 Parallax Pro

logo-Parallax-Pro-white

We use Parallax Pro theme on top of the Genesis framework. Notice how the Wooassist homepage content has a vertical design for easy visual eye movement and flow. As you scroll down the page, you will see that the content is divided into sections. The theme is also mobile responsive.

Installed Plugins

It is best practice to deactivate and delete any unused plugins on your site to minimize site bloat. Just stick to what features you need and the plugin that offers just that.

WooCommerce

WooCommerce

Since Wooassist provides WooCommerce support, it makes sense that we use WooCommerce.

Built with developers in mind, WooCommerce is extendable, adaptable and open source. It works with the core features of WordPress and is one of the most widely used ecommerce plugins. It’s free and allows for maximum flexibility and customization. You can even expand its features with a growing collection of more than 300 extensions.

WooCommerce Customizer

WooCommerce-Customizer

WooCommerce Customizer is a free plugin that adds an extra settings page for WooCommerce. This helps you make quick changes which otherwise would require writing some custom PHP functions. Basically, you can optimize the look of your WooCommerce store for optimum conversion, without writing any code.

Genesis Connect for WooCommerce

Genesis-Connect-for-WooCommerce

When WooCommerce is installed on a site using the Genesis platform, you may find some product pages do not display properly. Genesis Connect for WooCommerce fixes this by replacing WooCommerce’s built-in shop templates with its own Genesis-ready versions. These templates are single-product.php, archive-product.php and taxonomy.php.

WooCommerce Google Analytics Integration

WooCommerce-Google-Analytics-Integration

WooThemes created WooCommerce Google Analytics Integration plugin and is a must to integrate analytics in WooCommerce versions 2.1 and up. This plugin inserts tracking codes into your store pages.

WP-Optimize

WP-Optimize

We use WP-Optimize to clean and keep our database down to a reasonable size. The plugin helps clean up your WordPress database by removing old revisions of posts and stale/trashed comments. It also allows for optimization of your WordPress core tables.

WordPress Related Posts

WordPress-Related-Posts

WordPress Related Posts automatically adds thumbnails at the footer of your content. This helps readers find other relevant posts in our blog for further reading.

WooCommerce Paypal Pro

WooCommerce-PayPal-Pro

We use WooCommerce Paypal Pro as our payment gateway. Our clients can pay with their credits cards. A Paypal account is not necessary.

WooCommerce Checkout Manager

WooCommerce-Checkout-Manager

We use WooCommerce Checkout Manager to customize the fields on our checkout page. This allows for faster and easier checkout.

Akismet

Akismet

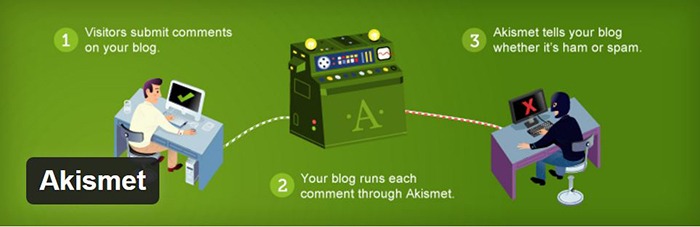
We trust Akismet to safeguard our site against spam comments. This product by Automattic comes bundled with WordPress installations. You just need to sign up at their website and get your API key to activate it. Akismet automatically checks incoming comments and moves ‘spam-like’ comments to the Spam folder.

PopupAlly

PopupAlly

We use PopupAlly to show time-delayed and exit intent popups for our free e-book offer and newsletter subscription, respectively. The plugin makes it easy to customize popup forms even for novice users.

Yoast SEO

Yoast-SEO

We use Yoast SEO to optimize our blog post and pages for SEO. It is a powerful plugin that helps to give any site an SEO boost. This plugin can also help optimize product pages and product categories in WooCommerce.

Visual Form Builder

Visual-Form-Builder

We use Visual Form Builder to create forms such as our contact form and custom package form. Visual Form Builder is easy to set up and use even for novice users.

Responsive Pricing Table

Responsive-Pricing-Table

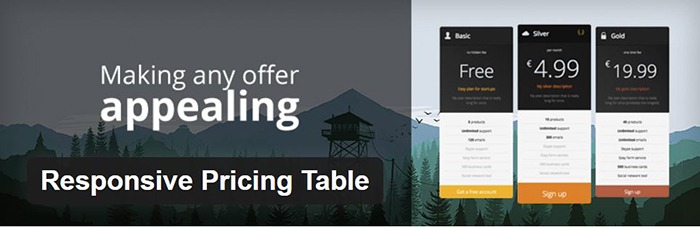
We use Responsive Pricing Table plugin to add a ‘Pricing Tables’ tab in the WordPress admin panel . This allows for creating pricing tables without coding. You can add features of up to 5 plans and display the price table anywhere with a shortcode.

Redirection

Redirection

Redirection is a free plugin that makes managing our 301 redirects easier. It also helps us keep tabs on any 404 errors. We use this mainly when changing slugs of blogs post when optimizing for SEO.

Filed Under: Theme and Plugin Reviews, Wooassist News Tagged With: Genesis, navigation, optimizations, plugins, PopupAlly, redirection, website development, Wooassist, WooCommerce, WooCommerce products, woothemes, WordPress, WPengine, Yoast

Why Should You Keep WordPress Updated?

May 24, 2016 By John 1 Comment

WordPress is getting more popular as a platform for creating e-commerce stores. Because of this, WordPress sites have become attractive targets for hackers to try and break into. There are a few reasons why hackers do this but the main motive has always been for profit. In this article, we will discuss how hackers take advantage of a WordPress site with poor security. You’ll also learn what should be done before a site update and other means to keep your site safe.

How Does a Hacker Take Advantage of a Compromised WordPress Site?

why should you keep wordpress updatedA lot can be done to a hacked WordPress site. It is not just getting sensitive information. Actually, getting sensitive information like credit card numbers is just a “bonus”. It’s not really your website that the hackers want. What they want more is the power of your server resources: computing power, disk space, and anonymity on the internet. So how can they use your server to their advantage? Here are some ways:

Bitcoin Mining

Bitcoin mining is the process of adding transaction records to the Bitcoin’s public ledger. One offers processing power to the public Bitcoin community to validate transactions. He gets a portion of the money being transacted as processing fee. Bitcoin mining is intentionally resource and processing intensive so that the number of blocks found each day by miners remains steady. This is where the hackers can take advantage. They will use your server to mine for themselves, hence noticeably slowing down your site.

Distributed Denial of Service (DDoS)

This attack is an attempt to crash one’s server. It spams that server with thousands of traffic simultaneously, thus denying service for other users. This is commonly used for cheating in online gaming, online gambling, and in taking down a site. Since you can’t overwhelm a server with traffic using a single PC, the likely scenario is that the attacker will have thousands of hacked servers and personal computers to perform an attack. All they need is a single PHP script saved on each site which they can activate at will.

Anonymous Attacks and Spam

Hackers can also use your server to attack or spam anyone anonymously. Since they are using your servers to do these malicious things, these will point to your name and not theirs. They can be churning thousands of spam emails to other people at your expense. They can send viruses and malware through these emails to infect more PCs to aid their hacking.

Data Mining

Hackers can also just mine sensitive information like credit card numbers, passwords, emails and others.

Automated Hacking

hacking-code-destroyMost attacks are automated and target small and unsecure sites. This works similar to how a search engine uses search engine crawlers to index information on the web. The hacker’s crawlers roam around the web to find exploitable sites. When a vulnerability is spotted, the hackers will attack that vulnerable point. Attacks vary from brute force attacks to code injection on contact forms.

Importance of Updating WordPress for Security

The people behind WordPress are working hard to increase security against these attacks. This is what most of the minor updates are for. As the attacks get smarter, the security needs to upgrade as well. Fundamentally, there is no such thing as a perfectly secure system. So whenever WordPress developers see or hear about a possible vulnerability, they will try to fix it as fast as possible.

This is why WordPress updates are very important. By keeping your WordPress core updated, you are protecting yourself from the latest known vulnerabilities.

Things to Do Before Updating

Most of the time, updating WordPress is harmless. However, some major updates that involve the core code may break some plugins or theme files which in turn can break some layout or functionality on your site. That’s why it is important to follow a process before pushing through with an update to avoid breaking your site.

Create a Backup

Creating a backup is the best thing that you can do before pushing through with an update. Backups are your last line of defense in case something goes wrong. If you think it is a hassle, you can actually automate backup creation. There are even hosts that automatically do this for you. However, it is best to have your own backup and not depend on your host to make your backups for you.

Testing on a Staging Site

A staging site is an independent copy of your site. Most hosting sites offer an easy way to make them but you can always create your own. Staging sites are used to ensure that everything works perfectly before you present your site to your customers. This is very important especially for e-commerce sites. You can lose your customers’ trust if you let them experience downtime and bugs.

Other Things to Help You Secure Your Site

cyber-security_keyboard-lockedAside from the updates, there are a lot of things you can do to harden the security of your site. Here are some examples:

Installing a WP Security Plugin

Like creating a backup, installing a WP Security plugin is one of the best things that you can do. Sucuri Security plugin is highly recommended. Basically Sucuri will act as a firewall for your site. It will protect your website from hackers, malware, DDoS and blacklists. It will receive all the traffic going to your site and filter it before sending it to your host. This allows the plugin to block all the attacks and only send you legitimate traffic. Because the filtering/blocking is happening on the Sucuri servers, your servers are relieved of a lot of load. Sucuri has always been the top go-to plugin when it comes to security.

Password Protect Some Directories

Password protecting /wp-admin directory adds another layer of security to your site aside from the login page. This can be done either manually or using cPanel. This is addressed on sites that have a lot of users accessing the wp-admin; for example large news/blog sites that accept guest authors.

Disabling PHP Execution

Disabling PHP Execution from certain directories protects you from backdoor access file attacks. The attacks come disguised as a WordPress core PHP file and inserted in easy access directories like /wp-includes/ and /wp-content/uploads/. Preventing PHP execution from these directories reduces the risk of backdoor access.

Changing the Prefix of Your Database

The default prefix of a WordPress database is “wp_”. Everything on your database will start with this so changing it will make it difficult for attackers to access your database.

Conclusion

Now that you’re more familiar with how hackers work, you can better equip your site to avoid being a victim. Backup your site and do not skimp on WordPress updates, even the minor ones. Remember that these updates will help you safeguard your WordPress site from the latest known security threats. Updates are one thing but you should also harden your site by implementing the strategies mentioned above.

When was the last time you updated WordPress? Do you have any other security tips you’d like to share? Let us know in the comments.
Filed Under: How-To Articles Tagged With: admin, backup, best practices, brute force, e-commerce, how-to, plugins, security, sucuri, website maintenance, WordPress

How to Change the Number of Related Products in WooCommerce

May 12, 2016 By John Leave a Comment

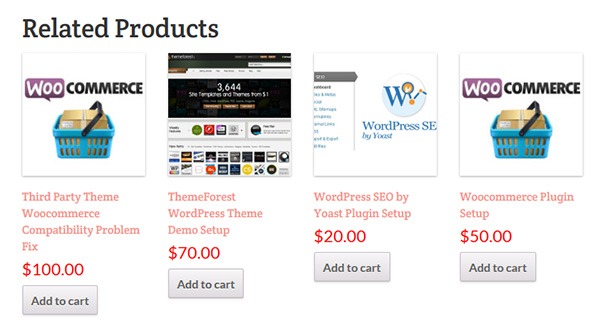
How to change the number of related products in woocommerceChanging the number of related products in WooCommerce is a relatively easy task if you know how to do it. WooCommerce defaults to two related products in the single product page but store owners may want to show their visitors more than just two related products.

Why Change the Number of the Related Products?

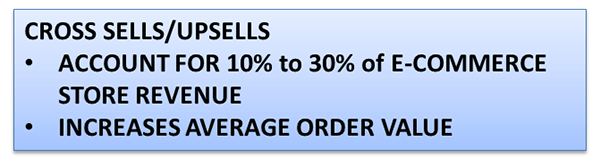
Showing more products in the Related Products section will increase and develop the browsing or buying choice of the user. This strategy is basically cross-selling/upselling. It is the strategic way of introducing your customers to other products that are related to what they are already interested in. Research shows that product recommendations account for 10% to 30% of e-commerce store revenue and increase average order value.Cross-Sells_Upsells

Setting up the Number of Related Products

There are two ways you can set up the number of related products. First is to insert a code snippet in the functions.php file on your theme. Second is to install a plugin to do it for you. The first method may seem intimidating to some WooCommerce shop owners, but it is actually as easy as copy and pasting a code. This method is recommended because it doesn’t bloat your site with unnecessary code.

In some themes, authors have added custom functions that allow users to edit WooCommerce and this includes the number of related products. Buying themes that come with a lot of custom functions however are generally not recommended as they can add unnecessary bloat to your site.

How to Change the Number of Related Products in WooCommerce Using Code Snippets

The best way to edit the number of related products is by using a code snippet that you insert into your child theme so that the code doesn’t get overwritten when you update your theme. Don’t get discouraged by the thought of coding but do take extra caution as one wrong code can break your entire site. If you do not know what you are doing, it would do you well to hire a developer to do this for you. If you are comfortable working with code snippets, then proceed with the steps below.

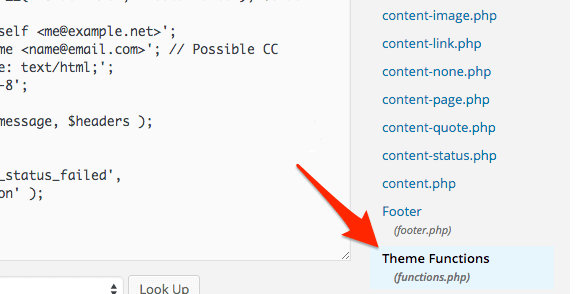
    1. To start, locate functions.php in the WordPress file system. Go to your WordPress Dashboard. Navigate to Appearance > Editor. Choose the theme you are using from the dropdown in the upper right sidebar and locate at the bottom right the functions.php file. You can also access your site’s file through an FTP client and edit the functions.php file from there.

WordPress-Dashboard_Edit-Themes_Themes-Function

  1. Next is to copy and paste the code below at the very bottom of your functions.php file.
    /**
    * WooCommerce Extra Feature
    * --------------------------
    *
    * Change number of related products on product page
    * Set your own value for 'posts_per_page'
    *
    */ 
    function woo_related_products_limit() {
      global $product;
      
      $args['posts_per_page'] = 6;
      return $args;
    }
    add_filter( 'woocommerce_output_related_products_args', 'jk_related_products_args' );
      function jk_related_products_args( $args ) {
      $args['posts_per_page'] = 4; // 4 related products
      $args['columns'] = 2; // arranged in 2 columns
      return $args;
    }
    
  2. The piece of code above will make the number of related products into 4 per page arranged in 2 columns. This is defined in these lines of code:

    “$args[‘posts_per_page’] = 4; // 4 related products”, and “$args[‘columns’] = 2; // arranged in 2 columns”.

    In order to have the desired number of related products, you just need to vary the values. For example you want to have 6 related products in a single column, change the 4 to 6 and 2 to 1. So it will be:

    “$args[‘posts_per_page’] = 6; // 6 related products” and “$args[‘columns’] = 1; // arranged in 1 columns”.

  3. Save the file when you are done.

How to Change the Number of Related Products in WooCommerce Using a Plugin

For less technical store owners, you may want to change the number of the Related Products in your WooCommerce store by using a plugin. Using a plugin will save you from editing important website files that can break your site. Here are some plugins that we can recommend:

Booster for WooCommerce

Booster for WooCommerce was previously called WooCommerce Jetpack. This enables you to tweak a lot of settings for WooCommerce not just changing the number of related products. For anyone using the WooCommerce platform, this plugin is highly recommended because it provides a lot of functionality.

To change the number of related products, follow the steps below:

    1. First, install and activate the plugin.
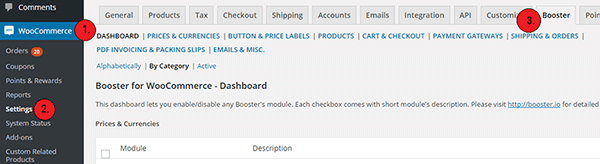
    2. Go to WooCommerce > Settings > Booster.

Booster-for-WooCommerce

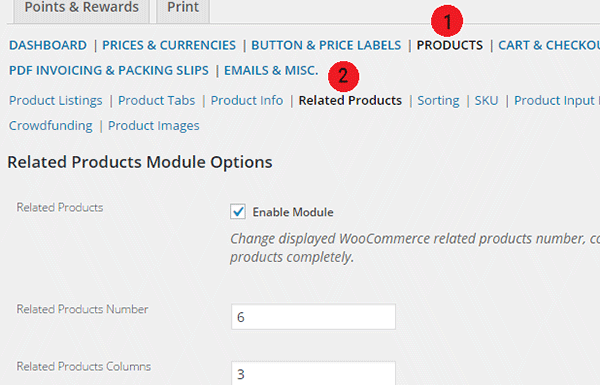
    1. In the Booster menu, click on the Products tab > Related Products.

Booster-for-WooCommerce_Related-Products-Tab_Options

  1. Enter the number of Related Products that you want. You can also change the number of columns for the Related Products Section.
  2. Check the Enable Module, save and you’re done.

While WooCommerce Booster is a powerful plugin in itself, you may want to use a different plugin if you just need to edit the number of related products. This is because the number of features that you wouldn’t be using would just add extra bloat to your site.

Woo Related Products

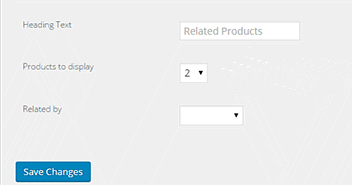
Woo Related Products is one of the simplest plugins out there for editing related products in WooCommerce. It is light and easy to navigate. It also allows you to change the heading text on the related products section.

  1. To start, install and activate the plugin.
  2. Locate “Related Products” from your WP admin menu panel.
  3. Select the number of related products you want to display. And then click on Save Changes.Woo-Related-Products_Products-to-Display

You want to increase your conversions. By increasing the number of related products from WooCommerce’s default to introduce more products to your customers, you can increase your revenue and average order value. You can follow the steps mentioned in this article to accomplish this for your own website.

Do you know of other strategies that can help increase conversions through cross sells and upsells? Let us know in the comments.

Filed Under: Code Snippets, How-To Articles Tagged With: admin, code snippet, conversion optimization, design tweaks, how-to, navigation, plugins, product management, WooCommerce, WooCommerce products, WordPress

  • « Previous Page
  • 1
  • …
  • 3
  • 4
  • 5
  • 6
  • 7
  • 8
  • Next Page »
Let us support your online store so you can manage your business

Get started today

Get 2 Hours of FREE SUPPORT

We are so confident that you will love our services that we will give you your first 4 hours at a 50% discount

That’s 4 hours for only $75

BUY NOW

Free eBook

5 Things Every Online Store Can Fix On Their Website In The Next Week To Increase Sales

Quick Links

  • How it Works
  • Pricing
  • Blog
  • Contact
  • About Wooassist
  • My Account
  • Checkout
  • Privacy Policy
  • Cookie Policy
  • Terms and Conditions

Wooassist

Australia:
59 Luke St.
Hemmant QLD 4174

Philippines:
San Miguel St.
Poblacion, Iligan City 9200

Connect


Copyright © 2026 · Wooassist

Yours FREE!

5 Things Every Online Store Can Fix On Their Website In The Next Week To Increase Sales