Wooassist

Assistance for Your Woocommerce Store

  • How it Works
  • Pricing
  • Services
    • Site Maintenance
    • AI SEO and Content Marketing
  • Blog
    • How-To Articles
    • Code Snippets
    • SEO For E-Commerce
    • Theme and Plugin Reviews
    • Wooassist News
    • WordPress/WooCommerce News
    • Interviews
  • About Us
  • Contact
You are here: Home / Archives for WordPress

How to Create a Contact Form for WooCommerce

June 3, 2016 By John Leave a Comment

How to Create a Contact Form for Your E-Commerce Store

You might have used a good amount of your resources to create a website for your business. You have an inviting and irresistible call-to-action. The last thing you’d want to happen is for a potential customer to bounce away from your site because they couldn’t find your contact information.

The Contact Us page is one of the most important pages on your website. It is one of the easiest ways to give your visitors a means of getting in touch with you.

What Do You Need to Have on Your Contact Us Page?

Having a contact form is just about the easiest way that a user can contact you. If you have several departments such as customer support, sales, press, etc. it may be worthwhile listing the contact information for each department in addition to the contact form. This can include the name of the contact person, e-mail and a phone number. If you have an office that can accept visitors, then putting your office address and a map would help.

It is important to note that your contact information should also be easily visible on your website’s home page. This increases the trust rating of your website.

How to Create a Contact Form Using a Plugin?

There are several ways to add contact forms on your WordPress website. The easiest method is by using a plugin.

There are plenty of plugins to choose from and they easy are to set up. You can choose which fields you want to include on your contact form. Here are the ones that we can recommend.

How to Create a Contact Form Using Contact Form 7

Contact Form 7

Contact Form 7 is one of the most popular plugins for creating contact forms. Currently, it has over one million active installs. It is free and it gives you the ability to create multiple forms that you can modify with markup. You can also place a contact form in any post or page using a shortcode.

To create a contact form using Contact Form 7, you need to do the following steps:

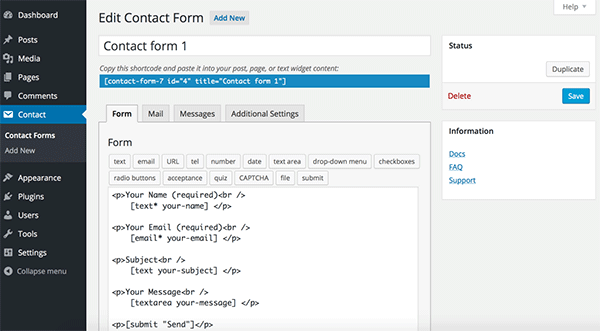
  1. After installing the plugin, mouse over “Contact” and then click “Contact Forms”.
  2. Customizing the form may take a bit of HTML skills. Basically you use shortcodes to customize the fields. For example, the shortcodes for a text field looks like [text* your-name].Contact Form 7_Add New
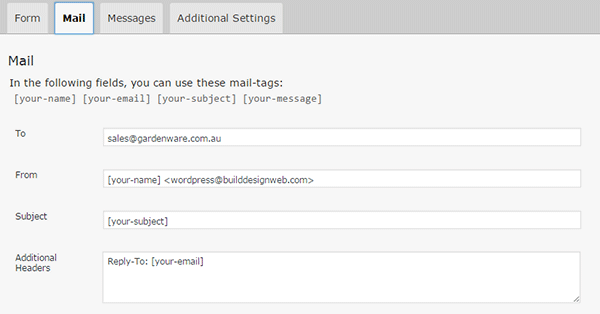
  3. Under the “Mail” tab, you can configure the email that will be sent after the confirmation. You can add the values of the fields to your email using the corresponding tags. For example, the email field [email* your-email] has the tag [your-email].Contact Form 7_Mail Tab
  4. Save the form.
  5. Copy and paste the shortcode to insert the form to your Contact Us page or wherever you want it shown.

How to Create a Contact Form Using Visual Form Builder

Visual Form Builder

Visual Form Builder was designed for fast and easy form building. There are no coding requirements. It has an intuitive drag and drop interface which lets you build forms fast.

You can insert your forms in any page or post using shortcodes. It has a logic based anti-spam system, a customizable confirmation message, and a multiple field layout option. It has an extensive FAQ page for customization and troubleshooting. It has an affordable premium version but the free version offers a lot too.

To create a contact form using Visual Form Builder, you need to do the following steps:

  1. Install the plugin and navigate to “Visual Form Builder”.
  2. To create a new form, click on “Add New Form” and fill in the required information.
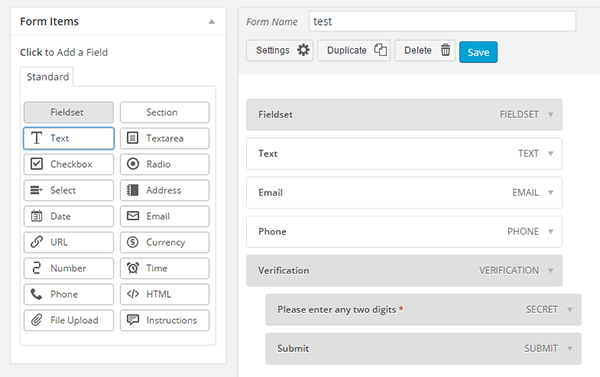
  3. Drag and drop the fields you need to the right and edit the details.Visual Form Builder_Add New
  4. Save the form when you are done.
  5. Under “Display Forms”, you can find the shortcode that you will paste on your Contact Us page.

How to Create a Contact Form Using Gravity Forms

Gravity Forms

Gravity Forms is the most popular paid contact form plugin for WordPress. It is one of most beginner friendly WordPress form plugins. With the help of some other add-ons, Gravity Forms can also be used to create surveys. It comes with premium support options and that is something you can get for spending extra bucks for this plugin.

To set up Gravity Forms, follow these steps:

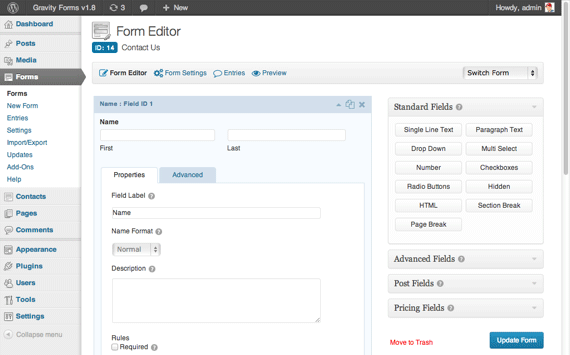
  1. Install the plugin and activate your product under Forms > Settings tab. Enter your activation key and you’re set to make your first contact form.
  2. Create a new form and then start adding the necessary fields.
  3. Customize the properties of each field.
  4. Save your form.
  5. Edit your contact page to insert the form by pasting the shortcode. Gravity Forms_Form Editor
How to Create a Contact Form Using Ninja Forms

Ninja Forms

With its really simple, intuitive, drag-and-drop interface, Ninja Forms is an excellent and powerful tool for building contacts forms in WordPress. Ninja Forms’ base product is free. If you wish to extend its functionality like connecting with Campaign Monitor, Freshbooks, Salesforce, SMS notifications, etc., you can buy the corresponding premium extensions.

To create a contact form using Ninja Forms:

  1. Once plugin is installed, find the “Forms” tab on your WordPress Dashboard then click on “Add New”.
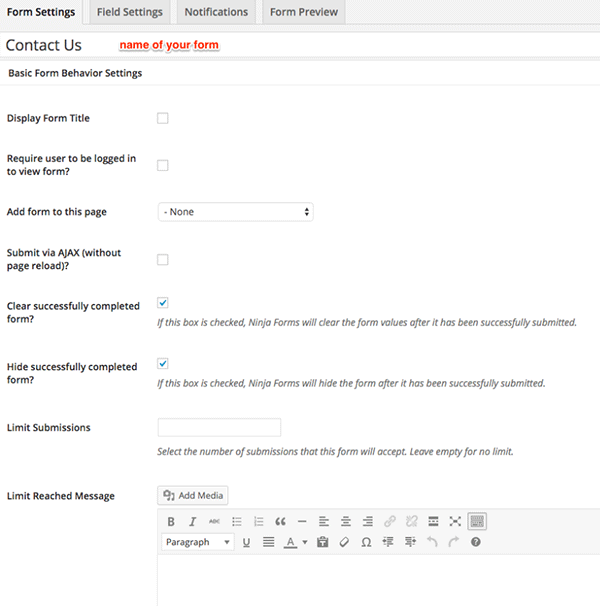
  2. In the “Form Settings” tab, you can see a lot of settings but the most important one to fill in is the form name. Other settings are quite intuitive but if you need some help, you can check out the Ninja Forms Documentation.Ninja Forms_Form Settings
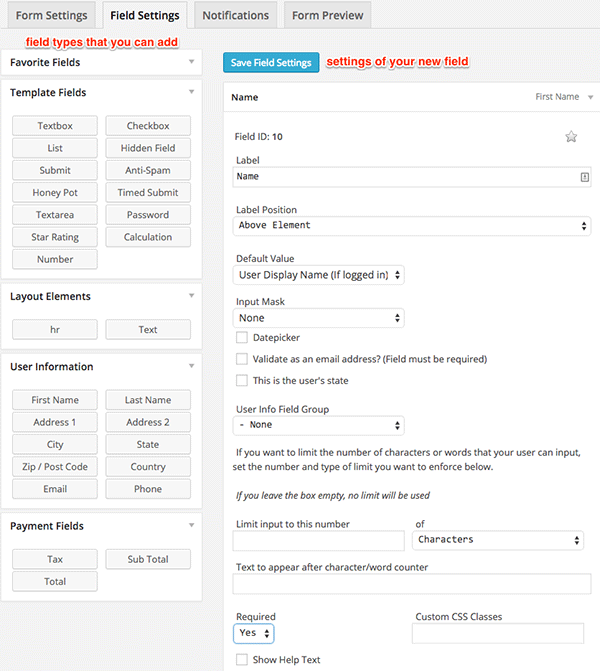
  3. The “Field Settings” tab is where you actually build your form. Drag and drop the needed fields and fill out the information. It is very easy to navigate so you can play around to learn the features. The best way to learn how to do it is actually doing it yourself.Ninja Forms_Field Settings
  4. You can edit the email notifications in the “Notifications” tab.
  5. Once you’ve completed your contact form, you can preview it in the “Form Preview” tab. Don’t forget to save it after.
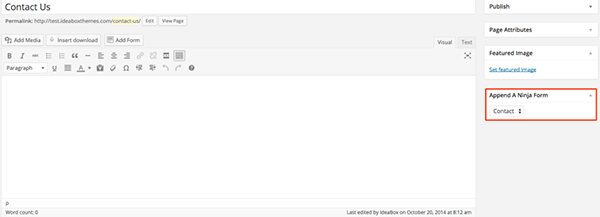
  6. Navigate to the ‘Edit’ mode of your Contact Us page. Find the section “Append A Ninja Form”, then select the form you just created and save the page.Ninja Forms_Append

How to Create a Contact Form Using Formidable Pro

Formidable Pro

Among WordPress users and developers, Formidable Pro is another popular choice. Formidable Pro provides a unique interface from which you can create stunning forms on your WordPress site. This form builder plugin has almost everything you’d need from a premium form plugin. Formidable Pro is a breath of fresh air. Its free version is powerful enough but going for the premium version gives you more features like integration with MailChimp, Aweber, Highrise, Twilio for SMS, WPML, and Zapier.

To set up a Formidable Pro contact form:

  1. After installing, go to Formidable > Forms and click “Add New”’ at the top of the page.
  2. You can start with a blank form or select from a template.
  3. Drag and drop the needed fields. The field settings are quite intuitive so you will learn as you select them.
  4. Click “Create” to save your form.
  5. There are two ways to publish a form on your Contact Us page:
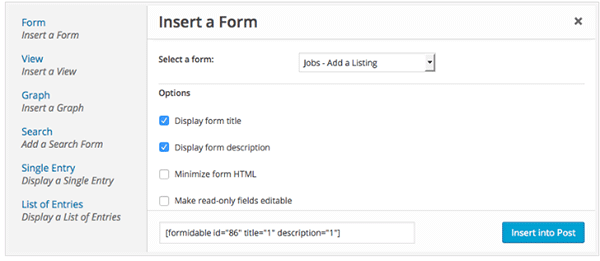
    • Use the shortcode builder. Click “Formidable”, select the correct form, and then click “Insert into Post”.

      Formidable Pro_Shortcode Builder
      img1 – In the Edit mode of your page, click “Formidable”
      Formidable Pro_Shortcode Builder_Insert
      img2 – Select the correct form, then click “Insert into Post”
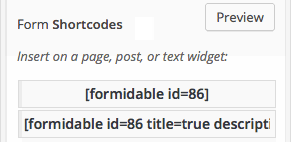
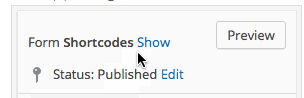
    • Insert the shortcode manually. Navigate to your form and in the upper right corner click “Show” then copy the form shortcode.
      Formidable Pro_Show Shortcode
      img1 – Click “Show”

      Formidable Pro_Show Shortcodes
      img2 – Copy either one of the two shortcodes

Note that the first shortcode [formidable id = 86], only shows the form itself. If you want the title and description to be displayed as well, copy the second shortcode [formidable id = 86 title=true description=true].

How to Create a Contact Form Using Fast Secure Contact Form

Fast Secure Contact Form is another popular free WordPress contact form plugin. Its name says it all. If you hate spam with a passion, then this is the plugin for you. It includes Akismet support to block spammers. You can also install a companion plugin to add CAPTCHA support.

To set up Fast Secure Contact Form:

  1. Install the plugin.
  2. Click the Plugin tab in the WordPress admin interface, then click “FS Contact Form”.
  3. Under the basic setting fill in the form label and the welcome introduction. The most important thing is to fill in the email address where you should receive the user information.
  4. The “Field” tab is where you actually build your form. You will see a default form with the default fields.
    • To add a field, click “Add New Field”. To edit the field, click on “Show Details”.
    • You can remove a field by clicking the “Show Details” then checking the “Disable Field”.
  5. Save your form when you’re done and locate the form shortcode.
  6. Copy and paste the shortcode to the Contact Us page.

Which is the Best Contact Form Plugin for WordPress?

Well there you have it! These are some of the more popular contact form plugins out there but there are more. Now you might ask what the best contact form to use is. Unfortunately, there is no definitive answer to that question as it will all depend on what you need in a contact form.

What is your favorite contact form plugin? Tell us in the comments.

Filed Under: How-To Articles, Theme and Plugin Reviews Tagged With: admin, e-commerce, how-to, plugins, WordPress

Connect Your WordPress.com Account to Continue Using WooCommerce Services

February 13, 2017 By John Leave a Comment

Since Automattic, the company behind WordPress and WordPress.com has acquired WooCommerce, it was only a matter of time before the two were integrated.

WooCommerce now requires a WordPress account for managing purchases, tickets and other subscriptions. You need to connect Your WordPress.com account to continue using WooCommerce services.

Before, users had to access two accounts to use the services of one company. Integrating WordPress.com into WooCommerce solves that problem for some users.

If you have purchased and are using premium plugins from WooCommerce, you will need to log in with a WordPress.com account to manage your subscriptions. If you don’t have a WordPress.com account, you can sign up by following this link.

Once you have a WordPress.com account, you can head over to https://woocommerce.com and click on “Sign in with WordPress.com”.

Connect Your WordPress.com Account to Continue Using WooCommerce Services

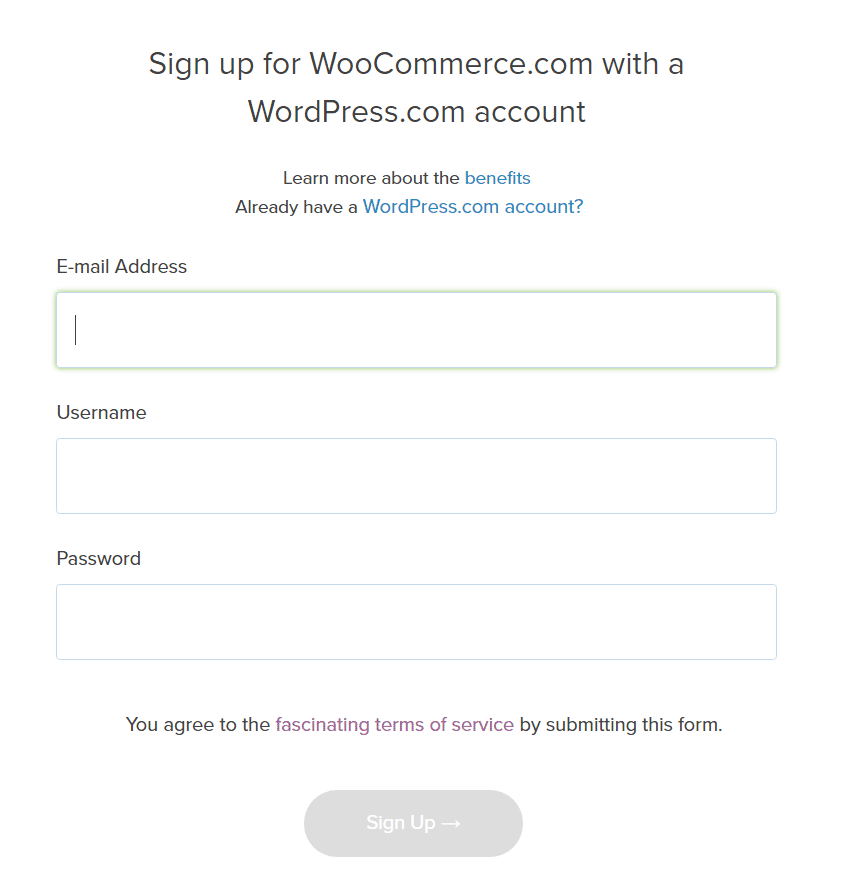
After that, click on the “Already have a WordPress.com account?” link, then proceed to the next step.

sign-up-with-woocommerce-with-wordpress

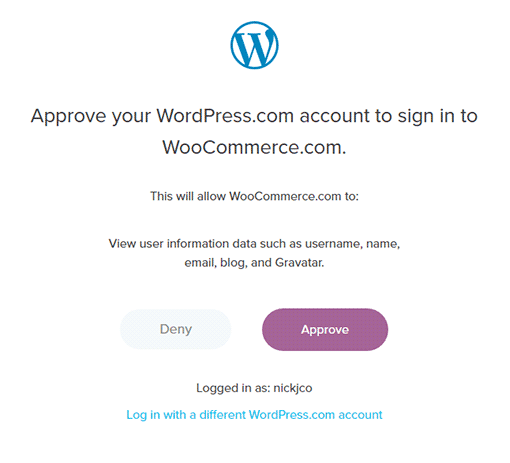
After logging in to Woocommerce.com via WordPress.com, you will need to click “Approve” to link your WordPress.com account to WooCommerce.

approve-wordpress.com-account

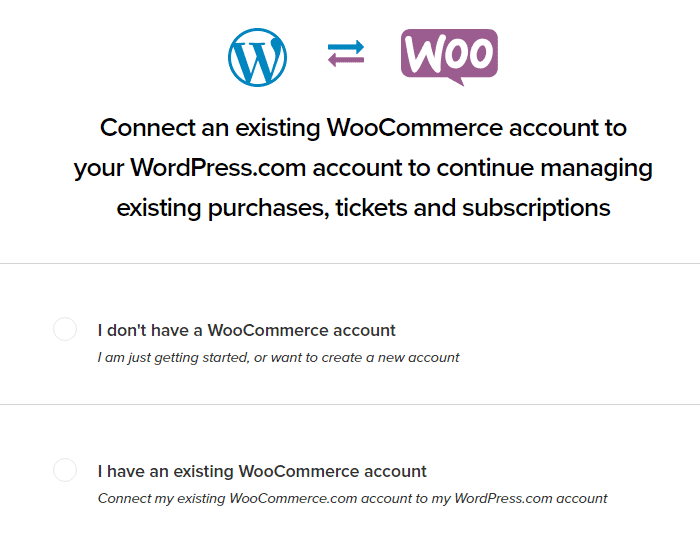
Next, you will need to connect an existing account or create a new one. Click on the “I have an existing WooCommerce account” if you have one and click on “Continue”.

connect-woocommerce-account-to-wordpres

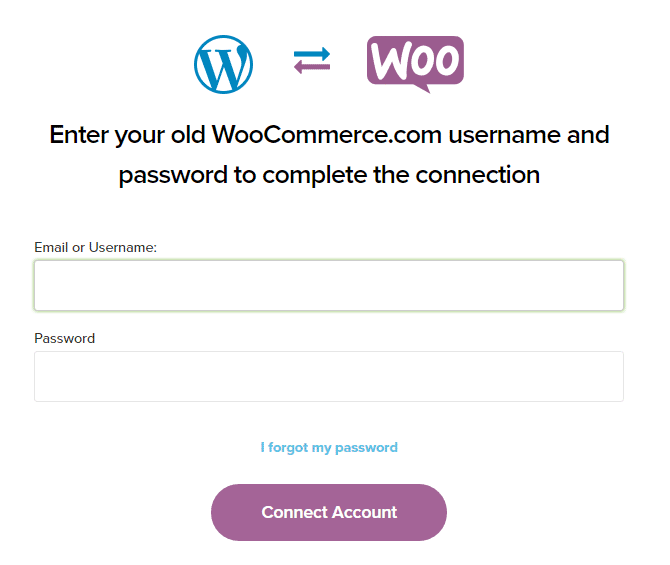
Here, you will to enter your old Woothemes.com/WooCommerce.com account.

After entering details, just click “Connect Account”.

connect-woocommerce-and-wordpress

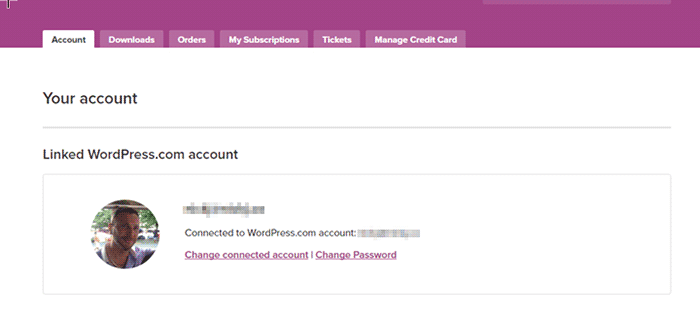
After connecting the account, you’ll then be redirected back to your account dashboard. From here on, you only need to login with your WordPress.com account to access WooCommerce services.

linked-wordpress.com-account

Were you able to successfully connect your WordPress.com and WooCommerce accounts? If you are having problems connecting your account, you can contact the Wooassist team to assist you.

Filed Under: How-To Articles, Wooassist News Tagged With: WooCommerce, woothemes, WordPress

11 Things You Can Do to Increase the Security of Your WooCommerce Store

March 11, 2018 By John Leave a Comment

Increase the security of your WooCommerce store

Keeping your WooCommerce store secure is important. Hackers discover new exploits every day. In fact, more than thirty thousand websites get hacked on a daily basis. Don’t be a part of that statistic. Increase the security of your WooCommerce store before it’s too late.

At Wooassist, we’ve had our fair share of clients that have had their websites hacked. Cleaning up after a hack is a lot of trouble. You have to get rid of the exploit and weed out any remaining backdoors that would allow the hacker to regain access to the hacked site. Worse, a hacking incident can lead to a website being penalized by search engines for containing malware. In this post, we’ll share some tips that you can do right now to increase the security of your WooCommerce store. Following these tips will reduce the odds of your site getting hacked.

1. Check Your Login Information.

Often, hacks happen because of the user’s fault. Almost 90% of cyber-attacks are caused by human error or behavior.

The first step to increase your website’s security is to make sure that your login information is secure. First, don’t use “admin” as your username. Why? Because brute force attacks usually target this username. And if you use admin as your username and have a weak password, it is almost guaranteed that your site will fall victim to a brute force attack. But what if you are already using admin as your username? You’ll just need to create a new administrator account using a unique username and a strong password. WordPress will already recommend a strong password that you can use. After creating a new account, log in to the new account and you can then proceed to delete the “admin” account.

2. Keep your WordPress/WooCommerce Site Updated

Keep your WordPress/WooCommerce Site UpdatedKeeping your WooCommerce store updated will protect your site from the latest known vulnerabilities. Developers regularly patch exploits that are found in their systems so it is imperative that you update on a regular basis.



Before updating however, it is important to test your updates first on a development site or at least create a backup. Often, updates can break your site and this can harm your conversion rates if you don’t have a backup that you can revert to. Websites breaking due to site updates are common. Some hosting providers such as WPEngine provide their customers an easy-to-set-up staging environment. Here you can test your updates before applying them to your live site.

3. Use Two-Factor Authentication.

Using 2-factor authentication greatly increases the security of your website. Even when a brute force attack manages to get into your site, you can block the hack with two-factor authentication. Unless the hackers get a hold of your phone, you’re safe.

4. Install a Security Plugin

A WordPress/WooCommerce site without a security plugin is like a computer without anti-virus software. Wordfence and Sucuri Security are some good options. Just install the plugins and then activate. After activating, just go to the plugin’s settings and configure depending on your needs.

Prevent Brute Force Attacks

5. Limit Login Attempts.

Limiting login attempts will deter brute force attacks. A brute force attack will attempt to guess your username and password sending hundreds if not thousands of requests every minute. Limiting login attempts pretty much renders brute force attacks powerless unless you have a weak password. There are a couple plugins that can help you limit login attempts such as Login Lockdown.

6. Protect your wp-config File

The wp-config file is a crucial part of the WordPress ecosystem. It contains important configuration information of your WordPress site which is why many hackers try to target this file. There is however a workaround to block intruders from getting access to this file. Simply place this code in your .htaccess file.

7. Hide Login Error Messages

Whenever you enter the wrong login credentials on WordPress, it returns an error message saying your username is wrong, your password is wrong, or your password does not match the username. You may think little of this, but for hackers, this bit of information is priceless. You can prevent hackers from getting clues on your WordPress logins. You can hide these error messages by adding the script below to your functions.php file. Do note however that making a mistake when tinkering with your functions.php file can cause your entire site to go down. Unless, you’re a web developer or know your way around the file, it is recommended to have a developer do this for you.

function wrong_login(){

Return ‘Wrong username or password.’;

}

Add_filter(‘login_errors’, ‘wrong_login’);

Hide WordPress Version

8. Hide WordPress Version

For hackers, discovering that your WordPress version is outdated is like finding a gold mine. So it is imperative that you always update to the latest version of WordPress. Many hosting providers will automatically update your WordPress version. However, this is not always ideal since automatic updates can mess up your site. If you’d like to do your WordPress updates at your own pace, then you should hide your WordPress version. To hide your WordPress version, paste the following code on your functions.php file.

function remove_version(){

Return”;

}

Add_filter(‘the_generator’, ‘remove_version’);

9. Do a Plugin Audit

A plugin audit is a process of reviewing the plugins installed on your site. You’ll want to look out for plugins that are no longer being updated by the developer. Outdated plugins usually become backdoors for hackers. When analyzing your plugins, you can categorize them in a number of ways.

  • Plugins that you want to keep.
  • Plugins that you don’t use or your customer’s don’t use. If you have a plugin that adds a certain functionality to your site but your customers are not using it, you might as well get rid of it. This just adds extra bloat to your site.
  • Plugins that are no longer being updated by the plugin author. This is a major security threat and you should get rid of these immediately. If you still need the functionality that the plugin provides, just find an alternative plugin. Just make sure that the new plugin is being constantly updated.

You can do a plugin audit every few months to keep your site spiffy clean.

10. Install Only Reliable Plugins

You’ve done your plugin audit. Great! Now, don’t go down the same road. Don’t just install any plugin that you find. Look at the plugin rating. Check reviews. Check when the plugin was last updated. If the plugin fails any of those three elements, consider finding something else.

11. Prevent Directory Access

If you do not block directory access on your WordPress site, users may be able to freely view the files on your site. These files may contain sensitive information that hackers can use to exploit vulnerabilities on your site. Disabling directory access can be done with a minor tweak. Just place the following code in your .htaccess file:

# Prevent folder browsing

Options All –Indexes

If you’ve done all these things, your WooCommerce store will be protected from most known threats. Should you need help getting any of these done, you can contact the Wooassist team and we’ll be able to help you out.

Do you know of any other things that you can do to help keep your WooCommerce store more secure? Let us know in the comments.

Filed Under: Code Snippets, How-To Articles Tagged With: admin, brute force, hacker, optimizations, plugin audit, plugins, security, WooCommerce, WordPress, WordPress updates

Wooassist Goes to WordCamp 2017 in Manila

November 27, 2017 By John Leave a Comment

The Wooassist team has set aside one day away from WooCommerce woes to get in touch with the local WordPress community in the recent WordCamp 2017 which happened in Manila.

Wooassist General Manager John, Project Manager Rob and Lead Developer Karl attended the one day event which took place at iAcademy Plaza in Makati last November 11. WordCamp is a conference for WordPress bloggers and developers and is held in different countries all over the world.

Wooassist Goes to WordCamp 2017 in Manila
The Wooassist Team. From left to right, John, Karl and Rob.

This year’s WordCamp had different breakout tracks to choose from. John attended the Designer’s Track. Rob attended the Blogging Track and Karl attended the Security and Maintenance Track. There was also a Developer’s Track. Unfortunately,  the team was not able to register for this track as slots were gone fast.

The talks were very insightful. The team certainly learned a lot and we’ll be sharing what we learned in future blog posts.

The panel discussions after the talks delved a lot on the future of WordPress. It appears that the local WordPress community is very keen on the direction that WordPress is taking.

Overall, WordCamp was a nice break from dealing with WooCommerce problems.

We’re looking forward to the next time WordCamp happens nearby.

Filed Under: Wooassist News Tagged With: Wooassist, wordcamp, WordPress

Why You Should Use a Development Site for WooCommerce

August 14, 2017 By John Leave a Comment

Using a development site (or a staging site) is best practice when working with websites. A development site allows web developers to safely test new features and updates without affecting the live site.

In the absence of a development site, developers will need to test new features and updates on a live site. This is not recommended because such actions can cause critical errors that may break the functionality of the site. In some cases, adding new features and new updates can cause a  website to go down. Without a proper backup, the results could be devastating especially for e-commerce stores.

Testing Ground When Adding New Site Features

If you want to add some new functionality on a live WooCommerce store, it is best to test this first on a development site. Make sure that everything is working before you roll out the new functionality to your customers.

You will most likely have a web developer who will help you add the new functionality that you want. If this is the case, the developer will recommend doing the changes first on a development site. On the off-chance he doesn’t, talk it over with your developer and recommend testing the new functionality on a development site. After adding the new feature, do some user testing on the development site to ensure that everything is working as intended and that no other existing features have been affected.

A Development Site Prevents Errors on Live Site During Site Updates

Aside from when adding new functionality to your WooCommerce store, you should use a development site when updating your site. Doing site updates on your live site can break your site so it is always best to test your updates on a development site. This is especially true when you are dealing with major releases of WordPress and WooCommerce.

How to Create a Development Site

But how do you create a development site on your server? Some hosting providers such as WPEngine provide a staging environment for their customers. If you do not have a development site, you can create one manually. However, do note that creating a development site is a complex process that includes tinkering with your site files and the database. If you are not confident in working with your site files and the database, scroll down to the next section. If you are confident with editing your site files and database, just follow the steps below:

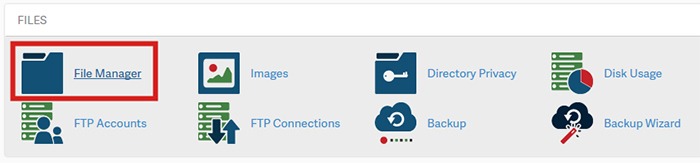
1. Log in to cPanel.

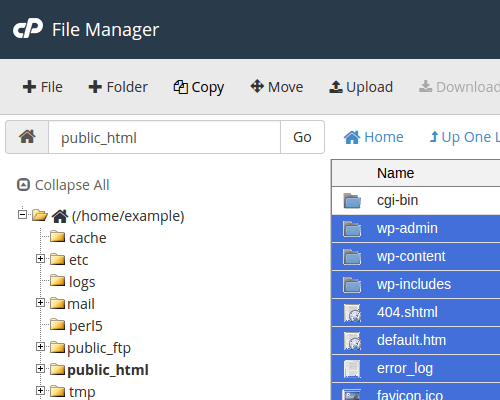
2. Go to your File Manager and go to the public_html folder. Create a ‘dev’ folder there.

How to Create a Development Site - step2

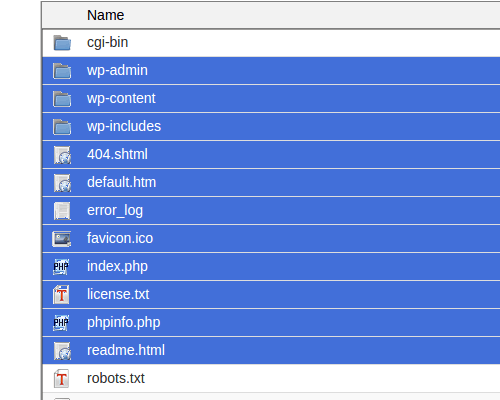
a. Copy your WordPress files from your current directory to the ‘dev’ folder you just created. Select all WordPress files and folders.

How to Create a Development Site - step2.a

b. Click Copy on the top menu.

How to Create a Development Site - step2.b

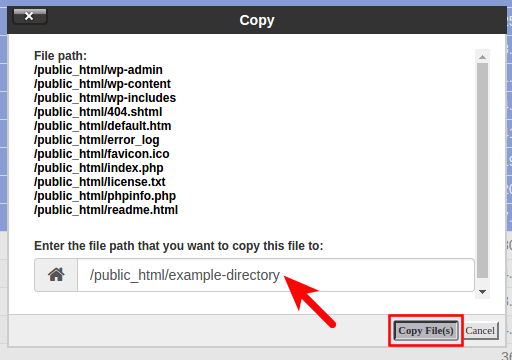
c. Type in the directory where you want to copy the files into. In this case, the directory is /public_html/dev

How to Create a Development Site - step2.c

3. Create a database. Note: Icons may differ but the names of the items should be the same.

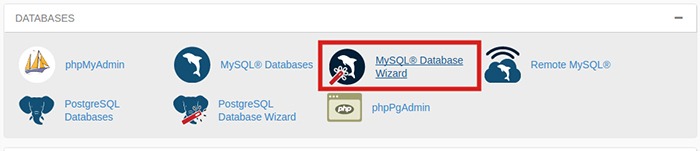
a. Go back to the cPanel home, Click the MySQL Database Wizard under the Databases heading.

How-to-Create-a-Development-Site---step3.a

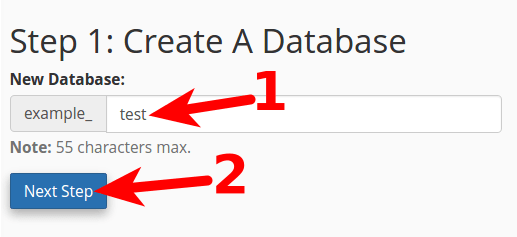
b. Next to New Database enter a name for your database and click Next Step.

How to Create a Development Site - step3.b

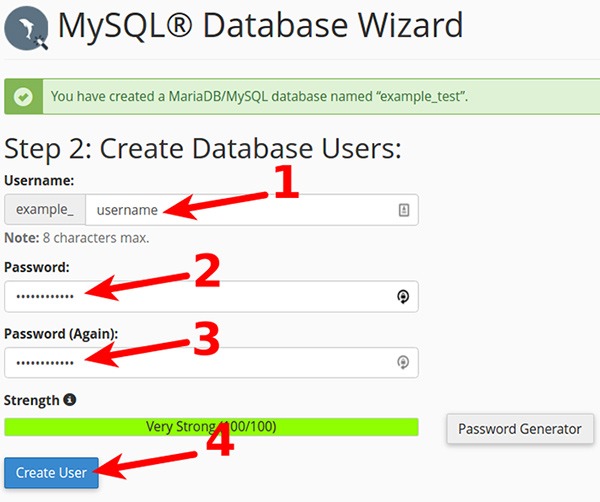
c. Next to Username enter a username. Enter and confirm a password and then click on Create User. Note these down as you will need it later.

How-to-Create-a-Development-Site---step3.c

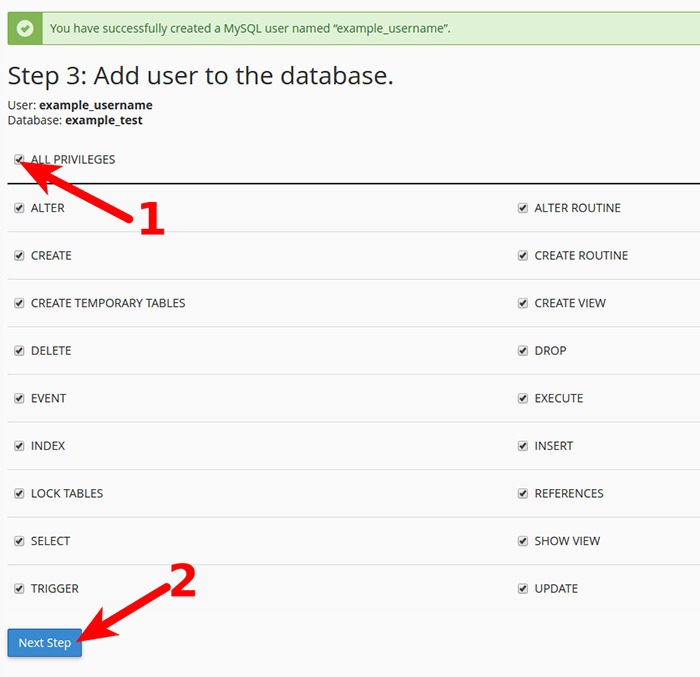
d. On the next page, you will need to assign privileges for the user on the database. Check the box next to All Privileges and then click Next Step.

How-to-Create-a-Development-Site---step3.d

4. Export your current database.

a. On the cPanel Home, click on phpMyAdmin icon under the Databases heading.

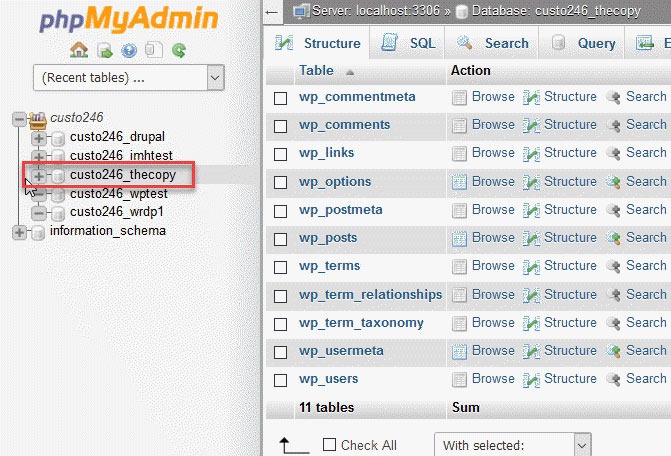
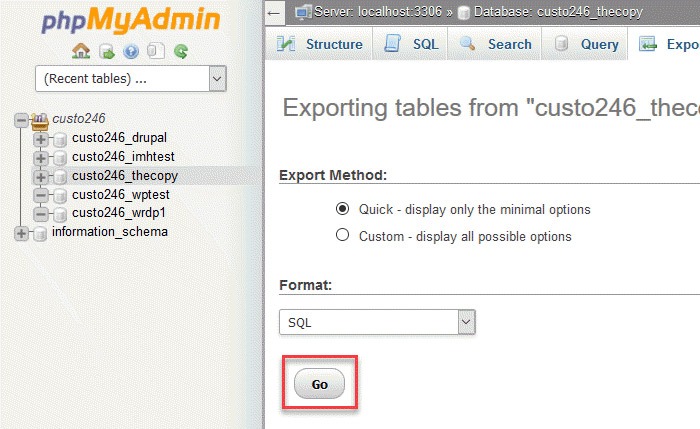
b. Select the database to export. Click on the database name you are working with in the left menu.

How-to-Create-a-Development-Site---step4.b

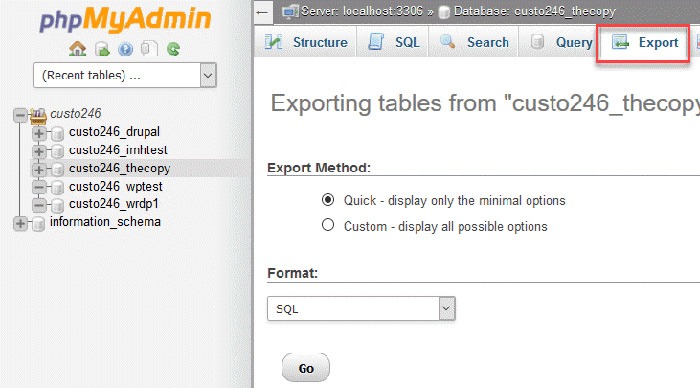
c. Click on Export option found in the tabs across the top of the screen.

How-to-Create-a-Development-Site---step4.c

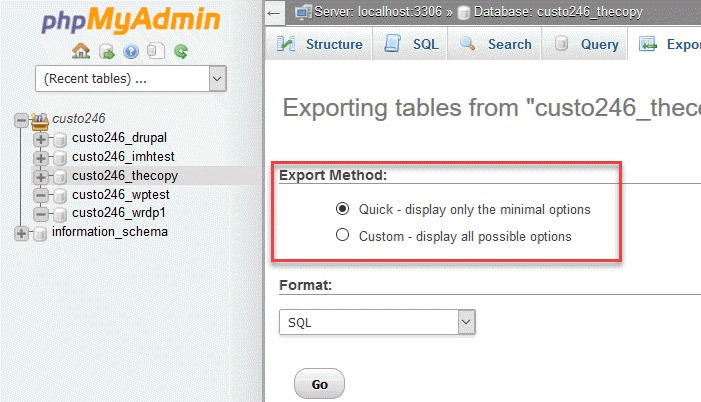
d. Click on the radial button for Quick.

How-to-Create-a-Development-Site---step4.d

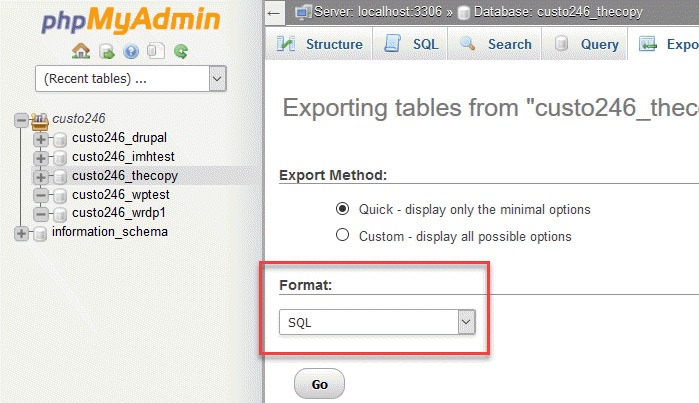
e. Next, you will need to click on the format of the export file. By default, it should be on SQL, so you don’t need to change anything.

How-to-Create-a-Development-Site---step4.e

f. Click on the Go button to start the export.

How-to-Create-a-Development-Site---step4.f

g. You will be prompted to either open or save the file. Choose the option to save the file and then save it somewhere you’ll remember.

5. Import your Database to the new database you created.

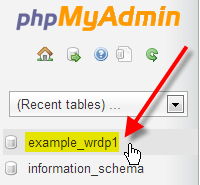
a. Still on the phpMyAdmin screen, on the left side, you should see the name of the new database you created earlier for the dev site.

b. Click on the database you created and click Import in the top menu.

c. Under File to Import, click Browse and select the backup file you previously created. You need to locate where you saved it on your computer.

d. Click Go at the bottom right. Wait for the import to finish.

e. When the database has been imported successfully, you should see a message that the import has successfully finished.

6. Configure the wp-config.php file for the dev site.

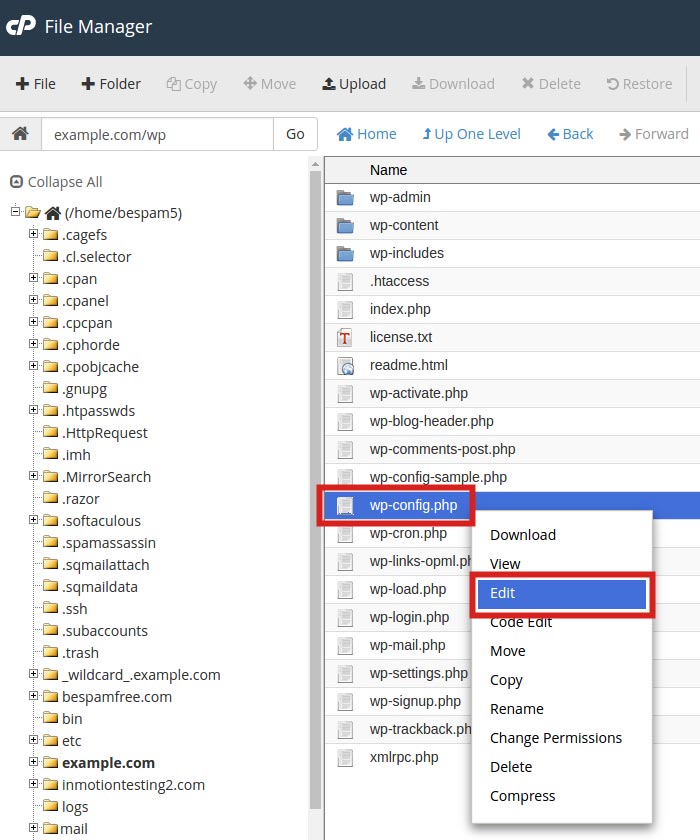
a. Click on File Manager located in the Files section of cPanel.

b. Navigate to the folder to where you uploaded WordPress.

c. Click the wp-config.php file, then click the Edit link on the top menu.

How-to-Create-a-Development-Site---step6.c

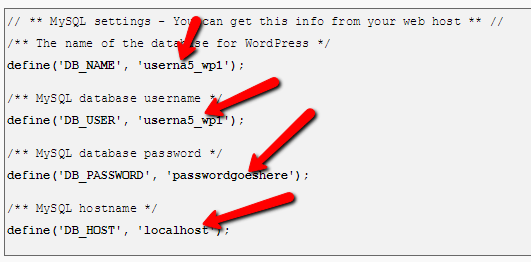
d. On the edit screen, change the values in the image below to the values you set for the new database you created earlier.

How to Create a Development Site - step6.d

7. Change the site URL for the dev site.

a. The site URL is stored in the WordPress database. In order for the site to load as a dev site, the site URL will need to be changed to the subfolder URL, eg. example.com/dev

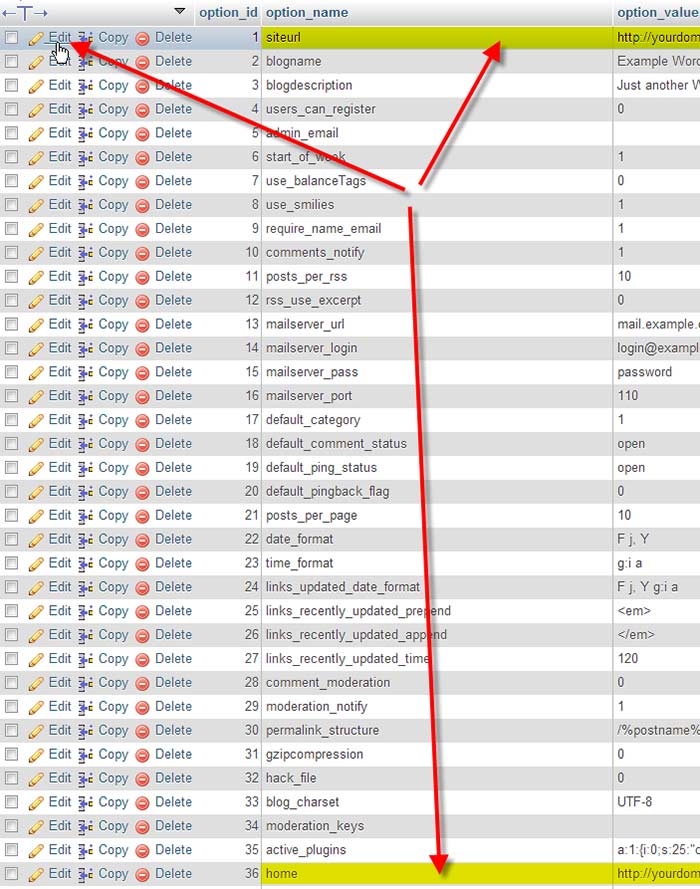
b. Go to phpMyAdmin. Select your WordPress database. Then select your wp_options table.

How to Create a Development Site - step7.b

c. Your wp_ prefix may differ depending on your install settings.

d. Click Edit beside either the siteurl or home entries.

How-to-Create-a-Development-Site---step7.d

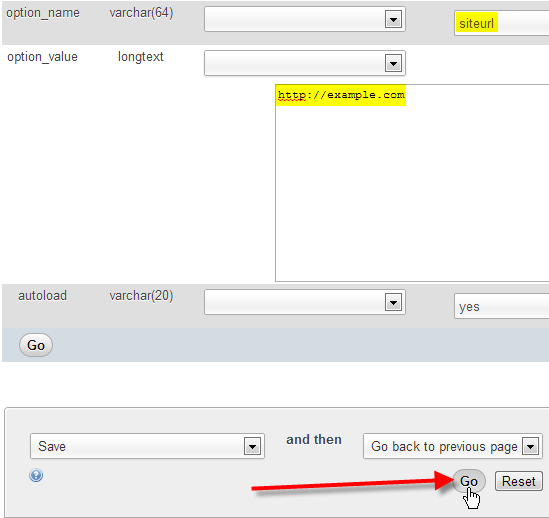
e. Enter in your new value in the option_value field, then click Go.

How to Create a Development Site - step7.e

8. Ensure that image links in your pages and posts are also changed.

a. These are in the database and not connected to the site URL so they will need to be changed separately.

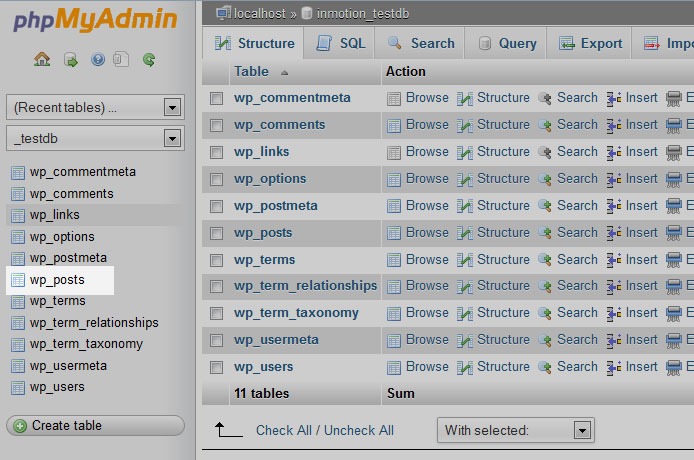
b. Using the sidebar again, find and click on the wp-posts table.

How-to-Create-a-Development-Site---step8.b

c. Look to the top of the screen and you will see several tabs that run across the page. Click on the SQL tab.

How-to-Create-a-Development-Site---step8.b2

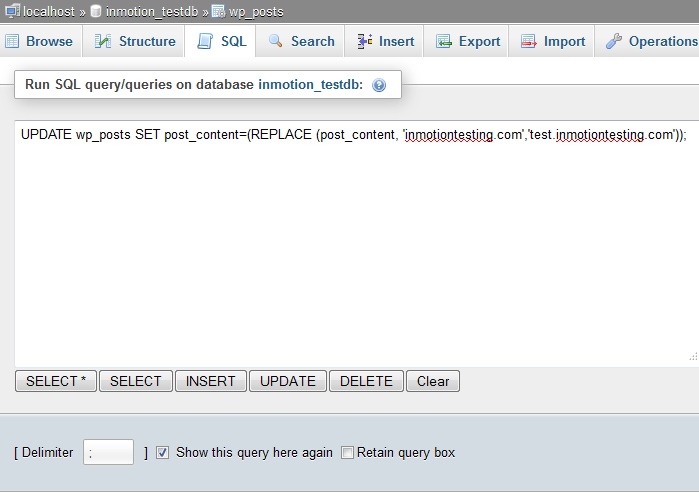
d. You are now on a MySQL editor screen. In the code area, copy the following bit of MySQL.

How-to-Create-a-Development-Site---step8.d

UPDATE wp_posts  SET post_content=(REPLACE (post_content, 'old url','new url'));

e. Be sure to replace <old_url> with the old sitename and <new_url> with the new site name. For instance, our original site was domain.com and the new test site will be at domain.com/dev so the code should appear as below:

UPDATE wp_posts SET post_content=(REPLACE (post_content,  ‘domain.com ',’ domain.com/dev '));

f. Click on the Go button to run the code and change the URLs for all images in the posts. This will also affect any other ‘hard coded’ links that were in the posts that pointed to the original site.

9. Update permalinks.

a. You can now login to your development site’s admin panel and update permalinks with the current settings. Just click update button. 

10. Hide dev site from search engines. 

a. Go to Settings > Reading page on backend, and make sure that the dev site is set to hide for search engines

b. If you are using WordPress SEO plugin by Yoast, you should turn off the sitemap functionality as well.

Create a Development Site Using a Plugin

If the steps in the previous section were too much to swallow, there are several plugins that you can use to create a development site. You can use Duplicator or WP-Staging plugin. Just follow the instructions on the plugin page and you should be good to go.

We hope this article can help you create your own development site. If you need help setting up a development site, the Wooassist team can help out. Just drop us an email. Or if you have questions, you can leave a comment below.

Filed Under: How-To Articles Tagged With: best practices, how-to, outsourcing, website development, website maintenance, Wooassist, WordPress

  • « Previous Page
  • 1
  • 2
  • 3
  • 4
  • 5
  • 6
  • …
  • 8
  • Next Page »
Let us support your online store so you can manage your business

Get started today

Get 2 Hours of FREE SUPPORT

We are so confident that you will love our services that we will give you your first 4 hours at a 50% discount

That’s 4 hours for only $75

BUY NOW

Free eBook

5 Things Every Online Store Can Fix On Their Website In The Next Week To Increase Sales

Quick Links

  • How it Works
  • Pricing
  • Blog
  • Contact
  • About Wooassist
  • My Account
  • Checkout
  • Privacy Policy
  • Cookie Policy
  • Terms and Conditions

Wooassist

Australia:
59 Luke St.
Hemmant QLD 4174

Philippines:
San Miguel St.
Poblacion, Iligan City 9200

Connect


Copyright © 2026 · Wooassist

Yours FREE!

5 Things Every Online Store Can Fix On Their Website In The Next Week To Increase Sales