Wooassist

Assistance for Your Woocommerce Store

  • How it Works
  • Pricing
  • Services
    • Site Maintenance
    • AI SEO and Content Marketing
  • Blog
    • How-To Articles
    • Code Snippets
    • SEO For E-Commerce
    • Theme and Plugin Reviews
    • Wooassist News
    • WordPress/WooCommerce News
    • Interviews
  • About Us
  • Contact
You are here: Home / Archives for Theme and Plugin Reviews

How to Create a Contact Form for WooCommerce

June 3, 2016 By John Leave a Comment

How to Create a Contact Form for Your E-Commerce Store

You might have used a good amount of your resources to create a website for your business. You have an inviting and irresistible call-to-action. The last thing you’d want to happen is for a potential customer to bounce away from your site because they couldn’t find your contact information.

The Contact Us page is one of the most important pages on your website. It is one of the easiest ways to give your visitors a means of getting in touch with you.

What Do You Need to Have on Your Contact Us Page?

Having a contact form is just about the easiest way that a user can contact you. If you have several departments such as customer support, sales, press, etc. it may be worthwhile listing the contact information for each department in addition to the contact form. This can include the name of the contact person, e-mail and a phone number. If you have an office that can accept visitors, then putting your office address and a map would help.

It is important to note that your contact information should also be easily visible on your website’s home page. This increases the trust rating of your website.

How to Create a Contact Form Using a Plugin?

There are several ways to add contact forms on your WordPress website. The easiest method is by using a plugin.

There are plenty of plugins to choose from and they easy are to set up. You can choose which fields you want to include on your contact form. Here are the ones that we can recommend.

How to Create a Contact Form Using Contact Form 7

Contact Form 7

Contact Form 7 is one of the most popular plugins for creating contact forms. Currently, it has over one million active installs. It is free and it gives you the ability to create multiple forms that you can modify with markup. You can also place a contact form in any post or page using a shortcode.

To create a contact form using Contact Form 7, you need to do the following steps:

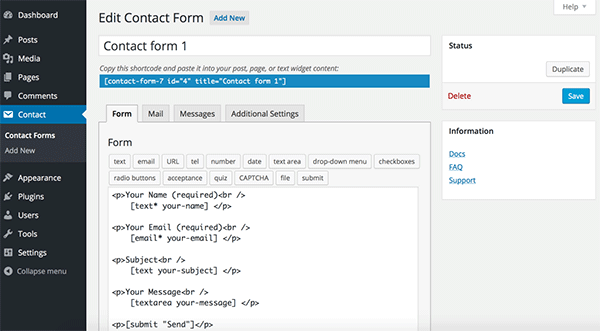
  1. After installing the plugin, mouse over “Contact” and then click “Contact Forms”.
  2. Customizing the form may take a bit of HTML skills. Basically you use shortcodes to customize the fields. For example, the shortcodes for a text field looks like [text* your-name].Contact Form 7_Add New
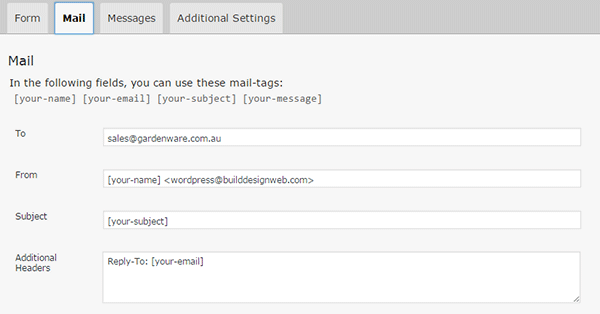
  3. Under the “Mail” tab, you can configure the email that will be sent after the confirmation. You can add the values of the fields to your email using the corresponding tags. For example, the email field [email* your-email] has the tag [your-email].Contact Form 7_Mail Tab
  4. Save the form.
  5. Copy and paste the shortcode to insert the form to your Contact Us page or wherever you want it shown.

How to Create a Contact Form Using Visual Form Builder

Visual Form Builder

Visual Form Builder was designed for fast and easy form building. There are no coding requirements. It has an intuitive drag and drop interface which lets you build forms fast.

You can insert your forms in any page or post using shortcodes. It has a logic based anti-spam system, a customizable confirmation message, and a multiple field layout option. It has an extensive FAQ page for customization and troubleshooting. It has an affordable premium version but the free version offers a lot too.

To create a contact form using Visual Form Builder, you need to do the following steps:

  1. Install the plugin and navigate to “Visual Form Builder”.
  2. To create a new form, click on “Add New Form” and fill in the required information.
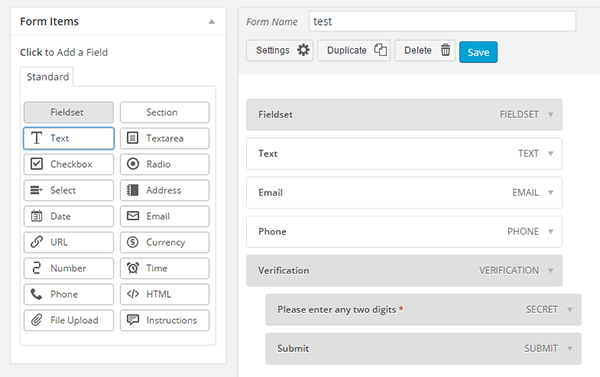
  3. Drag and drop the fields you need to the right and edit the details.Visual Form Builder_Add New
  4. Save the form when you are done.
  5. Under “Display Forms”, you can find the shortcode that you will paste on your Contact Us page.

How to Create a Contact Form Using Gravity Forms

Gravity Forms

Gravity Forms is the most popular paid contact form plugin for WordPress. It is one of most beginner friendly WordPress form plugins. With the help of some other add-ons, Gravity Forms can also be used to create surveys. It comes with premium support options and that is something you can get for spending extra bucks for this plugin.

To set up Gravity Forms, follow these steps:

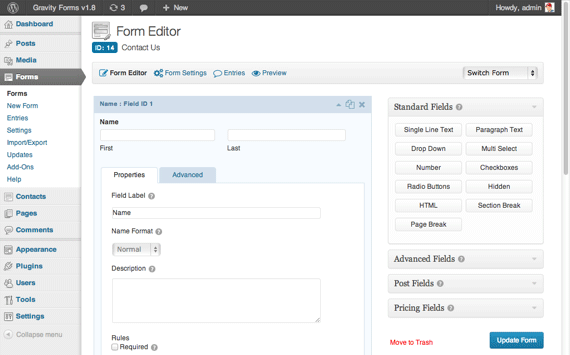
  1. Install the plugin and activate your product under Forms > Settings tab. Enter your activation key and you’re set to make your first contact form.
  2. Create a new form and then start adding the necessary fields.
  3. Customize the properties of each field.
  4. Save your form.
  5. Edit your contact page to insert the form by pasting the shortcode. Gravity Forms_Form Editor
How to Create a Contact Form Using Ninja Forms

Ninja Forms

With its really simple, intuitive, drag-and-drop interface, Ninja Forms is an excellent and powerful tool for building contacts forms in WordPress. Ninja Forms’ base product is free. If you wish to extend its functionality like connecting with Campaign Monitor, Freshbooks, Salesforce, SMS notifications, etc., you can buy the corresponding premium extensions.

To create a contact form using Ninja Forms:

  1. Once plugin is installed, find the “Forms” tab on your WordPress Dashboard then click on “Add New”.
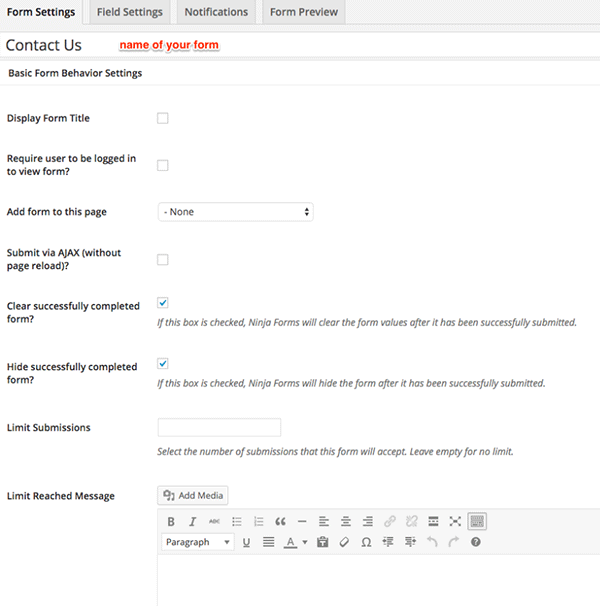
  2. In the “Form Settings” tab, you can see a lot of settings but the most important one to fill in is the form name. Other settings are quite intuitive but if you need some help, you can check out the Ninja Forms Documentation.Ninja Forms_Form Settings
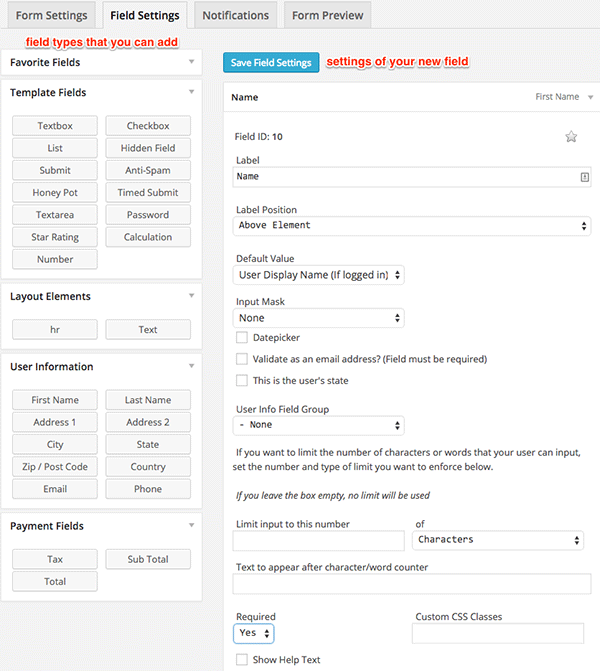
  3. The “Field Settings” tab is where you actually build your form. Drag and drop the needed fields and fill out the information. It is very easy to navigate so you can play around to learn the features. The best way to learn how to do it is actually doing it yourself.Ninja Forms_Field Settings
  4. You can edit the email notifications in the “Notifications” tab.
  5. Once you’ve completed your contact form, you can preview it in the “Form Preview” tab. Don’t forget to save it after.
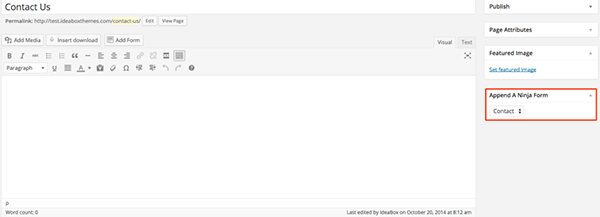
  6. Navigate to the ‘Edit’ mode of your Contact Us page. Find the section “Append A Ninja Form”, then select the form you just created and save the page.Ninja Forms_Append

How to Create a Contact Form Using Formidable Pro

Formidable Pro

Among WordPress users and developers, Formidable Pro is another popular choice. Formidable Pro provides a unique interface from which you can create stunning forms on your WordPress site. This form builder plugin has almost everything you’d need from a premium form plugin. Formidable Pro is a breath of fresh air. Its free version is powerful enough but going for the premium version gives you more features like integration with MailChimp, Aweber, Highrise, Twilio for SMS, WPML, and Zapier.

To set up a Formidable Pro contact form:

  1. After installing, go to Formidable > Forms and click “Add New”’ at the top of the page.
  2. You can start with a blank form or select from a template.
  3. Drag and drop the needed fields. The field settings are quite intuitive so you will learn as you select them.
  4. Click “Create” to save your form.
  5. There are two ways to publish a form on your Contact Us page:
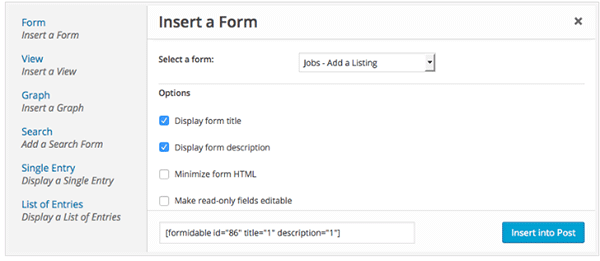
    • Use the shortcode builder. Click “Formidable”, select the correct form, and then click “Insert into Post”.

      Formidable Pro_Shortcode Builder
      img1 – In the Edit mode of your page, click “Formidable”
      Formidable Pro_Shortcode Builder_Insert
      img2 – Select the correct form, then click “Insert into Post”
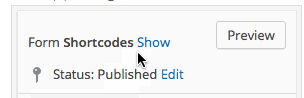
    • Insert the shortcode manually. Navigate to your form and in the upper right corner click “Show” then copy the form shortcode.
      Formidable Pro_Show Shortcode
      img1 – Click “Show”

      Formidable Pro_Show Shortcodes
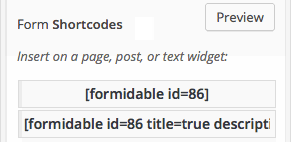
      img2 – Copy either one of the two shortcodes

Note that the first shortcode [formidable id = 86], only shows the form itself. If you want the title and description to be displayed as well, copy the second shortcode [formidable id = 86 title=true description=true].

How to Create a Contact Form Using Fast Secure Contact Form

Fast Secure Contact Form is another popular free WordPress contact form plugin. Its name says it all. If you hate spam with a passion, then this is the plugin for you. It includes Akismet support to block spammers. You can also install a companion plugin to add CAPTCHA support.

To set up Fast Secure Contact Form:

  1. Install the plugin.
  2. Click the Plugin tab in the WordPress admin interface, then click “FS Contact Form”.
  3. Under the basic setting fill in the form label and the welcome introduction. The most important thing is to fill in the email address where you should receive the user information.
  4. The “Field” tab is where you actually build your form. You will see a default form with the default fields.
    • To add a field, click “Add New Field”. To edit the field, click on “Show Details”.
    • You can remove a field by clicking the “Show Details” then checking the “Disable Field”.
  5. Save your form when you’re done and locate the form shortcode.
  6. Copy and paste the shortcode to the Contact Us page.

Which is the Best Contact Form Plugin for WordPress?

Well there you have it! These are some of the more popular contact form plugins out there but there are more. Now you might ask what the best contact form to use is. Unfortunately, there is no definitive answer to that question as it will all depend on what you need in a contact form.

What is your favorite contact form plugin? Tell us in the comments.

Filed Under: How-To Articles, Theme and Plugin Reviews Tagged With: admin, e-commerce, how-to, plugins, WordPress

How to Enable Apple Pay for WooCommerce

June 16, 2017 By John 2 Comments

What is Apple Pay?

how to enable Apple PayApple Pay presents a new and more convenient way to pay for mobile e-commerce purchases. Since Apple does not share your credit card details when you pay, it is safe, secure and private. Currently, Apple Pay is already accepted in a number of stores and websites. You can check this list of merchants that accept Apple Pay.
Why Add Apple Pay to Your WooCommerce Store?

Early adopters of Apple Pay have experienced an increase in conversion rates of up to 80%. The checkout process is made much faster as payment only requires a fingerprint check as opposed to entering your credit card number.

What Do I Need to Install Apple Pay on WooCommerce?

To install apple pay with WooCommerce, there are a few requirements. First, the store must support Stripe payments. You’ll also need the WooCommerce Stripe Extension which is free. Stripe is currently available in 10 countries, namely, Australia, Switzerland, United Kingdom, Hong Kong, Singapore, Canada, Spain, France, New Zealand, and the United States.

How to Enable Apple Pay on Your WooCommerce Store

Just follow the steps below to enable Apple Pay on your WooCommerce store. If you have already set up the WooCommerce Stripe Extension, please proceed to Step 7.

    1. Install and activate the WooCommerce Stripe Extension. You can download it here or just search for it in the plugins page.
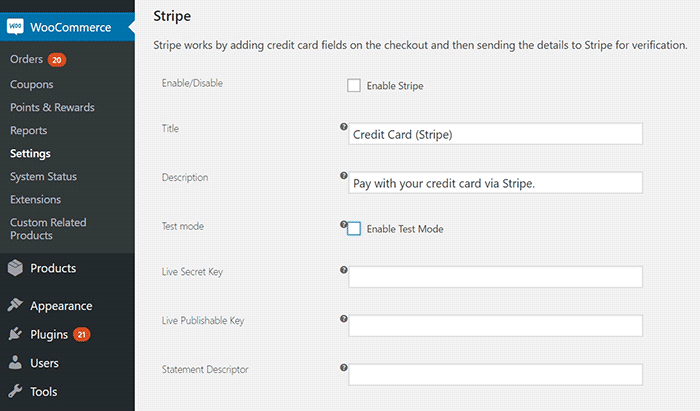
    2. Head over to WooCommerce > Settings > Checkout > Stripe and check the “Enable Stripe” box. Make sure you disable “Enable Test Mode” if you want to go live. If you are already accepting payment through Stripe, go to Step 7.
    3. Input your Live Secret Key and Live Publishable Key. You can get the information from your Stripe account.
    4. Input the Statement Descriptor. This is the text that will appear on your customer’s credit card statement.
      Stripe setup
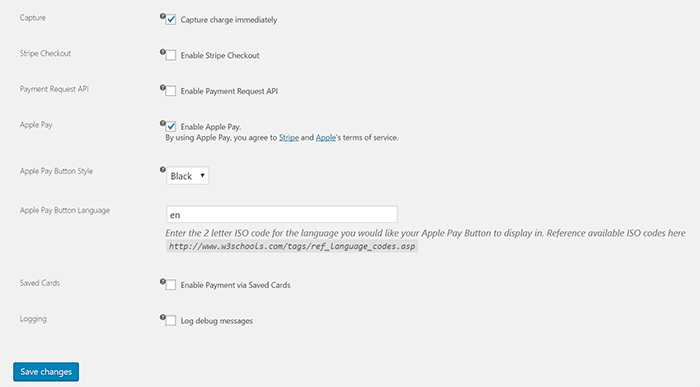
    5. Choose whether to “Capture Charge Immediately” or not. If you choose not to charge immediately, you will need to manually initiate the charge through the WooCommerce order page.
    6. You can choose to “Enable Stripe Checkout” for the plugin to create a pop-up that requests details. Choose this option if you want to accept Bitcoin.
    7. To enable Apple Pay, tick on the Enable Apple Pay box.
    8. Under “Apple Pay Button Style”, you can choose what color you want the Apple Pay button to be.
      Stripe setup2
    9. Under “Apple Pay Button Language”, you can enter the ISO code for the language you want to use. For English, just use “en”.
    10. Click on Save Changes when done.

That’s it. You are now ready to accept Apple Pay payments on your WooCommerce store.

If you are having problems enabling Apple Pay on WooCommerce, let us know in the comments.

Filed Under: How-To Articles, Theme and Plugin Reviews Tagged With: best practices, checkout form, e-commerce, how-to, plugins, WooCommerce

How to Add a Top Bar in Storefront Theme

July 29, 2016 By John 12 Comments

The release of Google’s Material design started the “top bar” trend. It was used mainly on mobile user experience (UX) designs but it found its way into desktop design. In this article, we’ll teach you how to add a top bar to the Storefront theme.

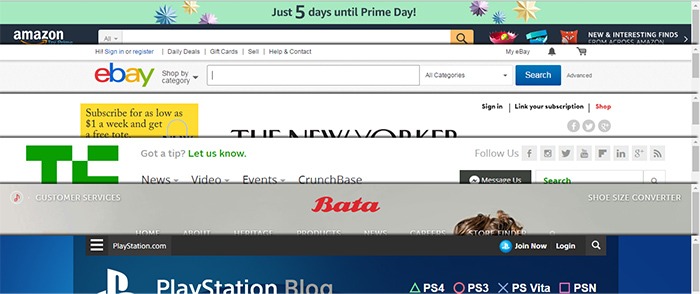
What Elements Can you Add to the Top Bar?

Top-Bar-examples

The top bar has been used in a variety of ways, depending on the UX design or the information you want to highlight. Let’s enumerate common items we see on the top bar.

  • Promotions – This can be anything from a sale to a new product release. The top bar is a good noticeable area that you can use to post your promotions and other offers.
  • User Login/Logout – When users want to log in or out, their eyes will scan the top right corner of the page to look for the link. Because of this, it makes sense to place the link in the top right corner.
  • Social Links – The top bar is a common location for the site’s social media profile links.
  • Mini Cart – The mini cart has a very important role in the UX design of e-commerce stores. It is an important element to have either on the main navigation or the top bar.
  • Search Bar – The search bar is also a crucial piece in the UX design of most websites and it can be positioned in the top bar.
  • Subscription Form/Link – Placing the subscription form on a very prominent location like the top bar draws the attention of your visitors to the form.
  • Quick Links Menu – Quick links can be any important link that you want your visitors to see or something that your visitors will be looking for. Some common quick links are My Account, Shop, Terms and Conditions, Privacy Policy, About, Contact and FAQs.

Depending on your site, you can use the top bar to contain other elements as you see fit.

How to Add a Top Bar to Storefront

To add a top bar to Storefront, you can use the Storefront Top Bar plugin. Our developers at Wooassist developed this plugin specifically for Storefront which adds two widget areas on top of the header.

Getting Started

Storefront-Top-Bar-Getting-Started

Install and activate Storefront Top Bar in your WordPress Dashboard.

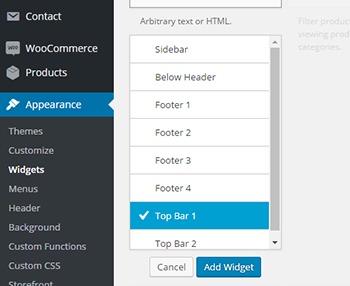
After installation, go to Appearance and click on Widgets. You should find two additional widget areas namely Top Bar 1 and Top Bar 2. These are the left and right widget areas on the top bar. You can add any content here just like in any widget area. Just make sure it looks good within the small space provided.

Adding a Simple Text

Storefront-Top-Bar-Appearance-Widgets

To add text to the top bar, find the text widget and add it to the top bar widget area. After that, you can just add any text in the text widget.

Storefront-Top-Bar-Adding-a-simple-text
Promotion 1 and Promotion 2 are the texts inserted in Top Bar 1 and Top Bar 2, respectively.

Adding a Menu

Storefront-Top-Bar-Adding-a-Menu

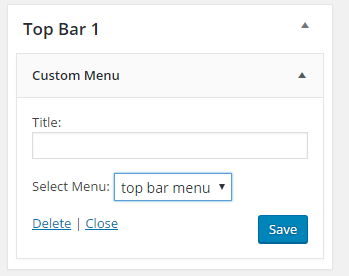
To add a custom menu to the top bar, you should first set up a custom menu in Appearance > Menu. After creating a menu, go back to the widgets area and add ‘custom menu widget’ in the top bar widget area. Select the menu you’ve just created and then click Save. Your custom menu should now appear in the top bar.

Storefront-Top-Bar-1-widget

Adding a Subscription Form Shortcode

You can add shortcodes using the text widget. In this example, we are using Mailchimp for WordPress. The plugin allows for creating a custom form which can be linked to your Mailchimp account. If you want to follow along and are wondering about the HTML markup of the subscription form in this example, you will just need the input type email and the submit button.

<input type="email" name="EMAIL" placeholder="Your email address" required />
<input type="submit" value="Sign up" />

After that, copy the shortcode and paste it in the text widget on the top bar. You can easily tweak the look of your form with CSS. In this case, the CSS we used is below. Feel free to use the code below for your own site. You can make adjustments to fit your needs.

.mc4wp-form input[type=email]{
width: 50%;
}
.mc4wp-form {
margin-bottom: 0;
}

Storefront-Top-Bar-Adding-Subscription-Form-Shortcode

Adding Other Elements to the Top Bar

The top bar works like a regular widget area. You can add shortcodes for other items like social icons, mini-cart, login, etc. You can also insert HTML and scripts in the text widget so the possibilities are endless.

Customizing the Top Bar Widget

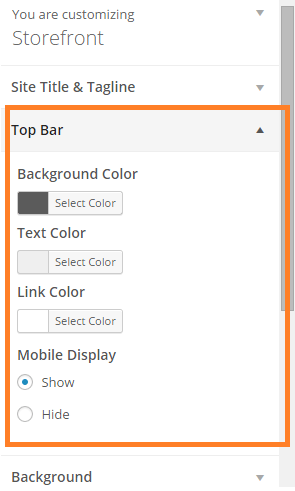
To customize the top bar widget, you can go to Appearance > Customize and click on “Top Bar”. Here you can change the background color, text color and link color. You can also set the top bar to be hidden in mobile view.
Storefront-Top-Bar-Customizing-Widget-Area

You can further tweak the top bar using CSS.

Align Top Bar 2 to the Right

By default, both Top Bar 1 and Top Bar 2 contents are left aligned. To make the content of Top Bar 2 align to the right, just use the CSS below.

.woa-top-bar.col-2 .woa-top-bar-2{
text-align: right;
}

Storefront-Top-Bar-Align-to-the-Right

Thickness/Height

To change the height of the bar, you can specify the height using CSS. Just use the code below and specify the height.

.woa-top-bar-wrap{
height: 35px;
}

Single Centered Top Bar

If you only want one top bar widget with a centered content, do not add any content to the Top Bar 2 widget area and then add the CSS below.

.woa-top-bar-wrap{
text-align: center;
}

Storefront-Top-Bar-Single-Centered

Final Notes

The Top Bar is the first thing that your customers will see on your site. It is one of most prominent areas above the fold. You now have the tools to make use of the top bar. It’s now up to how you will maximize the use of this valuable real estate.

Was this tutorial helpful? Do you have any questions about adding or tweaking the top bar in Storefront? Let us know in the comments.

Filed Under: How-To Articles, Theme and Plugin Reviews Tagged With: code snippet, CSS, design tweaks, how-to, navigation, plugins, Storefront, website development, Wooassist, WordPress

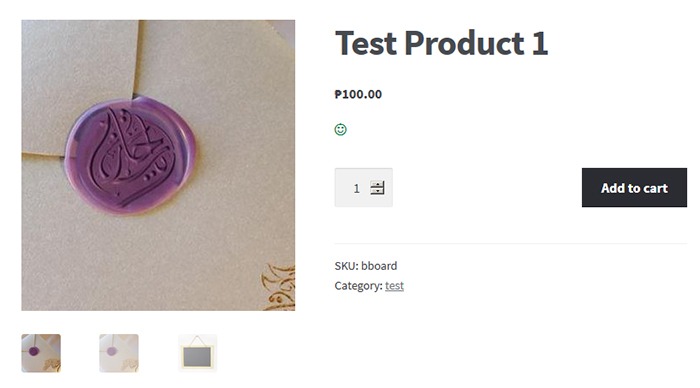
How to Revert to the Old WooCommerce Product Gallery in WooCommerce 3.0

April 11, 2017 By John Leave a Comment

WooCommerce 3.0 is now live. In this version of WooCommerce, the product gallery receives a major overhaul. This includes zooming on product images, more intuitive behavior, improved mobile view and function, and the ability to display the image’s true size on click.

The updates are promising as you can see from the video below. However, the zoom functionality poses a problem for many WooCommerce store owners.

Many WooCommerce Stores Don’t Have Hi-Res Images

The zoom function for the product gallery in single product pages can become a problem for low-res images. Many WooCommerce store owners would not have high-resolution images uploaded to their WooCommerce stores. This is because high-resolution images are bad for page load speed. Large images can slow down a site. Hence, when the zoom function rolls out, low resolution product images will appear grainy and pixelated when zoomed.

How to Revert to the Old WooCommerce Product Gallery Zoom Function
Zoom function upon mouseover in WooCommerce 2.7

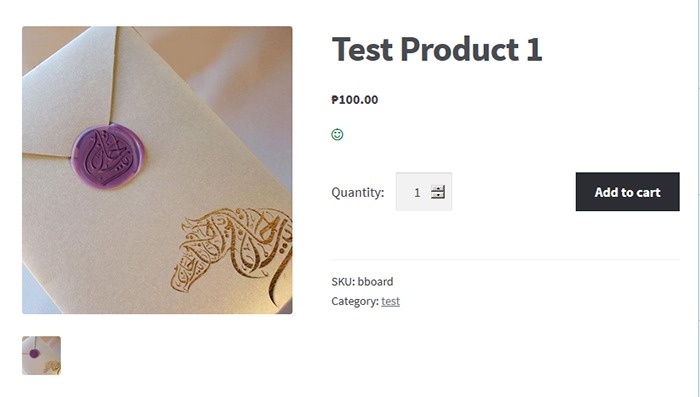
To solve this problem you can choose to revert to the old product gallery. While you use the old gallery, you can work on adding high-resolution product images to your store.

old-gallery_How to Revert to the Old WooCommerce Product Gallery
Old product gallery

Reverting to Old WooCommerce Product Gallery

Reverting to the old WooCommerce product gallery can be done by using the Revert WooCommerce Image Gallery plugin. Simply install and activate the plugin and your WooCommerce product gallery will automatically revert to the old product gallery. There are no complicated settings to tweak.

How to Update to the New Product Gallery

When you finish uploading high resolution images, simply deactivate or uninstall the plugin. The product gallery will automatically update to new product gallery. You can also choose to just keep the plugin if you want to keep the old product gallery.

We hope this tutorial is helpful.

Is your store ready for WooCommerce 3.0? Do you have questions about the WooCommerce 3.0 update or the Revert WooCommerce Image Gallery plugin? Let us know in the comments.

Filed Under: How-To Articles, Theme and Plugin Reviews Tagged With: admin, best practices, design tweaks, how-to, plugins, Storefront, Wooassist, WooCommerce

Custom Development for Your WooCommerce Store

March 20, 2017 By John Leave a Comment

One of WooCommerce’s best-selling points is its customizability. But as extensive as the WooCommerce plugin database is, sometimes it’s still not enough. That’s where custom development for your WooCommerce store comes in. With custom development, we open a whole new world to your website’s capabilities. Still, as powerful as it is, it doesn’t come without its challenges.

Customizability

business-meeting-discuss-website-development

What exactly do we mean when we say custom development? Well, it’s like a custom tailored suit – it is tailoring code according to your exact specifications. With that, we’ll have precise control of the end-result. It is making changes to your website using configurations beyond what the software or plugins are originally capable of.

Sometimes you may find that WooCommerce is lacking a certain functionality that you require. You search for a plugin and there’s no viable plugin for it. In cases like these, we can custom code to add that functionality to your WooCommerce store. If you don’t like how a WooCommerce plugin works, we can add custom code to tweak it and make it work the way you want it to.

However, this does not come without its challenges.

Compatibility

In a vacuum, programming is predictable. For example, if you only had to deal with WooCommerce and you wanted to change something, it is simple and straightforward. However, in reality, a website exists as a combination of different software working together. What should be a straightforward change to WooCommerce could become unpredictable. Other installed plugins may behave differently as a result of the custom code.

These complications can create additional work but solving them is a necessary step in custom development.

Iterative Nature

keyboard-testing-thumbs-up-down

Other obstacles to custom development are unexpected bugs and simple errors.

Custom development is adding short pieces of software to the site. And as with all software, the first release rarely turns out as perfect from the get-go. Even with thorough testing, not all cases can be tested. In some instances, the bugs can pop up at an irrelevant area of the website.

Errors are also common, especially with complex customizations. At Wooassist we have tested over 500 developers in our recruitment program and trialed almost 100 of them. We are left with the cream of the crop and have 3 solid developers. They are the top one percentile, but they are not machines. They are not perfect. These unexpected bugs and mistakes go hand in hand with custom development. To get things right, several iterations may be necessary.

More meticulous testing is advised, but it will also cost more. It is up to the client to set the balance between testing and cost.

Maintenance Costs

Another challenge for custom development is its dependency on the parent software. This includes – either WordPress itself, WooCommerce or the other plugins you have installed. There’s the possibility that updates and new software versions will affect your custom development.

This is because the custom code has been specifically designed for the current setup at the time. If the setup changes, then the custom code needs to be modified as well. This means that custom development is not a build-it-and-leave-it process. It needs regular maintenance to keep up with the updates of the original technology.

So should you still get custom development for your WooCommerce store?

Web-developer-dual-mointor

It depends.

Most of the time, the ready-built plugins and extensions for WordPress and WooCommerce are enough to get a website up and going. There are thousands of extensions, both free and paid. Chances are, the functionality you are looking for might already be available. If it comes down to a choice between a paid plugin and custom development, sometimes the paid plugin is more advisable. It is much safer and easier to adjust your expectations and solution compared to custom code.

Business owners can be guilty of coming up with less than optimal ideas and then investing in development to implement these. A much better process is to invest more in researching the problem and the range of solutions available. Find some experts, send them the objective, the problem and your proposed solution and let them do some research for you. There is often a much simpler and cheaper solution.

Now what if there are no plugins for the functionality you require?

This is when you have to decide whether the functionality is worth the challenges and costs that come with custom development. If it is a functionality that gives the site admins the capability to spend less time working on a task, then it will pay itself off in the long run. If it improves customer experience and increases conversions, then it should also be an acceptable cost.

You can also choose the option that requires the least customization. Strike a compromise between the functionality you require and functionality of the original software. Bend the software less to avoid complications. All in all, custom development is not advisable for all projects. While challenging, custom development tells us that there will almost always be a solution. For most website owners, custom development is a necessary step in creating the website that they envision. To pursue this path, the site owner must accept the challenges of custom development.

Examples

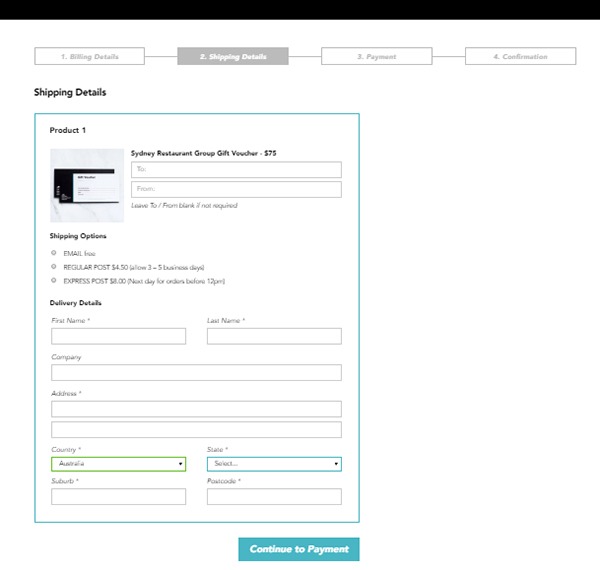
1. Here’s an example of a WooCommerce checkout that we’ve customized. Instead of the standard WooCommerce checkout page, we’ve separated certain sections grouping them together. We ended up with four sections, namely Billing Details, Shipping Details, Payment and Confirmation.

Example-1-Custom-Development-for-your-WooCommerce-Store

During the process, we encountered an error that cost some time to troubleshoot. So apart from the customization itself, we also needed to deal with unexpected complications.

Example-1-error-msg---Custom-Development-for-your-WooCommerce-Store

It turns out that it was caused by a conflict with an idle plugin activated on the site. Deactivating the plugin fixed the issue.

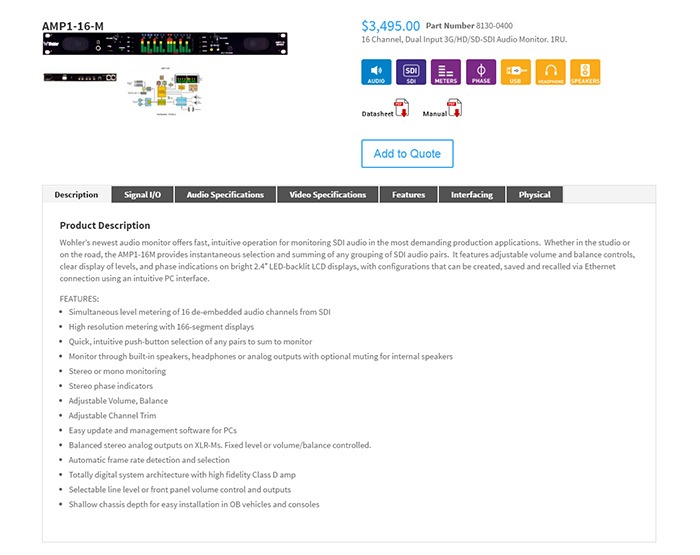
2. Here’s a product page that we’ve customized according to our client’s specifications. For this particular project, not only did we have to customize the product page, we also had to migrate an existing database of non-WooCommerce products to a WooCommerce website. This was complex as the existing products had attributes not compatible with WooCommerce.

The only viable solution we could think of was to make use of separate paid plugins to manage the attributes. In the end, the client had to purchase a separate premium plugin, WP All Import and the Advanced Custom Fields add-on. Unexpected costs like these may deter some website owners from custom development. However, these are often necessary.

Example-2 Custom Development for your WooCommerce Store

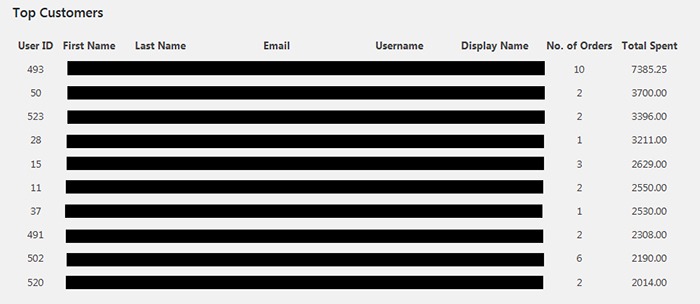
3. One of our clients asked for the functionality to create a list of the site’s most regular customers. She had installed a plugin for it. However, upon checking, the plugin has not been updated in over 2 years. As there are no alternative plugins, we figured that the most viable option would just be to build custom code for it.

The custom development itself was straightforward. Still, we needed to strike the right balance between spending time creating the code and spending time testing for errors. In the end, we were able to complete the custom development with the bare minimum in functionality in just a bit above 2 hours.

Example-3-Custom-Development-for-your-WooCommerce-Store

Final Advice

Here at Wooassist, we bill the work we do by the hour. So when it comes to custom development for your WooCommerce store, more complications can mean more time spent than expected. Most of our clients still prefer this arrangement as it is still cheaper than fixed price custom development work. Also, it is easier to arrange changes to the project along the way. Agencies that offer fixed-price quotes for free usually offer them at a premium as the client is also paying for the time when they didn’t get the work. And once the project has started, it is difficult to arrange changes without incurring additional charges.

But for those that would still prefer a fixed price quote, we can offer our Custom Project Roadmap product. When you purchase it, we will spend time researching, analyzing and defining the scope of the problem and solution. After these, we will offer a fixed price quotation. By having a clear strategy that is pre-assessed to be viable, we can minimize the complications. And when complications do arise, we won’t be billing you anymore for additional charges so you have control over the expense.

Filed Under: Theme and Plugin Reviews Tagged With: best practices, e-commerce, website development, website maintenance, Wooassist, WooCommerce

  • « Previous Page
  • 1
  • 2
  • 3
  • 4
  • 5
  • Next Page »
Let us support your online store so you can manage your business

Get started today

Get 2 Hours of FREE SUPPORT

We are so confident that you will love our services that we will give you your first 4 hours at a 50% discount

That’s 4 hours for only $75

BUY NOW

Free eBook

5 Things Every Online Store Can Fix On Their Website In The Next Week To Increase Sales

Quick Links

  • How it Works
  • Pricing
  • Blog
  • Contact
  • About Wooassist
  • My Account
  • Checkout
  • Privacy Policy
  • Cookie Policy
  • Terms and Conditions

Wooassist

Australia:
59 Luke St.
Hemmant QLD 4174

Philippines:
San Miguel St.
Poblacion, Iligan City 9200

Connect


Copyright © 2026 · Wooassist

Yours FREE!

5 Things Every Online Store Can Fix On Their Website In The Next Week To Increase Sales