Wooassist

Assistance for Your Woocommerce Store

  • How it Works
  • Pricing
  • Services
    • Site Maintenance
    • AI SEO and Content Marketing
  • Blog
    • How-To Articles
    • Code Snippets
    • SEO For E-Commerce
    • Theme and Plugin Reviews
    • Wooassist News
    • WordPress/WooCommerce News
    • Interviews
  • About Us
  • Contact
You are here: Home / Archives for how-to

Choosing a Color Scheme For Your Online Store

March 9, 2015 By John Leave a Comment

Choosing a color scheme for your online storeChoosing a color scheme for your online store might be an arbitrary decision based on your color preferences.

Usually peoples intuition for their color scheme is pretty good. But should you leave it to chance?

Spending a couple hours to learn the theory of color basics is recommended. If it does nothing else it will affirm the decisions you have made based off of your own intuition. But more likely it will or give you some deeper knowledge to craft your color scheme and result in increased sales.

Color Basics

Basically, some colors look good together and some colors don’t.

Through mathematics and the invention of the color wheel we can see patterns of why this might be.

There is a great tool I use called Kuler that lets you choose a color and will then give you other colors that match based on rules you can choose from.

I will show you an example of this soon, but first I just want to discuss what impact choosing a base color will have on your brand.

Emotional Color

Colors have emotional meaning to your visitor and the color scheme you decide on for your brand needs to take this into account. It is no accident that fast food restaurants all use red to make you hungry, and IBM uses its corporate blue to represent trust.

Before you choose a color scheme, here are a few good exercises to identify a personality for your brand.

  • Think of twenty words that describe your brand.
  • If your brand was a car what sort of make would it be?
  • What sort of feelings do you want to be associated with when someone sees your brand?

To learn more about what each color means here is a good article.  http://www.smashingmagazine.com/2010/01/28/color-theory-for-designers-part-1-the-meaning-of-color/

Existing Brand Assets

If you already have a logo then you will often find that the colors you chose were intuitively based on some form of emotional color theory.

If you discover you have chosen incorrectly and it is too costly to update your printed material from the old colors you can leave your logo as is and just add some secondary colors that will give your brand the emotional meaning you were looking for.

A Note on Contrast

Black, white and shades of grey can be used in addition to the color scheme you choose for your site and you can use these to create contrast. Dark colors on light colors and vice versa (light colors on dark colors) stand out more on the page than two colors closer in shade.

You can use this to highlight a particular element on a page by making the contrast of its background greater.

Into Action

To show you an example, I will use the logo from a company Wooassist manages: www.iotagarden.com.au

https://www.dropbox.com/s/k09mmys93n967as/Screenshot%202015-01-09%2012.16.15.png?dl=0

Here are some notes when we re-designed the IOTA site about 12 months ago.
color-1We don’t want to change things too much so we will stick with the two base colors of light and dark blue that are used for the logo. 

I would like to introduce one more color that is a bit brighter and contrasting with the current blues that will liven up the site. 

I am thinking maroon, but we can use adobe Kuler to see what a good contrasting color is mathematically. 

These are the colors from the logo.
Light blue #8da5aa
Dark blue # 005293

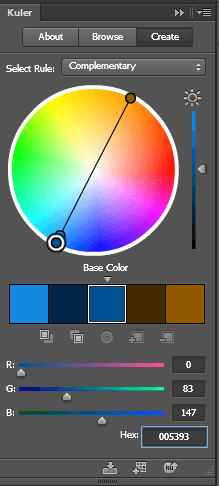
Without going too much into the details of how Adobe Kuler works, the end results speak for themselves. When I enter base color dark blue # 005293, the complimentary color was a brown.
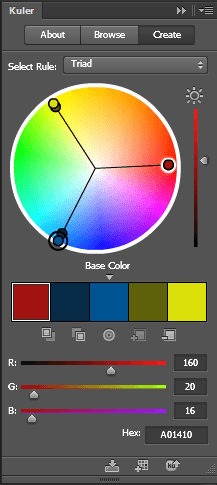
color-2That didn’t suit the objectives of livening the site up so if we look at the triad relationship I can see the magenta color I was originally thinking of #a01410

 And if we look at how these colors look together touching each other and apart you can see Kuler’s maths have not let us down. These colors look great together.

color-3

So here you can see with just a couple hours research and a couple of tools we were able to come up with a color scheme that suited our existing brand assets, while at the same time achieving our new objectives.

What color best represents the feeling of your brand?
Filed Under: How-To Articles Tagged With: colors, conversion optimization, design tweaks, how-to

How to Change the Arrows in Pagination for Storefront and WooCommerce

March 18, 2015 By John 2 Comments

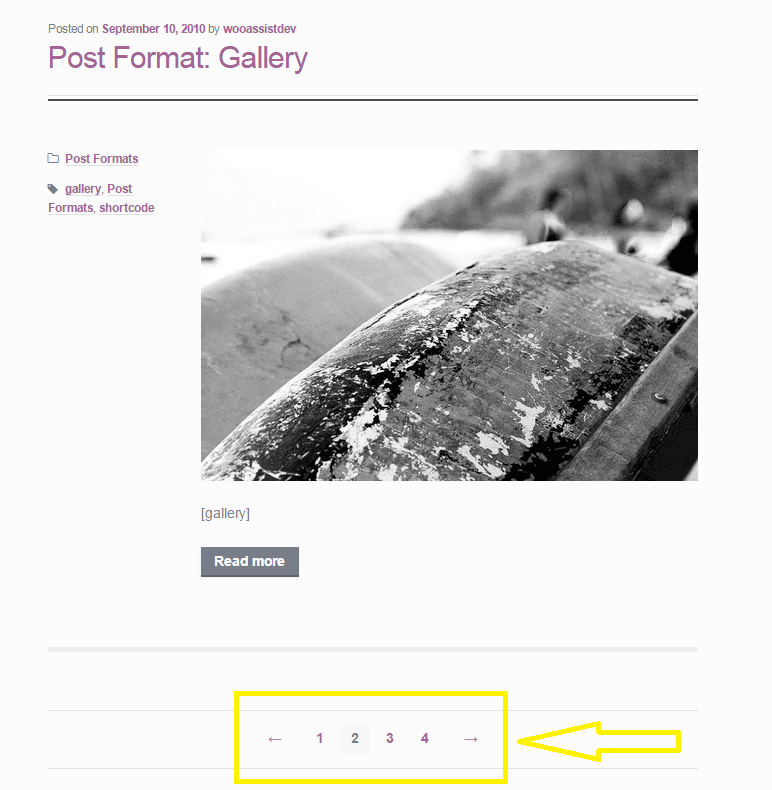
When looking at category pages for posts and WooCommerce products in Storefront theme, you can navigate to different pages by clicking on the default left and right pointing arrows. Notably, most themes would use a “Previous” or “Next” text instead of an arrow. If you want to change these arrows to text, it is easy enough to do by tweaking a few lines of code. Just follow the steps below.

pagination-2

Change the Arrows in Pagination for Storefront Theme

Since Storefront does not have a default filter for pagination, we’ll need to remove the function of the default pagination and replace it with our own function. Notably, the code in the function `woa_sf_paging_nav_replace` is just a copy of the original pagination function in Storefront and we just need to replace the text in the ‘prev_text’ and ‘next_text’ parameters. You don’t need to touch the other attributes.

Go to your functions.php and find the following code:

---- php-code ----

add_action( 'init', 'woa_sf_change_pagination_init' );
 
 
function woa_sf_change_pagination_init() {

 //remove current function used for Storefront's pagination
      remove_action( 'storefront_loop_after', 'storefront_paging_nav', 10 );

 //replaces pagination function with our own function
      add_action( 'storefront_loop_after', 'woa_sf_paging_nav_replace', 10 );
}
 
 
function woa_sf_paging_nav_replace() {
 
 global $wp_query;

      $big = 999999999; // need an unlikely integer
      $translated = __( 'Page', 'storefront' ); // Supply translatable string

      echo '<nav class="storefront-pagination">';

      echo wp_kses_post( paginate_links( array(
           'base' => str_replace( $big, '%#%', esc_url( get_pagenum_link( $big ) ) ),
           'format' => '?paged=%#%',
           'current' => max( 1, get_query_var( 'paged' ) ),
           'prev_text' => '<',
           'next_text' => '>',
           'type' => 'list',
           'total' => $wp_query->max_num_pages,
           'before_page_number' => '<span class="screen-reader-text">' . esc_attr( $translated ) . ' </span>',
 ) ) );

 echo '</nav>';
}

---- /php-code ----

Where it says:

'prev_text' => '<',
'next_text' => '>',

Change it to:

'prev_text' => 'Previous',
'next_text' => 'Next',

Change The Arrows in Pagination for WooCommerce Products

Editing the pagination for WooCommerce products is a bit simpler. We just need to find and use the filter `woocommerce_pagination_args`.
Head over to your functions.php and look for:

---- php-code ----

woa_wc_change_pagination_init() {

    add_filter( 'woocommerce_pagination_args', 	'woa_wc_woocommerce_pagination' );
}

function woa_sf_woocommerce_pagination( $args ) {

	$args['prev_text'] = '<';
	$args['next_text'] = '>';

	return $args;
}

---- /php-code ----

Where it says:

$args['prev_text'] = '<';
$args['next_text'] = '>';

Simply change it to:

$args['prev_text'] = 'Previous';
$args['next_text'] = 'Next;

Or replace ‘<‘ and ‘>’ to whatever text you prefer.

You just learned how to change the arrows in pagination for Storefront and WooCommerce. Did this post help solve your problem? Do you have any questions? Let us know in the comments.

Filed Under: Code Snippets, How-To Articles Tagged With: code snippet, design tweaks, how-to, navigation, Storefront, WooCommerce, woothemes

How to Create a Sitemap for your WooCommerce Store

March 19, 2015 By John 2 Comments

sitemapYou might have heard about XML sitemaps and that it’s good for your website’s SEO but don’t really know what it is. Or maybe you don’t know how to create a sitemap for your WooCommerce store. We can help with that. For starters, Google defines a sitemap as:
…a file where you can list the web pages of your site to tell Google and other search engines about the organization of your site content.

In short, a sitemap tells search engine crawlers about the structure of your site. Whenever you add something new to your website, whether that’s a new blog post, a new page or a new WooCommerce product, your sitemap is updated and communicates with web crawlers to tell search engine that there is something new on your website.

Even without a sitemap, the content on your website will still eventually be crawled by search engine crawlers but if the structure of your website is not well-organized, some pages may not be indexed. Also, having a sitemap will make crawling your website easier and much sooner. And if you have a new website, you probably don’t have a lot of other websites linking to your pages so it is highly likely that some of your pages may not get indexed. Having a sitemap almost ensures that all your pages get indexed.

How to Generate a Sitemap for Your WordPress Site

There are a couple of plugins that you can use to create a sitemap for your e-commerce website. We’ll list them down here.

How to Create a Sitemap Using WordPress SEO by Yoast

WordPress SEO by Yoast is the all-in-one plugin for your SEO needs. It is easily one of the best SEO plugins in the WordPress plugin repository. It has a lot of useful features and that includes the creation of a sitemap. If you are already using WordPress SEO by Yoast, then look nowhere else for creating your own XML sitemap. If you are not using WordPress SEO yet, I would suggest joining the bandwagon that is unless you are already using an SEO plugin that works well for you.

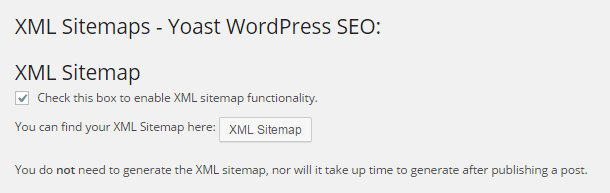
To enable XML sitemaps in WordPress SEO, go to SEO and click on XML sitemaps. Afterwards, just tick the box where it says “Check this box to enable XML sitemap functionality” and then “Save Changes”. When that’s done, just click on the button below and you will be taken to your sitemap.

sitemaps

How to Create a Sitemap Using Google XML Sitemaps

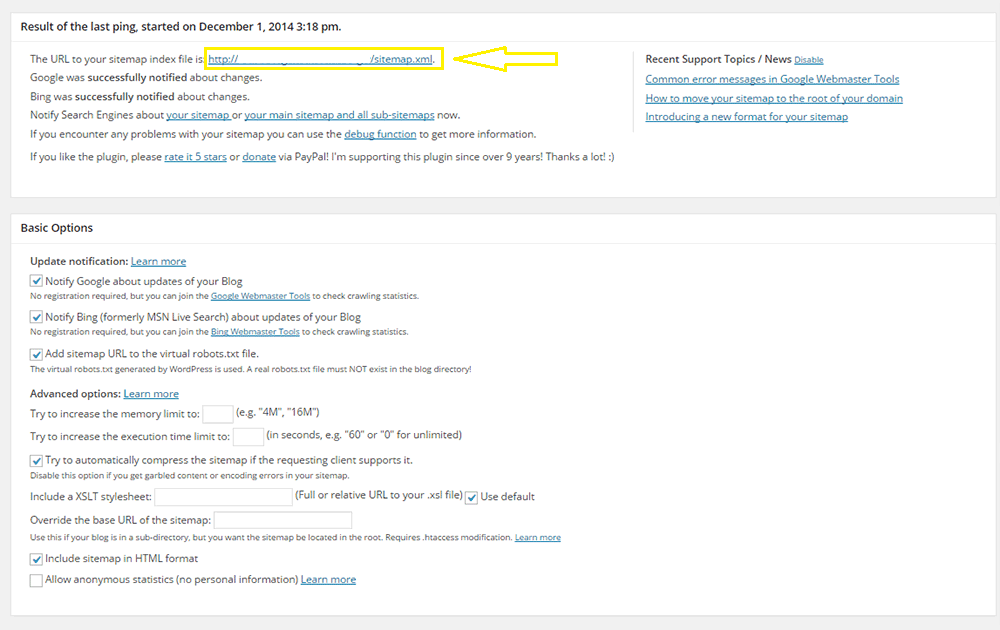
Creating a sitemap with the Google XML Sitemaps plugin is very easy. Simply download and install the plugin here. After you activate the plugin, just head over to Settings and click on XML-Sitemap. You should see a section that indicates the URL for your sitemap. There are a bunch of other settings that you can tweak. The default settings are good as is but if you want to change anything depending on your needs, feel free to do so.

google-xml-sitemaps

How to Create a Sitemap Using XML Sitemaps

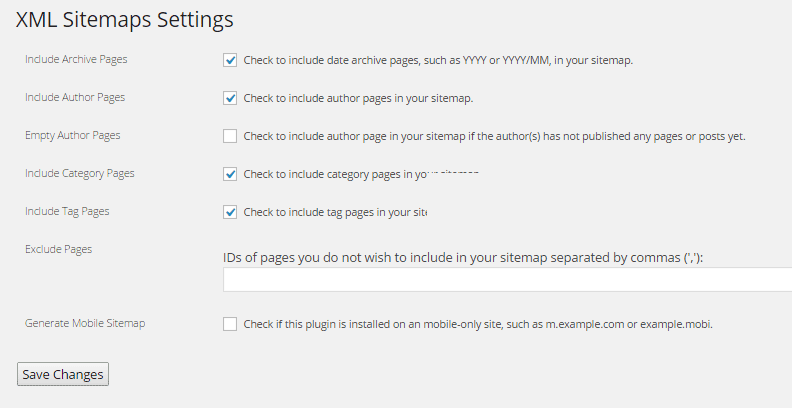
To create a sitemap using the XML Sitemaps plugin, simply install the plugin from this link. Activate the plugin and head over to yourdomain.com/sitemap.xml. That’s your sitemap. There are a few settings that you can tweak if you head over to Settings and click on XML Sitemaps.

xml-sitemaps

Adding a Link to Sitemap for Your WooCommerce Store

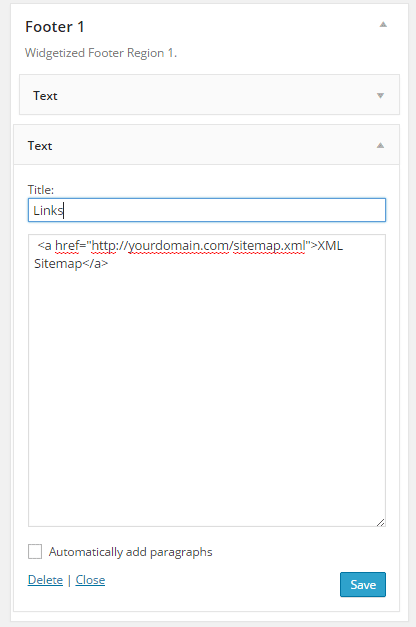
adding-sitemap-to-footerMost SEO experts say that adding a link to your sitemap on your website does not serve any purpose since the search engines find the sitemap through the robots.txt file or when you manually submit the sitemap to Google Webmaster Tools or Bing’s. Some disagree however and mention that having a link in the footer adds value.
If you do want to add a link to your sitemap on your WordPress site’s footer, it is very easy to do. Just go to Appearance and click on Widgets. Afterwards, drag a text widget to the footer where you want to have the link. Just link your sitemap using HTML code.

If you are not sure how to do this, use the code below and just replace the URL with your sitemap’s URL:

<a href=”http://yourdomain.com/sitemap.xml”>XML Sitemap</a>

Submitting your Sitemap to Search Engines

When you get your sitemap ready, you should submit it to search engines using Webmaster Tools. Before you do this however, you need to verify your website with Webmaster Tools. You can check our post about the WordPress SEO plugin by Yoast which has links to some useful resources that can help you verify your site if you haven’t done that yet.

How to Submit Your Sitemap to Google Webmaster Tools

To submit your sitemap to Google Webmaster Tools, log in to your account and click on the website that you want to add a sitemap to. On the left sidebar, you should see Site Configuration, click that and then click on Sitemaps. There should be an Add/Test sitemap button in the upper right corner. Add your sitemap and then click on Submit.

How to Submit Your Sitemap to Bing Webmaster Tools

To submit your sitemap to Bing Webmaster Tools, log in to your account and click on Sitemaps. Then click on Submit a Sitemap. A text box should appear where you can specify the URL to your sitemap. Save your settings.

The Verdict: Which one is for you?

Between the XML sitemap plugins mentioned above, which one is for you? WordPress SEO by Yoast has a ton of other features and is one of, if not the best SEO plugin for WordPress. If you are already using this plugin for your SEO, then there’s no reason to get another plugin to get a sitemap. You’ll just be adding extra bloat to your site by going with another plugin. Between Google XML Sitemap and XML Sitemap Plugin, there’s not much of a difference. Both are easy to set up but Google XML Sitemaps has a slight advantage for having more options such as:

  • Automatically notifying search engines whenever you post new content
  • Creation of an HTML sitemap
  • Compressing the sitemap
  • Adding the sitemap URL to the robots.txt file

Got some questions about sitemaps? Let us know in the comments.

Filed Under: How-To Articles, SEO For E-Commerce Tagged With: Google Webmaster Tools, Google+, how-to, plugins, WooCommerce, WordPress SEO, XML sitemap, Yoast

How to Install WooCommerce on your WordPress Site

April 8, 2015 By John Leave a Comment

how-to-install-woocommerce-pluginGetting started on a WooCommerce store all starts with installing WooCommerce. It’s pretty simple and straightforward, but if you don’t know how to install it, we’ll help you out. There are two ways to install WooCommerce and we’ll detail them both in this post.

How to Install WooCommerce through the WordPress Plugin Repository

  1. On your WordPress Dashboard, head over to Plugins then click on Add New.
  2. On the search bar, type in WooCommerce and press Enter. WooCommerce should appear as the first plugin in the search results. To make sure, check that it is the one published by WooThemes and that you are not installing some other plugin.
  3. Just click on Install Now and wait for the plugin to install and activate.

How to Install WooCommerce by Upload

The other method of installing WooCommerce is by downloading and uploading.

  1. Head over to the WooThemes website to download the latest version of WooCommerce.
  2. After that, go to your WordPress Dashboard. Click on Plugins and then Upload Plugin.
  3. Choose the WooCommerce installer that you just downloaded and click on Install Now.
  4. After that, just wait for the file to finish uploading. It should install and activate by itself.

How to Install WooCommerce via FTP

Here’s a bonus – another means of installing WooCommerce. This is a little bit more complicated than the first two methods since you need to access your WordPress install files. It is not recommended for the average user since you might alter the install files for your WordPress site. Doing so can cause your website to go down. Use this only if the other two methods fail or if you really know what you are doing.

For this method, you’ll need an FTP client like FileZilla. You’ll need this to upload the plugin file to your WordPress install. And since you need to log in to the FTP server, you’ll need the login information for that too. If you don’t know the login information, you can contact your hosting provider. Here’s are the steps:

  1. Download the WooCommerce plugin and extract the file.
  2. Log in to your FTP server using FileZilla or any other FTP client. Navigate to the wp-content/plugins directory of your WordPress install.
  3. Place the extracted folder in the wp-content/plugins folder.
  4. After that, head over to the plugin page of your WordPress site and activate the WooCommerce plugin.

Now that you know how to install WooCommerce, you’re just a few steps away from setting up your own e-commerce store.

Filed Under: How-To Articles Tagged With: e-commerce, how-to, website development, WooCommerce, WordPress

Google Mobile Friendly Update: Is Your Online Store Ready?

May 4, 2015 By John Leave a Comment

wooassist-iphoneGoogle mobile friendly update to penalize non-mobile friendly websites is out. Don’t tell me you didn’t see this coming. As more people used mobile devices to surf the internet, Google had to act. It was only a matter of time before Google started prioritizing websites that are optimized for mobile devices. The new algorithm came into effect April 21.

If you have an e-commerce store you should be concerned about all updates from Google. For a lot of online stores, the success of your business depends on Google. This update could destroy your rankings if your website is not mobile responsive. If ranking high in Google is a big part of your revenue strategy then this could be disastrous for your business.

What You Should Do

Use this Mobile-Friendly Test. If your website passes the test, then you have nothing to worry about. But if your website fails the test, you’ll be presented with suggestions on how you can resolve the problem.

If you have an e-commerce store using WooCommerce, there are a lot of responsive WordPress themes that you can use. These responsive themes are optimized for use on mobile devices. WooTheme’s own Storefront theme made especially for WooCommerce is responsive so that’s worth a look. We can also recommend Genesis themes from StudioPress.

How Much Will it Cost?

mobileThat question is a bit like. “I need a car. How much will that cost?” Of course, the answer is, “It depends”. But to give you an example, we have recently upgraded a few clients themes to the new Storefront theme for between $400-$600.
When upgrading a theme, you tend to notice things that you probably should have noticed on the original site, and need to update those as well. So setting a budget of $1000 – $1500 is probably more realistic.

Should You Have Made Your Site Responsive 12 Months Ago Anyway?

This update by Google might just be the thing that most store owners needed to push them into action. Non-responsive ecommerce sites are more than likely leaving a lot of money on table. There is some strong evidence to support this: 14-brands-that-increased-conversion-rates-via-responsive-design

For example, O’Neill Clothing’s redesign achieved some fairly spectacular results on iPhone/iPod:

  • Conversions increased by 65.71%.
  • Transactions went up 112.5%.
  • Revenue increased by 101.25%.

Similarly, on Android devices:

  • Conversions shot up by 407.32%.
  • Transactions increased by 333.33%.
  • Revenue increased by a whopping 591.42%.

Personally, we haven’t seen results this good on the sites we manage. But nonetheless, all responsive redesigns we have done have paid for themselves within 6 months.

The Mobile Friendly Algorithm

Like usual, Google’s algorithm remains a trade secret. It is now up to SEO experts to try to figure out what the algorithm considers in its ratings. Google is actually forgiving this time around as they did provide that tool that will let you check if your website meets their mobile-friendly standards.

If you want to see what your ecommerce store looks like on different mobile devices, you can use this mobile user testing tool. This tool emulates screen sizes of the most popular mobile devices so you can see exactly what your site looks like on a mobile device.

What Sites Were Affected

According to an article from USA Today, the algorithm update could affect as much as 40% of top websites.

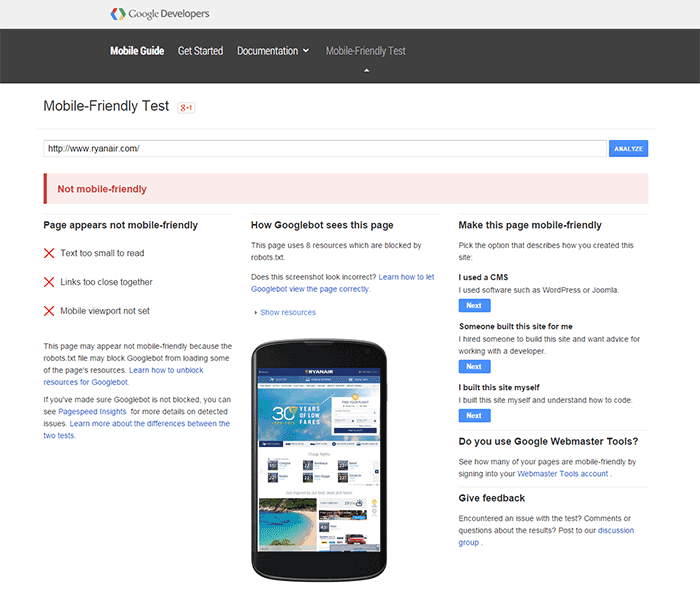
Here is the test result of one website that did not meet Google’s mobile-friendly update.

ryanair-non-mobile-friendly

A few weeks before the new algorithm came into effect, tech website TechCrunch tested the websites of Fortune 500 companies. Surprisingly, 44% of Fortune 500 companies’ websites did not pass the mobile-friendly test. So if your ecommerce store didn’t pass the test, you are not alone.

I Failed the Mobile Friendly Test. Should I be Worried?

Well, you should be worried. Still, according to an article from Search Engine Land, it’s not too late to act. You can still fix your website. While some changes in rankings were seen just a day after the update, these changes were not significant. This does not mean you shouldn’t bother doing anything. Sooner or later, Google could clamp down and bring harsher penalties to non-mobile friendly websites. Don’t wait for it to hit hard before you do something.

Filed Under: How-To Articles, SEO For E-Commerce Tagged With: e-commerce, Genesis, Google+, how-to, mobile friendly, responsive design, Storefront

  • « Previous Page
  • 1
  • …
  • 12
  • 13
  • 14
  • 15
  • Next Page »
Let us support your online store so you can manage your business

Get started today

Get 2 Hours of FREE SUPPORT

We are so confident that you will love our services that we will give you your first 4 hours at a 50% discount

That’s 4 hours for only $75

BUY NOW

Free eBook

5 Things Every Online Store Can Fix On Their Website In The Next Week To Increase Sales

Quick Links

  • How it Works
  • Pricing
  • Blog
  • Contact
  • About Wooassist
  • My Account
  • Checkout
  • Privacy Policy
  • Cookie Policy
  • Terms and Conditions

Wooassist

Australia:
59 Luke St.
Hemmant QLD 4174

Philippines:
San Miguel St.
Poblacion, Iligan City 9200

Connect


Copyright © 2026 · Wooassist

Yours FREE!

5 Things Every Online Store Can Fix On Their Website In The Next Week To Increase Sales