Wooassist

Assistance for Your Woocommerce Store

  • How it Works
  • Pricing
  • Services
    • Site Maintenance
    • AI SEO and Content Marketing
  • Blog
    • How-To Articles
    • Code Snippets
    • SEO For E-Commerce
    • Theme and Plugin Reviews
    • Wooassist News
    • WordPress/WooCommerce News
    • Interviews
  • About Us
  • Contact
You are here: Home / Archives for how-to

Email Opt-in Solutions for Your Woocommerce Store for Increased Sales

January 29, 2015 By John 2 Comments

SnapCrab_2015-06-26_14-44-28_No-0000Many online entrepreneurs tend to overlook the value of emails because of the rise of social media and other marketing strategies. In reality, it remains one of the best means of delivering promotional messages to potential customers.

Opt-In Email vs. Spam

An opt-in email is a type of promotional email that is specifically requested by the person who is to receive it. It’s the reverse of spam emails, which are sent regardless of whether they were requested or not.
SnapCrab_2015-06-26_14-44-52_No-0000

Here is a better explanation of the difference between opt-in and spam. It also lists the advantages of opt-in emails, like showing consumers how you respect their privacy.

You can promote your products better by taking advantage of personalized opt-in emails. They may contain newsletters or information that consumers take interest in. It can also include special offers that promote specific products or services.

Opt-in Solutions to Increase Sales

Increasing your email opt-ins can actually get you more subscribers, as explained in this article. Aside from boosting your subscription, it can help you realize your conversion and sales goals.If you want an email opt-in form that converts, you have to combine timing, design, and incentive.

SnapCrab_2015-06-26_14-45-05_No-0000

Pop-ups are really effective at getting people to sign-up.However,applying them on an ecommerce store is risky. The goal of most ecommerce stores is to sell. Any barrier to achieve that primary objective is counter-productive and costly. A good compromise is a pop-up on exit, using a plugin like PopupAlly.

Opt-in email continues to be the industry standard for good email marketing. It not only preserves your email marketing reputation, but also saves you time and money.Our Wooassist team can help you find the perfect email opt-in solutions for your business.

 

Filed Under: How-To Articles Tagged With: conversion optimization, e-commerce, email, how-to, PopupAlly, WooCommerce

How to Speed Up Your E-commerce Site through Caching and Minification

February 12, 2015 By John Leave a Comment

speed-up-your-websiteHow fast your website loads affects your conversion rate and ultimately, your revenue. If it takes 12 seconds to load up your website, that’s just a little too long and many potential clients could be annoyed and just click on the close button; go back to Google and click on something else. If that’s not bad enough, that person could forever remember that your website is that one website that loads very slowly. Any chance of converting from that person is gone.
There are a lot of ways to speed up your website. One is by optimizing the images that you use for your e-commerce site which I discussed in another post. This time around, we’ll look at how to speed up your e-commerce site with caching and minification.

What is Caching?

Caching is a means of serving your content as static pages instead of being dynamic pages. Serving static content is faster as opposed to dynamic content which means longer page load times. Essentially, caching is storing your dynamic content in the server as static content which will then be served when a browser communicates with the server. The static content that is saved on the server is updated at set intervals.

What is Minification?

When developers make code, they make code with a lot of white space. This is best practice in the sense that the code becomes easier to read and understand for humans. This however is not best practice for servers that read and parse the code to load up all the elements of your website. Computers don’t need that white space. All that white space just makes reading the code take longer for the machine. Even when you’re using a premium theme, you’ll see a lot of white space when you try to look at the code. This is where minification comes in. Minification removes all that white space and optimizes your code so that it becomes easier to read for machines to make parsing the webpage faster.

Implementing Caching and Minification

w3-total-cacheNow that we know what caching and minification is, it’s time to get to know how to implement it. If that sounds all too complicated, don’t worry. It is really very simple. All you need is one plugin to do both. That’s the beauty of WordPress. Seemingly complicated stuff becomes easy work. For this bit, we would recommend the W3 Total Cache plugin, because it has caching and minification solutions all in one plugin.
Setting up Caching with W3 Total Cache

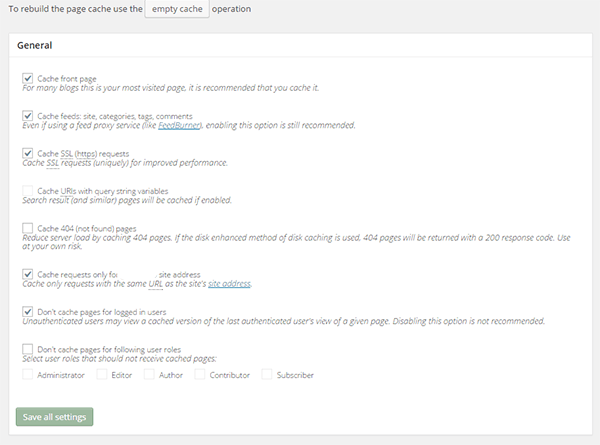
Install the plugin and activate it. After that, click on Performance on your WordPress dashboard and click on Page Cache. From there, you can turn on specific settings based on your caching needs. There is no single effective setting for all websites so feel free to go with your own settings and test page loads speeds after. When you’re done tweaking, just click on “Save all settings”.

A note on caching… When you’re updating your website like adding new products, editing blog posts, or adding new functionality,  it would be best to turn off caching entirely while working so you can see all the changes you make right away. Just don’t forget to turn caching back on when you’re done.

caching

Setting up Minification with W3 Total Cache

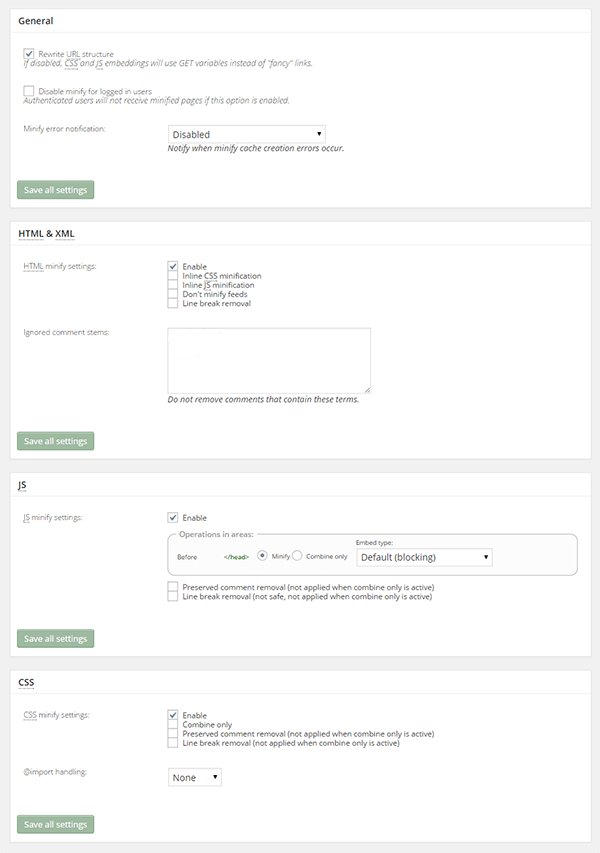
While you can set up minification manually, there’s no need to do it when all you need is a plugin and a few clicks. To set up minification with W3 Total Cache, just click on Performance then on Minify. After that, just tick “Enable“ for HTML & XML, JS, and CSS. You can tick other settings on and off as needed. When you’re done, just click on “Save all settings” and you’re all set for minification.

minification

Filed Under: How-To Articles Tagged With: caching, how-to, minification, optimizations, plugins, site speed optimization, W3 Total Cache, WordPress

How to Speed Up Your Website by Cleaning Your Database

February 18, 2015 By John Leave a Comment

cleaning-upYou might have read a few, or maybe a ton of articles about optimizing your website page load speeds. You might already know a few strategies like optimizing images, caching and minification, and getting a CDN. But here’s another strategy that is rarely discussed: maintaining and cleaning your database.
For many website owners, the database is just one of the requirements for a WordPress install. It is however more than just that. Keeping your database clean and optimized can also shave a few seconds of loading speed. We’re all suckers for that one or two seconds. And believe it or not, one or two seconds saved could mean the difference between a bounce and a conversion.

What’s in Your Database?

mysqlIf you don’t know what the database is for, then you might be surprised just how important it is. WordPress makes use of PHP to communicate with the database which contains important information such as posts, pages, your WooCommerce products, comments and product reviews, users and customer information, URLs, etc.

Why Do You Need to Clean Your Database?

Think of a database like it’s your computer’s hard drive. It’s where all your data is stored. ­ It’s where you keep everything and without it, your computer won’t work. If you want to keep your computer running in top form, you clean your hard drive. The same concept applies to a website, to keep your website running fast and smooth, you clean its database by removing all that gunk and clutter.

What’s there to clean? Over continued use, a website accumulates many spam comments, copies of post revisions, and remnants of deleted plugins and themes. When that becomes too large and bloated then website performance will suffer.

Back Up Your Website

Now that you know the importance of a database, you just want to jump in and clean your database. Halt! Before you start any database cleaning, it would be wise to create a backup of your website. There are a couple of plugins that can help you do this. Your hosting provider will most likely have a backup of your website so can also check in with them.

Clean ‘Em Up

You can clean up your website database manually or you can use these awesome plugins.

WP-Optimize

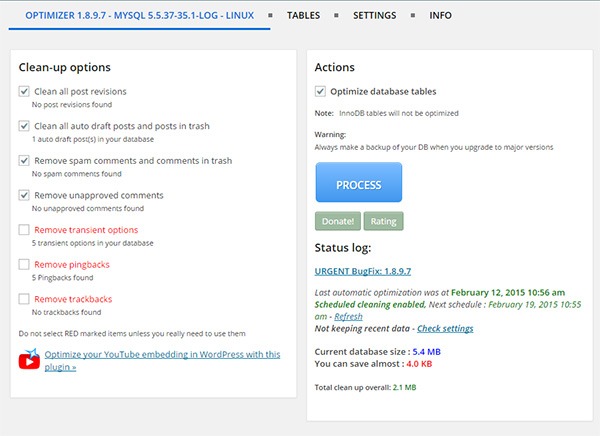
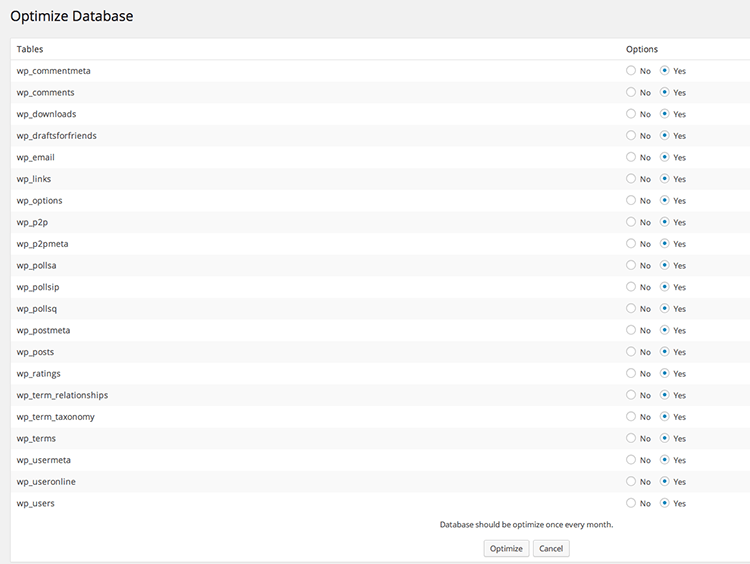
WP-Optimize is one of the most popular plugins for cleaning your database and it is also one of the easiest to use. Simply install the plugin and run it. The plugin also allows you to schedule a regular database cleanup which is pretty handy if you want to keep your database in peak condition.

wp-optimize

WP-DBManager

WP-DBManager is another popular plugin for database optimization. It is however geared for more advanced users. Setting it up can be tricky if you’re not familiar with database elements. Being trickier however means that it has more customizable options and features. Some of its features include repairing a corrupted database, a database restore, running MySQL calls, and clearing tables. WP-DBManager however cannot clear bloat so if you want to go with this one for its host of other features, you still might want to consider getting WP-Optimize or any other means to clear database bloat.

wpdbmanager

So when was the last time you optimized your database? What tool or plugin did you use to clean it?

Filed Under: How-To Articles Tagged With: backup, best practices, how-to, MySQL, optimizations, page speed, plugins, website maintenance, WordPress

How to Backup Your WordPress Site

February 22, 2015 By John 2 Comments

backupFor every website owner, there will always come a time when your website will go down. Often, this could be because of a downtime on your hosting service, but sometimes it’s because of some other reason. Maybe your website has been compromised or you did something that caused your site to go down. Notably, if you’re going to be doing some major work on your site, you shouldn’t be doing it without creating a backup first so you can restore your website to a working state just in case you mess something up. Here, we’ll teach you how to backup your WordPress site.
If you are adding some lines of your code to your functions.php file, it is best practice to create a backup copy. When you add your code and your site goes down, you simply replace your functions.php file with the working copy and voila! Your site will be back up. The same can be done for when you are tweaking your CSS files. Though errors in your CSS won’t cause your site to go down, it can really mess up how your website looks. So just create a copy of your CSS file and restore it if anything goes wrong. This basically sums up the concept of website backups only on a larger scale.

Your hosting service probably already has a few backups of your website. So you might think that creating your own backup is not necessary. That’s where you’re wrong. What’s your assurance that your hosting service creates regular backups? Certain situations can also render your host’s backups useless. So essentially, just to be on the safe side, you should have your own backup.

There are two ways to back up your website. The first one is through one of a few available plugins and the second is doing it manually.

Backing Up Your WordPress Site with BackUpWordPress

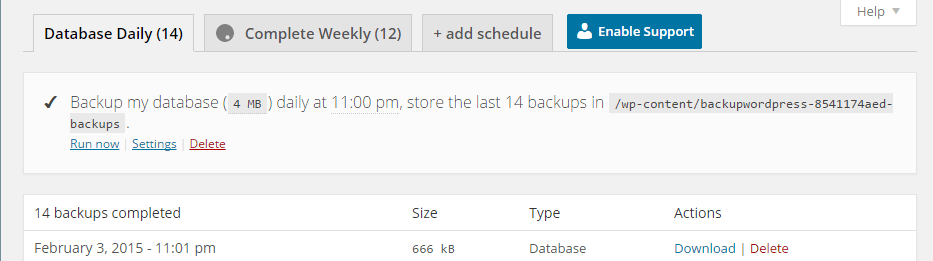
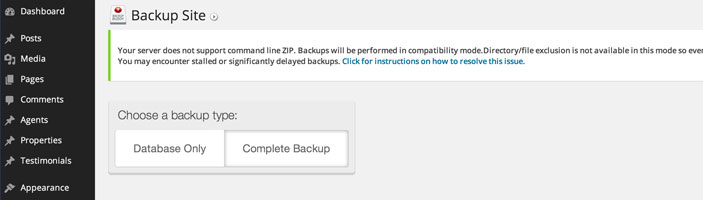
BackUpWordPress is the easiest means of backing up your website. Simply install the plugin and activate it. When that’s done, head over to tools and Backups. You can then choose between a Database Backup and a Complete Backup. To start backing up, just click on Run Now and wait until backup completes. You can also click on Settings to set the schedule for these backups. You can also add a custom schedule.

By default, your backups are stored on your server at /wp-content/backups. To restore a backup, simply find the latest working backup by navigating to the folder using an FTP client and unzip the backup on your server making sure to overwrite everything.

back-up

Backing Up Your WordPress Site with Backup Buddy

BackupBuddy is another popular backup plugin. Unlike BackupWordPress, BackupBuddy is a premium plugin so there is no free version. Once you get the plugin installed and set up, simply go to Backup. From there, you can choose to backup the database or do a complete backup. Next, you can choose to download the backup file so you can store it right in your computer’s hard drive.

BackupBuddy

You can also tweak your settings to have backups saved to Dropbox or Amazon S3, create custom backup profiles, and schedule backups.

How to Create Manual Backups

Backing Up Using MySQL

You can also backup your website manually using MySQL. To do this, head over to CPanel. From there, you can find phpMyAdmin. Click on the database and click on the Export tab. You can choose either quick or custom export. Set compression to gzip then click on Go.

Backing Up with CPanel

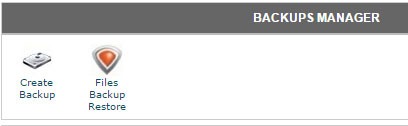
cpanel-backupTo create back-up using CPanel, navigate to Backup Manager and click on Create Backup. Where it says Download a MySQL Database Backup, just click on the database and download. A simple enough process but using a plugin just saves you from the trouble of doing this manually.
So when was the last time you backed up your website? Do you even have an existing backup? If you don’t, then it’s time to make one before it’s too late.

Filed Under: How-To Articles Tagged With: backup, best practices, CPanel, how-to, MySQL, plugins, website maintenance, WordPress

How to Change Checkout Form Heading in WooCommerce

February 26, 2015 By John 2 Comments

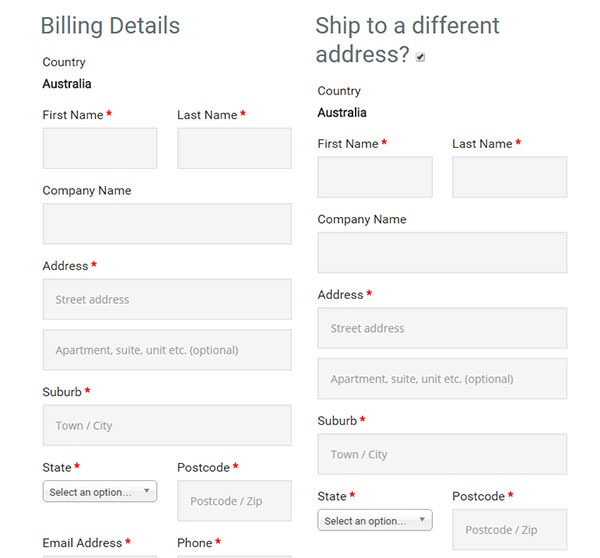
Here’s a neat trick if, for some reason, you want to change the checkout form heading in WooCommerce. By default, the heading is named “Billing Details” and you can change this to whatever you want in just a few steps.

checkout form heading in WooCommerce billing-details

First off, you’ll need to copy the template to your theme or more specifically, your child theme since you definitely should be using one.

The template can be found at:

\woocommerce\templates\checkout\form-billing.php

You should copy and paste it at:

\yourtheme\woocommerce\checkout\form-billing.php

Afterwards, just open the copy that you pasted into your theme and find the following lines of code:

<?php if ( WC()->cart->ship_to_billing_address_only() && WC()->cart->needs_shipping() ) : ?>

	<h3><?php _e( 'Billing & Shipping', 'woocommerce' ); ?></h3>

<?php else : ?>

	<h3><?php _e( 'Billing Details', 'woocommerce' ); ?></h3>

<?php endif; ?>

Once you find it, simply change “Billing Details” to the text that you want to replace it with.

Filed Under: Code Snippets, How-To Articles Tagged With: checkout form, code snippet, design tweaks, how-to, shopping cart, WooCommerce

  • « Previous Page
  • 1
  • …
  • 10
  • 11
  • 12
  • 13
  • 14
  • 15
  • Next Page »
Let us support your online store so you can manage your business

Get started today

Get 2 Hours of FREE SUPPORT

We are so confident that you will love our services that we will give you your first 4 hours at a 50% discount

That’s 4 hours for only $75

BUY NOW

Free eBook

5 Things Every Online Store Can Fix On Their Website In The Next Week To Increase Sales

Quick Links

  • How it Works
  • Pricing
  • Blog
  • Contact
  • About Wooassist
  • My Account
  • Checkout
  • Privacy Policy
  • Cookie Policy
  • Terms and Conditions

Wooassist

Australia:
59 Luke St.
Hemmant QLD 4174

Philippines:
San Miguel St.
Poblacion, Iligan City 9200

Connect


Copyright © 2026 · Wooassist

Yours FREE!

5 Things Every Online Store Can Fix On Their Website In The Next Week To Increase Sales