Wooassist

Assistance for Your Woocommerce Store

  • How it Works
  • Pricing
  • Services
    • Site Maintenance
    • AI SEO and Content Marketing
  • Blog
    • How-To Articles
    • Code Snippets
    • SEO For E-Commerce
    • Theme and Plugin Reviews
    • Wooassist News
    • WordPress/WooCommerce News
    • Interviews
  • About Us
  • Contact
You are here: Home / Archives for How-To Articles

How to Create a Child Theme for Storefront

February 26, 2016 By John 2 Comments

how-to-create-a-child-theme-for-storefront

Optimizing your website usually means making changes to your theme. These changes can range from simple to complex. It’s easy to make changes on your website but the problem is that you will lose all your changes when you update your theme.

There are ways to update your theme without losing your customizations and the best way is to use a child theme. In this post, we will teach you how you can use a child theme to make the website development process easier.

We’ll teach you how to create a child theme for Storefront theme. Storefront is the official theme for WooCommerce. It’s a good parent theme to work on as it’s built with the same high standards as WooCommerce. It is entirely free and 100% compatible with WooCommerce.

What is a Child Theme

A child theme is not a full theme. It only inherits all the code, styling and functionality of the main or parent theme. Changes made in a child theme do not affect the parent theme. This allows users to tweak a theme without having to worry about losing the customizations when updating the theme. Using a child theme is best practice for altering an existing theme.

A parent theme is the default of all your WordPress themes. It contains the templates, design and functionality needed to run your website on WordPress. Note that parent themes are different from theme frameworks. A parent theme is a complete theme that you can use right away while a theme framework like Genesis is a developmental template.

Why You Should Use a Child Theme

There are thousands of themes out there that you can use for your WordPress installation. The problem is they all look generic and may not exactly fit your website needs. Modifying the theme with CSS is recommended. Here are some reasons why you should use a child theme:

Speed Up Site Development

Child themes allow you to quickly add or modify specific functions or template files. It allows you to significantly speed up site development as you would not need to write a lot of code from scratch. You’ll get a great deal of flexibility especially from powerful theme frameworks like Genesis.

Preserve Theme Changes

Themes get updates from time to time. These updates are important as these address security exploits that come to light. Updating your theme will wipe all the changes you made to the base theme. However, if you use a child theme, you can preserve any changes you make to the child theme when you update the base theme.

Safe Fallback

Creating or editing a theme entails a lot of work. However, when you make customizations on a child theme, you have your parent theme’s codes and functionality as fallback in case you mess up something. The child theme will only change a specific function or style when you want it to.

Secure Your Site

WPBeginner found out that 83% of hacked WordPress sites are not upgraded properly. The safest way to update your theme is by using a child theme.

When to Use Child Themes

If you are in any way customizing your theme, then you should be using a child theme. Using a child theme is best practice.

If you are not familiar with CSS and PHP, creating your own child theme can be a challenge. You would also need to learn about the functionalities of your parent theme.

Robust frameworks can be more challenging as they have their own filters and hooks.

How to Create a Child Theme

Setting up a child theme for any WordPress theme is easy but you need to pick a good parent theme. Not all themes can be good parent themes. We recommend Storefront or the Genesis framework.

A good parent theme is a solid foundation for your site. You will be building your child theme over it so it has to be flexible and coded properly.

You can use plugins to generate a child theme or you can do it manually. You just need three things to start: child theme directory, style.css file and functions.php file.

Child Theme Folder

This folder will serve as the container for your stylesheet and function files. It is ideal to use the name of your parent theme as folder name and append it with “-child”. In this case, we named our directory “Storefront-child”. Make sure that your child theme’s directory name has no spaces to avoid possible errors. For the meantime, you can create this folder in your computer.
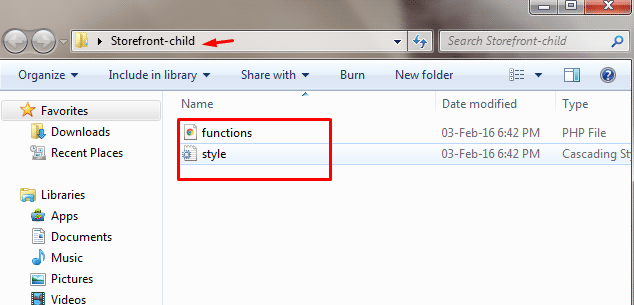
child-theme-folder

Child Theme Stylesheet

This is a basic style.css file. You need to set this stylesheet to inherit the styles from your parent theme. To do that, insert the stylesheet header below and replace them with relevant details. Note that customizations done here will override parent theme styles.

/*
 Theme Name:   Storefront Child
 Theme URI:    http://sitename.com/storefront/
 Description:  Storefront Child Theme
 Author:       Nick J
 Author URI:   http://sitename.com
 Template:     storefront /*this is case sensitive*/
 Version:      1.0.0
 License:      GNU General Public License v2 or later
 License URI:  http://www.gnu.org/licenses/gpl-2.0.html
 Tags:         light, dark, full-width, responsive-layout, accessibility-ready
 Text Domain:  storefront-child
*/
/*Theme customisations start here*/

We won’t teach you how to use CSS. It is impossible to cover that in one article. You can learn CSS here or have a developer do the CSS tweaks on your website.

Child Theme Function

Previous methods suggest that you use “@import” in your stylesheet to load your child theme. This is no longer considered best practice. You just need to “enqueue” your parent theme’s stylesheet in your child theme’s functions.php file. To do this, you can use “wp_enqueue_scripts action” and use “wp_enqueue_style()”.

The stylesheet for your child theme is usually loaded automatically. If not, you will need to enqueue it as well. You also need to make sure that the child stylesheet gets priority. You can use the code below instead. This code sets ‘parent-style’ as a dependency so your child-theme stylesheet loads after it.

<?php
function theme_enqueue_styles() {
$parent_style = 'parent-style';
wp_enqueue_style( $parent_style, get_template_directory_uri() . '/style.css' ); wp_enqueue_style( 'child-style', get_stylesheet_directory_uri() . '/style.css', array( $parent_style ) ); } add_action( 'wp_enqueue_scripts', 'theme_enqueue_styles' );
?>

Activation

To add a child theme to your WordPress themes, you need to create a .zip file of your child theme folder. You can use 7-zip or Winrar to do this. Make sure that you have your style.css and functions.php inside your child theme folder.

It is best to take note and keep records of other plugin settings before you activate your child theme. Once you’re done, you can upload this in your WordPress via Appearance > Add Themes.
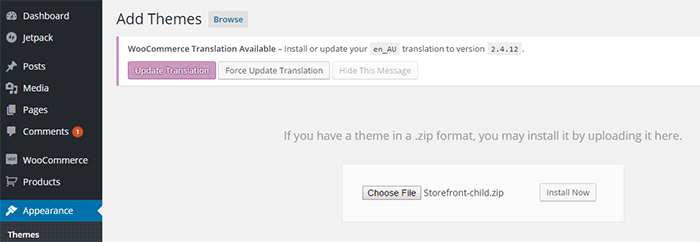
child-theme-activation-storefront

WordPress will install your child theme just like any other theme. Once installed, you need to activate this by clicking on ‘Activate’.
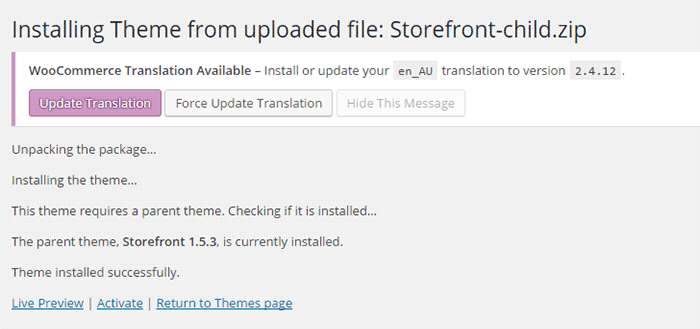
child-theme-activation-storefront-2

You can also choose to activate your child theme later when you go to Appearance > Themes.
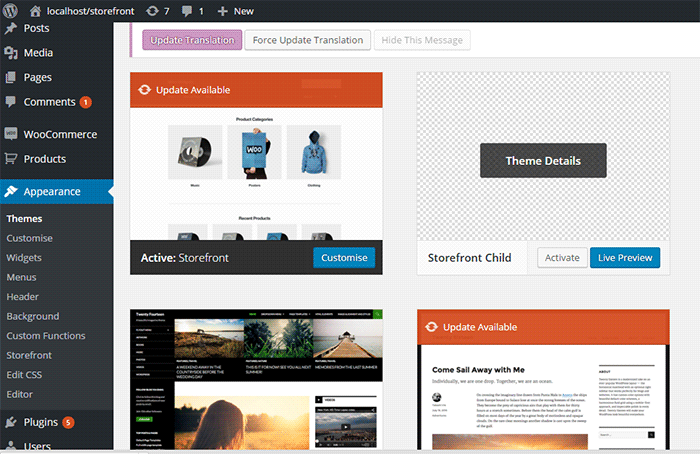
child-theme-activation-storefront-appearance-themes

Once installed or activated, you can apply any edits to functions.php and to the stylesheet directly on the child theme files

Popular Child Themes for Storefront

If creating your own child theme is proving to be a bit too difficult for you, you can always purchase one.

There are a handful of child themes for Storefront right now. Note that you should install Storefront base theme first before installing these child themes.

Boutique
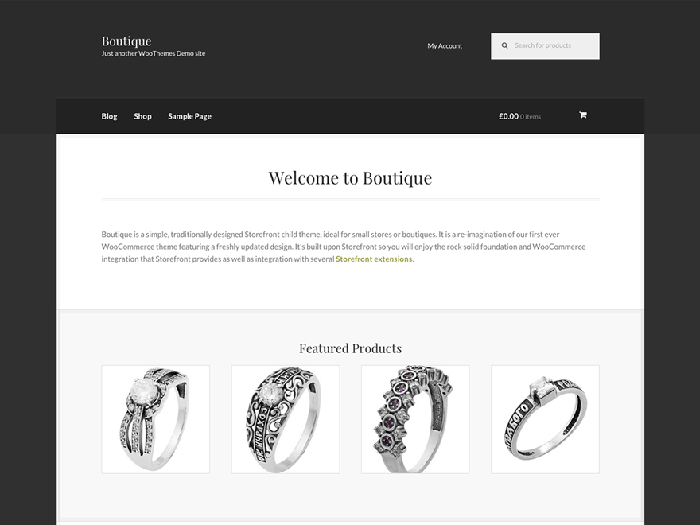
boutique_popular-child-themes-for-storefront

Boutique is simple and easy to customize. You can start selling after you create your color theme, add your logo and content.

Deli
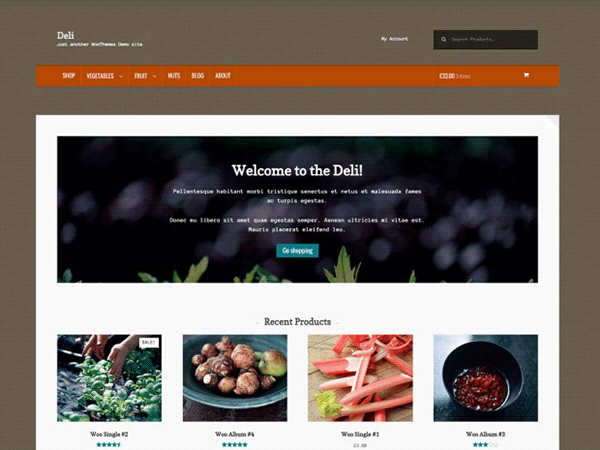
deli_popular-child-themes-for-storefront

If you want to add more personality to your store, you can use Deli. This child theme is great for small businesses. It has color schemes and textures that are inspired by nature.

Conclusion

Having a child theme is best practice when doing development work on your WooCommerce site. More importantly, using a child theme allows you to freely update your theme without losing any customizations you made on the child theme. A good and solid foundation is important for child themes. Hope this article has been helpful. Do you have any questions about child themes or anything you’d like to add? Let us know in the comments.


Filed Under: Code Snippets, How-To Articles Tagged With: best practices, child theme, code snippet, CSS, design tweaks, how-to, optimizations, Storefront, website development, website maintenance, WooCommerce, WordPress

How to Fix Checkout Problems in WooCommerce

June 6, 2016 By John 84 Comments

how to fix checkout problems in WooCommerce

One of the biggest problems a WooCommerce store owner can encounter is when the checkout fails. There are a lot of different types of issues that could happen during checkout, but these can be fixed easily if you can identify what is causing the problem. However, finding out the cause is not always easy for the average user. In this post, we will teach you how to fix the common checkout problems in WooCommerce.

The information in this post may or may not help with the specific problem that you are experiencing with your checkout. You may have a similar problem but the source could be different, hence the solutions mentioned here may not work for everyone. It is best to have a developer adept in both WordPress and WooCommerce make the suggested fixes for you. We also recommend that you create a staging/development site and do your debugging there rather than on the live site.

Most Common WooCommerce Checkout Issues

Here at Wooassist, a lot of new clients come to us with problems on their checkout. Having issues on the checkout page can be daunting as it can be difficult to figure out the cause. The checkout page is crucial because it is the last page of the “user shopping experience”. A simple error that could be fixed in a few minutes can hurt your business if it is not addressed swiftly. You could end up losing business opportunities and customers. To fix the problem, we need to figure out what the error is first.

Below are some common issues we encounter that you could be experiencing right now on your WooCommerce store.

Checkout Page Isn’t Available and is Just Redirecting Back to an Empty Cart

cart-is-currently-empty

While there are many reasons why checkout would redirect to an empty cart, it’s usually because your hosting is not totally compatible with WooCommerce.

The issue is most common with stores that enabled “force https on checkout”. In this case, the issue could be caused by a PHP security module called Suhosin. WooCommerce already has an official fix posted for this.

Simply paste the code below in your server’s PHP settings.

suhosin.session.cryptdocroot = Off

Review Order Section is Stuck on Loading

review-order-session-stuck-on-loading

When a customer enters their shipping/billing information, this triggers a script to reload the review order data. When there is an error in the script, it will just get stuck without an error shown that would’ve helped you understand what’s happening.

This usually happens when the returned data is not what WooCommerce expects. This is caused by either a plugin or template conflict. To fix this, you will need to check compatibility with all plugins installed and update any outdated WooCommerce templates.

Payment Option is Not Working

Some popular payments options are PayPal, Stripe, Authorize.net and eWay. These are the services that you’ve installed in your store to handle the payment process between you and your customers. This is the page where users enter their credit card information and hit the “place order” button.

Here are some scenarios where the payment option does not work:

Payment option is not available on checkout

You are sure that you have completely configured your payment option but it’s not showing up on the checkout page. This usually happens with stores that don’t have an SSL certificate installed and the payment option requires one. You can learn more about SSL in this post.

Authentication error pops up

When an authentication error pops up, this means there is something wrong between the connection of your store and your payment option service provider. To fix this, check that the credentials you entered in the payment option’s settings are correct.

Unknown error pops up

Checkout-unknown-error

Unknown error popping up could mean that a PHP script in WooCommerce isn’t working properly. There are many things that could cause this. It may be due to a plugin conflict, or your hosting doesn’t support the custom AJAX endpoints utilized by WooCommerce. To fix this you will need to check each plugin installed. Try disabling the plugins one at a time and see if that fixes your problem.

Nothing happens after clicking “Place order” button

If nothing happens when you click the place order button, then most likely there is a JavaScript conflict in the checkout page. The best way to fix this is to check your browser’s console to see which scripts are in conflict. You’ll want a developer to do this for you though.

Did any of these help solve your checkout page problem? If you have any other problems with checkout on your WooCommerce store, you can hit the comments or contact us and we’ll see what we can do for you.

Filed Under: How-To Articles Tagged With: best practices, checkout form, code snippet, how-to, security, website maintenance, WooCommerce

How to Make WooCommerce Pages Full Width in Storefront Theme

April 23, 2015 By John 20 Comments

storefront full width template

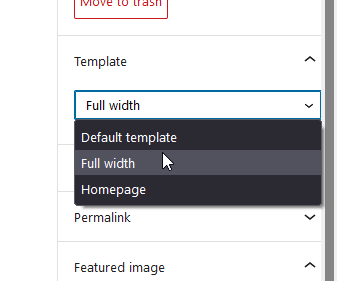
EDIT: Storefront now has a full-width page template so you no longer need to use the custom code in this article. To remove the sidebar on WooCommerce pages, you can set the page template to Full Width.

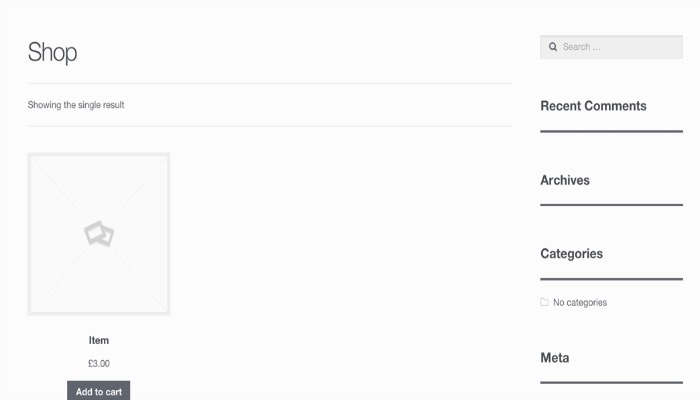
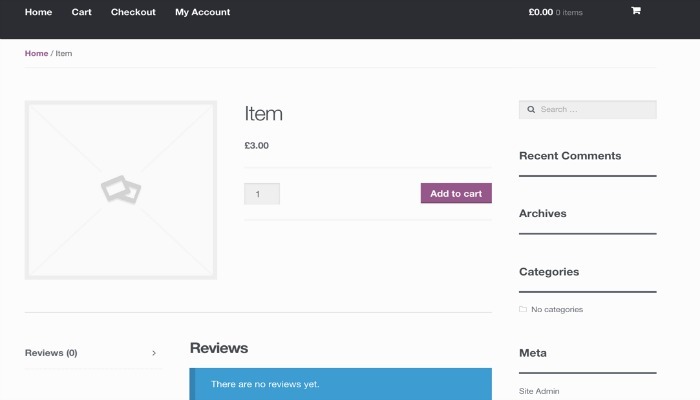
If you are using Storefront theme and you want to use the Full Width template for your store and other pages, you might come across a problem. After you’ve set your page to the Full Width template, you can still see the sidebar. And that’s not the case with the other pages, since setting the template to Full Width effectively hid the sidebar.

shopimage
Here is a shop page that is supposed to be full-width but still shows the sidebar
itemimage

And here is a product page which is supposed to be full-width but still shows the sidebar

This happens because all WooCommerce pages use the templates on the WooCommerce plugin. They do not use the Storefront templates. To resolve the problem, add the following code to your child theme’s functions.php.

add_action( 'wp', 'woa_remove_sidebar_shop_page' );
function woa_remove_sidebar_shop_page() {

if ( is_shop() || is_tax( 'product_cat' ) || get_post_type() == 'product' ) {

remove_action( 'storefront_sidebar', 'storefront_get_sidebar', 10 );
add_filter( 'body_class', 'woa_remove_sidebar_class_body', 10 );
}
}

function woa_remove_sidebar_class_body( $wp_classes ) {

$wp_classes[] = 'page-template-template-fullwidth-php';
return $wp_classes;
}

This code would remove the sidebars on the product page, product categories, and the shop page. It would also add the page-template-template-fullwidth-phpclass that causes the layout to be in full width.

Now you know how to make WooCommerce pages full width in Storefront Theme! If you have further questions please let us know.

Filed Under: Code Snippets, How-To Articles Tagged With: code snippet, design tweaks, how-to, Storefront, website development, WooCommerce

How to Fix Any Issue in WooCommerce – A Step by Step Guide

January 7, 2022 By John 1 Comment

how to troubleshoot problems in woocommerce

Whether you’re having problems with your cart, your shipping, your payment gateway, your WooCommerce checkout, or any other aspect of WooCommerce, you can just follow these simple steps to fix most problems.

Step 1: Try to Recall What Recent Changes You Did to Your WooCommerce Site

The first step in trying to solve a problem in WooCommerce is to try to determine what had caused it. Sometimes problems arise when you make a change to your site which is why it is important to always create a backup when you make any changes. In some cases, you might not always notice the problem right away which is also why it is important to do some user testing when you make changes to your store.

Try to recall what changes you made recently. Did you change any settings? Did you add a new plugin? Did you remove any plugins? Did you add any code snippets? In many situations, you can resolve the issue by rolling back the recent changes you made.

Step 2: Revert to a Backup

Determine when was the last time your site was working and revert to a backup from that date. If the issue is with a theme or plugin conflict, however, the issue will most likely pop back when you update. Not updating is not an option. You will have to update eventually. Reverting to a backup is only a temporary solution if you need your site back working and fast.

Step 3: Update Everything

If remedying the recent changes you did does not solve the issue you are having, the next step would be to update your site. Update everything – WordPress Core, themes, plugins, WooCommerce template files, and also make sure you’re using a supported PHP version.

If you are using any premium plugin that has a subscription, make sure you have an active subscription so you can get the latest updates.

If the updates don’t do the trick, it is time to test for a plugin conflict. You’ll want to do this on a staging site so you don’t affect the functionality of your live site.

Step 4: Check for a Theme Conflict

On your staging site, switch to a default WordPress theme like Twenty-Twenty One. Test if the issue still persists. If the issue is resolved, then it is a conflict with your theme. You’ll want to pass this on to your developer to fix the issue with the theme or contact the theme developers to let them know of the issue so it can be fixed. If the issue still persists after changing the theme, then it’s time to check for a plugin conflict.

twenty twenty-one theme

Step 5: Check for a Plugin Conflict

On your staging site, deactivate all your plugins except WooCommerce. Test if the issue persists. If the issue is resolved, it is time to identify which plugin is causing the issue. Activate your plugins one at a time. Every time you activate a new plugin, test if the issue returns. You’ll know if it’s the erring plugin if the issue pops back up after activating it. Once you’ve determined the problematic plugin, you can find a replacement plugin or reach out to the plugin developers so they can fix it.

If deactivating all your plugins does not fix the issue, then it is not a plugin conflict. You’ll have to explore other options.

Step 6: Check for Abandoned Plugins

abandoned plugin

WordPress will only alert you that you need to update a plugin when a new update is available. However, if a developer abandons a plugin or a plugin or it is removed from the plugin repository, WordPress will not alert you of this.

Over time, these abandoned plugins may stop working with future releases of WordPress and WooCommerce, and when that happens you’re going to have problems. These abandoned plugins can also become a backdoor for hackers.

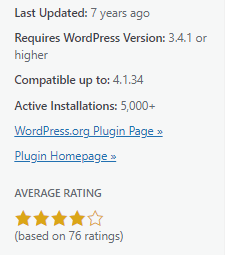
WordFence can help you detect abandoned plugins. Just install WordFence and do a scan of your site. If for some reason you don’t want to use WordFence, you’ll have to check all your plugins manually. Just head to your plugins page and click on View Details for each plugin. Keep tabs on plugins that have not been updated in a few months. Odds are those plugins could be abandoned. Any plugin that have not been updated in over 6 months is most likely already abandoned. Consider removing the abandoned plugins you find and then test if the issue you are having disappears.

Step 7: Submit a Bug Report

If all the above steps do not yield anything, it could be a bug in WordPress or WooCommerce. If this is the case, the next step would be to report the bug and how it can be reproduced.

Or you can contact the Wooassist team. We can help diagnose and fix the issue for you.

You can also file a support ticket with WooCommerce if the issue involves a premium plugin. To save time, before you contact WooCommerce, make sure you do the above steps first. They’ll just ask you to do the same things we mentioned in this article before they help you out.

Filed Under: How-To Articles

How to Set up AMP for WooCommerce and Speed Up Your Mobile Site

October 28, 2018 By John 2 Comments

For WooCommerce store owners, it is important to present your customers with a fast WooCommerce store. This is especially important for mobile the mobile platform. One means of achieving top speeds is to set up AMP. In this post, we’ll show you how to set up AMP for WooCommerce.

What is AMP?

Accelerated Mobile Pages, or simply AMP, makes websites load faster on mobile devices. This is an open-source initiative that Google started.

As Google pushes for a faster web experience, it approves of websites that have fast page loads speeds. And since AMP is  a pet project of Google, you have everything to gain and nothing to lose by adopting it. To be clear, AMP is not yet a ranking factor for SEO. However, you and your customers would still benefit from AMP since more searches are now being done on mobile devices.

How to Set Up AMP for WordPress

Before you can set up AMP for WooCommerce, you first need to set up AMP for WordPress.
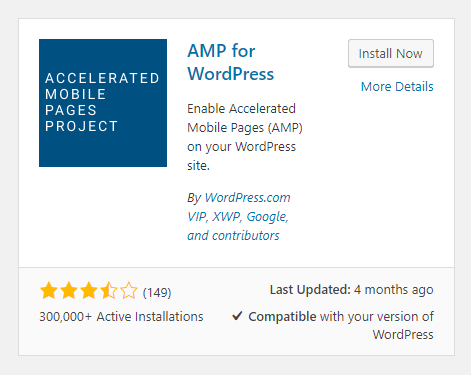
To set up AMP for WordPress, you will need to use a plugin. On your WordPress Dashboard, go to Plugins then Click on ‘Add New’. Search for AMP for WordPress. Once you find the plugin, click on Install Now and then activate it.

You can also download the plugin directly from the WordPress plugin repository and upload  it on your site. After that, you will need to activate the plugin from your plugins page.

If you are running a multisite network, you can install the AMP plugin on the multisite and activate it for the network.

Now that you have set up AMP for WordPress, you can get started on setting up AMP for your WooCommerce pages.

How to Set up AMP for WooCommerce

For integrating AMP for WooCommerce, you will need another plugin. Currently, there are no free plugins that add AMP functionality to WooCommerce so you will have to purchase a premium plugin. You can choose between the WooCommerce Pro for AMP plugin or the Publisher AMP plugin.

To enable AMP for WooCommerce, simply install and activate the plugin.

As you can see, setting up AMP for WordPress and WooCommerce is easy. But the work doesn’t stop there. You will still need to test your AMP site.

How to Test AMP

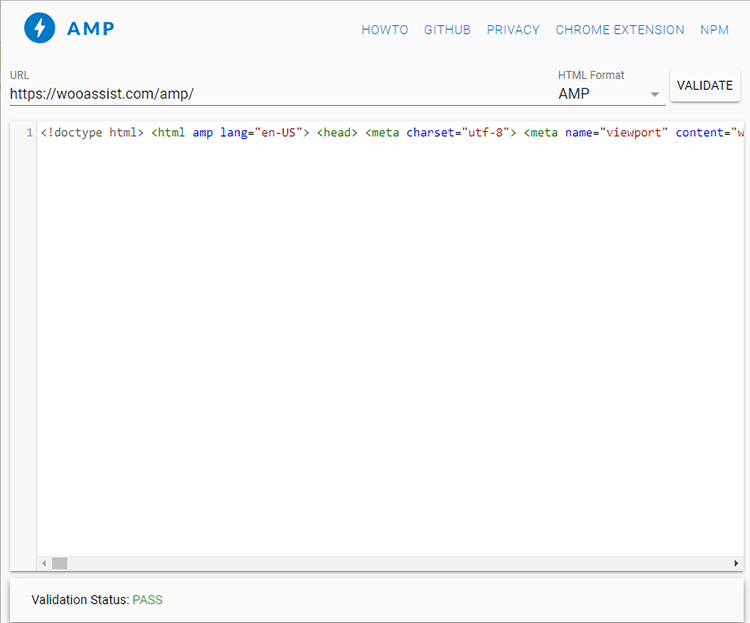
There are a few tools that can help you test your AMP set up. Simply input any of your AMP pages on the two sites below and you will be provided with results.

  • https://search.google.com/test/amp

  • https://validator.ampproject.org/

You might also want to check Google Search Console for any errors in your AMP set up. If you are not connected to Google Search Console, you can use Yoast SEO plugin to connect your WooCommerce store.

If you find any errors in your AMP set-up, you can get started on fixing them. If you are stuck and need help fixing any errors, you can contact the Wooassist team and we should be able to help out.

Check Your AMP Speed

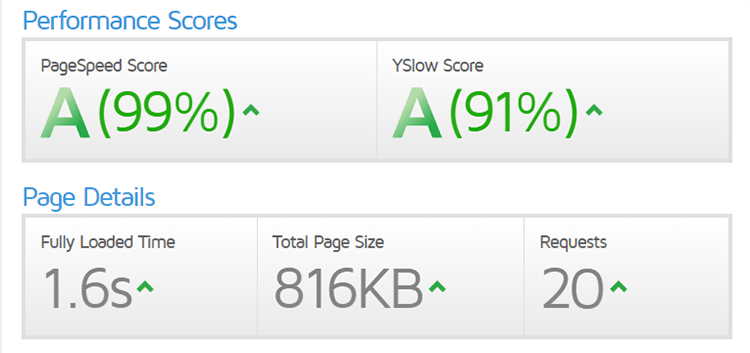
You can also check your AMP site for any improvements in site speed using GTmetrix or Pingdom.

Ensure Your AMP Pages are Indexed by Google

One way to ensure that your AMP pages will be indexed by Google is to generate a sitemap that includes the AMP pages. You can then upload it on Google Search Console. Just log in to your Google Search Console and then click on sitemap. In the field, just indicate your sitemap URL and click on “Submit”.

Ensure AMP Works with Yoast SEO Plugin

If you are using Yoast’s SEO  plugin, which we recommend you do, you will need to integrate Yoast SEO with AMP. This is a simple tasks and just requires that you install the Glue for Yoast SEO & AMP.

Final Notes

Now that you’ve set up AMP for your WooCommerce store, the mobile experience should be much faster. If you are having issues setting up your AMP, you contact us and we’ll see what we can do to help.

If you are looking for other ways to speed up your site, you can check out our post on how to speed up your WooCommerce store.

Filed Under: How-To Articles Tagged With: conversion optimization, seo, site speed optimization, WooCommerce

  • « Previous Page
  • 1
  • …
  • 8
  • 9
  • 10
  • 11
  • 12
  • …
  • 24
  • Next Page »
Let us support your online store so you can manage your business

Get started today

Get 2 Hours of FREE SUPPORT

We are so confident that you will love our services that we will give you your first 4 hours at a 50% discount

That’s 4 hours for only $75

BUY NOW

Free eBook

5 Things Every Online Store Can Fix On Their Website In The Next Week To Increase Sales

Quick Links

  • How it Works
  • Pricing
  • Blog
  • Contact
  • About Wooassist
  • My Account
  • Checkout
  • Privacy Policy
  • Cookie Policy
  • Terms and Conditions

Wooassist

Australia:
59 Luke St.
Hemmant QLD 4174

Philippines:
San Miguel St.
Poblacion, Iligan City 9200

Connect


Copyright © 2026 · Wooassist

Yours FREE!

5 Things Every Online Store Can Fix On Their Website In The Next Week To Increase Sales