Wooassist

Assistance for Your Woocommerce Store

  • How it Works
  • Pricing
  • Services
    • Site Maintenance
    • AI SEO and Content Marketing
  • Blog
    • How-To Articles
    • Code Snippets
    • SEO For E-Commerce
    • Theme and Plugin Reviews
    • Wooassist News
    • WordPress/WooCommerce News
    • Interviews
  • About Us
  • Contact
You are here: Home / Archives for How-To Articles

How to Add a Quantity Field on Your WooCommerce Shop Page

April 7, 2017 By John 30 Comments

counting-cubes-quantity-on-shop-page

By default, WooCommerce does not allow users to change the quantity of the product on the shop page before adding to cart. To change the quantity, users would have to proceed to the cart page which can be an arduous process. In this post, we will show you how to add a quantity field on your WooCommerce shop page.

If a customer wants to buy three sunglasses, and you only have the “Add to Cart” button on the shop page, the user will have to go to the Cart to edit the quantity that he/she wants to buy. This takes a few extra clicks and can become a real problem if the customer wants to shop for more items.

Less Clicks to Checkout

It is important to note that less clicks leading to the checkout page leads to more sales. As an e-commerce store owner, making your store more profitable should be on top of your priority list. Another way to reduce clicks to checkout is allowing the customer to check out as guests without the need to create an account.

Also, refrain from asking unnecessary information. At the very least, your checkout page should only have the name, address, email and phone number fields aside from the payment details.

Quality of Life Improvement

Adding the quantity field to the shop page is a good quality of life improvement that many of your visitors would appreciate. Instead of having to navigate to the cart or the product page to increase the quantity, they can increase the quantity from the shop page. If you think about it, making it easier for your customers to purchase more of your products means more sales for you.

A Necessity for Some Online Stores
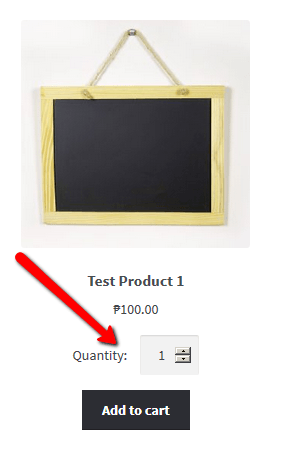
How to Add a Quantity Field on Your WooCommerce Shop PageAdding the quantity field to the shop page is a necessity to some stores where buying several pieces and having repeat sales are common. For example, buying canned cat food in bulk is common so if you own a store selling pet food, having the quantity field on the shop page will really help. Many of your customers will be buying again after some time. They can just add the products directly from the shop page since they know what they are buying and no longer need to see the product details.

How to Add a Quantity Field on Your Shop

You can use the Quantity Field on Shop Page for WooCommerce plugin to add a quantity field on your WooCommerce shop. Just install the plugin and activate it. There are no settings to tweak. Once the plugin is activated, the quantity field should be on your shop page.

Did this plugin work for you? Do you have any questions or ideas on how the plugin can be improved? Let us know in the comments.


Filed Under: How-To Articles, Theme and Plugin Reviews Tagged With: best practices, e-commerce, how-to, navigation, plugins, website development, Wooassist, WooCommerce

Create Product Descriptions for Your Woocommerce Store

January 29, 2015 By John Leave a Comment

product-description

Product descriptions exist for one specific purpose – to sell.

Imagine a potential customer browsing through your ‘Products’ page. She finds the perfect pair of shoes and decides to purchase it. She clicks on the image only to find a poor product description, with no material details, instructions for sizing, etc.

She then hesitates and moves on to another website. That’s a lost sale right there, and the next buyer will go through the exact same thing. How many more customers will you lose?

Make it effective.

The goal is to make a visitor click all the way to check out form. To do this, your product descriptions should be effective and dynamic to engage customers. They have to know how your product or service can change their lives. And, they won’t be able to – unless they read the description.

An effective product description is one that goes beyond simply informing potential buyers about the product. It needs to convince them to buy it. Visitors of your website should feel the need to buy your products and/or use your services.

Make it unique.

Creating original content for your product descriptions is also a must. Don’t just copy and paste from the manufacturer’s brochures or website. Otherwise, you’ll have similar descriptions with hundreds of other websites – and this will affect your site’s ranking. What’s more, Google may penalize your website for this.

Tell a story with your descriptions. Make it about the customer and how your product can help him. Also, be careful about your voice.

Don’t make it sound boring, or as if you are lecturing in the course of telling your story. Try and be personal with your voice and make it seem like you’re talking to a friend. Learn more about the voice you need to use.

Make it sell.

In the competitive e-commerce landscape, good product descriptions can give you an edge. You can even learn how to write your own. There is no need to be fancy about it. In fact, a simple approach is the best, as shown here.

You need to find the time to write them even though you’re busy with other aspects of growing your business. This useful resource can help you learn the secrets of creating product descriptions to help you find success.

So there you go. Tell the world about your products. Use stories and read about the resources mentioned above to guarantee that you are going to get results. However, if you feel that you are not up to it and need to put your focus elsewhere, our Wooassist team can help.

At the very least send your supplier’s descriptions to Wooassist and we will re-word them to make them unique.

Filed Under: How-To Articles Tagged With: admin, content marketing, copy writing, duplicate content, how-to, product management, WooCommerce products

How to Make Your WooCommerce Store GDPR-Compliant

June 18, 2018 By John Leave a Comment

How to Make Your WooCommerce Store GDPR-Compliant

The GDPR took effect on May 25. WooCommerce store owners are still scrambling to make sure that their sites are compliant with GDPR requirements. If you serve clients from the European Union, then it is imperative that you make your WooCommerce store GDPR-compliant. Don’t know what to do? Read on below.

What is the GDPR?

First off, a brief introduction about the GDPR. The General Data Protection Regulation (GDPR) is a new regulation in the European Union that sets out standards and regulations for data protection. Data protection reform was initiated way back in 2012 and the GDPR is one fruit of that labor. If you are interested in seeing the GDPR in its purest form, you can check out this link.

Why Comply with GDPR Regulations?

If you do not serve customers from the European Union, then there is no need for you to comply with GDPR regulations. Still, your customers will appreciate the gesture if you make an effort to comply. This shows that you value their data and privacy.

If you serve a specific country in the EU or serve a global audience, then you are covered by the GDPR. That means you may receive hefty penalties of up to €20 million if you are found to be in violation of its provisions.

How Can I Make My WooCommerce Store GDPR Compliant?

Due to harsh penalties, it is recommended to act to make your WooCommerce store compliant. We will now detail the tasks that you need to do to comply with GDPR regulations.

Step 1: Update Your Site

The first thing you should do is update your site. The latest versions of WordPress and WooCommerce have implemented features to be GDPR-compliant. WooCommerce now has a feature that allows users to export their data and delete their data. Site administrators are also granted tools to determine how long data will be retained as well as an option to delete user data. Don’t forget to back up your site and test updates on a development site before updating your live site. For more information on the changes relating to the GDPR, you can check out this post.

Other popular plugins that manage user data such as MailChimp and Google Analytics have also implemented measures to make their services GDPR-compliant.

Step 2: Secure Your Site

Another mandate of the GDPR is that store owners should make their site secure. One way of keeping your site secure is by using the HTTPS protocol. You’ll need an SSL certificate to use HTTPS. You can follow this guide on how to install an SSL Certificate on your WooCommerce store.

There are a few other things that you can do to increase the security of your WooCommerce store. This includes keeping your site updated or using a security plugin. You can check this blog post for other important security tweaks.

Step 3: Create Important Pages

You will need to create a Terms and Conditions page, a Privacy Policy page and a Cookie Policy page. We would still recommend consulting your legal department about creating these pages. If you already have these pages, you need to make sure that you add provisions specific to the GDPR.

Create a Terms and Conditions Page

You can create your own Terms and Conditions page or you can generate a terms and conditions page using this tool from Shopify. If you choose to generate a terms and conditions page, you’ll still need to tweak it. And make sure to add any specific terms and conditions unique to your business.

Create a Privacy Policy Page

You can create your own Privacy Policy page or you can download a template here that you can tweak depending on your needs.

Create a Cookie Policy Page

You can create your own Cookie Policy page or you can download this template and tweak it according to your needs.

Notes on Important Pages

After you’ve created all the pages above, you will need to ensure that these pages can be accessed from any page on your site. For this purpose, we recommend adding links leading to these pages on your WooCommerce store’s footer.

Step 4: Create a Data Breach Response Plan

As per GDPR requirements, you will need to detail how your organization deals with a security breach. You can download a template here. Populate it with pertinent information about your Security Incident Response Team and external contacts.

In case of a security breach, you must also inform all customers whose data may have been leaked. You will need to have a template ready for communicating the breach. You can download the email template here.

Step 5: Add a Cookie Notification Pop-Up

You might have noticed that most, if not all, websites that you visit now have a pop-up that declares that the site uses cookies. That’s because the GDPR also requires website to declare that they are using cookies to track user data. Implementing this is easy on WordPress. You can use the UK Cookie Consent plugin to create a cookie notification pop-up on your WooCommerce store.

Step 6: Ensure that Your Email Opt-in Forms are GDPR-Compliant

If you are using MailChimp, you will need to turn on the GDPR fields on your opt-in forms. Note that this does not make your opt-in forms GDPR-compliant. Rather, this is the first step to making your WooCommerce store GDPR-compliant.

You will still need to get consent from new contacts and existing contacts. You read that right. Even if users have already consented to receive emails from you prior to the GDPR, you will still need to get consent again. For more information on how to get consent, you can check out this article from MailChimp.

If you are using a different tool for your email marketing, you can check with your service provider. Check if they have made any changes to help you comply with GDPR.

Step 7: Ensure that the Plugins You Use are GDPR Compliant

To ensure that your plugins are GDPR compliant, you will need to do a plugin audit. This task may be tedious as you have to sift through all the plugins that you use. First, you’ll need to check if the plugins are still being updated by the plugin author. If that plugin author has not updated the plugin in months (or worse, years), then that’s a red flag. A plugin that is not being updated is a security concern and GDPR requires that websites need to be secure.

Once you’ve weeded out the outdated plugins, you’ll need to identify which plugins manage or use user data. Example of plugins that deal with user data are analytics plugins, contact form plugins, and opt-in form plugins. Check if the plugins that manage user data have taken steps to become GDPR compliant. If they have not, consider finding another plugin that is GDPR-compliant.

Final Notes

Doing all the steps above does not guarantee that your WooCommerce store will be fully GDPR-compliant. We still recommend seeking legal advice. If you need any help getting any of these tasks done, you can contact the Wooassist team and we should be able to help.

Do you have any other tips on how to make a WooCommerce store GDPR-compliant? Let us know in the comments.

Filed Under: How-To Articles Tagged With: email marketing, GDPR, mailchimp, security, WooCommerce, WooCommerce updates, WordPress updates

How to Edit Footer Credit Text in Storefront Theme

March 20, 2017 By John Leave a Comment

Like most themes, Storefront theme comes with a generic footer text. As a WooCommerce store owner, this doesn’t really help your site so you will want to change it.

Storefront-Default-Footer

Why Edit Footer Credit Text Area?

Well, you certainly wouldn’t want the default one. You can edit your site footer credit text area to include your business name and declare your copyright. You can also use this area to include whatever best fits your needs.

But first off…

How Do You Edit the Edit Footer Credit Text in Storefront Theme?

By editing your e-commerce store’s footer, you can make it a part of your strategy. You can easily edit it if you know how to code. However, this can prove challenging to the average user. In this case, there’s a plugin for that. Just follow the steps below:

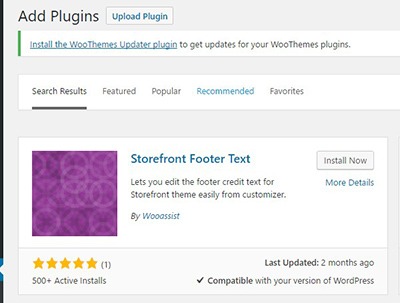
  1. Storefront-Footer-Text-Plugin-400x300Head over to your WordPress Dashboard and go to plugins

  2. Click on “Add New”. In the Search field, input “Storefront Footer Text” and press Enter.
  3. Click on ‘Install Now’ on the plugin and then click Activate.
  4. Once Activated, head over Appearance > Customizer
  5. Under the Footer section, you will find a text area for you to enter your custom credit text. You can use HTML tags so you can be creative when adding your footer text.
  6. When you’re done, just click on Save.

What Can I Add to My WooCommerce Store’s Footer Credit Area?

There are a lot of things you can add to your store’s footer credit section. Below are just some of them.

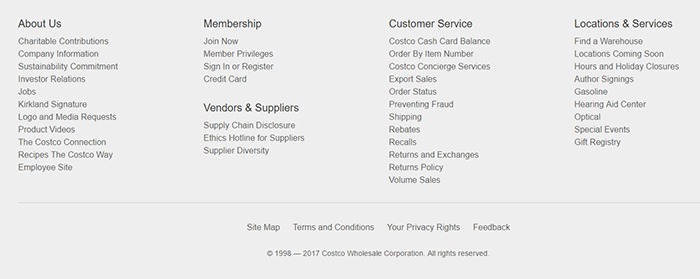
Declare Copyright and Other Important Declarations

The most common use of this area is to declare a copyright. This has three elements: the copyright icon, the company name and the year that you started the e-commerce store/business up to the current year.

If there are other important declarations that you want to add for legal purposes, you can add them in this section as well. Some websites have been known to use this area to declare the use of cookies.

Declare-Copyright-in-Footer

Here’s how it looks like on the Costco website.

Contact Details

In addition to copyright information, you can add your contact details on the footer credit section to increase your credibility. You can add your phone number, address, email as well as a link to your contact us page.

Social Media Icons

You can add social media icons in this section in a way that is not intrusive. When you add social icons at the top of your page, it can be a distraction from your website’s goal. But when you add it at the bottom of your site, it becomes another way for you to engage with your visitors if they ignored your main call-to-action.

Social-Media-Icons-in-Footer
Newegg.com adds both social icons and security seals in the footer credit area.

Show Security Seals and Certificates

Newegg.com adds the security seals on their footer credit section along with their social media icons. You can add your own Norton Security Seal here.

Payment Options

You can also add icons of the payment options that you accept on your e-commerce store. This makes it easier for your visitors to know what payment options you accept without having to look for the FAQ section.

Add Other Important Links

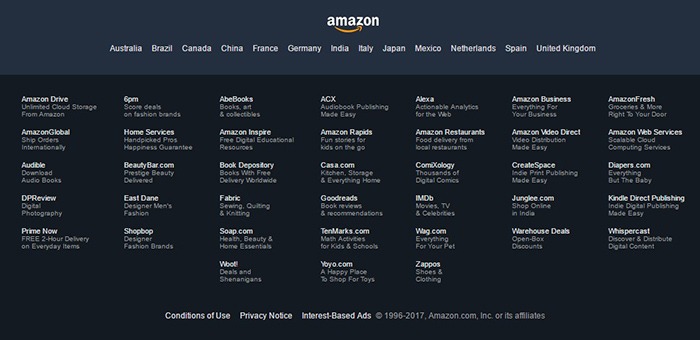
You can also use the footer credit area to add other important links such as your terms and conditions and privacy policy. This is how Amazon does it.

Terms-Conditions-Footer

No matter what you put on your footer credit text area, it must be an element that helps you achieve your e-commerce store’s goals.

Did this plugin help you edit footer credit text in Storefront? Did you experience any problems using it? What elements did you add to your footer credit area? Let us know in the comments.

Filed Under: How-To Articles, Theme and Plugin Reviews Tagged With: best practices, design tweaks, e-commerce, how-to, navigation, plugins, Storefront, Wooassist, WooCommerce

Things to Do Before Your Website Goes Live

May 7, 2015 By John Leave a Comment

checklistThe bulk of the work is done. Your website is ready to go live. But are you sure it is really ready? Here’s a handy checklist of things to do before your website goes live. Make sure everything is working fine before you click that “Go Live” button.


Page Content

  1. Proof read web copywriting, spelling and grammar are correct
  2. Paragraphs and headers and formatting are correct
  3. Copywriting date on the footer shows current year
  4. Company details and contact info are accurate all throughout the website.
  5. Lorem Ipsum has been removed
  6. Images, videos and audio files are properly formatted and are working on different devices
  7. Premium content such as PDFs, whitepaper, ebooks, etc. have been proofread, spelling and grammar are correct. These files are properly stored in their respective libraries.
  8. Images, font and other content are properly licensed or have proper citation

Design

  1. Site pages are compatible across different browsers (Firefox, Safari, IE 7, 8, 9, and 10, Chrome, Opera)
  2. Pages are compatible across different devices (tablets, laptops, desktops, and other mobile devices)
  3. Check for CSS and HTML error, fix and validate
  4. Favicon is uploaded and is rendering properly
  5. Paragraph and styles are working properly

design

Functionality

  1. Forms are submitting data properly
  2. Thank you message or confirmation message displays after the form is submitted.
  3. Form data is emailed to the recipient
  4. Auto-responders (if any) are working properly
  5. Internal links are working
  6. External links are working
  7. Social media icons are working properly
  8. Feeds are working properly
  9. Company logo is linked to the homepage
  10. Site load time should take not more than 2-3 seconds
  11. 404 Redirects are in place
  12. Integration with third-party tools such as e-commerce software, CRM, Marketing software platforms are running smoothly
  13. Site structure is clean and should be easy to navigate and maneuvered by your users
  14. Payment processing should be live
  15. Shipping options checked
  16. Credit card transaction checked
  17. Run a test order. Check tax, sub-total, total, coupons, etc
  18. Confirm order is placed
  19. Reset order number
  20. Verify MyAccount
  21. Dummy orders and test accounts are cleared.
  22. Test email from client to merchant
  23. Cart icon is on each page
  24. Checkout button should be large and is strategically located on the page.
  25. Search box with suggestive search
  26. Feedback tab at the bottom of each page for users to notify the webmasters when having problems with the site.

SEO

  1. Page titles should be unique, less than 70 characters and should include keywords.
  2. Meta Descriptions are unique and should not exceed 156 characters
  3. Keyword per page not more than 10, depending on the # of words per page
  4. Metadata for RSS in place
  5. Metadata for social media sharing in place
  6. Metadata spelling and grammar correct
  7. Alt tags for images
  8. Dynamic XML sitemap created and submitted to search engines
  9. Breadcrumbs in place
  10. Slugs should reflect site structure and should be short with relevant keywords.
  11. 301 redirects for old URLs are in place
  12. rel=”nofollow” tags are in place on applicable links and pages
  13. Site indexing is on

Google Analytics

  1. Analytics codes are properly inserted
  2. Relevant IP addresses have been excluded from analytics tracking.
  3. Google Webmaster Tools and Google Analytics are synced
  4. Google Adwords and Google Analytics are synced

Security and Backups

security

  1. Monitoring scripts installed.
  2. Copy of the final website stored in a safe place
  3. Ongoing copies of the site is being generated everyday (depending on how large the site is)
  4. Usernames and passwords stored in a secure database
  5. Check robots.txt file to restrict access to sensitive pages

Compliance to Web Rules and Regulations

This may vary depending on the country and industry.

  1. Pages offer accessibility to users with disabilities
  2. Users need to be informed if site is using cookies
  3. Compliant to usage rights of images, fonts, videos, etc.
  4. Terms and Privacy policy for users should be readily accessible and visible to site visitors
  5. Website is PCI compliant
  6. SSL certificate properly installed. Check receipt and checkout page, my account and my account details in SSL mode.
  7. SSL mode for logins and registrations

Filed Under: How-To Articles Tagged With: 404 error, backup, best practices, breadcrumbs, Google Analytics, Google Webmaster Tools, how-to, redirection, security, SEO strategy, website development, WordPress

  • « Previous Page
  • 1
  • …
  • 7
  • 8
  • 9
  • 10
  • 11
  • …
  • 24
  • Next Page »
Let us support your online store so you can manage your business

Get started today

Get 2 Hours of FREE SUPPORT

We are so confident that you will love our services that we will give you your first 4 hours at a 50% discount

That’s 4 hours for only $75

BUY NOW

Free eBook

5 Things Every Online Store Can Fix On Their Website In The Next Week To Increase Sales

Quick Links

  • How it Works
  • Pricing
  • Blog
  • Contact
  • About Wooassist
  • My Account
  • Checkout
  • Privacy Policy
  • Cookie Policy
  • Terms and Conditions

Wooassist

Australia:
59 Luke St.
Hemmant QLD 4174

Philippines:
San Miguel St.
Poblacion, Iligan City 9200

Connect


Copyright © 2026 · Wooassist

Yours FREE!

5 Things Every Online Store Can Fix On Their Website In The Next Week To Increase Sales