Wooassist

Assistance for Your Woocommerce Store

  • How it Works
  • Pricing
  • Services
    • Site Maintenance
    • AI SEO and Content Marketing
  • Blog
    • How-To Articles
    • Code Snippets
    • SEO For E-Commerce
    • Theme and Plugin Reviews
    • Wooassist News
    • WordPress/WooCommerce News
    • Interviews
  • About Us
  • Contact
You are here: Home / Archives for How-To Articles

The Ultimate Guide on How to Set Up Shipping on Your WooCommerce Store

February 14, 2023 By John 1 Comment

Shipping is one of the most important aspects of running an e-commerce store, and it can be a bit overwhelming to set up, especially for new store owners. 

WooCommerce is one of the most popular e-commerce platforms available, and it offers a variety of shipping options to suit the needs of different businesses. In this guide, we will walk you through the process of setting up shipping on your WooCommerce store, so you can get your products to your customers as quickly and efficiently as possible.

This guide assumes you already have WooCommerce installed and you already have your products set up. So let’s get started.

Quick Navigation
  • Configure Your Shipping Zones
  • Integrate Shipping Carriers
    • Setting Product Weight and Dimensions
    • Shipping Method Plugins
    • How to Set Up USPS Shipping Method on WooCommerce
    • How to Set Up UPS Shipping Method on WooCommerce
    • How to Set Up FedEx Shipping Method on WooCommerce
    • How to Set Up Royal Mail Shipping Method on WooCommerce
    • How to Set Up Australia Post Shipping Method on WooCommerce
    • How to Set Up Canada Post Shipping Method on WooCommerce
  • Consider Using Table Rate Shipping
    • Flexibility
    • Accurate Rates
    • Competitive Rates
    • Better Profit Margins
    • Automation
    • How to Set Up Table Rate Shipping
  • Printing Shipping Labels
    • Use a Shipping Label Plugin
    • Automate Printing of Your Shipping Labels
  • Customize Your Checkout Form Fields
  • Ecommerce Shipping Best Practices
    • Offer Free Shipping
    • Provide Accurate Shipping Rates
    • Use Tracking Information
    • Offer Multiple Shipping Options
    • Provide Excellent Customer Service
  • Customizing WooCommerce Transaction Emails
  • Add Shipping Tracking Code to Your WooCommerce Transaction Emails
  • What to Do When Products Arrive Broken?
  • Final Words

Configure Your Shipping Zones

To configure your shipping settings, go to WooCommerce > Settings > Shipping. Here, you will see a list of shipping zones, which are regions where you ship your products. By default, WooCommerce will set up a default zone for the entire world, but you can also set up additional zones for specific countries or regions.
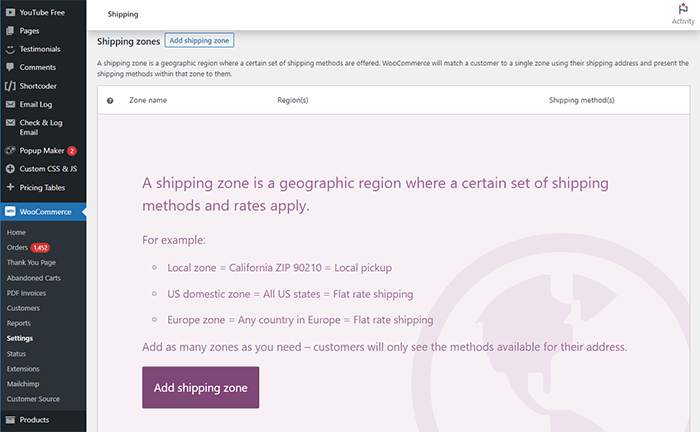
woocommerce configure shipping zones

Next, you will need to set up your shipping methods. WooCommerce offers several built-in shipping methods, including flat rate, free shipping, and local pickup. If this is all you need, then you can set it up and be done.

However, some stores are a bit more complicated and require a more robust shipping system. That’s not a problem. You can also install additional shipping methods using plugins.

Integrate Shipping Carriers

One of the most important things you need to do when setting up shipping on your WooCommerce store is to integrate shipping carriers. This will allow you to calculate real-time shipping rates and print shipping labels for your orders directly from your dashboard.

There are several popular shipping carriers that you can integrate with WooCommerce, including USPS, UPS, FedEx, Canada Post, Royal Mail and Australia Post. To integrate these carriers, you will need to sign up for an account with each carrier and obtain an API key. Once you have your API key, you can install the appropriate plugin or extension for each carrier.

Setting Product Weight and Dimensions

Do note that integrating these shipping carriers usually requires you to set up weight and dimensions for all products that qualify for shipping. To add these dimensions to a WooCommerce product, edit the product you want to add dimensions to. Under Product Data, click on the Shipping tab and then fill in the Weight and Dimensions fields. Save when you are done. 
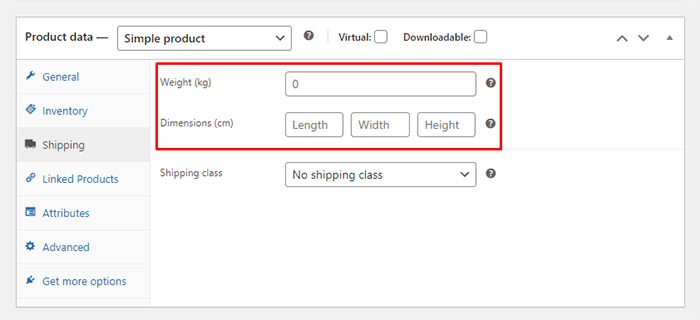
woocommerce add product weight and dimensions

Shipping Method Plugins

You can find the plugin for each shipping company using the links below:

  • USPS Shipping Method
  • UPS Shipping Method
  • FedEx Shipping Method
  • Royal Mail
  • Australia Post Shipping Method
  • Canada Post Shipping Method

If you are looking for a specific shipping method plugin not listed above, you can head over to the extension store to find more shipping plugins.

How to Set Up USPS Shipping Method on WooCommerce

how to set up usps shipping method

USPS Shipping Method is an add-on that enables you to connect the United States Postal Service (USPS) to your WooCommerce store. This integration allows you to compute real-time shipping rates and print shipping labels directly from your store’s dashboard. 

The extension is suitable for stores that use the US Dollar as their currency and have the United States, US Virgin Islands, or Puerto Rico as their base country. It is compatible with inches and pounds, but other measurements can be converted automatically. USPS offers worldwide quotes for both domestic and international shipping options, including options such as First Class, Flat Rate, Priority Mail, Priority Mail Express, Standard Post, Media Mail, Library Mail, First Class Mail International, Global Express Guaranteed, Priority Mail International, Priority Mail International Flat Rate and International Postcards. 

It is recommended to use this extension in combination with the free service WooCommerce Shipping, which allows you to create discounted shipping labels directly from your WooCommerce store’s dashboard.

To set up USPS Shipping Method, you must first install and activate the plugin after purchasing a license. After plugin activation, you will need to set up a USPS account and enable integration through the USPS API.

To get your USPS API credentials, you will need to create a USPS account here.

After that, you can follow the setup and configuration guide here.

How to Set Up UPS Shipping Method on WooCommerce

how to set up ups shipping method

UPS Shipping Method makes it possible for you to obtain shipping rates from UPS through its API. It’s important to note that your server must have SimpleXML capabilities to use the plugin. This shipping option uses inches for measurements and pounds for weight, though other units can be converted automatically. The currency for the returned shipping rates is determined by the origin country specified in your shipping settings.

It is also important to note that products that qualify for shipping must have weight and dimensions set so that shipping rates can be computed correctly. UPS provides quotes for both domestic and international shipments but it has a weight limit of 150 pounds per package.

To get started, install and activate the plugin then get your API credentials using the UPS Developer Kit. For a detailed guide on getting your API key and setting up shipping, you can check the plugin documentation.

How to Set Up FedEx Shipping Method on WooCommerce

how to set up fedex shipping method

The FedEx Shipping Method provides your customers with shipping options and costs at checkout, calculated through the FedEx API. This extension mandates that your store utilizes US or Canadian Dollars as its currency, has either the US or Canada set as the base country, and that your server has SOAP client installed. The shipping method primarily uses inches and pounds for measurements, though other units can be automatically converted.

With FedEx, you can get shipping quotes for both domestic and international parcels, as it offers worldwide coverage.

For setting up the plugin, you can refer to the plugin documentation found here. 

How to Set Up Royal Mail Shipping Method on WooCommerce
how to set up royal mail shipping method

For WooCommerce store owners in the UK, the Royal Mail Shipping Plugin for WooCommerce makes it simple to offer Royal Mail shipping rates to your customers. Unlike other shipping methods, this plugin does not require an API as Royal Mail does not provide a public one. Instead, it follows the price guide available on the Royal Mail website.

To use this plugin, your store must have GBP as its currency and have the United Kingdom set as the base country. Additionally, weights and shipping dimensions must be set up for all products. The plugin primarily uses mm and g for measurements, but other units can be automatically converted.

For setting up Royal Mail, you can consult the plugin documentation here.

How to Set Up Australia Post Shipping Method on WooCommerce

how to set up australia post shipping method

For WooCommerce store owners in Australia, the Australia Post for WooCommerce plugin lets you access shipping rates from Australia Post’s Shipping API, which offers coverage for both domestic and international parcels. To use this plugin, your store must have Australian Dollars as its currency and use cm and kg for product dimensions and weight, though other units can be automatically converted.

To set up Austrlia Post Shipping, check the plugin documentation here.

How to Set Up Canada Post Shipping Method on WooCommerce

how to set up canada post shipping method

Canada Post Shipping Method is a premium shipping option that enables you to access shipping rates through Canada Post’s API. For the method to work, your store must use Canadian Dollars as its currency and your server must have SimpleXML installed. The extension primarily uses cm for measurements and kg for weight, though other units can be automatically converted.

Canada Post provides shipping services for both domestic and international shipments. Just like for UPS, the API and the built-in box-packer require weights and dimensions to be set for all products that qualify for shipping. You can consult the plugin documentation for detailed setup and configuration.

Consider Using Table Rate Shipping

Table rate shipping is a shipping method that allows store owners to set up custom shipping rates based on a combination of factors such as weight, destination, and price. This method gives store owners more flexibility and control over their shipping rates, allowing them to offer more accurate and competitive rates to their customers. Here are some reasons why using table rate shipping can be beneficial for a store:

Flexibility

Table rate shipping allows store owners to set up custom shipping rates based on a variety of factors, such as destination, product weight, and price. This gives store owners more flexibility in setting shipping rates, which can be beneficial for businesses that sell products of varying sizes, weights, and prices.

Accurate Rates

Table rate shipping allows store owners to set up shipping rates that are more accurate and reflective of the actual cost of shipping. This can help store owners avoid overcharging or undercharging customers for shipping.

Competitive Rates

By using table rate shipping, store owners can offer competitive shipping rates. This can help to attract and retain customers who are looking for the best deals on shipping.

Better Profit Margins

Table rate shipping can help store owners improve their profit margins by allowing them to set shipping rates that accurately reflect the costs of shipping. This also helps store owners avoid losing money on shipping to increase their overall profits.

Automation

Table Rate shipping can be automated using plugins such as “WooCommerce Table Rate Shipping” this plugin allows store owners to easily set up shipping rates based on weight, destination, and price, without having to manually calculate rates for each order.

How to Set Up Table Rate Shipping

how to set up table rate shipping woocommerce

We recommend using the Table Rate Shipping plugin by WooCommerce. Install and activate the plugin. After that, you can follow the instructions in this documentation to set up your table rates.

It’s important to test your table rate shipping settings before making them live on your store. This will help you to ensure that the rates you have set up are accurate and reflect the actual cost of shipping.

Printing Shipping Labels

Printing shipping labels is an essential part of fulfilling orders for an e-commerce business. In WooCommerce, there are several options for printing shipping labels.

Use a Shipping Label Plugin

There are many shipping label plugins available for WooCommerce that make the process of printing shipping labels simple and straightforward. Printing shipping labels is already integrated into WooCommerce. Also, most popular carriers will have printing shipping labels integrated into the plugin or you might need to log in to their websites to print your labels.

Automate Printing of Your Shipping Labels

If you ship a large volume of orders, it may be more efficient to use shipping software that will help automate part of your shipping process and this includes printing shipping labels. Shipping software such as ShipStation Shippo and Stamps.com allows you to automate your shipping process You can connect your WooCommerce store to the shipping software and manage all of your shipping needs in one place.

Regardless of which method you choose, it is important to ensure that you have accurate information for the shipping address, weight, and size of the package before printing a shipping label. This will help to prevent any shipping delays or errors.

Customize Your Checkout Form Fields

Sometimes shipping out your products require additional information from your customers that you don’t find implemented in the default WooCommerce checkout fields. In this case, you will want to add some fields to your checkout form.

However, note that adding too many fields in checkout leads to a bad user experience. It can cause users to abandon checkout and just flat-out leave your site. You don’t want this so make sure you only ask for the necessary information.

To edit the WooCommerce Checkout Fields, you can use the Checkout Field Editor plugin.

Or you can use the code snippet below which makes use of the  woocommerce_checkout_fields filter. This code adds a new text field called “Phone Number” to the checkout page but you can easily tweak it based on your needs.

Open your child theme’s functions.php file. 

Add the following code:

add_filter( 'woocommerce_checkout_fields' , 'custom_override_checkout_fields' );

function custom_override_checkout_fields( $fields ) {

    $fields['billing']['billing_phone'] = array(

        'label'     => __('Phone Number', 'woocommerce'),

        'placeholder'   => _x('Phone Number', 'placeholder', 'woocommerce'),

        'required'  => true,

        'class'     => array('form-row-wide'),

        'clear'     => true

    );

    return $fields;

}

add_action('woocommerce_checkout_process', 'custom_validate_checkout_fields');

function custom_validate_checkout_fields() {

    if ( ! $_POST['billing_phone'] )

        wc_add_notice( __( 'Please enter your phone number.' ), 'error' );

}

In this code, billing_phone is the field name that you want to add, you can change it as you wish. The ‘label’ value is the field’s label that will be shown on the checkout page and the ‘placeholder’ value is the placeholder text that will be displayed in the field before a customer inputs their information.

The ‘required’ value is set to true, meaning that the field is required to be filled out by the customer before they can complete the checkout. Set this to false if you do not want it to be a required field.

Save the changes and refresh the checkout page to see the new Phone Number field. 

This also includes validation on the field by using the woocommerce_checkout_process action hook and the add_action function. This checks if the Phone Number field is filled in. If it’s not, the function will add an error notice to the checkout page.

Ecommerce Shipping Best Practices

woocommerce shipping best practices

Shipping is an essential aspect of running an e-commerce store, and it can greatly impact the customer experience. To ensure that your customers receive their orders quickly and efficiently, it’s important to implement best practices for ecommerce shipping.

Offer Free Shipping

One of the most effective ways to increase sales and improve customer satisfaction is to offer free shipping. Customers love free shipping, and it can be a great incentive to make a purchase. Consider offering free shipping on orders above a certain amount or using a free shipping coupon code.

Provide Accurate Shipping Rates

Customers want to know the exact cost of shipping before they make a purchase. Make sure to provide accurate shipping rates based on the weight and dimensions of your products, as well as the shipping destination. Also, be sure to include any additional fees such as handling or packaging costs.

Use Tracking Information

Providing tracking information is a must for e-commerce shipping. Customers want to know when their orders will arrive and where their packages are at all times. Be sure to include tracking information in the shipping confirmation email and make it easy for customers to track their orders on your website.

Offer Multiple Shipping Options

Customers have different needs and preferences when it comes to shipping. Some may want their orders delivered as soon as possible, while others may prefer a more economical option. To meet the needs of all of your customers, consider offering multiple shipping options, such as standard, express, and overnight delivery.

Provide Excellent Customer Service

In the event of a shipping issue, such as a delay or lost package, it’s important to provide excellent customer service. Be sure to respond promptly to customer inquiries and work to resolve any issues as quickly as possible.

By implementing these best practices for ecommerce shipping, you can improve the customer experience, increase sales, and ensure that your customers receive their orders on time and in good condition.

Customizing WooCommerce Transaction Emails

customizing woocommerce transaction emails

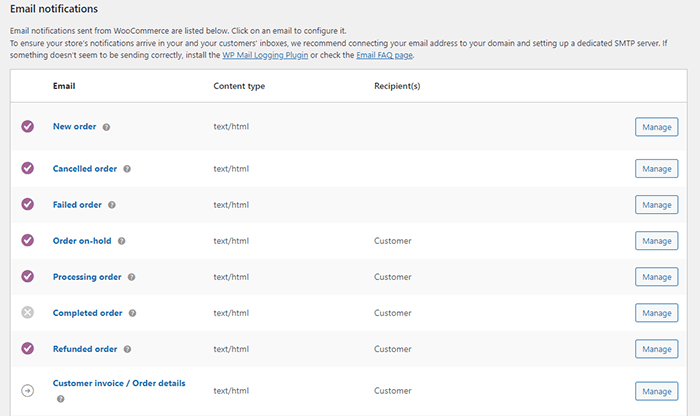
WooCommerce transaction emails are automated emails sent to customers and store administrators when certain events occur, such as when an order is placed, when an order is completed, or when a customer’s account is created. These emails are important for communicating important information to customers and keeping them informed about the status of their orders. Using the default email templates is fine for most use cases. However, it is best if you customize these emails for your specific needs.

Here’s how you can edit the WooCommerce transaction emails:

  1. From your WordPress dashboard, go to WooCommerce > Settings > Emails. This will bring up a list of all the different email templates.
  2. From the list of email templates, select the one you want to edit. 
  3. After selecting the email template, you will be able to edit the email’s subject, heading, and body content. You can also use the “Preview Email” button to see how the email will look when it’s sent.
  4. Customize the email design: You can also customize the design of the emails by editing the HTML and CSS code.
Add Shipping Tracking Code to Your WooCommerce Transaction Emails

You can even add shipping tracking codes to your transaction emails. This is a great way to keep customers informed about the status of their orders as well as provide them with a means to track their package. 

We recommend using the WooCommerce Shipment Tracking plugin. Just follow the steps below to set up the plugin.

  1. Install and activate the plugin.
  2. To add tracking information to orders, go to WooCommerce > Orders and click on the specific order you want to edit. Note: This should be done before an order is marked as completed. 
  3. On the order page, you can find the Shipment Tracking fields in the upper-right-hand section. Just fill in all the required fields and the shipment information should now be added automatically to all emails pertaining to that order.

You can view the detailed documentation for the plugin here.

What to Do When Products Arrive Broken?

You’ve done all you can on your end and delivered your products to your customer but sometimes, parcels can be mishandled and products sometimes arrive broken. When products arrive broken, it can be a frustrating and disappointing experience for both the customer and the seller. However, it’s important to handle these situations in a professional and timely manner to mitigate any negative impact on the customer experience. Here are some steps to take when products arrive broken:

what to do when products arrive broken
  1. Investigate the Damage: As soon as you are notified of a broken product, investigate the damage and ask the customer to take pictures of the broken item. This will help you determine if the damage occurred during shipping or if it was a manufacturing defect.
  2. Contact the Customer: Reach out to the customer as soon as possible and apologize for the inconvenience. Let them know that you will take steps to resolve it.
  3. Refund or Replace: Depending on the cause of the damage, you may need to either refund or replace the broken product. If the damage occurred during shipping, contact the shipping carrier to file a claim. If the product is defective, offer a replacement at no extra cost to the customer. If necessary, you may ask the customer to return the defective product and tell them you will shoulder the cost of returning the item. 
  4. Provide Compensation: In addition to refunding or replacing the broken product, consider offering additional compensation, such as a discount on their next purchase or a gift card. This can help to mitigate any negative impact on the customer experience and show them that you value their business. You not only mitigate bad customer experience; you also create a possible repeat customer.
  5. Improve Your Process: Once the situation is resolved, take the time to review your process and see if there are any ways to improve it. This could include changes to packaging, shipping methods, or product quality control.

By following these steps, you can handle broken products in a professional and timely manner, mitigate any negative impact on the customer experience, and improve your process to prevent similar issues in the future.

Final Words

To sum it all up, configuring shipping options on your WooCommerce store can be a bit daunting. With the right tools, however, it can be a breeze. By following these steps, you can configure your shipping settings and integrate shipping carriers. You can also learn how to set up shipping rates, track and manage your shipments, offer shipping promotions, customize the checkout process, and set up email notifications. 

Remember to test your settings before taking your site live. Don’t hesitate to reach out to us for help if you need it. Happy shipping!


Filed Under: How-To Articles

How to Counter Brute Force Attacks on WordPress

January 15, 2016 By John Leave a Comment

Counter Brute Force

WordPress is one of the most popular Content Management System (CMS) available. Its popularity is the reason why it is highly targeted by attackers. A secure website is a must if you’re operating an online business so you can protect your business and your customers.

In this article, you will learn:

  • What is a brute force attack?
  • How to know if someone is brute forcing into your site
  • How to counter brute force attacks on WordPress
  • What to do when someone succeeds at brute forcing into your website

WordPress does not currently have any built-in feature to stop brute force attacks so you are responsible in preventing them on your own website.

What is a Brute Force Attack?

Brute Force Fist

Brute force attack or brute forcing is one of the leading causes of website compromises and is similar to a trial and error method. The objective of the attacker is to gain access to the server level of your site by using various username and password combinations repeatedly until it succeeds. Not only that, it can also be utilized to find hidden pages and content in a web application.

Brute Force Attack is, simply put, an attack to the weakest link in a website’s security. Sucuri, a security company focusing on spotting and repairing compromised websites, reports at least 770,000 brute force attacks every hour. Your website is vulnerable to this type of hacking if you require user authentication or login access.

There are endless catastrophic possible events that could happen once an attacker gains access to your site. The access will be exploited and accounts can be locked out, malware or viruses can be injected, important financial transactions can be compromised or blocked, or data can be changed or stolen. All the hard work you have invested in your business could go down the drain in an instant and hurt your virtual presence.

Brute Force Attack Methods

WordPress LoginBrute forcing can be done in different systematic ways. It can be done manually or with automated tools. This can be done in a matter of minutes or years depending on the complexity of your authentication data and process. In most cases, it is done by automated tools that use bots to crawl the web and look for weak preset conditions and weak targets. For WordPress, the common targets are the /wp-admin extensions, /wp-login.php and the XML-RPC.

Brute Force Attacks can be used positively if the goal is to test a website’s security but unfortunately, most of the time, it is used by hackers to crack encrypted data for their own advantage. There is a growing number and improving array of automated tools that can be used for brute force attacks. They are simple to use that even a teenager can use them. These tools determine the length of usernames or passwords and try different possible combinations to gain access. The following are commonly used methods:

Dictionary Attack

The common targets here are administrator accounts. In this method, the attacker will use a database or ‘dictionary’ containing millions of words that are commonly used as a login password. Each one will be tried for authentication. The attacker will succeed once the password is accepted as correct.

These attacks can lock out one account or more and gather more information from the site depending on the error responses. This is actually resource- and time- consuming but this can be done quickly with better computing power. It does not decrypt information. It only cycles through a list of words until it becomes successful.

Hybrid Brute Force Attack

This is similar to the dictionary attack but the attacker may use permutations of words from a password dictionary, your real or site user name, website and company name. It uses a smarter set of rules, such as adding numbers and doubling up some characters or words, to intelligently guess passwords. An attack can occur and succeed quicker if more information is available to the attacker.

Reverse Brute Force Attack

This is less common but your website is vulnerable to this if your site users use weak passwords. In this method, the attacker will try to use one password and try to match it against many user names.

How Do You Know if Someone is Brute Forcing into Your Site?

brute-force-maskThe tough reality is Brute Force attacks can be the same as DDoS (Distributed Denial of Service) or DoS (Denial of Service) attacks. You can differentiate them by the intent. DDoS/DoS is after disruption of service while Brute Forcing is after gaining access. DDoS/DoS however can be a byproduct of Brute Forcing as the access attempts can overload your servers. Some attacks are easy to detect but some are harder to detect because they use different open proxy servers.

Careful observation and monitoring is necessary to detect Brute Force Attacks. Be on the lookout for irregularities and malicious activities in your site. To help you out, these are the most common ones experienced by victims of brute forcing:

  • Numerous failed logins coming from the same IP address
  • Multiple usernames used to login from the same IP address
  • Continuous login for one username from various IP addresses
  • Logins with suspicious usernames and passwords
  • Overloaded server memory that results from excessive bandwidth consumption from a single use
  • Performance problems
  • Weird links
  • Notice from the webserver of attacks and an unusually large amount of data being used in a short period of time
  • Website redirects to a different page or website
  • Unwanted popups and ads are all over their site
  • Malware or virus
  • Spam emails or comments
  • Help desk flooded by complaints of locked out accounts.

How to Avoid Brute Force Attacks

A Brute Force Attack can be minimized, if not avoided, as long as you follow these steps.

Keep Everything Updated

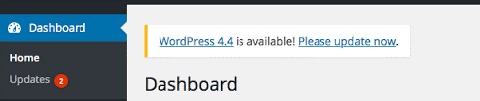
WordPress themes and other plugins update their version to keep them safe from vulnerabilities and to fix bugs. Updating can be tedious but this will help protect your site from known exploits. Just make sure that you keep a backup before doing updates. Be on the lookout for updates in your WordPress Dashboard for the following:

  • WordPress Version
  • WordPress Theme
  • WordPress Plugins

dashboard-update-message

Use Strong Passwords and Change Them Regularly

The best way to protect your site is to use strong passwords and avoid keeping the same password for a long time. If your site allows numerous login accounts, it is best to make sure that all your users follow these basic rules in making strong passwords:

  • Keep your passwords long. Use a minimum of 8 characters.
  • Keep it complex. Do not use dictionary words.
  • Keep it mixed. Use a combination of numbers, upper- and lower-case alphabets and non-alphanumeric characters.
  • Check if your password is a common password.

Avoid Common Usernames

sucuri-common-usernames-1
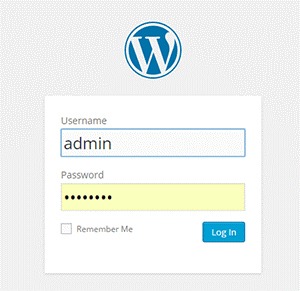
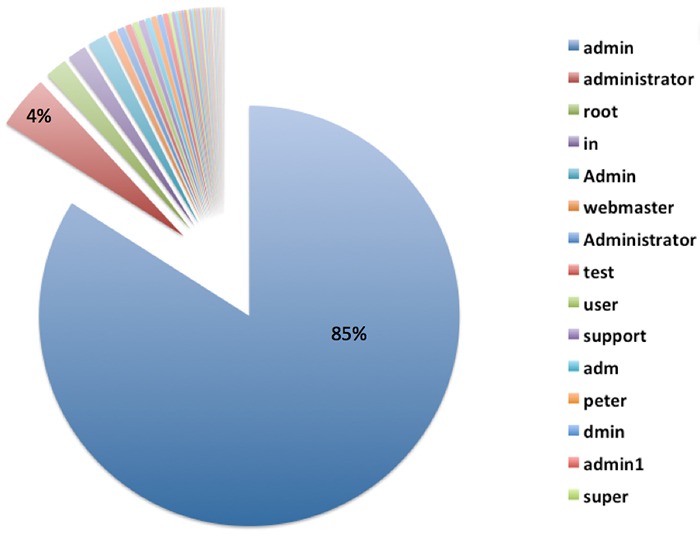
“admin” is the most used username for Brute Force attacks. Image Source: https://blog.sucuri.net/2014/03/understanding-denial-of-service-and-brute-force-attacks-wordpress-joomla-drupal-vbulletin.html

This is very important especially for administrator accounts. Do not use the default username ‘admin’ or any similar usernames containing the same word. Doing so will significantly increase the likelihood of your site being attacked by malicious users.

Use Two-Way Authentication for Administrator Accounts

For extra security, you can activate two-way authentication in your Cpanel or use a plugin such as miniOrange’s Two-Factor Authentication (Google Authenticator). The con to this, however, is you would need to have your phone with you all the time and your log-in process would take more effort and time from you.

Set Administrator Logins to Certain IP Addresses

If you have the privilege of getting a static IP address, this is a great added security option. You can actually block all sign in attempts from all other IP addresses by editing your .htaccess file. However, this can be a problem if your network uses dynamic IP addresses that can change over time.

Design Your Site to Not Use Predictable and Data Exposing Behavior for Failed Login Attempts.

If you are tech savvy, this is one option that you can do by changing the error messages that your website shows. For example, an error message that shows ‘bad username or password’ will make the attacker try the next information in their list. Adding progressive delays every failed attempt can also help improve your website’s security. You can also prompt your users to answer a captcha or a secret question after failed attempts. Be wary of using captcha though as it can negatively affect your websites user experience.

Secure Your Site with Tools and Plugins

There are many available tools and plugins that you can use. Some are free and some come with a price. Here are some tools, plugins and features that you should consider to significantly improve your website’s security. They can help you counter brute force attacks on your WordPress site. Before adding a plugin, you need to check if it’s compatible with your theme, other plugins, and WordPress version first. Some of the tools mentioned below may overlap with other ones in the list.

Security Scanner

There are so many security scanner plugins available for WordPress and most of them also include various tools that improve your website’s security. Top plugins that you can check out are:

  • Wordfence Security
  • VaultPress
  • iThemes Security
  • All In One WP Security & Firewall
  • Sucuri Security
  • Theme Authenticity Checker

Login attempt limit, blocks, and delay

There are plugins that can limit the rate of login attempts and block IP addresses temporarily to protect your site from brute force attacks such as WP Limit Login Attempts. You can also be on the lookout by tracking IP, usernames, passwords and adding idle timeout in your login with Login Security Solution.

Hide Login Page and Data

Attackers would normally target your /wp-login.php or /wp-admin. To hide your login page, you can use WPS Hide Login plugin.

Strong Passwords

brute-force-login

WordPress already generates a strong password for new users but if you are not a new user, you might want to create a very strong password by using a mix of upper case and lower case letters, numbers and symbols.

One way of creating a strong password that is easy to remember is to think of a sentence. For example: “The quick brown fox jumped over the lazy dog.” Take the first letter of every word and you will get “TQBFJOTLD”. Convert some letters to numbers or symbols and you can get “7Q3FJ0T1D” and then vary the remaining letters to upper case and lower case. Your strong password could be “7q3Fj0T1d”. Whenever you want to type your password, just recall the sentence that you used to generate your password.

Cloud/Proxy Services

You can use the aid of cloud or proxy services to help mitigate attacks all over the web as these block the IPs before they even reach your server. Cloudflare and Sucuri CloudProxy are notable services to check out.

What if Someone Already Got into My Site?

Brute Force Unlocked

Don’t Do Anything Rash

The worst mistake you can do is to delete things without backing up data first or cause further problems by troubleshooting. If your site has been compromised, the best option is to seek professional help.

Keep Calm and Regain Control of Your Site

Keep Calm and Chill

Take a step back and calm yourself down. You can still recover from this miserable event. Try to regain admin access of your site. If your password was changed, you can simply get access again by using the ‘forgot password’ option. If this has failed, get in touch with your hosting provider.

Change All Your Backend Passwords

This is an important step that you should do when you regain access to your hacked website. Make sure that you use a strong password so you can avoid further damage being done to your website.

Identify the Damage Done

Once you’ve gotten access to your site, scan your website with online malware scanners like Sucuri’s or with Google’s Safe Browsing. You can do the latter by typing this in your url: google.com/safebrowsing/diagnostic?site=yoursiteaddresshere.com

Check with Your Hosting Company

Some hosting services provide technical support for issues like this. Getting professional help is still recommended.

Restore from Backup

If you keep regular backups, you can restore your most recent backup just make sure the backup that you chose was from before your site was compromised.

Check and Change User Permissions

Checking user permissions, especially if there are many accounts that can access administrator settings, should be done to further prevent other users’ access while you’re cleaning up.

Close Hacker Backdoors

Secure your wp-config.php file and close all the backdoors that the hacker may have left. You will need professional help for this.

Change Your Passwords Again

Yes, again. The hacker may have gotten wind of your new password through a malware so change your password again when you are done cleaning up.

Have Your Site and IP Address Whitelisted

Once you have finished cleaning your site up, find out where you have been blacklisted. You may still be marked as spam by some online services like Unmask Parasites.

Summary

Your e-commerce website being compromised is one of the worst experiences an entrepreneur can go through. So planning ahead and hardening your websites security should never be taken lightly. The adage “An ounce of prevention is better than a pound of cure” rings true. If you did the hardening methods we have shown in this article, give yourself a pat on the back. If you are here because your website was compromised, get professional help as soon as possible.

Filed Under: How-To Articles Tagged With: brute force, CloudFlare, how-to, redirection, security, sucuri, website maintenance, WordPress

How to Create an Awesome About Us Page for your WooCommerce Store

March 3, 2016 By John Leave a Comment

awesome about us page main-imageYour e-commerce site is the face of your company and your brand on the web. Your “About Us” page tells your visitors who you are and what you do. In this post, we will teach you how to create an awesome About Us page.


What is an About Us Page?

The About Us page introduces your brand to your visitors. More people check a website’s About Us page before making online purchases.

About Us Page Statistics

According to the NN Group, while most websites do have an About Us page, these websites often do a poor job of presenting their About pages. They also found that there are more people who couldn’t find information about a company or organization. Factual information from these websites was replaced by out of place marketing. As a result, the subjective satisfaction of website users decreased from 5.2 to 4.6, on a 1-7 scale.

Importance of an About Us Page

Increased Trust Rating

People who shop online check for proof that the company they are buying from is legit. Showing your website’s legitimacy boosts your credibility. This just shows that consumers are very wary of where they spend their money. The About Us page helps you show consumers that you are worthy of their trust, money, and time.

Increased Conversion

In another study, consumers spent five times more when shops tweaked their About Us page. They even spent 22.5% more, on average. These figures may rise depending on how good your About Us page is. Increase your profit by connecting with your visitors on a more personal level.

about-us-boost-conversion

SEO Opportunity

The SEO opportunity in About Us pages is no rocket science. This page can just contain more keywords related to your niche than other pages in your website. It’s a good idea to fit niche-related keywords all over the page, just don’t over-optimize.

Increased Engagement

Adding important internal links, other media and links to social media pages can help increase engagement. You can also add a contact form to serve as a lead generation tool to gather emails.

What Info Should I Put on My About Us Page?

Before creating an About Us page, here are a couple of things you need to do.

First, identify your audience or target market. Better yet, create a customer persona. Use this knowledge to customize the content on your page and reach out to that audience. Stay away from the typical general corporate-speak. Rather, use a personal but professional tone and feel.

Second, provide key context. The About Us page should show what your customers want to know about you. Every element, from text to multimedia, should be a part of your story. Make this page appear ‘human’. Customers enjoy getting a sense of the company behind a product and website.

How to Structure Your About Us page

Teaser or Tagline

This is a brief phrase or statement that summarizes your organization. Copyblogger was witty enough with their power statement. What is your company about in a nutshell?

about-sample-copyblogger

The Round-Up

This section usually contains a paragraph or two. It features your company information, vision, goals and main accomplishments. Be careful not to overdo this by using empty superlatives. The goal here is to provide information and not to gloat.

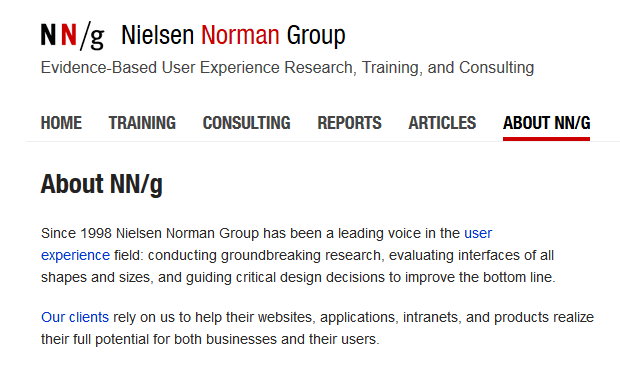
about-sample-nng
A straightforward About Us page example from the Nielsen Norman Group.

Quick Facts

Add some quick facts on your About Us page. This can come in different forms. You can add information about your team, history, performance, or your office culture. Stay with the facts and let your customers be the judge. Get creative by using different multimedia or graphic elements. Just remember that whatever you put should be accurate and verifiable.

about-sample-abbvie
Easy on the eyes information from AbbVie.

about-sample-woothemes
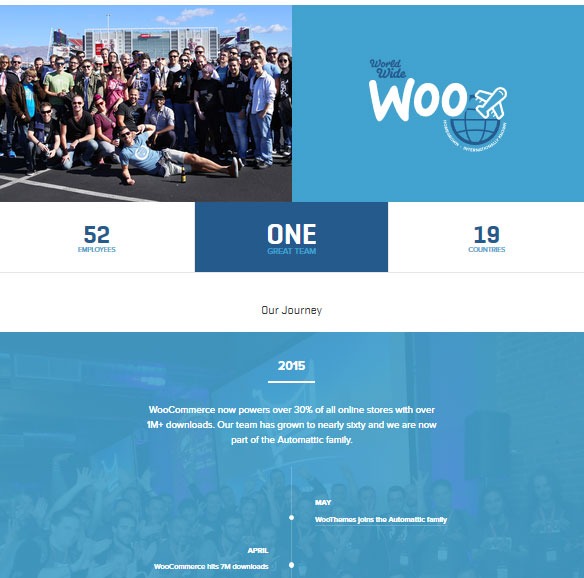
Simple but informative layout from Woothemes.

Outsider’s Perspective

If you have industry awards, reviews and testimonials, let them be known in your About Us page. If you have a lot, you can add some highlights in the About Us page and link to a sub-page where the rest of the info is placed.

about-sample-blue-fountain-media-awards

Engagement

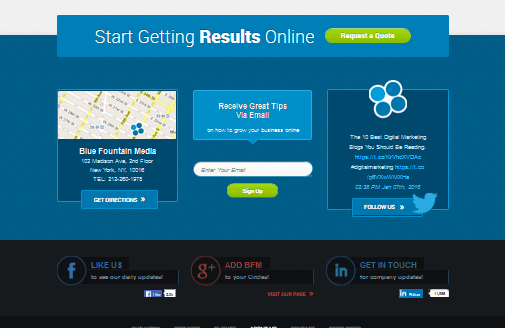
This is an avenue for interaction. Add elements like a contact form, social media buttons, and calls-to-action.

about-sample-blue-fountain-media-2

Introduce Your Team

Adding information about the people behind your company will boost your credibility. Take time to post photos or some quick information about your team. The National Center for Biotechnology Information found that photos inflate subjective feelings of truth.

How to Create an Awesome About Us Page

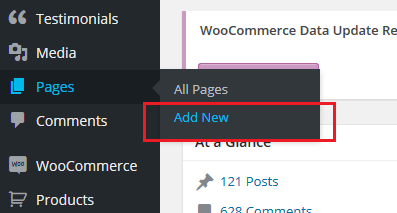
You can create your About Us page just as you would any other page. Some WordPress themes have a built-in special About Us page template. If your theme does not have that, you can create a simple About Us page by going to Pages and clicking on Add new. Add your content and then click on Publish to save your page.

about-us-add-new-page

Add content to your About Us page as you would to any other kind of page.

about us create page add content
Name your page “About”, “About Us” or “About ”. Use the same for the permalink.

about us create page

How to Add Your About Us Page to Navigation Menu

Once you’re done saving your page, you need to add it to your navigation menu. Go to Appearance > Menus.

To display your About Us page in your menu navigation, select About Us page in the list of pages. After that, click Add to Menu. Drag it to desired position. Click on ‘Save Menu’ when you’re done.

Plugins that Can Help Create an About Us Page

Plugins are your go-to solution if you don’t know how to code. Here’s a list of plugins that you can use to create an awesome About Us page.
Powr About Us

powr-about-us-pluginPowr About Us is a plugin with free and premium versions. The free version lets you create profiles for your company and employees. It has the features from the premium version, but it shows the plugin’s watermark logo and has limited support. The premium version has premium support, analytics, no access limits and no watermark logo. Once installed and activated, you will see a plug icon integrated in your Pages editor. It’s a drop down menu that lets you add shortcodes in the content area. This will help you create a professional About Us page. Once added, you will be able to edit them on the front end of your site.

Page Builder by SiteOrigin

page-builder-site-origin-pluginPage Builder by SiteOrigin is a free drag and drop page builder. It adds a ‘Page Builder’ tab in the Pages editor after installation and activation. This plugin has a lot of options that you can use to create an About Us page. It allows customization of page dimensions, layouts, and adding different elements to the page. For more advanced users, you can also use CSS to further tweak the look of your page. The plugin allows for creating some very unique About Us pages.

Team

team-about-us-pluginThe Team plugin by ParaThemes will help you build a responsive grid team profiles in WordPress. It uses pure HTML & CSS3 and is easy to customize. It lets you create profiles that include descriptions and links to social media profiles. The free version gives you enough customizations with unlimited team members. If you are not satisfied with the free version’s options, you can get their pro version which gives more in-depth custom controls. It has drag and drop, pop-up profiles, and more display options.

In Summary

The About Us page is an essential part of any website as it introduces your company or organization to your audience. For a Woocommerce site, having a good About Us page may result to an increase in the site’s performance. Creating an About Us page is simple and easy but you need to build it with your users in mind. You may also enlist the help of a plugin to help you create one. Do you have any more tips or ideas that you’d like to share regarding About Us? Let us know in the comments.

Filed Under: How-To Articles Tagged With: best practices, conversion optimization, how-to, plugins, WordPress

6 Things That Slow Down Your WooCommerce Site and What You Can Do To Fix It

April 8, 2016 By John Leave a Comment

highway-speed-lightsIf you see that your WooCommerce site visitors are leaving your site not long after they get in, you might want to check if your site is loading fast enough. Slow page loading is one of the primary reasons people leave websites. Studies have shown that a 1-second delay in page response can result in a 7% reduction in conversions. Even Google admitted they hate slow-loading sites and penalize the ranking of slow websites. In this article, we will get into the factors that cause your site to slow down and how you can fix them.

Unoptimized Images

camera-lensIt is critical for WooCommerce sites to have optimized images, specifically product images. The sheer number of product images and alternate images can significantly affect a WooCommerce site’s page speed. You might want to aim for a file size not larger than 100kb. But this is just a rule of thumb. Full-width images are of course an exception. Also always try to use appropriate sizes. For optimum speed, the images should not exceed the size of the placeholder. Lastly, try to adjust the quality of the image. It doesn’t mean you compromise image quality. There are ways to reduce image file size without affecting image quality. You can optimize the image by adjusting some settings and removing some color palettes that are not observable by the naked eye.

We suggest a plugin called WPSmush.it. This is a plugin that automatically optimizes the image as you upload your images through the WordPress Media Library. Still, it is important that you optimize your images before uploading them. Learn more about pre-upload adjustments in our post about image optimizations.

Serving Content without Caching

Content caching is basically preprocessing the files and storing them as static content instead of asking the server for the contents upon each client’s request. The static content can be stored either from an intermediary nearby server (server-side caching) or from the client’s web browser (client-side caching). This practice reduces page load time significantly because it reduces server load and the content is served from a closer location. Caching can improve your website speed by up to 300%. If you are looking for a caching plugin, we can recommend WP Super Cache.

Having Too Many Plugins Installed

run-track-and-fieldPage size is not the only thing that has a direct impact on your page load time. The total number of HTTP requests is a major factor as well. Every image, JavaScript file, CSS file, and jQuery file adds up to more HTTP requests.

This is why having too many plugins installed on your WooCommerce site is not advisable. The same goes for having a theme with a lot of bundled plugins. Plugins can have their own stylesheets and scripts and these add to total the number of requests. Of course, it depends on the plugin. Some plugins have efficient code, but others can have issues with poorly coded PHP scripts. A poorly coded plugin needs a longer server processing time before it completes a calculation. That’s why it is important to only use plugins that you really need. Avoid plugins with too many features that you don’t really need.

Not Minifying Scripts and Stylesheets

Even if you already uninstalled unused plugins, chances are you will still have a couple of individual stylesheets and scripts queued for request. Minifying is a technique made to handle this issue. What it does is combine stylesheets and scripts. So instead of 5-7 stylesheets and 9-12 scripts, you will end with a single file for each type. After combining, it will further compress the files and serve them with gzip compression. This technique reduces the number of requests and page size significantly. Don’t worry about the technicalities of minifying though. W3 Total Cache has Minify together with the caching service.

Plenty of Externally Hosted Content

binary-treeAnother culprit in slowing down a site is having externally hosted content. They can look harmless at first but without moderation, your site will get bogged down by these contents. Your site will only be as fast as your external host server. It is not limited to external videos, audio, and images. External content can also be stylesheets and scripts. One common culprit is the overuse of Google Fonts, so as much as possible try to only use at most 2 font families from Google fonts.


Server Load

Server overload is a common problem, especially for site owners that use shared servers. Shared servers don’t cost that much but they have their limits. Most of these servers can’t handle huge amounts of traffic. One solution is to invest in a pricier dedicated server. Another one is to use a Content Delivery Network (CDN) service. CDN is a system of distributed servers. Basically, you can apply to use a CDN service and they will store your cached site in their server systems across the globe. You can use the W3 Total Cache plugin to easily set up a CDN for your WooCommerce store.

Conclusion

It is important to invest in speed optimization to maintain a good user experience across your WooCommerce store and if you want to keep your SEO rankings. To test your WooCommerce store’s speed, you can use Pingdom’s site speed test or Google’s page speed tool. If your site takes more than 2 seconds to load, you have to make some adjustments. Hopefully, the pointers above will help you achieve an acceptable page load speed.

Was this article helpful? Do you know of any tips to help improve a WooCommerce store’s page load speed? Let us know in the comments.

Filed Under: How-To Articles Tagged With: best practices, caching, CDN, how-to, minification, page speed, site speed optimization, W3 Total Cache, website development, WooCommerce

How to Build an Ecommerce Roadmap in Under 3 Hours for a ROI of $1000’s

February 16, 2016 By John 1 Comment

Ecommerce-Roadmap-in-Under-3-Hours-for-a-ROI-of-$1000’s

Objective of the Blueprint

My goal for this post is to educate retailers, on exactly what they need to have as the foundation of their website, to build a strong digital strategy on successful online store on top of.

This is an action document. Every philosophy is followed by a list of action steps.

There is nothing new here, we have merely taken the best advice from top web design firms and condensed it into an actionable post. If you were to spend 20k plus at a prestigious web agency these are the sort of questions they would address in the pre-contract and kick-off phase of the project.

Invest Just 3 Hours for a ROI of $1000’s

time-invest-roiI recognize the opportunity cost of your time and I wholeheartedly believe in delegating as much as possible. But this 3 hours is not one of those times, the reality is it will take someone else much longer than you to do this because the information is already in your head. If you can allocate just a few hours of your time you will end up with a website brief worth 1000’s of dollars.

You will be able to take this brief to a number of web agencies and be a highly sought after client. The biggest challenge web agencies have is a client not providing them with the information they need to do their job. If you present this finished document to them they will love you and you will likely get a much better rate.

Some of these questions may feel repetitive or as though you have answered them 100 times before. Trust this process in the knowledge that all high end web design firms insist on this type of documentation, known as the “Discovery Phase”, and build $2000 plus into the project price to extract this information out of their clients.

If you have a business or marketing plan and some of these questions may have already been addressed, by all means use that as a reference. The critical thing is that you have all the information in your “Website Blueprint”.

Your Business Objectives

Whats-Your-StoryThe very start of the website blueprint is to identify why you have or want a website in the first place. Your website should be the core of your marketing, not a separate entity. As such, your website objectives need to be the core of your business objectives.

I’m going to throw you in the deep end and run a list of questions that in time you should be able to answer. Don’t worry, these questions are not designed to be answered right now. They are just meant to get your thinking going.

  • What specific reasons do you have for owning a website?
  • Are you not really sure, but see everyone else has one and don’t want to miss out?
  • What would life look like if you didn’t have a website?
  • What % of income is generated from the site?
  • What % of leads is generated from the site?
  • If improvements were made to your website what increase in these percentages could you expect?
  • What does a successful website look like to you?

Now list the top three business objectives of your website. Here are some examples.

  • Be found on Google.
  • Sell Products.
  • Actively generate leads.
  • Pre-qualify clients.
  • Show we are an authority in our particular niche/segment.
  • Resource to describe the services you offer.

Branding

BrandingYou probably already have some sort of visual branding such as a logo with a color scheme and brand or trading name. It will be a wise investment to spend 30 minutes looking at these and assessing if they still fit the business objectives you are trying to achieve.


Grab some of your marketing assets, e.g. print brochure, letter head, business cards, existing website, and have these in front of you while you go through the rest of this section.

Who are you? What do you do? Who do you do it for?

When a customer visits your website for the first time, you have only a few seconds to answer these questions. The words you use are only one way to address this, There are a lot more subtle cues such as the color, images and font type you use.

  • Who are you?
  • What do you do?
  • Who do you do it for?

Before answering the above questions I want to take you through an exercise.

Answering these questions below first will assist in uncovering the personality of your brand. They may feel a bit weird, but try and see it through.

  • If your website was a car, what make and model would it be?
  • If your website was a cookie, what sort of cookie would it be?
  • 10 – 20 Words that describe the business.

On a scale of 1-5, 5 being my business is most like this word, rank the following words.

Thats-my-Business

  • Feminine
  • Masculine
  • Young
  • Mature
  • Luxury
  • Economical
  • Modern
  • Classic
  • Playful
  • Serious
  • Loud
  • Quiet
  • Simple
  • Complex
  • Subtle
  • Obvious

Target Audience for the Website

If you could have 10 new customers today, but they all had to be a clone of one of your existing customers, who would the existing customer be?

The best way to find that existing client is to identify who is the most profitable, gives you the least amount of grief, is a joy to work with, refers you to new business, pays on time and who you would genuinely like to have more of.

Describe your ideal client. *Some things to consider.

  • Your-Ideal-CustomerInvolved in what industry/business
  • Title
  • Income bracket
  • Education level
  • Lifestyle
  • Social circle
  • Recreation activities
  • Type of car they drive

Now you can answer:

  • Who are you?
  • What do you do?
  • Who do you do it for?

Positioning

The main thing about positioning is you have to take a position. If you try and be all things to all people you will be nothing to everyone. Here are some different ways to position yourself.

  • Industry Segment.
  • Geographic. Position yourself as the local expert.
  • Price. Expensive or budget.
  • Process. Demonstrate your process is better and more organised.
  • Customer service.

The previous exercises will help. Now you know who you are and who you want to serve, it’s now time to present yourself exactly as you want to be seen.

  • What is your niche, specialty, or position in the market?
  • What makes you different from your competitors?
  • What are your strengths that can give you a competitive edge?
  • What is your Unique Selling Proposition (USP)?

Now you are ready to create a positioning statement. Fill in the blanks below:

A [Your Company] client is someone who wants […………………………….] and recognizes our specialized focus in […………………………].

Content Audit

You now need to do an audit of what assets you have that will affirm your position in the market. These include:

businessman-write-laptop

  • Images
  • Videos
  • Articles
  • Interviews
  • Tutorials
  • Whitepapers
  • Case Studies
  • Portfolios
  • Testimonials

If they are already on your existing website, that’s great. The questions then are. “What is there?” and “Are they being used as effectively as possible?”

Eventually every piece of content on your site will need to be reviewed and updated as necessary. But for the moment, just taking stock will do. At a glance you will be able to:

  • See what assets you have
  • Rate their quality
  • Rate their relevance to your position in the Market.
  • See what areas you will need to increase your investment

Call to Action

Now you have identified what assets you have and what you need. Go back to your list of three business objectives for your website and spend a minute to review them and see if they are still relevant now that you have refined your position in the market.

Now with these objectives in mind what are the top three actions you want users to take when they visit your site?customer_shopping-cart

Here are some ideas:

  • Buy a product
  • Phone you
  • Browse your services
  • Fill out the contact/quote request form
  • Look at your portfolio
  • Give you their email address
  • Like your Facebook page

These top three actions need to be the most prevalent items on the main pages of your site visitors are coming to. You can find out which pages on your site visitors are landing on from Google Analytics.

Fulfilling Website User Needs

Users come to your site with specific tasks in mind. You need to identify what these are and then present them with choices that fulfill their needs at the same time as meeting your own business objectives.

  • Why would people visit your website?
  • What tasks do they want to complete when they are at your website?

There are a number of core functionalities most web users expect when they go to a web site, these are:

  • Contact
  • Services/Products Offered
  • About Us
  • FAQ

Contact Page

contact-us_small-iconsYour contact page is the page your customer sees after they have made a significant mental shift in their decision making process. The moment they click on the contact page they become more invested in you and your brand.

The way you approach this will depend on the personality of your brand and the services you offer. Here are a few options.

Serious. Just the facts.

Let people know where they are on the page with a “Contact Us” heading. Followed by; address, phone number, email, and trading/office hours (if applicable).

A map, either an embedded map or just a link to your address on Google maps.

Simple Contact Form including fields for:

  • Name
  • Email
  • Phone
  • Postal Address
  • Inquiries

Prompt the User to Think About Their Purchase.

If the product/service you sell is more involved and has multiple options and additional purchasing criteria, you can encourage your visitors to invest time and energy into getting somewhat emotionally involved about their potential purchase with you. You can add fields like:

  • Type of Project
  • Budget – If you can’t profitably serve projects under a certain amount you can use this as a filtering process by having a drop down and not offering budgets under $X
  • Timeline

If the project requirements are more detailed than a few fields it will be worth considering a separate page titled “quotation request” or “project planner”.

Add Some Personality to the Contact Page.

Add a big background image. This could be a recent project, a photo of the team, or an aerial view of your office.

  • Some fun or cheeky text, e.g. For a good time call …………………
  • Encourage the client to contact you through social media channels.

Products/Services Offered

Your category page, or pages, acts as a quick link for users to see the details of what you do and just as importantly don’t do.

It is important that the home page, portfolio and about page only give snap shots of what you do, so that the user does not get overwhelmed with details, and instead can get a feel of your positioning in under the 3 seconds you have their attention for.

The category page is your opportunity to go into the detail that you have intentionally held back on the home page, portfolio and about pages. Visitors clicking deeper into your site that get to your category and products pages have requested this information, so will spend slightly more time looking at it.

Photographer-Camera_SLRThey still won’t spend as much time as you think, or want, so use of sub-headings and thumbnail images is critical. 90% of people won’t read the body copy. It needs to capture the viewers’ attention in a matter of seconds. This is achieved by allowing the photos to tell the story.

Don’t take the photos on your phone. You at least need a good quality camera and preferably someone that knows what they are doing with it. If you don’t have someone with these skills you should hire a professional photographer.

Is there anyone on the team with a good quality camera that has some training in photography?

FAQ

What are the 5-10 most common questions you get asked? Wouldn’t it be nice not to have to answer these as often? Wouldn’t it be nice for your clients not to have to ask? And what about the ones that are too shy to ask? Could you be missing out on a lead?

It’s a simple and easy process and most web users interested in you will appreciate it.

About Us Page

About-Us_BusinessmanUse this opportunity to go deeper into establishing your position in the market. Review the answers to your questions from the positioning exercise and back this position up here.
This page should be kept reasonably brief and it’s a good opportunity to link to other areas of your site like:

  • Products/Services
  • Case Studies
  • Team member profiles
  • Blog
  • Whitepapers
  • Testimonials

Viewable on All Devices

mobile-devices-tablet-androidIt is estimated that over half of website visitors will be viewing your site first from a mobile device. If your website is not “responsive” to all screen sizes you could be losing important leads before you even begin.

Responsive design is the practice that allows a website’s pages to reformat themselves depending on which device they are being displayed on. This ensures that whatever screen size the user is viewing your website on it will remain user-friendly.

There is no excuse now for small business sites not to be responsive.

Sales Funnel and Lead Capture

People buy from other people they know, like and trust. The object of lead capture is to get your leads into your know-like-trust funnel, and the best way to do that is by giving them incredibly valuable information over time via email. Yes, boring old email.

The Hero’s Journey

Time-for-change_DoorLuke Skywalker was living a simple life as a farmer on the planet Tatooine. He knew there was more opportunity out there in the universe and through a series of events he was called by a message from the princess. At first he resisted, but then his mentor Obi-Wan Kenobi showed up and guided him.

This story structure has been used over and over again. The Matrix is another good example, with Neo and his mentor Morpheus. You can use this story structure to develop your buyer’s journey.

Most of you reading this will have something to sell online in firms with less than a 10-person staff. You have some knowledge of digital marketing and can’t deny you need a strong web presence. There are a number of things you think might benefit your business like:

  • Increase in online sales
  • Blogging
  • Weekly Newsletters
  • Social Media

And generally engaging at a deeper level with your customers via an online strategy.

But how to execute all these moving parts into a cohesive system that does not take all your time or cost the earth is a bit of a quandary. You are resistant to throwing 20-30k to what you don’t understand well enough to monitor, control and be guaranteed a return on your investment.

How am I doing so far?

Wooassist offers a service that is affordable and may solve a lot of your challenges. Instead of selling you our core offer straight away we present this article that guides you through the fundamentals of an online store.

There is nothing here that sounds too farfetched; just some common sense, down to earth advice. And by the time you finish reading this article, you will be much more confident and prepared to outsource some assistance for your online store.

Now Your Buyers Journey

Where Are They Now?

Going back to your ideal client. Where are they now? What problems and challenges are they trying to solve?

Start with the End in Mind.

What do you want them to ultimately do? What do you want to ultimately sell them? Is it a commodity product, a project with X budget or an ongoing maintenance contract?

Bridge the Gap.

It’s your job to guide them from where they are now to where they can be knowledgeable enough in your process and confident enough in your expertise to pay for your service.

Identify the time line from interest to purchase for the niche you are in and then list the information your client needs over this time period to get them to know, like and trust you.

This doesn’t have to be complicated; a simple 2000 word report to get their email address followed up by 5-10 pre-written automated emails could increase your sales by 50%.

You can get into more of these details later. For the moment, all I want you to do is a quick brain storm and come up with 3 potential topics for an eBook or whitepaper.

Ongoing Correspondence

Email-Ongoing-CorrespondenceThe 5-10 pre-written automated emails are called email auto responders. They are not “Buy Now”. Like dating, we are asked in for “coffee” at some stage, but usually not the first date. And it’s always better to be asked than to ask.

The email auto responders add to the value of the report. They prompt your subscriber to think about working with your firm without blatantly stating it.

After 5-10 emails it might be appropriate to offer a gateway product. It’s much easier for a customer to give you $1000 if they have already given you $100 and feel like they got value out of it. And it’s much easier for them to sign a 10k contract if they have gotten value out of $1000.

A gateway product could be a preliminary design, a consultation or an educational product like a series of video tutorials.

What gateway product/s could you offer?

Search Engine Optimization (SEO)

SEO-Search.Engine.OptimizationGoogle’s business model is to return the most relevant search results so people keep using them to search online. Google is very good at correctly assessing the most relevant websites and have hundreds of criteria to determine their rankings.

There is no longer a magic bullet. The answer is to have a well-rounded website built on a best practice code base that offers the content your users are searching for in an interesting and engaging way.

 Search Terms

What terms are your ideal client using when searching for your products or service?

They may not be the same terms that you use.

Make a list of the 5-10 phrases that you think your ideal client will be searching and then play around with creating synonyms, abbreviations, plurals, past tense, present tense, verbs nouns, etc. From one word “Shoe” we can get: shoes, footwear, runners, joggers, walkers and probably many more.

You will not rank for shoe, so it’s keyword “phrases” that we are looking for that will attract your ideal client. E.g. Comfortable walking shoes. The words need to be compared to other variants like comfy trekking footwear.

For the moment we are just looking to brainstorm, down the track you can compare these terms and phrases in Google Trends and the Adwords keyword tool.

To go the extra mile you can do a short-term Adwords campaign for a few hundred dollars testing all these key phrases. The data you get from the Adwords campaign will tell you what are the most commonly searched terms and what terms generate the most engagement on your site. You can measure this by bounce rate, pages visited and time on site.

Help Google Find You

Magnifying-GlassYou can assist Google by basically labelling your content. Everything on your site can be labelled by what’s called meta data. Meta data is not visible to the user, but helps Google web crawlers identify what your site is about. All good website platforms like WordPress have this baked in to make it very easy to add “meta data” to any page, image or link on your site.

On its own, meta data won’t do much to get you in the rankings. It needs to be accompanied with relevant content that backs up what the meta data is saying your site is about. Your content needs to have your keywords in it, plus synonyms and related words. If you are genuinely writing about the topic you want to rank for then this should happen naturally.

Let Google Know you are Relevant and an Authority

Having links to your site from other relevant websites is still the number one way to rank highly in Google. It’s just a lot harder now to game the search results. A few years ago it was possible to create these links yourself and trick Google into thinking you were popular, but Google has made it its mission to recognize “un-natural” links and have been very successful in this. The best way moving forward is to create content so good and useful that people will link to it from their site and will share it with their friends on social media.

For more detailed information check these links.

http://moz.com/beginners-guide-to-seo

http://static.googleusercontent.com/media/www.google.com/en//webmasters/docs/search-engine-optimization-starter-guide.pdf

Noticed I linked to them because they are highly valuable and useful.

The irony is you will rank high in Google when you no longer need to. If you create the great content that Google wants you to, and people are sharing your content, then you will be getting a lot of traffic to your site without the help of Google.

Local Geographic Focus

A lot of companies operate within a geographic boundary. Google Places is a great free service that you can sign up for and will increase your chances of ranking on the first page in the Google Maps section, which is right up the top of the search results.

http://www.google.com/business/

You can also increase your chances of getting ranked in Google places for specific searches for your local area by writing articles that relate your service to the needs and uniqueness of your local area.

Social Media

Social media pages can become gateways to obtaining new clients and maintaining good relationships with your existing clients.

Scrabble_Social-MediaThe most important social networks to consider are:

  • Facebook
  • Twitter
  • LinkedIn
  • Google+

If your business relies heavily on visual media, then the following might also be considered:

  • Instagram
  • Youtube
  • Pinterest

How to Start

Once you have signed up for and created your social media profiles and pages, you can start getting followers or subscribers.

First off, try getting your own social media friends and connections, as well as your existing clients to like and follow your pages.

The next step is to create content that your targeted social media users will be interested in. These could be interesting photos, stories, articles and even recent info in your industry.

If you have created useful and interesting content, your followers will start sharing them with their own networks and this creates a chain reaction of sharing and get more people to see your content. If these people are interested in what your business offers, they will like your page and increase your social media presence.

It is also a good idea to provide links to your social media profiles directly on your website and email signatures.

Building Brand Awareness

Your social media profiles and pages give users an alternative glimpse from your website of what your company is all about. Give your profiles and pages an identity and real human voice that your ideal clients can relate to and who they would want to work with.

With that said, however, do not simply talk tirelessly about yourself. People use social media for connecting with others. They do not want to be simply marketed to.

Building Relationships

Web-tablet-social-mediaThe main purpose of creating a social media presence is to build and nurture relationships with your existing and previous customer base. Your social media profiles and pages can serve as a means for people to contact you and you can and should promptly reply to these inquiries as well.

If you keep your business at the forefront of your customers’ attention in social media, you will be the one they contact when they need to acquire your products and/or services once again.

Best Practices

  • Post content that is relevant to your industry like recent industry news.
  • Post content that interesting or informative to your audience like tips and tricks to home renovation.
  • Follow similar social media pages in your industry.
  • Be a part of the community. Interact, share others’ posts and respond to others’ interactions.
  • Make use of a human voice. Avoid sounding too corporate or salesy.
  • Observe social media etiquette. Your social media identity defines your brand identity.
  • Depending on your audience, post 1-4 short updates daily or 1-2 important announcements every week.

Social Media Tools

To save your time, there are multiple tools, free and paid, that can help automate your social media campaigns.

  • Hootsuite (https://hootsuite.com/)
  • Buffer (https://bufferapp.com/)

Conclusion

Start-Up_PlanningIf this is the first time you have read this, congratulations. Now go through it again and invest just three hours to build a really solid foundation for what is to become your website strategy.

If you have answered the questions, even with your best guesses, then congratulations. You have just developed a really solid platform for building a website strategy and put yourself miles ahead of your competition.

What to do now?

Collate your answers from this blueprint into an “Online Blueprint Document.” The time it takes you will pay dividends many times over.

Regardless of what you sell online there are 101 tasks you can outsource. Whether you choose a full service agency, do it yourself, or something in between like what wooassist.com offers, communication is the key and this doc will get your vision clearly stated and set the foundation for any web developer/designer relationship you have in the future.

Filed Under: How-To Articles Tagged With: best practices, conversion optimization, customer persona, LinkedIn, marketing strategy, social media, Twitter, Wooassist, WordPress, WordPress SEO

  • « Previous Page
  • 1
  • …
  • 4
  • 5
  • 6
  • 7
  • 8
  • …
  • 24
  • Next Page »
Let us support your online store so you can manage your business

Get started today

Get 2 Hours of FREE SUPPORT

We are so confident that you will love our services that we will give you your first 4 hours at a 50% discount

That’s 4 hours for only $75

BUY NOW

Free eBook

5 Things Every Online Store Can Fix On Their Website In The Next Week To Increase Sales

Quick Links

  • How it Works
  • Pricing
  • Blog
  • Contact
  • About Wooassist
  • My Account
  • Checkout
  • Privacy Policy
  • Cookie Policy
  • Terms and Conditions

Wooassist

Australia:
59 Luke St.
Hemmant QLD 4174

Philippines:
San Miguel St.
Poblacion, Iligan City 9200

Connect


Copyright © 2026 · Wooassist

Yours FREE!

5 Things Every Online Store Can Fix On Their Website In The Next Week To Increase Sales