Wooassist

Assistance for Your Woocommerce Store

  • How it Works
  • Pricing
  • Services
    • Site Maintenance
    • AI SEO and Content Marketing
  • Blog
    • How-To Articles
    • Code Snippets
    • SEO For E-Commerce
    • Theme and Plugin Reviews
    • Wooassist News
    • WordPress/WooCommerce News
    • Interviews
  • About Us
  • Contact
You are here: Home / Archives for How-To Articles

How to Add a Custom Note on WooCommerce Checkout

July 1, 2018 By John 8 Comments

How to Add a Custom Note on WooCommerce Checkout

There are times when WooCommerce store owners need to add a custom note on checkout. This can be done by adding some custom code to your site. Read on below to learn how to add a custom note on WooCommerce checkout.

What Situations Would I Need to add a Custom Note on Checkout?

There are several situations when you’ll want to add a custom note on checkout such as:

  • If you are having checkout problems and you want to inform your customers of a workaround to the problem
  • If you want to let your customers know about a coupon code that they can use on checkout
  • If you want to remind your customers about an ongoing promotion so they can add more items to the cart

Adding the Custom Note on WooCommerce Checkout
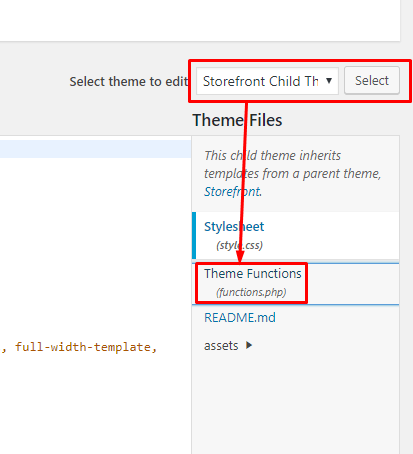
Choose Functions.php

To add the custom note on WooCommerce checkout. You will need to edit your child theme’s functions.php file.

A word of caution before proceeding. The functions.php file is a sensitive file and editing it can cause your site to do down and even lock you out from the WordPress Dashboard. We recommend letting your developer do this. You can also edit the file using an FTP client so you can easily revert any changes in case you mess something up. If you have no developer and need help getting this done, you can contact the Wooassist team to help you out.

To get started, click on Appearance > Editor.
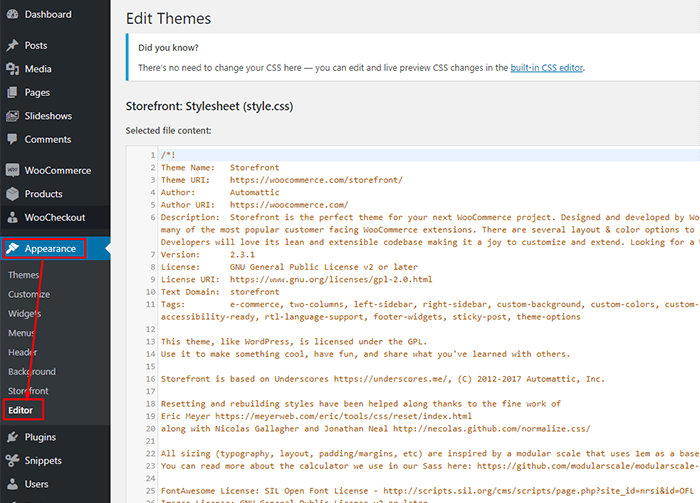
Edit Theme Functions.php

Next, choose the active theme. Make sure you are using a child theme. Click “Select”. If you are using Storefront theme and don’t have a child theme, check out this guide.

Find the “functions.php” and click to open it.

Copy the code below and paste it on the bottom part of the file as shown in the image. Edit the “Add custom note here” text with the custom text that you want to add.

/** Custom Note on Checkout - By WooAssist  **/

add_action('woocommerce_review_order_before_payment','wooassist_custom_note');

function wooassist_custom_note() {

echo 'Add custom note here'; //You put your own note here between the  

}
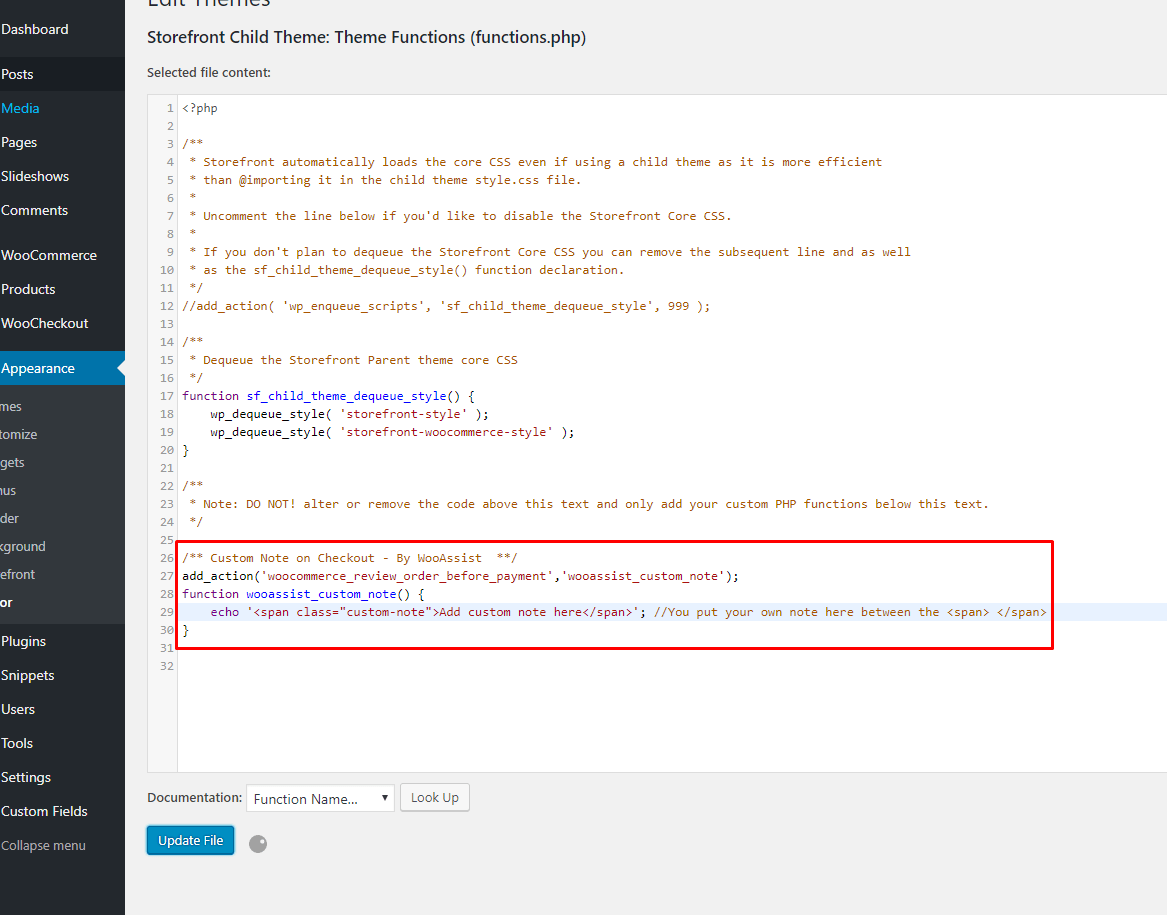
How to Add a Custom Note on WooCommerce Checkout - Insert Code Snippet

CSS Styling

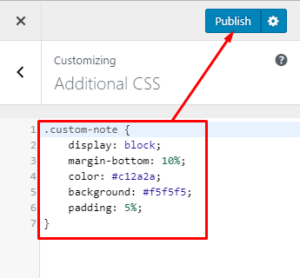
That’s a done deal but you may want add some styling to your custom note it will look professional. Add this CSS code by clicking the Customize link on your WordPress admin bar. Then click on Additional CSS.

You can then copy and paste the CSS code below and hit publish to save.

.custom-note {

display: block;

margin-bottom: 10%;

color: #c12a2a;

background: #f5f5f5;

padding: 5%;

}

Note that you may need to tweak the values in the code depending on your theme.

You can now see the styled custom note section on your WooCommerce store’s checkout.
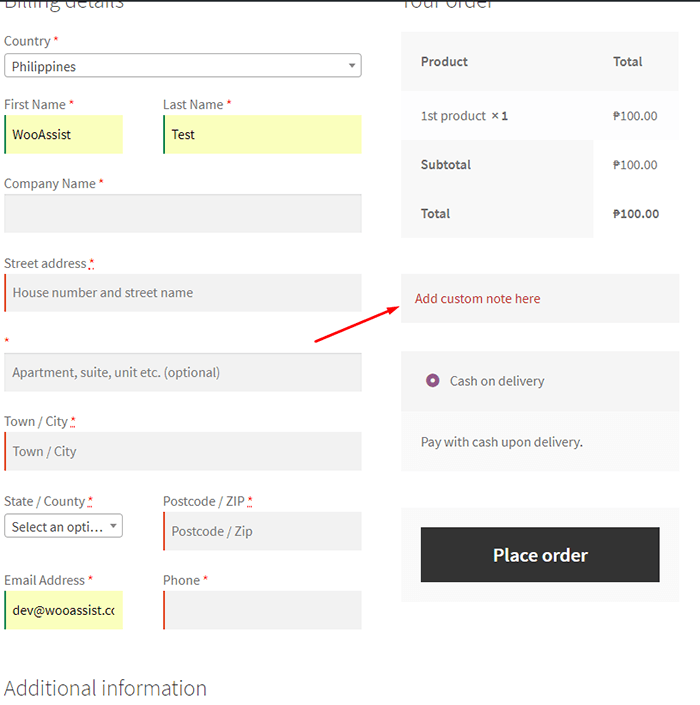
See Custom Note section

Did that work for you? If you have any questions, let us know in the comments.
Filed Under: How-To Articles Tagged With: custom code, WooCommerce, woocommerce checkout

WooCommerce Site Speed Optimization: How to Disable Lazy Loading for Images Above the Fold

September 15, 2023 By John Leave a Comment

Site speed can make or break a WordPress site. This is especially important for WooCommerce stores. Optimizing site speed becomes even more vital considering how site speed affects conversion rates. Maybe you’ve scanned and one of the issues indicated that you should not lazy load images above the fold. But how exactly do you do this? Read on below to learn how to disable lazy loading for images above the fold.

How to Disable Lazy Loading for Images Above the Fold

What is Lazy Loading?

Lazy loading is a performance optimization technique used to defer the loading of images until they are about to come into the user’s view. The term “lazy” refers to the postponement of resource loading until it becomes necessary. When a webpage uses lazy loading, the images and other media below the visible area of the screen are not loaded when the page is initially opened. Instead, they are loaded dynamically as the user scrolls down the page and approaches the point where the media comes into view. By implementing lazy loading, websites can reduce the initial page load time, as only the critical content is loaded immediately, leading to faster loading times, improved site performance, and better user experience.

Why You Should Not Lazy Load Images Above the Fold?

Lazy loading is a performance optimization technique used to defer the loading of non-essential content, such as images or videos, until they are about to come into the user’s view. The term “lazy” refers to the postponement of resource loading until it becomes necessary. When a webpage uses lazy loading, the images and other media below the visible area of the screen are not loaded when the page is initially opened. Instead, they are loaded dynamically as the user scrolls down the page and approaches the point where the media comes into view. By implementing lazy loading, websites can reduce the initial page load time, as only the critical content is loaded immediately, leading to faster loading times, improved site performance, and better user experience.

Site Speed Tests and Lazy Loading

website page load speed

As website owners, we all strive to deliver the best possible user experience to our visitors. Site speed plays a crucial role in this endeavor, and site speed tests, like Google’s PageSpeed Insights or GTmetrix, are valuable tools for identifying areas for improvement. One of the common issues detected during such tests is the recommendation to avoid lazy loading images above the fold. The reason behind this advice is that lazy loading of above-the-fold images can sometimes delay the initial rendering of the visible content, leading to slower loading times and a suboptimal user experience.

Importance of Site Speed for User Experience and SEO

User experience and search engine optimization (SEO) go hand in hand, and site speed is a key factor that influences both. A fast-loading website significantly improves user satisfaction and engagement. On the other hand, a slow-loading website frustrates visitors, leading to higher bounce rates and lower chances of conversions. When it comes to e-commerce, user experience plays a vital role in the conversion rate optimization process. Customers expect a seamless and enjoyable shopping journey, and a slow website can adversely affect their perception of your brand.

Moreover, search engines like Google have openly stated that site speed is one of the factors they consider when ranking websites. Faster-loading sites are more likely to rank higher in search results, leading to increased visibility and organic traffic. Therefore, improving site speed not only benefits your users but also positively impacts your website’s overall SEO strategy.

Enhancing Ecommerce Conversion Rate Optimization

Conversion rate optimization (CRO) is the process of maximizing the percentage of website visitors who complete a desired action, such as making a purchase. In the context of a WooCommerce blog, this desired action is completing a transaction. As mentioned earlier, site speed plays a significant role in user experience, and a faster website can directly impact your ecommerce conversion rates.

When a potential customer visits your WooCommerce blog, you want to provide them with a seamless and efficient shopping experience. Slow-loading pages can lead to cart abandonment and lost sales. By optimizing your site speed and disabling lazy loading for above-the-fold images, you can create a smoother and more pleasant shopping journey for your customers, increasing the likelihood of them completing their purchases and boosting your conversion rates.

Disabling Lazy Loading for Above-the-Fold Images

The provided code snippet presents a simple and effective solution to disable lazy loading for images above the fold.

But before you proceed, some considerations.

Use a Child Theme

It is generally recommended to use a child theme when making changes to your theme’s files. A child theme allows you to customize your site without affecting the parent theme directly. This ensures that your customizations are preserved even when the parent theme receives updates.

If you do not use a child theme, any modifications you make to your theme files will be deleted every time you update your theme.

Backup Your Site

Before making any changes to your website’s theme files, it is essential to create a backup of your site. This provides a safety net in case anything goes wrong during the editing process.

Syntax Errors

When adding code to your theme’s files, be cautious about syntax errors. Even a small mistake can cause your site to malfunction. If you encounter any issues, double-check the code for accuracy or revert to the previous version by restoring the backup.

Step-by-Step Guide to Add the Code Snippet:

Here is the code snippet for disabling lazy load for images above the fold.

function disable_lazy_load_above_fold($content) {
    if (is_admin()) {
        return $content;
    }

    if (strpos($content, 'loading="lazy"') !== false) {
        $pattern = '/<img([^>]+)loading="lazy"([^>]*)>/i';
        $replacement = '<img$1$2>';
        $content = preg_replace($pattern, $replacement, $content);
    }

    return $content;
}
add_filter('the_content', 'disable_lazy_load_above_fold', 9999);

Method 1: Using Theme Editor

If you are using the theme editor, make sure you have FTP logins handy since you can be locked out of your WordPress Dashboard if you make a mistake.

  1. In the WordPress dashboard, locate and click on “Appearance” in the left-hand menu. From the submenu, choose “Theme Editor.” 
  2. You should see a list of files associated with your active theme (preferably a child theme) on the right-hand side. If you make edits to the functions.php file of a theme, all customizations will be removed when you update your theme.
  3. Look for the “functions.php” file. Click on “functions.php” to open it.
  4. Scroll to the end of the file to find an empty line and paste the provided code snippet.
  5. After pasting the code snippet, click on the “Update File” button located at the bottom of the Theme Editor page. This will save the changes and add the provided code to your theme’s “functions.php” file.
  6. Clear your cache (if applicable).

Method 2: Using FTP (File Transfer Protocol)

  1. Use an FTP client like FileZilla to connect to your website’s server. Enter your FTP credentials, including the host, username, password, and port, to establish the connection.
  2. Once connected via FTP, navigate to the “wp-content” folder and then into the “themes” directory. Here, you’ll find a list of folders corresponding to your installed themes. Locate the folder of your currently active theme (preferably a child theme) and open it.
  3. Right-click on the “functions.php” file and select “Download” to save a copy of the file to your computer. 
  4. Open the downloaded “functions.php” file using a text editor (e.g., Notepad++ or Visual Studio Code). Add the provided code snippet at the end of the file.
  5. After adding the code snippet, save the changes to the “functions.php” file. Then, use your FTP client to upload the modified “functions.php” file back to the same location on the server, overwriting the original file.
  6. Clear your cache (if applicable).

Method 3: Using a Custom Snippets Plugin

  1. Install and activate a custom code snippets Plugin like Code Snippets.
  2. Instructions may vary depending on which plugin you are using but the general idea should be the same. So navigate to your custom snippets plugin and add a new code snippet.
  3. Just paste the provided code snippet and add a description (if the option is available).
  4. Activate the code snippet.
  5. Clear your cache.

Using Autoptimize Plugin to Disable Lazy Loading for Images Above the Fold

While the provided code snippet offers a direct and efficient method to disable lazy loading for above-the-fold images, some users might prefer using plugins for easier implementation. If you are already using Autoptimize to speed up your site, you’ll be glad to know it has added a feature that allows disabling lazy loading for above-the-fold images.

Simply navigate to the Autoptimize settings page (Settings > Autoptimize) in your WordPress dashboard. In the “Images” section, check the box that says “Lazy load images”.

After that, set a value for the field “Lazy-load from nth image”. This section disables lazy loading for the value of the images found on the top of the page. In most cases, you just need to set this to 2 assuming you have a site logo and one banner image above the fold. Feel free to change this value depending on your specific needs.

After doing any of these, you can test your site on any of the aforementioned site speed scanners and you should no longer see the option that tells you to disable lazy loading for images above the fold. 

Site Speed Optimization is Crucial for Success

A lightning-fast website is crucial for success. Optimizing site speed is not only beneficial for user experience but also plays a pivotal role in search engine rankings and ecommerce conversion rate optimization. Disabling lazy loading for images above the fold is one of the tactics you can employ to improve site speed and provide a smoother shopping experience to your customers.

The provided code snippet offers a simple yet effective solution for disabling lazy loading on your WooCommerce blog. By removing the ‘loading=”lazy”‘ attribute from above-the-fold images, you can ensure a quicker initial page rendering and enhance user satisfaction. Alternatively, if you prefer using plugins, the Autoptimize plugin provides a user-friendly approach to achieving the same outcome.

They say content is king and that still holds true. Site speed, on the other hand, is the queen. Just as a successful kingdom relies on both a wise king and a capable queen, achieving a strong online presence necessitates not only compelling content but also exceptional site speed. When these elements work together harmoniously, your Google rankings can ascend to royal heights.

Filed Under: How-To Articles

How to Set a Minimum Order Amount for Specific Categories on WooCommerce

August 25, 2023 By John 3 Comments

If you’re running an online store using WooCommerce, you may have specific requirements for minimum order amounts. For instance, you might want to set a minimum order value for a particular category of products. This ensures that customers must meet a certain threshold before they can proceed to checkout. In this blog post, we’ll walk you through a custom code snippet that will guide you on how to set a minimum order amount for specific categories in WooCommerce.

Set a Minimum Order Amount for Specific Categories on WooCommerce

To get started, you’ll need to access your WordPress theme files or use a child theme to add the following code. Open your theme’s functions.php file and paste the code snippet at the end:

/**
 * Set a minimum order amount for checkout (Specific Category)
 */
add_action( 'woocommerce_checkout_process', 'woa_cat_minimum_order_amount' );
add_action( 'woocommerce_before_cart' , 'woa_cat_minimum_order_amount' );
add_action( 'woocommerce_before_checkout_form' , 'woa_cat_minimum_order_amount' );

function woa_cat_minimum_order_amount() {
    $minimum = 200;      // Set this variable to specify a minimum order value for the target category
    $term = 'target_category';  // Set this variable to specify the target category

    // Utility function that counts the specific product category of cart items
    $ctotal = 0; // Initialize cart total
    $count = 0;  // Counter variable

    // Loop through cart items to check each category
    foreach( WC()->cart->get_cart() as $cart_item ) {
        if( has_term( $term, 'product_cat', $cart_item['product_id'] ) ) {
            $count += $cart_item['quantity'];
            $ctotal += $cart_item['line_subtotal'];
        }
    }

    // Function that checks if the total order amount is less than the required order amount for the target category
    if ( ($ctotal < $minimum) && ($count > 0) ) {

        if( is_cart() ) { // If the user is viewing the cart page, display a warning and disable checkout

            wc_print_notice( 
                sprintf( 'Your current order total for the Target Category is %s — you must have an order with a minimum of %s <span class="woocommerce-Price-amount amount">+ freight</span> to place your order.', 
                    wc_price( $ctotal ), 
                    wc_price( $minimum )
                ), 'error' 
            );
            remove_action( 'woocommerce_proceed_to_checkout', 'woocommerce_button_proceed_to_checkout', 20 ); // Blocks the user from checking out

        } else { // Display warning on all other pages

            wc_add_notice( 
                sprintf( 'Your current order total for the Target Category is %s — you must have an order with a minimum of %s <span class="woocommerce-Price-amount amount">+ freight</span> to place your order.', 
                    wc_price( $ctotal ), 
                    wc_price( $minimum )
                ), 'error' 
            );

        }
    }
}

Breaking Down the Code

Let’s break down the code and how you can tweak it to work for your WooCommerce store.
The woa_cat_minimum_order_amount() function is hooked to three WooCommerce actions: woocommerce_checkout_process, woocommerce_before_cart, and woocommerce_before_checkout_form. These actions ensure that the minimum order amount check is performed during the checkout process.


Inside the function, you’ll find two variables that you need to customize:

$minimum: This variable represents the minimum order value you want to set for the target category. You can change the value according to your requirements.

$term: This variable holds the slug of the target category. Replace ‘target_category’ with the actual slug of the category you want to apply the minimum order amount to.

The code then initializes two variables, $ctotal and $count, to keep track of the total order amount and the number of products in the target category, respectively.

The code uses a loop to iterate through each item in the cart and checks if it belongs to the target category using the has_term() function. If it does, the product quantity and line subtotal are added to the respective variables.

After calculating the total order amount and the number of products in the target category, the code checks if the current order amount is less than the specified minimum and if there is at least one product from the target category in the cart.

If the conditions are met, the code displays a warning message to the user. If the user is on the cart page, the warning is shown, and the checkout button is disabled using remove_action(). If the user is on any other page, the warning is displayed without disabling the checkout button.

That’s it! By adding this custom code to your theme’s functions.php file, you can set a minimum order amount for a specific category in WooCommerce. Customers are notified about the minimum order requirement, ensuring that they meet the specified threshold before proceeding to checkout.

Remember to customize the $minimum and $term variables according to your needs. Additionally, if you want to restrict the minimum order requirement to specific user roles, you can uncomment the code block provided and modify it to suit your requirements.

Set a Minimum Order Amount Sitewide for WooCommerce

If you’re looking for a simpler implementation and just want a sitewide minimum order amount for your WooCommerce checkout, you can use the code below which is provided in the WooCommerce documentation.

/**
 * Set a minimum order amount for checkout
 */
add_action( 'woocommerce_checkout_process', 'wc_minimum_order_amount' );
add_action( 'woocommerce_before_cart' , 'wc_minimum_order_amount' );
 
function wc_minimum_order_amount() {
    // Set this variable to specify a minimum order value
    $minimum = 50;

    if ( WC()->cart->total < $minimum ) {

        if( is_cart() ) {

            wc_print_notice( 
                sprintf( 'Your current order total is %s — you must have an order with a minimum of %s to place your order ' , 
                    wc_price( WC()->cart->total ), 
                    wc_price( $minimum )
                ), 'error' 
            );

        } else {

            wc_add_notice( 
                sprintf( 'Your current order total is %s — you must have an order with a minimum of %s to place your order' , 
                    wc_price( WC()->cart->total ), 
                    wc_price( $minimum )
                ), 'error' 
            );

        }
    }
}

In the code snippet, you will notice a line that says $minimum = 50;. Here, you can set the desired minimum order value by replacing 50 with your preferred amount. For example, if you want to set the minimum order value to $100, change the line to $minimum = 100;.

Note: We recommend testing the code on a staging or development site before implementing it on a live site. This allows you to ensure that everything works as expected and doesn’t conflict with any other plugins or customizations you may have on your WooCommerce store.

If you need help implementing this functionality on your WooCommerce store, you can contact us. Our team can help.

Filed Under: Code Snippets, How-To Articles

How to Create a Custom 404 Error Page for Your WooCommerce Store

February 25, 2016 By John Leave a Comment

What is a 404 Error

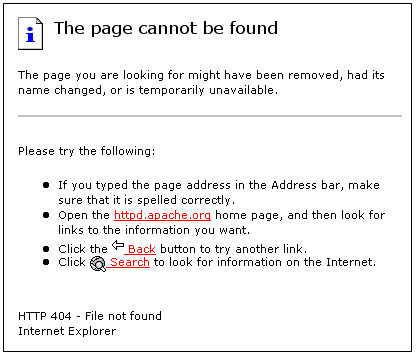
A 404 Error is an error message displayed when an accessed page is not found in the server that you want to access. It is a standard response when an entered address does not match a data from a server.

This happens when you rename, move, or delete a page. This message also appears when the URL is incomplete, mistyped or misspelled. You can change the way your WooCommerce store responds to this error by redirecting or just letting your visitors arrive at a custom 404 Error page.

Creating a Custom 404 Error Page

default-404-error-page_screenshot-pngYou can actually just leave it and most websites would just send out a typical text response. So why create a custom 404 error page for your Woocommerce store? A lot of people are highly visual.


Web design is a huge factor in discerning a company’s credibility. Zabisco found out that 40% will respond to visual information better than plain text. This alludes to the importance of creating a visually-appealing custom 404 error page.

Custom content will not only boost your branding but will make customers have a more positive view of your company. Custom content is one of the many reasons that make a customer feel positive about your website.

Statistics/Case Studies on 404 Error Pages

From a search engine ranking standpoint, 404 error pages will not hurt your ranking per se. It only matters when an important link in your site returns a 404 error. This important link could be your “about” page or “contact” page. Your rankings could suffer since these important pages are actually ranking factors.

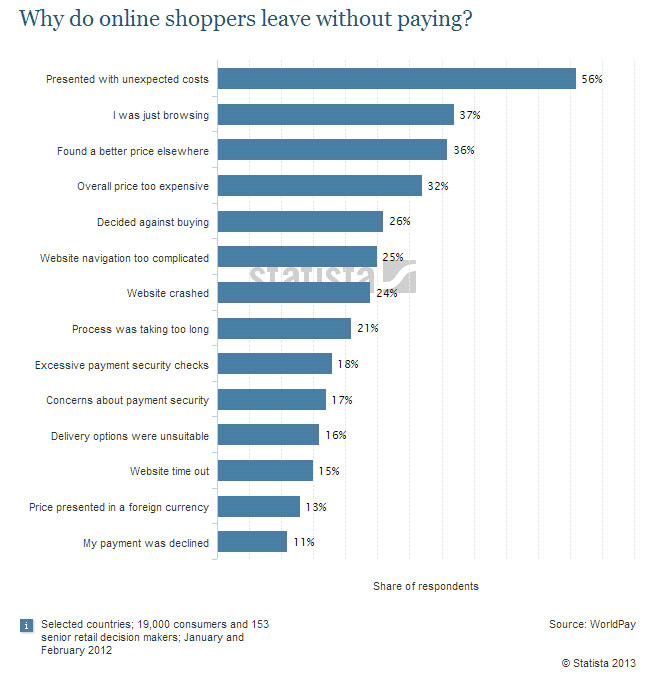
Any other 404 error could also frustrate your visitors and just leave your website. Shopify surveyed why online retailers are losing 67.45% of their sales. They discovered that some of the most common mentioned issues are website problems.

Shopify-survey-why-online-shoppers-leave_screenshot-png

A 404 error also affects a website’s bounce rate. A bounce happens when a visitor comes to your website, does not click on any other page and leaves. Search engines like Google use bounce rate as ranking factor.

A high bounce rate raises several red flags for your WooCommerce store. It may imply poor user experience and your website may be deemed irrelevant to your market.

Elements of a Custom 404 Error Pagelabyrinth

Now before you go and make any changes, keep in mind that each theme is different. There are different ways on how you can create a custom 404 Error page. Here are some important things that you need to consider.

Use Simple Language

A regular site visitor will not understand a typical technical 404 message. Use simple human language to inform your site visitor of what went wrong. You can even use language translations or location specific pages. The goal is to deliver a clear message.

How You Can Help

Apologizing and offering a helpful suggestion should be the main theme. The aim is to change the negative experience from 404 pages into a positive one. You can do this by:

touch-screen_touchscreen

  • Adding a search box
  • Showing your menu navigation
  • Adding a contact, subscription or ticket submission form
  • Adding a sitemap, category lists or key links
  • Linking popular posts or social media accounts
  • Giving out coupons, discounts, or other offers

Time spent in your site should not end in your 404 page. These elements are also engagement and conversion boosters. Your customers stay happy and you get a positive rep.

Examples of Good 404 Error Pages

A lot of huge brands out there appeal to human emotions in their marketing strategy. This is because customers are not buying products, they buy the experience. 404 Error pages in the past are just simple text warnings. Websites now use humor or a bit of personality to communicate their brand to the customers. You can use graphics, animations, or even videos. Here’s some inspiration to get you started.

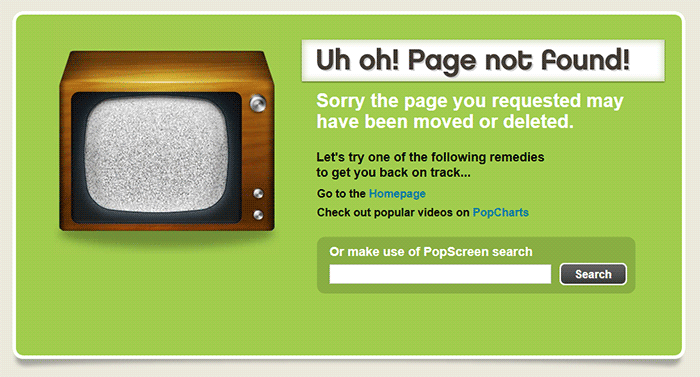
Popscreen

Popscreen showcases a clean and bright but simple and straightforward 404. You can see a link to the home page and popular videos as well as search bar.

404-error-page_Popscreen_screenshot

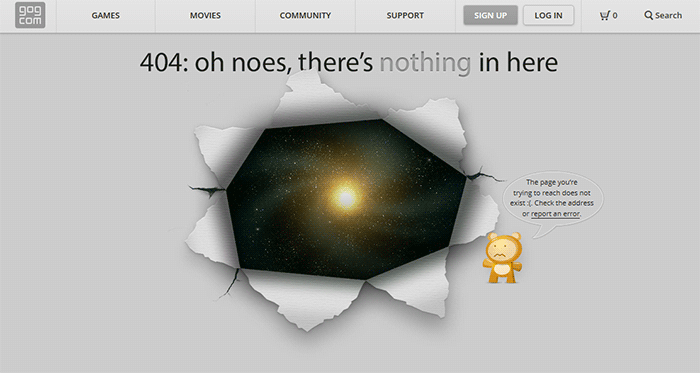
GOG

GOG displays a unique design to say that you lost your way. The 404 error page retains the navigation and footer menu so it is easy for users to navigate. Users can also report the error.

404-error-page_GOG_screenshot

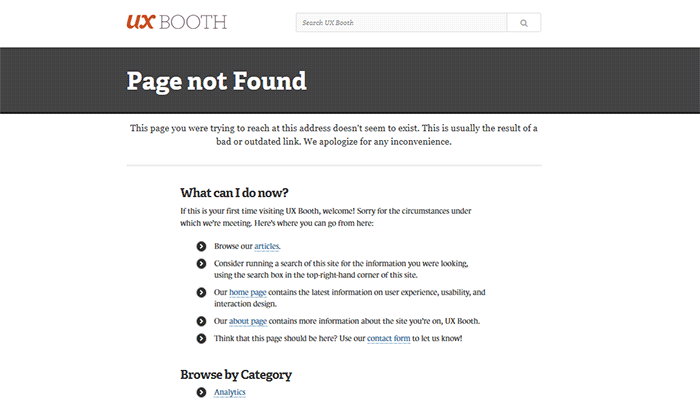
UX Booth

The UX Booth 404 error page uses simple, concise and direct language and an immediate apology. The page suggests popular links on the website as well as the list of categories. It also retains the footer links and the search bar.

404-error-page_UX-Booth_screenshot

Average Joes Blog

Average Joes Blog is a good example of category-rich 404 error page. In fact, the 404 error page is a replica of the home page.

404-error-page_Average-Joes-Blog_screenshot

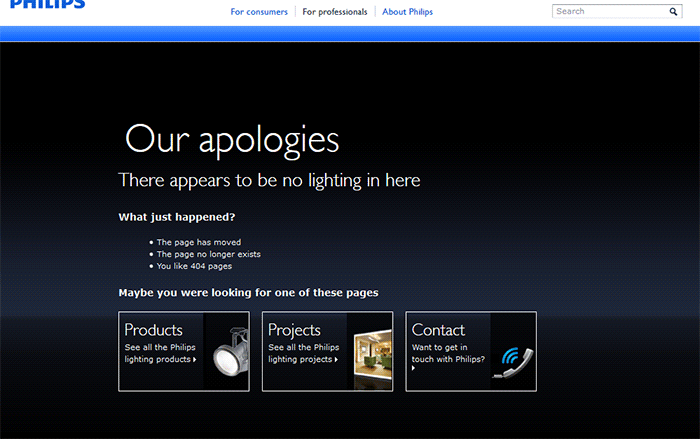
Philips

Philips goes creative and witty with its 404 error page. It mentions the absence of lighting then explains what happened and suggests popular links.

404-error-page_Philips_screenshot

Email Center UK

The Email Center UK website uses humor. Since you are at an error page, it means someone messed up and you get to choose who to fire for the fiasco. Below all that is a simple link to the home page.

404-error-page_Email-Center-UK_screenshot

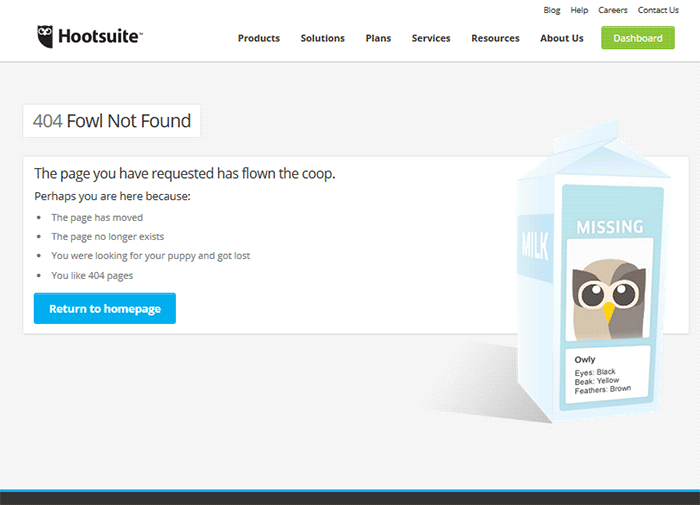
Hootsuite

The Hootsuite 404 error page lists down possible reasons for the error. They used ‘fowl” language to keep the identity of the brand/mascot.

404-error-page_Hootsuite_screenshot

IMDB

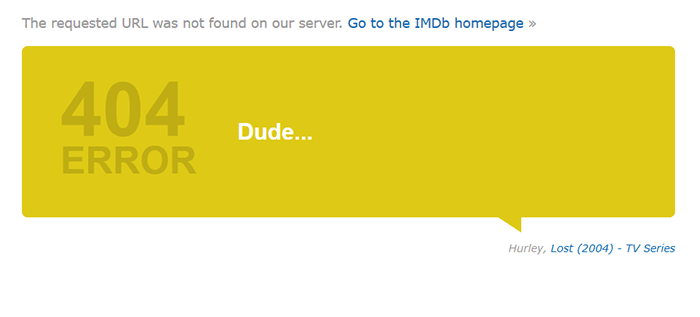
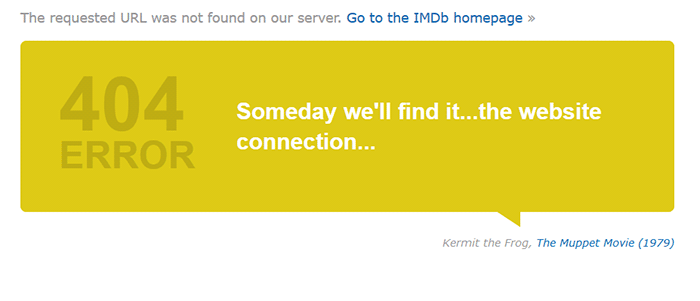
The IMDB 404 error page uses a simple layout with a clever idea. Every visit to a 404 error displays a random movie quote. Movie buffs will definitely find this entertaining. A convenient link to the home page is also positioned at the top.

404-error-page_IMDB_screenshot

404-error-page_IMDB2_screenshot

Blue Fountain Media

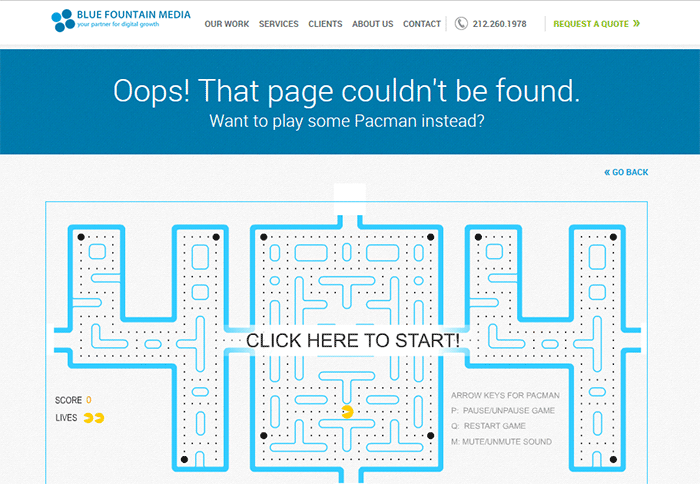
Blue Fountain Media makes a 404 page that you will look forward to – an actual PAC-MAN game. They retained their main navigation and a “Go Back” link that takes you to the last visited working page.

404-error-page_Blue-Fountain-Media_screenshot

Not Found Org

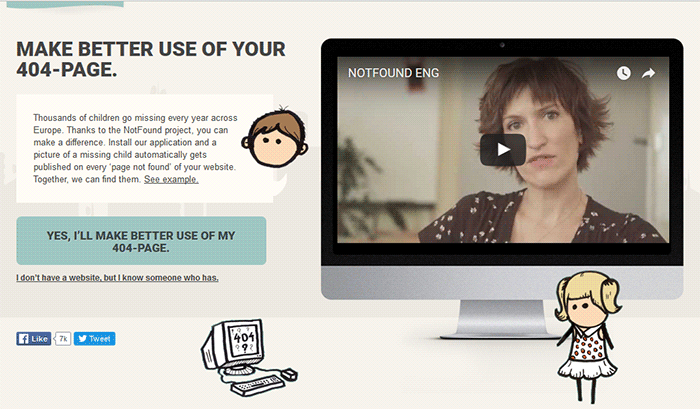
NotFound.org actually uses its 404 error page to achieve a goal. It is an app that you can install in your website. It lets you customize your 404 page to help their cause – find thousands of children that go missing every year.

404-error-page_Not-Found-Org_screenshot

Creating a Custom 404 Error Page

Now that you have some inspiration, it’s time to create your own. You can check out WordPress’ basic guide here if you are able to code, if not you can check out the plugins below.

Since WooCommerce is installed on the WordPress platform, you can use the power of WordPress plugins to create awesome About Us pages.

Custom 404 Pro

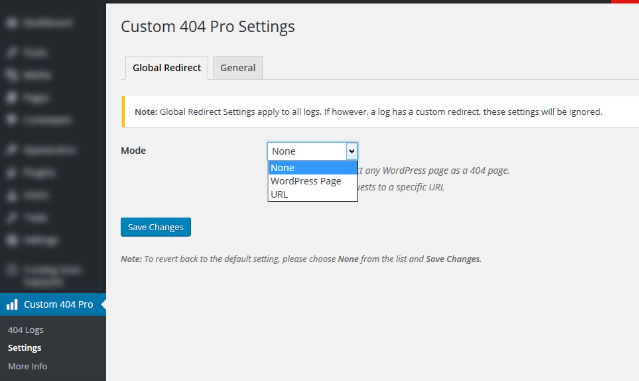
The Custom 404 Pro plugin lets you override the default 404 page with any page of your choice. To set your custom 404 error page:

  1. Install and activate the Custom 404 Pro plugin.
  2. Create a new page that you want to use as your 404 error page.
  3. Click on Custom 404 Pro on your WordPress Dashboard and then click on Settings.
  4. Set the page or URL that you want to use as your 404 error page and then click on Save Changes.

Create-custom-404-error-page_Plugin_Custom-404-Pro-Settings

404page

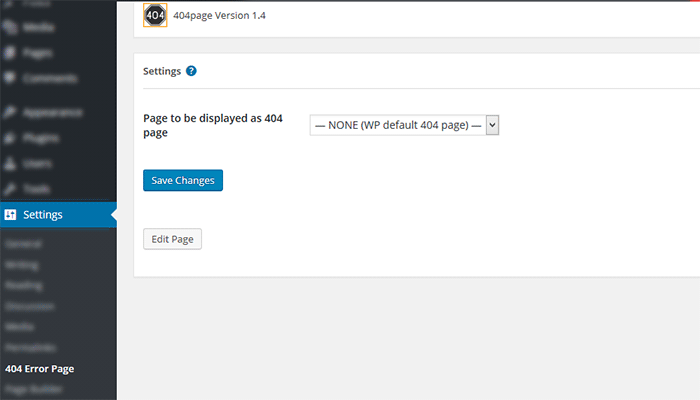
404page is another easy plugin to use to create custom 404 error pages. To create a custom 404 error page using the 404page plugin:

  1. Install and activate the plugin.
  2. Create a new page that you want to use as your 404 page.
  3. Click on Settings and then choose the page that you want to use as your 404 error page.
  4. Click on Save Changes.

Plugin_404page_Create-custom-404-error-page

Test Your 404 Error Page

To test if your new 404 error page is working, just pop any non-existent URL in your domain on your browser. If your new 404 error page does not appear, check if your website is set to redirect to your new 404 error page.

Create-custom-404-error-page_Plugin_404page

Conclusion

404 Error Pages can be annoying but you can use them to your advantage. Customize them to boost engagement and conversion. Align your new 404 error page with your brand image and website goals. It will do wonders for your WooCommerce store and your brand. Do you have any other suggestions for creating a good 404 error page?

Filed Under: Code Snippets, How-To Articles Tagged With: best practices, design tweaks, navigation, plugins, redirection, WordPress

Design Tweaks on WooCommerce

January 29, 2015 By John Leave a Comment

SnapCrab_2015-06-26_15-14-47_No-0000

Your online business using WooCommerce is all set. Each important element is in place and accounted for. Your website is done. You get regular traffic. You got your marketing strategies in place. You have a blog and you are active in social media. You think you’ve got it all covered, but then a few things start to bug you.

Optimize Web Design

You realize the design needs few tweaks and you come up with a few ideas that should be able to increase sales. What you have to do right now is optimize your design for better conversion rates. This is called conversion rate optimization.

A few design tweaks on your website will help increase your conversion rates. It may involve adjusting or repositioning some visual and design elements. Color, images, cues and their placement on your landing or checkout pages, are all part of optimizing your web design – see here design tweaks.

Keep Your Design Simple

Your website needs to look good, but not necessarily flashy. Simplicity in your design can go a long way towards increasing conversions.

It is understandable that you’d like to fill your pages with a lot of useful features and elements. However, it could also be a hindrance. Visitors would usually turn away from complicated designs. Keep it simple and understandable.

Design Tweaks

In changing the colors on your website, take the context into consideration. Make use of call-to-actions (CTA), and place them in a favourable manner to make your visitors take action. The design of your website should encourage visitors to want to browse more. Essentially, they should immediately see what they’re looking for.

Use the right amount of white space. It can definitely put emphasis on where it is needed. It is a simple and effective way of making sure that important elements of your site are easy to locate. This post enumerates user interface tweaks can you make, to improve your conversion rates.

Know Your Audience

An important part of adjusting your site’s design is learning about your potential customers. Understand who they are what their personalities are like. That way, you could adjust your design elements to fit in with them.

SnapCrab_2015-06-26_15-15-17_No-0000

You can read more about customer personas in these articles:

New MailChimp User Persona Research

Web Design Tips that Increase Conversions

Having a clear idea of your current users can help you better empathize with them. Combining these tips will not only get people to visit your site, but also encourage visitors to take the next step.

A few design tweaks on your WooCommerce store can set you up for better conversions which will in turn lead to better sales for your business.

Filed Under: How-To Articles Tagged With: call-to-action, colors, conversion optimization, CSS, customer persona, design tweaks, how-to, optimizations, WooCommerce

  • « Previous Page
  • 1
  • …
  • 3
  • 4
  • 5
  • 6
  • 7
  • …
  • 24
  • Next Page »
Let us support your online store so you can manage your business

Get started today

Get 2 Hours of FREE SUPPORT

We are so confident that you will love our services that we will give you your first 4 hours at a 50% discount

That’s 4 hours for only $75

BUY NOW

Free eBook

5 Things Every Online Store Can Fix On Their Website In The Next Week To Increase Sales

Quick Links

  • How it Works
  • Pricing
  • Blog
  • Contact
  • About Wooassist
  • My Account
  • Checkout
  • Privacy Policy
  • Cookie Policy
  • Terms and Conditions

Wooassist

Australia:
59 Luke St.
Hemmant QLD 4174

Philippines:
San Miguel St.
Poblacion, Iligan City 9200

Connect


Copyright © 2026 · Wooassist

Yours FREE!

5 Things Every Online Store Can Fix On Their Website In The Next Week To Increase Sales