Wooassist

Assistance for Your Woocommerce Store

  • How it Works
  • Pricing
  • Services
    • Site Maintenance
    • AI SEO and Content Marketing
  • Blog
    • How-To Articles
    • Code Snippets
    • SEO For E-Commerce
    • Theme and Plugin Reviews
    • Wooassist News
    • WordPress/WooCommerce News
    • Interviews
  • About Us
  • Contact
You are here: Home / Archives for plugins

Why You Should Do a Plugin Audit on Your WooCommerce Store?

January 14, 2018 By John Leave a Comment

Have you ever wondered if you can make your WooCommerce store load faster? Have you ever looked at your plugins page and thought about removing some of them? If you answered yes to both of these questions, then you are on the right track. That’s a little something we like to call a “plugin audit” and this can help make your website load faster.

What is a Plugin Audit and Why You Need to Do It?

A plugin audit is an analysis of the plugins currently installed on your WooCommerce store to determine which plugins you can remove.

Why Remove your Plugins?

Improve Site Speed

You might be asking yourself right now why you would want to remove some of your plugins. The simple answer to that is having too many plugins can slow down your site. And a slow website can have negative effects on your conversion rate.

Compatibility Issues

Another issue with having too many plugins is that it makes your site more prone to breaking when you update your plugins. Your plugins will need to be able to work seamlessly with each other. Having too many plugins means that the odds of one plugin not being compatible with another is high. After every update, plugins can also break compatibility with plugins they were originally compatible with.

Security Threats

Having too many plugins also exposes your site to security issues. Poor coding can result in hackers exploiting vulnerabilities in some plugins. If you only have a few plugins, then the odds of your website being hacked through plugin vulnerabilities is also reduced.

But How Many Plugins is Too Many?

There is no definitive number that equates to a “right” number of plugins that you need to have on your WooCommerce store. But a good rule of thumb is to just use the plugins that you really need.

Also, don’t install multiple plugins that do the same thing. Avoid using plugins like Jetpack that bundle numerous plugins into a single plugin. Jetpack is not bad per se. Feel free to use it if you use all of its features but chances are you won’t be using everything that Jetpack has to offer. In which case, Jetpack’s unused features needlessly eat up your WooCommerce store’s resources. It would be better to determine which features of Jetpack you use and find a plugin that does only that.

Which Plugins Should You Remove?

Plugins that do the same thing. If you have two or more plugins that do the same thing, you should remove the other plugins and choose the best one for your needs. The duplicate plugins just hog up your resources so there’s no reason for you not to remove them.

Plugins that can be supplemented with custom code. Sometimes you will need to install some kind of code somewhere on your site to remove a feature you don’t want or to add support to a service that you are using. But since you are not a developer, you find a plugin that will insert the code for you. Over time, these plugins could add up. When doing a plugin audit, you can list down all the plugins that can be supplemented by inserting custom code and then you can hire a developer to insert all these codes for you in one go. To an experienced developer, this should be doable in less than an hour but we recommend spending a bit more time for testing.

Plugins that you don’t use. If you have installed some plugins that you are not using, then there’s no sense in keeping them. You keep telling yourself, you might need them in the future. Uninstall them now and just install them again when you actually need them.  

Plugins that your customers don’t use. Maybe you installed a Wishlists plugin but then you find that none of your customers have actually used it. Because this plugin does not provide any value to your store, you might as well just remove it.

Plugins that have not been updated in a long time. Outdated plugins can break after some time so it is best to find another plugin that does the same thing and has been updated recently. Also, outdated plugins can be a security concern. Even when installing new plugins, you should check if the plugin you will be installing is being updated regularly.

Final Words

After doing a plugin audit, you will have a site that is faster and less prone to breaking during updates. Should you need help in doing a plugin audit for your WooCommerce store, you can contact us and we can help you out.

If you have any questions, comments or suggestions, you can let us know in the comments.
Filed Under: How-To Articles Tagged With: conversion optimization, optimizations, plugins, site speed optimization

How to Add a Top Bar in Storefront Theme

July 29, 2016 By John 12 Comments

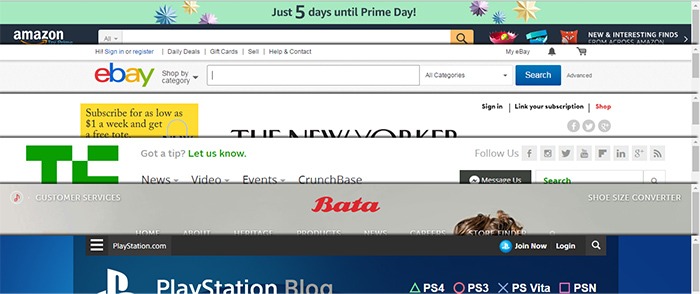
The release of Google’s Material design started the “top bar” trend. It was used mainly on mobile user experience (UX) designs but it found its way into desktop design. In this article, we’ll teach you how to add a top bar to the Storefront theme.

What Elements Can you Add to the Top Bar?

Top-Bar-examples

The top bar has been used in a variety of ways, depending on the UX design or the information you want to highlight. Let’s enumerate common items we see on the top bar.

  • Promotions – This can be anything from a sale to a new product release. The top bar is a good noticeable area that you can use to post your promotions and other offers.
  • User Login/Logout – When users want to log in or out, their eyes will scan the top right corner of the page to look for the link. Because of this, it makes sense to place the link in the top right corner.
  • Social Links – The top bar is a common location for the site’s social media profile links.
  • Mini Cart – The mini cart has a very important role in the UX design of e-commerce stores. It is an important element to have either on the main navigation or the top bar.
  • Search Bar – The search bar is also a crucial piece in the UX design of most websites and it can be positioned in the top bar.
  • Subscription Form/Link – Placing the subscription form on a very prominent location like the top bar draws the attention of your visitors to the form.
  • Quick Links Menu – Quick links can be any important link that you want your visitors to see or something that your visitors will be looking for. Some common quick links are My Account, Shop, Terms and Conditions, Privacy Policy, About, Contact and FAQs.

Depending on your site, you can use the top bar to contain other elements as you see fit.

How to Add a Top Bar to Storefront

To add a top bar to Storefront, you can use the Storefront Top Bar plugin. Our developers at Wooassist developed this plugin specifically for Storefront which adds two widget areas on top of the header.

Getting Started

Storefront-Top-Bar-Getting-Started

Install and activate Storefront Top Bar in your WordPress Dashboard.

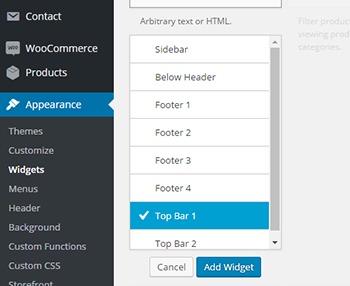
After installation, go to Appearance and click on Widgets. You should find two additional widget areas namely Top Bar 1 and Top Bar 2. These are the left and right widget areas on the top bar. You can add any content here just like in any widget area. Just make sure it looks good within the small space provided.

Adding a Simple Text

Storefront-Top-Bar-Appearance-Widgets

To add text to the top bar, find the text widget and add it to the top bar widget area. After that, you can just add any text in the text widget.

Storefront-Top-Bar-Adding-a-simple-text
Promotion 1 and Promotion 2 are the texts inserted in Top Bar 1 and Top Bar 2, respectively.

Adding a Menu

Storefront-Top-Bar-Adding-a-Menu

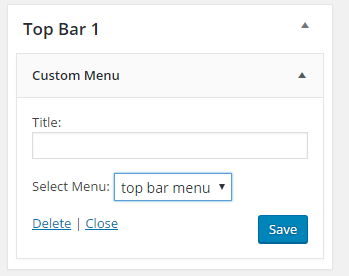
To add a custom menu to the top bar, you should first set up a custom menu in Appearance > Menu. After creating a menu, go back to the widgets area and add ‘custom menu widget’ in the top bar widget area. Select the menu you’ve just created and then click Save. Your custom menu should now appear in the top bar.

Storefront-Top-Bar-1-widget

Adding a Subscription Form Shortcode

You can add shortcodes using the text widget. In this example, we are using Mailchimp for WordPress. The plugin allows for creating a custom form which can be linked to your Mailchimp account. If you want to follow along and are wondering about the HTML markup of the subscription form in this example, you will just need the input type email and the submit button.

<input type="email" name="EMAIL" placeholder="Your email address" required />
<input type="submit" value="Sign up" />

After that, copy the shortcode and paste it in the text widget on the top bar. You can easily tweak the look of your form with CSS. In this case, the CSS we used is below. Feel free to use the code below for your own site. You can make adjustments to fit your needs.

.mc4wp-form input[type=email]{
width: 50%;
}
.mc4wp-form {
margin-bottom: 0;
}

Storefront-Top-Bar-Adding-Subscription-Form-Shortcode

Adding Other Elements to the Top Bar

The top bar works like a regular widget area. You can add shortcodes for other items like social icons, mini-cart, login, etc. You can also insert HTML and scripts in the text widget so the possibilities are endless.

Customizing the Top Bar Widget

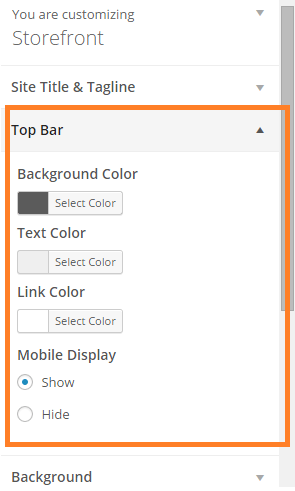
To customize the top bar widget, you can go to Appearance > Customize and click on “Top Bar”. Here you can change the background color, text color and link color. You can also set the top bar to be hidden in mobile view.
Storefront-Top-Bar-Customizing-Widget-Area

You can further tweak the top bar using CSS.

Align Top Bar 2 to the Right

By default, both Top Bar 1 and Top Bar 2 contents are left aligned. To make the content of Top Bar 2 align to the right, just use the CSS below.

.woa-top-bar.col-2 .woa-top-bar-2{
text-align: right;
}

Storefront-Top-Bar-Align-to-the-Right

Thickness/Height

To change the height of the bar, you can specify the height using CSS. Just use the code below and specify the height.

.woa-top-bar-wrap{
height: 35px;
}

Single Centered Top Bar

If you only want one top bar widget with a centered content, do not add any content to the Top Bar 2 widget area and then add the CSS below.

.woa-top-bar-wrap{
text-align: center;
}

Storefront-Top-Bar-Single-Centered

Final Notes

The Top Bar is the first thing that your customers will see on your site. It is one of most prominent areas above the fold. You now have the tools to make use of the top bar. It’s now up to how you will maximize the use of this valuable real estate.

Was this tutorial helpful? Do you have any questions about adding or tweaking the top bar in Storefront? Let us know in the comments.
Filed Under: How-To Articles, Theme and Plugin Reviews Tagged With: code snippet, CSS, design tweaks, how-to, navigation, plugins, Storefront, website development, Wooassist, WordPress

How to Revert to the Old WooCommerce Product Gallery in WooCommerce 3.0

April 11, 2017 By John Leave a Comment

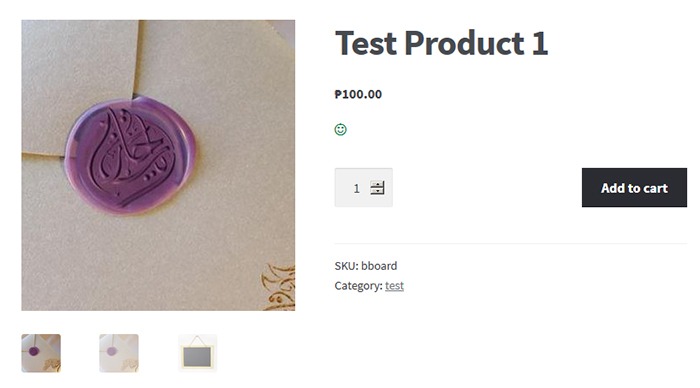
WooCommerce 3.0 is now live. In this version of WooCommerce, the product gallery receives a major overhaul. This includes zooming on product images, more intuitive behavior, improved mobile view and function, and the ability to display the image’s true size on click.

The updates are promising as you can see from the video below. However, the zoom functionality poses a problem for many WooCommerce store owners.

Many WooCommerce Stores Don’t Have Hi-Res Images

The zoom function for the product gallery in single product pages can become a problem for low-res images. Many WooCommerce store owners would not have high-resolution images uploaded to their WooCommerce stores. This is because high-resolution images are bad for page load speed. Large images can slow down a site. Hence, when the zoom function rolls out, low resolution product images will appear grainy and pixelated when zoomed.

How to Revert to the Old WooCommerce Product Gallery Zoom Function
Zoom function upon mouseover in WooCommerce 2.7

To solve this problem you can choose to revert to the old product gallery. While you use the old gallery, you can work on adding high-resolution product images to your store.

old-gallery_How to Revert to the Old WooCommerce Product Gallery
Old product gallery

Reverting to Old WooCommerce Product Gallery

Reverting to the old WooCommerce product gallery can be done by using the Revert WooCommerce Image Gallery plugin. Simply install and activate the plugin and your WooCommerce product gallery will automatically revert to the old product gallery. There are no complicated settings to tweak.

How to Update to the New Product Gallery

When you finish uploading high resolution images, simply deactivate or uninstall the plugin. The product gallery will automatically update to new product gallery. You can also choose to just keep the plugin if you want to keep the old product gallery.

We hope this tutorial is helpful.

Is your store ready for WooCommerce 3.0? Do you have questions about the WooCommerce 3.0 update or the Revert WooCommerce Image Gallery plugin? Let us know in the comments.
Filed Under: How-To Articles, Theme and Plugin Reviews Tagged With: admin, best practices, design tweaks, how-to, plugins, Storefront, Wooassist, WooCommerce

How to Add “Where Did You Hear About Us” Field on WooCommerce Checkout

December 7, 2016 By John 16 Comments

As an e-commerce store owner, it is important to know where you are getting your customers so you can plan your marketing efforts. You can either focus on channels that help you convert or tweak your marketing strategy on channels that are not very successful. One way to find out where your customers are coming from is by adding a “Where Did You Hear About Us” field on WooCommerce checkout.

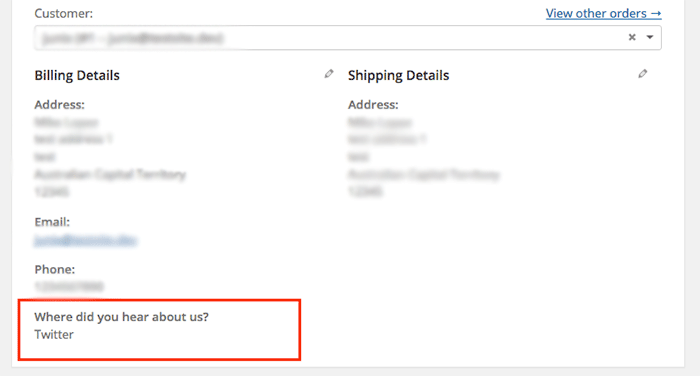
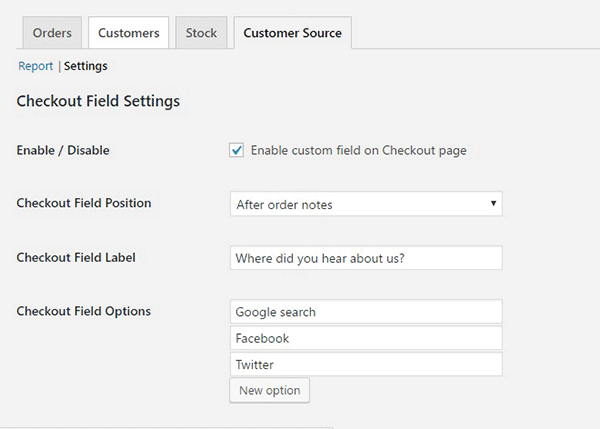
To start, just install and activate the “Where Did You Hear About Us Checkout Field for WooCommerce” plugin. When that’s done, go to WooCommerce > Reports > Customers Source Tab. Click on Settings to enable/disable the “Where Did You Hear About Us” custom field on checkout. Below you can see other plugin settings to customize. You can even make it a required field on your checkout page.

“Where Did You Hear About Us Field” on WooCommerce checkout

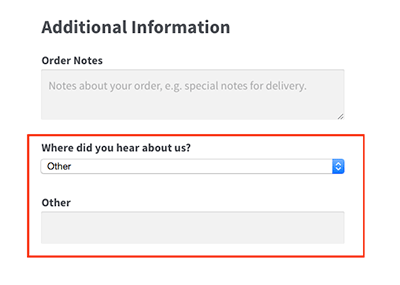
Using the plugin, you can add your channel options. You can even add an “Other” option so your clients can indicate how they found your e-commerce store if it is not in the list.

where-did-you-hear-about-us-plugin-additional-information

where-did-you-hear-about-us-plugin-below-billing-details

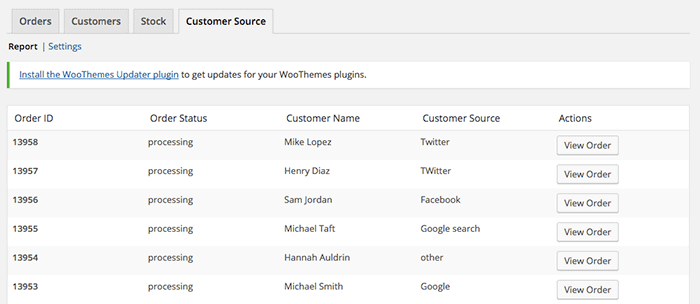
To view the data you gathered, go to Customer Source tab and click “Report”. You should be able to view the details which include customer name, customer source, order status, and order ID.

where-did-you-hear-about-us-plugin-customer-source-tab

The best part about this plugin is that it is totally free. There are no subscriptions. There is no premium version to buy. You can use it in as many websites as you want.

When you learn where your customers come from, you can make your business more profitable. If you tried using this plugin, tell us your experience about it in the comments section.

Filed Under: How-To Articles, Theme and Plugin Reviews Tagged With: e-commerce, how-to, marketing strategy, plugins, website development, Wooassist, WooCommerce

How to Show Only Blog Excerpts in Storefront Theme

November 30, 2016 By John 7 Comments

How to Show Only Blog Excerpts in Storefront

Having a blog has a huge impact on e-commerce sites. A blog helps drive up to 55% more traffic. Blogs are all about providing relevant content to drive visitors to the site. Most blogs in the past prefer the full post display but recently, the snippet view or blog excerpts view has become quite popular. With blog excerpts view, the blog content is more scannable, with posts lined up and a Read More button available after each one. This lets the visitor browse through the posts and just click on the article he/she wants to read more about. In this article, we talk about how to show only blog excerpts in Storefront.

Why Show Only Blog Excerpts?

Increased Visibility

When you have a lot of posts on your blog, displaying only blog excerpts will make more of your content visible. Your latest post may not be the one that the reader is interested in. Having short excerpts of each post will show your visitors that you have a lot of content that they can indulge in.

Ease of Use for Visitors in Choosing Content that Interests Them

With a lot of posts in view, your visitors will be able to easily choose which article to read. This also helps bring more attention to your old posts so keeping those old posts updated with new information will also pay dividends. Readers can scan the blog page easily and may click not just one, but several articles that spark their interest.

Trims Down Lengthy Posts

If you create a lot of long blog posts, then having an excerpts view will make your blog more manageable. A 2000-word blog post is enough to cover a few screens which take attention away from other posts in a full-length view.

Reduced Page Load Times

Since you are only loading post snippets, your blog page will load much faster. Just imagine the number of images on a few of your blog posts and how much longer it would take to load all those.

Increased Page Views and Time on Site

With more content to browse through, showing only blog excerpts will increase your page views. And as visitors read more of your content, you also effectively increase user’s time on your site giving more opportunity for conversion.

Displaying Blog Excerpts in Storefront Theme Using a Plugin

You can switch to a blog excerpts display by editing the WordPress template files. However, you have to be familiar with the WordPress loop and edit the normal content with the excerpts function. An easier method is to use a plugin.

storefront-blog-excerpts-plugin

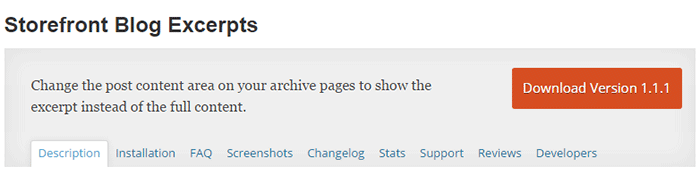
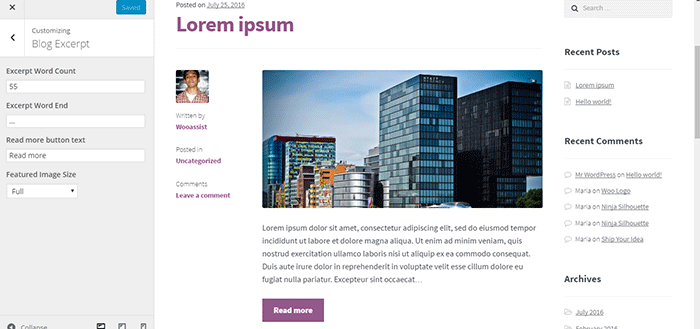
The Storefront Blog Excerpts plugin is made to work with Storefront theme by WooThemes. This also adds a section in the WordPress Customizer for you to modify how to display your blog content in excerpts view.

How to Use Storefront Blog Excerpts

  • In the plugins page, click “Add New”. Search for “Storefront Blog Excerpts” in the WordPress repository. Click on “Install” then activate the plugin.
  • After activation, the blog archive will be automatically replaced by the excerpts display.
  • You can further customize how your blog archive is displayed. Go to the Appearance > Customizer and find the Blog Excerpts section.
  • You can modify the following properties in this section.
    • Excerpt word count – The default value is 55. The average word count of an academic paragraph is around 100 – 200. 55 is around half of it. Based on this, adjust how many words you want to display in each excerpt.
    • Excerpt word end – The default value is “…”. You can customize on the symbols that you can use to indicate a continuation. Other not so common symbols are “>”and “->”
    • Read more button text – The default value is “Read more”. This is the basic call-to-action. You can be more descriptive on the text and try “Go to Full Article”.
    • Featured image size – The default value is “Full”. Here, you can choose different sizes of feature images.

How to Show Only Blog Excerpts in Storefront

Have you tried displaying only blog excerpts on your WooCommerce store’s blog? If you haven’t, you should consider doing it as it might just get you more page views and increased time on site. If you have tried the plugin above, let us know your experience about it and your ideas on how it can be improved.

Filed Under: How-To Articles, Theme and Plugin Reviews Tagged With: best practices, how-to, navigation, plugins, Storefront, Wooassist

  • « Previous Page
  • 1
  • …
  • 3
  • 4
  • 5
  • 6
  • 7
  • 8
  • Next Page »
Let us support your online store so you can manage your business

Get started today

Get 2 Hours of FREE SUPPORT

We are so confident that you will love our services that we will give you your first 4 hours at a 50% discount

That’s 4 hours for only $75

BUY NOW

Free eBook

5 Things Every Online Store Can Fix On Their Website In The Next Week To Increase Sales

Quick Links

  • How it Works
  • Pricing
  • Blog
  • Contact
  • About Wooassist
  • My Account
  • Checkout
  • Privacy Policy
  • Cookie Policy
  • Terms and Conditions

Wooassist

Australia:
59 Luke St.
Hemmant QLD 4174

Philippines:
San Miguel St.
Poblacion, Iligan City 9200

Connect


Copyright © 2026 · Wooassist

Yours FREE!

5 Things Every Online Store Can Fix On Their Website In The Next Week To Increase Sales