Wooassist

Assistance for Your Woocommerce Store

  • How it Works
  • Pricing
  • Services
    • Site Maintenance
    • AI SEO and Content Marketing
  • Blog
    • How-To Articles
    • Code Snippets
    • SEO For E-Commerce
    • Theme and Plugin Reviews
    • Wooassist News
    • WordPress/WooCommerce News
    • Interviews
  • About Us
  • Contact
You are here: Home / Archives for John

How to Change the Arrows in Pagination for Storefront and WooCommerce

March 18, 2015 By John 2 Comments

When looking at category pages for posts and WooCommerce products in Storefront theme, you can navigate to different pages by clicking on the default left and right pointing arrows. Notably, most themes would use a “Previous” or “Next” text instead of an arrow. If you want to change these arrows to text, it is easy enough to do by tweaking a few lines of code. Just follow the steps below.
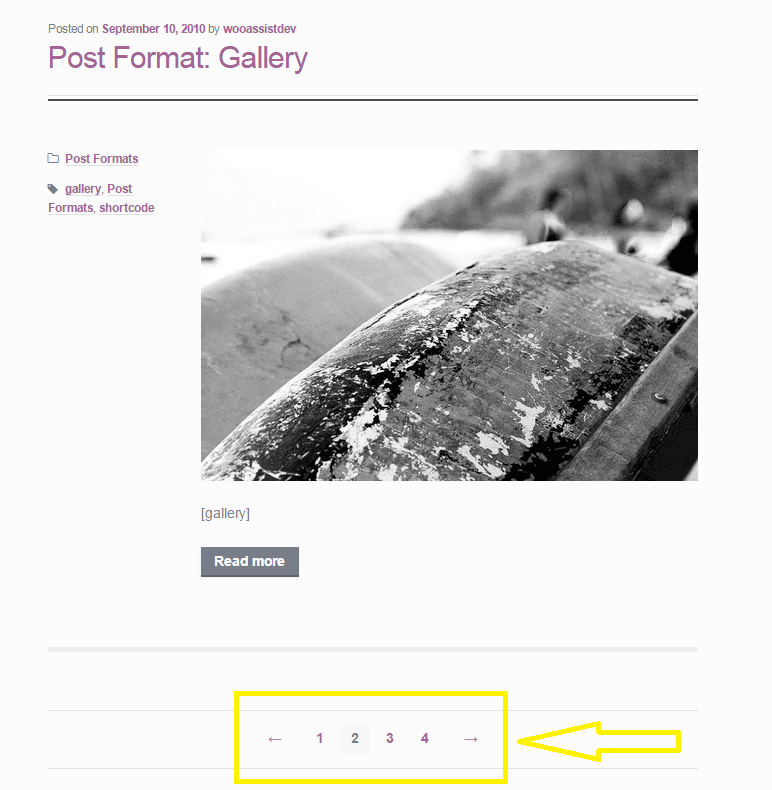
pagination-2

Change the Arrows in Pagination for Storefront Theme

Since Storefront does not have a default filter for pagination, we’ll need to remove the function of the default pagination and replace it with our own function. Notably, the code in the function `woa_sf_paging_nav_replace` is just a copy of the original pagination function in Storefront and we just need to replace the text in the ‘prev_text’ and ‘next_text’ parameters. You don’t need to touch the other attributes.

Go to your functions.php and find the following code:

---- php-code ----

add_action( 'init', 'woa_sf_change_pagination_init' );
 
 
function woa_sf_change_pagination_init() {

 //remove current function used for Storefront's pagination
      remove_action( 'storefront_loop_after', 'storefront_paging_nav', 10 );

 //replaces pagination function with our own function
      add_action( 'storefront_loop_after', 'woa_sf_paging_nav_replace', 10 );
}
 
 
function woa_sf_paging_nav_replace() {
 
 global $wp_query;

      $big = 999999999; // need an unlikely integer
      $translated = __( 'Page', 'storefront' ); // Supply translatable string

      echo '<nav class="storefront-pagination">';

      echo wp_kses_post( paginate_links( array(
           'base' => str_replace( $big, '%#%', esc_url( get_pagenum_link( $big ) ) ),
           'format' => '?paged=%#%',
           'current' => max( 1, get_query_var( 'paged' ) ),
           'prev_text' => '<',
           'next_text' => '>',
           'type' => 'list',
           'total' => $wp_query->max_num_pages,
           'before_page_number' => '<span class="screen-reader-text">' . esc_attr( $translated ) . ' </span>',
 ) ) );

 echo '</nav>';
}

---- /php-code ----

Where it says:

'prev_text' => '<',
'next_text' => '>',

Change it to:

'prev_text' => 'Previous',
'next_text' => 'Next',

Change The Arrows in Pagination for WooCommerce Products

Editing the pagination for WooCommerce products is a bit simpler. We just need to find and use the filter `woocommerce_pagination_args`.
Head over to your functions.php and look for:

---- php-code ----

woa_wc_change_pagination_init() {

    add_filter( 'woocommerce_pagination_args', 	'woa_wc_woocommerce_pagination' );
}

function woa_sf_woocommerce_pagination( $args ) {

	$args['prev_text'] = '<';
	$args['next_text'] = '>';

	return $args;
}

---- /php-code ----

Where it says:

$args['prev_text'] = '<';
$args['next_text'] = '>';

Simply change it to:

$args['prev_text'] = 'Previous';
$args['next_text'] = 'Next;

Or replace ‘<‘ and ‘>’ to whatever text you prefer.

You just learned how to change the arrows in pagination for Storefront and WooCommerce. Did this post help solve your problem? Do you have any questions? Let us know in the comments.
Filed Under: Code Snippets, How-To Articles Tagged With: code snippet, design tweaks, how-to, navigation, Storefront, WooCommerce, woothemes

Woocommerce 2.3 Update: New Features and Common Issues Encountered

March 11, 2015 By John 4 Comments

It has been a month now since Woocommerce 2.3 was officially released. There has been mixed feelings about the new version. Some users find the new features awesome while others struggle to keep it together. To give you a recap, here are the new features of Woocommerce 2.3 “Handsome Hippo”.

Woocommerce 2.3 Features

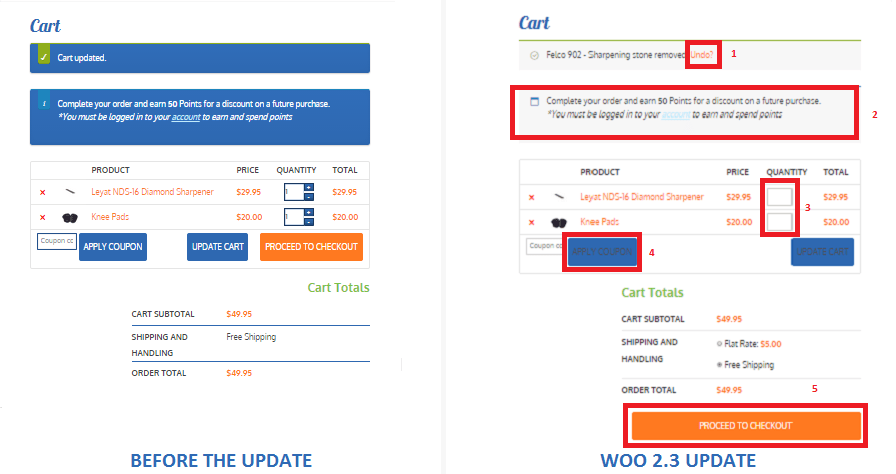
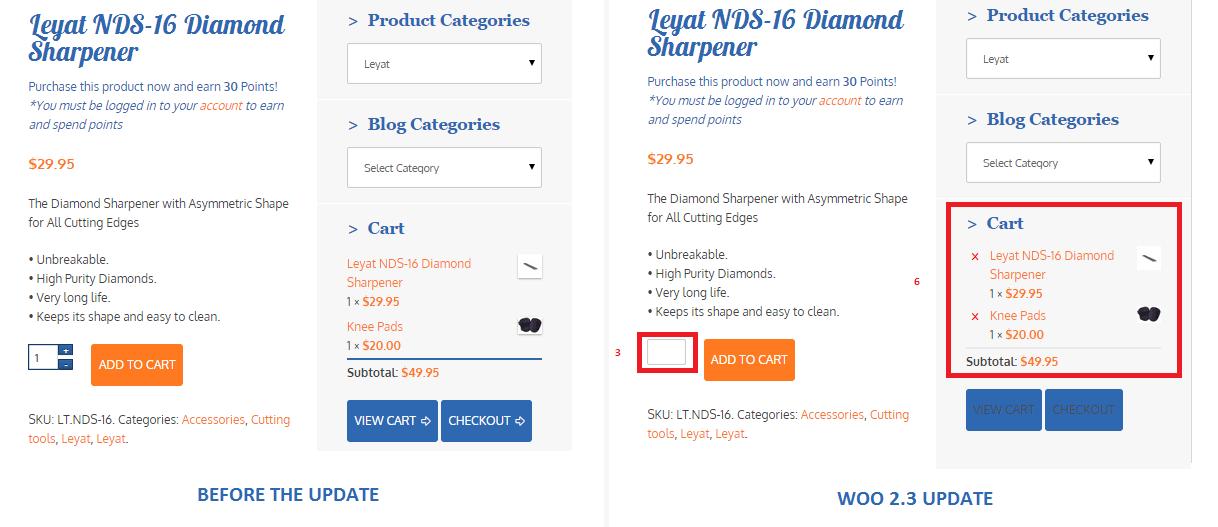
  • User Interface and User Experience Update- Woocommerce 2.3, also known as the handsome hippo, has a flat design that goes well with many themes. The messages, notices (2 in the figure below), buttons (4), and the payment box during checkout has an updated look.Woocommerce 2.3 Cart Update

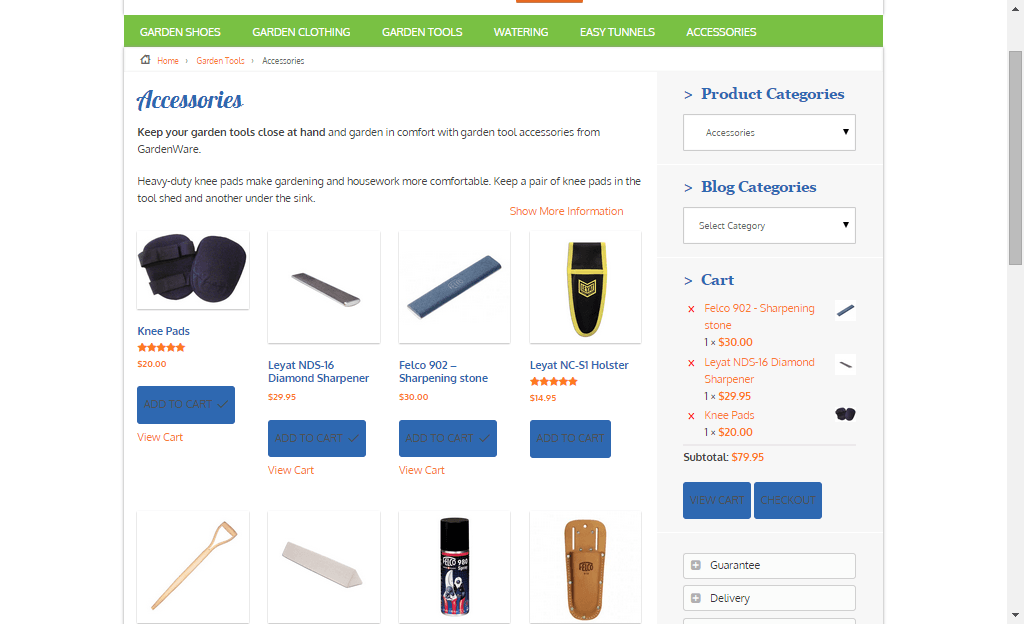
The cart template is also updated. The “Proceed to Checkout” button (5) was moved under the cart totals to enhance user experience. Another cool feature is the undo option (1) in the cart. That means that if you accidentally removed a product on your cart you can easily add it back in using the undo button. You also have the option to remove product from the cart widget (6), which I think is a really cool update on the default style template.

Woocommerce 2.3 cart_widget

There are also several features that were removed due to redundancy. The option to change the colors of the buttons as well as the increment and decrement button (3) were removed. Now, if you want to add those features back, you need to install additional plugins.

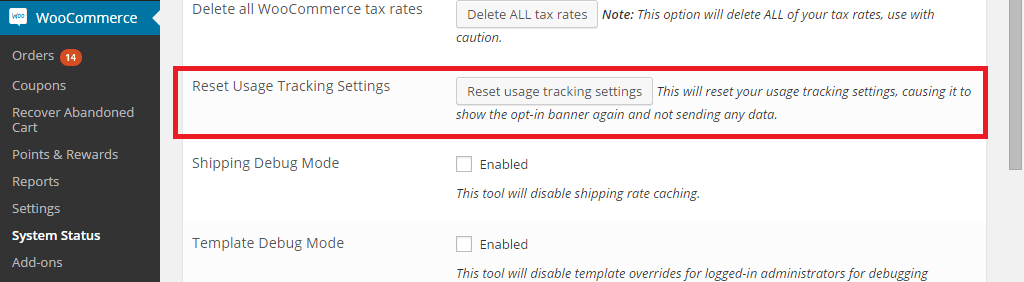
Woocommerce 2.3 also introduced an opt-in usage tracking that allows the Woocommerce team to view the settings of sites. This will allow them to upgrade their system to fit the requirements of their users. You will have an option to disable tracking in the woocommerce dashboard using this path: Woocommerce/System Status/Tools. Simply click the Reset Usage Tracking Settings button.

Woocommerce 2.3 usage_tracking

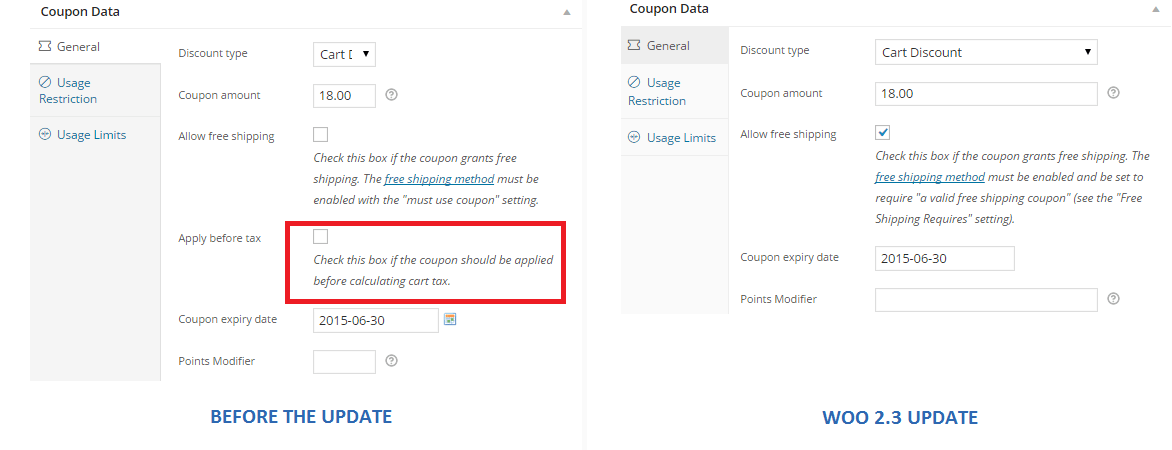
  • Coupons Update- This is probably one of the major updates in Woocommerce 2.3. Coupons will no longer be applied before taxes. The “apply before tax” option has been removed in the woocommerce settings.

Woocommerce 2.3 coupon

Aside from that, the rest of the coupons settings are left untouched. However, there are still a few issues with coupons that has not yet been sorted out on the latest version of woocommerce 2.3. We will get to that in a sec.

  • Emails- woocommerce 2.3 makes it easier for developers to override the CSS of emails sent through woocommerce. Additional hooks are created so that developers can easily adjust the CSS templates according to their preferences. In addition to that, emails sent will be using the woocommerce core templates but will also allow plugin templates to blend in with the shop emails.
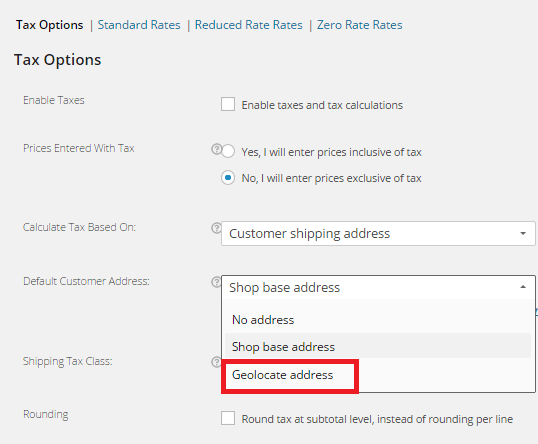
  • Geolocation- Now, with “Handsome Hippo”, you can easily locate your customers by using their IPs. This can be used to calculate tax based on the users estimated location.

Woocommerce 2.3 Geo_Location

Issues Encountered

Woocommerce informed large theme companies about the changes before releasing Woocommerce 2.3. Prior to the official release, Woocommerce also released Woocommerce 2.3 beta so that they can work hand in hand with theme companies and plugin authors to make the release as smooth as possible. Though a lot of site owners welcome the design update on the front-end, some sites suffered from CSS and theme incompatibility and had to do a complete overhaul. Woocommerce 2.3 started using Sass, and there are inevitable plugin incompatibilities encountered by sites that use plugins using LESS.

The image below is taken from one of our sites that we manage. You will notice that the buttons, due to the flat design, need fixing. You can barely see the labels of the buttons.

Woocommerce 2.3 buttons_and_option_to_remove_products_from_cart_widget

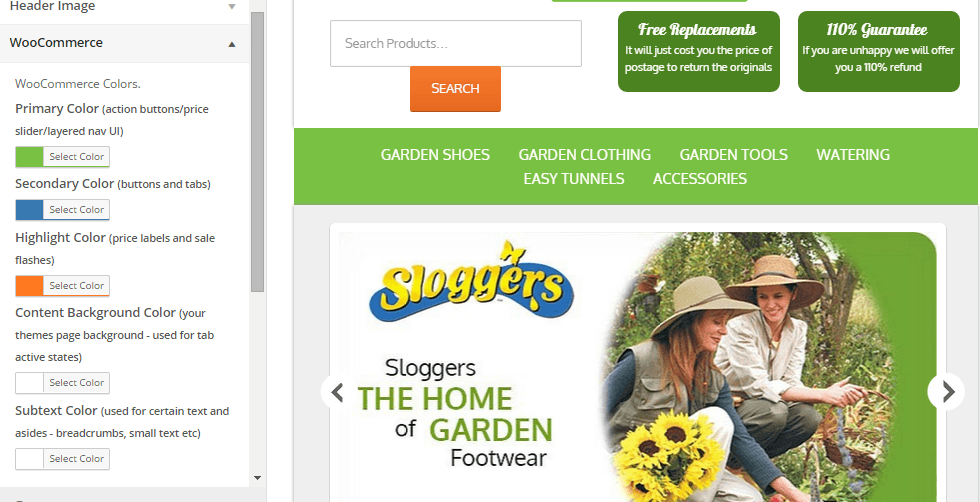
To fix this issue, Woocommerce suggests installing a plugin that will allow site owners to easily change the colors of buttons and other elements on their sites. You can customize the buttons by clicking Appearance/Customize/Woocommerce.

Woocommerce 2.3 buttons

On the same site, we also encountered problems with the application of coupon codes. Though the products added are exclusive of tax, which means that the tax calculations will not be affected, we experienced a weird issue with the application of coupons on top of a free shipping rule. The free shipping rule allows customers to get free shipping when the item bought is more than $49.

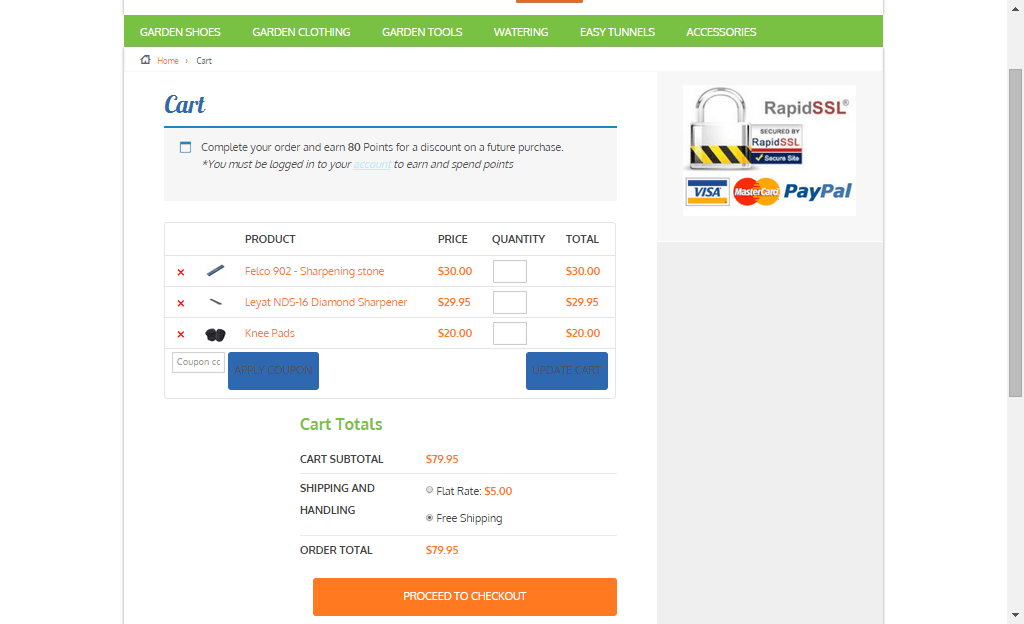
If you look at the image below, instead of displaying the free shipping note on the “Shipping and Handling”, it has been replaced by a radio. Here you will have the option to either choose free shipping or flat rate, which doesn’t make sense because customers would always want to choose the free shipping option. Aside from that, if you apply a coupon and the order total falls below $49, the flat rate automatically kicks in without the free shipping option. The store owner would not want that to happen and this issue only started after the Woocommerce 2.3 update. We will be discussing the solution to this issue on our next article.

Woocommerce 2.3 increment_decrement,_notices-2.3

Conclusion

Keeping your plugins up to date is very important. However, with major updates like this, it is best that you create several backups of your live site before doing anything. In some cases, it might even be necessary to copy your live site to a development site. Doing plugin updates on the development site allows you to fix errors caused by the update and at the same time reduce losses due to downtime.

The woocommerce team spend so much time and dedication for this update. Though there may be some hiccups along the way, their proactive communication with theme companies have been really helpful in ensuring that the update will not cause serious problems to their users.

If you have encountered some issues regarding the woocommerce 2.3 update or if you want to share your take on the new features of woocommerce, feel free to leave your comments below.


Filed Under: Theme and Plugin Reviews Tagged With: checkout form, colors, CSS, email, plugins, shopping cart, WooCommerce, woothemes, WordPress updates

Choosing a Color Scheme For Your Online Store

March 9, 2015 By John Leave a Comment

Choosing a color scheme for your online storeChoosing a color scheme for your online store might be an arbitrary decision based on your color preferences.
Usually peoples intuition for their color scheme is pretty good. But should you leave it to chance?

Spending a couple hours to learn the theory of color basics is recommended. If it does nothing else it will affirm the decisions you have made based off of your own intuition. But more likely it will or give you some deeper knowledge to craft your color scheme and result in increased sales.

Color Basics

Basically, some colors look good together and some colors don’t.

Through mathematics and the invention of the color wheel we can see patterns of why this might be.

There is a great tool I use called Kuler that lets you choose a color and will then give you other colors that match based on rules you can choose from.

I will show you an example of this soon, but first I just want to discuss what impact choosing a base color will have on your brand.

Emotional Color

Colors have emotional meaning to your visitor and the color scheme you decide on for your brand needs to take this into account. It is no accident that fast food restaurants all use red to make you hungry, and IBM uses its corporate blue to represent trust.

Before you choose a color scheme, here are a few good exercises to identify a personality for your brand.

  • Think of twenty words that describe your brand.
  • If your brand was a car what sort of make would it be?
  • What sort of feelings do you want to be associated with when someone sees your brand?

To learn more about what each color means here is a good article.  http://www.smashingmagazine.com/2010/01/28/color-theory-for-designers-part-1-the-meaning-of-color/

Existing Brand Assets

If you already have a logo then you will often find that the colors you chose were intuitively based on some form of emotional color theory.

If you discover you have chosen incorrectly and it is too costly to update your printed material from the old colors you can leave your logo as is and just add some secondary colors that will give your brand the emotional meaning you were looking for.

A Note on Contrast

Black, white and shades of grey can be used in addition to the color scheme you choose for your site and you can use these to create contrast. Dark colors on light colors and vice versa (light colors on dark colors) stand out more on the page than two colors closer in shade.

You can use this to highlight a particular element on a page by making the contrast of its background greater.

Into Action

To show you an example, I will use the logo from a company Wooassist manages: www.iotagarden.com.au

https://www.dropbox.com/s/k09mmys93n967as/Screenshot%202015-01-09%2012.16.15.png?dl=0

Here are some notes when we re-designed the IOTA site about 12 months ago.

color-1We don’t want to change things too much so we will stick with the two base colors of light and dark blue that are used for the logo. 
I would like to introduce one more color that is a bit brighter and contrasting with the current blues that will liven up the site. 

I am thinking maroon, but we can use adobe Kuler to see what a good contrasting color is mathematically. 

These are the colors from the logo.
Light blue #8da5aa
Dark blue # 005293

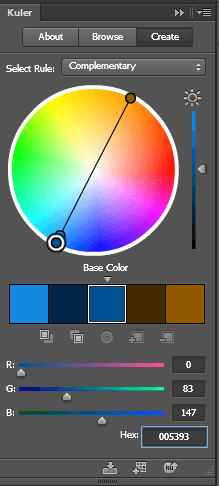
Without going too much into the details of how Adobe Kuler works, the end results speak for themselves. When I enter base color dark blue # 005293, the complimentary color was a brown.

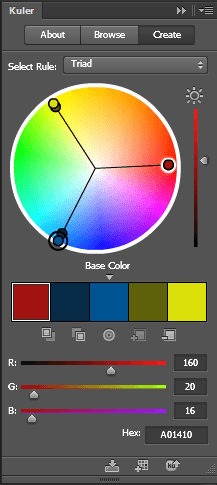
color-2That didn’t suit the objectives of livening the site up so if we look at the triad relationship I can see the magenta color I was originally thinking of #a01410


 And if we look at how these colors look together touching each other and apart you can see Kuler’s maths have not let us down. These colors look great together.

color-3

So here you can see with just a couple hours research and a couple of tools we were able to come up with a color scheme that suited our existing brand assets, while at the same time achieving our new objectives.

What color best represents the feeling of your brand?

Filed Under: How-To Articles Tagged With: colors, conversion optimization, design tweaks, how-to

How to Specify CSS Styling on a Single WordPress Page  

March 5, 2015 By John Leave a Comment

Understanding a bit of CSS is a useful skill for a website owner. Now, suppose you wanted to apply a line of CSS styling on just a single page instead of the entire site. Learning how to target your CSS to specific pages can solve hours of frustration when a code snippet isn’t readily available on the internet.

Let’s use this example: we’re going to hide the page title of just the Home Page.

The basic CSS for hiding a page title will usually look like this:

.main-title {
display: none;
}

When you copy the code above and place it in your styles.css file, it should hide all the page titles in the website. Normally, we’d stop there if that was what we wanted but we just want to hide the page title on the home page.

Basically, the code right now is targeting the display attribute for the main-title element. There is however no indication of which main-title is targeted. Is it the main-title on the home page? Is it the main-title on the About page? For cases like these, all main-titles will be affected.

To target a specific page, you need to add another selector and it looks like this:

.home .main-title {
display: none;
}

The “.home” part is the part that indicates which main-title we are targeting.

Now, our next challenge will be figuring out what to write in the “.home” part. For that, we need to look at the page source. Look for the start of the <body> HTML. You will then see something like this:

page-classes

Notice those classes? Those are what we use for the selectors. We can’t just use any of those though because other pages might be using the same classes and if that’s the case, those other pages will be affected by your CSS as well. We have to find the class unique to that page and in this case it is “home”.

On this next example, the unique class which is also the page ID is “page-id-155”. When we make use of “.page-id-155”, we are basically specifying that only that page should be affected by any CSS you write next to it.

page id

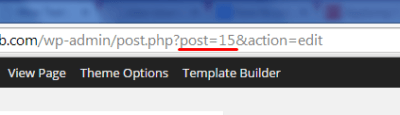
However, there are cases where you might have trouble finding the unique class or the page ID is not indicated as one of the classes. In this case, you should go edit that page in the WordPress dashboard. Once you are in the edit page, check out the URL in the address bar. The number corresponding to post= is your page ID that you can then use to target that page.

post id

That’s about it. And do keep in mind that this knowledge isn’t simply limited to your page titles. Here are some more applications:

  • Hiding the widget area for some of your pages.
  • Reducing/enlarging the main content area depending on the current page.
  • Keeping font/color styling on specific pages

When you know the unique class or page ID you can target specific pages with your CSS styling now and I hope it helps you make your website become the best it can be.

Now you know how to specify CSS styling on a single WordPress page. Got questions? Head over to the comments section.

Filed Under: How-To Articles Tagged With: CSS, design tweaks, how-to, website development, WordPress

How to Integrate WooCommerce into a Non-WooThemes Theme

March 2, 2015 By John Leave a Comment

how to integrate WooCommerce into a non-WooThemes theme

WooCommerce (WC) and themes from WooThemes go hand in hand when building an e-commerce website. But what if you wanted to use a theme not from WooThemes? There may be some compatibility issues but it could still work. To solve these problems, we’ll need to set it up in such a way that your non-WooCommerce or custom theme supports Woocommerce and make the integration flawless.

WooCommerce provides two methods to do this. Either we use hooks or make use of their catch-all woocommerce_content() function. The second method is the easier of the two so we’ll only talk about the second method of the catch-all woocommerce_content() function in this post.

To start, know that it’s divided into 5 simple steps which we’ll outline below:

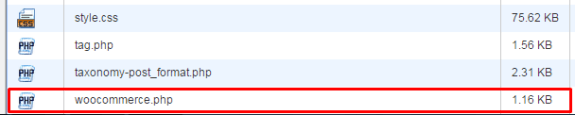
STEP 1: Duplicate your page.php file and rename it as woocommerce.php

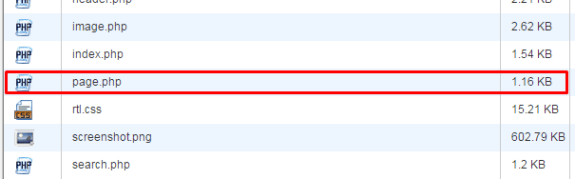
For this, you’ll need to access your website files using an FTP program or cPanel file manager. Find your page.php file which is usually located in wp-content/themes/[YOURTHEME]/page.php.

copying page-php
creating woocommerce.php

All themes should have this file so make a copy of yours then rename it to woocommerce.php. Basically, you’re creating a file called woocommerce.php where the content is the same as page.php.

If you’re using a child theme, you’ll need to copy the page.php of the parent theme and place woocommerce.php on the child theme so that you don’t have to worry about it being overwritten when the theme is updated.

STEP 2: Edit woocommerce.php and locate the loop

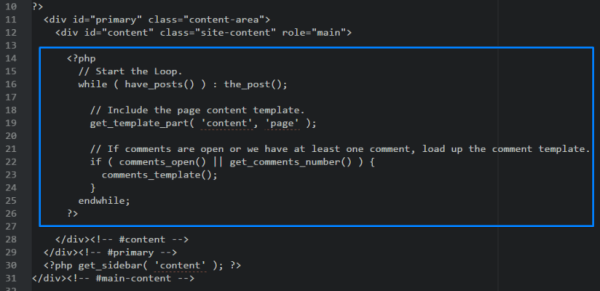
After creating the file woocommerce.php, you then need to edit it with the editor of your choice. When it’s opened, browse through and look for code that looks like the one below:

the loop

It usually starts with

<?php if ( have_posts() ) :

and ends with

<?php endif; ?>

but in our case it ends with

endwhile; ?>

so it’s not always the same. This bit is called the loop and you need to determine where it starts and where it ends.

STEP 3: Replace the loop with <?php woocommerce_content(); ?>

Now, after finding the loop, replace it with:

<?php woocommerce_content(); ?>

That lengthy bit of code will be replaced by just this one line. And that’s entirely the point – nothing to be alarmed of. And when you’ve done that, it should look like the one below:

woocommerce-content

Now, save it.

STEP 4: Declare support for WooCommerce

Next, we’ll do something about the notice message that looks like the one below.

woocommerce does not support notice

To do this, we’ll need to add:

add_theme_support( 'woocommerce' );

to our functions.php. If you’re using a child theme, you’ll need to find the functions.php file that is inside the child theme folder. Once you’ve found the correct functions.php, place the code exactly at the end. Now, save. And that’s it. That notice should be gone now.

STEP 5: Bask in your success

And that’s how to integrate WooCommerce with a non-Woothemes Theme. For the unavoidable instances that you need to make use of a non-WooCommerce or custom theme, you need to follow the steps above.

Do you have any other suggestions? Feel free to comment below.

Filed Under: How-To Articles Tagged With: code snippet, design tweaks, e-commerce, how-to, WooCommerce, woothemes

  • « Previous Page
  • 1
  • …
  • 34
  • 35
  • 36
  • 37
  • 38
  • …
  • 41
  • Next Page »
Let us support your online store so you can manage your business

Get started today

Get 2 Hours of FREE SUPPORT

We are so confident that you will love our services that we will give you your first 4 hours at a 50% discount

That’s 4 hours for only $75

BUY NOW

Free eBook

5 Things Every Online Store Can Fix On Their Website In The Next Week To Increase Sales

Quick Links

  • How it Works
  • Pricing
  • Blog
  • Contact
  • About Wooassist
  • My Account
  • Checkout
  • Privacy Policy
  • Cookie Policy
  • Terms and Conditions

Wooassist

Australia:
59 Luke St.
Hemmant QLD 4174

Philippines:
San Miguel St.
Poblacion, Iligan City 9200

Connect


Copyright © 2026 · Wooassist

Yours FREE!

5 Things Every Online Store Can Fix On Their Website In The Next Week To Increase Sales