Wooassist

Assistance for Your Woocommerce Store

  • How it Works
  • Pricing
  • Services
    • Site Maintenance
    • AI SEO and Content Marketing
  • Blog
    • How-To Articles
    • Code Snippets
    • SEO For E-Commerce
    • Theme and Plugin Reviews
    • Wooassist News
    • WordPress/WooCommerce News
    • Interviews
  • About Us
  • Contact
You are here: Home / Archives for How-To Articles

How to Change Fonts in Storefront Theme

April 13, 2016 By John 8 Comments

UPDATED 19/06/2017: Revised steps in adding Google Fonts

how to change fonts in storefront themeBy default, Storefront theme uses the Helvetica Neue font. This default font is simple and simple is good. However simple may not always fit the design that you are aiming for. You may want to use a different font. But how do you go about changing the theme’s font? In this post, we’ll teach you how to change fonts in Storefront theme using Google Fonts.

What Type of Fonts Should I Use?

There are fonts that are expressive and stylish. There are some that just work in a lot of situations. Even though you would want to express yourself with a certain type of font, you would also want to use the font type suitable for your needs. The key is to find the right balance.

Four Basic Types of Fonts

font-types

Serif

Serif fonts are characterized by small lines attached to the end of a stroke. These small lines are called serifs. In general, they are thought to be traditional font types. Serif fonts are easier to read in print so they are preferred for use in print.

Sans-serif

Sans-serif literally means ‘without serifs’. These fonts are modern and minimalistic. Sans-serif fonts are recommended for web publishing.

Scripts

Also called cursive font types, Scripts mimic the cursive handwriting. They generally have connecting letters. This type is often portrayed to be feminine and elegant.

Decorative

Halloween fonts, Christmas fonts or the iconic Star Wars font, there are a lot of fonts out there that fall under the decorative type. They are novelty, used for specific purposes. As the name suggests, decorative fonts should only be used as for decoration and never for the main copy.

Serif vs Sans Serif?

It’s best to choose fonts wherein readers won’t notice the font but the message. Decorative and scripts type fonts can be a distraction when reading content. Hence, serif and sans-serif fonts are typically used in the body or in the copy.

yes-no-wood-postLet’s break down the difference between Serif’s and Sans-serif type fonts.

The purpose of the serif is to guide the horizontal “flow” of the words. These little decorations increase the contrast of the spacing. The serif helps the eyes and the brain in distinguishing each chunk of words as one making it easier to read.

This is not the case for texts made for the web though. Because of the limited dot per inch (DPI) in our monitors, the thick and thin lines of the serif types may not be as recognizable in small texts. This is why a simplified font is needed. Minimalist, modern and simplistic sans-serif is suitable for this purpose.

Serif fonts are good for reading that’s why it is mainly used in books, newspapers magazines and other print media. On the other hand, online publishing favors the use of sans-serif fonts because of the DPI limitations.

In some cases Serif works just fine even for online publishing. A good example for of a website using Serif fonts is the The Guardian. We can say the serif font type fits the news site’s identity as an online newspaper. The key to maintaining readability when using a serif font for online publishing is the proper use of font sizes and line spacing. This removes DPI problem.
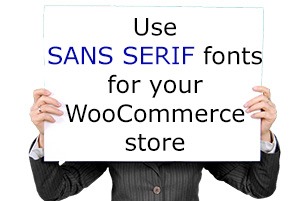
information-boardSo what font should you use for your WooCommerce store? The correct answer would be a sans serif font and this is true in most cases. However, you should not let this limit your design choices. If you think a serif font will work towards your purpose, then use it by all means.

What is Google Fonts?

Google Fonts is a free service by Google that makes it easier for websites to use custom fonts. If you want to use a particular font from the Google Fonts directory, you only need to copy a piece of code and Google will host the font for your website. If you want to change your font easily, Google Fonts is one of the best solutions out there.
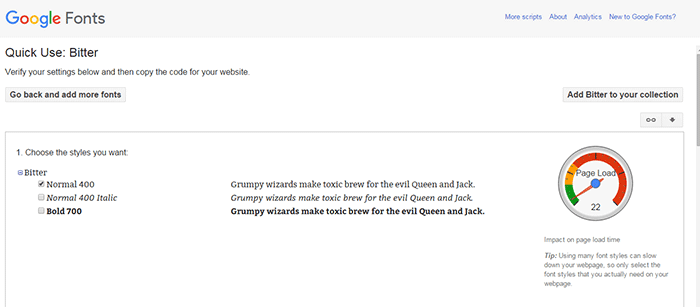
Google-Fonts

Google Fonts Pros and Cons

The Pros

  • Google Fonts are released as open source and can be used for any commercial or non-commercial project for free.
  • It is easy to install and set up.
  • Analytics show most popular fonts by usage across the web

The Cons

  • The font is hosted outside your site. Meaning, it could add a slight page loading time. Actually, Google displays a gauge for each font’s impact on page load time.
  • Open source fonts can have some quality issues. Except for the popular ones, most of the fonts in the directory are made by the community. Some may have been poorly executed. Issues like bad scalability, fonts not showing on iOS, and missing glyphs may arise depending on the font.

How to Find the Right Google Font for You

To help you choose the right font for your WooCommerce site, just go to Google Fonts then use the extensive font preview. You can preview the fonts as a word, sentence, paragraph or as a poster. This will help you decide what font to use.

Check a font type’s readability using the Paragraph preview. Here is Lato (a Sans-serif type) with Slabo (a Serif type) previewed in a paragraph.
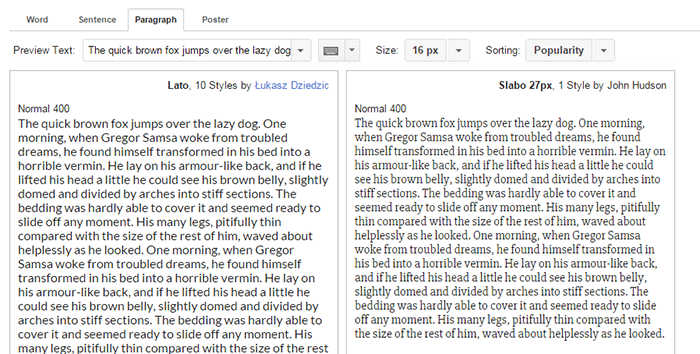
Google-Fonts_Paragraph-preview

For headings and other large texts, use the Poster preview.
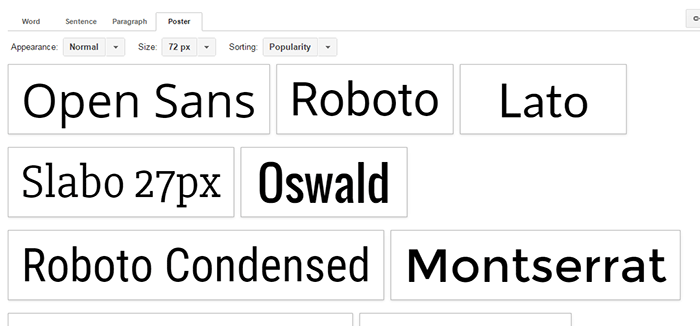
Google-Fonts_Poster-preview

If you are looking for font pairs that look good together, click the ‘pop-out’ button, then the Pairings tab. Google offers a lot of suggestions there and you can preview it in multiple layouts.
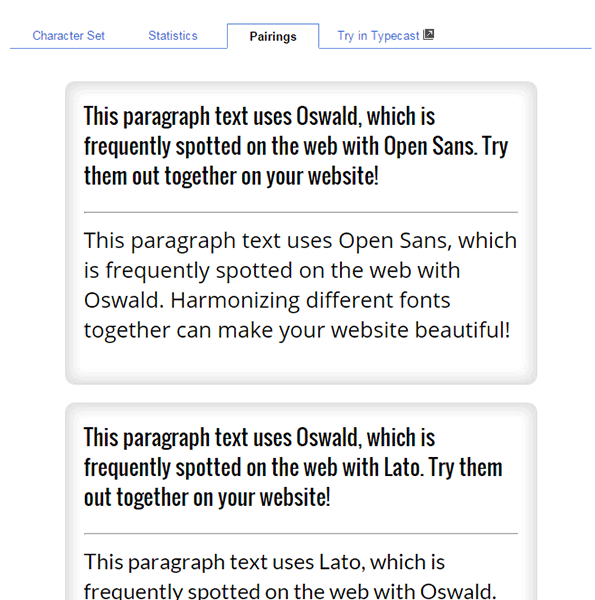
Google-Fonts_Pairings-tab

When you have decided what fonts you want to use, add them to your collection and click ‘Review’. Go to the ‘Test Drive’ tab and see your selected fonts in action.
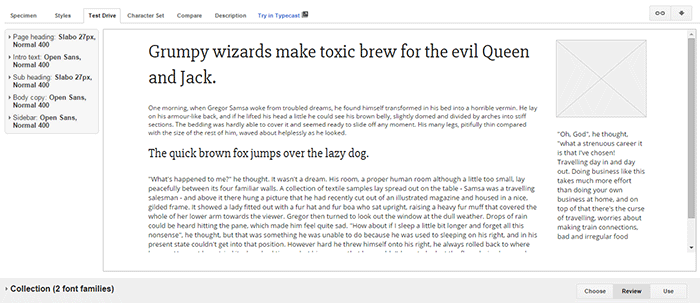
Google-Fonts_Test-Drive-tab

How to Add Google Fonts in Storefront

Implementing Google Fonts on your website is as simple as copy and paste. Here is a step-by-step instruction.

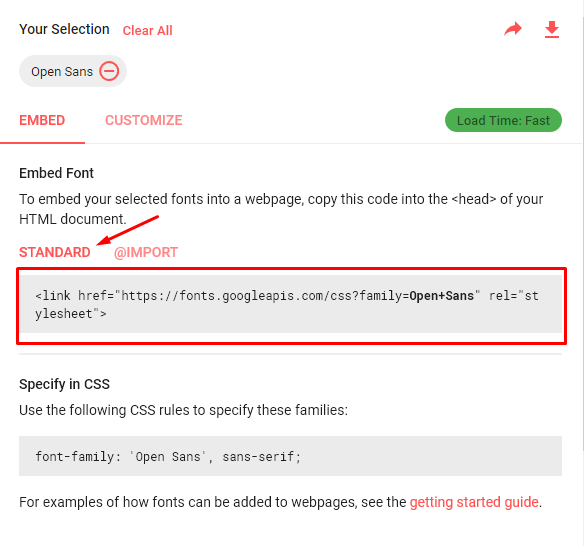
  1. Choose a font that you want to embed. Select the standard code and copy.Google Fonts - Standard Code
  2. Add a hook function to your child theme’s functions.php. Note that using a child theme is important here. If you don’t use a child theme, the changes you make will be lost when you update Storefront. Alternatively you can use the My Custom Functions plugin and paste the code snippet there.
    add_action( 'storefront_header', 'jk_storefront_header_content', 40 );
    	function jk_storefront_header_content() { ?>
    		// Replace this line with the copied google font code here
    		<?php
    	}
    

    *Note the part where you need to insert the code you got in Step 1.

After this, your WooCommerce site is now capable of using the fonts you’ve selected.

How to Apply the Fonts on the Contents

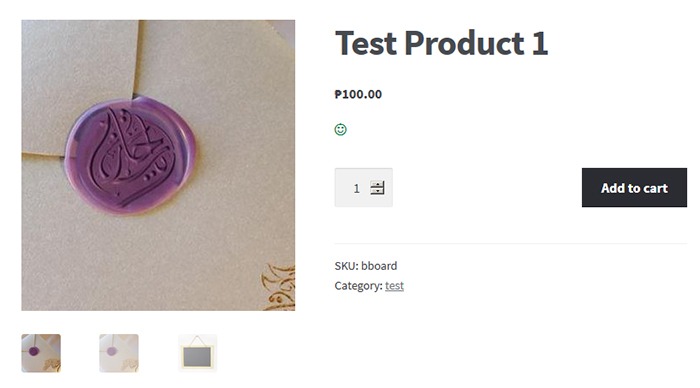
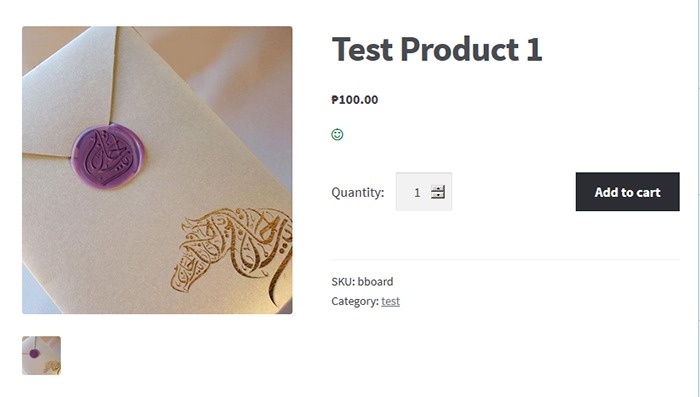
You still need to add the font to your CSS for the fonts to be live on your site. The code below will replace the default font in Storefront to ‘Open Sans’. You just need to replace the font name with the font that you added in the previous section and then paste the code to your child theme’s styles.css. You can also use Simple Custom CSS plugin to add the CSS to your site and not have to worry about it disappearing when you update your theme.

h1, h2, h3, h4, h5, h6, body, button, input, textarea {
	font-family: 'Open Sans', sans-serif;	
}

If you want to use a different set of fonts for your headers, use the code below instead. In this case, the headings will have the Slabo font and the rest will have the Open Sans font. Just replace the font name with the fonts that you added.

body, button, input, textarea {
	font-family: 'Open Sans', sans-serif;	
}
h1, h2, h3, h4, h5, h6 {
	font-family: 'Slabo 27px', serif;
}

Note that the above codes may not work if you are using a child theme that uses a more specific selector. It will give more priority to Storefront’s default selectors. You will need to update the selectors with the selectors used in your child theme. Check out this neat guide for a firm understanding on how CSS specificity works. You may need to apply a few more custom CSS codes to get the right look and feel for your site.

And that’s how you change Storefront theme’s font. Hope this article helped you out. If you have any questions or if this didn’t work for you, let us know in the comments. We’ll do our best to help.
Filed Under: Code Snippets, How-To Articles Tagged With: best practices, code snippet, design tweaks, how-to, Storefront, website development, WooCommerce

How to Revert to the Old WooCommerce Product Gallery in WooCommerce 3.0

April 11, 2017 By John Leave a Comment

WooCommerce 3.0 is now live. In this version of WooCommerce, the product gallery receives a major overhaul. This includes zooming on product images, more intuitive behavior, improved mobile view and function, and the ability to display the image’s true size on click.

The updates are promising as you can see from the video below. However, the zoom functionality poses a problem for many WooCommerce store owners.

Many WooCommerce Stores Don’t Have Hi-Res Images

The zoom function for the product gallery in single product pages can become a problem for low-res images. Many WooCommerce store owners would not have high-resolution images uploaded to their WooCommerce stores. This is because high-resolution images are bad for page load speed. Large images can slow down a site. Hence, when the zoom function rolls out, low resolution product images will appear grainy and pixelated when zoomed.

How to Revert to the Old WooCommerce Product Gallery Zoom Function
Zoom function upon mouseover in WooCommerce 2.7

To solve this problem you can choose to revert to the old product gallery. While you use the old gallery, you can work on adding high-resolution product images to your store.

old-gallery_How to Revert to the Old WooCommerce Product Gallery
Old product gallery

Reverting to Old WooCommerce Product Gallery

Reverting to the old WooCommerce product gallery can be done by using the Revert WooCommerce Image Gallery plugin. Simply install and activate the plugin and your WooCommerce product gallery will automatically revert to the old product gallery. There are no complicated settings to tweak.

How to Update to the New Product Gallery

When you finish uploading high resolution images, simply deactivate or uninstall the plugin. The product gallery will automatically update to new product gallery. You can also choose to just keep the plugin if you want to keep the old product gallery.

We hope this tutorial is helpful.

Is your store ready for WooCommerce 3.0? Do you have questions about the WooCommerce 3.0 update or the Revert WooCommerce Image Gallery plugin? Let us know in the comments.

Filed Under: How-To Articles, Theme and Plugin Reviews Tagged With: admin, best practices, design tweaks, how-to, plugins, Storefront, Wooassist, WooCommerce

How to Add “Where Did You Hear About Us” Field on WooCommerce Checkout

December 7, 2016 By John 16 Comments

As an e-commerce store owner, it is important to know where you are getting your customers so you can plan your marketing efforts. You can either focus on channels that help you convert or tweak your marketing strategy on channels that are not very successful. One way to find out where your customers are coming from is by adding a “Where Did You Hear About Us” field on WooCommerce checkout.

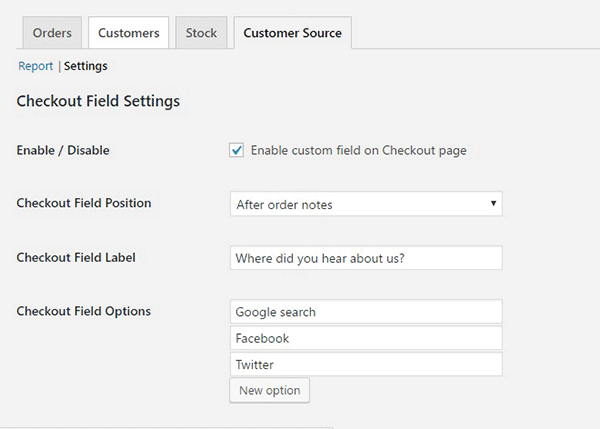
To start, just install and activate the “Where Did You Hear About Us Checkout Field for WooCommerce” plugin. When that’s done, go to WooCommerce > Reports > Customers Source Tab. Click on Settings to enable/disable the “Where Did You Hear About Us” custom field on checkout. Below you can see other plugin settings to customize. You can even make it a required field on your checkout page.

“Where Did You Hear About Us Field” on WooCommerce checkout

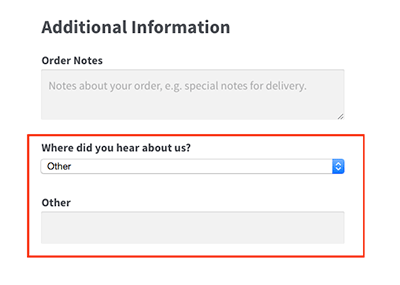
Using the plugin, you can add your channel options. You can even add an “Other” option so your clients can indicate how they found your e-commerce store if it is not in the list.

where-did-you-hear-about-us-plugin-additional-information

where-did-you-hear-about-us-plugin-below-billing-details

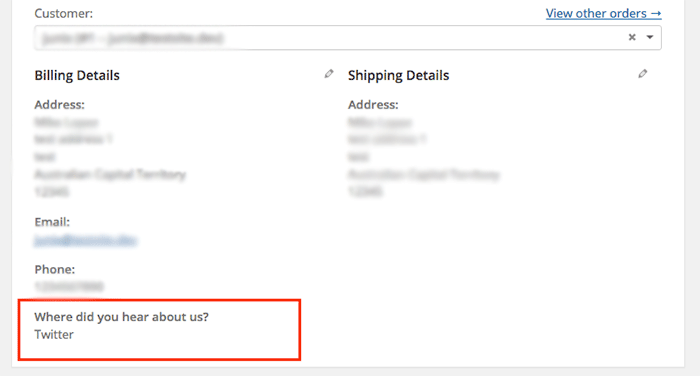
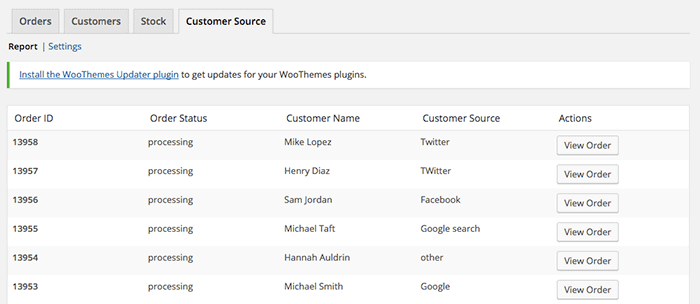
To view the data you gathered, go to Customer Source tab and click “Report”. You should be able to view the details which include customer name, customer source, order status, and order ID.

where-did-you-hear-about-us-plugin-customer-source-tab

The best part about this plugin is that it is totally free. There are no subscriptions. There is no premium version to buy. You can use it in as many websites as you want.

When you learn where your customers come from, you can make your business more profitable. If you tried using this plugin, tell us your experience about it in the comments section.

Filed Under: How-To Articles, Theme and Plugin Reviews Tagged With: e-commerce, how-to, marketing strategy, plugins, website development, Wooassist, WooCommerce

How to Show Only Blog Excerpts in Storefront Theme

November 30, 2016 By John 7 Comments

How to Show Only Blog Excerpts in Storefront

Having a blog has a huge impact on e-commerce sites. A blog helps drive up to 55% more traffic. Blogs are all about providing relevant content to drive visitors to the site. Most blogs in the past prefer the full post display but recently, the snippet view or blog excerpts view has become quite popular. With blog excerpts view, the blog content is more scannable, with posts lined up and a Read More button available after each one. This lets the visitor browse through the posts and just click on the article he/she wants to read more about. In this article, we talk about how to show only blog excerpts in Storefront.

Why Show Only Blog Excerpts?

Increased Visibility

When you have a lot of posts on your blog, displaying only blog excerpts will make more of your content visible. Your latest post may not be the one that the reader is interested in. Having short excerpts of each post will show your visitors that you have a lot of content that they can indulge in.

Ease of Use for Visitors in Choosing Content that Interests Them

With a lot of posts in view, your visitors will be able to easily choose which article to read. This also helps bring more attention to your old posts so keeping those old posts updated with new information will also pay dividends. Readers can scan the blog page easily and may click not just one, but several articles that spark their interest.

Trims Down Lengthy Posts

If you create a lot of long blog posts, then having an excerpts view will make your blog more manageable. A 2000-word blog post is enough to cover a few screens which take attention away from other posts in a full-length view.

Reduced Page Load Times

Since you are only loading post snippets, your blog page will load much faster. Just imagine the number of images on a few of your blog posts and how much longer it would take to load all those.

Increased Page Views and Time on Site

With more content to browse through, showing only blog excerpts will increase your page views. And as visitors read more of your content, you also effectively increase user’s time on your site giving more opportunity for conversion.

Displaying Blog Excerpts in Storefront Theme Using a Plugin

You can switch to a blog excerpts display by editing the WordPress template files. However, you have to be familiar with the WordPress loop and edit the normal content with the excerpts function. An easier method is to use a plugin.

storefront-blog-excerpts-plugin

The Storefront Blog Excerpts plugin is made to work with Storefront theme by WooThemes. This also adds a section in the WordPress Customizer for you to modify how to display your blog content in excerpts view.

How to Use Storefront Blog Excerpts

  • In the plugins page, click “Add New”. Search for “Storefront Blog Excerpts” in the WordPress repository. Click on “Install” then activate the plugin.
  • After activation, the blog archive will be automatically replaced by the excerpts display.
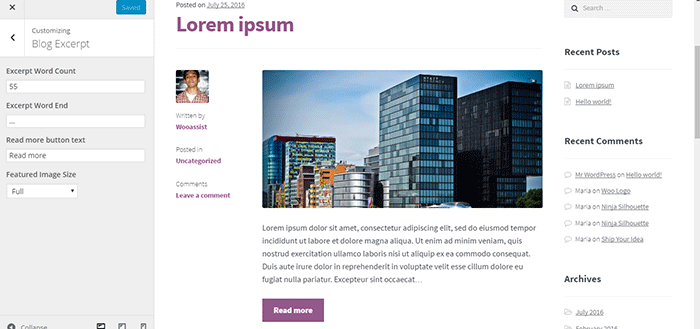
  • You can further customize how your blog archive is displayed. Go to the Appearance > Customizer and find the Blog Excerpts section.
  • You can modify the following properties in this section.
    • Excerpt word count – The default value is 55. The average word count of an academic paragraph is around 100 – 200. 55 is around half of it. Based on this, adjust how many words you want to display in each excerpt.
    • Excerpt word end – The default value is “…”. You can customize on the symbols that you can use to indicate a continuation. Other not so common symbols are “>”and “->”
    • Read more button text – The default value is “Read more”. This is the basic call-to-action. You can be more descriptive on the text and try “Go to Full Article”.
    • Featured image size – The default value is “Full”. Here, you can choose different sizes of feature images.

How to Show Only Blog Excerpts in Storefront

Have you tried displaying only blog excerpts on your WooCommerce store’s blog? If you haven’t, you should consider doing it as it might just get you more page views and increased time on site. If you have tried the plugin above, let us know your experience about it and your ideas on how it can be improved.

Filed Under: How-To Articles, Theme and Plugin Reviews Tagged With: best practices, how-to, navigation, plugins, Storefront, Wooassist

12 WooCommerce Tasks You Should Outsource

August 18, 2016 By John Leave a Comment

WooCommerce Tasks You Should OutsourceHow much value do you put on your time? As a business owner, this is a question that you should be asking yourself. Ideally, you should be working on your business rather than in your business. This entails hiring staff to handle the day-to-day operations and outsourcing works well for this purpose. Outsourcing is not easy but it can do good for your e-commerce business.

We’ll take a look at some of the benefits of outsourcing. We’ll also discuss the challenges that come with outsourcing, how you can deal with them, and the tasks that you can outsource.

Benefits of Outsourcing

You may opt for an in-house staff, but why is outsourcing a popular alternative? Here are a couple of reasons.

Getting a WooCommerce Expert to Do the Job

Outsourcing an experienced virtual assistant is made simpler. With some digging, you can find a WooCommerce expert who doesn’t charge exorbitant fees. With the right approach, you can even find someone who will stick with your company for years.

Reduced Costs

Hiring a virtual assistant will cost less than hiring a full-time in-house staff. You won’t need to invest in an office space for the outsourced worker. The outsourced worker will have his/her own computer with internet access. You may however need to provide some online tools and resources specific to your business.

You may have to offer a higher salary (still cheaper than your local rates) or offer some benefits if you want to keep a good virtual assistant. Do some research to find out what benefits are afforded to employees in certain countries. For example, virtual assistants from the Philippines will expect a 13th month bonus. Incentives for good performance are also good.

Challenges with Outsourcing

laptop-outsourcing

Outsourcing comes with its share of risks but these risks can be controlled.

The Need for Training

When you delegate work, the outcome may not always meet your expectations. To improve on this, make sure you create systems that the virtual assistant can follow. Provide ample time in training the outsourced worker.  Familiarize them with your business processes. This will help in paving the way for a long-term mutually beneficial relationship.

Confidentiality or Security Issues

You want to protect your business and that’s understandable so you might be hesitant in hiring someone from the other side of the world. When hiring a virtual assistant, you will most likely be sharing sensitive company information. On top of that, you will be providing access to your site and other accounts. Before hiring, you can do your research on the person that you are hiring. Check out social media profiles and other mentions on the web. Charles Haines also offers some interview tips for measuring integrity.

During the first few weeks, you can consider providing the outsourced worker limited access to your systems. When you are more comfortable, you can start providing more access.

WooCommerce Tasks You Should Outsource

As you work on growing your business, you may find that you spend a lot of your time on tasks that you can delegate. Outsourced WooCommerce tasks are web design and development, marketing, SEO and other back-office roles.

WooCommerce Tasks

1. Create and Edit Products – Creating and editing WooCommerce products can be time consuming. You need to set up products with different attributes and optimize and upload images for each one. Delegate this task so you can use your business expertise where it is needed.

2. Product Image Editing – Images need to be optimized before being used on your WooCommerce store lest you risk bloating your site and increasing page load times.

3. Improve Product Copy – Writing product descriptions that highlight your product benefits will help you sell. Copy writers and virtual assistant know this. Speak to your target market and convince them to make the purchase. This is one less task to worry about, as professional copy writers can do this for you.

Web Design and Development

programming-outsourcing4. Update Plugins and Core – It’s important to keep your WooCommerce store protected from the latest known vulnerabilities. A WooCommerce expert can help improve security and site performance by keeping everything updated.

5. Design Tweaks – Improving user experience (UX) is a major factor in the success of your online store. A professional web developer can recommend and apply design changes to your site to optimize UX.

6. Analytics and Webmaster Reports – When optimizing your site to increase conversion or improve user experience, analyzing and interpreting existing data is invaluable. A virtual assistant adept at Google Analytics can analyze and interpret your website data. This can help you make sound decisions.

7. Technical Solutions – Don’t get wrapped up in the technicalities of developing and maintaining your website. An experienced WooCommerce developer can optimize your design and add new functionality in a fraction of the time it takes you to do.

8. Secure Your Site – Apart from WordPress and plugins updates, a WooCommerce expert can help you set up automated backups and set up other security features.

9. Speed Optimization – Keeping your site running at its fastest will improve user experience and will reduce bounce rates. Notably, site speed is also an important ranking factor for SEO. A WooCommerce developer can help you optimize your site speed. This can include optimizing images, optimizing the HTCaccess file, setting up caching, minification, and DNS.

Marketing and SEO

10. Search Engine Optimization – Make it easier for potential customers to find your WooCommerce store by ranking high in organic search results. This is no small feat as SEO can take a lot of time. However, many virtual assistants make a living through SEO so finding an SEO expert is easy. A WooCommerce SEO expert can help optimize your product pages and blog posts to rank better in search engines.

11. Email Opt-in Solutions – To improve your site’s lead generation capabilities, a WooCommerce expert can help you add email opt-in forms in strategic locations on your site.

12. Landing Pages – An effective landing page should help you achieve your site’s goals. A WooCommerce expert can help you optimize your landing pages for this purpose.

Final Notes

Outsourcing a WooCommerce expert can help you save your time so you can focus on other things that need your attention. You now have a better idea of what tasks you can outsource to save your time. A WooCommerce expert can do tasks in a fraction of the time that it would take you. While outsourcing can be a challenge, the tips above should help ease the process.

Do you have any questions? Have you tried outsourcing? Do you have any tips that you can share? Let us know in the comments.

Filed Under: How-To Articles Tagged With: admin, best practices, e-commerce, how-to, marketing strategy, outsourcing, website maintenance, Wooassist, WooCommerce

  • « Previous Page
  • 1
  • …
  • 16
  • 17
  • 18
  • 19
  • 20
  • …
  • 24
  • Next Page »
Let us support your online store so you can manage your business

Get started today

Get 2 Hours of FREE SUPPORT

We are so confident that you will love our services that we will give you your first 4 hours at a 50% discount

That’s 4 hours for only $75

BUY NOW

Free eBook

5 Things Every Online Store Can Fix On Their Website In The Next Week To Increase Sales

Quick Links

  • How it Works
  • Pricing
  • Blog
  • Contact
  • About Wooassist
  • My Account
  • Checkout
  • Privacy Policy
  • Cookie Policy
  • Terms and Conditions

Wooassist

Australia:
59 Luke St.
Hemmant QLD 4174

Philippines:
San Miguel St.
Poblacion, Iligan City 9200

Connect


Copyright © 2026 · Wooassist

Yours FREE!

5 Things Every Online Store Can Fix On Their Website In The Next Week To Increase Sales