Wooassist

Assistance for Your Woocommerce Store

  • How it Works
  • Pricing
  • Services
    • Site Maintenance
    • AI SEO and Content Marketing
  • Blog
    • How-To Articles
    • Code Snippets
    • SEO For E-Commerce
    • Theme and Plugin Reviews
    • Wooassist News
    • WordPress/WooCommerce News
    • Interviews
  • About Us
  • Contact
You are here: Home / Archives for How-To Articles

How to Install an SSL Certificate on Your WooCommerce Store

April 11, 2016 By John Leave a Comment

cyber-security-lockFor WooCommerce stores, an SSL certificate plays a huge role in securing sensitive data for your users particularly their credit card details and other payment information. Having a secure WooCommerce store builds your customers’ trust. Without trust, the visitor will not convert. If you are serious about your e-commerce business, you should take the necessary steps to secure your site.

What is SSL?

SSL stands for secure sockets layer. It is a type of security that handles the encryption of data before they are sent to the internet. Encryption locks data to avoid unauthorized use. Data sent via SSL must be decrypted for the content to be readable.

Why is SSL a Requirement for Accepting Credit Card Payments?

credit-card-online-purchase

Connections that use plain Hyper Text Transfer Protocol (http) are sending data in plain text. Data will pass through a lot of internet nodes and it is possible to intercept the data before it reaches the destination server. It is a security concern when sensitive data like credit card numbers are sent unencrypted.

Connections that check for an SSL certificate and encrypt data use https (secured http). Aside from encryption, SSL certificates also provide authentication. Trusted SSL providers will only issue an SSL certificate after several layers of identity checks. A green https address bar and a lock icon in it are the best indicators that a site has an SSL certificate and can be trusted. Your customers are less likely to fall for a scam because scammers will not have an SSL certificate in their sites. Also, users will see a warning in their browsers should they try to go to a website without proper SSL certificate using https.

Maintaining Your SSL

One downside of getting an SSL is the added administrative burden in terms of cost, paperwork, and third party verification. Once you get an SSL certificate for your e-commerce site, you must not neglect its renewal. Your WooCommerce store will get a red flag as an unsecure site if you have an expired SSL certificate. It’s scary enough that many users will tend to back off seeing your site as a security threat. If you neglect to renew your SSL, your organic traffic would suffer and you could be penalized by Google.
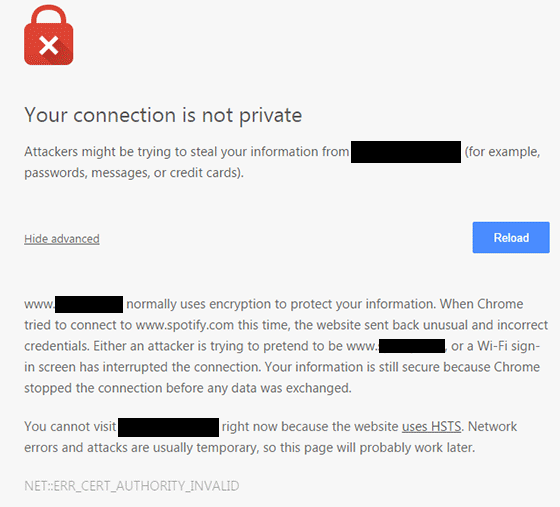
ssl-error_cert-authority-invalid

How to Choose an SSL Plan for WooCommerce
data-keyThere are a lot of SSL plans available. An SSL certificate is generally priced depending on its scope and type of validation.

Scope of Validation

Basic SSL only provides security on the main domain. Wildcard SSL certificate secures a domain together with its sub-domains. If you have sub-domains like sports.example.com, shop.example.com, and news.example.com, go for a wildcard SSL certificate.

Types of Validation

Domain Validation

Domain Validation SSL certificate is cheaper than other certificates and issued within minutes. It only verifies the domain name and you do not need to provide any documents.

Organization Validation

This certificate validates that your business really exists. The validation process usually takes two to five business days. Your organization’s name will be displayed in the certificate which in turn earns your customer’s trust.

Extended Validation

An EV SSL certificate has the highest form of SSL certificate validation. Sites with EV SSL certification will have unique visual cues in them: a green https address bar and a lock icon in it. To get an Extended Validated SSL, an organization will have to complete a process defined by Certificate Authority (CA).

paypal-validation

Choosing a reliable SSL certificate for your WooCommerce store is a matter of trust. You might choose to have an inexpensive yet relatively unknown certificate. Some of these inexpensive certificates are just as reliable as the expensive ones.

How to Acquire an SSL certificate

Installing an SSL on your e-commerce site can be really easy or quite frustrating, depending on your hosting provider. SSL installations require configuring the servers and hosting providers typically own the servers themselves.

There are two ways of getting an SSL certificate: buying from the hosting provider themselves or buying from a third party.

Buying from the hosting provider is the simplest way to get an SSL. The process differs from one hosting provider to another. But in most cases they will handle the installation themselves. All you have to do is fill out a form and accept the terms. In 1 to 2 days, you will get an email finalizing your SSL installation. Most of these SSL certificates are domain validation though.

If you want a higher type of validation, consider buying a certification from a third party. The process may vary with different SSL and hosting providers but here’s the general process that you need to follow:

  • Prepare your validating documents. Ask for a separate dedicated IP address from your hosting provider. Shared IP addresses aren’t allowed in SSL.
  • Generate the Certificate Signing Request (CSR) from your web hosting server. It is best to ask your hosting provider to generate the CSR. The Certificate Authority will create your certificate based on the information contained in the CSR.
  • Submit the CSR and other validating documents to the Certificate Authority. Usually, your SSL provider will handle this for you.
  • Have your domain and company validated.
  • After receiving the SSL certificate, you need to upload it to your hosting account, then “turn it on” for the site you want to secure. Depending on the hosting server, you can do this in the cPanel. Alternatively, you can send a ticket on your hosting provider to do this for you.

If you are having problems with securing an SSL certificate it is best to get in touch with your hosting provider.

Now that you have a better understanding of SSL certificates, it’s time to get one for your site if you don’t already have one. If you have any other questions or if anything is not clear, let us know in the comments and we’ll do our best to help.

Filed Under: How-To Articles Tagged With: best practices, e-commerce, how-to, security

Why Should You Keep WordPress Updated?

May 24, 2016 By John 1 Comment

WordPress is getting more popular as a platform for creating e-commerce stores. Because of this, WordPress sites have become attractive targets for hackers to try and break into. There are a few reasons why hackers do this but the main motive has always been for profit. In this article, we will discuss how hackers take advantage of a WordPress site with poor security. You’ll also learn what should be done before a site update and other means to keep your site safe.

How Does a Hacker Take Advantage of a Compromised WordPress Site?

why should you keep wordpress updatedA lot can be done to a hacked WordPress site. It is not just getting sensitive information. Actually, getting sensitive information like credit card numbers is just a “bonus”. It’s not really your website that the hackers want. What they want more is the power of your server resources: computing power, disk space, and anonymity on the internet. So how can they use your server to their advantage? Here are some ways:

Bitcoin Mining

Bitcoin mining is the process of adding transaction records to the Bitcoin’s public ledger. One offers processing power to the public Bitcoin community to validate transactions. He gets a portion of the money being transacted as processing fee. Bitcoin mining is intentionally resource and processing intensive so that the number of blocks found each day by miners remains steady. This is where the hackers can take advantage. They will use your server to mine for themselves, hence noticeably slowing down your site.

Distributed Denial of Service (DDoS)

This attack is an attempt to crash one’s server. It spams that server with thousands of traffic simultaneously, thus denying service for other users. This is commonly used for cheating in online gaming, online gambling, and in taking down a site. Since you can’t overwhelm a server with traffic using a single PC, the likely scenario is that the attacker will have thousands of hacked servers and personal computers to perform an attack. All they need is a single PHP script saved on each site which they can activate at will.

Anonymous Attacks and Spam

Hackers can also use your server to attack or spam anyone anonymously. Since they are using your servers to do these malicious things, these will point to your name and not theirs. They can be churning thousands of spam emails to other people at your expense. They can send viruses and malware through these emails to infect more PCs to aid their hacking.

Data Mining

Hackers can also just mine sensitive information like credit card numbers, passwords, emails and others.

Automated Hacking

hacking-code-destroyMost attacks are automated and target small and unsecure sites. This works similar to how a search engine uses search engine crawlers to index information on the web. The hacker’s crawlers roam around the web to find exploitable sites. When a vulnerability is spotted, the hackers will attack that vulnerable point. Attacks vary from brute force attacks to code injection on contact forms.

Importance of Updating WordPress for Security

The people behind WordPress are working hard to increase security against these attacks. This is what most of the minor updates are for. As the attacks get smarter, the security needs to upgrade as well. Fundamentally, there is no such thing as a perfectly secure system. So whenever WordPress developers see or hear about a possible vulnerability, they will try to fix it as fast as possible.

This is why WordPress updates are very important. By keeping your WordPress core updated, you are protecting yourself from the latest known vulnerabilities.

Things to Do Before Updating

Most of the time, updating WordPress is harmless. However, some major updates that involve the core code may break some plugins or theme files which in turn can break some layout or functionality on your site. That’s why it is important to follow a process before pushing through with an update to avoid breaking your site.

Create a Backup

Creating a backup is the best thing that you can do before pushing through with an update. Backups are your last line of defense in case something goes wrong. If you think it is a hassle, you can actually automate backup creation. There are even hosts that automatically do this for you. However, it is best to have your own backup and not depend on your host to make your backups for you.

Testing on a Staging Site

A staging site is an independent copy of your site. Most hosting sites offer an easy way to make them but you can always create your own. Staging sites are used to ensure that everything works perfectly before you present your site to your customers. This is very important especially for e-commerce sites. You can lose your customers’ trust if you let them experience downtime and bugs.

Other Things to Help You Secure Your Site

cyber-security_keyboard-lockedAside from the updates, there are a lot of things you can do to harden the security of your site. Here are some examples:
Installing a WP Security Plugin

Like creating a backup, installing a WP Security plugin is one of the best things that you can do. Sucuri Security plugin is highly recommended. Basically Sucuri will act as a firewall for your site. It will protect your website from hackers, malware, DDoS and blacklists. It will receive all the traffic going to your site and filter it before sending it to your host. This allows the plugin to block all the attacks and only send you legitimate traffic. Because the filtering/blocking is happening on the Sucuri servers, your servers are relieved of a lot of load. Sucuri has always been the top go-to plugin when it comes to security.

Password Protect Some Directories

Password protecting /wp-admin directory adds another layer of security to your site aside from the login page. This can be done either manually or using cPanel. This is addressed on sites that have a lot of users accessing the wp-admin; for example large news/blog sites that accept guest authors.

Disabling PHP Execution

Disabling PHP Execution from certain directories protects you from backdoor access file attacks. The attacks come disguised as a WordPress core PHP file and inserted in easy access directories like /wp-includes/ and /wp-content/uploads/. Preventing PHP execution from these directories reduces the risk of backdoor access.

Changing the Prefix of Your Database

The default prefix of a WordPress database is “wp_”. Everything on your database will start with this so changing it will make it difficult for attackers to access your database.

Conclusion

Now that you’re more familiar with how hackers work, you can better equip your site to avoid being a victim. Backup your site and do not skimp on WordPress updates, even the minor ones. Remember that these updates will help you safeguard your WordPress site from the latest known security threats. Updates are one thing but you should also harden your site by implementing the strategies mentioned above.

When was the last time you updated WordPress? Do you have any other security tips you’d like to share? Let us know in the comments.

Filed Under: How-To Articles Tagged With: admin, backup, best practices, brute force, e-commerce, how-to, plugins, security, sucuri, website maintenance, WordPress

How to Change the Number of Related Products in WooCommerce

May 12, 2016 By John Leave a Comment

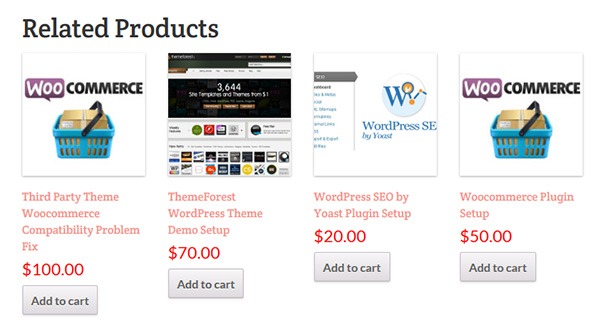
How to change the number of related products in woocommerceChanging the number of related products in WooCommerce is a relatively easy task if you know how to do it. WooCommerce defaults to two related products in the single product page but store owners may want to show their visitors more than just two related products.
Why Change the Number of the Related Products?

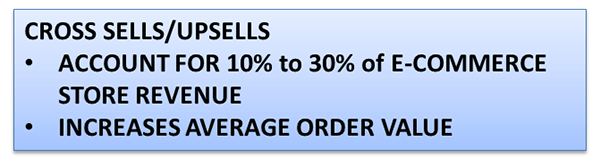
Showing more products in the Related Products section will increase and develop the browsing or buying choice of the user. This strategy is basically cross-selling/upselling. It is the strategic way of introducing your customers to other products that are related to what they are already interested in. Research shows that product recommendations account for 10% to 30% of e-commerce store revenue and increase average order value.Cross-Sells_Upsells

Setting up the Number of Related Products

There are two ways you can set up the number of related products. First is to insert a code snippet in the functions.php file on your theme. Second is to install a plugin to do it for you. The first method may seem intimidating to some WooCommerce shop owners, but it is actually as easy as copy and pasting a code. This method is recommended because it doesn’t bloat your site with unnecessary code.

In some themes, authors have added custom functions that allow users to edit WooCommerce and this includes the number of related products. Buying themes that come with a lot of custom functions however are generally not recommended as they can add unnecessary bloat to your site.

How to Change the Number of Related Products in WooCommerce Using Code Snippets

The best way to edit the number of related products is by using a code snippet that you insert into your child theme so that the code doesn’t get overwritten when you update your theme. Don’t get discouraged by the thought of coding but do take extra caution as one wrong code can break your entire site. If you do not know what you are doing, it would do you well to hire a developer to do this for you. If you are comfortable working with code snippets, then proceed with the steps below.

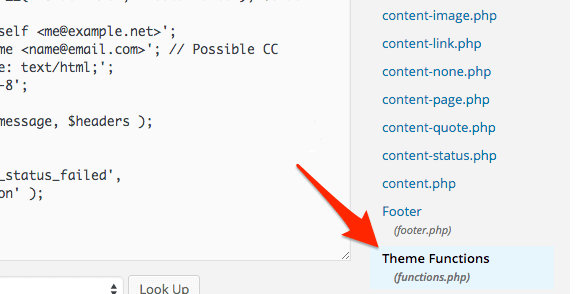
    1. To start, locate functions.php in the WordPress file system. Go to your WordPress Dashboard. Navigate to Appearance > Editor. Choose the theme you are using from the dropdown in the upper right sidebar and locate at the bottom right the functions.php file. You can also access your site’s file through an FTP client and edit the functions.php file from there.

WordPress-Dashboard_Edit-Themes_Themes-Function

  1. Next is to copy and paste the code below at the very bottom of your functions.php file.
    /**
    * WooCommerce Extra Feature
    * --------------------------
    *
    * Change number of related products on product page
    * Set your own value for 'posts_per_page'
    *
    */ 
    function woo_related_products_limit() {
      global $product;
      
      $args['posts_per_page'] = 6;
      return $args;
    }
    add_filter( 'woocommerce_output_related_products_args', 'jk_related_products_args' );
      function jk_related_products_args( $args ) {
      $args['posts_per_page'] = 4; // 4 related products
      $args['columns'] = 2; // arranged in 2 columns
      return $args;
    }
    
  2. The piece of code above will make the number of related products into 4 per page arranged in 2 columns. This is defined in these lines of code:

    “$args[‘posts_per_page’] = 4; // 4 related products”, and “$args[‘columns’] = 2; // arranged in 2 columns”.

    In order to have the desired number of related products, you just need to vary the values. For example you want to have 6 related products in a single column, change the 4 to 6 and 2 to 1. So it will be:

    “$args[‘posts_per_page’] = 6; // 6 related products” and “$args[‘columns’] = 1; // arranged in 1 columns”.

  3. Save the file when you are done.

How to Change the Number of Related Products in WooCommerce Using a Plugin

For less technical store owners, you may want to change the number of the Related Products in your WooCommerce store by using a plugin. Using a plugin will save you from editing important website files that can break your site. Here are some plugins that we can recommend:

Booster for WooCommerce

Booster for WooCommerce was previously called WooCommerce Jetpack. This enables you to tweak a lot of settings for WooCommerce not just changing the number of related products. For anyone using the WooCommerce platform, this plugin is highly recommended because it provides a lot of functionality.

To change the number of related products, follow the steps below:

    1. First, install and activate the plugin.
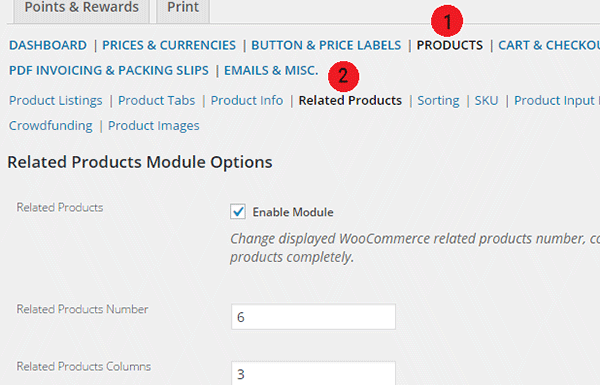
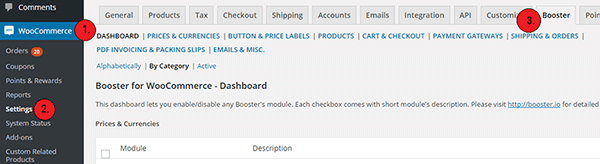
    2. Go to WooCommerce > Settings > Booster.

Booster-for-WooCommerce

    1. In the Booster menu, click on the Products tab > Related Products.

Booster-for-WooCommerce_Related-Products-Tab_Options

  1. Enter the number of Related Products that you want. You can also change the number of columns for the Related Products Section.
  2. Check the Enable Module, save and you’re done.

While WooCommerce Booster is a powerful plugin in itself, you may want to use a different plugin if you just need to edit the number of related products. This is because the number of features that you wouldn’t be using would just add extra bloat to your site.

Woo Related Products

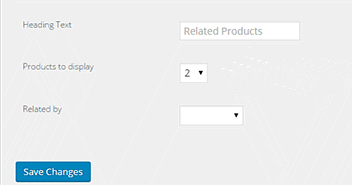
Woo Related Products is one of the simplest plugins out there for editing related products in WooCommerce. It is light and easy to navigate. It also allows you to change the heading text on the related products section.

  1. To start, install and activate the plugin.
  2. Locate “Related Products” from your WP admin menu panel.
  3. Select the number of related products you want to display. And then click on Save Changes.Woo-Related-Products_Products-to-Display

You want to increase your conversions. By increasing the number of related products from WooCommerce’s default to introduce more products to your customers, you can increase your revenue and average order value. You can follow the steps mentioned in this article to accomplish this for your own website.

Do you know of other strategies that can help increase conversions through cross sells and upsells? Let us know in the comments.

Filed Under: Code Snippets, How-To Articles Tagged With: admin, code snippet, conversion optimization, design tweaks, how-to, navigation, plugins, product management, WooCommerce, WooCommerce products, WordPress

How to Add a Home Page Slider in Storefront Theme

March 9, 2016 By John 7 Comments

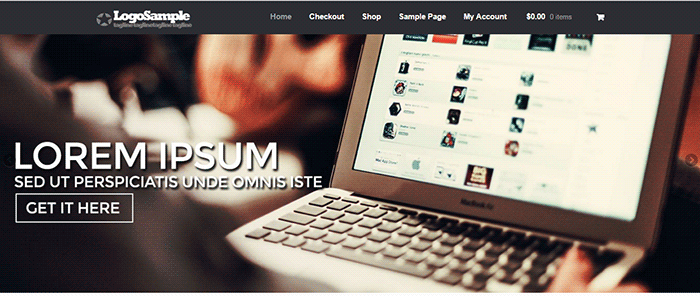
Storefront-home-page-slider_bannerContent sliders, also known as carousels, can contain complex arrangements of images, video and HTML content usually found top and center on your home page. Storefront however is about simplicity and by itself does not support sliders. You can however add a slider with the help of a plugin.

Should You Use a Content Slider on Your Site?

communication_i-am-rightMany websites overuse sliders and there has been a lot of debates about having sliders. E-commerce websites are able to present their products/services in a visually appealing way with the help of a slider. But a word of warning; sliders are not for every website. Many experts actually advise against the use of sliders.
It Causes Banner Blindness

Because many website owners are abusing the use of sliders, visitors tend to associate them with advertisements. And we all know what happens to advertisements, they get ignored. This is because web users have become increasingly indifferent with advertisements.

It Slows Down Your Site

The more complexity you add, the slower your page becomes. Packing three to five high resolution images alone can dramatically slow down your site. No matter how good or optimized your page is, no one can see it if your page takes too long to load. So keep your slides simple and avoid animations and layers. If you are only after the aesthetics value, there are a lot of alternatives to a home page slider that looks just as good and will not slow down your site.

Preparing Images for Sliders

There are a lot of things to consider when preparing images for your home page slider. Since this will be the largest element in your home page, it should be visually appealing and must convey the message efficiently.

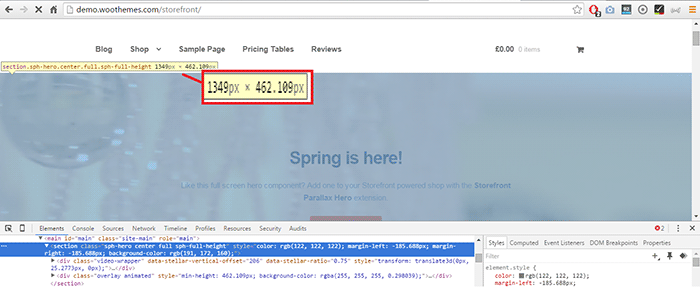
We recommend hiring a professional to do this for you. Before a graphic artist starts preparing your images, you must identify the size of your slider. This will depend on your placeholder. On your web browser, simply right click on the placeholder then click “Inspect Element”. You should be able to see the size of the placeholder in pixels.

Storefront_Placeholder_Inspect-ElementYou will most likely receive a large file from your graphic artist since the file will contain layers and other information about the image. You should request another copy that’s ready for web publishing or you can optimize the image yourself.
Here are some tips and ideas in preparing images for sliders.

  • Go for big, bold and bright images as these are what the human eye loves.
  • Avoid stock images. This will only make your images look like an advertisement and users will only ignore it. Taking your own photos or hiring a professional photographer is advantageous.
  • Your copy should be catchy. Avoid jargon and clichés. Make it short and simple. Copywriting isn’t easy so you might need to put in a bit more effort in finding the right words to help you sell your product/service. Have a strong call-to-action. Add some text or a button that tells the reader the action you want them to take like Shop Now or Download Free Trial.

Slider Plugins

Sliders use jQuery and CSS in its animations. Hence, it is necessary to have a lightweight slider plugin so that it won’t slow down your site significantly. Similarly, it is important to have a slider that is responsive. Since more and more people are browsing using mobile devices, a slider that works on small screen sizes is a necessity. Not to mention Google is now favoring mobile-friendly websites.

Here are some of the recommended slider plugins for WordPress.

Soliloquy Lite

Slider-plugin_Soliloquy-LiteSoliloquy Lite is built with performance in mind and is our slider plugin of choice. It is lightweight so it doesn’t add extra bloat to your site. Also, it is responsive making your WooCommerce site mobile friendly. In performance tests, Soliloquy has always been at the top. Its speed, responsiveness and ease of use are just top notch.

Meta Slider

Slider-plugin_Meta-SliderMeta Slider is both the best rated and the most downloaded slider plugin in the WordPress repository. It’s simple and has a user–friendly interface that it is well-received by the WordPress community.

WooSlider

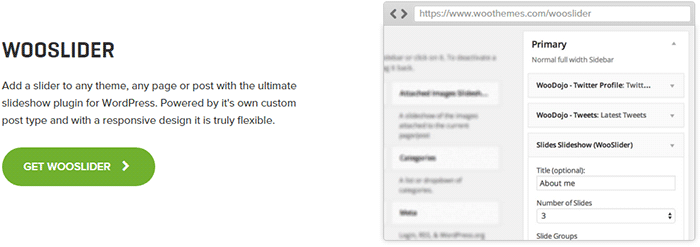
Slider-plugin_WooSliderWooSlider was made by WooThemes, the same people who developed WooCommerce and Storefront theme. Hence, you can expect that the plugin will work perfectly with WooCommerce and Storefront. WooSlider is a premium plugin and you can find out more about it in the plugin page.
Adding the Home Page Slider in Storefront

The guys that made Storefront built the theme with the philosophy to provide a basic, solid foundation to any WooCommerce project. Other WordPress themes already include multiple sliders in them and this adds unnecessary bloat to the website. Storefront lets you choose your own slider plugin should you decide you need one.

To add a full-width home page slider in Storefront, we need to make use of the extensive hooks conveniently provided by the makers of Storefront. For this example, we will use Soliloquy Lite.

How to Create a Home Page Slider in Storefront using Soliloquy Lite

WordPress-Dashboard_Soliloquy_Add-New-Images

    1. Install and activate the Soliloquy Lite plugin.
    2. Prepare the images for the slider. Make sure they are of the right size and optimized for web publishing.
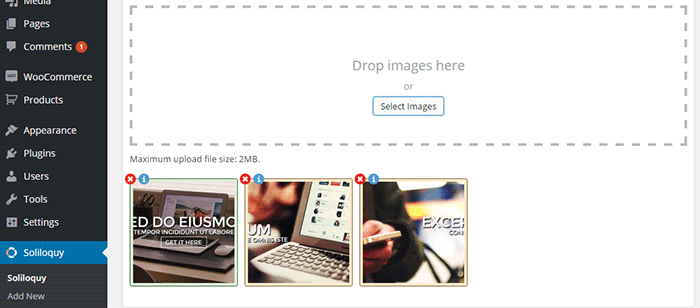
    3. On your WordPress Dashboard, click on Soliloquy > Add New. Select the slider images that you will be using.
    4. Go to the Config Tab to configure your slider settings. When you are done, click Update.
    5. Take note of the ‘shortcode’ for your slider. It will be something like [soliloquy id=“102”]. You have to remove the quotation marks inside the shortcode so it would look like [soliloquy id=102]
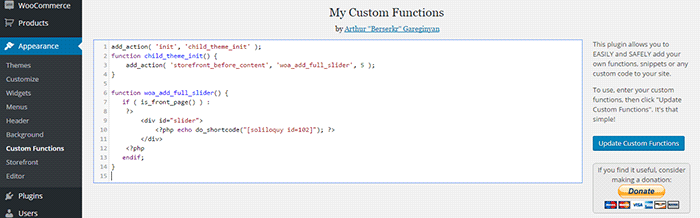
      • Note: The next steps require technical knowledge. This is a very delicate process and one mishap could cause your entire site to go down. If you do not know what you are doing, we would advise on having a developer do this step for you. An alternative is to use My Custom Functions plugin to prevent a fatal error on your site.
    6. Add the piece of code below to your theme’s functions.php file.
    7. Replace the shortcode in the code we provided with the shortcode of your slider.

WordPress-Dashboard_Appearance_Shortcode-Slider

add_action( 'init', 'child_theme_init' );
function child_theme_init() {
      add_action( 'storefront_before_content', 'woa_add_full_slider', 5 );
}

function woa_add_full_slider() { 
 if ( is_front_page() ) :
      ?> 
            <div id="slider">
                    <?php echo do_shortcode("[soliloquy id=102]"); ?>
            </div> 
      <?php
 endif; 
}

Using Other Plugins

The code above makes a container where you can put your slider shortcode. You can use this code in any slider plugin as long as it has shortcode capabilities. Just replace the ‘shortcode’ in the code we provided and you’re all set.

There are a lot of free and premium sliders out there that you can try. The important thing is to choose a slider plugin that is lightweight, responsive and addresses your individual needs. It is very easy to get carried away and use a complex slider plugin that offers lots of animation and layers but note that this will significantly slow down your site. Always remember to keep sliders simple.

If you have any questions or anything you’d like to add, please let us know in the comments.

Filed Under: Code Snippets, How-To Articles Tagged With: code snippet, design tweaks, plugins, Storefront, WooCommerce

How to Center Logo in Storefront Theme

February 12, 2016 By John 35 Comments

Centering the logo on a WordPress site is a popular design concept, but doing it can be tricky. Most themes, Storefront included, are styled with the logo aligned to the left.

While you can use a premium plugin like Storefront Designer to center the logo, you can edit your child theme’s CSS instead. There are two benefits in doing this manually. For one, you don’t have to buy a plugin. Secondly, you don’t add extra bloat to your site.

How to Center Logo in Storefront with CSS

Centering Your Logo with CSS

Before anything else, you should install a child theme on your site otherwise the changes you make will be lost every time you update your theme. Alternatively, you can use Simple Custom CSS Plugin which creates a new stylesheet that won’t get overwritten.

Add the following code to your child theme’s styles.css:

@media screen and (min-width: 768px) {
	.site-branding{
		text-align: center;
		margin: 0 auto !important;
		float: none !important;
	}
}

Text align and margin set the margin to adjust accordingly to the sides. We need to place “!important” in that line to make sure that it gets priority and doesn’t get overridden by other CSS codes.

We also need to override the default “float:left;” code so that it won’t stick to the left. We do this using “float:none !important;”.

To make sure these styles don’t affect the mobile version of your site, we set a minimum width in the selector.

Doing Away with the Secondary Menu and Search Bar

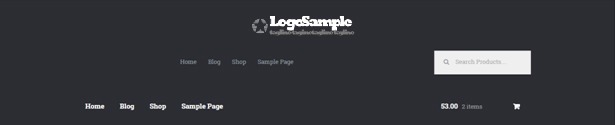
If you are using Storefront out of the box, the secondary menu and the product search bar will still be in the way. We need to do something about that next. Temporarily, the header will look something like this.

Doing Away with the Secondary Menu and Search Bar

To remove the secondary menu, go to Appearance > Customize > Menu > Menu Locations and do not set the secondary menu to anything.

To move the search bar inline with the main navigation and cart menu, you have to paste the code below to your functions.php file. A word of warning, do not proceed with this step if you do not know what you are doing. One slip up here could cause your site to go down and become inaccessible. Alternatively, you can install My Custom Functions plugin to insert the code. The plugin warns the user the code will cause a fatal error.

add_action( 'init', 'jk_remove_storefront_header_search' );
function jk_remove_storefront_header_search() {
remove_action( 'storefront_header', 'storefront_product_search', 	40 );
add_action( 'storefront_header', 'storefront_product_search', 	70 );
}

After this step, your site will look something like this.

Move search bar inline with the main navigation and cart menu

The product search bar is still not inline with the main navigation as you can see. The CSS code below will adjust the width of the main navigation so that the search box won’t warp around to the bottom.

/*adjusting the width of the main-navigation*/
.woocommerce-active .site-header .main-navigation {
	width: 50%;
}

Applying the CSS code above will result to this. Now, the only thing left to do is to resize the search box using CSS.

Adjust width of main navigation for search box to un-warp around the bottom

Putting Everything Together

Put everything inside the media screen brackets, together with the CSS code for the resizing of the search box. The final CSS code will be:

@media screen and (min-width: 768px) {
	/*centers the logo*/
	.site-branding{
		text-align: center;
		margin: 0 auto !important;
		float: none !important;
	}
	/* adjusts the width of the main navigation container to accommodate the search box in the same line*/
	.woocommerce-active .site-header .main-navigation {
		width: 50%;
	}
	/* positions the search icon properly in the search box*/
	#masthead .site-search .widget_product_search form:before {
		top: 1.75em;
		left: .75em;
		position: relative;
	}
	/*  resizes the search box*/
	#masthead .site-search .widget_product_search input[type=search],#masthead .site-search .widget_product_search input[type=text] {
		padding: .5em .5em .5em 2em;
		line-height: 1;
	}
	/* places the search box to the left of the cart menu(optional)*/
	.woocommerce-active .site-header .site-search {
		float: left;
	}

}

And you’re done. The outcome should look something like this.

Storefront Center Logo_Final

If you are unable to achieve this with the above code snippets, it could be that you are using a child theme that has codes that conflict with the codes above. Feel free to post your questions in the comments section.

Filed Under: Code Snippets, How-To Articles Tagged With: code snippet, CSS, design tweaks, how-to, mobile friendly, Storefront, WooCommerce, WordPress

  • « Previous Page
  • 1
  • …
  • 17
  • 18
  • 19
  • 20
  • 21
  • …
  • 24
  • Next Page »
Let us support your online store so you can manage your business

Get started today

Get 2 Hours of FREE SUPPORT

We are so confident that you will love our services that we will give you your first 4 hours at a 50% discount

That’s 4 hours for only $75

BUY NOW

Free eBook

5 Things Every Online Store Can Fix On Their Website In The Next Week To Increase Sales

Quick Links

  • How it Works
  • Pricing
  • Blog
  • Contact
  • About Wooassist
  • My Account
  • Checkout
  • Privacy Policy
  • Cookie Policy
  • Terms and Conditions

Wooassist

Australia:
59 Luke St.
Hemmant QLD 4174

Philippines:
San Miguel St.
Poblacion, Iligan City 9200

Connect


Copyright © 2026 · Wooassist

Yours FREE!

5 Things Every Online Store Can Fix On Their Website In The Next Week To Increase Sales