Wooassist

Assistance for Your Woocommerce Store

  • How it Works
  • Pricing
  • Services
    • Site Maintenance
    • AI SEO and Content Marketing
  • Blog
    • How-To Articles
    • Code Snippets
    • SEO For E-Commerce
    • Theme and Plugin Reviews
    • Wooassist News
    • WordPress/WooCommerce News
    • Interviews
  • About Us
  • Contact
You are here: Home / Archives for How-To Articles

Why You Should Use a Development Site for WooCommerce

August 14, 2017 By John Leave a Comment

Using a development site (or a staging site) is best practice when working with websites. A development site allows web developers to safely test new features and updates without affecting the live site.

In the absence of a development site, developers will need to test new features and updates on a live site. This is not recommended because such actions can cause critical errors that may break the functionality of the site. In some cases, adding new features and new updates can cause a  website to go down. Without a proper backup, the results could be devastating especially for e-commerce stores.

Testing Ground When Adding New Site Features

If you want to add some new functionality on a live WooCommerce store, it is best to test this first on a development site. Make sure that everything is working before you roll out the new functionality to your customers.

You will most likely have a web developer who will help you add the new functionality that you want. If this is the case, the developer will recommend doing the changes first on a development site. On the off-chance he doesn’t, talk it over with your developer and recommend testing the new functionality on a development site. After adding the new feature, do some user testing on the development site to ensure that everything is working as intended and that no other existing features have been affected.

A Development Site Prevents Errors on Live Site During Site Updates

Aside from when adding new functionality to your WooCommerce store, you should use a development site when updating your site. Doing site updates on your live site can break your site so it is always best to test your updates on a development site. This is especially true when you are dealing with major releases of WordPress and WooCommerce.

How to Create a Development Site

But how do you create a development site on your server? Some hosting providers such as WPEngine provide a staging environment for their customers. If you do not have a development site, you can create one manually. However, do note that creating a development site is a complex process that includes tinkering with your site files and the database. If you are not confident in working with your site files and the database, scroll down to the next section. If you are confident with editing your site files and database, just follow the steps below:

1. Log in to cPanel.

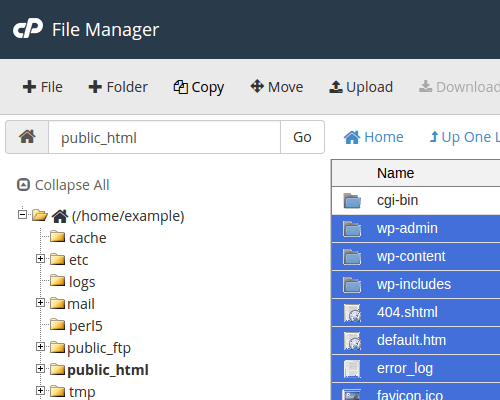
2. Go to your File Manager and go to the public_html folder. Create a ‘dev’ folder there.
How to Create a Development Site - step2

a. Copy your WordPress files from your current directory to the ‘dev’ folder you just created. Select all WordPress files and folders.
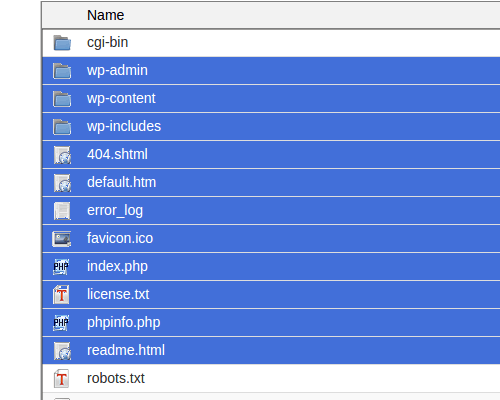
How to Create a Development Site - step2.a

b. Click Copy on the top menu.

How to Create a Development Site - step2.b

c. Type in the directory where you want to copy the files into. In this case, the directory is /public_html/dev
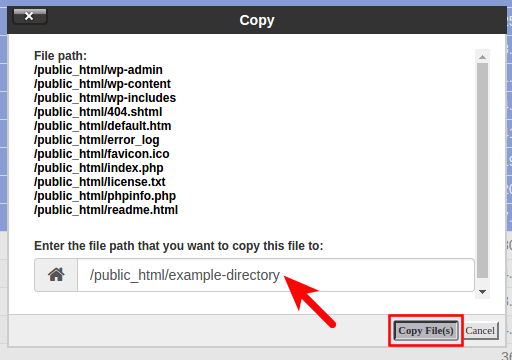
How to Create a Development Site - step2.c

3. Create a database. Note: Icons may differ but the names of the items should be the same.

a. Go back to the cPanel home, Click the MySQL Database Wizard under the Databases heading.
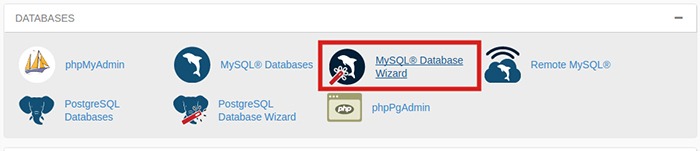
How-to-Create-a-Development-Site---step3.a

b. Next to New Database enter a name for your database and click Next Step.
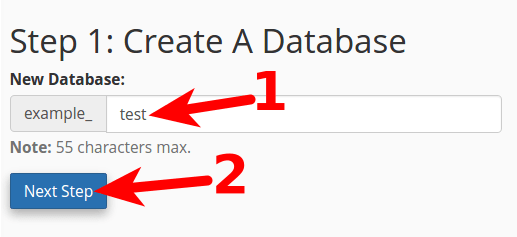
How to Create a Development Site - step3.b

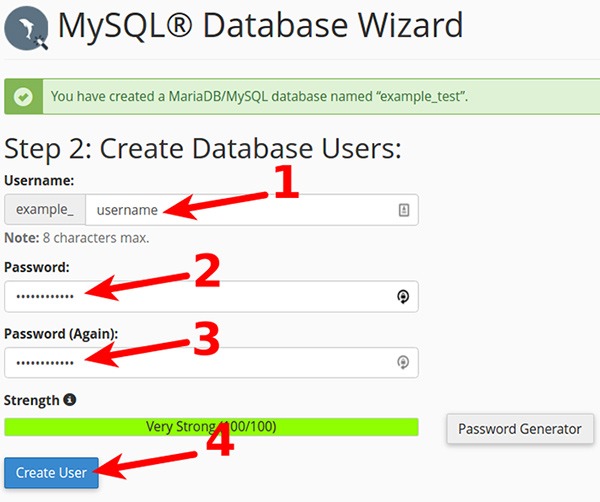
c. Next to Username enter a username. Enter and confirm a password and then click on Create User. Note these down as you will need it later.
How-to-Create-a-Development-Site---step3.c

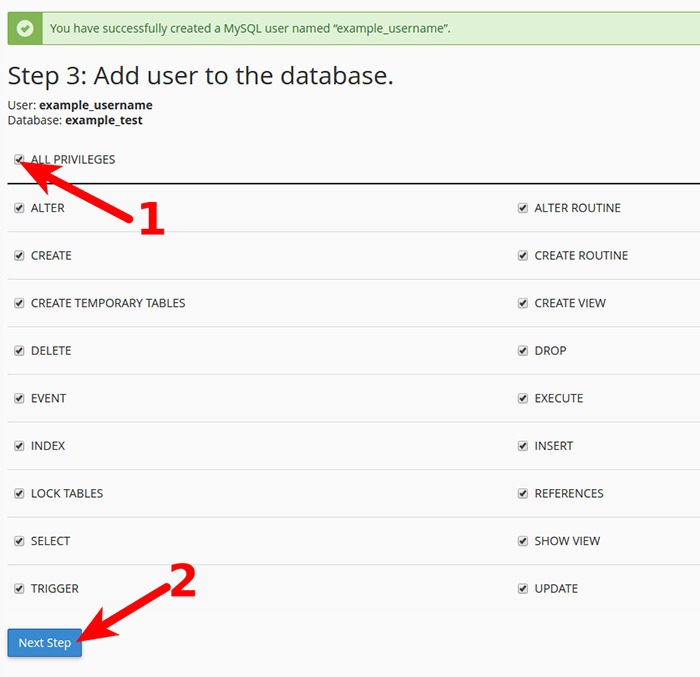
d. On the next page, you will need to assign privileges for the user on the database. Check the box next to All Privileges and then click Next Step.
How-to-Create-a-Development-Site---step3.d

4. Export your current database.

a. On the cPanel Home, click on phpMyAdmin icon under the Databases heading.

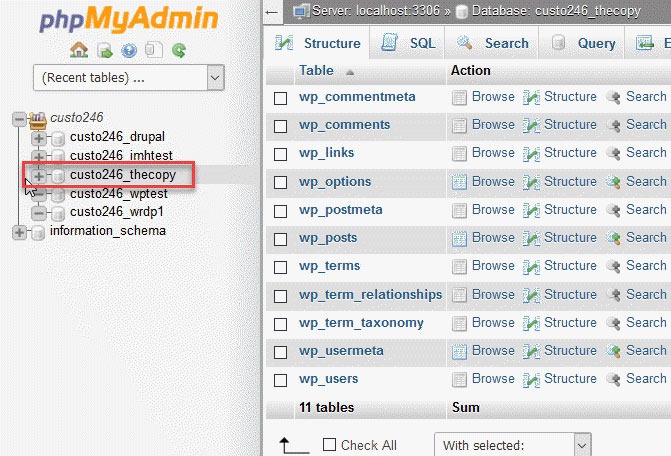
b. Select the database to export. Click on the database name you are working with in the left menu.
How-to-Create-a-Development-Site---step4.b

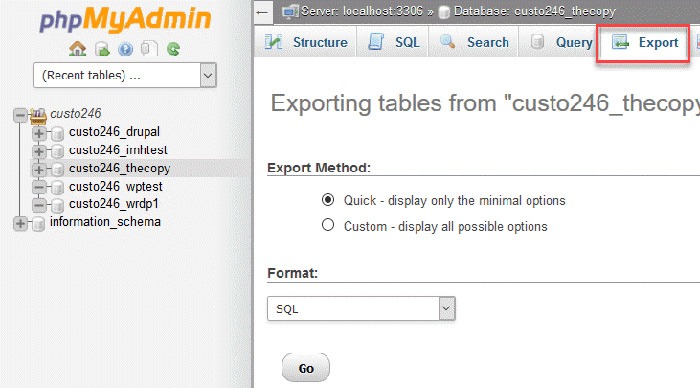
c. Click on Export option found in the tabs across the top of the screen.
How-to-Create-a-Development-Site---step4.c

d. Click on the radial button for Quick.
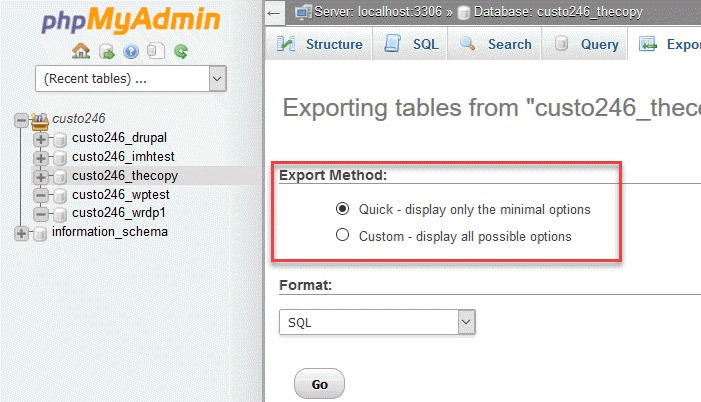
How-to-Create-a-Development-Site---step4.d

e. Next, you will need to click on the format of the export file. By default, it should be on SQL, so you don’t need to change anything.
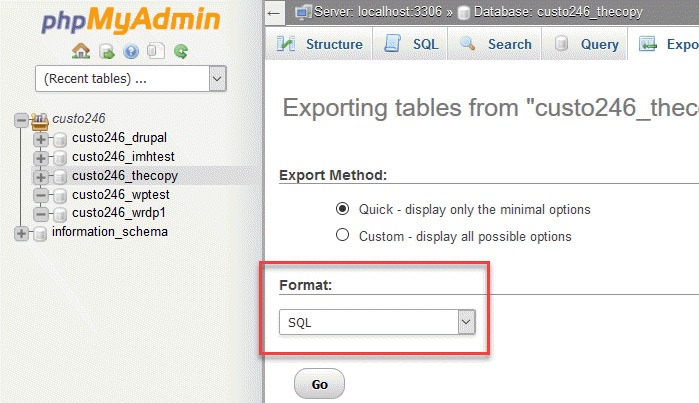
How-to-Create-a-Development-Site---step4.e

f. Click on the Go button to start the export.
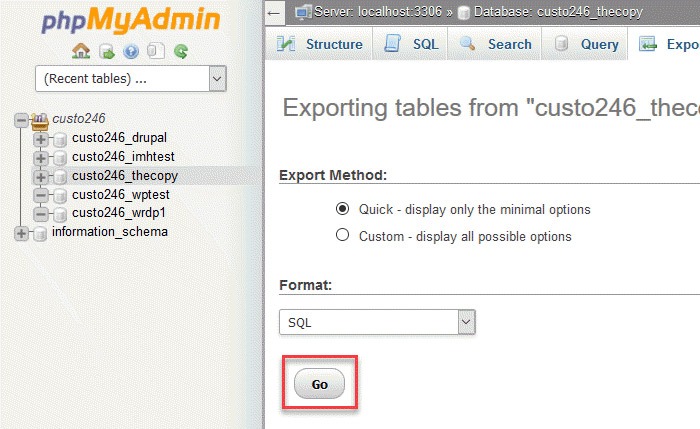
How-to-Create-a-Development-Site---step4.f

g. You will be prompted to either open or save the file. Choose the option to save the file and then save it somewhere you’ll remember.

5. Import your Database to the new database you created.

a. Still on the phpMyAdmin screen, on the left side, you should see the name of the new database you created earlier for the dev site.

b. Click on the database you created and click Import in the top menu.

c. Under File to Import, click Browse and select the backup file you previously created. You need to locate where you saved it on your computer.

d. Click Go at the bottom right. Wait for the import to finish.

e. When the database has been imported successfully, you should see a message that the import has successfully finished.

6. Configure the wp-config.php file for the dev site.

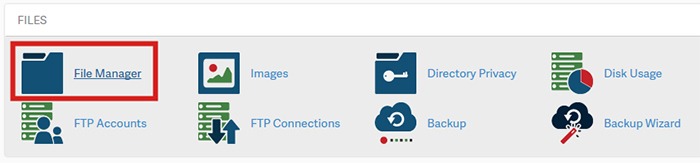
a. Click on File Manager located in the Files section of cPanel.

b. Navigate to the folder to where you uploaded WordPress.

c. Click the wp-config.php file, then click the Edit link on the top menu.
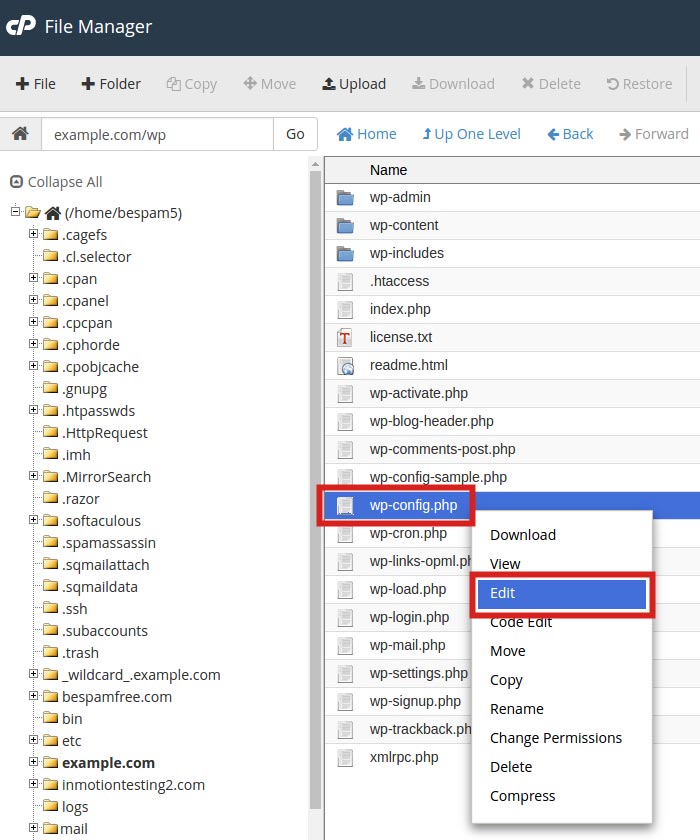
How-to-Create-a-Development-Site---step6.c

d. On the edit screen, change the values in the image below to the values you set for the new database you created earlier.
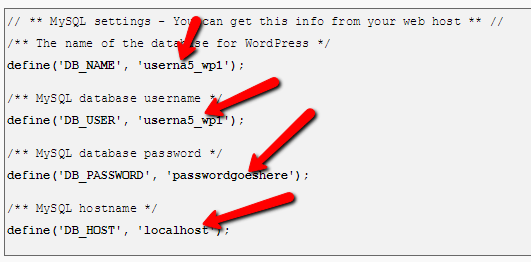
How to Create a Development Site - step6.d

7. Change the site URL for the dev site.

a. The site URL is stored in the WordPress database. In order for the site to load as a dev site, the site URL will need to be changed to the subfolder URL, eg. example.com/dev

b. Go to phpMyAdmin. Select your WordPress database. Then select your wp_options table.
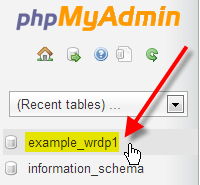
How to Create a Development Site - step7.b

c. Your wp_ prefix may differ depending on your install settings.

d. Click Edit beside either the siteurl or home entries.
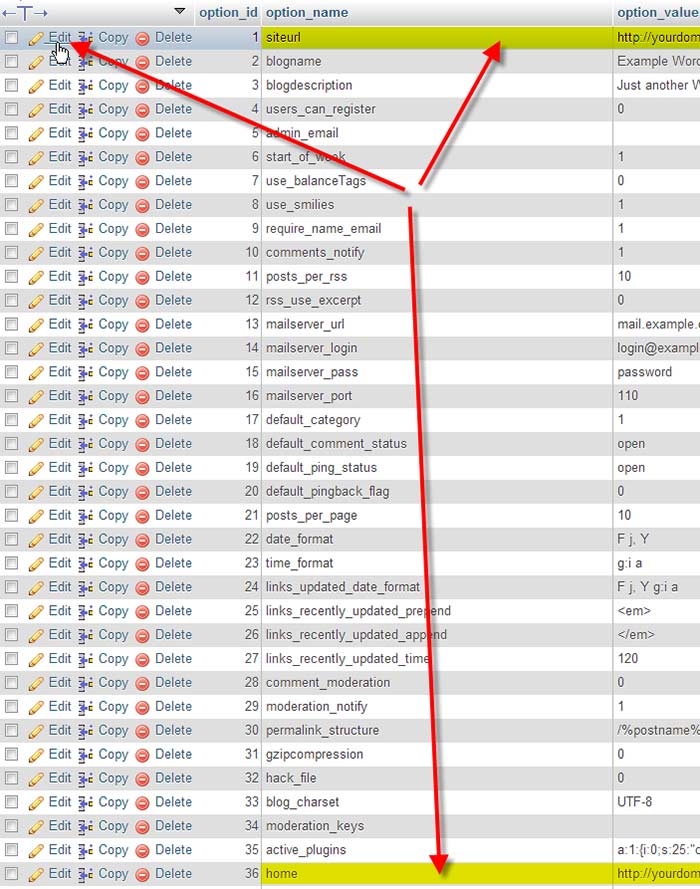
How-to-Create-a-Development-Site---step7.d

e. Enter in your new value in the option_value field, then click Go.
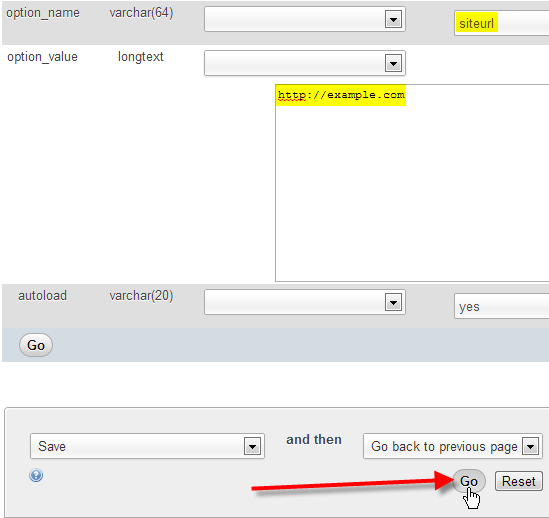
How to Create a Development Site - step7.e

8. Ensure that image links in your pages and posts are also changed.

a. These are in the database and not connected to the site URL so they will need to be changed separately.

b. Using the sidebar again, find and click on the wp-posts table.
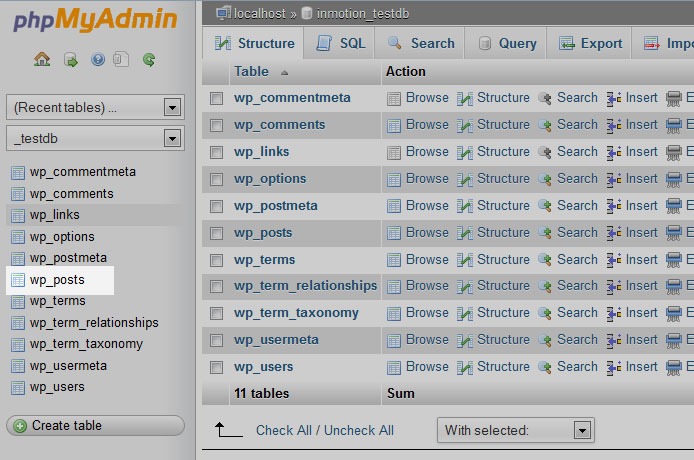
How-to-Create-a-Development-Site---step8.b

c. Look to the top of the screen and you will see several tabs that run across the page. Click on the SQL tab.

How-to-Create-a-Development-Site---step8.b2

d. You are now on a MySQL editor screen. In the code area, copy the following bit of MySQL.
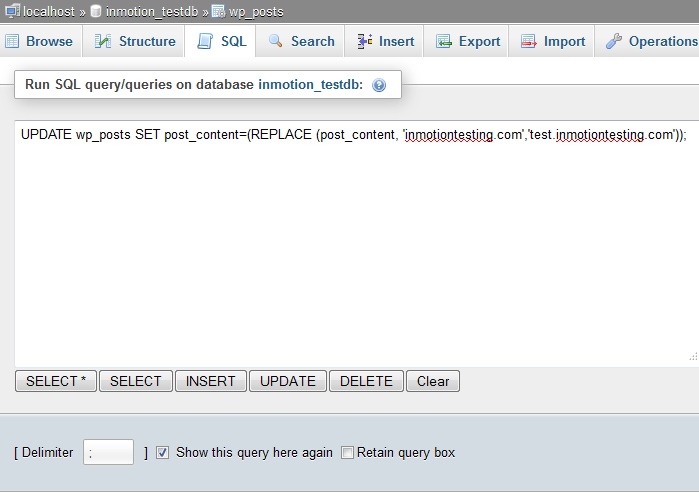
How-to-Create-a-Development-Site---step8.d

UPDATE wp_posts  SET post_content=(REPLACE (post_content, 'old url','new url'));

e. Be sure to replace <old_url> with the old sitename and <new_url> with the new site name. For instance, our original site was domain.com and the new test site will be at domain.com/dev so the code should appear as below:

UPDATE wp_posts SET post_content=(REPLACE (post_content,  ‘domain.com ',’ domain.com/dev '));

f. Click on the Go button to run the code and change the URLs for all images in the posts. This will also affect any other ‘hard coded’ links that were in the posts that pointed to the original site.

9. Update permalinks.

a. You can now login to your development site’s admin panel and update permalinks with the current settings. Just click update button. 

10. Hide dev site from search engines. 

a. Go to Settings > Reading page on backend, and make sure that the dev site is set to hide for search engines

b. If you are using WordPress SEO plugin by Yoast, you should turn off the sitemap functionality as well.

Create a Development Site Using a Plugin

If the steps in the previous section were too much to swallow, there are several plugins that you can use to create a development site. You can use Duplicator or WP-Staging plugin. Just follow the instructions on the plugin page and you should be good to go.

We hope this article can help you create your own development site. If you need help setting up a development site, the Wooassist team can help out. Just drop us an email. Or if you have questions, you can leave a comment below.

Filed Under: How-To Articles Tagged With: best practices, how-to, outsourcing, website development, website maintenance, Wooassist, WordPress

Conversion Rate Optimization for WooCommerce – An Infographic

August 24, 2017 By John Leave a Comment

As a WooCommerce store owner, you want to make your store as profitable as it can be. This is where conversion optimization comes in. We created this easy-to-follow infographic to help you optimize your store’s conversion rates. Should you ever need help getting some of these things done, just send us a message and we can help you out.

If you want to share this infographic on your site, just paste the code below on your site’s text/HTML editor.

<a href="https://wooassist.com/conversion-rate-optimization-for-woocommerce-an-infographic"><img class="aligncenter wp-image-3020 size-full" src="https://wooassist.com/wp-content/uploads/2017/08/Conversation-Rate-Optimization-for-WooCommerce-An-Infographic-by-Wooassist.png" alt="Conversion Rate Optimization for WooCommerce - An Infographic by Wooassist" width="700" height="4428" /></a>

Filed Under: How-To Articles Tagged With: call-to-action, checkout, conversion optimization, free shipping, image optimization, marketing strategy, testimonials

7 Things You Can Do to Increase the Trust Rating of Your WooCommerce Store – An Infographic

August 23, 2017 By John Leave a Comment

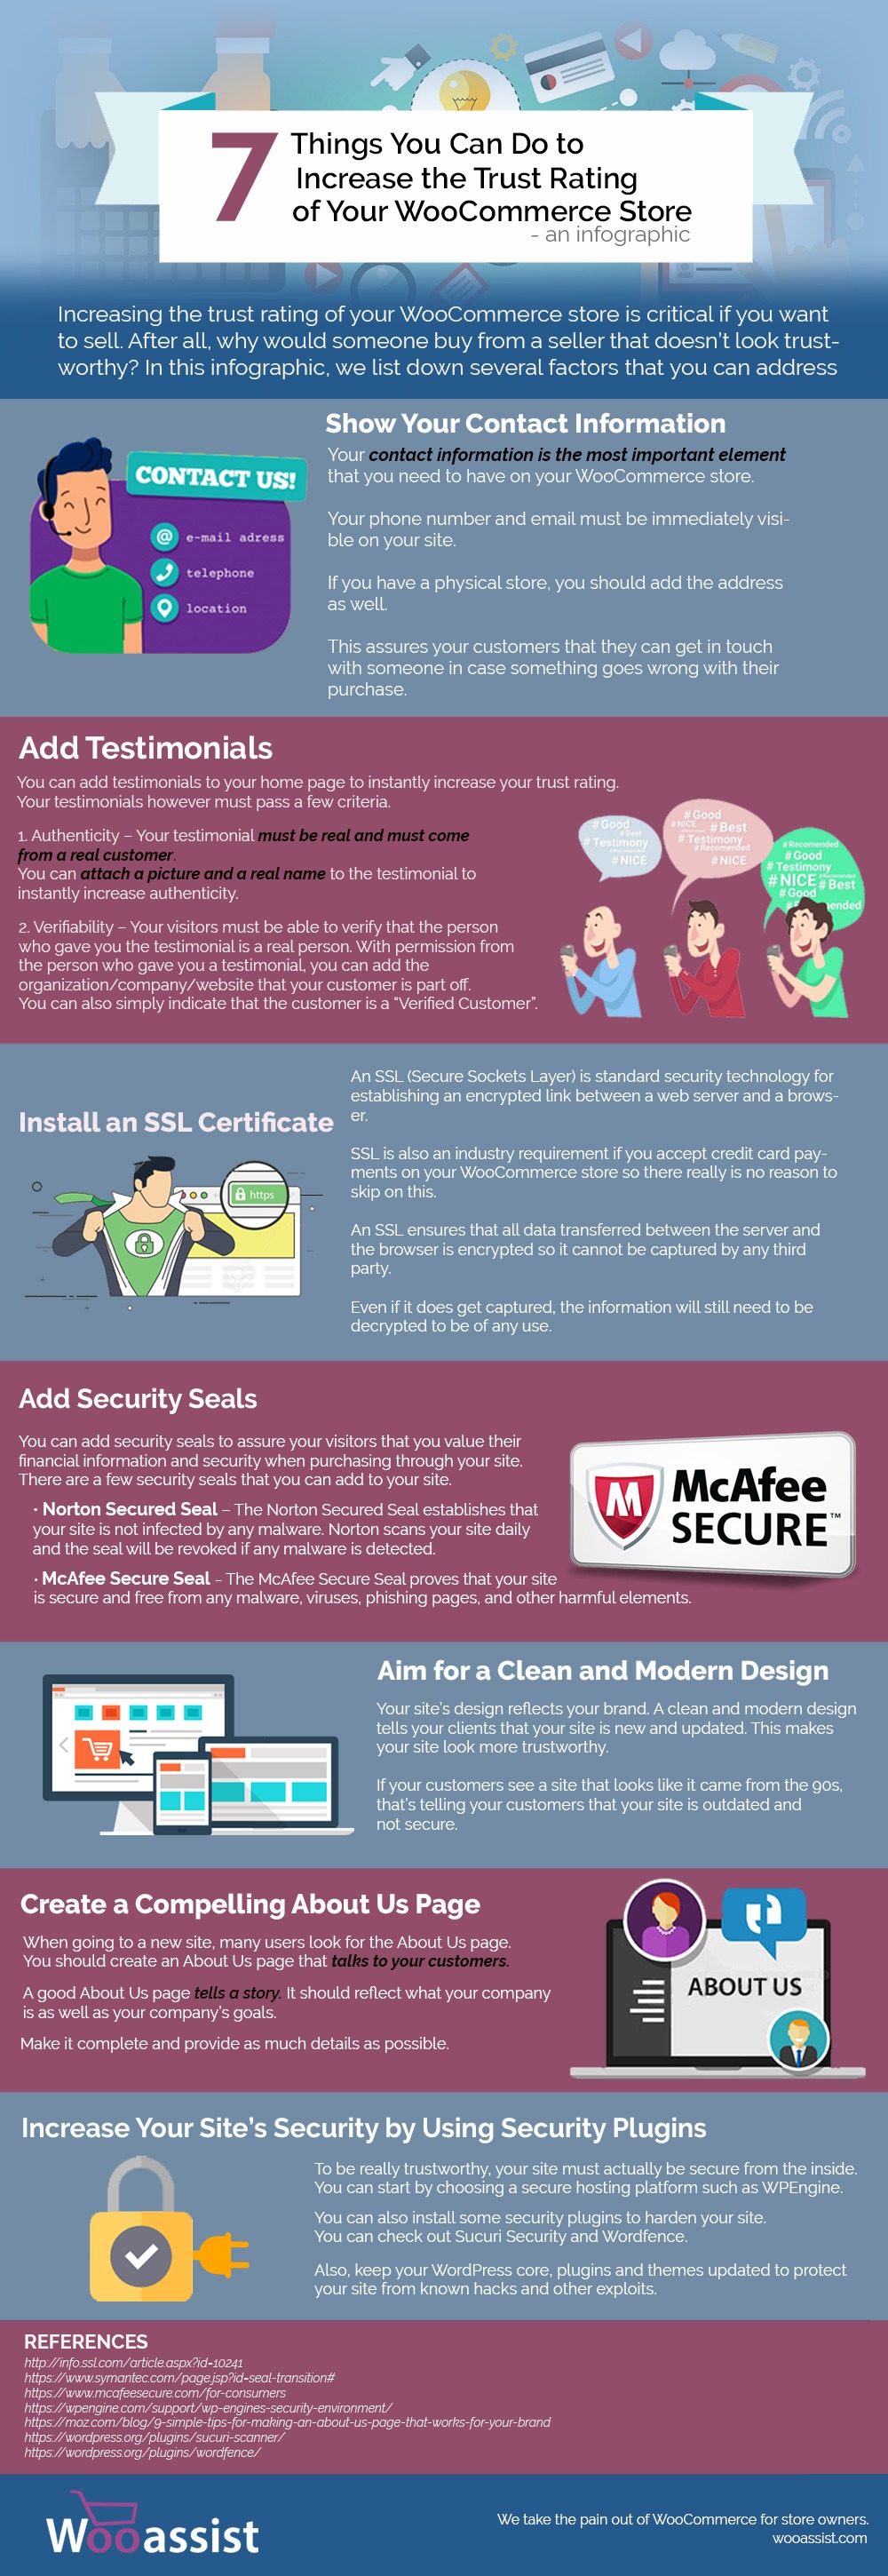
We listed down the 7 things that you can do to increase the trust rating of your WooCommerce Store in one handy infographic.

If you want to share this infographic on your site, you can use the code below and paste it in your HTML/text editor.

<a href="https://wooassist.com/7-things-you-can-do-to-increase-the-trust-rating-of-your-woocommerce-store-an-infographic"><img class="aligncenter wp-image-3017 size-full" src="https://wooassist.com/wp-content/uploads/2017/08/Increase-Trust-Rating.jpg" alt="Increase the Trust Rating of Your WooCommerce Store - An Inforgraphic by Wooassist" width="700" height="2030" /></a>

Filed Under: How-To Articles Tagged With: conversion optimization, security, testimonials, WooCommerce

How Often Should I Update My WooCommerce Store?

July 20, 2017 By John Leave a Comment

update my woocommerce store

How often should I update my WooCommerce store? We get that a lot from our clients. The ideal answer is that site updates should be done whenever there are critical security updates to keep your site secure.

For regular scheduled site updates, we have found that monthly updates are ideal. Weekly updates may be too frequent. There usually isn’t a lot to update in one week’s time. Every two or three months is way too long that the site remains vulnerable to security threats. Monthly updates are just about right. Note that even if monthly updates are being done, site owners must promptly update their WooCommerce stores should a critical security update come up.

Should I Even Update my WooCommerce Store?

We sometimes get this question too. It is true that updating your WooCommerce store can break your site. However, not updating your WooCommerce store can also eventually break your site. So essentially, it is still best to do the updates.

How to Prevent Issues When Updating My WooCommerce Store?

There is no sure-fire way to know if there will be any issues on your site as a result of updates. The best you can do is to test the updates first on a development site to see if any errors would occur. Also, you can stay on top of what the WordPress and WooCommerce developers are doing. You can sign up to newsletters or follow developer blogs to stay updated. You can check out the WooCommerce changelogs and the WordPress changelogs too.

When major updates are released, it might be ideal to wait a few weeks before updating your site. This is to give WordPress, WooCommerce and other plugin and theme developers sufficient time to update anything that was broken during the update.

What to Do Before Updating My WooCommerce Store?

There are a few steps you can take before updating your WooCommerce store. First, you can test your site updates on a development or staging site. Many hosting providers, such as WPEngine, provide their clients a staging environment for testing site updates. If your hosting provider does not provide a staging environment, don’t worry. You can still create a staging site manually.

checklistAfter applying the updates on the development site, the next step is to check if the site has any broken features. Some important elements to check are:

  • Home Page Formatting
  • Product Page Formatting
  • Product Image Gallery
  • Add to Cart and Checkout Process
  • Contact Forms
  • Email Signup Forms

If you find that anything is not working, you can proceed to fix or forward to your developer to fix. If you do not have an in-house developer, you can contact us and we can help you fix the problem. If there are no problems, you can proceed to the next step.

The third step is to back up the live site. WPEngine features a one-click backup. You can also use a plugin for creating backups. We recommend Updraft Plus plugin which also features a quick restore feature in case something goes wrong.

Once you have created a backup, you can proceed to update WooCommerce, all other plugins, themes and the WordPress core. When that’s done, you need to check if anything is broken on the live site. If everything is working and there are no formatting issues, then that’s it. You have successfully updated your site. If something gets broken, you can attempt to fix the problem or restore your backup.

What to Do When Something Breaks When Updating Your Site?

The WordPress infrastructure makes updating your WooCommerce store easy. But dealing with the complications that come with updates can be very daunting, especially if you are not a developer. As such, we recommend working with a developer when doing your site updates so that any issues can be resolved quickly. If you do not have a full-time developer on board, you can contact us so we can get our experienced WooCommerce developers to help fix any issues.

Filed Under: How-To Articles Tagged With: admin, best practices, e-commerce, how-to, security, website maintenance, WooCommerce

How to Add a Top Bar in Storefront Theme

July 29, 2016 By John 12 Comments

The release of Google’s Material design started the “top bar” trend. It was used mainly on mobile user experience (UX) designs but it found its way into desktop design. In this article, we’ll teach you how to add a top bar to the Storefront theme.

What Elements Can you Add to the Top Bar?

Top-Bar-examples

The top bar has been used in a variety of ways, depending on the UX design or the information you want to highlight. Let’s enumerate common items we see on the top bar.

  • Promotions – This can be anything from a sale to a new product release. The top bar is a good noticeable area that you can use to post your promotions and other offers.
  • User Login/Logout – When users want to log in or out, their eyes will scan the top right corner of the page to look for the link. Because of this, it makes sense to place the link in the top right corner.
  • Social Links – The top bar is a common location for the site’s social media profile links.
  • Mini Cart – The mini cart has a very important role in the UX design of e-commerce stores. It is an important element to have either on the main navigation or the top bar.
  • Search Bar – The search bar is also a crucial piece in the UX design of most websites and it can be positioned in the top bar.
  • Subscription Form/Link – Placing the subscription form on a very prominent location like the top bar draws the attention of your visitors to the form.
  • Quick Links Menu – Quick links can be any important link that you want your visitors to see or something that your visitors will be looking for. Some common quick links are My Account, Shop, Terms and Conditions, Privacy Policy, About, Contact and FAQs.

Depending on your site, you can use the top bar to contain other elements as you see fit.

How to Add a Top Bar to Storefront

To add a top bar to Storefront, you can use the Storefront Top Bar plugin. Our developers at Wooassist developed this plugin specifically for Storefront which adds two widget areas on top of the header.

Getting Started

Storefront-Top-Bar-Getting-Started

Install and activate Storefront Top Bar in your WordPress Dashboard.

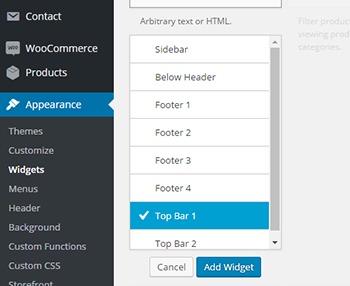
After installation, go to Appearance and click on Widgets. You should find two additional widget areas namely Top Bar 1 and Top Bar 2. These are the left and right widget areas on the top bar. You can add any content here just like in any widget area. Just make sure it looks good within the small space provided.

Adding a Simple Text

Storefront-Top-Bar-Appearance-Widgets

To add text to the top bar, find the text widget and add it to the top bar widget area. After that, you can just add any text in the text widget.

Storefront-Top-Bar-Adding-a-simple-text
Promotion 1 and Promotion 2 are the texts inserted in Top Bar 1 and Top Bar 2, respectively.

Adding a Menu

Storefront-Top-Bar-Adding-a-Menu

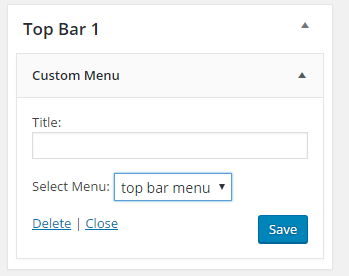
To add a custom menu to the top bar, you should first set up a custom menu in Appearance > Menu. After creating a menu, go back to the widgets area and add ‘custom menu widget’ in the top bar widget area. Select the menu you’ve just created and then click Save. Your custom menu should now appear in the top bar.

Storefront-Top-Bar-1-widget

Adding a Subscription Form Shortcode

You can add shortcodes using the text widget. In this example, we are using Mailchimp for WordPress. The plugin allows for creating a custom form which can be linked to your Mailchimp account. If you want to follow along and are wondering about the HTML markup of the subscription form in this example, you will just need the input type email and the submit button.

<input type="email" name="EMAIL" placeholder="Your email address" required />
<input type="submit" value="Sign up" />

After that, copy the shortcode and paste it in the text widget on the top bar. You can easily tweak the look of your form with CSS. In this case, the CSS we used is below. Feel free to use the code below for your own site. You can make adjustments to fit your needs.

.mc4wp-form input[type=email]{
width: 50%;
}
.mc4wp-form {
margin-bottom: 0;
}

Storefront-Top-Bar-Adding-Subscription-Form-Shortcode

Adding Other Elements to the Top Bar

The top bar works like a regular widget area. You can add shortcodes for other items like social icons, mini-cart, login, etc. You can also insert HTML and scripts in the text widget so the possibilities are endless.

Customizing the Top Bar Widget

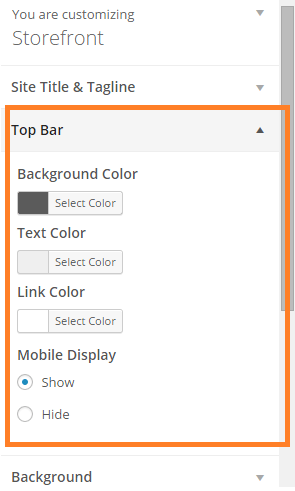
To customize the top bar widget, you can go to Appearance > Customize and click on “Top Bar”. Here you can change the background color, text color and link color. You can also set the top bar to be hidden in mobile view.
Storefront-Top-Bar-Customizing-Widget-Area

You can further tweak the top bar using CSS.

Align Top Bar 2 to the Right

By default, both Top Bar 1 and Top Bar 2 contents are left aligned. To make the content of Top Bar 2 align to the right, just use the CSS below.

.woa-top-bar.col-2 .woa-top-bar-2{
text-align: right;
}

Storefront-Top-Bar-Align-to-the-Right

Thickness/Height

To change the height of the bar, you can specify the height using CSS. Just use the code below and specify the height.

.woa-top-bar-wrap{
height: 35px;
}

Single Centered Top Bar

If you only want one top bar widget with a centered content, do not add any content to the Top Bar 2 widget area and then add the CSS below.

.woa-top-bar-wrap{
text-align: center;
}

Storefront-Top-Bar-Single-Centered

Final Notes

The Top Bar is the first thing that your customers will see on your site. It is one of most prominent areas above the fold. You now have the tools to make use of the top bar. It’s now up to how you will maximize the use of this valuable real estate.

Was this tutorial helpful? Do you have any questions about adding or tweaking the top bar in Storefront? Let us know in the comments.

Filed Under: How-To Articles, Theme and Plugin Reviews Tagged With: code snippet, CSS, design tweaks, how-to, navigation, plugins, Storefront, website development, Wooassist, WordPress

  • « Previous Page
  • 1
  • …
  • 15
  • 16
  • 17
  • 18
  • 19
  • …
  • 24
  • Next Page »
Let us support your online store so you can manage your business

Get started today

Get 2 Hours of FREE SUPPORT

We are so confident that you will love our services that we will give you your first 4 hours at a 50% discount

That’s 4 hours for only $75

BUY NOW

Free eBook

5 Things Every Online Store Can Fix On Their Website In The Next Week To Increase Sales

Quick Links

  • How it Works
  • Pricing
  • Blog
  • Contact
  • About Wooassist
  • My Account
  • Checkout
  • Privacy Policy
  • Cookie Policy
  • Terms and Conditions

Wooassist

Australia:
59 Luke St.
Hemmant QLD 4174

Philippines:
San Miguel St.
Poblacion, Iligan City 9200

Connect


Copyright © 2026 · Wooassist

Yours FREE!

5 Things Every Online Store Can Fix On Their Website In The Next Week To Increase Sales