Wooassist

Assistance for Your Woocommerce Store

  • How it Works
  • Pricing
  • Services
    • Site Maintenance
    • AI SEO and Content Marketing
  • Blog
    • How-To Articles
    • Code Snippets
    • SEO For E-Commerce
    • Theme and Plugin Reviews
    • Wooassist News
    • WordPress/WooCommerce News
    • Interviews
  • About Us
  • Contact
You are here: Home / Archives for How-To Articles

11 Things You Can Do to Increase the Security of Your WooCommerce Store

March 11, 2018 By John Leave a Comment

Increase the security of your WooCommerce store

Keeping your WooCommerce store secure is important. Hackers discover new exploits every day. In fact, more than thirty thousand websites get hacked on a daily basis. Don’t be a part of that statistic. Increase the security of your WooCommerce store before it’s too late.

At Wooassist, we’ve had our fair share of clients that have had their websites hacked. Cleaning up after a hack is a lot of trouble. You have to get rid of the exploit and weed out any remaining backdoors that would allow the hacker to regain access to the hacked site. Worse, a hacking incident can lead to a website being penalized by search engines for containing malware. In this post, we’ll share some tips that you can do right now to increase the security of your WooCommerce store. Following these tips will reduce the odds of your site getting hacked.

1. Check Your Login Information.

Often, hacks happen because of the user’s fault. Almost 90% of cyber-attacks are caused by human error or behavior.

The first step to increase your website’s security is to make sure that your login information is secure. First, don’t use “admin” as your username. Why? Because brute force attacks usually target this username. And if you use admin as your username and have a weak password, it is almost guaranteed that your site will fall victim to a brute force attack. But what if you are already using admin as your username? You’ll just need to create a new administrator account using a unique username and a strong password. WordPress will already recommend a strong password that you can use. After creating a new account, log in to the new account and you can then proceed to delete the “admin” account.

2. Keep your WordPress/WooCommerce Site Updated

Keep your WordPress/WooCommerce Site UpdatedKeeping your WooCommerce store updated will protect your site from the latest known vulnerabilities. Developers regularly patch exploits that are found in their systems so it is imperative that you update on a regular basis.

Before updating however, it is important to test your updates first on a development site or at least create a backup. Often, updates can break your site and this can harm your conversion rates if you don’t have a backup that you can revert to. Websites breaking due to site updates are common. Some hosting providers such as WPEngine provide their customers an easy-to-set-up staging environment. Here you can test your updates before applying them to your live site.

3. Use Two-Factor Authentication.

Using 2-factor authentication greatly increases the security of your website. Even when a brute force attack manages to get into your site, you can block the hack with two-factor authentication. Unless the hackers get a hold of your phone, you’re safe.

4. Install a Security Plugin

A WordPress/WooCommerce site without a security plugin is like a computer without anti-virus software. Wordfence and Sucuri Security are some good options. Just install the plugins and then activate. After activating, just go to the plugin’s settings and configure depending on your needs.

Prevent Brute Force Attacks

5. Limit Login Attempts.

Limiting login attempts will deter brute force attacks. A brute force attack will attempt to guess your username and password sending hundreds if not thousands of requests every minute. Limiting login attempts pretty much renders brute force attacks powerless unless you have a weak password. There are a couple plugins that can help you limit login attempts such as Login Lockdown.

6. Protect your wp-config File

The wp-config file is a crucial part of the WordPress ecosystem. It contains important configuration information of your WordPress site which is why many hackers try to target this file. There is however a workaround to block intruders from getting access to this file. Simply place this code in your .htaccess file.

7. Hide Login Error Messages

Whenever you enter the wrong login credentials on WordPress, it returns an error message saying your username is wrong, your password is wrong, or your password does not match the username. You may think little of this, but for hackers, this bit of information is priceless. You can prevent hackers from getting clues on your WordPress logins. You can hide these error messages by adding the script below to your functions.php file. Do note however that making a mistake when tinkering with your functions.php file can cause your entire site to go down. Unless, you’re a web developer or know your way around the file, it is recommended to have a developer do this for you.

function wrong_login(){

Return ‘Wrong username or password.’;

}

Add_filter(‘login_errors’, ‘wrong_login’);

Hide WordPress Version

8. Hide WordPress Version

For hackers, discovering that your WordPress version is outdated is like finding a gold mine. So it is imperative that you always update to the latest version of WordPress. Many hosting providers will automatically update your WordPress version. However, this is not always ideal since automatic updates can mess up your site. If you’d like to do your WordPress updates at your own pace, then you should hide your WordPress version. To hide your WordPress version, paste the following code on your functions.php file.

function remove_version(){

Return”;

}

Add_filter(‘the_generator’, ‘remove_version’);

9. Do a Plugin Audit

A plugin audit is a process of reviewing the plugins installed on your site. You’ll want to look out for plugins that are no longer being updated by the developer. Outdated plugins usually become backdoors for hackers. When analyzing your plugins, you can categorize them in a number of ways.

  • Plugins that you want to keep.
  • Plugins that you don’t use or your customer’s don’t use. If you have a plugin that adds a certain functionality to your site but your customers are not using it, you might as well get rid of it. This just adds extra bloat to your site.
  • Plugins that are no longer being updated by the plugin author. This is a major security threat and you should get rid of these immediately. If you still need the functionality that the plugin provides, just find an alternative plugin. Just make sure that the new plugin is being constantly updated.

You can do a plugin audit every few months to keep your site spiffy clean.

10. Install Only Reliable Plugins

You’ve done your plugin audit. Great! Now, don’t go down the same road. Don’t just install any plugin that you find. Look at the plugin rating. Check reviews. Check when the plugin was last updated. If the plugin fails any of those three elements, consider finding something else.

11. Prevent Directory Access

If you do not block directory access on your WordPress site, users may be able to freely view the files on your site. These files may contain sensitive information that hackers can use to exploit vulnerabilities on your site. Disabling directory access can be done with a minor tweak. Just place the following code in your .htaccess file:

# Prevent folder browsing

Options All –Indexes

If you’ve done all these things, your WooCommerce store will be protected from most known threats. Should you need help getting any of these done, you can contact the Wooassist team and we’ll be able to help you out.

Do you know of any other things that you can do to help keep your WooCommerce store more secure? Let us know in the comments.

Filed Under: Code Snippets, How-To Articles Tagged With: admin, brute force, hacker, optimizations, plugin audit, plugins, security, WooCommerce, WordPress, WordPress updates

Optimize Images on Your WooCommerce Store Before It’s Too Late

October 27, 2017 By John 2 Comments

Optimize Images on Your WooCommerce Store
A lot of WooCommerce store owners complain about their website loading slowly. While a slow website can be optimized to run faster, sometimes optimization can only on do so much if you don’t have the foundations for a fast website. Site speed optimization is not a one-off process. It should be done from the moment the website is created and implemented on a regular basis.

Optimize All Your Images before Uploading

Before you go and use an image on your website, it is important to have these images optimized. Take note where you will use your image and resize it to the actual size of image placeholder. Your image should be no bigger than the size that the image placeholder permits. Anything more than that is just unnecessary load on your server and a few milliseconds of extra page loading time.

It is also important to use an image editing application like Photoshop to remove image metadata and further optimize the image file size. For more information on optimizing images, you can read our guide on how to optimize images for the web. You can also use this online tool to help you optimize your images.

Also, make sure to use descriptive file names. This will help boost your SEO compared to default image files names containing number strings such as IMG20182708 or Image 1.

What If I Did Not Optimize My Images Before Uploading?

If you did not optimize your images before uploading them on your site, it is not too late. There are certain plugins that can help you. The WP-Smush plugin optimizes images as you upload them on your site. It can also optimize your images in bulk. However, the plugin can only do so much if you uploaded very large images.

If the images you uploaded are too large, it might be best to reupload an optimized version of that image. If you’ve had your site for years, this could mean a lot of work. There are no shortcuts but you can start with the images on the most important pages on your site. These include your home page, other landing pages, and best-selling products. Should you need help optimizing your site’s images, you can contact the Wooassist team to help out.

Optimizing Your Product Images

product-zoom-in-optimized-300x350In optimizing your product images, you will need to strike a balance between file size and image quality. Better images will have a bigger file size. The importance of image quality has especially been highlighted since WooCommerce started to implement the zoom functionality when hovering over product images. You now have to test zooming in on your images if they would still look good when zoomed. You don’t want your customers seeing a pixelated image when they try to zoom in on your product. Not all stores are alike so you will need to test what level of quality will work for your store.

Do Away with the Image Sliders

If you have large image sliders on your home page, you might want to consider removing them. Image sliders are resource-intensive and can really slow down a site. Combine that with unoptimized images, and your site will be a top contender for the slowest site on the web.

Sliders do not help your site convert. In addition, it is bad for your site’s user experience. There is an overwhelming amount of data that back this claim. Just check out these articles below.

  • Sliders suck and should be banned from, your website
  • Why Sliders Are Slowly Killing E-commerce Conversion Rates + What To Do About It
  • 6 Reasons Why Image Sliders Are Bad for Conversions
  • Don’t Use Automatic Image Sliders or Carousels
  • Homepage Sliders: Bad For SEO, Bad For Usability

What Should I Use in Place of Sliders?

Image sliders can cause banner blindness especially when your sliders look too much like ads. You can replace your image sliders with a single hero image with a large call-to-action. Compared to a slider which overwhelms your visitors with multiple calls-to-action, a single hero image will contain just one call-to-action. This means it will be easier for you to convince your visitors to take the action that you want them to take. When creating the hero image, make sure it does not look too much like an ad. Otherwise your visitors will just ignore it. The Wooassist team can help you set up a hero image on your store.

You can now start optimizing the images on your WooCommerce store. If you have any questions, you can contact us or let us know in the comments below.

Filed Under: How-To Articles Tagged With: conversion optimization, hero image, image optimization, plugins, site speed optimization

How to Set Up MailChimp Opt-In Form in WooCommerce Checkout

January 29, 2018 By John Leave a Comment

How to Set Up MailChimp Opt-In Form in WooCommerce Checkout

If your WooCommerce store is not set up to capture your customer’s emails, then you’re missing out on a lot of potential sales. According to data gathered by Campaign Monitor, transactional emails can help you generate up to 6 times more revenue. Your prospective customers are also five times more likely to see the emails you send out compared to when posting it on your Facebook. With increasing competition in Facebook post reach, email marketing is only becoming more lucrative. In this post, we’ll teach you how to set up MailChimp opt-in form in WooCommerce checkout so you can increase your conversion rates.

What Do You Need to Set Up Email Opt-in Forms in WooCommerce Checkout?

To get started with adding email-opt in forms to your WooCommerce store, you need two things. The first one is a MailChimp account. You can sign up to MailChimp for free and continue to use it until you exceed a thousand subscribers. At this point, you will need to purchase a plan. You can sign up for a MailChimp account here.

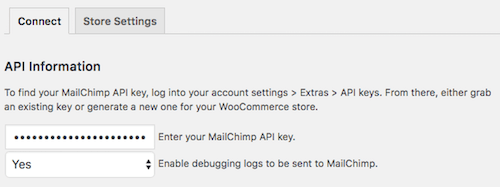
Once you’ve set up a MailChimp account, you will need to generate an API key which you will use to connect MailChimp to your WooCommerce store. To get your API key, log in to your MailChimp account and click on your name on the upper right corner and then click on Account; click on Extras and then on API keys. From here, you can copy the existing API key or create a new one. Save your API key for now. We’ll need this later.

The second thing that you need is the MailChimp for WooCommerce plugin which you can download here. You can also install the plugin from the Plugins page of your WordPress Dashboard. Once you install the plugin, make sure you activate it.

How to Set Up MailChimp for WooCommerce Plugin

After activating the plugin, head over to the Plugins page on your WordPress Dashboard and look for MailChimp for WooCommerce and then click on Settings.

On the Connect Tab, you will need to input your API key. If you followed the steps in the previous section, you should have your API key ready. Just input your API key in the API key field and click on “Save all changes”.

When that’s done, click on Store Setting and set your store information and then click on “Save all changes”.

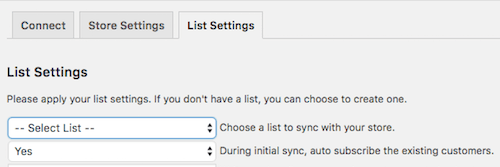
The next step is to set up your subscriber lists. Click on List Settings and choose a list to sync with your WooCommerce store. You can also indicate whether you want to automatically subscribe your existing customers to your list.

If you want to switch to a different list, you will need to remove and reinstall the plugin.

You can also set other setting such as checkbox display options, subscription opt-in message, and the location of the opt-in checkbox form on checkout.

When that’s done, you can sync your list with your MailChimp account.

To view your site details and change other settings, you can log in to your MailChimp account, click on your profile name and click on “Connected Sites”.

Final Notes

Now that your store is set up to sync your customer’s emails to your MailChimp list, you can easily email them special offers and other deals to help boost your sales.

If you have any questions, let us know in the comments.

If you need help setting up the plugin on your WooCommerce store, you can contact us.

Filed Under: How-To Articles Tagged With: checkout, checkout form, conversion optimization, email, email marketing, mailchimp, plugins, WooCommerce

Why You Should Do a Plugin Audit on Your WooCommerce Store?

January 14, 2018 By John Leave a Comment

Have you ever wondered if you can make your WooCommerce store load faster? Have you ever looked at your plugins page and thought about removing some of them? If you answered yes to both of these questions, then you are on the right track. That’s a little something we like to call a “plugin audit” and this can help make your website load faster.

What is a Plugin Audit and Why You Need to Do It?

A plugin audit is an analysis of the plugins currently installed on your WooCommerce store to determine which plugins you can remove.

Why Remove your Plugins?

Improve Site Speed

You might be asking yourself right now why you would want to remove some of your plugins. The simple answer to that is having too many plugins can slow down your site. And a slow website can have negative effects on your conversion rate.

Compatibility Issues

Another issue with having too many plugins is that it makes your site more prone to breaking when you update your plugins. Your plugins will need to be able to work seamlessly with each other. Having too many plugins means that the odds of one plugin not being compatible with another is high. After every update, plugins can also break compatibility with plugins they were originally compatible with.

Security Threats

Having too many plugins also exposes your site to security issues. Poor coding can result in hackers exploiting vulnerabilities in some plugins. If you only have a few plugins, then the odds of your website being hacked through plugin vulnerabilities is also reduced.

But How Many Plugins is Too Many?

There is no definitive number that equates to a “right” number of plugins that you need to have on your WooCommerce store. But a good rule of thumb is to just use the plugins that you really need.

Also, don’t install multiple plugins that do the same thing. Avoid using plugins like Jetpack that bundle numerous plugins into a single plugin. Jetpack is not bad per se. Feel free to use it if you use all of its features but chances are you won’t be using everything that Jetpack has to offer. In which case, Jetpack’s unused features needlessly eat up your WooCommerce store’s resources. It would be better to determine which features of Jetpack you use and find a plugin that does only that.

Which Plugins Should You Remove?

Plugins that do the same thing. If you have two or more plugins that do the same thing, you should remove the other plugins and choose the best one for your needs. The duplicate plugins just hog up your resources so there’s no reason for you not to remove them.

Plugins that can be supplemented with custom code. Sometimes you will need to install some kind of code somewhere on your site to remove a feature you don’t want or to add support to a service that you are using. But since you are not a developer, you find a plugin that will insert the code for you. Over time, these plugins could add up. When doing a plugin audit, you can list down all the plugins that can be supplemented by inserting custom code and then you can hire a developer to insert all these codes for you in one go. To an experienced developer, this should be doable in less than an hour but we recommend spending a bit more time for testing.

Plugins that you don’t use. If you have installed some plugins that you are not using, then there’s no sense in keeping them. You keep telling yourself, you might need them in the future. Uninstall them now and just install them again when you actually need them.  

Plugins that your customers don’t use. Maybe you installed a Wishlists plugin but then you find that none of your customers have actually used it. Because this plugin does not provide any value to your store, you might as well just remove it.

Plugins that have not been updated in a long time. Outdated plugins can break after some time so it is best to find another plugin that does the same thing and has been updated recently. Also, outdated plugins can be a security concern. Even when installing new plugins, you should check if the plugin you will be installing is being updated regularly.

Final Words

After doing a plugin audit, you will have a site that is faster and less prone to breaking during updates. Should you need help in doing a plugin audit for your WooCommerce store, you can contact us and we can help you out.

If you have any questions, comments or suggestions, you can let us know in the comments.

Filed Under: How-To Articles Tagged With: conversion optimization, optimizations, plugins, site speed optimization

10 Things You Can Do Right Now to Improve Your WooCommerce Store

October 10, 2017 By John Leave a Comment

Ecommerce - Improve your WooCommerce StoreAs a WooCommerce store owner, your goal is to make your business as profitable as it can be. Here, we list down 10 things that you can do today to improve your WooCommerce store.


1. Add a call-to-action button on your home page

Adding a call-to-action button on your home page encourages your visitors to take whatever action you want them to take. You can direct them to click on your shop, sign up to your email newsletter, send you an email, call you, or add a product to the cart.

thumbs-up

2. Add your contact details

Making sure that your contact details are immediately visible will increase your site’s trust rating. It can be your email or phone number. You can even add your store’s address if you have a physical store.

3. Add an email capture form

Getting your customer’s emails will allow you to send newsletters or special offers to those who sign up.

4. Remove distractions from your checkout page

Removing distractions from your checkout page will reduce cart abandonment. When a customer reaches your checkout page, you don’t want them clicking anything else except that “Pay Now” button.

5. Add related products to your product page

Adding related products to your products page will encourage your customers to purchase more items from your store. This will increase your average order value.

6. Offer free shipping

Not everyone can offer free shipping. But if you are able to, free shipping can really amp up your conversion rates. You can also offer free shipping with a minimum order value or for specific locations only. Make sure your visitors know you offer free shipping by placing a notice in a prominent area of your site.

7. Optimize your product copy

There are a lot of ways to optimize your product copy. You can optimize your copy to appeal to customers by emphasizing on the problems that your products can solve. You can also optimize your product copy to include technical details. Lastly, you can optimize your copy for ease of reading. How you optimize your product copy really depends on your product and your customer profile. You can use Hemingwayapp to check your copy’s readability score.

8. Optimize images on your WooCommerce store

product-zoom-in

When uploading product images, you must first optimize your product images to make sure you are uploading the correct image sizes. To determine the correct image sizes for your theme, you will need to use the “Inspect Element” feature of your browser. You will then need to go to WooCommerce settings to set the correct image size. Uploading anything bigger than the image placeholder’s size is a waste of resources and will just slow down your site. You can learn how to optimize images for the web in this blog post.

9. Remove sliders and use a single hero image with a call-to-action

Sure, sliders look good. But the truth is, they may actually do more harm than good to your site. Sliders can really slow down a site and a slow site is bad for SEO and conversion rate. Also, sliders can confuse customers and makes for bad user experience. Your website must send a clear message on what you want your customers to do. A slider just confuses your customers with various images that look like advertisements.

10. Make your site is mobile responsive

If you have not updated your site’s design for years, it might not be mobile responsive. This means that your website does not adapt to different screen sizes which makes browsing on a mobile device difficult. This is not good for your site’s user experience. Also, having a mobile responsive WooCommerce store is an advantage in terms of SEO. You can address this by using a responsive theme such as Storefront or the Genesis framework with a Genesis child theme. Both these themes are compatible with WooCommerce.

If you need any help getting any of these things done, you can contact us and we will help you get these sorted. If you have any questions, you can let us know in the comments section.

Filed Under: How-To Articles Tagged With: admin, best practices, call-to-action, content marketing, conversion optimization, design tweaks, e-commerce, how-to, optimizations, page speed, responsive design, website maintenance

  • « Previous Page
  • 1
  • …
  • 14
  • 15
  • 16
  • 17
  • 18
  • …
  • 24
  • Next Page »
Let us support your online store so you can manage your business

Get started today

Get 2 Hours of FREE SUPPORT

We are so confident that you will love our services that we will give you your first 4 hours at a 50% discount

That’s 4 hours for only $75

BUY NOW

Free eBook

5 Things Every Online Store Can Fix On Their Website In The Next Week To Increase Sales

Quick Links

  • How it Works
  • Pricing
  • Blog
  • Contact
  • About Wooassist
  • My Account
  • Checkout
  • Privacy Policy
  • Cookie Policy
  • Terms and Conditions

Wooassist

Australia:
59 Luke St.
Hemmant QLD 4174

Philippines:
San Miguel St.
Poblacion, Iligan City 9200

Connect


Copyright © 2026 · Wooassist

Yours FREE!

5 Things Every Online Store Can Fix On Their Website In The Next Week To Increase Sales