Wooassist

Assistance for Your Woocommerce Store

  • How it Works
  • Pricing
  • Services
    • Site Maintenance
    • AI SEO and Content Marketing
  • Blog
    • How-To Articles
    • Code Snippets
    • SEO For E-Commerce
    • Theme and Plugin Reviews
    • Wooassist News
    • WordPress/WooCommerce News
    • Interviews
  • About Us
  • Contact
You are here: Home / Archives for How-To Articles

How to Optimize WooCommerce Products for SEO

May 31, 2018 By John 1 Comment

You’ve set up your WooCommerce store but you’re not getting any traffic. You wonder what you’re doing wrong. Have you optimized your product pages for SEO? If not, that could be one of the reasons why you’re not getting any traffic. In this article, we’ll teach you how to optimize your WooCommerce products for SEO.

Why Optimize for SEO?

You can do all the link-building you want but if the pages that you want to rank for are not properly optimized for SEO, then you’ll have a hard getting ranked on top of Google.

Still, traffic is just a metric and what really matters is your conversion rate. Even if you are getting thousands in traffic but they are not converting, you still have a problem. On the other hand, you can’t convert anyone if you are not getting any traffic at all. Essentially, SEO and conversion optimization go hand-in-hand.

You have to optimize for SEO to make sure you are attracting the right people to your WooCommerce store.

Steps on How to Optimize WooCommerce Products for SEO

Identify What Keywords to Optimize For

Normally, it will be difficult to rank for regular keywords. For example, if you are selling digital cameras, it will be difficult to compete with Wikipedia or Amazon unless your WooCommerce store is already an authority on digital cameras. So optimizing for the keyword “digital cameras” won’t work for you. This is where long-tail keywords come in.

What is a Long-Tail keyword?

Compared to a regular keyword, long tail keywords are longer and more specific. Instead of optimizing for “digital camera”, you can optimize for specific camera models or for specific features of digital cameras. Optimize for anything unique about the product that you are selling. A few examples of long-tail keywords can be “digital camera for underwater photography”, “digital cameras for beginners”, or “sports action digital camera”.

Do Your Keyword Research

Don’t start optimizing until you do your keyword research. You can use whatever keyword research tool you have at your disposal. We can also recommend Ubersuggest. Just pop in a basic keyword and you can get a list of long-tail keywords that you can optimize for along with some valuable search data. You can even filter the keyword ideas and remove negative keywords. You can also export the keywords into a handy CSV file.
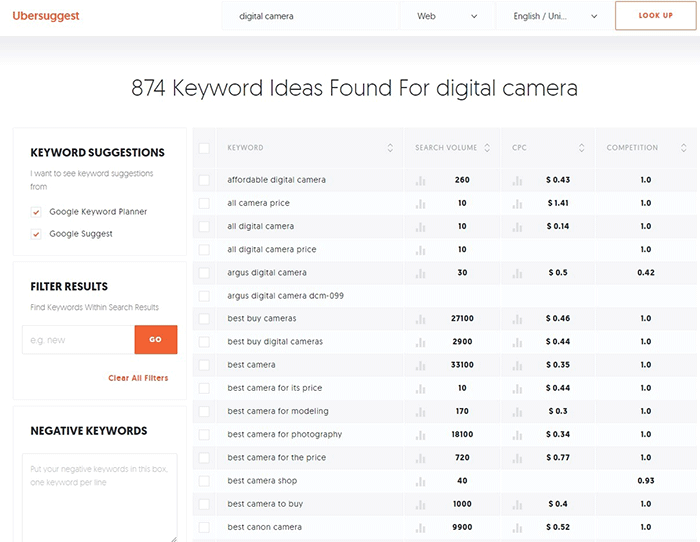
Ubersuggest Keyword Research

Add the Long-Tail Keyword to Your Product Page

To help with optimizing your WooCommerce Products for SEO, you can use the WordPress SEO plugin by Yoast. The plugin provides detailed information on how you can optimize your products for SEO. It also has a boatload of other features that will help boost your SEO. Just install the plugin and you’ll gain access to the SEO optimizations block on your WooCommerce product editor.

When optimizing products for SEO, input the long-tail keyword that you wish to target on the “Focus Keyword” field. After doing this, you can see the analysis section below will show you recommendations on how you can improve your product’s SEO score.
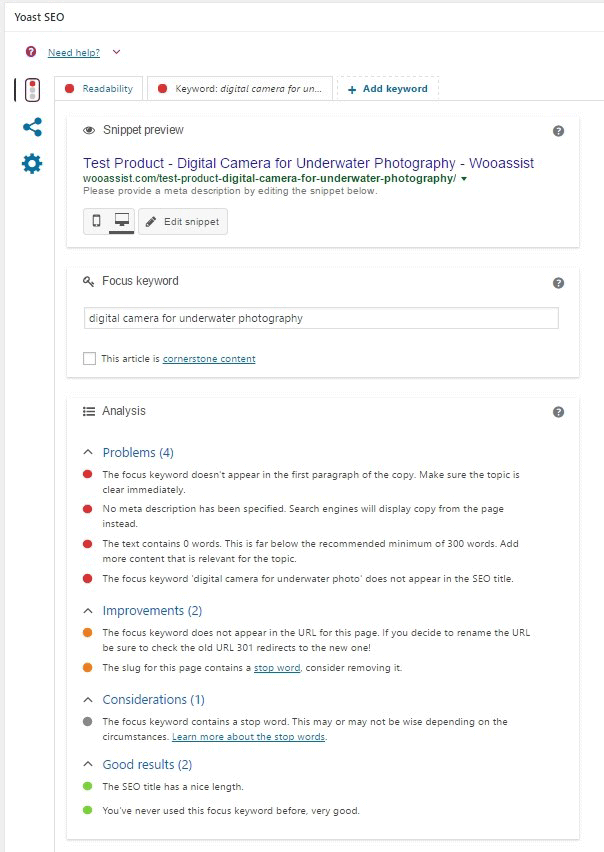
How to Optimize WooCommerce Products for SEO

Generally, you will need to add your focus keywords to:

  1. The article title
  2. The first paragraph of the article
  3. One of the heading tags
  4. On the body of the article
  5. In one of the image alt tags
  6. In the URL/slug

You don’t need to force yourself to do every little thing that the Yoast SEO section recommends. Just use it a rough guide since it does recommend the currently known best practices.

Improving Content Readability

Google now also considers content readability as an SEO ranking factor. So it is important to ensure that your product descriptions are easy to read. In some cases, you may have to use some technical terms when writing your product descriptions and that’s totally fine. Depending on your products, that may actually be best practice. Still, it’s a good idea to check the readability of your content.

The Yoast SEO section also gives recommendations on Readability. Just click on the readability tab and you’ll see the problems that need to be addressed.
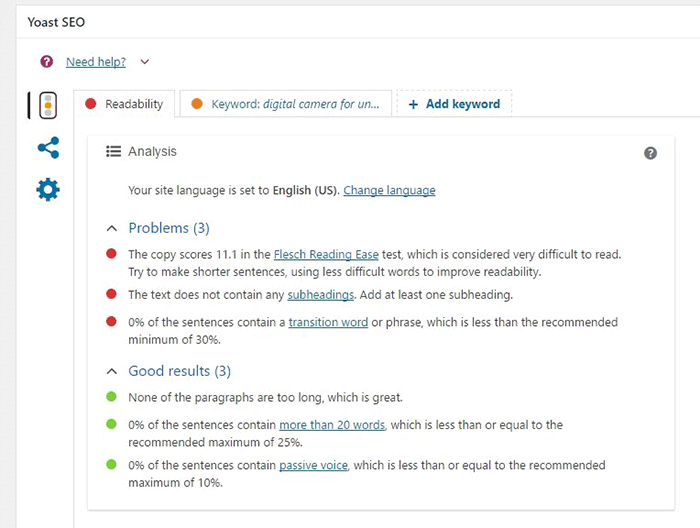
WooCommerce Products Optimize for Readability

When creating your product descriptions, you can also use Hemingwayapp to optimize its readability. You can also use this tool when writing blog posts.

Now that you know how to optimize your content for SEO, people who are interested in your products are now more likely to find your products. If you need help with SEO optimizations, the Wooassist Team can help. We’ll start off by doing an SEO audit of your site so we can determine what needs to be addressed and move forward from there.

Optimizing your WooCommerce store does not end with product optimizations. There are other optimizations that need to be done to ensure you are maximizing your conversion rates.

Filed Under: How-To Articles, SEO For E-Commerce Tagged With: keyword research, optimizations, seo, SEO strategy, SEO tools, WooCommerce, WooCommerce products, woocommerce seo, WordPress SEO, Yoast

How to Set up Abandoned Cart Emails in WooCommerce

May 15, 2018 By John Leave a Comment

How to Set up Abandoned Cart Emails in WooCommerce - Wooassist

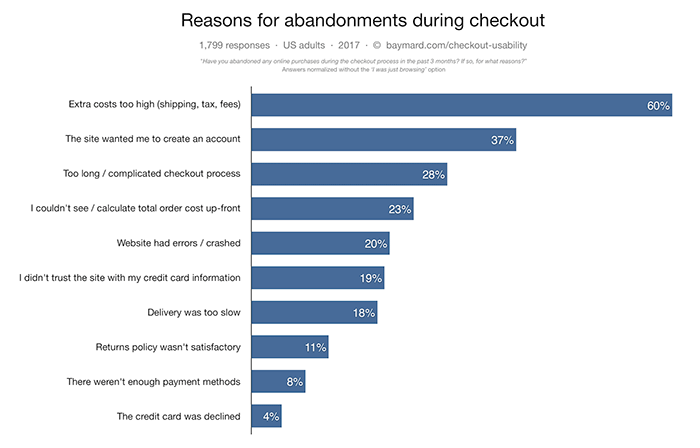
You are losing money and you may not even be aware of it. According to data from the Baymard Institute, over 69% of shopping carts are being abandoned. Also, 57% of online shoppers have abandoned a shopping cart in the last 3 months stating various reasons. It may not always be your fault but you can do something about it.

Reasons for Cart Abandonment

The Baymard Institute has researched shoppers’ reasons for cart abandonment.

reasons for cart abandonment
Source: Baymard Institute

Many of the reasons customers cite for leaving carts can be addressed. It can be a simple matter of making it more convenient for your customers to check out or just being transparent about the fees that you collect. Sometimes, you just need to offer more payment options.

How to Reduce Cart Abandonment

Before we move on to how you can recover abandoned carts, it is important to address why carts are being abandoned. After all, it would be better if your customer didn’t abandon their carts in the first place.

Extra Costs Too High

Shipping fees and taxes go hand in hand with ecommerce. There is no way around it. But if your customers complain that your shipping fees are too high, you might have a problem. Have you considered using a different company that can offer more affordable shipping? Have you considered adding a shipping calculator to your WooCommerce store? Have you considered offering free shipping? If you can’t afford free shipping, you can also consider offering free shipping for a minimum order value.

Complicated Checkout Process

You should make it easy for your customers to buy your products. Don’t make them jump hoops. There are a few things that you can do to ease the checkout process. You can enable guest checkout, reduce checkout form fields, and make your checkout mobile-friendly. Put yourself in your customers’ shoes and try out your checkout process. Better yet, survey some of your customers and ask them for feedback.

Improve Your Trust Rating

One reason that customer’s abandon carts is that your ecommerce store has not shown that it can be trusted. What can you do to improve your WooCommerce’ store’s trust rating?

  1. Show your contact information.
  2. Add testimonials
  3. Install an SSL Certificate
  4. Add security seals
  5. Have a professional looking site
  6. Create a compelling about us page
  7. Increase your site’s security

Once you address these things, you should be able to see improved checkout completion. This doesn’t mean you’ll have zero abandoned carts. For your abandoned carts, you can still recover them through abandoned cart emails.

How to Recover Abandoned Carts in WooCommerce

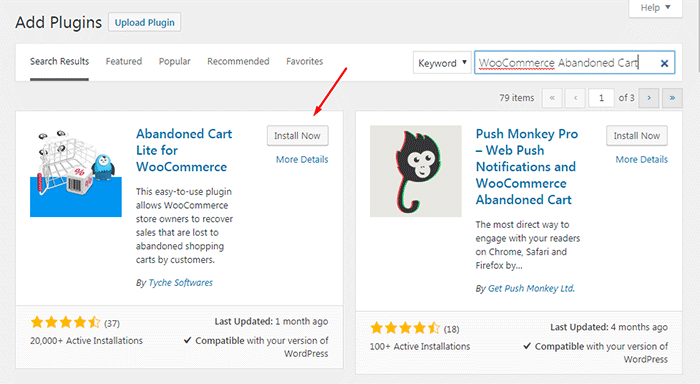
Abandoned cart emails are easy to set up using a plugin. First thing that you need to do is install the WooCommerce Abandoned Cart plugin.

In your WordPress dashboard go to Plugins > Add New and search for WooCommerce Abandoned Cart.

WooCommerce Abandoned Cart plugin

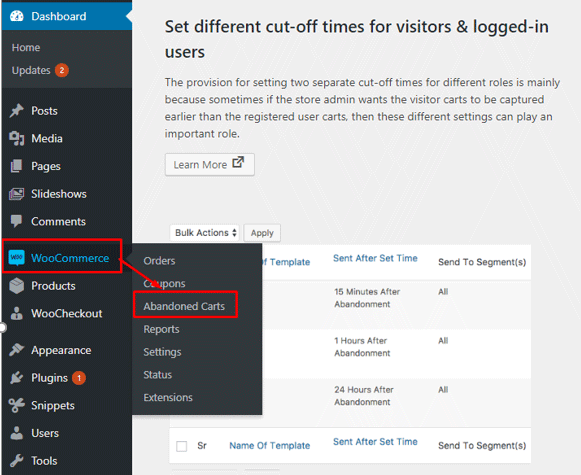
After installing and activating the plugin, it will automatically bring you to the plugin’s Dashboard page.

To edit the plugin’s settings on your Dashboard, go to WooCommerce > Abandoned Carts.

WooCommerce Abandoned Cart Settings

In the settings page, you can change various plugin settings.

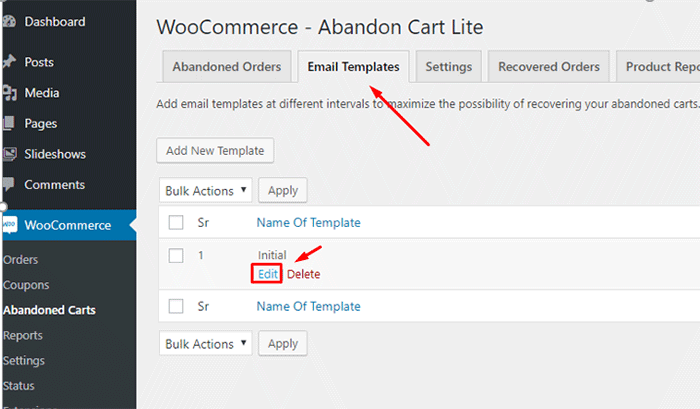
The first thing we need to do is edit the email template that will be sent to customers. To do this, click on the “Email Templates” tab. Here you can see the default email template. Hover on the existing template and click on “Edit”.

WooCommerce Abandoned Cart Edit Template

This will open a new page where you can edit and personalize the email that you want to send to your visitors that abandon carts.

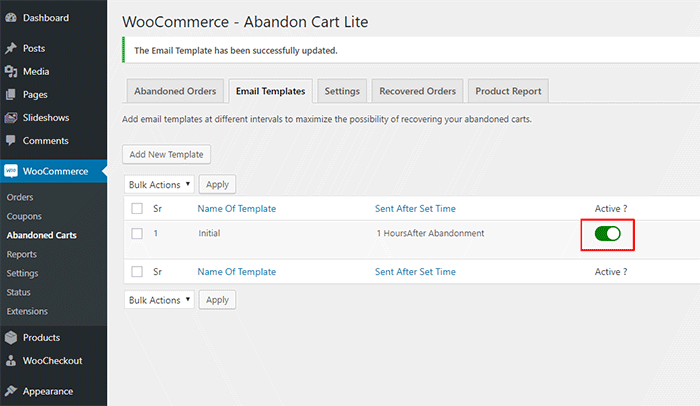
After editing the template, click on “Update Changes” and click on the activate button.

Activate WooCommerce Abandoned Cart

That’s it. The plugin will now automatically send emails to visitors that abandon their carts which will help you recover these carts and increase your sales.

Additional Tips

If you want further increase your sales, you can also consider doing email marketing for WooCommerce. You can start by configuring WooCommerce to automatically add customer emails to your MailChimp lists. Or if you want more conversion optimization tips, you can also check out our conversion optimization infographic.

If you have any questions about setting up abandoned cart emails in WooCommerce, you can let us know in the comments.

Filed Under: How-To Articles Tagged With: conversion optimization, email, email marketing, plugins, shopping cart, WooCommerce

Connect Your WordPress.com Account to Continue Using WooCommerce Services

February 13, 2017 By John Leave a Comment

Since Automattic, the company behind WordPress and WordPress.com has acquired WooCommerce, it was only a matter of time before the two were integrated.

WooCommerce now requires a WordPress account for managing purchases, tickets and other subscriptions. You need to connect Your WordPress.com account to continue using WooCommerce services.

Before, users had to access two accounts to use the services of one company. Integrating WordPress.com into WooCommerce solves that problem for some users.

If you have purchased and are using premium plugins from WooCommerce, you will need to log in with a WordPress.com account to manage your subscriptions. If you don’t have a WordPress.com account, you can sign up by following this link.

Once you have a WordPress.com account, you can head over to https://woocommerce.com and click on “Sign in with WordPress.com”.

Connect Your WordPress.com Account to Continue Using WooCommerce Services

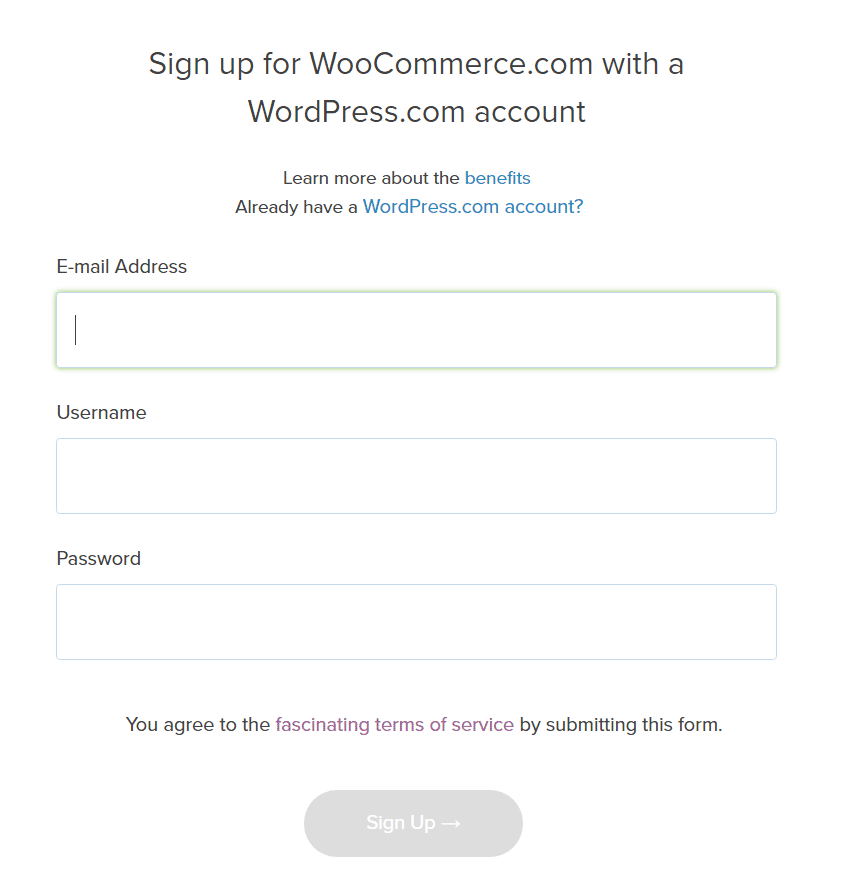
After that, click on the “Already have a WordPress.com account?” link, then proceed to the next step.

sign-up-with-woocommerce-with-wordpress

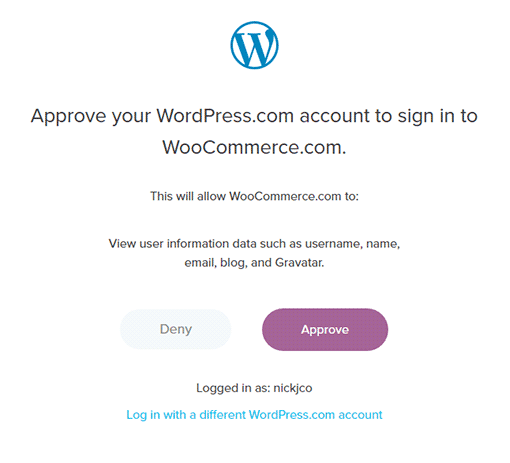
After logging in to Woocommerce.com via WordPress.com, you will need to click “Approve” to link your WordPress.com account to WooCommerce.

approve-wordpress.com-account

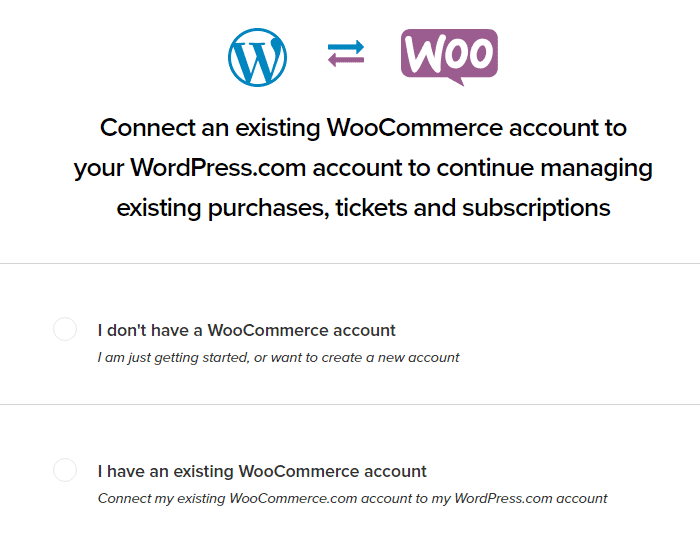
Next, you will need to connect an existing account or create a new one. Click on the “I have an existing WooCommerce account” if you have one and click on “Continue”.

connect-woocommerce-account-to-wordpres

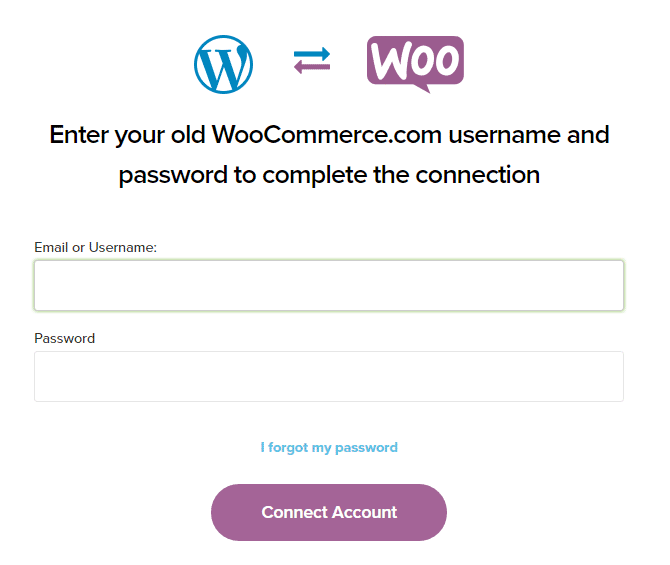
Here, you will to enter your old Woothemes.com/WooCommerce.com account.

After entering details, just click “Connect Account”.

connect-woocommerce-and-wordpress

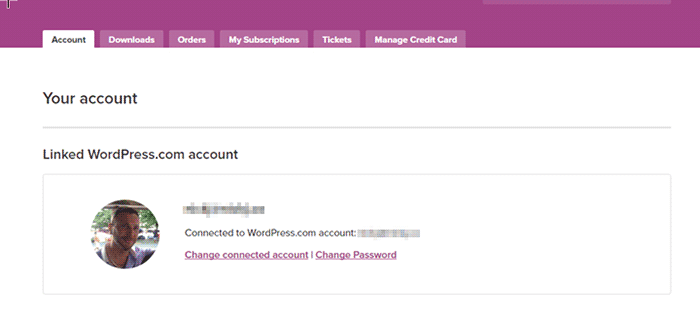
After connecting the account, you’ll then be redirected back to your account dashboard. From here on, you only need to login with your WordPress.com account to access WooCommerce services.

linked-wordpress.com-account

Were you able to successfully connect your WordPress.com and WooCommerce accounts? If you are having problems connecting your account, you can contact the Wooassist team to assist you.

Filed Under: How-To Articles, Wooassist News Tagged With: WooCommerce, woothemes, WordPress

How to Enable Apple Pay for WooCommerce

June 16, 2017 By John 2 Comments

What is Apple Pay?

how to enable Apple PayApple Pay presents a new and more convenient way to pay for mobile e-commerce purchases. Since Apple does not share your credit card details when you pay, it is safe, secure and private. Currently, Apple Pay is already accepted in a number of stores and websites. You can check this list of merchants that accept Apple Pay.
Why Add Apple Pay to Your WooCommerce Store?

Early adopters of Apple Pay have experienced an increase in conversion rates of up to 80%. The checkout process is made much faster as payment only requires a fingerprint check as opposed to entering your credit card number.

What Do I Need to Install Apple Pay on WooCommerce?

To install apple pay with WooCommerce, there are a few requirements. First, the store must support Stripe payments. You’ll also need the WooCommerce Stripe Extension which is free. Stripe is currently available in 10 countries, namely, Australia, Switzerland, United Kingdom, Hong Kong, Singapore, Canada, Spain, France, New Zealand, and the United States.

How to Enable Apple Pay on Your WooCommerce Store

Just follow the steps below to enable Apple Pay on your WooCommerce store. If you have already set up the WooCommerce Stripe Extension, please proceed to Step 7.

    1. Install and activate the WooCommerce Stripe Extension. You can download it here or just search for it in the plugins page.
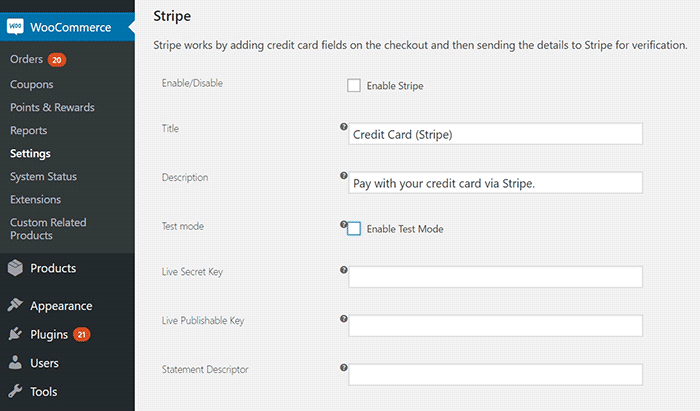
    2. Head over to WooCommerce > Settings > Checkout > Stripe and check the “Enable Stripe” box. Make sure you disable “Enable Test Mode” if you want to go live. If you are already accepting payment through Stripe, go to Step 7.
    3. Input your Live Secret Key and Live Publishable Key. You can get the information from your Stripe account.
    4. Input the Statement Descriptor. This is the text that will appear on your customer’s credit card statement.
      Stripe setup
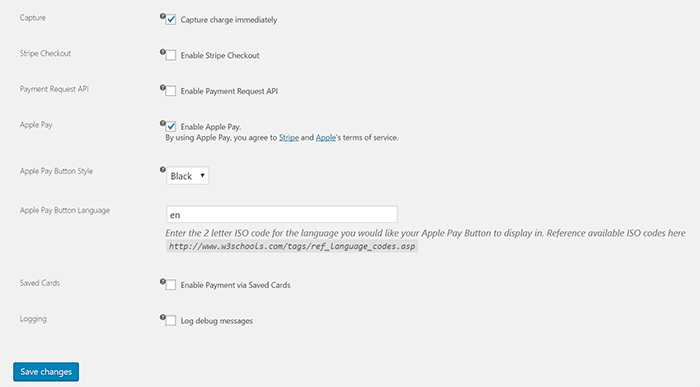
    5. Choose whether to “Capture Charge Immediately” or not. If you choose not to charge immediately, you will need to manually initiate the charge through the WooCommerce order page.
    6. You can choose to “Enable Stripe Checkout” for the plugin to create a pop-up that requests details. Choose this option if you want to accept Bitcoin.
    7. To enable Apple Pay, tick on the Enable Apple Pay box.
    8. Under “Apple Pay Button Style”, you can choose what color you want the Apple Pay button to be.
      Stripe setup2
    9. Under “Apple Pay Button Language”, you can enter the ISO code for the language you want to use. For English, just use “en”.
    10. Click on Save Changes when done.

That’s it. You are now ready to accept Apple Pay payments on your WooCommerce store.

If you are having problems enabling Apple Pay on WooCommerce, let us know in the comments.

Filed Under: How-To Articles, Theme and Plugin Reviews Tagged With: best practices, checkout form, e-commerce, how-to, plugins, WooCommerce

How to Troubleshoot Problems in WooCommerce

September 4, 2017 By John 2 Comments

How to Troubleshoot Problems in WooCommerce

When something breaks on your WooCommerce store, don’t panic. Usually, these issues are caused by an outdated software/plugin, a theme conflict or a plugin conflict. These issues can normally be resolved in a few basic steps. In this post, we’ll teach you how to troubleshoot problems in WooCommerce before you hire some professional help.

Before anything else, you need to identify the scope of the problem and if you need to set your site to maintenance mode. If the current problem will cause more problems down line like having to issue refunds for any sale, you might want to consider putting your site on maintenance mode. There are a lot of plugins on the plugin repository that can help you set up a maintenance mode page. When that’s done, you can proceed with the steps below.

Step 1: Update Your Themes and Plugins

The first step to troubleshooting an issue on your WooCommerce store is to update your themes and plugins. However, before you update, make sure you create a backup or test your updates on a development site.

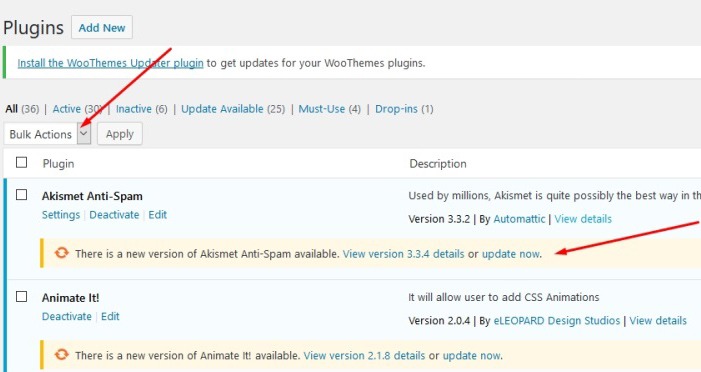
To update your plugins, just go to your WordPress Dashboard, click on plugins and click on Update Now for each plugin. To update all your plugins in one go, you can tick on the tick boxes and then click on Update in the Bulk Actions field and then click on Apply. If you are running some premium plugins, note that you may need to renew expired licenses to update those.

plugin-dashboard-1

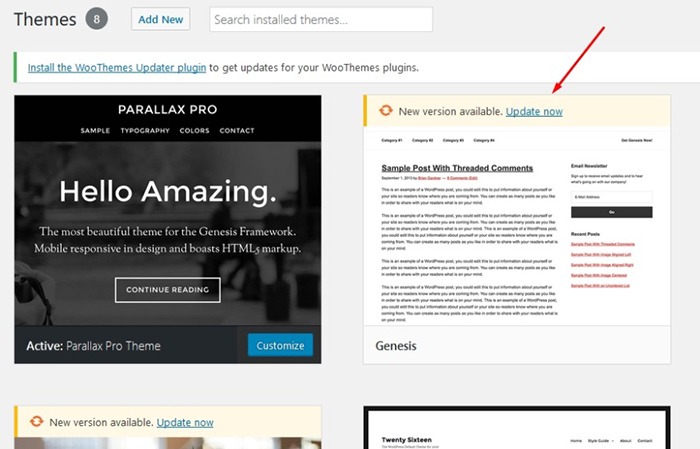
To update your themes, click on ‘Appearance’ and then ‘Themes’. This will bring you to the Theme page which shows all your installed themes. Here, just click on Update Now on the theme that you need to update.

themes-dashboard

Step 2: Deactivate All Your Plugins

If updating your themes and plugin does not fix the issue, you have to rule out the possibility that a plugin is causing the issue. You will need to deactivate all your plugins.

You can first choose to deactivate any new plugins you have recently installed and then test if that would fix the issue on your site.

If that does not fix the problem, you can deactivate other plugins that you think may be related to the issue. Minification and caching plugins often cause site issues so you can start with those plugins if you have any. If that still does not work, proceed to deactivate the rest of your plugins one by one.

When you’ve found the plugin in question, you can just leave it deactivated and find an alternative plugin. You can also reach out to the plugin developers to let them know about the problem you had so they can look into it and try to fix it.

If deactivating all your plugins still does not fix the issue. You can proceed to the next step.

Step 3: Use a Default WordPress Theme

Many theme developers bloat their themes with unnecessary features. Sometimes this causes conflicts with WordPress, WooCommerce and other plugins. Before you change your theme, make sure you back up your site.

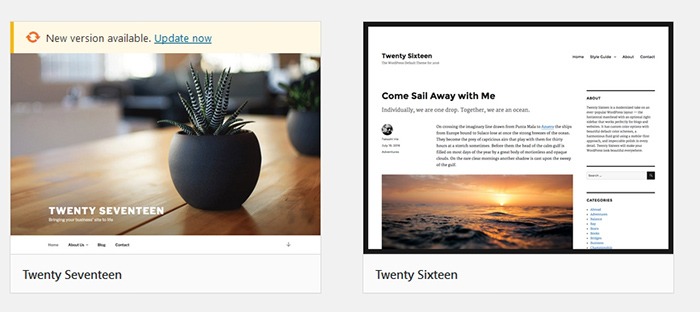
When you are ready, you can proceed to activate any of the basic WordPress themes such as Twenty Seventeen. If that fixes your problem, then you’ve got an issue with your theme. You can get in contact with your theme developer about the issue so they can fix it. You can use another theme but this is not an easy choice to make especially if you’ve invested a lot of work on your current site’s design. You can also contact us so we can advise if there is anything else that can be done to fix the theme issue. There is a chance that the problem can be fixed with a few simple tweaks.

twenty-seventeen

We recommend using Storefront theme which is one of the best themes to use for WooCommerce because of compatibility. Storefront theme was made specifically for WooCommerce by the same developers who created WooCommerce.

The Genesis Framework is also a good choice for a theme. It has a wide range of child themes customized for the needs of specific website types.

But My Problem Still Persists?

If the steps above did not solve your problems, there are still a few things you can do. Forums and message boards are a good way of getting help with issues concerning WordPress or WooCommerce. If you have a WordPress problem, you can post it in the WordPress forums and someone might be able to help you out. If your problem is specific to WooCommerce, you can head over to the WooCommerce support page.

If all else fails and you don’t have an in-house developer, you can contact us so we can have our expert WooCommerce developers try and fix the issue for you.

Filed Under: How-To Articles Tagged With: best practices, e-commerce, troubleshooting

  • « Previous Page
  • 1
  • …
  • 13
  • 14
  • 15
  • 16
  • 17
  • …
  • 24
  • Next Page »
Let us support your online store so you can manage your business

Get started today

Get 2 Hours of FREE SUPPORT

We are so confident that you will love our services that we will give you your first 4 hours at a 50% discount

That’s 4 hours for only $75

BUY NOW

Free eBook

5 Things Every Online Store Can Fix On Their Website In The Next Week To Increase Sales

Quick Links

  • How it Works
  • Pricing
  • Blog
  • Contact
  • About Wooassist
  • My Account
  • Checkout
  • Privacy Policy
  • Cookie Policy
  • Terms and Conditions

Wooassist

Australia:
59 Luke St.
Hemmant QLD 4174

Philippines:
San Miguel St.
Poblacion, Iligan City 9200

Connect


Copyright © 2026 · Wooassist

Yours FREE!

5 Things Every Online Store Can Fix On Their Website In The Next Week To Increase Sales