Wooassist

Assistance for Your Woocommerce Store

  • How it Works
  • Pricing
  • Services
    • Site Maintenance
    • AI SEO and Content Marketing
  • Blog
    • How-To Articles
    • Code Snippets
    • SEO For E-Commerce
    • Theme and Plugin Reviews
    • Wooassist News
    • WordPress/WooCommerce News
    • Interviews
  • About Us
  • Contact
You are here: Home / Archives for How-To Articles

How to Convert Your Old Posts and Pages into Gutenberg Blocks

February 5, 2019 By John Leave a Comment

Towards the end of 2018, WordPress 5.0, also known as the Gutenberg update was released. The notable thing about WordPress 5.0 is the introduction of “blocks”. Blocks have replaced the old WordPress text and visual editor.

Should You Update to Gutenberg?

Some WooCommerce store owners might be hesitant to update to Gutenberg. Gutenberg is a big change from the classic editor so being hesitant to move to Gutenberg is understandable. If you don’t really want to use Gutenberg, you can install the classic editor for WordPress. It is however imperative to update your site to the most recent WordPress version for security reasons. Sticking to an old version of WordPress will leave your site vulnerable to security threats. New versions of plugins and themes might also cause issues on older versions of WordPress.

Since WordPress 5.0 is a major update, we recommend testing your updates on a development site first. If you need help updating to WordPress 5.0, you can contact us and we can help you out.

Will Updating to Gutenberg Affect Your Old Posts and Pages?

Updating to Gutenberg will not affect your old posts and pages. Any new content you create will make use of blocks. Still, any old content that does not use Gutenberg blocks will be housed in a classic editor block.
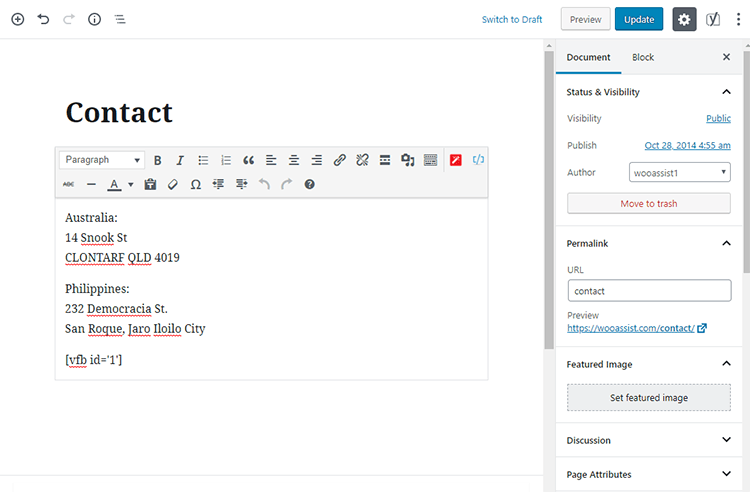
How to Convert Old Posts and Pages into Blocks?

Converting your old posts and pages into Gutenberg blocks can be done in a few clicks. Click on Edit on the post or page that you want to convert. On the classic editor block, look at the upper right section. Here you will find an icon with three dots. Click that icon and click Convert to Blocks.
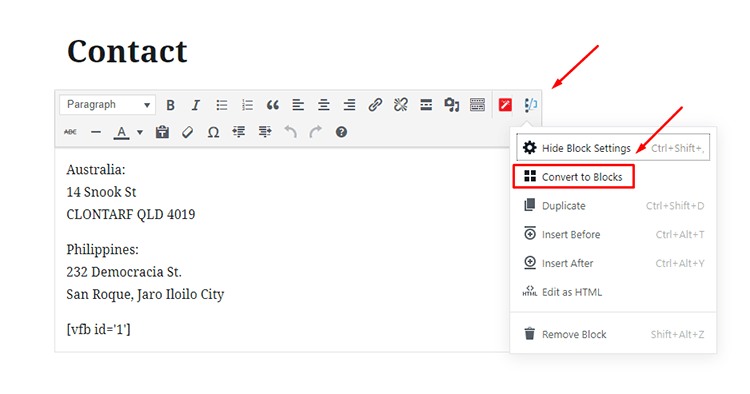
After that, you should see your post/page converted into Gutenberg blocks.
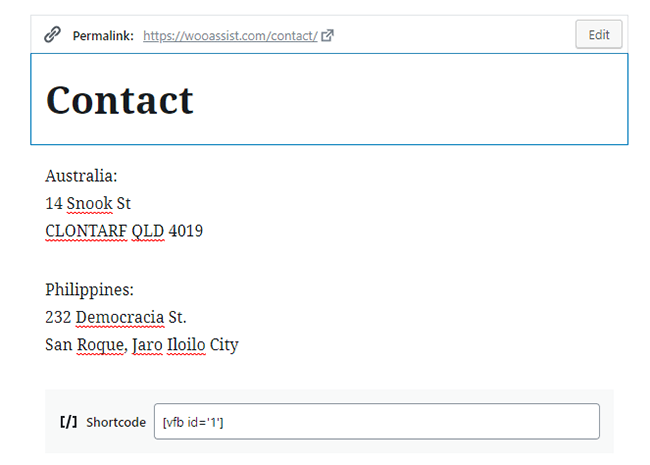
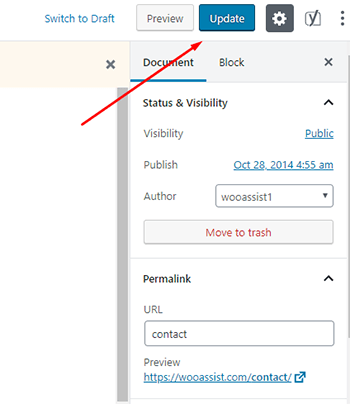
From here, click on Update to save your changes.
Repeat this process for each post or page that you want to convert into blocks.

After converting, be sure to check the actual page or post to make sure that there are no layout issues. If you are using shortcodes, check that the shortcodes are working as well.

If you have any questions about converting old posts into Gutenberg blocks, let us know in the comments.


Filed Under: How-To Articles Tagged With: blog, gutenberg, WordPress, wordpress 5.0

How to Create a Contact Form for WooCommerce

June 3, 2016 By John Leave a Comment

How to Create a Contact Form for Your E-Commerce Store

You might have used a good amount of your resources to create a website for your business. You have an inviting and irresistible call-to-action. The last thing you’d want to happen is for a potential customer to bounce away from your site because they couldn’t find your contact information.

The Contact Us page is one of the most important pages on your website. It is one of the easiest ways to give your visitors a means of getting in touch with you.

What Do You Need to Have on Your Contact Us Page?

Having a contact form is just about the easiest way that a user can contact you. If you have several departments such as customer support, sales, press, etc. it may be worthwhile listing the contact information for each department in addition to the contact form. This can include the name of the contact person, e-mail and a phone number. If you have an office that can accept visitors, then putting your office address and a map would help.

It is important to note that your contact information should also be easily visible on your website’s home page. This increases the trust rating of your website.

How to Create a Contact Form Using a Plugin?

There are several ways to add contact forms on your WordPress website. The easiest method is by using a plugin.

There are plenty of plugins to choose from and they easy are to set up. You can choose which fields you want to include on your contact form. Here are the ones that we can recommend.

How to Create a Contact Form Using Contact Form 7

Contact Form 7

Contact Form 7 is one of the most popular plugins for creating contact forms. Currently, it has over one million active installs. It is free and it gives you the ability to create multiple forms that you can modify with markup. You can also place a contact form in any post or page using a shortcode.

To create a contact form using Contact Form 7, you need to do the following steps:

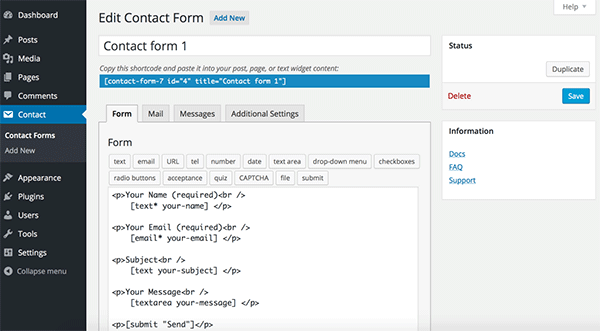
  1. After installing the plugin, mouse over “Contact” and then click “Contact Forms”.
  2. Customizing the form may take a bit of HTML skills. Basically you use shortcodes to customize the fields. For example, the shortcodes for a text field looks like [text* your-name].Contact Form 7_Add New
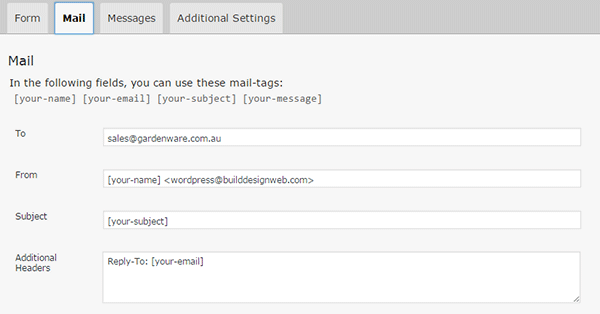
  3. Under the “Mail” tab, you can configure the email that will be sent after the confirmation. You can add the values of the fields to your email using the corresponding tags. For example, the email field [email* your-email] has the tag [your-email].Contact Form 7_Mail Tab
  4. Save the form.
  5. Copy and paste the shortcode to insert the form to your Contact Us page or wherever you want it shown.

How to Create a Contact Form Using Visual Form Builder

Visual Form Builder

Visual Form Builder was designed for fast and easy form building. There are no coding requirements. It has an intuitive drag and drop interface which lets you build forms fast.

You can insert your forms in any page or post using shortcodes. It has a logic based anti-spam system, a customizable confirmation message, and a multiple field layout option. It has an extensive FAQ page for customization and troubleshooting. It has an affordable premium version but the free version offers a lot too.

To create a contact form using Visual Form Builder, you need to do the following steps:

  1. Install the plugin and navigate to “Visual Form Builder”.
  2. To create a new form, click on “Add New Form” and fill in the required information.
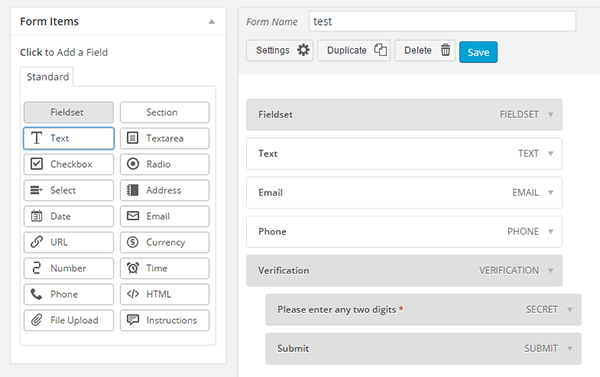
  3. Drag and drop the fields you need to the right and edit the details.Visual Form Builder_Add New
  4. Save the form when you are done.
  5. Under “Display Forms”, you can find the shortcode that you will paste on your Contact Us page.

How to Create a Contact Form Using Gravity Forms

Gravity Forms

Gravity Forms is the most popular paid contact form plugin for WordPress. It is one of most beginner friendly WordPress form plugins. With the help of some other add-ons, Gravity Forms can also be used to create surveys. It comes with premium support options and that is something you can get for spending extra bucks for this plugin.

To set up Gravity Forms, follow these steps:

  1. Install the plugin and activate your product under Forms > Settings tab. Enter your activation key and you’re set to make your first contact form.
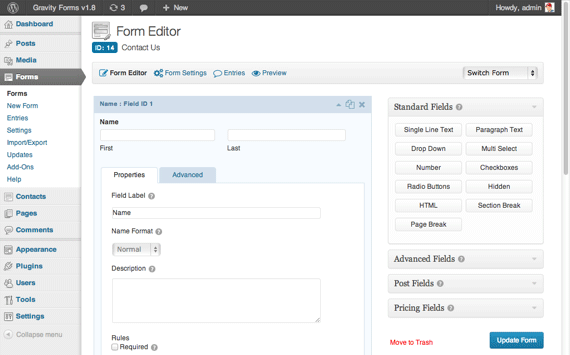
  2. Create a new form and then start adding the necessary fields.
  3. Customize the properties of each field.
  4. Save your form.
  5. Edit your contact page to insert the form by pasting the shortcode. Gravity Forms_Form Editor

How to Create a Contact Form Using Ninja Forms

Ninja Forms

With its really simple, intuitive, drag-and-drop interface, Ninja Forms is an excellent and powerful tool for building contacts forms in WordPress. Ninja Forms’ base product is free. If you wish to extend its functionality like connecting with Campaign Monitor, Freshbooks, Salesforce, SMS notifications, etc., you can buy the corresponding premium extensions.

To create a contact form using Ninja Forms:

  1. Once plugin is installed, find the “Forms” tab on your WordPress Dashboard then click on “Add New”.
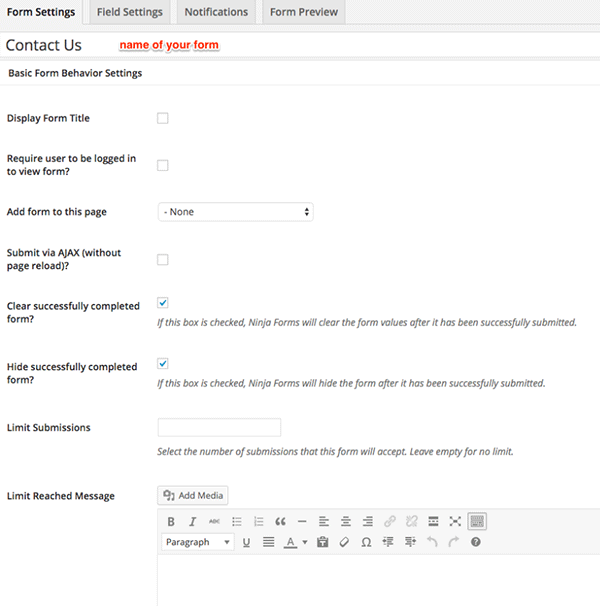
  2. In the “Form Settings” tab, you can see a lot of settings but the most important one to fill in is the form name. Other settings are quite intuitive but if you need some help, you can check out the Ninja Forms Documentation.Ninja Forms_Form Settings
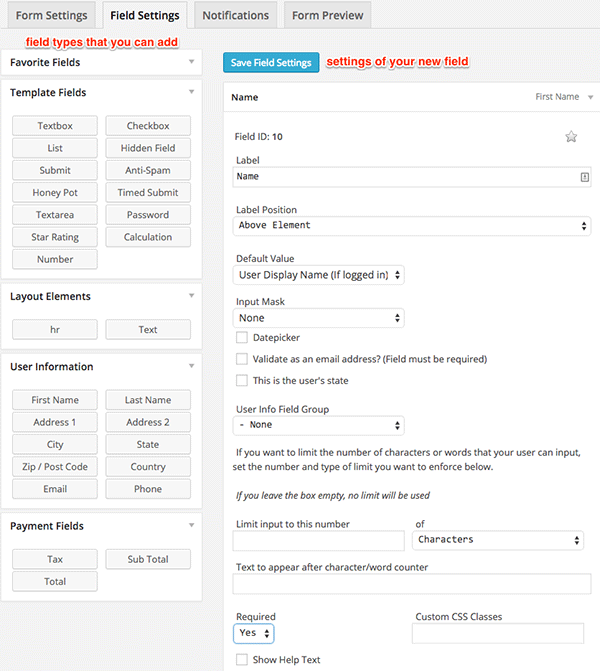
  3. The “Field Settings” tab is where you actually build your form. Drag and drop the needed fields and fill out the information. It is very easy to navigate so you can play around to learn the features. The best way to learn how to do it is actually doing it yourself.Ninja Forms_Field Settings
  4. You can edit the email notifications in the “Notifications” tab.
  5. Once you’ve completed your contact form, you can preview it in the “Form Preview” tab. Don’t forget to save it after.
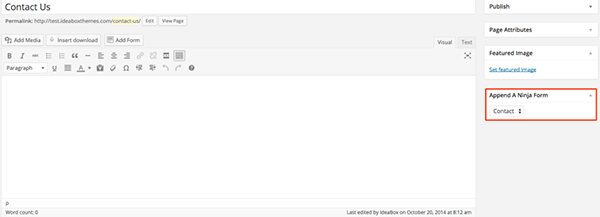
  6. Navigate to the ‘Edit’ mode of your Contact Us page. Find the section “Append A Ninja Form”, then select the form you just created and save the page.Ninja Forms_Append

How to Create a Contact Form Using Formidable Pro

Formidable Pro

Among WordPress users and developers, Formidable Pro is another popular choice. Formidable Pro provides a unique interface from which you can create stunning forms on your WordPress site. This form builder plugin has almost everything you’d need from a premium form plugin. Formidable Pro is a breath of fresh air. Its free version is powerful enough but going for the premium version gives you more features like integration with MailChimp, Aweber, Highrise, Twilio for SMS, WPML, and Zapier.

To set up a Formidable Pro contact form:

  1. After installing, go to Formidable > Forms and click “Add New”’ at the top of the page.
  2. You can start with a blank form or select from a template.
  3. Drag and drop the needed fields. The field settings are quite intuitive so you will learn as you select them.
  4. Click “Create” to save your form.
  5. There are two ways to publish a form on your Contact Us page:
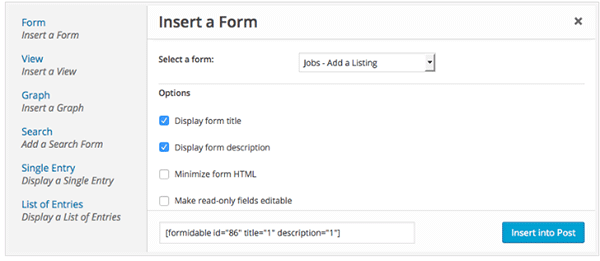
    • Use the shortcode builder. Click “Formidable”, select the correct form, and then click “Insert into Post”.

      Formidable Pro_Shortcode Builder
      img1 – In the Edit mode of your page, click “Formidable”

      Formidable Pro_Shortcode Builder_Insert
      img2 – Select the correct form, then click “Insert into Post”
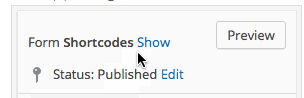
    • Insert the shortcode manually. Navigate to your form and in the upper right corner click “Show” then copy the form shortcode.

      Formidable Pro_Show Shortcode
      img1 – Click “Show”

      Formidable Pro_Show Shortcodes
      img2 – Copy either one of the two shortcodes

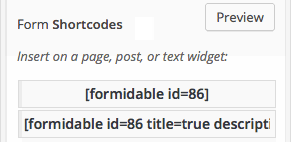
Note that the first shortcode [formidable id = 86], only shows the form itself. If you want the title and description to be displayed as well, copy the second shortcode [formidable id = 86 title=true description=true].

How to Create a Contact Form Using Fast Secure Contact Form

Fast Secure Contact Form is another popular free WordPress contact form plugin. Its name says it all. If you hate spam with a passion, then this is the plugin for you. It includes Akismet support to block spammers. You can also install a companion plugin to add CAPTCHA support.

To set up Fast Secure Contact Form:

  1. Install the plugin.
  2. Click the Plugin tab in the WordPress admin interface, then click “FS Contact Form”.
  3. Under the basic setting fill in the form label and the welcome introduction. The most important thing is to fill in the email address where you should receive the user information.
  4. The “Field” tab is where you actually build your form. You will see a default form with the default fields.
    • To add a field, click “Add New Field”. To edit the field, click on “Show Details”.
    • You can remove a field by clicking the “Show Details” then checking the “Disable Field”.
  5. Save your form when you’re done and locate the form shortcode.
  6. Copy and paste the shortcode to the Contact Us page.

Which is the Best Contact Form Plugin for WordPress?

Well there you have it! These are some of the more popular contact form plugins out there but there are more. Now you might ask what the best contact form to use is. Unfortunately, there is no definitive answer to that question as it will all depend on what you need in a contact form.

What is your favorite contact form plugin? Tell us in the comments.

Filed Under: How-To Articles, Theme and Plugin Reviews Tagged With: admin, e-commerce, how-to, plugins, WordPress

How to Add a Hero Image in Storefront

July 1, 2016 By John 36 Comments

laptop_Hero-Image

The idea of using hero images came about because of issues caused by homepage sliders. Using a homepage slider is discouraged as it will slow down your WooCommerce store and it doesn’t have good conversion rates. If your WooCommerce store running on Storefront has sliders and you are looking for a good alternative, you should consider using a hero image instead.

What is a Hero Image?

To better explain what a hero image is, let’s define what is the “fold” and “above the fold content”. Originally, the fold is a term used in the newspaper industry. Since newspapers are normally folded in half, the upper half of the front page will be the part of the newspaper that is exposed. This is where the most important content is featured, hence the term “above the fold content”. In web design, this is the area of the page that can be seen without scrolling down.

A hero image takes up most of the space above the fold. The trend is to make it large, attractive and relative to the content of the entire site.

It is important that you provide a complete overview of what your company/site is about with just a glance of your hero image. 90% of the time, the hero image has a large text in the center that is related to the branding of the site.

Preparing Your Images

Before you add your image, make sure you have it optimized for web use. You’d want to have the best image quality for the hero image, but you have to take into account the image size as well. As of 2016, the most common screen resolution is 1920x1080px. You should try not to go over this mark. Any excess is just a waste of page size and will just slow down your page load time.

Once you get the right resolution, try to further reduce the image size by down-scaling the image quality. You can actually reduce the image quality without having noticeable pixelation in the image. This is because the human eye can only see limited minute differences in the color changes. Try to strike a balance between having a small image size and having a good looking image. Check out this other post on how to optimize images. Once you are done preparing your image, just upload it to your WordPress site.

Adding a Hero Image in Storefront

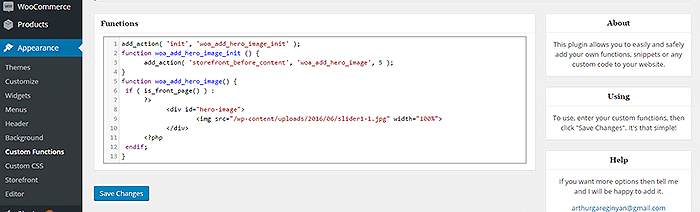
To add a full-width hero image in Storefront, we need to use Storefront’s extensive hooks. We’ll just need to insert a few lines of code.

How-to-add-a-hero-image-in-Storefront-Appearance-Functions

If you are comfortable working with code, you can paste the code below in the functions.php of your child theme. If you are a novice user, we recommend using My Custom Functions plugin to insert the code. Note that one error can cause your entire site to crash.

how to add a hero image in storefront

Copy and paste the code below. Just replace the “/wp-content/uploads/imageurl.jpg” with the URL of the image you uploaded earlier. Width set to 100% makes your image responsive to different screen sizes.

add_action( 'init', 'woa_add_hero_image_init' );
function woa_add_hero_image_init () {
   add_action( 'storefront_before_content', 'woa_add_hero_image', 5 );
}
function woa_add_hero_image() {
   if ( is_front_page() ) :
      ?>
         <div id="hero-image">
             <img src="/wp-content/uploads/imageurl.jpg" width="100%">
         </div>
      <?php
   endif;
}

Your hero image should now appear on your homepage below the main navigation.

If you want to add a link to the shop page or any other url on your image, copy and paste the code below. Just replace the “http://change_me_to_your_url” with the URL you want to link to.

add_action( 'init', 'woa_add_hero_image_init' );
function woa_add_hero_image_init () {
   add_action( 'storefront_before_content', 'woa_add_hero_image', 5 );
}
function woa_add_hero_image() {
   if ( is_front_page() ) :
      ?>
         <div id="hero-image">
             <a href="http://change_me_to_your_url"><img src="/wp-content/uploads/imageurl.jpg" width="100%"></a>
         </div>
      <?php
   endif;
}

Final Notes

Hero images are more effective than sliders in terms of aesthetics. You don’t have to keep using sliders if it’s slowing down your site. Explore more options. Keep your site simple and fast.

If you are still using sliders, you are most likely hurting your site speed. And a slow WooCommerce store will convert less. Your Google rankings could also suffer as a result. It’s time to do away with the slider. Go with a hero image instead.

Was this tutorial helpful? If you have any questions or anything you’d like to add, please let us know in the comments.
Filed Under: Code Snippets, How-To Articles Tagged With: admin, best practices, code snippet, conversion optimization, design tweaks, how-to, image optimization, plugins, site speed optimization, Storefront

Why Have More Than One Payment Gateway for WooCommerce?

September 17, 2018 By John Leave a Comment

Why Have More Than One Payment Gateway for WooCommerce?

If you own a WooCommerce store and only have one mode of accepting payments, you might want to consider adding other payment options. Adding more payment gateways should be easy. WooCommerce can integrate easily with many payment gateway providers. In most cases, you’ll just need to configure a plugin and a few settings. But why have more than one payment gatewat for WooCommerce if the one you have is working fine?

Why Have More than One Payment Gateway?

There are several benefits to having more than one payment gateway.

Reduce Checkout Abandonment

One important reason why you should have more than one payment gateway is to reduce checkout abandonment. Not to be confused with cart abandonment, checkout abandonment is when a user reaches checkout and does not complete the checkout process.

There are various reasons your customers can abandon checkout. Common reasons include having too many form fields, hidden fees, and not having the user’s preferred payment option. For example, some users may prefer to pay using Paypal since it comes with buyer protection or they may believe it is more secure. But if you only have credit card payments, then users who want to use Paypal might abandon your checkout.

Backup Payment Gateway

If you only have one payment gateway and you encounter issues with your payment gateway, your customer will have no other options for completing checkout. That means you are out of business until you sort out your payment gateway issue. It’s great if these issues can be fixed in a matter of minutes, but sometimes these issues can go for days. The longer that it takes for you to fix the issue, the more business you lose.

In short, using only one payment gateway is risky. Having two or more modes of payment allows your customers to check out using another payment gateway if their first choice is not available or having problems.

Flexibility

Many payment gateways are not capable of handling different payment methods. If you want to cover all bases, then you should use more than one payment gateway. In addition, some payment gateways might not be able to process foreign currency. This can be a problem if your business caters to a global market.

Customer Preference

Having more choices is better when it comes to payment options. Trust is hard to come by and if you are using a payment gateway that your customers trust, they will hand you their money. The more payment options you offer, it is more likely that you’ll have your customers’ preferred payment option.

Some users may not be comfortable with entering their credit card information on every ecommerce site that they use. These users are more comfortable using services such as Paypal, Apple Pay or Amazon Pay. Still, some people might not have an account for these services and would prefer entering their credit card information. It’s all a matter of preference. Giving your customers the ability to pay with their preferred payment gateway scores you a point.

What are the Common Payment Options?

There are a lot of payment gateway choices to use for WooCommerce. These include Paypal, which can be Paypal Standard, Paypal Express, Paypal Advanced or Paypal Pro. Using Paypal is already akin to having two payment gateways since users can pay via Paypal or through their credits cards without need for a Paypal account. You can check out the Paypal Extension Comparison page to determine which Paypal option is right for your WooCommerce store.

Other popular payment gateway options include Stripe, Authorize.net, Amazon Pay and Apple Pay which is available through Stripe.

Which Payment Option is Right for Me?

How do you know which payment option is right for you? There are several factors to consider such as cost, location and security. Depending on where you do business, you might also want to consider location-specific regulations such as GDPR. There is no single right answer as to which payment gateway is the best, it all depends on your business’ particular needs.

Get to adding that extra payment gateway as soon as possible. If you ever need help setting up your payment gateways for WooCommerce, you can contact the Wooassist team and we’ll help you out. If you have any suggestions or comments, you can post them in the comments section below.

Filed Under: How-To Articles Tagged With: conversion optimization, payment gateway, Paypal, Stripe, WooCommerce

How to Set Up Amazon Pay for WooCommerce

July 16, 2018 By John Leave a Comment

How to Set Up Amazon Pay for WooCommerce

Amazon, the ecommerce giant, provides a secure means of payment through Amazon Pay. And did you know that you can set Amazon Pay to receive payments on your WooCommerce store? In this post, we’ll teach you how to set up Amazon Pay for WooCommerce.

Why Use Amazon Pay?

As a WooCommerce store owners, having more payment gateways is always a good idea. In case your only payment gateway fails, your customers will still have a means to check out using other payment gateways that you have set up.

Sometimes your customers prefer to pay using a different payment gateway so it’s a good idea to given them different options.

Using Amazon Pay, make for faster and easier payments since users would have already set up their Amazon Pay accounts. They won’t need to keep entering their credit card numbers every time they make a purchase on your store.

Also, Amazon is already a trusted name in ecommerce so having Amazon Pay on your checkout may increase your store’s trust rating. An increased trust rating could result in better conversion rates.

What About Amazon Pay Fees?

If you want to know more about the fees associated with Amazon Pay, you can check out this link.

How to Set Up Amazon Pay for WooCommerce

To set up Amazon Pay for WooCommerce, follow the steps below.

  1. To get started, download and install the Amazon Pay plugin for WooCommerce.
  2. Sign up for an Amazon Pay Merchant account for your region.
    • US – Amazon Pay
    • UK – Amazon Pay
    • DE – Amazon Pay
    • FR – Amazon Pay
    • IT – Amazon Pay
    • ES – Amazon Pay
    • JP – Amazon Pay
  3. When that’s done, head over to your WordPress Dashboard and go to WooCommerce > Settings > Checkout > Login & Pay with Amazon.
  4. The first option on your screen should be the box for “Enable Amazon Payments Advanced”. Tick the box to enable Amazon Pay.
  5. Input your Seller ID, MWS Access Key and Secret Key on the appropriate fields.
    • You can find your Seller ID in your Amazon Seller Central Account. Go to Settings and then on Integration Settings.
    • For the MWS Access Key and Secret Key, click on Integration and then on MWS Access Key (also on your Amazon Seller Central account).
  6. Under Payment Capture, choose how to you want to capture payments. You have the option to:
    • Authorize and Capture – Payment is automatically authorized and captured.
    • Authorize – Payment needs to be captured manually.
    • Don’t authorize – Payment needs to be manually capture and authorized.
  7. Under “Cart login button dislay”, you can either choose button or banner.

Note: If you want to test the payment gateway, tick the “Use Sandbox” option on the settings page.

Note: You can enable debug mode for the plugin to log any errors. This can be used when troubleshooting payment issues.

With that, you are now set to accept payments through Amazon Pay.

In you want to use Apple Pay to provide your customers more payments, you can also check out our guide on how to enable Apple Pay for your WooCommerce store.

Got any questions about enabling Amazon Pay on your WooCommerce store? Let us know in the comments.

Filed Under: How-To Articles Tagged With: Amazon, Amazon Pay, payment gateway, WooCommerce

  • « Previous Page
  • 1
  • …
  • 12
  • 13
  • 14
  • 15
  • 16
  • …
  • 24
  • Next Page »
Let us support your online store so you can manage your business

Get started today

Get 2 Hours of FREE SUPPORT

We are so confident that you will love our services that we will give you your first 4 hours at a 50% discount

That’s 4 hours for only $75

BUY NOW

Free eBook

5 Things Every Online Store Can Fix On Their Website In The Next Week To Increase Sales

Quick Links

  • How it Works
  • Pricing
  • Blog
  • Contact
  • About Wooassist
  • My Account
  • Checkout
  • Privacy Policy
  • Cookie Policy
  • Terms and Conditions

Wooassist

Australia:
59 Luke St.
Hemmant QLD 4174

Philippines:
San Miguel St.
Poblacion, Iligan City 9200

Connect


Copyright © 2026 · Wooassist

Yours FREE!

5 Things Every Online Store Can Fix On Their Website In The Next Week To Increase Sales