Wooassist

Assistance for Your Woocommerce Store

  • How it Works
  • Pricing
  • Services
    • Site Maintenance
    • AI SEO and Content Marketing
  • Blog
    • How-To Articles
    • Code Snippets
    • SEO For E-Commerce
    • Theme and Plugin Reviews
    • Wooassist News
    • WordPress/WooCommerce News
    • Interviews
  • About Us
  • Contact
You are here: Home / Archives for WooCommerce

How to Add a Quantity Field on Your WooCommerce Shop Page

April 7, 2017 By John 30 Comments

counting-cubes-quantity-on-shop-page

By default, WooCommerce does not allow users to change the quantity of the product on the shop page before adding to cart. To change the quantity, users would have to proceed to the cart page which can be an arduous process. In this post, we will show you how to add a quantity field on your WooCommerce shop page.

If a customer wants to buy three sunglasses, and you only have the “Add to Cart” button on the shop page, the user will have to go to the Cart to edit the quantity that he/she wants to buy. This takes a few extra clicks and can become a real problem if the customer wants to shop for more items.

Less Clicks to Checkout

It is important to note that less clicks leading to the checkout page leads to more sales. As an e-commerce store owner, making your store more profitable should be on top of your priority list. Another way to reduce clicks to checkout is allowing the customer to check out as guests without the need to create an account.

Also, refrain from asking unnecessary information. At the very least, your checkout page should only have the name, address, email and phone number fields aside from the payment details.

Quality of Life Improvement

Adding the quantity field to the shop page is a good quality of life improvement that many of your visitors would appreciate. Instead of having to navigate to the cart or the product page to increase the quantity, they can increase the quantity from the shop page. If you think about it, making it easier for your customers to purchase more of your products means more sales for you.

A Necessity for Some Online Stores
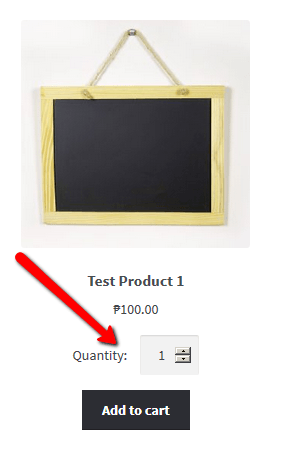
How to Add a Quantity Field on Your WooCommerce Shop PageAdding the quantity field to the shop page is a necessity to some stores where buying several pieces and having repeat sales are common. For example, buying canned cat food in bulk is common so if you own a store selling pet food, having the quantity field on the shop page will really help. Many of your customers will be buying again after some time. They can just add the products directly from the shop page since they know what they are buying and no longer need to see the product details.

How to Add a Quantity Field on Your Shop

You can use the Quantity Field on Shop Page for WooCommerce plugin to add a quantity field on your WooCommerce shop. Just install the plugin and activate it. There are no settings to tweak. Once the plugin is activated, the quantity field should be on your shop page.

Did this plugin work for you? Do you have any questions or ideas on how the plugin can be improved? Let us know in the comments.


Filed Under: How-To Articles, Theme and Plugin Reviews Tagged With: best practices, e-commerce, how-to, navigation, plugins, website development, Wooassist, WooCommerce

How to Make Your WooCommerce Store GDPR-Compliant

June 18, 2018 By John Leave a Comment

How to Make Your WooCommerce Store GDPR-Compliant

The GDPR took effect on May 25. WooCommerce store owners are still scrambling to make sure that their sites are compliant with GDPR requirements. If you serve clients from the European Union, then it is imperative that you make your WooCommerce store GDPR-compliant. Don’t know what to do? Read on below.

What is the GDPR?

First off, a brief introduction about the GDPR. The General Data Protection Regulation (GDPR) is a new regulation in the European Union that sets out standards and regulations for data protection. Data protection reform was initiated way back in 2012 and the GDPR is one fruit of that labor. If you are interested in seeing the GDPR in its purest form, you can check out this link.

Why Comply with GDPR Regulations?

If you do not serve customers from the European Union, then there is no need for you to comply with GDPR regulations. Still, your customers will appreciate the gesture if you make an effort to comply. This shows that you value their data and privacy.

If you serve a specific country in the EU or serve a global audience, then you are covered by the GDPR. That means you may receive hefty penalties of up to €20 million if you are found to be in violation of its provisions.

How Can I Make My WooCommerce Store GDPR Compliant?

Due to harsh penalties, it is recommended to act to make your WooCommerce store compliant. We will now detail the tasks that you need to do to comply with GDPR regulations.

Step 1: Update Your Site

The first thing you should do is update your site. The latest versions of WordPress and WooCommerce have implemented features to be GDPR-compliant. WooCommerce now has a feature that allows users to export their data and delete their data. Site administrators are also granted tools to determine how long data will be retained as well as an option to delete user data. Don’t forget to back up your site and test updates on a development site before updating your live site. For more information on the changes relating to the GDPR, you can check out this post.

Other popular plugins that manage user data such as MailChimp and Google Analytics have also implemented measures to make their services GDPR-compliant.

Step 2: Secure Your Site

Another mandate of the GDPR is that store owners should make their site secure. One way of keeping your site secure is by using the HTTPS protocol. You’ll need an SSL certificate to use HTTPS. You can follow this guide on how to install an SSL Certificate on your WooCommerce store.

There are a few other things that you can do to increase the security of your WooCommerce store. This includes keeping your site updated or using a security plugin. You can check this blog post for other important security tweaks.

Step 3: Create Important Pages

You will need to create a Terms and Conditions page, a Privacy Policy page and a Cookie Policy page. We would still recommend consulting your legal department about creating these pages. If you already have these pages, you need to make sure that you add provisions specific to the GDPR.

Create a Terms and Conditions Page

You can create your own Terms and Conditions page or you can generate a terms and conditions page using this tool from Shopify. If you choose to generate a terms and conditions page, you’ll still need to tweak it. And make sure to add any specific terms and conditions unique to your business.

Create a Privacy Policy Page

You can create your own Privacy Policy page or you can download a template here that you can tweak depending on your needs.

Create a Cookie Policy Page

You can create your own Cookie Policy page or you can download this template and tweak it according to your needs.

Notes on Important Pages

After you’ve created all the pages above, you will need to ensure that these pages can be accessed from any page on your site. For this purpose, we recommend adding links leading to these pages on your WooCommerce store’s footer.

Step 4: Create a Data Breach Response Plan

As per GDPR requirements, you will need to detail how your organization deals with a security breach. You can download a template here. Populate it with pertinent information about your Security Incident Response Team and external contacts.

In case of a security breach, you must also inform all customers whose data may have been leaked. You will need to have a template ready for communicating the breach. You can download the email template here.

Step 5: Add a Cookie Notification Pop-Up

You might have noticed that most, if not all, websites that you visit now have a pop-up that declares that the site uses cookies. That’s because the GDPR also requires website to declare that they are using cookies to track user data. Implementing this is easy on WordPress. You can use the UK Cookie Consent plugin to create a cookie notification pop-up on your WooCommerce store.

Step 6: Ensure that Your Email Opt-in Forms are GDPR-Compliant

If you are using MailChimp, you will need to turn on the GDPR fields on your opt-in forms. Note that this does not make your opt-in forms GDPR-compliant. Rather, this is the first step to making your WooCommerce store GDPR-compliant.

You will still need to get consent from new contacts and existing contacts. You read that right. Even if users have already consented to receive emails from you prior to the GDPR, you will still need to get consent again. For more information on how to get consent, you can check out this article from MailChimp.

If you are using a different tool for your email marketing, you can check with your service provider. Check if they have made any changes to help you comply with GDPR.

Step 7: Ensure that the Plugins You Use are GDPR Compliant

To ensure that your plugins are GDPR compliant, you will need to do a plugin audit. This task may be tedious as you have to sift through all the plugins that you use. First, you’ll need to check if the plugins are still being updated by the plugin author. If that plugin author has not updated the plugin in months (or worse, years), then that’s a red flag. A plugin that is not being updated is a security concern and GDPR requires that websites need to be secure.

Once you’ve weeded out the outdated plugins, you’ll need to identify which plugins manage or use user data. Example of plugins that deal with user data are analytics plugins, contact form plugins, and opt-in form plugins. Check if the plugins that manage user data have taken steps to become GDPR compliant. If they have not, consider finding another plugin that is GDPR-compliant.

Final Notes

Doing all the steps above does not guarantee that your WooCommerce store will be fully GDPR-compliant. We still recommend seeking legal advice. If you need any help getting any of these tasks done, you can contact the Wooassist team and we should be able to help.

Do you have any other tips on how to make a WooCommerce store GDPR-compliant? Let us know in the comments.

Filed Under: How-To Articles Tagged With: email marketing, GDPR, mailchimp, security, WooCommerce, WooCommerce updates, WordPress updates

Samantha Gowing on Food Health Wealth and Thriving in the Wellness Industry – The Wooassist Interview Series

February 15, 2019 By John Leave a Comment

Samantha Gowing has close to 20 years of experience in improving the health and well-being of Australians. Her background as a restaurateur and dietitian ensures she creates tasty and nutritious meals that everyone can enjoy. This, coupled with her business expertise, allowed Food Health Wealth to thrive in a trillion dollar indsutry.

We have been working with Sam since 2015 helping her maintain her website, among other things. We look up to her as an expert in her own field, so we saw it fit to include her in this interview series. Read on below for the interview.

How did the Food Health Wealth website start?

I co-created the first incarnation of the website in 2002 with a coder I met through a friend. I had wanted to build a site since the 90s, but web design was so expensive then. For about $500 I was able to work with a great developer who coded the back end originally in Mambo freeware. It was rather clunky in hindsight, yet it got my business up and running in the new digital era.

Samantha Gowing Wooassist Interview
Samantha Gowing started Food Health Wealth way back in 2002.
Image Credit: Nelly le Comte

What are some of the major challenges for Food Health Wealth?

Raising awareness so people understand the power of food as medicine and the benefits of cooking from scratch are some of the constant challenges.  The solution is to create a multi-faceted platform of services and skill sets that can constantly evolve and change to suit market trends, dietary changes and constantly researching the science-based evidence as it comes to hand, so you are always the leader in the field and top of the game.

What has been the biggest challenge in your career?

Transitioning from a successful career as a hotelier and restaurateur to retraining as a clinical nutritionist in 1999 and trusting that the wellness industry would be the $4.2 trillion global Industry it is today. Being ahead of the trend has allowed me to develop the unique spa and wellness programs that service the niche in the global marketplace for a spa cuisine and wellness specialist in the booming arena of luxury lifestyle retreats, health spas and elegant beach resorts.

Benefits to industry include intensive one-on-one training in the healing cuisines, exclusive cooking demonstrations, conference presentations ready-to-go spa food menus, management systems and kitchen templates.

What are your tips on how to make a business start-up a successful one?

Ask yourself if you are meeting your clients’ needs before you meet your own needs? Do you consider what the client can afford to pay more than what you need to earn? Letting go of the hourly rate structure brings about an opportunity to focus on the project as a whole and not incremental parts, which in my experience leads to less productivity as a consultant as constant clock-watching and cramming tasks into set hours can result in taking more time to do the actual work. If you’ve ever been self-employed in the healing arts or other creative health pursuits then you’ll probably agree that one of the biggest hurdles is knowing not what to charge, but how – and when.

How has eCommerce changed over the past 10 years?

It’s never been easier to set up an online store as it is today. While eBay and PayPal have made online transactions secure in the last ten years, it was unchartered territory. Contact forms were the target of cyber pests and unsecured payment gateways were fraught with danger.

What do you think is the future of eCommerce?

With internet access 24/7, it is easy to shop online almost anywhere. Be mindful of this when developing products and services. Consider lightweight products for better shipping rates and understand what your market really wants when it comes to purchasing a product online. VDO platforms and seamless downloadable modular courses are the way to go if you’re a service only provider such as a wellness consultant. If you’re a chef and nutritionist like me, then think about developing a signature range to sell within your own country with the view of global export in the longer term. Ecommerce is a rapidly growing vehicle that is constantly changing and evolving so stay ahead of the game and as Apple Pay and afterpay platforms ensure your customers can shop 24/7 it is an exciting time for ecommerce and online stores. .

How did you get started with WooCommerce?

I was looking for an ecommerce platform that would seamlessly integrate with my site and be just complex enough to navigate when I wanted to make changes and add new products. 

What advice can you offer for aspiring ecommerce entrepreneurs?

1. Know how to network your market. Get yourself a mentor or a go-to

I cannot stress this enough. You must surround yourself with like-minded peers. The biggest challenge many start-ups face is gaining clarity over their product and their offer. You simply cannot be all things to all people, and you must create a niche that is an inch wide and a mile deep. See my mentoring page here.

2. Future hunt trends before they arrive

Adopt an entrepreneur’s mentality. For example, current research from Global Wellness Institute forecasts that workplace wellness approaches will change radically. Embrace trend forecasting websites and blogs to help you identify emerging trends before they become part of the culture and business potential.

3. Beware of imitations

The highest form of flattery they say, however it can be very costly and very painful. This is the problem with being a pioneer. Don’t let it get you down. Rise up and rule your roost.

4. Protect and defend your IP

Trademark what you can. Image and recipe ‘borrowing’ is rife and always has been. Always credit your source! In academia, you’d be booted out of an institute for not referencing diligently – and plagiarism. Always declare your influence. Start with something like, ‘the work of (fill in this gap) has always inspired me’.

5. Develop Product

In order to get traction, you need to become very good at selling yourself and your products with grace, peace and ease. If you truly believe in yourself, your product and your offer, then you should not have to think twice about it as it will help your community. Get your product in to as many hands as possible and ask friends to take a pic of them reading, eating or wearing it.

Filed Under: Interviews Tagged With: business, business development, WooCommerce

How to Edit Footer Credit Text in Storefront Theme

March 20, 2017 By John Leave a Comment

Like most themes, Storefront theme comes with a generic footer text. As a WooCommerce store owner, this doesn’t really help your site so you will want to change it.

Storefront-Default-Footer

Why Edit Footer Credit Text Area?

Well, you certainly wouldn’t want the default one. You can edit your site footer credit text area to include your business name and declare your copyright. You can also use this area to include whatever best fits your needs.

But first off…

How Do You Edit the Edit Footer Credit Text in Storefront Theme?

By editing your e-commerce store’s footer, you can make it a part of your strategy. You can easily edit it if you know how to code. However, this can prove challenging to the average user. In this case, there’s a plugin for that. Just follow the steps below:

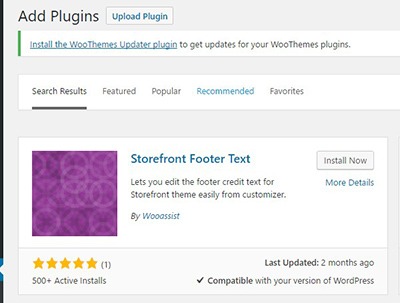
  1. Storefront-Footer-Text-Plugin-400x300Head over to your WordPress Dashboard and go to plugins

  2. Click on “Add New”. In the Search field, input “Storefront Footer Text” and press Enter.
  3. Click on ‘Install Now’ on the plugin and then click Activate.
  4. Once Activated, head over Appearance > Customizer
  5. Under the Footer section, you will find a text area for you to enter your custom credit text. You can use HTML tags so you can be creative when adding your footer text.
  6. When you’re done, just click on Save.

What Can I Add to My WooCommerce Store’s Footer Credit Area?

There are a lot of things you can add to your store’s footer credit section. Below are just some of them.

Declare Copyright and Other Important Declarations

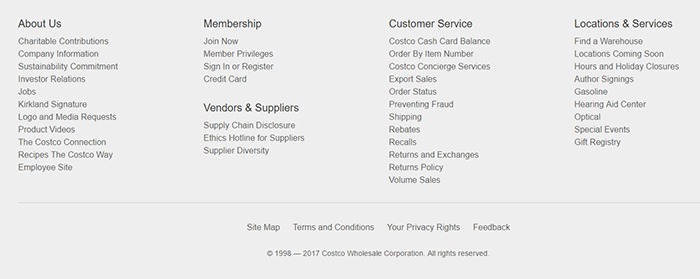
The most common use of this area is to declare a copyright. This has three elements: the copyright icon, the company name and the year that you started the e-commerce store/business up to the current year.

If there are other important declarations that you want to add for legal purposes, you can add them in this section as well. Some websites have been known to use this area to declare the use of cookies.

Declare-Copyright-in-Footer

Here’s how it looks like on the Costco website.

Contact Details

In addition to copyright information, you can add your contact details on the footer credit section to increase your credibility. You can add your phone number, address, email as well as a link to your contact us page.

Social Media Icons

You can add social media icons in this section in a way that is not intrusive. When you add social icons at the top of your page, it can be a distraction from your website’s goal. But when you add it at the bottom of your site, it becomes another way for you to engage with your visitors if they ignored your main call-to-action.

Social-Media-Icons-in-Footer
Newegg.com adds both social icons and security seals in the footer credit area.

Show Security Seals and Certificates

Newegg.com adds the security seals on their footer credit section along with their social media icons. You can add your own Norton Security Seal here.

Payment Options

You can also add icons of the payment options that you accept on your e-commerce store. This makes it easier for your visitors to know what payment options you accept without having to look for the FAQ section.

Add Other Important Links

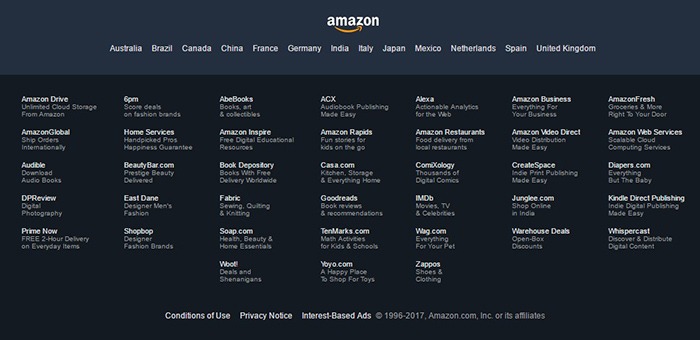
You can also use the footer credit area to add other important links such as your terms and conditions and privacy policy. This is how Amazon does it.

Terms-Conditions-Footer

No matter what you put on your footer credit text area, it must be an element that helps you achieve your e-commerce store’s goals.

Did this plugin help you edit footer credit text in Storefront? Did you experience any problems using it? What elements did you add to your footer credit area? Let us know in the comments.

Filed Under: How-To Articles, Theme and Plugin Reviews Tagged With: best practices, design tweaks, e-commerce, how-to, navigation, plugins, Storefront, Wooassist, WooCommerce

How to Create a Child Theme for Storefront

February 26, 2016 By John 2 Comments

how-to-create-a-child-theme-for-storefront

Optimizing your website usually means making changes to your theme. These changes can range from simple to complex. It’s easy to make changes on your website but the problem is that you will lose all your changes when you update your theme.

There are ways to update your theme without losing your customizations and the best way is to use a child theme. In this post, we will teach you how you can use a child theme to make the website development process easier.

We’ll teach you how to create a child theme for Storefront theme. Storefront is the official theme for WooCommerce. It’s a good parent theme to work on as it’s built with the same high standards as WooCommerce. It is entirely free and 100% compatible with WooCommerce.

What is a Child Theme

A child theme is not a full theme. It only inherits all the code, styling and functionality of the main or parent theme. Changes made in a child theme do not affect the parent theme. This allows users to tweak a theme without having to worry about losing the customizations when updating the theme. Using a child theme is best practice for altering an existing theme.

A parent theme is the default of all your WordPress themes. It contains the templates, design and functionality needed to run your website on WordPress. Note that parent themes are different from theme frameworks. A parent theme is a complete theme that you can use right away while a theme framework like Genesis is a developmental template.

Why You Should Use a Child Theme

There are thousands of themes out there that you can use for your WordPress installation. The problem is they all look generic and may not exactly fit your website needs. Modifying the theme with CSS is recommended. Here are some reasons why you should use a child theme:

Speed Up Site Development

Child themes allow you to quickly add or modify specific functions or template files. It allows you to significantly speed up site development as you would not need to write a lot of code from scratch. You’ll get a great deal of flexibility especially from powerful theme frameworks like Genesis.

Preserve Theme Changes

Themes get updates from time to time. These updates are important as these address security exploits that come to light. Updating your theme will wipe all the changes you made to the base theme. However, if you use a child theme, you can preserve any changes you make to the child theme when you update the base theme.

Safe Fallback

Creating or editing a theme entails a lot of work. However, when you make customizations on a child theme, you have your parent theme’s codes and functionality as fallback in case you mess up something. The child theme will only change a specific function or style when you want it to.

Secure Your Site

WPBeginner found out that 83% of hacked WordPress sites are not upgraded properly. The safest way to update your theme is by using a child theme.

When to Use Child Themes

If you are in any way customizing your theme, then you should be using a child theme. Using a child theme is best practice.

If you are not familiar with CSS and PHP, creating your own child theme can be a challenge. You would also need to learn about the functionalities of your parent theme.

Robust frameworks can be more challenging as they have their own filters and hooks.

How to Create a Child Theme

Setting up a child theme for any WordPress theme is easy but you need to pick a good parent theme. Not all themes can be good parent themes. We recommend Storefront or the Genesis framework.

A good parent theme is a solid foundation for your site. You will be building your child theme over it so it has to be flexible and coded properly.

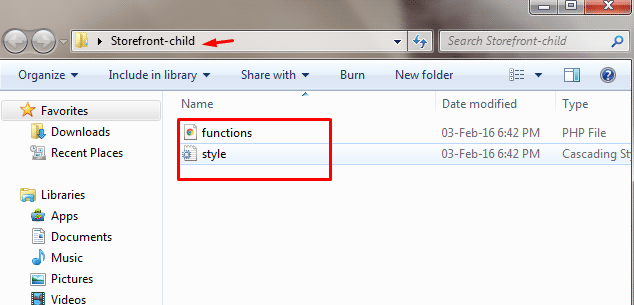
You can use plugins to generate a child theme or you can do it manually. You just need three things to start: child theme directory, style.css file and functions.php file.

Child Theme Folder

This folder will serve as the container for your stylesheet and function files. It is ideal to use the name of your parent theme as folder name and append it with “-child”. In this case, we named our directory “Storefront-child”. Make sure that your child theme’s directory name has no spaces to avoid possible errors. For the meantime, you can create this folder in your computer.

child-theme-folder

Child Theme Stylesheet

This is a basic style.css file. You need to set this stylesheet to inherit the styles from your parent theme. To do that, insert the stylesheet header below and replace them with relevant details. Note that customizations done here will override parent theme styles.

/*
 Theme Name:   Storefront Child
 Theme URI:    http://sitename.com/storefront/
 Description:  Storefront Child Theme
 Author:       Nick J
 Author URI:   http://sitename.com
 Template:     storefront /*this is case sensitive*/
 Version:      1.0.0
 License:      GNU General Public License v2 or later
 License URI:  http://www.gnu.org/licenses/gpl-2.0.html
 Tags:         light, dark, full-width, responsive-layout, accessibility-ready
 Text Domain:  storefront-child
*/
/*Theme customisations start here*/

We won’t teach you how to use CSS. It is impossible to cover that in one article. You can learn CSS here or have a developer do the CSS tweaks on your website.

Child Theme Function

Previous methods suggest that you use “@import” in your stylesheet to load your child theme. This is no longer considered best practice. You just need to “enqueue” your parent theme’s stylesheet in your child theme’s functions.php file. To do this, you can use “wp_enqueue_scripts action” and use “wp_enqueue_style()”.

The stylesheet for your child theme is usually loaded automatically. If not, you will need to enqueue it as well. You also need to make sure that the child stylesheet gets priority. You can use the code below instead. This code sets ‘parent-style’ as a dependency so your child-theme stylesheet loads after it.

<?php
function theme_enqueue_styles() {
$parent_style = 'parent-style';
wp_enqueue_style( $parent_style, get_template_directory_uri() . '/style.css' ); wp_enqueue_style( 'child-style', get_stylesheet_directory_uri() . '/style.css', array( $parent_style ) ); } add_action( 'wp_enqueue_scripts', 'theme_enqueue_styles' );
?>

Activation

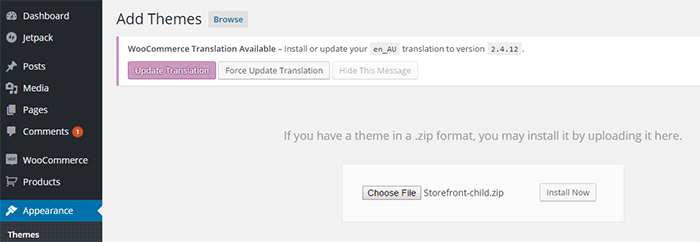
To add a child theme to your WordPress themes, you need to create a .zip file of your child theme folder. You can use 7-zip or Winrar to do this. Make sure that you have your style.css and functions.php inside your child theme folder.

It is best to take note and keep records of other plugin settings before you activate your child theme. Once you’re done, you can upload this in your WordPress via Appearance > Add Themes.

child-theme-activation-storefront

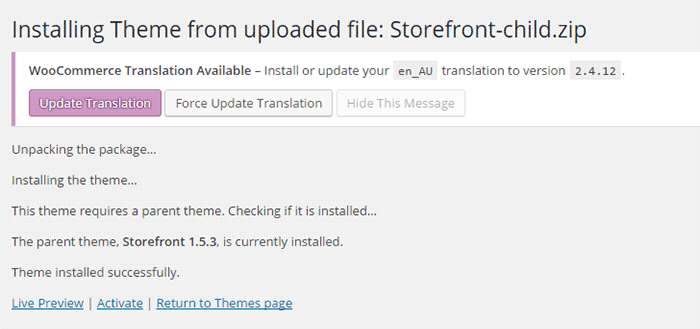
WordPress will install your child theme just like any other theme. Once installed, you need to activate this by clicking on ‘Activate’.

child-theme-activation-storefront-2

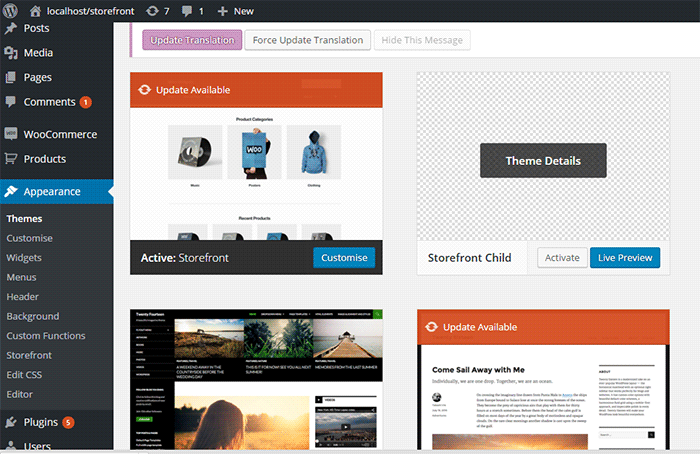
You can also choose to activate your child theme later when you go to Appearance > Themes.

child-theme-activation-storefront-appearance-themes

Once installed or activated, you can apply any edits to functions.php and to the stylesheet directly on the child theme files

Popular Child Themes for Storefront

If creating your own child theme is proving to be a bit too difficult for you, you can always purchase one.

There are a handful of child themes for Storefront right now. Note that you should install Storefront base theme first before installing these child themes.

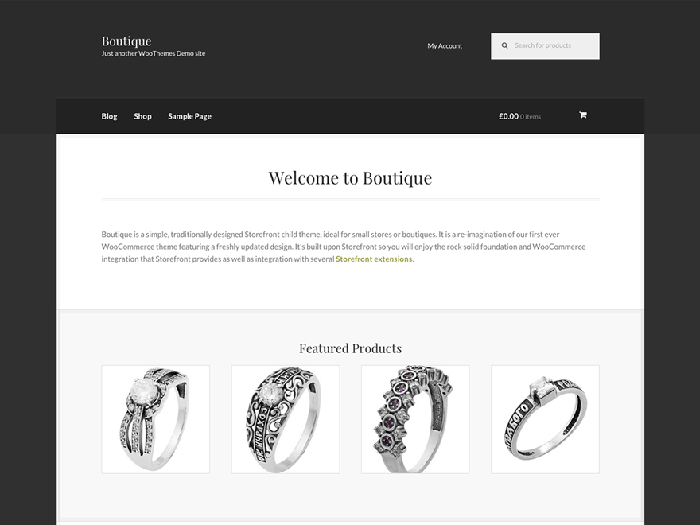
Boutique

boutique_popular-child-themes-for-storefront

Boutique is simple and easy to customize. You can start selling after you create your color theme, add your logo and content.

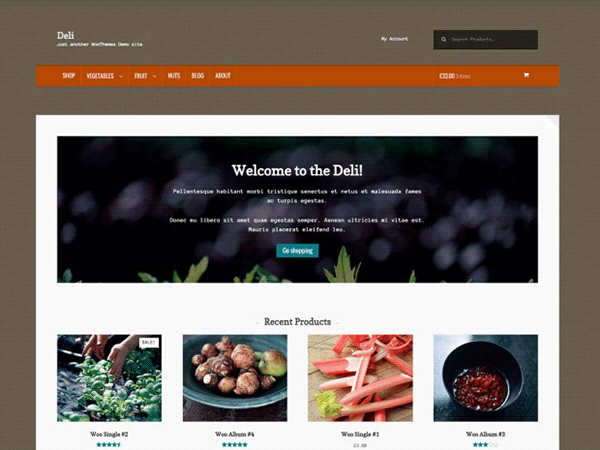
Deli

deli_popular-child-themes-for-storefront

If you want to add more personality to your store, you can use Deli. This child theme is great for small businesses. It has color schemes and textures that are inspired by nature.

Conclusion

Having a child theme is best practice when doing development work on your WooCommerce site. More importantly, using a child theme allows you to freely update your theme without losing any customizations you made on the child theme. A good and solid foundation is important for child themes. Hope this article has been helpful. Do you have any questions about child themes or anything you’d like to add? Let us know in the comments.

Filed Under: Code Snippets, How-To Articles Tagged With: best practices, child theme, code snippet, CSS, design tweaks, how-to, optimizations, Storefront, website development, website maintenance, WooCommerce, WordPress

  • « Previous Page
  • 1
  • …
  • 3
  • 4
  • 5
  • 6
  • 7
  • …
  • 15
  • Next Page »
Let us support your online store so you can manage your business

Get started today

Get 2 Hours of FREE SUPPORT

We are so confident that you will love our services that we will give you your first 4 hours at a 50% discount

That’s 4 hours for only $75

BUY NOW

Free eBook

5 Things Every Online Store Can Fix On Their Website In The Next Week To Increase Sales

Quick Links

  • How it Works
  • Pricing
  • Blog
  • Contact
  • About Wooassist
  • My Account
  • Checkout
  • Privacy Policy
  • Cookie Policy
  • Terms and Conditions

Wooassist

Australia:
59 Luke St.
Hemmant QLD 4174

Philippines:
San Miguel St.
Poblacion, Iligan City 9200

Connect


Copyright © 2026 · Wooassist

Yours FREE!

5 Things Every Online Store Can Fix On Their Website In The Next Week To Increase Sales