Wooassist

Assistance for Your Woocommerce Store

  • How it Works
  • Pricing
  • Services
    • Site Maintenance
    • AI SEO and Content Marketing
  • Blog
    • How-To Articles
    • Code Snippets
    • SEO For E-Commerce
    • Theme and Plugin Reviews
    • Wooassist News
    • WordPress/WooCommerce News
    • Interviews
  • About Us
  • Contact
You are here: Home / Archives for John

How to Set up Abandoned Cart Emails in WooCommerce

May 15, 2018 By John Leave a Comment

How to Set up Abandoned Cart Emails in WooCommerce - Wooassist

You are losing money and you may not even be aware of it. According to data from the Baymard Institute, over 69% of shopping carts are being abandoned. Also, 57% of online shoppers have abandoned a shopping cart in the last 3 months stating various reasons. It may not always be your fault but you can do something about it.

Reasons for Cart Abandonment

The Baymard Institute has researched shoppers’ reasons for cart abandonment.

reasons for cart abandonment
Source: Baymard Institute

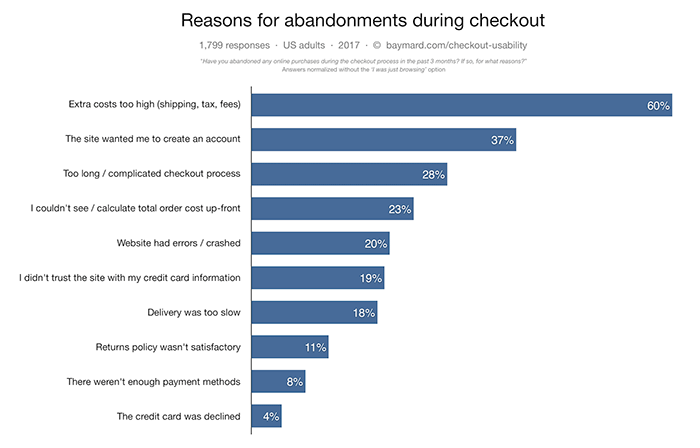
Many of the reasons customers cite for leaving carts can be addressed. It can be a simple matter of making it more convenient for your customers to check out or just being transparent about the fees that you collect. Sometimes, you just need to offer more payment options.

How to Reduce Cart Abandonment

Before we move on to how you can recover abandoned carts, it is important to address why carts are being abandoned. After all, it would be better if your customer didn’t abandon their carts in the first place.

Extra Costs Too High

Shipping fees and taxes go hand in hand with ecommerce. There is no way around it. But if your customers complain that your shipping fees are too high, you might have a problem. Have you considered using a different company that can offer more affordable shipping? Have you considered adding a shipping calculator to your WooCommerce store? Have you considered offering free shipping? If you can’t afford free shipping, you can also consider offering free shipping for a minimum order value.

Complicated Checkout Process

You should make it easy for your customers to buy your products. Don’t make them jump hoops. There are a few things that you can do to ease the checkout process. You can enable guest checkout, reduce checkout form fields, and make your checkout mobile-friendly. Put yourself in your customers’ shoes and try out your checkout process. Better yet, survey some of your customers and ask them for feedback.

Improve Your Trust Rating

One reason that customer’s abandon carts is that your ecommerce store has not shown that it can be trusted. What can you do to improve your WooCommerce’ store’s trust rating?

  1. Show your contact information.
  2. Add testimonials
  3. Install an SSL Certificate
  4. Add security seals
  5. Have a professional looking site
  6. Create a compelling about us page
  7. Increase your site’s security

Once you address these things, you should be able to see improved checkout completion. This doesn’t mean you’ll have zero abandoned carts. For your abandoned carts, you can still recover them through abandoned cart emails.

How to Recover Abandoned Carts in WooCommerce

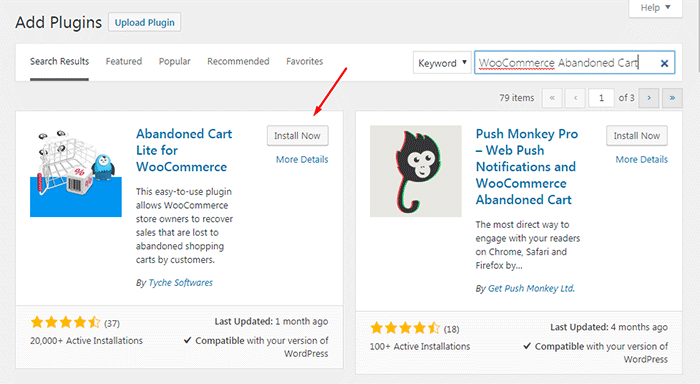
Abandoned cart emails are easy to set up using a plugin. First thing that you need to do is install the WooCommerce Abandoned Cart plugin.

In your WordPress dashboard go to Plugins > Add New and search for WooCommerce Abandoned Cart.

WooCommerce Abandoned Cart plugin

After installing and activating the plugin, it will automatically bring you to the plugin’s Dashboard page.

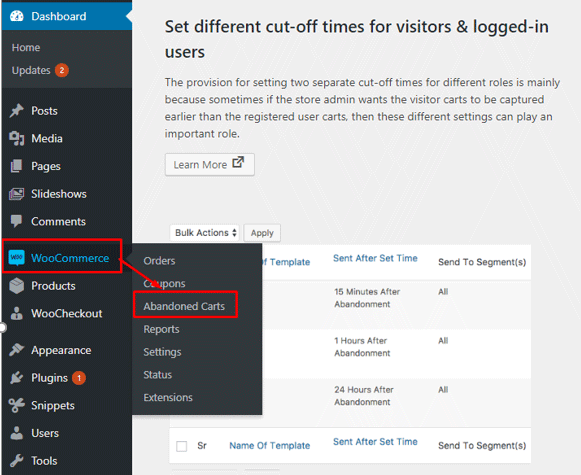
To edit the plugin’s settings on your Dashboard, go to WooCommerce > Abandoned Carts.

WooCommerce Abandoned Cart Settings

In the settings page, you can change various plugin settings.

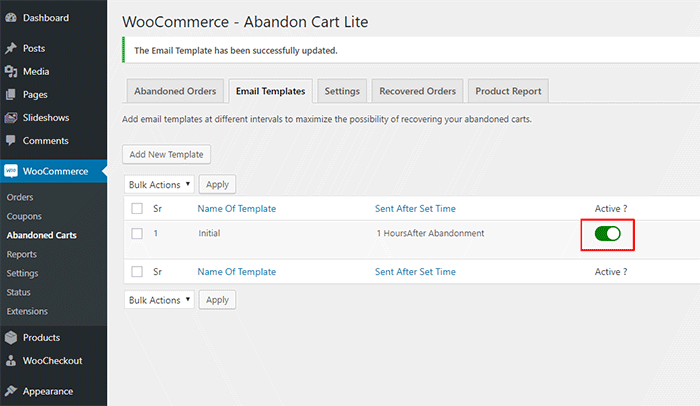
The first thing we need to do is edit the email template that will be sent to customers. To do this, click on the “Email Templates” tab. Here you can see the default email template. Hover on the existing template and click on “Edit”.

WooCommerce Abandoned Cart Edit Template

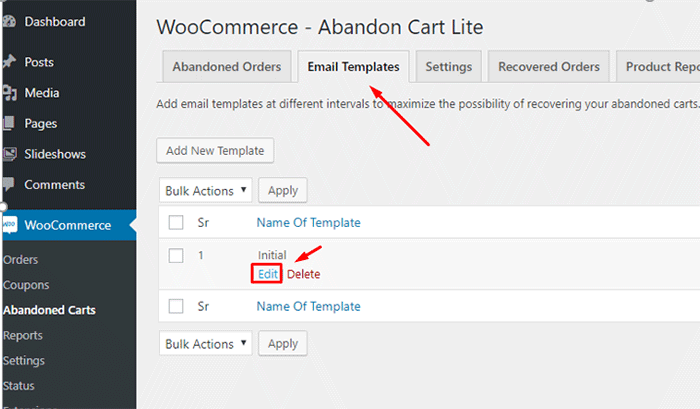
This will open a new page where you can edit and personalize the email that you want to send to your visitors that abandon carts.

After editing the template, click on “Update Changes” and click on the activate button.

Activate WooCommerce Abandoned Cart

That’s it. The plugin will now automatically send emails to visitors that abandon their carts which will help you recover these carts and increase your sales.

Additional Tips

If you want further increase your sales, you can also consider doing email marketing for WooCommerce. You can start by configuring WooCommerce to automatically add customer emails to your MailChimp lists. Or if you want more conversion optimization tips, you can also check out our conversion optimization infographic.

If you have any questions about setting up abandoned cart emails in WooCommerce, you can let us know in the comments.

Filed Under: How-To Articles Tagged With: conversion optimization, email, email marketing, plugins, shopping cart, WooCommerce

How to Start an Email Marketing Campaign on WooCommerce from Scratch

April 30, 2018 By John Leave a Comment

How to Start an Email Marketing Campaign on WooCommerce from Scratch

Social media marketing is abuzz. But did you know that email marketing is more effective than social media? In comparison, email marketing gets an average click-through rate of 3.57% while you can only get a 0.07% click-through on Facebook. In this post, we’ll teach you how to start an email marketing campaign on WooCommerce.

Why Email Marketing Works?

More than 90% of consumers check their emails daily and 77% prefer email for marketing. Cold calls, text messages and even social media ads are considered intrusive. If you do good email marketing, you’ll have an email list of people that have already shown interest in what you offer.

Also, email is a platform that you own and you don’t need to abide by Facebook, Twitter and Google’s rules which regularly get updated.

Social Media Not Without Merit

While email marketing is more effective, social media marketing is not without merit. Social media will allow you to tap into the entire social media user base while email marketing entails that you build your own mailing list. Also social media can become a gold mine if you have what it takes to go viral.

How to Get Started on Email Marketing on WooCommerce

Have a Clear Goal

Before you go jump on email marketing, it’s important that you don’t jump in blind. You should have a clear goal in mind. What do you want to achieve with the emails that you will be sending out? Drive more traffic to your site? Promote your product? Increase sales? Keep your customers engaged? Send special offers? Whatever your goal is, it should be clear from the start.

Find a Platform to Use

There are plenty of platforms that you can use for email marketing but we’ll focus on MailChimp. MailChimp integrates well with WordPress and WooCommerce. To get started, you’ll need to create an account on MailChimp. Other well-known email marketing platforms are Active Campaign, AWeber, ConvertKit, ConstantContact, Drip and GetResponse.

SubscribeBuild Your Email List

Don’t be Lured into Buying Emails

The success of your email campaign depends a lot on how you build you email list. There are plenty of ways to build your email list. You might be tempted to take a shortcut and buy an email list from a shady company. Don’t do this, you’ll only get a list of emails that has been spammed endlessly and thus has lost any value.

Gathering Emails

Importing Emails You Already Have

If you already have a list of client emails, you can import this list to your MailChimp account. Make sure the people in your list have consented to receive emails from you.

Create an Email Opt-In Form

You can create an email opt-in form in a prominent area of your site. It can be your main call-to-action on your home page. You can add it to your side-bar. You can add it on the top-bar. Or you can choose to create a pop-up. Contrary to popular belief, pop-ups do work well when they are implemented properly. In fact, email opt-in pop-ups can drive up to 1,375% more email sign ups. Don’t spam your visitors with pop-ups. You can show them one pop-up every set number of days. You can show a pop-up when a visitor has spent a specific amount of time on your site. You can show a pop-up when your visitor has scrolled down to the end of your landing page. Getting the right timing to show a pop-up is critical.

Add Email Opt-In to Your Contact Form

Another way of building your list is by having your form contacts become a part of your list. Note that you must expressly indicate that you are going to add them to your mailing list. If you are using Contact Form 7, you can use the Contact Form 7 MailChimp Extension to automatically add form submission to your Mailchimp lists.

Add Email Opt-in to Your Checkout

You can also automatically add your new customers to your MailChimp list by adding an opt-in form at checkout. You can do this using the MailChimp for WooCommerce plugin. You can check out our post on how to set up email opt-in on WooCommerce checkout.

Create Your First Newsletter

Create Your First Newsletter

After you’ve determined your goal and gathered enough emails, you can get started on your first campaign. We’re not going to tell you how to create your campaign because that depends on your strategy but there are a few important pointers to keep in mind.

Optimize Your Campaign for Ease of Reading

Your campaign should be easy to read. Avoid big words that are difficult to understand. Simple words work best. Avoid using passive voice and adverbs. If your campaign is a mess and hard to read, people will not read it.

Optimize Your Campaign for Clicks on Your Call-to-Action

Make sure your call-to-action is clearly visible. If your campaign can’t encourage your email list to take action, then it is useless. Also, test that your campaign looks good on a mobile device. Many of your contacts will browse emails over their phone and if your call-to-action is not visible on mobile view, you will be losing out on a lot of clicks.

Make Sure Your Campaign is Relevant to Your Customers

If the campaigns you send out are not relevant to your email list, you’re risking your contacts unsubscribing from your campaign. People unsubscribe from email lists all the time. That’s to be expected. But if your unsubscribe rates are too high, MailChimp may put restrictions on your account. You can prevent this by not subscribing emails that did not agree to receive emails from you and sending them campaigns that are relevant to them.

When everything is set, get ready to send your first newsletter. After you’ve sent your campaign, what’s next?

Check Your Data

After you’ve sent your first newsletter, it’s time to look at your data. Most email marketing platforms will have built in analytics reporting. How many opened your emails and clicked, were converted and unsubscribed?

When you’ve sent your second newsletter, check your analytics data again and compare. Determine how you can improve your conversion rates. You can even split test your campaigns to see which works best and what are the best times for sending out your newsletters.

Got any questions about starting your own email marketing campaign on WooCommerce? Let us know in the comments.

Filed Under: How-To Articles Tagged With: ecommerce, email, email marketing, mailchimp, WooCommerce

13 Routine Maintenance Tasks that You Should Do on WordPress and WooCommerce

April 2, 2018 By John Leave a Comment

Routine Maintenance Tasks for WordPress

Maintaining a WooCommerce store is a lot of work. There are a lot of routine maintenance tasks for WordPress and WooCommerce that need to be done on a regular basis. In this post, we list down the most important tasks that you should do on your WooCommerce store.

1. Create Regular Website Backups

Create Regular Website BackupsCreating regular site backups is critical. It is your first fallback in case something breaks on your site. While you can make backups manually, it is important to make regular automated backups. Check with your hosting provider if they create regular backups of your database as well as a complete backup of your site. You can also install a backup plugin such as Updraft Plus or BackWPup and set it up to make regular automated backups for you. We still recommend creating manual backups before doing major work on your WooCommerce store though.

2. Update WordPress, WooCommerce, Themes and Plugins

Updating all elements of your WooCommerce store should be done on a regular basis. Do this weekly if you have the time. If not, monthly updates are good enough. Updates include updating WordPress Core, themes, WooCommerce and all other installed plugins. Remember to backup up your site before proceeding with updates since updates could cause your website to break. If you have a development site, it would be best to test the updates first on this staging environment. Then, do some user testing to make sure that there are no errors. After that, you can proceed to update your live site. When that’s done, you will need to do another round of testing. Some important elements to test include checkout, add to cart, contact form emails, opt-in forms and other customizations that were done on the site.

3. Update WooCommerce Template Files

After updating WooCommerce, you will sometimes get an error notifying you of outdated WooCommerce template files. This just means that your theme has not updated to include the latest WooCommerce template files. In some cases, this could cause some formatting issues on your store. If there are no errors on your store, you can simply wait for your theme to release an update that includes the most recent template files. Or you can also fix this manually by following the steps in this documentation from WooCommerce.

4. Change User Passwords

It is important to use strong passwords. However, it is just as important to change passwords on a regular basis. There are times when security breaches can go undetected for a long time. Changing your password regularly blocks out these security breaches that you might not realize are there. You should change your password for WordPress admin, FTP, database and cPanel. And a pro-tip, never use “admin” as your username. This is the first username that hackers try out when brute forcing into websites.

5. Optimize Your Product Images

We’ve always emphasized the importance of optimizing images for your WooCommerce store to keep your site running fast. If you have uploaded any product image that is more than 100KB in size, it might be a good idea to replace that image with an optimized product image. To learn more, you can check out our blog post on how to optimize images.

6. Approve and Respond to Product Reviews

Moderate Product ReviewsIf you are not asking your customers for product reviews then you might want to reconsider. Most people who buy online look for product reviews before they decide to purchase something. One study found that 85.57% of users read reviews before they purchase. And if you are asking your customers for product reviews, then you will need to approve reviews on a regular basis. A word of advice, do not remove negative reviews of your products. Instead, make it an avenue where you can show good customer service. Respond to the negative review. Offer a replacement for a defective product or offer a refund. People reading reviews will want to see some negative reviews to get a well-rounded picture of your product. When moderating reviews, you only need to remove the spam reviews.

7. Approve and Respond to Blog Comments

If you have a blog that is made to drive customer engagement, then your blog will most likely attract comments. Same with product reviews; don’t delete the negative comments. Rather, address them positively. Remove any spam comments as this will negatively impact the user experience of your blog. If you are using Akismet: Anti Spam plugin, this will block out most spam comments. However, some spam comments can still get through and you will need to manage them manually.

8. Test Your Contact Forms and Email Opt-in Forms

Every now and then, you will need to make sure that your contact forms and email opt-in forms are working. Just fill in your forms and send. If you receive it in your email, then you’re all good. But if you don’t, there’s something wrong and you need to do something about it. Have your developer look into it.

9. Optimize Your Database

Over time, your database accumulates a lot of gunk and you need to clean it to make sure your website runs fast. Before you go about this task, make sure you create a backup. You can choose to clean your database manually if you are comfortable and familiar with working on your database. Otherwise, you can use a plugin to do the optimizations for you. Notable plugins include WP-DBManager and WP-Optimize. You can check out our guide on how to clean your database.

10. Test Your WooCommerce Store’s Speed

If you have not yet made optimizations to your WooCommerce store’s speed, you should consider doing it now. Site speed has become increasingly important for WooCommerce store owners. Google now considers site speed as a ranking factor for SEO. Also, if you have a slow site, this will negatively impact the customer’s experience on your site. It is easy for your customers to buy instead from your competitors. You can test your site speed on Google’s Page Speed test and Google will provide you with recommendations on how you can improve your site’s speed. Other notable tools that you can use to test your site are Pingdom Website Speed Test and GTmetrix.

11. Scan Your Site for Malware

One way to keep on top of your website’s security is to regularly test your site for any malware. If you are connected to Google Search Console, it will let you know if malware is detected on your site. If your site has been found to have any form of malware, Google Chrome will actually alert your visitors that your site is dangerous. This can have devastating effects on your traffic and conversion rate. No one will want to enter their payment information on a site that has malware. In extreme cases, Google may block your site from appearing in the Google search results page. You want to prevent this from happening. It would be best to invest on your site’s security by installing a security plugin such as Sucuri Security and WordFence. Even if you have those plugins installed, it is still a good idea to a manual scan. You can scan your website at Sucuri’s Website Malware and Security Scanner, or at SiteGuarding. If any manual scans detect anything malicious, you can contact your developer to fix the issue. You should get it fixed before Google applies any penalties. Wooassist also offers a security hardening service to improve the security of your site so you can prevent this from happening.

12. Fix Broken Links

Broken links are bad for user experience so check your site regularly for any broken links. You can use W3C Link Checker or any other similar tool to check for broken links. Once you’ve found the broken links on your site, you can start fixing them. You can either remove the links or points the links to a new relevant URL.

13. Test Your Checkout Process

Last but definitely not the least; you should regularly test your checkout process. If you suddenly experience loss of sales, it’s a good idea to test your checkout. There might be an error that prevents your customers from checking out. Testing also gives you a feel of what your customers go through so you can optimize your checkout. Once you’ve determined that your checkout has problems, you can check out our post on how to fix the most common checkout problems in WooCommerce.

Final Notes

By doing these tasks on a regular basis, you can keep yourself on top of any issues that may occur on your WooCommerce store. If you find yourself overwhelmed by the all these, you can hire someone else to do it. You can also contact us and our team will be glad to assist with any of these tasks.

Are there any other routine maintenance tasks for WordPress and WooCommerce you think should be done on a regular basis? Do you have any suggestions? Let us know in the comments.

Filed Under: How-To Articles Tagged With: blog, contact form, conversion optimization, image optimization, plugins, security, site speed optimization, website maintenance, WooCommerce, WooCommerce products, WordPress, WordPress SEO, WordPress updates

Preparing Product Images for WooCommerce

March 12, 2018 By John Leave a Comment

Preparing product images for WooCommerce can be a tedious task. You can easily snap a picture of your products and just add it to your site. Unfortunately, snap and upload is not the way to go.

A digital image from a camera is usually very large. It can easily reach upwards of 2MB in size. When you put a 2MB image on your product page, your customers would have to wait at least a couple of seconds before they can see the image.

If you have more than one image, it’s going to take even longer. Eventually, someone would just get tired of waiting and head over to a competitor’s website. Not convinced? Check out this post on how loading time affects your bottom line.

How to Prepare Your Images for Web

product

Preparing product images to upload into your WooCommerce store requires an image editing tool, such as Adobe Photoshop. Check out this post from our blog to learn how to use Photoshop to prepare your images for uploading on your website.

If you don’t have Photoshop, there are some alternatives in the form of web tools. You can check out this post on Mashable, which lists down a couple of tools that can help you optimize your images.

Understanding Image File Types

When working with images, understanding image file types is necessary. Certain types of images are best suited to a certain file type. You need to know what that file type is, so your images will look good even if they are scaled down.

Here’s a good article that details the most common image file types including when you should use each file type.

An important note: Using an image editing tool like Photoshop is still the better option since it gives you better control on how you want to optimize your images.

Using Descriptive Files Names

One more thing you need to do before uploading your image to your WooCommerce store is to name them properly. Ideally, you’d want to use a file name that describes your image like “red sling bag”. This would make managing your media library easier. Searching for specific images on your media library would be very difficult if you use default image file names such as IMG0001.jpg.

When you’ve finally uploaded your image file, you should also add an alt tag that will tell search engines what your image is. Using alt tags is best practice for SEO but that doesn’t mean you cram keywords on your alt tags. Your alt tags should describe what your image is.

Now that you have a better idea on how to prepare your images for your e-commerce store, you can improve its page load speed. Eventually, you’ll start to see its effect on your conversion rates.

If you don’t have time to spend on editing product images, the Wooassist team is here to help you out. With our experience, you’ll have your images optimized and look professional in no time.

Filed Under: How-To Articles Tagged With: best practices, how-to, image optimization, photoshop, product management, site speed optimization, WooCommerce

11 Things You Can Do to Increase the Security of Your WooCommerce Store

March 11, 2018 By John Leave a Comment

Increase the security of your WooCommerce store

Keeping your WooCommerce store secure is important. Hackers discover new exploits every day. In fact, more than thirty thousand websites get hacked on a daily basis. Don’t be a part of that statistic. Increase the security of your WooCommerce store before it’s too late.

At Wooassist, we’ve had our fair share of clients that have had their websites hacked. Cleaning up after a hack is a lot of trouble. You have to get rid of the exploit and weed out any remaining backdoors that would allow the hacker to regain access to the hacked site. Worse, a hacking incident can lead to a website being penalized by search engines for containing malware. In this post, we’ll share some tips that you can do right now to increase the security of your WooCommerce store. Following these tips will reduce the odds of your site getting hacked.

1. Check Your Login Information.

Often, hacks happen because of the user’s fault. Almost 90% of cyber-attacks are caused by human error or behavior.

The first step to increase your website’s security is to make sure that your login information is secure. First, don’t use “admin” as your username. Why? Because brute force attacks usually target this username. And if you use admin as your username and have a weak password, it is almost guaranteed that your site will fall victim to a brute force attack. But what if you are already using admin as your username? You’ll just need to create a new administrator account using a unique username and a strong password. WordPress will already recommend a strong password that you can use. After creating a new account, log in to the new account and you can then proceed to delete the “admin” account.

2. Keep your WordPress/WooCommerce Site Updated

Keep your WordPress/WooCommerce Site UpdatedKeeping your WooCommerce store updated will protect your site from the latest known vulnerabilities. Developers regularly patch exploits that are found in their systems so it is imperative that you update on a regular basis.

Before updating however, it is important to test your updates first on a development site or at least create a backup. Often, updates can break your site and this can harm your conversion rates if you don’t have a backup that you can revert to. Websites breaking due to site updates are common. Some hosting providers such as WPEngine provide their customers an easy-to-set-up staging environment. Here you can test your updates before applying them to your live site.

3. Use Two-Factor Authentication.

Using 2-factor authentication greatly increases the security of your website. Even when a brute force attack manages to get into your site, you can block the hack with two-factor authentication. Unless the hackers get a hold of your phone, you’re safe.

4. Install a Security Plugin

A WordPress/WooCommerce site without a security plugin is like a computer without anti-virus software. Wordfence and Sucuri Security are some good options. Just install the plugins and then activate. After activating, just go to the plugin’s settings and configure depending on your needs.

Prevent Brute Force Attacks

5. Limit Login Attempts.

Limiting login attempts will deter brute force attacks. A brute force attack will attempt to guess your username and password sending hundreds if not thousands of requests every minute. Limiting login attempts pretty much renders brute force attacks powerless unless you have a weak password. There are a couple plugins that can help you limit login attempts such as Login Lockdown.

6. Protect your wp-config File

The wp-config file is a crucial part of the WordPress ecosystem. It contains important configuration information of your WordPress site which is why many hackers try to target this file. There is however a workaround to block intruders from getting access to this file. Simply place this code in your .htaccess file.

7. Hide Login Error Messages

Whenever you enter the wrong login credentials on WordPress, it returns an error message saying your username is wrong, your password is wrong, or your password does not match the username. You may think little of this, but for hackers, this bit of information is priceless. You can prevent hackers from getting clues on your WordPress logins. You can hide these error messages by adding the script below to your functions.php file. Do note however that making a mistake when tinkering with your functions.php file can cause your entire site to go down. Unless, you’re a web developer or know your way around the file, it is recommended to have a developer do this for you.

function wrong_login(){

Return ‘Wrong username or password.’;

}

Add_filter(‘login_errors’, ‘wrong_login’);

Hide WordPress Version

8. Hide WordPress Version

For hackers, discovering that your WordPress version is outdated is like finding a gold mine. So it is imperative that you always update to the latest version of WordPress. Many hosting providers will automatically update your WordPress version. However, this is not always ideal since automatic updates can mess up your site. If you’d like to do your WordPress updates at your own pace, then you should hide your WordPress version. To hide your WordPress version, paste the following code on your functions.php file.

function remove_version(){

Return”;

}

Add_filter(‘the_generator’, ‘remove_version’);

9. Do a Plugin Audit

A plugin audit is a process of reviewing the plugins installed on your site. You’ll want to look out for plugins that are no longer being updated by the developer. Outdated plugins usually become backdoors for hackers. When analyzing your plugins, you can categorize them in a number of ways.

  • Plugins that you want to keep.
  • Plugins that you don’t use or your customer’s don’t use. If you have a plugin that adds a certain functionality to your site but your customers are not using it, you might as well get rid of it. This just adds extra bloat to your site.
  • Plugins that are no longer being updated by the plugin author. This is a major security threat and you should get rid of these immediately. If you still need the functionality that the plugin provides, just find an alternative plugin. Just make sure that the new plugin is being constantly updated.

You can do a plugin audit every few months to keep your site spiffy clean.

10. Install Only Reliable Plugins

You’ve done your plugin audit. Great! Now, don’t go down the same road. Don’t just install any plugin that you find. Look at the plugin rating. Check reviews. Check when the plugin was last updated. If the plugin fails any of those three elements, consider finding something else.

11. Prevent Directory Access

If you do not block directory access on your WordPress site, users may be able to freely view the files on your site. These files may contain sensitive information that hackers can use to exploit vulnerabilities on your site. Disabling directory access can be done with a minor tweak. Just place the following code in your .htaccess file:

# Prevent folder browsing

Options All –Indexes

If you’ve done all these things, your WooCommerce store will be protected from most known threats. Should you need help getting any of these done, you can contact the Wooassist team and we’ll be able to help you out.

Do you know of any other things that you can do to help keep your WooCommerce store more secure? Let us know in the comments.

Filed Under: Code Snippets, How-To Articles Tagged With: admin, brute force, hacker, optimizations, plugin audit, plugins, security, WooCommerce, WordPress, WordPress updates

  • « Previous Page
  • 1
  • …
  • 17
  • 18
  • 19
  • 20
  • 21
  • …
  • 41
  • Next Page »
Let us support your online store so you can manage your business

Get started today

Get 2 Hours of FREE SUPPORT

We are so confident that you will love our services that we will give you your first 4 hours at a 50% discount

That’s 4 hours for only $75

BUY NOW

Free eBook

5 Things Every Online Store Can Fix On Their Website In The Next Week To Increase Sales

Quick Links

  • How it Works
  • Pricing
  • Blog
  • Contact
  • About Wooassist
  • My Account
  • Checkout
  • Privacy Policy
  • Cookie Policy
  • Terms and Conditions

Wooassist

Australia:
59 Luke St.
Hemmant QLD 4174

Philippines:
San Miguel St.
Poblacion, Iligan City 9200

Connect


Copyright © 2026 · Wooassist

Yours FREE!

5 Things Every Online Store Can Fix On Their Website In The Next Week To Increase Sales