Wooassist

Assistance for Your Woocommerce Store

  • How it Works
  • Pricing
  • Services
    • Site Maintenance
    • AI SEO and Content Marketing
  • Blog
    • How-To Articles
    • Code Snippets
    • SEO For E-Commerce
    • Theme and Plugin Reviews
    • Wooassist News
    • WordPress/WooCommerce News
    • Interviews
  • About Us
  • Contact
You are here: Home / Archives for John

How to Optimize Email Opt-in Forms for Increased Conversions in WooCommerce

May 17, 2016 By John Leave a Comment

how to optimize email opt-in formsAs part of your sales funnel, your goal probably is to convert site visitors into subscribers and later on, into paying customers. Email marketing is still one of the best means to connect with your potential customers after they’ve left your site. As you get visitors in your WooCommerce store, you’ll want to get their emails. To do this, you need to learn how to optimize email opt-in forms.

In this post, we’ll show you what you should put in an opt-in form and how to position it strategically on your e-commerce store. We’ll also introduce you to some popular WordPress plugins to easily add opt-in forms on your site.

Where can You Add Opt-in Forms?

It is useful to add opt-in forms in different sections and pages on your e-commerce store.

Landing page

Using a landing page (or a squeeze page) is the traditional method of collecting leads. Because your goal is to get people to sign up to your mailing list, every element of the landing page should support that desired action. Don’t add a side-bar because it will just distract the users from the real goal. Remove links that will take the site visitor away from the landing page before they even fill out and submit the opt-in form.

Feature Box

A feature box is a full-width email opt-in box usually added on top of your homepage. Some do not use a feature box because of two things: it takes up the most valuable space on your homepage, and it seems pushy to immediately ask for an email address. To validate the feature box’s location and avoid getting negative attention from site visitors, make sure that what you’re offering is definitely useful in exchange for their email address.

As an example, the use of a feature box on DIYthemes’ blog resulted in a 51.7% increase in its daily blog subscription.
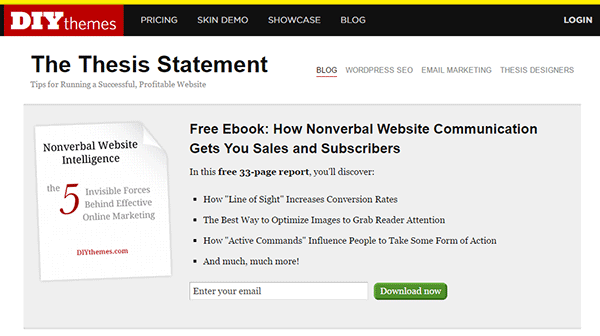
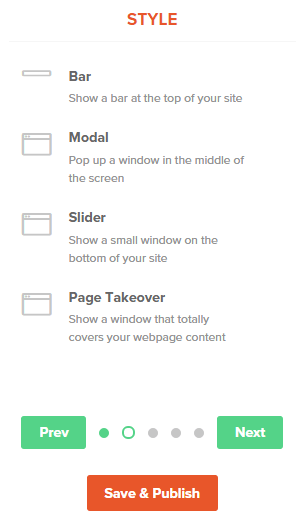
feature-box_DIYthemes

Pop-up Window

Because of its nature of ‘popping-up’ and interrupting the user while browsing the site, many visitors don’t like pop-ups. Nevertheless, a pop-up window is still one of the most effective lead generation tools. A lightbox works the same way as a pop-up window, but the rest of the site is darkened to make the form stand out.

Note that the timing should be perfect to avoid hindering good user experience. Once seen, you have only 1-2 seconds to grab the user’s attention and pique their interest before they close the window. Here are some examples of high converting pop-up email forms.

Opt-In Forms in Other Pages

options-2Apart from the feature box in the homepage, you can insert more opt-in forms in other pages (About page and Splash page) and in other page sections (top of sidebar, sticky top bar and below the footer).

The About Us page is usually one of the most visited pages in any website, so it’s a good idea to make the most of that traffic.

In a Kissmetrics review, using a splash page might be a better idea than a pop-up on the homepage. A pop-up is frowned upon because it interrupts the user while browsing the site. A splash page appears as a preliminary message. As such, it is better perceived.

Sidebar Opt-In Form

A sidebar opt-in form is the most common email list building method mainly because it is built in to most website templates. Keep your opt-in form to the top of your sidebar though, to maximize results.

Sticky Top Bar

Because a sticky top bar remains visible on top of the page even as you scroll down, visitors have plenty of time and opportunity to notice the message and eventually subscribe.

Components of an Opt-In Form

Once you’ve determined where you want your opt-in forms, the next step is to create them. To increase your chances of getting sign-ups, your opt-in form should have the right timing, design, form fields and copy.

Timing

15-seconds_traffic-stoplightIn using a pop-up window, you need to properly time it. You can set a time delay before showing the pop-up. If it’s too early, you’ll annoy site visitors even before they’ve taken a look of your site and what you have to offer. A 15-second delay is enough time for visitors to look around your site and not be too bothered with a pop-up. Note that this does not necessarily apply to your target audience. It’s best to conduct your own tests.

You can also show pop-ups as visitors reach the bottom of your content or as they exit your site.

Design

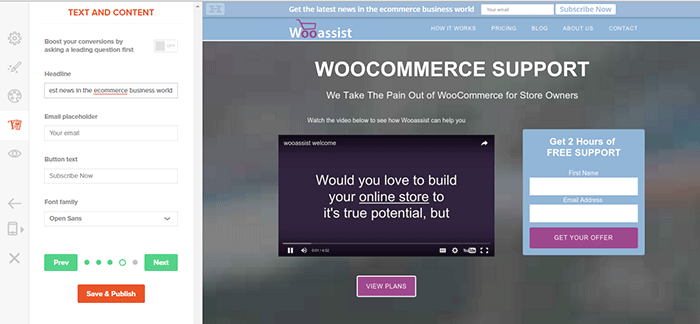
To effectively connect with your visitors as they quickly scan your opt-in form, you need to add visual elements that enhance your messaging. Humanize your opt-in form with a photo. Inject credibility with a testimonial or statistic. If your opt-in form is not a pop-up, make sure it will get noticed but at the same match your site’s theme.

Form Fields

More people sign up when less form data is requested. Note that you just need the email address of your site visitors for email marketing purposes. Usually just a name and email in the form will suffice. You can even make the name optional.

Concise Copy

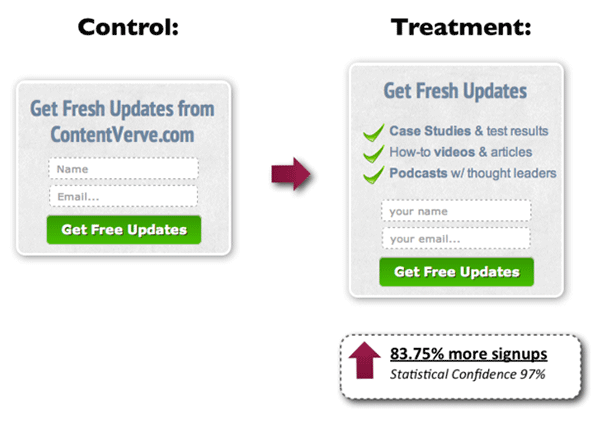
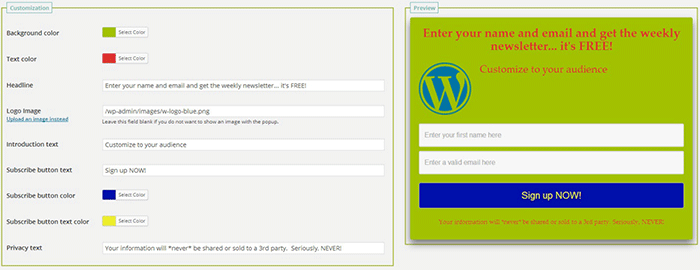
Make your opt-in form copy as concise as possible. It’s important to present a clear purpose when asking for personal information. Spell out what your site visitors will get in return. You can also assure them that you won’t sell their addresses to a third party or spam them. BeemDigital showed an 83.75% increase in sign-ups when they added value and relevance to their opt-in form.

concise-copy_Contentverve
Image Credit: http://contentverve.com/how-to-write-high-converting-signup-form-copy/

Another effective tactic is to offer a lead magnet, like a free e-book, product trial, discount, or even free shipping. On a side note, you can set up the incentive in such a way that your new subscribers won’t unsubscribe immediately. If you’re offering a free e-book, break it up in parts and offer them in a series of emails. Entice them to want to wait for what’s coming next.

Recommended Opt-In Form Plugins for Your WooCommerce Store

In choosing your opt-in plugin, consider what features you need and choose a plugin that provides just that and nothing more. Anything more is just extra bloat on your site. Below we list some of opt-in form plugins that we can recommend.

OptinMonster

optinmonsterOptinMonster is a paid pop-up plugin that offers a wide range of functionality. It comes with an easy-to-use form builder that allows you to create various types of opt-in forms including WordPress popup forms, floating header and footer bars, slide-ins also known as scroll triggered boxes, sidebar forms, after post forms, in-line forms, mobile-specific forms, and welcome gates. Other features are exit-intent technology, page-level targeting, behavior automation and A/B testing, and a 2-step opt-in process.

PopupAlly

popupallyPopupAlly’s free version allows you to create advanced popup signup forms even if you don’t know how to code. You can also embed opt-in forms at the bottom of your posts, set a few seconds’ delay or have the pop-up appear as the users leave your site.

Its premium version, PopupAlly Pro, has an optimized interface and extra features. This includes more customizable templates, more opt-in options (horizontal, sidebar, below-the-post, etc) and allows for any web fonts to be used. Click-based and scroll activation timing features and one-on-one email support are available only with the premium version.

Hello Bar

hellobar_wooassist pagehellobar_style menuHello Bar is a free plugin that allows you to copy and paste a code snippet from HelloBar.com straight to your WordPress admin interface. Above is the HelloBar interface from the website. You can choose from several goals like grow your email list, promote your social pages, promote an offer, or add a contact form. You can choose from several styles of opt-in forms and even change the colors to match your website’s colors. To set up HelloBar, just visit the site to configure. The interface is very straight forward so you should have the design in minutes. To apply this to your site, just install the free plugin that is generated specifically for your website. This plugin will only work for the site that you registered it for. You can just create a new one for another site.

This plugin also comes with A/B testing so you can easily optimize for increased conversion.

Ninja Forms

ninjaforms
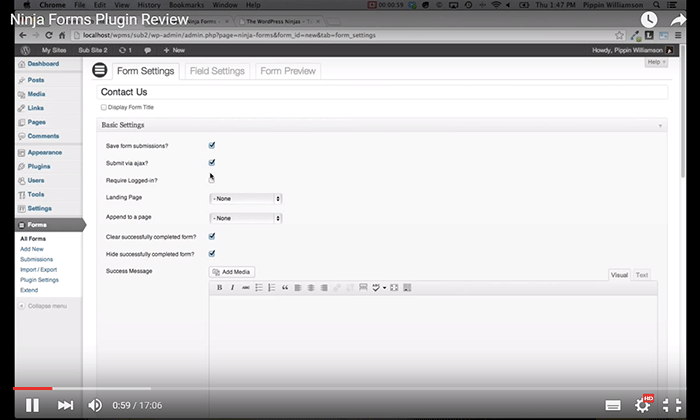
Ninja Forms is a plugin built with developers in mind. Included are hundreds of functions, action hooks, and filters that developers can use to create their own custom functionality. Customize field options and forms with its extensive settings. Add a Ninja Form to your e-commerce site easily with a widget, shortcode, template function, or append it automatically to any content. Upgraded bundles include automatic updates, add-ons and sites per add-on, and email support with faster response time.

Which Opt-in Forms Leads to More Conversions?

arm-wrestling-2There is no single correct answer to this question. Different websites vary in terms of design and market. This article could help point you in the right direction, but there are a lot of things you need to figure out for yourself. Get to know your customers by creating a customer persona. When you are able to identify your customers, you’ll know how to market to them. From there, you can create a sales funnel that works for you. Use heat maps like CrazyEgg to find out where your visitors click. Constant A/B split testing will help you determine what variation converts better.

Conclusion

Opt-in forms should be placed strategically throughout your website. Optimize them so they are easily visible. Make them stand out. These forms should offer value and relevance to encourage users to subscribe. Enhance copy with visual elements and keep form fields to a minimum. If you decide to use pop-ups, you need to time them correctly so as not to be intrusive. Make sure you’re getting the most of your opt-in plugin’s features without sacrificing site performance. When your opt-in forms are set up, you need to conduct your own split testing to optimize for maximum conversion.

Hope this article helped you out. Do you have any strategies you’d like to share for increasing opt-in form conversion? Do you want to add something that we might have missed? Let us know in the comments section.

Filed Under: How-To Articles, Theme and Plugin Reviews Tagged With: best practices, conversion optimization, design tweaks, how-to, marketing strategy, plugins, PopupAlly, website development, WordPress

Work “ON” Your Business Rather Than “IN” Your Business to Save Time and Increase Revenue for Your E-Commerce Store

May 16, 2016 By John Leave a Comment

work on your business rather than in your businessAs a business owner, you may struggle with having to wear so many different hats and working many hours.

An online business brings with it even more challenges, as you need to develop, secure and maintain your website. These are time-consuming and counter-productive if you do them yourself.

In this article, I’ll show you what steps you can take to effectively work on your business and what are the benefits of outsourcing your tasks.

What Does It Mean to Work “ON” Your Business Rather Than “IN” Your Business?

This popular entrepreneurial mindset has two points: you want a profitable business that produces consistent results, and you won’t need to do the day-to-day activities yourself. Basically, working “in” your business means doing those routine activities that keep the business going every day. On the other hand, working “on” your business means you prioritize developing your business and building customer relationships. Working on your business also means creating a systems-dependent business and delegating work.

Create Business Results that are Systems-Dependent, Not People-Dependent

process-diagramThe system you create becomes the tool everyone uses to get the job done in a way it needs to get done. Working on your business means you need to test and develop these systems to make sure they produce your desired result. When you have an efficient system in place, you’re mostly assured of the quality of work, and that business continues even if the people come and go. Training new staff becomes that much easier.

You may need to personally create these systems on your own. It is important that you document it. For Wooassist, we use DokuWiki to document our processes. You can find your own platform that you are comfortable with. Once the system is in place, it’ll be easier to delegate the task to someone else.

Delegate Work

It’s important that you build a team that you trust. These people will do the day-to-day activities of your business, following the systems you’ve approved or set. Delegation will only be effective if you trust the team to do the job for you. Because you trust these people, you can focus more on being the business owner and developing strategies to sustain and even grow your business.

Outsource Technical Tasks to Save Your Time

networkEven if you love working in your business, chances are there isn’t enough time to get everything done on your own. This is especially true as your business continues to grow. Hire reliable, technology-savvy staff and those with technical skills that match your needs. Doing so will help you better manage your time so you can focus on managing and growing your business.

You Can Be Assured that Experts Will Do a Good Job

You don’t necessarily need to be The Expert on each role in your company. You may only do a mediocre job at a technical task but a skilled professional can save you time by doing a great job on a role where he’s already an expert. You won’t need to spend too much time learning nor trying to do the job yourself. That’s the developer’s job. For an e-commerce store owner in need of a web developer, outsourcing is the way to go if hiring full time isn’t ideal.

You Have More Time for Leisure/Travel

Nanette Miller, founder of The Training Doctor LLC, outsources 40 hours of work weekly for non-revenue-generating tasks. This includes administrative work, website maintenance and social media posts. Outsourcing allowed her to focus on growing her business and keep a manageable work schedule that allows her to have a personal life. She gets to take about 12 weeks of well-deserved vacation per year. Just imagine the places you can visit with that much free time.

You Have More Time to Spend with Family and Friends

When you outsource, you free yourself of the daily worries of running your business. You have a better hold of your work schedule and productivity. After work, you have time to relax and be with your family. You can even go out and spend time with your friends.

WooCommerce Happiness Engineer Dustin Hartzler strictly adheres to his work schedule and wraps up work by 4:30pm. The rest of the evening is spent with his family and on non-computer activities.

Work on Things that Require Your Skills as a Business Owner

puzzle-business-componentsWith routine and technical tasks delegated to staff, you can devote more time in managing and developing your business. This means you can focus on exploring ways to innovate on what your business needs to grow. For an online business, here are some functions a business owner can prioritize:

Planning and Strategy

You should have more time to revisit your business roadmap and make changes as needed. Conduct market research to identify current trends that could help you sell your products. Check your competition and find ways to attract more customers. Devote time on continuous learning. You get to leverage on other people’s expertise, but the decision is still yours to make.

Marketing and Sales

You may feel comfortable handling your own SEO and advertising. This is because you’ve conducted market research and you know who your target customers are. When you have clearly defined your customer personas and know how to use them, you’re well on your way to maximizing your marketing efforts. You can also allot time to learn more online marketing strategies and apply them to your business.

Customer Experience

You build customer relationships. You make sure their needs are met, particularly as they navigate through your website. You may also opt to personally address customer queries. You may need help on this though, depending on your business’ size and nature.

Conclusion

stop-wasting-your-time_300x248While it’s understandable to be very busy at work, especially in the early stages of your business, you also need to know when and how to effectively delegate. Prioritize your core functions as a business owner and focus on growing your business. Set up systems and tools to maintain consistent, quality results for routine activities. Outsource technical and other non-income-generating functions. These actions will help you better achieve a work-life balance. Spend more time with your family and friends and go on much-needed vacations.

Was this post helpful? Do you have anything you’d like to add or share? Let us know in the comments.

Filed Under: How-To Articles Tagged With: admin, best practices, how-to, marketing strategy, outsourcing, website maintenance, Wooassist

How to Change the Number of Related Products in WooCommerce

May 12, 2016 By John Leave a Comment

How to change the number of related products in woocommerce
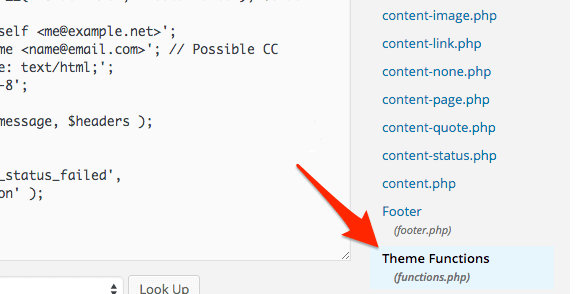
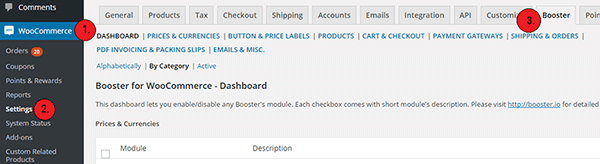
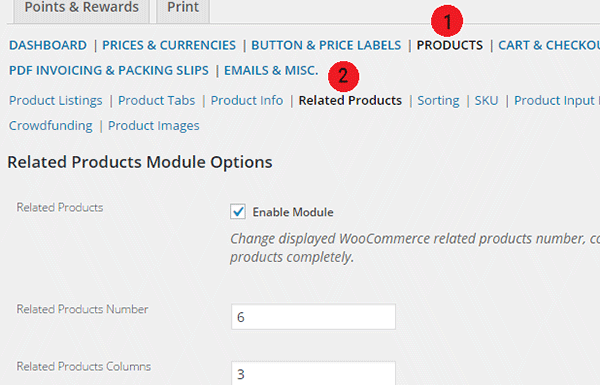
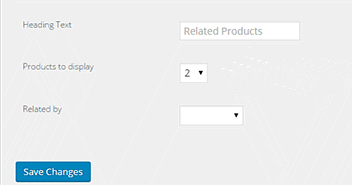
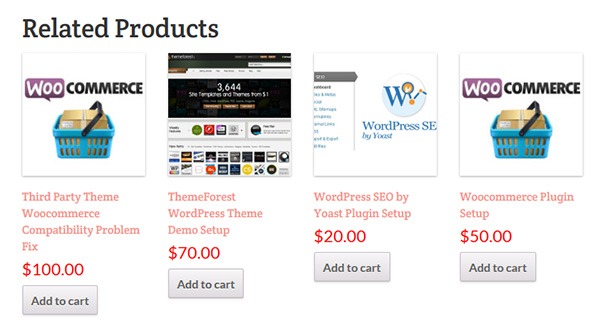
Changing the number of related products in WooCommerce is a relatively easy task if you know how to do it. WooCommerce defaults to two related products in the single product page but store owners may want to show their visitors more than just two related products.

Why Change the Number of the Related Products?

Showing more products in the Related Products section will increase and develop the browsing or buying choice of the user. This strategy is basically cross-selling/upselling. It is the strategic way of introducing your customers to other products that are related to what they are already interested in. Research shows that product recommendations account for 10% to 30% of e-commerce store revenue and increase average order value.Cross-Sells_Upsells

Setting up the Number of Related Products

There are two ways you can set up the number of related products. First is to insert a code snippet in the functions.php file on your theme. Second is to install a plugin to do it for you. The first method may seem intimidating to some WooCommerce shop owners, but it is actually as easy as copy and pasting a code. This method is recommended because it doesn’t bloat your site with unnecessary code.

In some themes, authors have added custom functions that allow users to edit WooCommerce and this includes the number of related products. Buying themes that come with a lot of custom functions however are generally not recommended as they can add unnecessary bloat to your site.

How to Change the Number of Related Products in WooCommerce Using Code Snippets

The best way to edit the number of related products is by using a code snippet that you insert into your child theme so that the code doesn’t get overwritten when you update your theme. Don’t get discouraged by the thought of coding but do take extra caution as one wrong code can break your entire site. If you do not know what you are doing, it would do you well to hire a developer to do this for you. If you are comfortable working with code snippets, then proceed with the steps below.

    1. To start, locate functions.php in the WordPress file system. Go to your WordPress Dashboard. Navigate to Appearance > Editor. Choose the theme you are using from the dropdown in the upper right sidebar and locate at the bottom right the functions.php file. You can also access your site’s file through an FTP client and edit the functions.php file from there.

WordPress-Dashboard_Edit-Themes_Themes-Function

  1. Next is to copy and paste the code below at the very bottom of your functions.php file.
    /**
    * WooCommerce Extra Feature
    * --------------------------
    *
    * Change number of related products on product page
    * Set your own value for 'posts_per_page'
    *
    */ 
    function woo_related_products_limit() {
      global $product;
      
      $args['posts_per_page'] = 6;
      return $args;
    }
    add_filter( 'woocommerce_output_related_products_args', 'jk_related_products_args' );
      function jk_related_products_args( $args ) {
      $args['posts_per_page'] = 4; // 4 related products
      $args['columns'] = 2; // arranged in 2 columns
      return $args;
    }
    
  2. The piece of code above will make the number of related products into 4 per page arranged in 2 columns. This is defined in these lines of code:

    “$args[‘posts_per_page’] = 4; // 4 related products”, and “$args[‘columns’] = 2; // arranged in 2 columns”.

    In order to have the desired number of related products, you just need to vary the values. For example you want to have 6 related products in a single column, change the 4 to 6 and 2 to 1. So it will be:

    “$args[‘posts_per_page’] = 6; // 6 related products” and “$args[‘columns’] = 1; // arranged in 1 columns”.

  3. Save the file when you are done.

How to Change the Number of Related Products in WooCommerce Using a Plugin

For less technical store owners, you may want to change the number of the Related Products in your WooCommerce store by using a plugin. Using a plugin will save you from editing important website files that can break your site. Here are some plugins that we can recommend:

Booster for WooCommerce

Booster for WooCommerce was previously called WooCommerce Jetpack. This enables you to tweak a lot of settings for WooCommerce not just changing the number of related products. For anyone using the WooCommerce platform, this plugin is highly recommended because it provides a lot of functionality.

To change the number of related products, follow the steps below:

    1. First, install and activate the plugin.
    2. Go to WooCommerce > Settings > Booster.

Booster-for-WooCommerce

    1. In the Booster menu, click on the Products tab > Related Products.

Booster-for-WooCommerce_Related-Products-Tab_Options

  1. Enter the number of Related Products that you want. You can also change the number of columns for the Related Products Section.
  2. Check the Enable Module, save and you’re done.

While WooCommerce Booster is a powerful plugin in itself, you may want to use a different plugin if you just need to edit the number of related products. This is because the number of features that you wouldn’t be using would just add extra bloat to your site.

Woo Related Products

Woo Related Products is one of the simplest plugins out there for editing related products in WooCommerce. It is light and easy to navigate. It also allows you to change the heading text on the related products section.

  1. To start, install and activate the plugin.
  2. Locate “Related Products” from your WP admin menu panel.
  3. Select the number of related products you want to display. And then click on Save Changes.Woo-Related-Products_Products-to-Display

You want to increase your conversions. By increasing the number of related products from WooCommerce’s default to introduce more products to your customers, you can increase your revenue and average order value. You can follow the steps mentioned in this article to accomplish this for your own website.

Do you know of other strategies that can help increase conversions through cross sells and upsells? Let us know in the comments.

Filed Under: Code Snippets, How-To Articles Tagged With: admin, code snippet, conversion optimization, design tweaks, how-to, navigation, plugins, product management, WooCommerce, WooCommerce products, WordPress

How to Check if a Theme is Suitable for WooCommerce

April 15, 2016 By John 1 Comment

How to Check if a Theme is Suitable for WooCommerceSome website owners might think that a good theme just needs to look good. Well, that’s not wrong but it’s also not entirely correct. You need to know how to check if a theme is a good theme for your WooCommerce store. Here’s a checklist to help you decide if a WordPress theme is good for your WooCommerce Store.

Theme Ratings and Reviews

Product ratings and reviews are solid indicators of quality. These reviews come from WordPress users who have actually used the theme themselves. Note that even good themes can get a few bad reviews so take them with a grain of salt. However, if the number of bad reviews is unusually high, then it is something to be wary of.

Update Frequency and Support

computer-thinking-manUpdate frequency is a good sign of a solid WordPress theme. It shows that the developers are continuously making it better by addressing bugs and other security threats. Similarly, check if the developer is active in public forums. This is a good sign that you will get answers if you are ever met a problem.
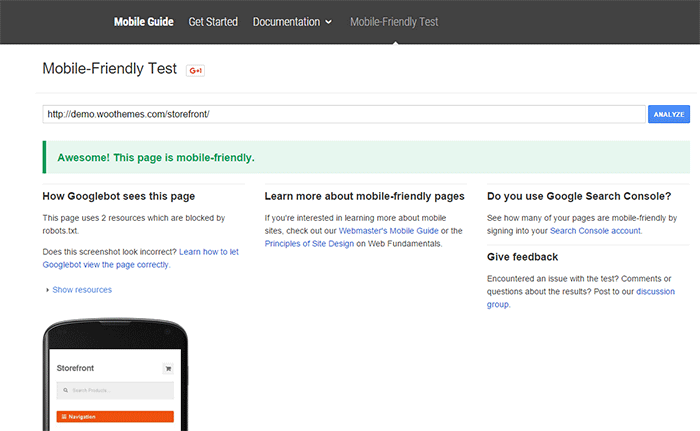
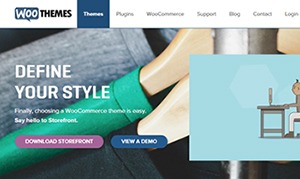
Demo Site

Having a demo site is not optional anymore. The demo site is not just where you see how the theme looks like. It is a place where you can perform some crucial tests on it. If your theme doesn’t have a demo site, it could just be outdated or at worst it’s hiding malicious stuff.

Responsiveness

Make sure your theme is responsive. That means it adjusts to fit different screen sizes of mobile devices. More and more traffic is now being generated from mobile devices so a theme that looks good on a mobile device will help make your WooCommerce site more competitive. In fact Google favors websites that work well across all devices. The easiest way to check for mobile responsiveness is Google’s mobile friendly test. Grab the URL of the demo site of your theme and paste it in there to check if the theme is mobile friendly.

Google-mobile-friendly-test

Site Speed and Theme Bloat

You have only a few seconds to capture the attention of your e-commerce site’s visitors. Having a slow site doesn’t help. Even if your site looks good, none of that will matter if it is slow. Google hates slow websites and these slow websites are being penalized in rankings.

Themes become slow when they are loaded with unnecessary features. Be careful when the theme offers a lot of functionality that normally shouldn’t be in a theme like the ability to create sliders or change fonts, colors, and other add-ons like shortcodes, additional widgets, and content builders. The add-ons will make it hard for you to switch themes in the future. You may think you are getting good value for your money but its effects on site speed will only hurt your WooCommerce site and your SEO rankings.

Do note that other factors also affect site speed. You can read more about it in this blog post.
browsers

Cross Browser Compatibility

Your users will be using different browsers. You may not see any errors on your side but there might be something broken when someone else uses a different browser to view your site. Make sure your website looks the same across different browsers.

SEO-Friendly Markup

HTML isn’t so strict on errors so it will render your content as long as it isn’t something fatal. But when it comes to SEO the HTML markup is crucial. Proper HTML markup will help boost your SEO. You can easily check if your theme HTML code is valid using Markup Validation Service by W3C. Pop the theme demo site’s URL to check for errors in the HTML markup.

Plugin Readiness

A good well-coded theme is lightweight and can support a wide range of popular plugins. For your e-commerce site, you need to make sure that your theme supports WooCommerce. You will often see this in the list of theme features. During development, make sure not to bloat your site with unnecessary plugins. Install only plugins that you need and will actually use.

Page Templates

Another good indication of a good quality theme is the availability of page templates. These templates are fetched when a certain query is performed. Make sure your theme has it all.

  • home.php: the homepage template
  • single.php: the template for single posts
  • page.php: the template for pages
  • category.php: the template for category indexes
  • author.php: the template used when someone queries on the author
  • date.php: the template used when someone searches for posts on a certain date
  • archive.php: this template is used when either category.php, author.php ordate.php isn’t there
  • search.php: used when someone searches on your blog
  • 404.php: the template used when WordPress can’t find the URL on your site

Design

design-cursor-iconSimplicity is the epitome of great design. Select a proper theme that matches the nature of your e-commerce store and will appeal to your target market. If you are planning for a content rich website, go for a more formal look with good typography for enhanced readability. If you are selling products for kids, you can be more playful with the design. Spend some time researching for a theme that addresses your needs. Consider the aspects mentioned above and decide if this is the theme for you.

Theme Developers

Here’s a bonus. A good indication of a quality theme is the reputation of the developers who made the theme. Perform a background check on the people behind the theme. Are they helpful in the WordPress community? Do they have a good reputation? Do they respond in forums regarding questions on their creations? If you answered yes to all of these, then you’re dealing with a good developer/s and odds are their themes are great.

Our Recommended Themes

Storefront

storefront_define-your-styleStorefront is an intuitive, lightweight, and flexible theme offering deep integration with WooCommerce. The main goal in developing Storefront is to provide a rock-solid foundation for your WooCommerce store, avoiding extra bloat and unnecessary features. It is built by the same people behind WooCommerce so the standards are as high as WooCommerce itself. To learn more about Storefront, you can check out our review.

Genesis Themes

Genesis-FrameworkThe Genesis framework is known for its core code and is considered one of if not the best WordPress framework available. It is very flexible because of how well the core code is built. Anything can be customized around the core code using child themes. It is SEO optimized and compatible with WooCommerce.

Was this post helpful in choosing a theme for your WooCommerce store? Do you have any other tips that you’d like to share? Let us know in the comments.

Filed Under: How-To Articles, Theme and Plugin Reviews Tagged With: design tweaks, how-to, responsive design, site speed optimization, Storefront, Wooassist, WooCommerce

How to Change Fonts in Storefront Theme

April 13, 2016 By John 8 Comments

UPDATED 19/06/2017: Revised steps in adding Google Fonts

how to change fonts in storefront themeBy default, Storefront theme uses the Helvetica Neue font. This default font is simple and simple is good. However simple may not always fit the design that you are aiming for. You may want to use a different font. But how do you go about changing the theme’s font? In this post, we’ll teach you how to change fonts in Storefront theme using Google Fonts.

What Type of Fonts Should I Use?

There are fonts that are expressive and stylish. There are some that just work in a lot of situations. Even though you would want to express yourself with a certain type of font, you would also want to use the font type suitable for your needs. The key is to find the right balance.

Four Basic Types of Fonts

font-types

Serif

Serif fonts are characterized by small lines attached to the end of a stroke. These small lines are called serifs. In general, they are thought to be traditional font types. Serif fonts are easier to read in print so they are preferred for use in print.

Sans-serif

Sans-serif literally means ‘without serifs’. These fonts are modern and minimalistic. Sans-serif fonts are recommended for web publishing.

Scripts

Also called cursive font types, Scripts mimic the cursive handwriting. They generally have connecting letters. This type is often portrayed to be feminine and elegant.

Decorative

Halloween fonts, Christmas fonts or the iconic Star Wars font, there are a lot of fonts out there that fall under the decorative type. They are novelty, used for specific purposes. As the name suggests, decorative fonts should only be used as for decoration and never for the main copy.

Serif vs Sans Serif?

It’s best to choose fonts wherein readers won’t notice the font but the message. Decorative and scripts type fonts can be a distraction when reading content. Hence, serif and sans-serif fonts are typically used in the body or in the copy.

yes-no-wood-postLet’s break down the difference between Serif’s and Sans-serif type fonts.

The purpose of the serif is to guide the horizontal “flow” of the words. These little decorations increase the contrast of the spacing. The serif helps the eyes and the brain in distinguishing each chunk of words as one making it easier to read.

This is not the case for texts made for the web though. Because of the limited dot per inch (DPI) in our monitors, the thick and thin lines of the serif types may not be as recognizable in small texts. This is why a simplified font is needed. Minimalist, modern and simplistic sans-serif is suitable for this purpose.

Serif fonts are good for reading that’s why it is mainly used in books, newspapers magazines and other print media. On the other hand, online publishing favors the use of sans-serif fonts because of the DPI limitations.

In some cases Serif works just fine even for online publishing. A good example for of a website using Serif fonts is the The Guardian. We can say the serif font type fits the news site’s identity as an online newspaper. The key to maintaining readability when using a serif font for online publishing is the proper use of font sizes and line spacing. This removes DPI problem.

information-boardSo what font should you use for your WooCommerce store? The correct answer would be a sans serif font and this is true in most cases. However, you should not let this limit your design choices. If you think a serif font will work towards your purpose, then use it by all means.

What is Google Fonts?

Google Fonts is a free service by Google that makes it easier for websites to use custom fonts. If you want to use a particular font from the Google Fonts directory, you only need to copy a piece of code and Google will host the font for your website. If you want to change your font easily, Google Fonts is one of the best solutions out there.

Google-Fonts

Google Fonts Pros and Cons

The Pros

  • Google Fonts are released as open source and can be used for any commercial or non-commercial project for free.
  • It is easy to install and set up.
  • Analytics show most popular fonts by usage across the web

The Cons

  • The font is hosted outside your site. Meaning, it could add a slight page loading time. Actually, Google displays a gauge for each font’s impact on page load time.
  • Open source fonts can have some quality issues. Except for the popular ones, most of the fonts in the directory are made by the community. Some may have been poorly executed. Issues like bad scalability, fonts not showing on iOS, and missing glyphs may arise depending on the font.

How to Find the Right Google Font for You

To help you choose the right font for your WooCommerce site, just go to Google Fonts then use the extensive font preview. You can preview the fonts as a word, sentence, paragraph or as a poster. This will help you decide what font to use.

Check a font type’s readability using the Paragraph preview. Here is Lato (a Sans-serif type) with Slabo (a Serif type) previewed in a paragraph.

Google-Fonts_Paragraph-preview

For headings and other large texts, use the Poster preview.

Google-Fonts_Poster-preview

If you are looking for font pairs that look good together, click the ‘pop-out’ button, then the Pairings tab. Google offers a lot of suggestions there and you can preview it in multiple layouts.

Google-Fonts_Pairings-tab

When you have decided what fonts you want to use, add them to your collection and click ‘Review’. Go to the ‘Test Drive’ tab and see your selected fonts in action.

Google-Fonts_Test-Drive-tab

How to Add Google Fonts in Storefront

Implementing Google Fonts on your website is as simple as copy and paste. Here is a step-by-step instruction.

  1. Choose a font that you want to embed. Select the standard code and copy.Google Fonts - Standard Code
  2. Add a hook function to your child theme’s functions.php. Note that using a child theme is important here. If you don’t use a child theme, the changes you make will be lost when you update Storefront. Alternatively you can use the My Custom Functions plugin and paste the code snippet there.
    add_action( 'storefront_header', 'jk_storefront_header_content', 40 );
    	function jk_storefront_header_content() { ?>
    		// Replace this line with the copied google font code here
    		<?php
    	}
    

    *Note the part where you need to insert the code you got in Step 1.

After this, your WooCommerce site is now capable of using the fonts you’ve selected.

How to Apply the Fonts on the Contents

You still need to add the font to your CSS for the fonts to be live on your site. The code below will replace the default font in Storefront to ‘Open Sans’. You just need to replace the font name with the font that you added in the previous section and then paste the code to your child theme’s styles.css. You can also use Simple Custom CSS plugin to add the CSS to your site and not have to worry about it disappearing when you update your theme.

h1, h2, h3, h4, h5, h6, body, button, input, textarea {
	font-family: 'Open Sans', sans-serif;	
}

If you want to use a different set of fonts for your headers, use the code below instead. In this case, the headings will have the Slabo font and the rest will have the Open Sans font. Just replace the font name with the fonts that you added.

body, button, input, textarea {
	font-family: 'Open Sans', sans-serif;	
}
h1, h2, h3, h4, h5, h6 {
	font-family: 'Slabo 27px', serif;
}

Note that the above codes may not work if you are using a child theme that uses a more specific selector. It will give more priority to Storefront’s default selectors. You will need to update the selectors with the selectors used in your child theme. Check out this neat guide for a firm understanding on how CSS specificity works. You may need to apply a few more custom CSS codes to get the right look and feel for your site.

And that’s how you change Storefront theme’s font. Hope this article helped you out. If you have any questions or if this didn’t work for you, let us know in the comments. We’ll do our best to help.

Filed Under: Code Snippets, How-To Articles Tagged With: best practices, code snippet, design tweaks, how-to, Storefront, website development, WooCommerce

  • « Previous Page
  • 1
  • …
  • 25
  • 26
  • 27
  • 28
  • 29
  • …
  • 41
  • Next Page »
Let us support your online store so you can manage your business

Get started today

Get 2 Hours of FREE SUPPORT

We are so confident that you will love our services that we will give you your first 4 hours at a 50% discount

That’s 4 hours for only $75

BUY NOW

Free eBook

5 Things Every Online Store Can Fix On Their Website In The Next Week To Increase Sales

Quick Links

  • How it Works
  • Pricing
  • Blog
  • Contact
  • About Wooassist
  • My Account
  • Checkout
  • Privacy Policy
  • Cookie Policy
  • Terms and Conditions

Wooassist

Australia:
59 Luke St.
Hemmant QLD 4174

Philippines:
San Miguel St.
Poblacion, Iligan City 9200

Connect


Copyright © 2026 · Wooassist

Yours FREE!

5 Things Every Online Store Can Fix On Their Website In The Next Week To Increase Sales