Wooassist

Assistance for Your Woocommerce Store

  • How it Works
  • Pricing
  • Services
    • Site Maintenance
    • AI SEO and Content Marketing
  • Blog
    • How-To Articles
    • Code Snippets
    • SEO For E-Commerce
    • Theme and Plugin Reviews
    • Wooassist News
    • WordPress/WooCommerce News
    • Interviews
  • About Us
  • Contact
You are here: Home / Archives for John

How to Add a Home Page Slider in Storefront Theme

March 9, 2016 By John 7 Comments

Storefront-home-page-slider_bannerContent sliders, also known as carousels, can contain complex arrangements of images, video and HTML content usually found top and center on your home page. Storefront however is about simplicity and by itself does not support sliders. You can however add a slider with the help of a plugin.

Should You Use a Content Slider on Your Site?

communication_i-am-rightMany websites overuse sliders and there has been a lot of debates about having sliders. E-commerce websites are able to present their products/services in a visually appealing way with the help of a slider. But a word of warning; sliders are not for every website. Many experts actually advise against the use of sliders.

It Causes Banner Blindness

Because many website owners are abusing the use of sliders, visitors tend to associate them with advertisements. And we all know what happens to advertisements, they get ignored. This is because web users have become increasingly indifferent with advertisements.

It Slows Down Your Site

The more complexity you add, the slower your page becomes. Packing three to five high resolution images alone can dramatically slow down your site. No matter how good or optimized your page is, no one can see it if your page takes too long to load. So keep your slides simple and avoid animations and layers. If you are only after the aesthetics value, there are a lot of alternatives to a home page slider that looks just as good and will not slow down your site.

Preparing Images for Sliders

There are a lot of things to consider when preparing images for your home page slider. Since this will be the largest element in your home page, it should be visually appealing and must convey the message efficiently.

We recommend hiring a professional to do this for you. Before a graphic artist starts preparing your images, you must identify the size of your slider. This will depend on your placeholder. On your web browser, simply right click on the placeholder then click “Inspect Element”. You should be able to see the size of the placeholder in pixels.
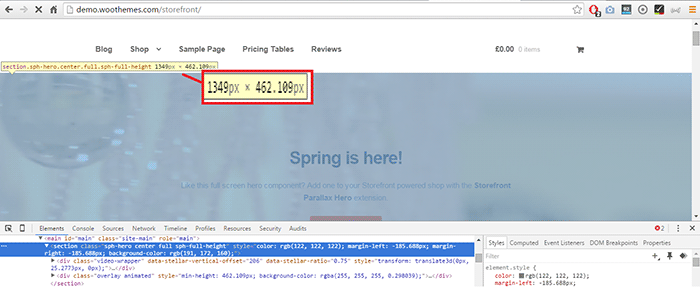
Storefront_Placeholder_Inspect-ElementYou will most likely receive a large file from your graphic artist since the file will contain layers and other information about the image. You should request another copy that’s ready for web publishing or you can optimize the image yourself.

Here are some tips and ideas in preparing images for sliders.

  • Go for big, bold and bright images as these are what the human eye loves.
  • Avoid stock images. This will only make your images look like an advertisement and users will only ignore it. Taking your own photos or hiring a professional photographer is advantageous.
  • Your copy should be catchy. Avoid jargon and clichés. Make it short and simple. Copywriting isn’t easy so you might need to put in a bit more effort in finding the right words to help you sell your product/service. Have a strong call-to-action. Add some text or a button that tells the reader the action you want them to take like Shop Now or Download Free Trial.

Slider Plugins

Sliders use jQuery and CSS in its animations. Hence, it is necessary to have a lightweight slider plugin so that it won’t slow down your site significantly. Similarly, it is important to have a slider that is responsive. Since more and more people are browsing using mobile devices, a slider that works on small screen sizes is a necessity. Not to mention Google is now favoring mobile-friendly websites.

Here are some of the recommended slider plugins for WordPress.

Soliloquy Lite

Slider-plugin_Soliloquy-LiteSoliloquy Lite is built with performance in mind and is our slider plugin of choice. It is lightweight so it doesn’t add extra bloat to your site. Also, it is responsive making your WooCommerce site mobile friendly. In performance tests, Soliloquy has always been at the top. Its speed, responsiveness and ease of use are just top notch.

Meta Slider

Slider-plugin_Meta-SliderMeta Slider is both the best rated and the most downloaded slider plugin in the WordPress repository. It’s simple and has a user–friendly interface that it is well-received by the WordPress community.

WooSlider
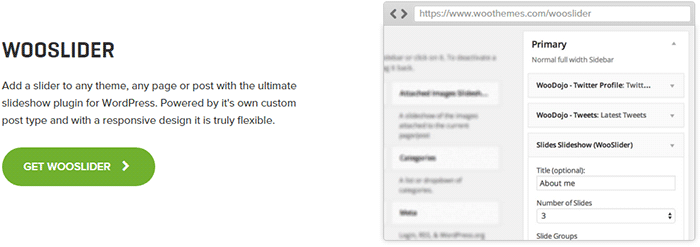
Slider-plugin_WooSliderWooSlider was made by WooThemes, the same people who developed WooCommerce and Storefront theme. Hence, you can expect that the plugin will work perfectly with WooCommerce and Storefront. WooSlider is a premium plugin and you can find out more about it in the plugin page.

Adding the Home Page Slider in Storefront

The guys that made Storefront built the theme with the philosophy to provide a basic, solid foundation to any WooCommerce project. Other WordPress themes already include multiple sliders in them and this adds unnecessary bloat to the website. Storefront lets you choose your own slider plugin should you decide you need one.

To add a full-width home page slider in Storefront, we need to make use of the extensive hooks conveniently provided by the makers of Storefront. For this example, we will use Soliloquy Lite.

How to Create a Home Page Slider in Storefront using Soliloquy Lite
WordPress-Dashboard_Soliloquy_Add-New-Images

    1. Install and activate the Soliloquy Lite plugin.
    2. Prepare the images for the slider. Make sure they are of the right size and optimized for web publishing.
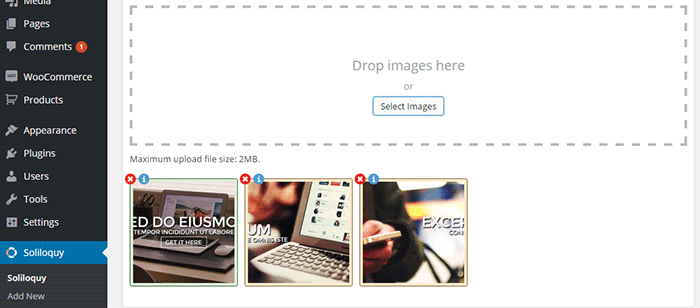
    3. On your WordPress Dashboard, click on Soliloquy > Add New. Select the slider images that you will be using.
    4. Go to the Config Tab to configure your slider settings. When you are done, click Update.
    5. Take note of the ‘shortcode’ for your slider. It will be something like [soliloquy id=“102”]. You have to remove the quotation marks inside the shortcode so it would look like [soliloquy id=102]
      • Note: The next steps require technical knowledge. This is a very delicate process and one mishap could cause your entire site to go down. If you do not know what you are doing, we would advise on having a developer do this step for you. An alternative is to use My Custom Functions plugin to prevent a fatal error on your site.
    6. Add the piece of code below to your theme’s functions.php file.
    7. Replace the shortcode in the code we provided with the shortcode of your slider.
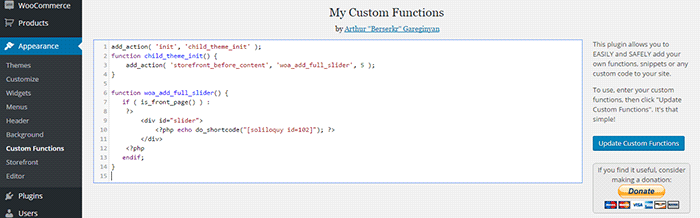
WordPress-Dashboard_Appearance_Shortcode-Slider

add_action( 'init', 'child_theme_init' );
function child_theme_init() {
      add_action( 'storefront_before_content', 'woa_add_full_slider', 5 );
}

function woa_add_full_slider() { 
 if ( is_front_page() ) :
      ?> 
            <div id="slider">
                    <?php echo do_shortcode("[soliloquy id=102]"); ?>
            </div> 
      <?php
 endif; 
}

Using Other Plugins

The code above makes a container where you can put your slider shortcode. You can use this code in any slider plugin as long as it has shortcode capabilities. Just replace the ‘shortcode’ in the code we provided and you’re all set.

There are a lot of free and premium sliders out there that you can try. The important thing is to choose a slider plugin that is lightweight, responsive and addresses your individual needs. It is very easy to get carried away and use a complex slider plugin that offers lots of animation and layers but note that this will significantly slow down your site. Always remember to keep sliders simple.

If you have any questions or anything you’d like to add, please let us know in the comments.
Filed Under: Code Snippets, How-To Articles Tagged With: code snippet, design tweaks, plugins, Storefront, WooCommerce

How to Create an Awesome About Us Page for your WooCommerce Store

March 3, 2016 By John Leave a Comment

awesome about us page main-imageYour e-commerce site is the face of your company and your brand on the web. Your “About Us” page tells your visitors who you are and what you do. In this post, we will teach you how to create an awesome About Us page.


What is an About Us Page?

The About Us page introduces your brand to your visitors. More people check a website’s About Us page before making online purchases.

About Us Page Statistics

According to the NN Group, while most websites do have an About Us page, these websites often do a poor job of presenting their About pages. They also found that there are more people who couldn’t find information about a company or organization. Factual information from these websites was replaced by out of place marketing. As a result, the subjective satisfaction of website users decreased from 5.2 to 4.6, on a 1-7 scale.

Importance of an About Us Page

Increased Trust Rating

People who shop online check for proof that the company they are buying from is legit. Showing your website’s legitimacy boosts your credibility. This just shows that consumers are very wary of where they spend their money. The About Us page helps you show consumers that you are worthy of their trust, money, and time.

Increased Conversion

In another study, consumers spent five times more when shops tweaked their About Us page. They even spent 22.5% more, on average. These figures may rise depending on how good your About Us page is. Increase your profit by connecting with your visitors on a more personal level.

about-us-boost-conversion

SEO Opportunity

The SEO opportunity in About Us pages is no rocket science. This page can just contain more keywords related to your niche than other pages in your website. It’s a good idea to fit niche-related keywords all over the page, just don’t over-optimize.

Increased Engagement

Adding important internal links, other media and links to social media pages can help increase engagement. You can also add a contact form to serve as a lead generation tool to gather emails.

What Info Should I Put on My About Us Page?

Before creating an About Us page, here are a couple of things you need to do.

First, identify your audience or target market. Better yet, create a customer persona. Use this knowledge to customize the content on your page and reach out to that audience. Stay away from the typical general corporate-speak. Rather, use a personal but professional tone and feel.

Second, provide key context. The About Us page should show what your customers want to know about you. Every element, from text to multimedia, should be a part of your story. Make this page appear ‘human’. Customers enjoy getting a sense of the company behind a product and website.

How to Structure Your About Us page

Teaser or Tagline

This is a brief phrase or statement that summarizes your organization. Copyblogger was witty enough with their power statement. What is your company about in a nutshell?

about-sample-copyblogger

The Round-Up

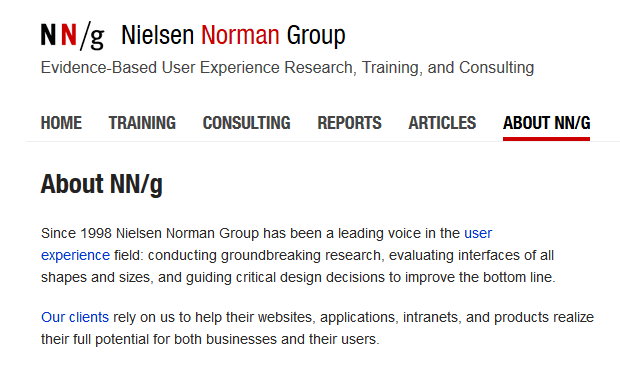
This section usually contains a paragraph or two. It features your company information, vision, goals and main accomplishments. Be careful not to overdo this by using empty superlatives. The goal here is to provide information and not to gloat.

about-sample-nng
A straightforward About Us page example from the Nielsen Norman Group.

Quick Facts

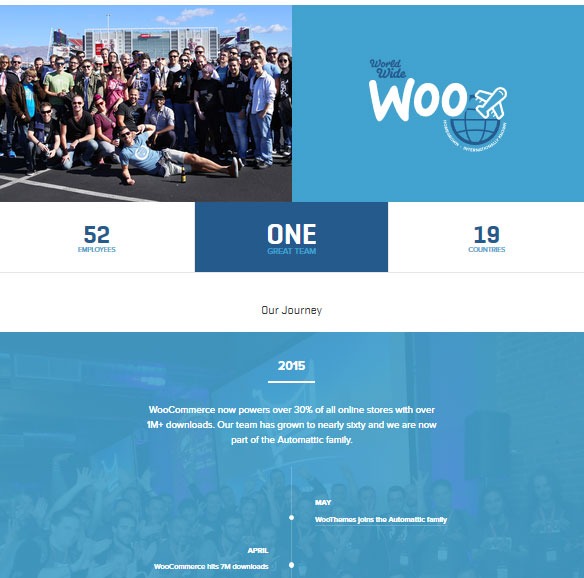
Add some quick facts on your About Us page. This can come in different forms. You can add information about your team, history, performance, or your office culture. Stay with the facts and let your customers be the judge. Get creative by using different multimedia or graphic elements. Just remember that whatever you put should be accurate and verifiable.

about-sample-abbvie
Easy on the eyes information from AbbVie.
about-sample-woothemes
Simple but informative layout from Woothemes.

Outsider’s Perspective

If you have industry awards, reviews and testimonials, let them be known in your About Us page. If you have a lot, you can add some highlights in the About Us page and link to a sub-page where the rest of the info is placed.

about-sample-blue-fountain-media-awards

Engagement

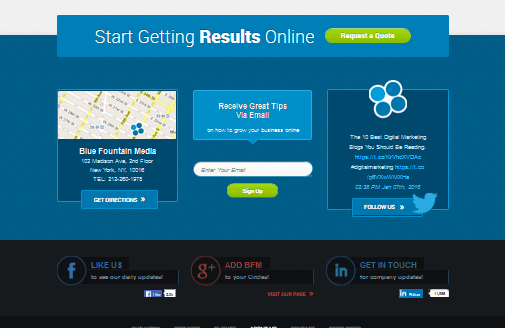
This is an avenue for interaction. Add elements like a contact form, social media buttons, and calls-to-action.

about-sample-blue-fountain-media-2

Introduce Your Team

Adding information about the people behind your company will boost your credibility. Take time to post photos or some quick information about your team. The National Center for Biotechnology Information found that photos inflate subjective feelings of truth.

How to Create an Awesome About Us Page

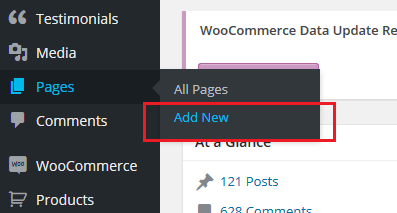
You can create your About Us page just as you would any other page. Some WordPress themes have a built-in special About Us page template. If your theme does not have that, you can create a simple About Us page by going to Pages and clicking on Add new. Add your content and then click on Publish to save your page.

about-us-add-new-page

Add content to your About Us page as you would to any other kind of page.

about us create page add content
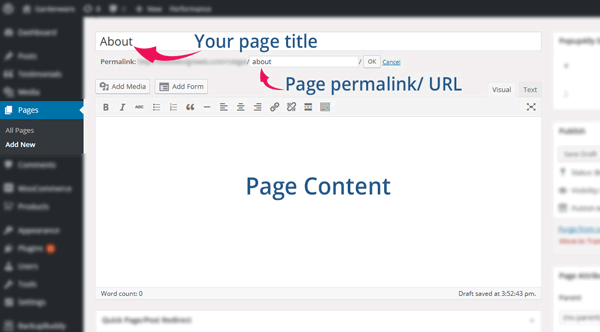
Name your page “About”, “About Us” or “About ”. Use the same for the permalink.

about us create page

How to Add Your About Us Page to Navigation Menu

Once you’re done saving your page, you need to add it to your navigation menu. Go to Appearance > Menus.

To display your About Us page in your menu navigation, select About Us page in the list of pages. After that, click Add to Menu. Drag it to desired position. Click on ‘Save Menu’ when you’re done.

Plugins that Can Help Create an About Us Page

Plugins are your go-to solution if you don’t know how to code. Here’s a list of plugins that you can use to create an awesome About Us page.
Powr About Us

powr-about-us-pluginPowr About Us is a plugin with free and premium versions. The free version lets you create profiles for your company and employees. It has the features from the premium version, but it shows the plugin’s watermark logo and has limited support. The premium version has premium support, analytics, no access limits and no watermark logo. Once installed and activated, you will see a plug icon integrated in your Pages editor. It’s a drop down menu that lets you add shortcodes in the content area. This will help you create a professional About Us page. Once added, you will be able to edit them on the front end of your site.

Page Builder by SiteOrigin

page-builder-site-origin-pluginPage Builder by SiteOrigin is a free drag and drop page builder. It adds a ‘Page Builder’ tab in the Pages editor after installation and activation. This plugin has a lot of options that you can use to create an About Us page. It allows customization of page dimensions, layouts, and adding different elements to the page. For more advanced users, you can also use CSS to further tweak the look of your page. The plugin allows for creating some very unique About Us pages.

Team

team-about-us-pluginThe Team plugin by ParaThemes will help you build a responsive grid team profiles in WordPress. It uses pure HTML & CSS3 and is easy to customize. It lets you create profiles that include descriptions and links to social media profiles. The free version gives you enough customizations with unlimited team members. If you are not satisfied with the free version’s options, you can get their pro version which gives more in-depth custom controls. It has drag and drop, pop-up profiles, and more display options.

In Summary

The About Us page is an essential part of any website as it introduces your company or organization to your audience. For a Woocommerce site, having a good About Us page may result to an increase in the site’s performance. Creating an About Us page is simple and easy but you need to build it with your users in mind. You may also enlist the help of a plugin to help you create one. Do you have any more tips or ideas that you’d like to share regarding About Us? Let us know in the comments.

Filed Under: How-To Articles Tagged With: best practices, conversion optimization, how-to, plugins, WordPress

How to Add a Favicon to your WooCommerce Store

February 29, 2016 By John Leave a Comment

What is a Favicon?

Favicons are typically 16×16 square images. Old versions of Internet Explorer refer to the bookmark section as “favorites”. Hence the name “favorites icon” or favicon for short.

What is the Point of Having Favicons?

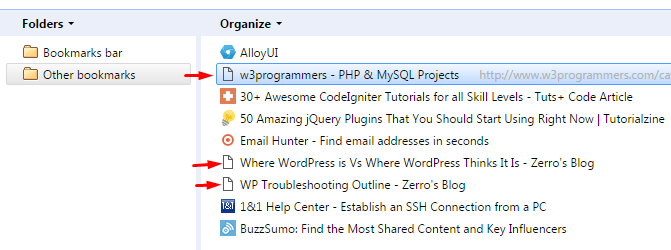
The main purpose of having favicons is to easily distinguish different websites in the bookmarks page. Here is a snapshot of a bookmarks page. Notice that the pages without favicons are hard to distinguish if they belong to the same website or not.

favicons in bookmark manager

Search engines and websites then are not as powerful and strongly connected with links. If you came across a good site, it was usually a good idea to bookmark it. As a result, people often have a long list in their “Favorites page”. The favicon answers the need to tell each website apart in the list at a glance.

Favicons are not limited to bookmarks pages though. It is also used around different parts of the browser like the history page, tabs, and more. Favicons play a huge role in online branding providing easy recognition and association. If you are serious in brand recognition, then you must add a favicon to your site.

Adding a Favicon to Your Woocommerce Store

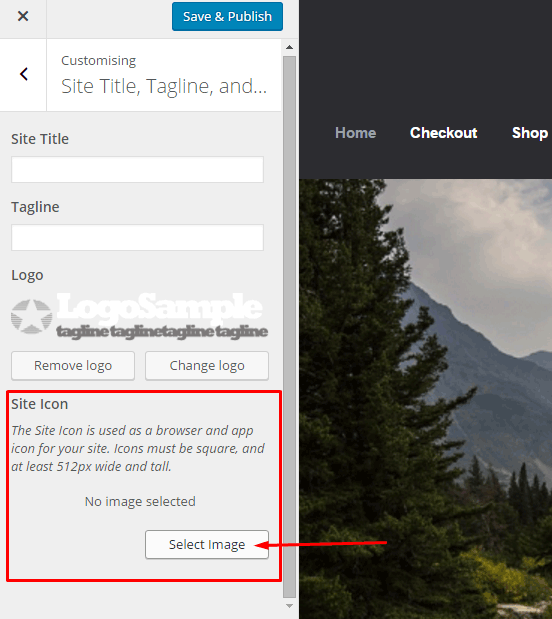
Starting from WordPress 4.3, you can now add your favicon directly using the admin panel. Navigate to Appearance > Customize > Site Title, Tagline, and Logo.

add favicon to your woocommerce - customize wordpress site icon

Simply select a 512×512 image from your media library or you can upload a new one. If you select an image larger than 512×512 or a non-square image, you will receive a prompt to crop your image.

After this, click save and publish. Refresh or restart your browser to see your new favicon.

Note that this is a default feature since WordPress 4.3. If you don’t see this feature in the theme you are using, contact your theme’s support for assistance. Or you can do it the old fashioned way with the steps below.

How to Make a Favicon?

If you have a small logo, that would be good to use for a favicon. Otherwise, you’ll have to create a miniature version of your logo. If you are not comfortable working with graphics, you can contact your graphic designer to help you out.

How to Manually Add a Favicon?

To add a favicon to your WooCommerce store, start by saving the image to one of your site’s folders. You can upload it using FTP or via media library upload. After saving it, take note of the filename and file path. It is best to save your favicon in your website’s root folder or in the images folder of your theme’s folder.

On your Dashboard, navigate to Appearance > Editor. Find your theme’s header.php file. Remember, the best way to edit your theme’s files is via a Child Theme. You can select one from several Storefront child themes to help you customize your WooCommerce store.

Paste the code below in your header.php file just below the other lines starting with “<link rel=”.

<link rel="icon" href="http://www.domain.com/favicon.png" type="image/x-icon" />
<link rel="shortcut icon" href="http://www.domain.com/favicon.ico" type="image/x-icon" />

Replace “http://www.domain.com/favicon.ico” with the file path of your favicon. Save the file and you’re done. You may need to restart your browser to see the new favicon.

I hope we helped you in adding a favicon to your WooCommerce store. If you have any questions and feedback, leave us a comment below. We are always ready to help.

Filed Under: How-To Articles Tagged With: code snippet, design tweaks, e-commerce, how-to, image optimization, photoshop, WooCommerce, WordPress

How to Create a Child Theme for Storefront

February 26, 2016 By John 2 Comments

how-to-create-a-child-theme-for-storefront

Optimizing your website usually means making changes to your theme. These changes can range from simple to complex. It’s easy to make changes on your website but the problem is that you will lose all your changes when you update your theme.

There are ways to update your theme without losing your customizations and the best way is to use a child theme. In this post, we will teach you how you can use a child theme to make the website development process easier.

We’ll teach you how to create a child theme for Storefront theme. Storefront is the official theme for WooCommerce. It’s a good parent theme to work on as it’s built with the same high standards as WooCommerce. It is entirely free and 100% compatible with WooCommerce.

What is a Child Theme

A child theme is not a full theme. It only inherits all the code, styling and functionality of the main or parent theme. Changes made in a child theme do not affect the parent theme. This allows users to tweak a theme without having to worry about losing the customizations when updating the theme. Using a child theme is best practice for altering an existing theme.

A parent theme is the default of all your WordPress themes. It contains the templates, design and functionality needed to run your website on WordPress. Note that parent themes are different from theme frameworks. A parent theme is a complete theme that you can use right away while a theme framework like Genesis is a developmental template.

Why You Should Use a Child Theme

There are thousands of themes out there that you can use for your WordPress installation. The problem is they all look generic and may not exactly fit your website needs. Modifying the theme with CSS is recommended. Here are some reasons why you should use a child theme:

Speed Up Site Development

Child themes allow you to quickly add or modify specific functions or template files. It allows you to significantly speed up site development as you would not need to write a lot of code from scratch. You’ll get a great deal of flexibility especially from powerful theme frameworks like Genesis.

Preserve Theme Changes

Themes get updates from time to time. These updates are important as these address security exploits that come to light. Updating your theme will wipe all the changes you made to the base theme. However, if you use a child theme, you can preserve any changes you make to the child theme when you update the base theme.

Safe Fallback

Creating or editing a theme entails a lot of work. However, when you make customizations on a child theme, you have your parent theme’s codes and functionality as fallback in case you mess up something. The child theme will only change a specific function or style when you want it to.

Secure Your Site

WPBeginner found out that 83% of hacked WordPress sites are not upgraded properly. The safest way to update your theme is by using a child theme.

When to Use Child Themes

If you are in any way customizing your theme, then you should be using a child theme. Using a child theme is best practice.

If you are not familiar with CSS and PHP, creating your own child theme can be a challenge. You would also need to learn about the functionalities of your parent theme.

Robust frameworks can be more challenging as they have their own filters and hooks.

How to Create a Child Theme

Setting up a child theme for any WordPress theme is easy but you need to pick a good parent theme. Not all themes can be good parent themes. We recommend Storefront or the Genesis framework.

A good parent theme is a solid foundation for your site. You will be building your child theme over it so it has to be flexible and coded properly.

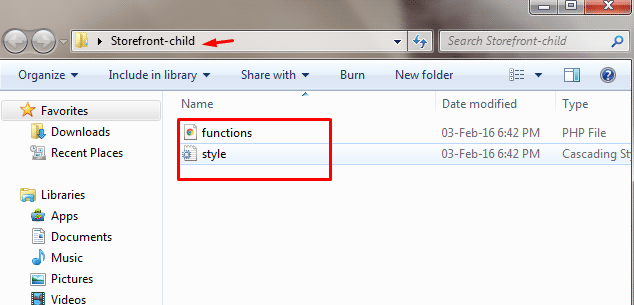
You can use plugins to generate a child theme or you can do it manually. You just need three things to start: child theme directory, style.css file and functions.php file.

Child Theme Folder

This folder will serve as the container for your stylesheet and function files. It is ideal to use the name of your parent theme as folder name and append it with “-child”. In this case, we named our directory “Storefront-child”. Make sure that your child theme’s directory name has no spaces to avoid possible errors. For the meantime, you can create this folder in your computer.

child-theme-folder

Child Theme Stylesheet

This is a basic style.css file. You need to set this stylesheet to inherit the styles from your parent theme. To do that, insert the stylesheet header below and replace them with relevant details. Note that customizations done here will override parent theme styles.

/*
 Theme Name:   Storefront Child
 Theme URI:    http://sitename.com/storefront/
 Description:  Storefront Child Theme
 Author:       Nick J
 Author URI:   http://sitename.com
 Template:     storefront /*this is case sensitive*/
 Version:      1.0.0
 License:      GNU General Public License v2 or later
 License URI:  http://www.gnu.org/licenses/gpl-2.0.html
 Tags:         light, dark, full-width, responsive-layout, accessibility-ready
 Text Domain:  storefront-child
*/
/*Theme customisations start here*/

We won’t teach you how to use CSS. It is impossible to cover that in one article. You can learn CSS here or have a developer do the CSS tweaks on your website.

Child Theme Function

Previous methods suggest that you use “@import” in your stylesheet to load your child theme. This is no longer considered best practice. You just need to “enqueue” your parent theme’s stylesheet in your child theme’s functions.php file. To do this, you can use “wp_enqueue_scripts action” and use “wp_enqueue_style()”.

The stylesheet for your child theme is usually loaded automatically. If not, you will need to enqueue it as well. You also need to make sure that the child stylesheet gets priority. You can use the code below instead. This code sets ‘parent-style’ as a dependency so your child-theme stylesheet loads after it.

<?php
function theme_enqueue_styles() {
$parent_style = 'parent-style';
wp_enqueue_style( $parent_style, get_template_directory_uri() . '/style.css' ); wp_enqueue_style( 'child-style', get_stylesheet_directory_uri() . '/style.css', array( $parent_style ) ); } add_action( 'wp_enqueue_scripts', 'theme_enqueue_styles' );
?>

Activation

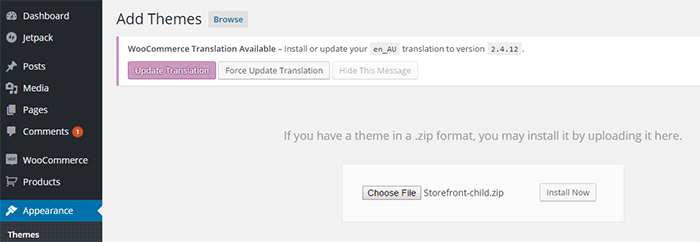
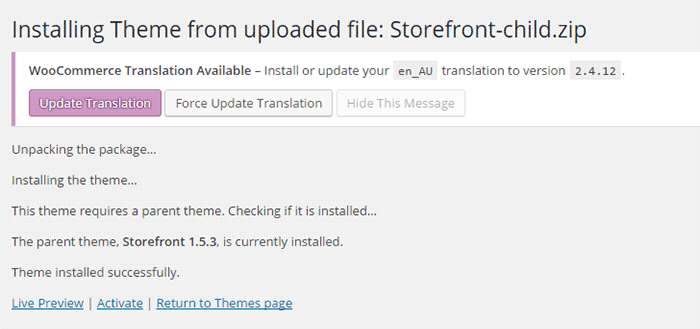
To add a child theme to your WordPress themes, you need to create a .zip file of your child theme folder. You can use 7-zip or Winrar to do this. Make sure that you have your style.css and functions.php inside your child theme folder.

It is best to take note and keep records of other plugin settings before you activate your child theme. Once you’re done, you can upload this in your WordPress via Appearance > Add Themes.

child-theme-activation-storefront

WordPress will install your child theme just like any other theme. Once installed, you need to activate this by clicking on ‘Activate’.

child-theme-activation-storefront-2

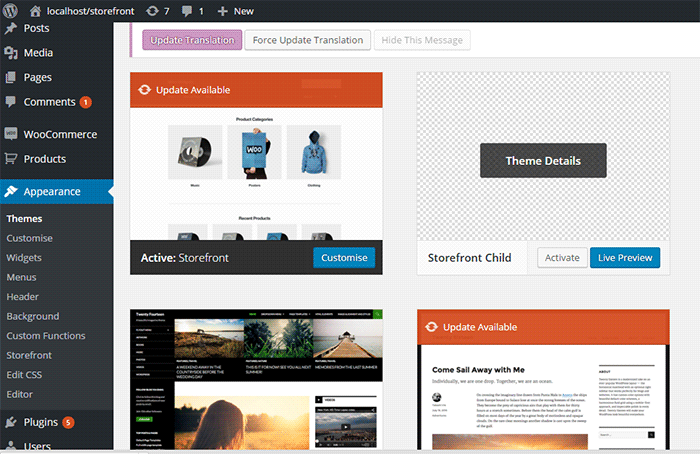
You can also choose to activate your child theme later when you go to Appearance > Themes.

child-theme-activation-storefront-appearance-themes

Once installed or activated, you can apply any edits to functions.php and to the stylesheet directly on the child theme files

Popular Child Themes for Storefront

If creating your own child theme is proving to be a bit too difficult for you, you can always purchase one.

There are a handful of child themes for Storefront right now. Note that you should install Storefront base theme first before installing these child themes.

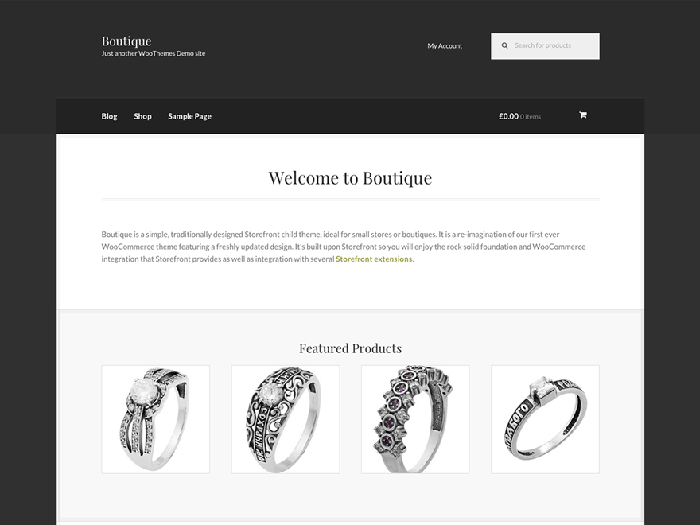
Boutique

boutique_popular-child-themes-for-storefront

Boutique is simple and easy to customize. You can start selling after you create your color theme, add your logo and content.

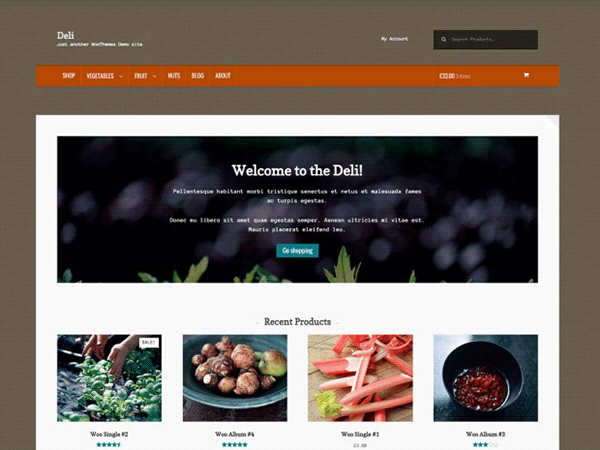
Deli

deli_popular-child-themes-for-storefront

If you want to add more personality to your store, you can use Deli. This child theme is great for small businesses. It has color schemes and textures that are inspired by nature.

Conclusion

Having a child theme is best practice when doing development work on your WooCommerce site. More importantly, using a child theme allows you to freely update your theme without losing any customizations you made on the child theme. A good and solid foundation is important for child themes. Hope this article has been helpful. Do you have any questions about child themes or anything you’d like to add? Let us know in the comments.

Filed Under: Code Snippets, How-To Articles Tagged With: best practices, child theme, code snippet, CSS, design tweaks, how-to, optimizations, Storefront, website development, website maintenance, WooCommerce, WordPress

“Getting Things Done”: How One Book Changed Our Workflow and Increased Productivity

February 26, 2016 By John Leave a Comment

thinking_business-man_laptop
Is your workflow a mess? Mine used to be until I read that one book. Soon after, I was getting more accomplished with much less effort and stress. David Allen’s Getting Things Done: The Art of Stress Free Productivity was the secret.

For every hire thereafter, part of their on-boarding became reading this book and implementing it into their workflow. Here’s an insight on what some of the team members do to manage their workflow.

Nick J – Director

Getting Things Done has been a game changer for my life. I took the instructions literally and dedicated a weekend going through old files and boxes of “stuff” so I could start with a clean slate. I even bought a label machine as instructed (which I now rarely use).

inbox-outbox_filesOnce I had my filing and boxes of “someday maybe” sorted I chose Evernote as my “In” box and everything I need to remember gets added into a notebook called “inbox” as a reminder so it goes to the top. This is very easy to do from my phone or laptop. The following morning, I catalogue all the previous day’s reminders into where they need to go, usually other Evernote notebooks.

This gives me a good idea of what I need to do for my day and catalogues what needs to be done down the track in their respective “buckets”. My mind is a lot freer because I don’t have to worry about remembering 101 things as they are all written down and catalogued. The only downside is now I have become really dependent on this system I don’t remember anything unless it is recorded in my “In bucket”. Oh well, the price of a free mind.

Junix – Lead Developer

After reading “Getting Things Done” by David Allen, I have realized how unorganized I was in handling my tasks. I have learned the 5 stages of managing workflow, which enables me to not forget an important task, which I tend to do sometimes. In Wooassist, most of the tasks assigned to me have an email notification from the project management tool. This allows me to collect the inputs I need to do for a day and coming days. But even so with these emails, I’m still forgetting things as I’m not properly jotting them down to a different platform. I also tend to preview emails, so that I can know the gist of all the things I need to do in a day, but then forget that I had to do that task because it’s not bolded anymore in my inbox. I also find it tedious to “copy and paste” information that is already there in the email.

thumbs-up_smileyI did my research and found a tool called Sortd which was still on a beta test and was invitation based only. Fortunately, I got an invitation link and was able to start using the tool. I love it as I am able to organize my tasks within my email. Even if I preview an email, it will still be bolded in my task list until I mark it completed. Within Gmail, I am now able to separate other emails from important tasks, and can also divide them into different categories easily.

Sortd allows me to create different columns, just like Kanbanflow and Trello. Currently, I have four columns in use: “Priority tasks”, “Today Tasks”, “Delegated Tasks”, and “Scheduled Tasks” respectively. With this four columns, processing tasks have been easier and I’m now doing most of the tasks assigned to me without forgetting anything.

For processing the tasks, I realized that the guide told by the book applies to me. It was stated there that if a task takes more than 2 minutes for me to complete it, I need to delegate it, but I believe for myself and kind of work I do, time is not a perfect barometer for it. Currently I check if the tasks can be delegated based on its difficulty. I like to do tasks that are difficult to do, so the tasks that are easy and moderate are the tasks that I delegate.

I am also making it a habit now to check the tasks that I have marked as complete and also my emails on a weekly basis, just to make sure that I have properly done them and that I haven’t missed a task that needs to be done.

John – Project Manager

How do I get things done? For myself, it stems from having low energy levels that I have designed the systems in my life to make them more efficient. I live and breathe efficiency. I hate books that bury their core actionable concepts in a layer of fluff. Whenever possible, I watch movies and TV shows on average at 1.5X playback speed. And I talk much, much less than normal people because I prefer to be short and concise with my words.

be-smartWithout context, that would mean I am very productive. But in actuality, it’s only to preserve my energy levels for the tasks that matter. In the past, I have done this subconsciously. But upon reading Getting Things Done by David Allen, I have started to take a conscious approach to productivity. I believe it all boils down to self-optimization.
As for myself, the concepts that I believe are most important to the way I get things done are:

  1. Creating or finding a task management system that fits my own needs and personality. The usual digital productivity apps are Asana, Evernote and other similar applications. We do make use of these as all-around solutions for Wooassist. But for the tasks specific to my own role, I am using a custom spreadsheet and Kanbanflow. I’ve tailor-made the spreadsheet to record everything I need to keep track of. And we chose Kanbanflow simply because we have found that it fits our needs best.
  2. Rid yourself of worry and think in terms of actionable steps (what’s the next step, what you can do about it, etc.
    • The usual culprit of being underproductive and burning out is worry. It is a nagging feeling that keeps draining your mental capacity even when you’re not at work. For this, I put my trust on my task management system. And let it serve as my memory so that I don’t have to worry about an unfinished task when I’m not at work.
    • And when mistakes happen, customer-facing roles usually have it bad. That is because clients lash out at the people on the frontlines. I can’t stop mistakes from happening but I do not worry about it too much. Instead, I think of the concrete steps that I can take to create a suitable solution or course of action.
    • Once you are overcome with worry, you become unproductive and stressed out. If fear is the mind-killer, worry is the mind-stopper.
  3. Keep optimizing yourself. This for me is the most important thing that people fail to do. There are tons of productivity techniques out there. E.g. time-blocking, the Pomodoro technique or establishing a routine. For myself, I am constantly A/B testing myself to figure out what works and what doesn’t. There’s no catch-all method, everyone is different and we’ve got to figure out what works for us ourselves.

Rob – Project Manager

Three years ago, Nick recommended reading the book Getting Things Done: The Art of Stress Free Productivity by David Allen. I wasn’t a big book reader so instead I listened to the audiobook.

Over the past three years, I tried to follow the tips in the book. Some stuff didn’t stick but some things I keep doing up until now.

sticky-notes

I start my work day checking emails. I have email alerts set up for Asana, Hipchat and Kanbanflow so everything goes to my email. For any task that can be done around 2 minutes I do it immediately. I also keep a log of all current tasks that I have. I use Sticky Notes for this.

I tried using Evernote before and I still use it from time to time for saving stuff that I might need access to when I’m not on PC. I’m rarely on another machine though so it doesn’t get much use. It has proven really useful the few times I had problems with my PC and had to log in at a net café. I’m not saying Evernote is bad. It’s actually really good but I just like Sticky Notes because it’s more lightweight and it just sits there on the background.

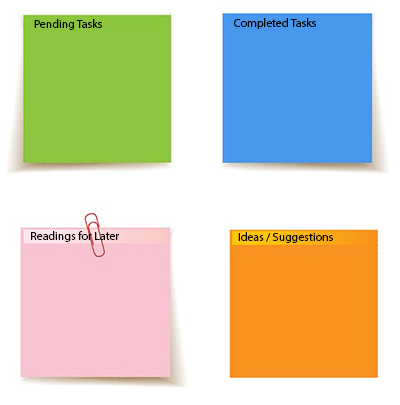
I keep a note of all my pending tasks called “Tasks” and this helps me get prepped for work. From this list, I pick out what I need to do for the day. Every task I complete I move to another note called “Completed Tasks”. This other note helps me prepare my report before I end of shift for the day.

While working, if I stumble upon any useful articles that I want to read later on either for leisure or for work, I put them on a note called “Readings for Later”. And if I come up with good ideas to suggest, I’ll note them down in another note called “Ideas/Suggestions”.

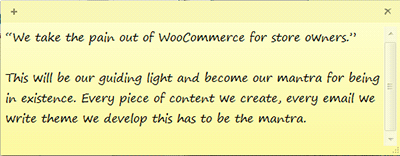
Oh and another thing. I have one note which just mentions the Wooassist mantra:

company-mantra_screenshot

 Joanne – Site Maintenance and Admin

Before reading “Getting Things Done” I found my work life in utter chaos, missed deadlines, increased stress levels, not being able to do the things that I want to do, and not having enough time for my family as much as I want to. Being a mom, a wife, a daughter and an employee is not that easy for me, especially because I work from home.

to-do-List_hand

I’ve tried numerous methods of organizing my daily routines, some actually work for some time, but once my schedule is disrupted for some reason, I crumble. I rush through things eager to do as much as I can in my limited time, playing catch up and formulating new ways to spend half an hour on a task that requires a full hour. And the result, well let’s just say, is less than stellar.

After reading Getting Things Done, I realized that useless cramming makes you unproductive and inefficient. I also recognized that my subconscious effort to juggle all my responsibilities, like doing the laundry or planning a weekend getaway for the kids can affect my work. With this in mind, I came up with a system to make sure that I exert effort on things where I can make a difference and not worry about the things that I can do nothing about.

For work, I have synced my email with Kanbanflow and Asana Board so that all of tasks and reminders will directly go to my email. I also formulated a morning routine that basically consists of morning meditation and coffee. I usually wake up around 4 am just to feel the sense of calmness. I used to think that I’m more productive working late hours but after reading Getting Things Done and evaluating myself, I realized that waking up around 8 or 9, when everyone is busy, affects me and I sort of get frantic and flustered too.

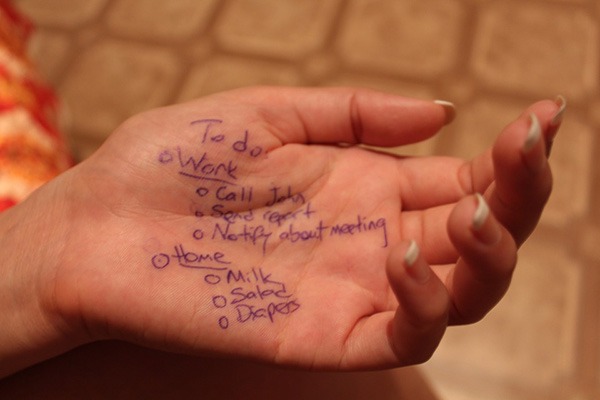
To manage my personal life, finances, and other things, I use a notebook. There I list down my goals for every month, track down my finances, and basically list down other things like groceries, things my son needs for school and so much more. Most of the task I list down there gets delegated though but it’s easier to keep track of things.

Each and every one of us is different and there’s no step by step solution for getting things done. You need to know what works for you and evaluate your values and priorities. If you haven’t read the book yet, I strongly suggest that you do. It can make your life easier.

The Secret to Stress-Free Productivity

relax_no-stress_300There is no concrete formula that would work for everyone. It is up to you to discover what will work best for you. The book Getting Things Done: The Art of Stress Free Productivity by David Allen did wonders for the Wooassist team. Each team member adapted his/her own way of dealing with the workflow based on the book and it worked wonders. We hope this post inspires you to set up your own system and to start being efficient.

If you can get the book, we highly recommend reading it. And when you’re done reading it and you’ve adapted your own stress-free workflow, we hope you can come back to this post, hit the comments and tell us something about it.

Filed Under: Wooassist News Tagged With: admin, best practices, task management, Wooassist

  • « Previous Page
  • 1
  • …
  • 27
  • 28
  • 29
  • 30
  • 31
  • …
  • 41
  • Next Page »
Let us support your online store so you can manage your business

Get started today

Get 2 Hours of FREE SUPPORT

We are so confident that you will love our services that we will give you your first 4 hours at a 50% discount

That’s 4 hours for only $75

BUY NOW

Free eBook

5 Things Every Online Store Can Fix On Their Website In The Next Week To Increase Sales

Quick Links

  • How it Works
  • Pricing
  • Blog
  • Contact
  • About Wooassist
  • My Account
  • Checkout
  • Privacy Policy
  • Cookie Policy
  • Terms and Conditions

Wooassist

Australia:
59 Luke St.
Hemmant QLD 4174

Philippines:
San Miguel St.
Poblacion, Iligan City 9200

Connect


Copyright © 2026 · Wooassist

Yours FREE!

5 Things Every Online Store Can Fix On Their Website In The Next Week To Increase Sales